WMF Series 1300 prestolino User manual

coffee wakes up the world
User Manual
North America English
01.01.001
Coffee machine
Model Series 1300 Order number 33 2495 3000 Edition 09.2009

2User Manual WMF 1300
Introduction and General information
Safety Warnings
The lightning flash with arrowhead symbol, within an equilateral
triangle, is intended to alert the user to the presence of uninsulated
“dangerous voltage” within the product’s enclosure that may be of
sufficient magnitude to constitute a risk of fire or electric shock to
persons.
The exclamation point within an equilateral triangle is intended to
alert the user to the presence of important operating and maintenance
(servicing) instructions in the literature accompanying the appliance.
Do not use the machine if it is not working properly or if it is damaged.
Never alter built-in safety devices.
Ensure that there is always a receptacle under the outlet when dispensing
hot beverages and hot steam to avoid scalding.
Do not touch hot machine components.
Never reach into the coffee grinders.
Never reach into the chocolate hopper.
Switch off the machine before cleaning the front panel to avoid a hot
beverage being accidentally dispensed.
The milk system must be thoroughly cleaned at least once a day to ensure
proper hygiene.
Milk hose should be changed at regular intervals.•
Never reach under the spouts while cleaning the machine.•
Ensure that mixer hose is replaced securely because hot liquid may•
escape.
Never reach under the spouts while cleaning.
Do not reach into the bean hopper or the brewing unit opening when
the coffee machine is switched on to avoid bruising or crushing when
handling moving parts.
Do not remove cover.
No user-serviceable parts inside.
Repair should be done by authorized service personnel only.

3
User Manual WMF 1300
Introduction and General information
Safety Warning Signs
For a detailed description of the warnings, see the “Safety” chapter 9.1.
NOTICE CAUTION
Hazard to the machine.
Read and understand user
manual before using this
machine.
Hazard to the user.
See chapter 9.1: Safety.
CAUTION CAUTION
Burn hazard.
Hot surface.
See chapter 9.1: Safety.
Burn hazard.
Hot steam. Hot liquids.
See chapter 9.1: Safety.
CAUTION CAUTION
Hot steam.
See chapter 9.1: Safety.
Bruising or crushing
hazard.
See chapter 9.1: Safety.
WARNING
Failure to follow safety
warnings can lead to
serious injury.
See chapter 9.1: Safety.
Warning
Risk of fire or electric shock.
Do not open.
WARNING, to reduce the risk of fire or electric shock,
do not remove cover (or back),
no user-serviceable parts inside,
repair should be done by authorized service personnel only.
(33 1453 5000)

4User Manual WMF 1300
Introduction and General information
Congratulations on the purchase of your
WMF coffee machine
You will be impressed by the machine's technical design,
long service life, economy, and especially by the quality of
the coffee it produces.
The WMF 1300 coffee machine is a fully automatic single
cup machine for espresso, café crème, cappuccino, milk
coffee, latte macchiato, foamed milk and hot water. Hot
chocolate beverage and steam dispensing are also available
as options.
Each beverage is freshly brewed at the press of a button
which guarantees a high quality beverage.
User guidance is provided by a graphical touch-screen
display on the coffee machine.
The coffee machine is designed to prepare up to
15,000 coffees and 6,000 chocolate beverages a year.
After every 7,500 brews, customer check-up by the user
is necessary, and a full service is required after every
30,000 servings.
Please be sure to follow the instructions in the Software
wS e t t i n g s wWater Hardness and Range chapter, and to
make the necessary settings.
CAUTION
Read and
understand user
manual before
using this machine.
Ensure staff have access to
the user manual.
Important.
See page 2 and 3:
Safety warnings.
See chapter 9.1: Safety.
NOTICE
Observe the manual.
Observe the chapter 9.4:
Warranty.
In the event of failure to comply
with maintenance information
(see chapter 7: Maintenance),
no liability is accepted for any
resultant damage.
Similarly all guarantee/warranty
obligations cease to apply in
such cases.

5
User Manual WMF 1300
Table of Contents
Safety Warnings ............................................................ 2
Safety Warning Signs . . . . . . . . . . . . . . . . . . . . . . . . . . . . . . . . . . . . . . . . . . . . . . . . . . . . . . . . 3
Chapter 1 Introduction 8
1.1 Parts of the coffee machine 8
User Manual Signs and Symbols ............................................. 10
Glossary ..................................................................11
Chapter 2 Operation 12
2.1 Switch on coffee machine 12
2.2 Dispensing beverages 12
2.3 Decaf button (optional) 12
2.4 Milk or milk foam (optional) 13
2.4.1 Dispense milk or milk foam .................................................... 13
2.4.2 Connect up the milk ......................................................... 13
Standard ................................................................ 13
With WMF Cooler, WMF Cup&Cool (optional). . . . . . . . . . . . . . . . . . . . . . . . . . . . . . . . . . . . 13
2.5 Dispensing hot water 14
2.6 Dispensing steam (optional) 14
Warm beverages .......................................................... 14
Foam milk ............................................................... 14
2.7 Height adjustment of the combi spout 15
2.8 Bean hopper/product hopper 15
2.9 Manual insert/tablet insert 15
2.10 Grounds container 16
2.11 Grounds disposal through the counter (optional) 16
2.12 Drip tray 17
2.13 Switch off the coffee machine 17
Chapter 3 Software 18
3.1 An overview 18
3.2 Ready to operate 20
3.2.1 Warm rinsing ............................................................... 20
3.2.1 Barista pad ................................................................. 20
3.2.3 Toggle pad (optional) ......................................................... 20
3.2.4 To main menu . . . . . . . . . . . . . . . . . . . . . . . . . . . . . . . . . . . . . . . . . . . . . . . . . . . . . . . . . . . . . . . 20
3.2.5 Information ................................................................. 21
Service .................................................................. 21
Customer care ............................................................ 21
Brew time . . . . . . . . . . . . . . . . . . . . . . . . . . . . . . . . . . . . . . . . . . . . . . . . . . . . . . . . . . . . . . . . 21
Journal .................................................................. 21
Timer ................................................................... 21
3.3 Main menu 22
3.3.1 Milk and foam . . . . . . . . . . . . . . . . . . . . . . . . . . . . . . . . . . . . . . . . . . . . . . . . . . . . . . . . . . . . . . 22
Milk foam quality . . . . . . . . . . . . . . . . . . . . . . . . . . . . . . . . . . . . . . . . . . . . . . . . . . . . . . . . . . 22
Latte macchiato pause interval . . . . . . . . . . . . . . . . . . . . . . . . . . . . . . . . . . . . . . . . . . . . . . . 22
3.3.2 Timer program .............................................................. 22
Timer state ............................................................... 23
Set timer ................................................................ 23
Copy day ................................................................. 24
Timer overview . . . . . . . . . . . . . . . . . . . . . . . . . . . . . . . . . . . . . . . . . . . . . . . . . . . . . . . . . . . . 24
Delete timer .............................................................. 25
Timer information ......................................................... 25

6User Manual WMF 1300
Table of Contents
3.3.3 Care . . . . . . . . . . . . . . . . . . . . . . . . . . . . . . . . . . . . . . . . . . . . . . . . . . . . . . . . . . . . . . . . . . . . . . . 25
Cleaning program . . . . . . . . . . . . . . . . . . . . . . . . . . . . . . . . . . . . . . . . . . . . . . . . . . . . . . . . . . 26
Foamer cleaning . . . . . . . . . . . . . . . . . . . . . . . . . . . . . . . . . . . . . . . . . . . . . . . . . . . . . . . . . . . 26
Mixer rinsing ............................................................. 26
Descaling ................................................................ 27
Descaling with water tank
Descaling machine with constant water supply
Filter change . . . . . . . . . . . . . . . . . . . . . . . . . . . . . . . . . . . . . . . . . . . . . . . . . . . . . . . . . . . . . . 29
Rinse filter ............................................................... 30
Customer Check-up . . . . . . . . . . . . . . . . . . . . . . . . . . . . . . . . . . . . . . . . . . . . . . . . . . . . . . . . 30
3.3.4 Settings ................................................................... 30
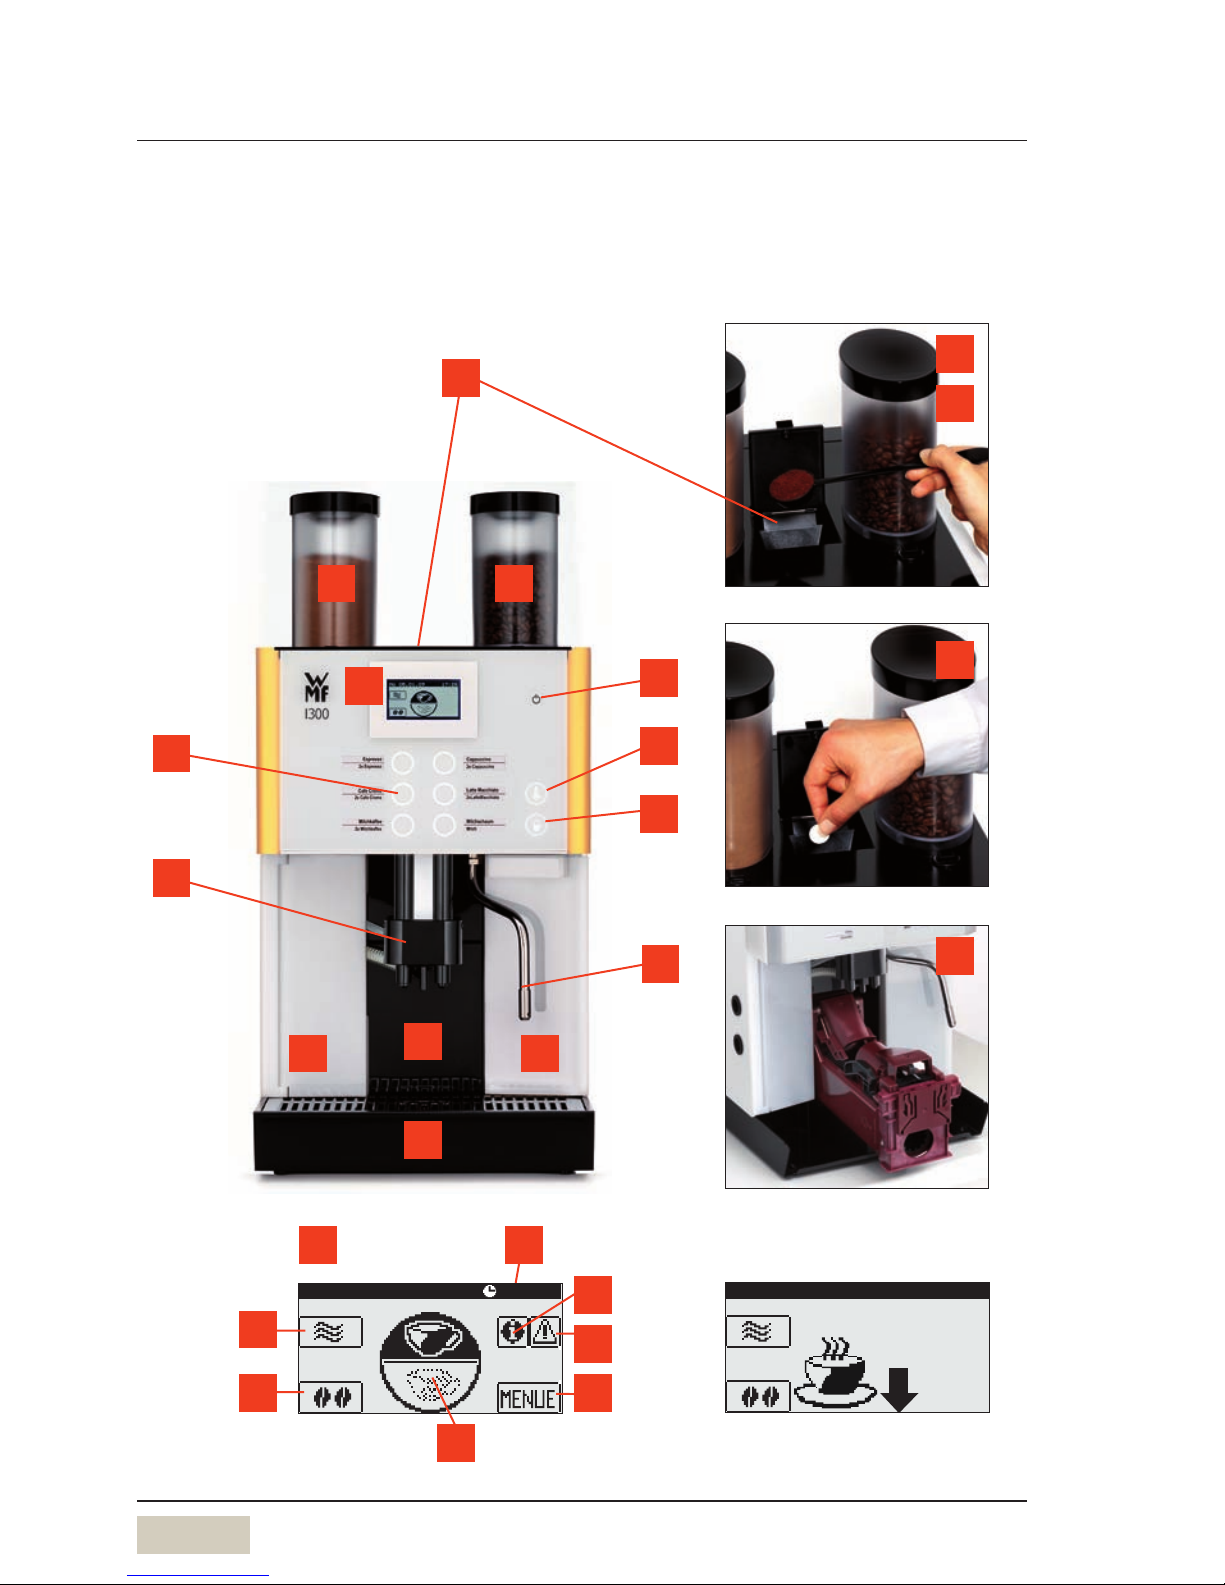
Recipe and beverage buttons ................................................ 30
Selecting the beverage button when setting
Selecting the beverage button on the 2nd Level
Adjust values
Start a brewing test with the current values
Save setting
Cup volumes . . . . . . . . . . . . . . . . . . . . . . . . . . . . . . . . . . . . . . . . . . . . . . . . . . . . . . . . . . . . . . 31
Change recipes . . . . . . . . . . . . . . . . . . . . . . . . . . . . . . . . . . . . . . . . . . . . . . . . . . . . . . . . . . . . 31
Button allocation
Select grinder for a coffee beverage
Weigh grounds
Boiler temperatur . . . . . . . . . . . . . . . . . . . . . . . . . . . . . . . . . . . . . . . . . . . . . . . . . . . . . . . . . . 33
Reset . . . . . . . . . . . . . . . . . . . . . . . . . . . . . . . . . . . . . . . . . . . . . . . . . . . . . . . . . . . . . . . . . . . . 33
Time and date ............................................................. 33
Display language .......................................................... 33
Display contrast . . . . . . . . . . . . . . . . . . . . . . . . . . . . . . . . . . . . . . . . . . . . . . . . . . . . . . . . . . . 33
Scale filter is fitted . . . . . . . . . . . . . . . . . . . . . . . . . . . . . . . . . . . . . . . . . . . . . . . . . . . . . . . . 33
Water hardness/capacity . . . . . . . . . . . . . . . . . . . . . . . . . . . . . . . . . . . . . . . . . . . . . . . . . . . . 34
Warm-up rinsing .......................................................... 34
Foamer rinsing (optional) ................................................... 34
Rinsing interval ........................................................... 34
Operating options ......................................................... 34
Illumination .............................................................. 35
Display inversely . . . . . . . . . . . . . . . . . . . . . . . . . . . . . . . . . . . . . . . . . . . . . . . . . . . . . . . . . . 35
Intro .................................................................... 35
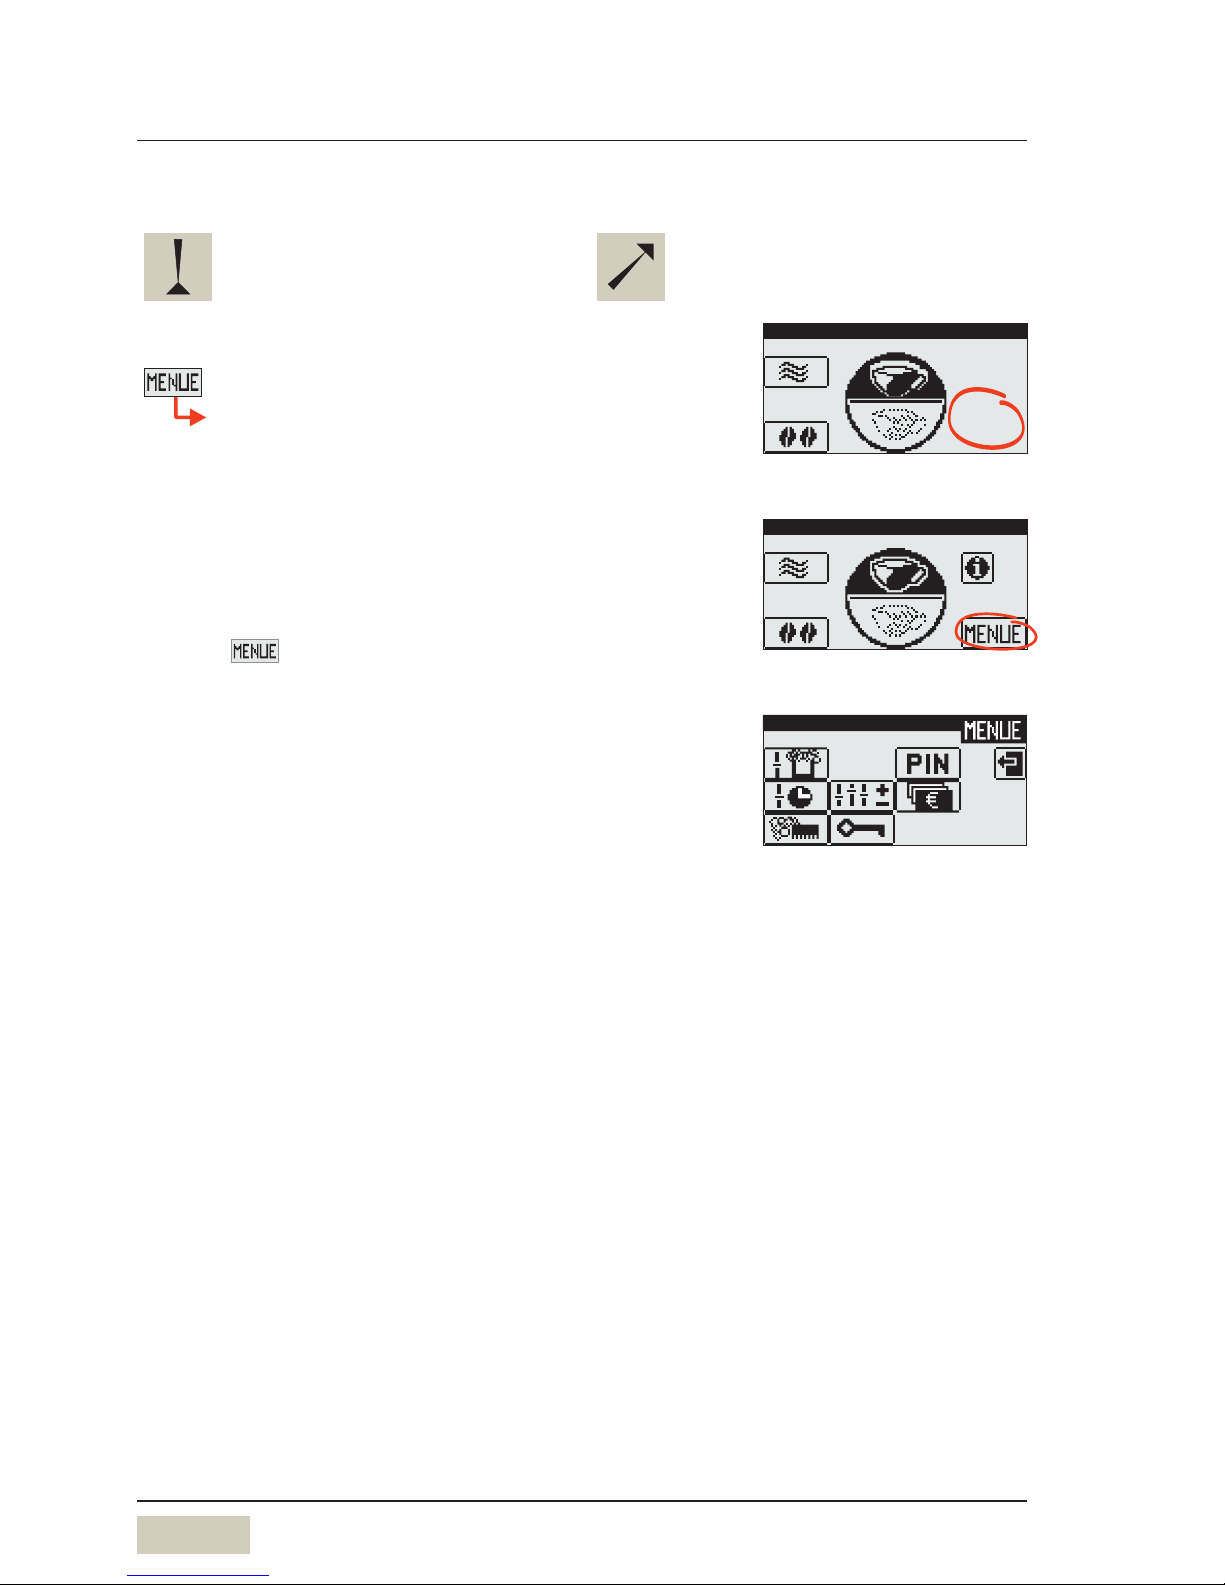
3.3.5 Enter PIN . . . . . . . . . . . . . . . . . . . . . . . . . . . . . . . . . . . . . . . . . . . . . . . . . . . . . . . . . . . . . . . . . . . 35
3.3.6 PIN rights access control ...................................................... 36
Cleaning level ............................................................. 36
Setting level . . . . . . . . . . . . . . . . . . . . . . . . . . . . . . . . . . . . . . . . . . . . . . . . . . . . . . . . . . . . . . 36
Accounting level . . . . . . . . . . . . . . . . . . . . . . . . . . . . . . . . . . . . . . . . . . . . . . . . . . . . . . . . . . . 36
Delete PIN . . . . . . . . . . . . . . . . . . . . . . . . . . . . . . . . . . . . . . . . . . . . . . . . . . . . . . . . . . . . . . . . 37
3.3.7 Accounting numbers of beverages . . . . . . . . . . . . . . . . . . . . . . . . . . . . . . . . . . . . . . . . . . . . . . . 37
Chapter 4 Other settings 38
4.1 Mechanical settings 38
4.1.1 Set grinding degree . . . . . . . . . . . . . . . . . . . . . . . . . . . . . . . . . . . . . . . . . . . . . . . . . . . . . . . . . . . 38
4.2 Labelling of beverage buttons 38
Chapter 5 Care 39
5.1 Daily cleaning 41
For all cleaning procedures. . . . . . . . . . . . . . . . . . . . . . . . . . . . . . . . . . . . . . . . . . . . . . . . . . . . . . . . . . . . . . . 41
5.1.1 Cleaning program . . . . . . . . . . . . . . . . . . . . . . . . . . . . . . . . . . . . . . . . . . . . . . . . . . . . . . . . . . . . 41
5.1.2 Milk system cleaning ......................................................... 41
Standard ................................................................. 41
Plug&Clean . . . . . . . . . . . . . . . . . . . . . . . . . . . . . . . . . . . . . . . . . . . . . . . . . . . . . . . . . . . . . . . 42

7
User Manual WMF 1300
Table of Contents
5.1.3 Mixer rinsing . . . . . . . . . . . . . . . . . . . . . . . . . . . . . . . . . . . . . . . . . . . . . . . . . . . . . . . . . . . . . . . . 42
5.1.4 Combi spout cleaning ........................................................ 42
5.1.5 General cleaning ............................................................. 42
5.2 Weekly cleaning 43
5.2.1 Cleaning the brewing unit ..................................................... 43
5.2.2 Choc/Topping mixer cleaning (optional) .......................................... 44
5.2.3 Water tank cleaning . . . . . . . . . . . . . . . . . . . . . . . . . . . . . . . . . . . . . . . . . . . . . . . . . . . . . . . . . . 45
5.3 Regular cleaning 46
5.3.1 Bean hopper cleaning ......................................................... 46
5.3.2 Product hopper cleaning (optional) . . . . . . . . . . . . . . . . . . . . . . . . . . . . . . . . . . . . . . . . . . . . . . 46
5.4 Steam outlet cleaning 47
5.5 Filter change 47
5.6 Descaling 47
Chapter 6 HACCP schedule 48
Recommendation for Choc and Topping (optional) . . . . . . . . . . . . . . . . . . . . . . . . . . . . . . . 49
Chapter 7 Maintenance 50
7.1 Coffee machine maintenance 50
7.2 Mixer maintenance (Choc) 51
7.3 Mixer maintenance (Topping) 51
7.4 WMF Customer Service 51
Chapter 8 Messages and instructions 52
8.1 Messages for operation 52
8.2 Error messages and malfunctions 53
8.3 Error without error display 56
Chapter 9 Safety 57
9.1 Hazards to the operator 57
9.2 Hazards to the coffee machine 58
9.3 Duties of the owner/operator 59
9.4 Warranty claims 60
No warranty is provided: .................................................... 61
Appendix A: Overview of additional instructions 62
Appendix B: Technical data 64
Technical data for coffee machine 64
Conditions for usage and installation 64
Appendix C: Accessories and spare parts 67
Index 69

8User Manual WMF 1300
We 08.04.2009 08:16
13
410
11
12
5
7
9
14
6
13
2
8
15
1
2
2
18
20
19
21
4
16
17
22
Introduction and General information
We 08.04.2009 08:16
Display with one button level
Chapter 1 Introduction
1.1 Parts of the coffee machine

9
User Manual WMF 1300
Introduction and General information
1Bean hopper (optional 1 or 2)
2Manual insert/Tablet insert
3Choc hopper/Topping hopper (optional)
4Touch-screen display
5Beverage buttons
6Height-adjustable combi spout with integrated milk foamer
7Cover
8Grounds container
9Removable drip tray with drip grid
10 ON/OFF button
11 Steam button (optional) or Decaf button (optional)
12 Hot water button
13 Dispense steam (optional) or hot water dispensing
14 Water tank (coffee machines without constant water supply)
15 Brewing unit
16 Warm rinse pad
17 Barista pad
18 Timer and clock display
19 Info pad
20 Messages/error messages
21 Menu pad (opens main menu)
22 Second level/toggle pad (option)

10 User Manual WMF 1300
Introduction and General information
User Manual Signs and Symbols
Tip
Instruction Cross reference
Start position
Main menu
If the menu symbol is shown in this user manual, the
description starts at the start position.
Call up the main menu
Touch clear area on the ready to operate display
Additional pads are activated.
Touch
The main menu is displayed.
There are other display options wMain menu.
We 08.04.2009 08:16
Ready to operate display
We 08.04.2009 08:16
... with additional pads
main menu
Main menu

11
User Manual WMF 1300
Introduction and General information
Glossary
Term Explanation
• Listings, selection options•
Individual steps
Text in italics Description of coffee machine state and/or explanations of
automatic steps.
sec Seconds
min Minutes
Barista Professional coffee server
Beverage dispensing Dispensing coffee, hot water or Choc beverages
Capacity For example performance of the water filter in litres of water
it can filter
Carbonate hardness Quoted in gpg (°dkH). The water hardness is a measure of the
calcium dissolved in the water.
Choc Hot chocolate
Decaf Decaffeinated Coffee
Grounds chute See grounds disposal through counter, chapter 2.11
Main tap Water stop cock, angle valve
Milk system Combi spout, milk nozzle and milk hose
Mixer system Complete module, mixer with portion controller for
C h o c / T o p p i n g
O-rings Seals
Preinfusion Prior to brewing, coffee is briefly infused in order to ensure
a more intense release of its aromatic substances.
Pressing Automatic pressing of coffee grounds prior to brewing
Rinsing Intermediate cleaning
Self-service Self-service customer operation
Topping Milk powder

12 User Manual WMF 1300
Operation
Chapter 2 Operation
A display-guided installation program takes care of initial
start-up after delivery from the factory.
2.1 Switch on coffee machine
Press ON/OFF button and hold for 2 seconds
Coffee machine switches on and heats up.
When the machine is ready to dispense beverages, the
ready to operate display appears.
2.2 Dispensing beverages
Pressing the beverage button triggers dispensing of the
beverage selected.
Lit up button• =Ready to dispense
Flashing button• =Beverage dispensing
Unlit button• = not ready to dispense/
button disabled
Place a suitably sized beverage receptacle below the
dispenser
Press desired beverage button
Desired beverage and progress of dispensing indicated on
the display.
2.3 Decaf button (optional)
Preparation of a decaffeinated coffee beverage from the
decaf grinder:
Press Decaf button
Press desired beverage button
The steam dispensing option is not available with the decaf
option.
Initial start-up
wInstallation instruction
PIN protection
wSoftware
wSettings
wOperating options
page 34
wTimer program
page 22
CAUTION
Burn hazard.
Hot steam.
Hot liquids.
Do not reach under
the spouts.
Button assignment
wSoftware wSettings
wRecipe and beverage buttons
page 30

13
User Manual WMF 1300
Operation
2.4 Milk or milk foam (optional)
2.4.1 Dispense milk or milk foam
Press the beverage button assigned to milk or milk foam
Dispensing occurs. Dispensing continues for as long as the
button is held.
2.4.2 Connect up the milk
Use a suitable milk nozzle.
orange milk nozzle•
* blue milk nozzle
=with a refrigerator,
milk temperature 39-46 °F
(4-8 °C)
green milk nozzle•
* white milk nozzle
= milk temperature 46-61 °F
(8-16 °C)
* Alternative milk nozzles, depending on the milk types
used.
Standard
Insert the milk nozzle into the milk connection on the
combi spout
Open the milk packaging and place on the left next to
the coffee machine
Insert the milk hose with the beige milk nozzle into the
milk pack
The hose must not be under tension or bent when
adjusting the height of the combi spout.
With WMF Cooler, WMF Cup&Cool (optional)
Insert the milk nozzle into the milk connection on the
combi spout
Pull out the milk container
Push the lid of the milk container back
Pour milk into the milk container
Place the lid back on the container
Insert the adapter on the milk hose into the connection
in the milk container lid
Push the milk container back in carefully
The milk hose is inserted into the adapter.
Cooler version
Cooler milk container
Cooler adapter

14 User Manual WMF 1300
Operation
2.5 Dispensing hot water
Press the hot water button
Dispensing occurs.
If less water is required than the pre-set dispense amount,
dispensing can be stopped by pressing the button again.
2.6 Dispensing steam (optional)
Press the steam button
Steam is dispensed for as long as the button is held
pressed.
Steam warms beverages•
Steam manually foams milk•
Warm beverages
Use as tall and slim a Cromargan® jug as possible, with
handle
Fill jug to no more than half way
Immerse steam nozzle deeply into jug
Press and hold steam button until desired temperature
is reached
Release steam button
Swing steam outlet over to the drip tray
Briefly press steam button
Residue in the steam outlet tube is rinsed out.
Wipe steam outlet with a damp cloth
Foam milk
Use as tall and slim a Cromargan® jug as possible, with
handle
Fill jug to no more than half way
Immerse steam nozzle into jug to just under the surface
Press and hold steam button whilst rotating jug in
a clockwise direction
A thick creamy milk foam results.
Release steam button
Swing steam outlet over to the drip tray
Briefly press steam button
Residue in the steam outlet tube is rinsed out.
Wipe steam outlet with a damp cloth
CAUTION
Burn hazard.
Hot steam.
Do not reach under
the spouts.
A Cromargan® jug, such as
WMF order code 06.3417.6040
CAUTION
Burn hazard.
Hot surfaces.
Wait until the
machine has cooled
down.
Do not overheat milk when
foaming, otherwise foam volume
decreases.
CAUTION
Burn hazard.
Hot surfaces.
Wait until the
machine has cooled
down.

15
User Manual WMF 1300
Operation
2.7 Height adjustment of the combi spout
The combi spout height is adjustable.
Take hold of the combi spout from the front and push
to the desired height
Adjustment height: 1.97 - 7.48 inch (50 - 180 mm)
2.8 Bean hopper/product hopper
If possible, replenish product hopper in advance.
Fill the hopper to a maximum of the amount needed
for one day, in order to maintain the freshness of the
products.
2.9 Manual insert/tablet insert
The manual/tablet insert is located in the centre of the
coffee machine cover.
Manual insert is used:
For inserting cleaning tablets•
When using an additional coffee variety, such as•
decaffeinated coffee
For a coffee trial•
Add coffee grounds or cleaning tablet only when
instructed to do so by the display.
Put only ground coffee in the manual insert.
Coffee beans into bean hopper,
Choc powder into Choc hopper.
Tablet insert
NOTICE
Follow the instructions
beside.
See chapter 9.4: Warranty.

16 User Manual WMF 1300
Operation
Preparation of coffee grounds using the manual insert
Open manual insert lid
Insert coffee grounds (max. 0.035 lbs /16 g)
Close manual insert lid
Press desired beverage button
For beverages on level two, touch the toggle button before
opening the manual insert lid.
2.10 Grounds container
The coffee grounds container catches the used coffee
grounds.
It has the capacity to catch coffee grounds from
approx. 40 brewings.
The display shows a message as soon as the coffee grounds
container needs to be emptied.
Beverage dispensing is blocked for as long as the coffee
grounds container is removed.
Push combi spout fully upwards
Pull out coffee grounds container
Empty and replace coffee grounds container
Confirm procedure on display
If coffee grounds container cannot be replaced, check
chute for coffee residues and remove.
Always empty coffee grounds container before
reinserting. Replacing without emptying results in the
coffee grounds container being overfilled. The coffee
machine will be soiled. This may cause subsequent
damage to the machine.
2.11 Grounds disposal through the counter
(optional)
The coffee machine can be fitted with through-counter
coffee grounds disposal. Both the coffee grounds container
and the coffee machine base have an opening in them, in
this case, which passes through the counter the machine
is placed on. The spent coffee grounds are collected in
a large container under the counter.
Manual insert
Clean daily
wCare
NOTICE
Follow the instructions
beside.
See chapter 9.4: Warranty.
Through-counter feature cannot
be retrofitted.
Clean coffee grounds chute daily
wC a r e
page 43

17
User Manual WMF 1300
Operation
2.12 Drip tray
For coffee machines without a drain connection, the drip
tray must be emptied regularly.
Pull out the drip tray carefully and empty it, then
replace the drip tray
On coffee machines with a drain connection the drip tray
may also be removed (e.g. for cleaning). Replace carefully
so that no water accidentally drips down.
2.13 Switch off the coffee machine
The coffee machine must be cleaned daily prior to
switching it off.
Press and hold ON/OFF button until coffee machine
switches off
Disconnect mains plug
Coffee machines with a constant water supply:
Turn off mains water supply
If this is not observed, the warranty is invalidated in the
event of any resultant damage.
CAUTION
Burn hazard.
Hot steam.
Hot liquids.
Switch off the
machine before
moving the drip
tray. Move the drip
tray carefully.
Do not reach under
the spouts.
Clean drip tray daily
wCare
page 42
PIN protection
wSoftware wSettings
wOperating options
page 34
NOTICE
Follow the instructions
beside.
See chapter 9.4: Warranty.

18 User Manual WMF 1300
Software
Chapter 3 Software
3.1 An overview
Ready to operate
We 08.04.2009 08:16
Touch clear area on the ready to operate display. Additional pads
are activated.
We 08.04.2009 08:16
There are various options for the ready to operate display.
Further options wReady to operate display.
We 08.04.2009 08:16
If there are errors, the relevant pad is displayed.
If Cleaning , Descaling or Filter change
are required this is displayed.
Other display options wS e t t i n g s wOperating options.
Pads on the ready to operate display Chapter 3.2
Warm rinsing
Chapter 3.2.1
Barista (strength of the coffee)
Chapter 3.2.2
Toggle switch (optional)
Chapter 3.2.3
Main menu
Chapter 3.2.4
Information
Chapter 3.2.5
Error message
Touching the pad calls up the error message.
Care message
Touching the pad leads directly to the menu.
Cleaning required.
Descaling required.
Self-service and
operating options
wSettings
page 34

19
User Manual WMF 1300
Software
Main menu functions (pads) Chapter 3.3
Milk and foam
Chapter 3.3.1
Timer program
Chapter 3.3.2
Care
Chapter 3.3.3
Settings
Chapter 3.3.4
PIN entry
Chapter 3.3.5
PIN access control
Chapter 3.3.6
Accounting
Chapter 3.3.7
Menu control pads
Save settings
start
continue
Start or confirm a step
Back to the higher menu level
Abort/leave without saving (Exit)
Clear or reset
Start preparation test/grounds check
Increase and reduce setting values
Forward or back one step in listings

20 User Manual WMF 1300
Software
3.2 Ready to operate
3.2.1 Warm rinsing
Touch the warm rinse pad
The pipes are rinsed with hot water begins. The water
warms the brewing system and guarantees an optimum
coffee temperature.
3.2.1 Barista pad
Touch the Barista pad
The coffee strength will be altered once for the next brew.
normal, as per setting
weaker (-15 %)
stronger (+15 %)
3.2.3 Toggle pad (optional)
Each beverage button may be doubly assigned.
This is possible using a secondary level for the
beverage buttons.
Level 1 activated.
Touch the toggle pad
Level 2 activated.
Touch again to switch back to level 1.
3.2.4 To main menu
Call up the main menu
Touch clear area on the ready to operate display
Additional pads are activated.
Touch
The main menu is displayed.
Recommended after a longer
brewing pause, especially before
dispensing a cup of espresso.
Warm rinse pad (active/inactive)
wSettings wOperating options
page 34
Barista pad (active/inactive)
wSettings wOperating options
page 34
Level 1 is active Level 2 is active
Toggle pad (active/inactive)
wSettings
wOperating options
page 34
We 08.04.2009 08:16
Ready to operate display
We 08.04.2009 08:16
... with additional pads
Delayed fading in
wSettings
wOperating options
page 34
Other manuals for Series 1300 prestolino
1
Table of contents
Other WMF Coffee Maker manuals