WMF WMF1000 User manual

USER MANUAL
ENGLISH
0.40
COFFEE MACHINE
WMF1000 33 0915 6010 2006.08
WMF 1000

2WMF 1000 user manual
Introduction and General Information
Congratulations on the purchase of your
WMF coffee machine.
You will be impressed by the machine‘s technical design,
its long service life and economical operation, and
especially by the quality of the coffee it produces.
The WMF 1000 pro coffee machine is a fully-automatic
single-cup coffee machine for espresso,
café crème, cappuccino, café latte, latte macchiato, hot
milk, foamed milk and hot water.
Each beverage is freshly brewed at the press of a button,
which guarantees a high-quality beverage.
User guidance for the coffee machine is provided on the
display.
Keep this user manual near the coffee machine so that
you and your operating staff have the right information
handy and can take the correct action(s) in the event of
any technical problems.
The coffee machine is designed to prepare up to 10,000
coffee beverages per year.
After every 10,000 beverages, service by the WMF
service centre is required.
The machine must be cleaned and descaled regularly.
Please absolutely head the Chapter 2 of the manual
Commissioning > Setting > Water hardness and to make
the necessary settings.
In the event of failure to comply
with cleaning and maintenance
information (see Maintenance
chapter) no liability is accepted
for any resultant damage.
Similarly, in that event all
guarantee/warranty obligations
cease to apply.
Please read the user manual
prior to using the coffee
machine!
Make the user manual available
to your staff!
Important!
Chapter 1 Pre-setting
Heed signs and symbols in the
user manual!
Heed Chapter 9 Safety!

3
WMF 1000 user manual
Table of Contents
Chapter 1 Introduction and General Information
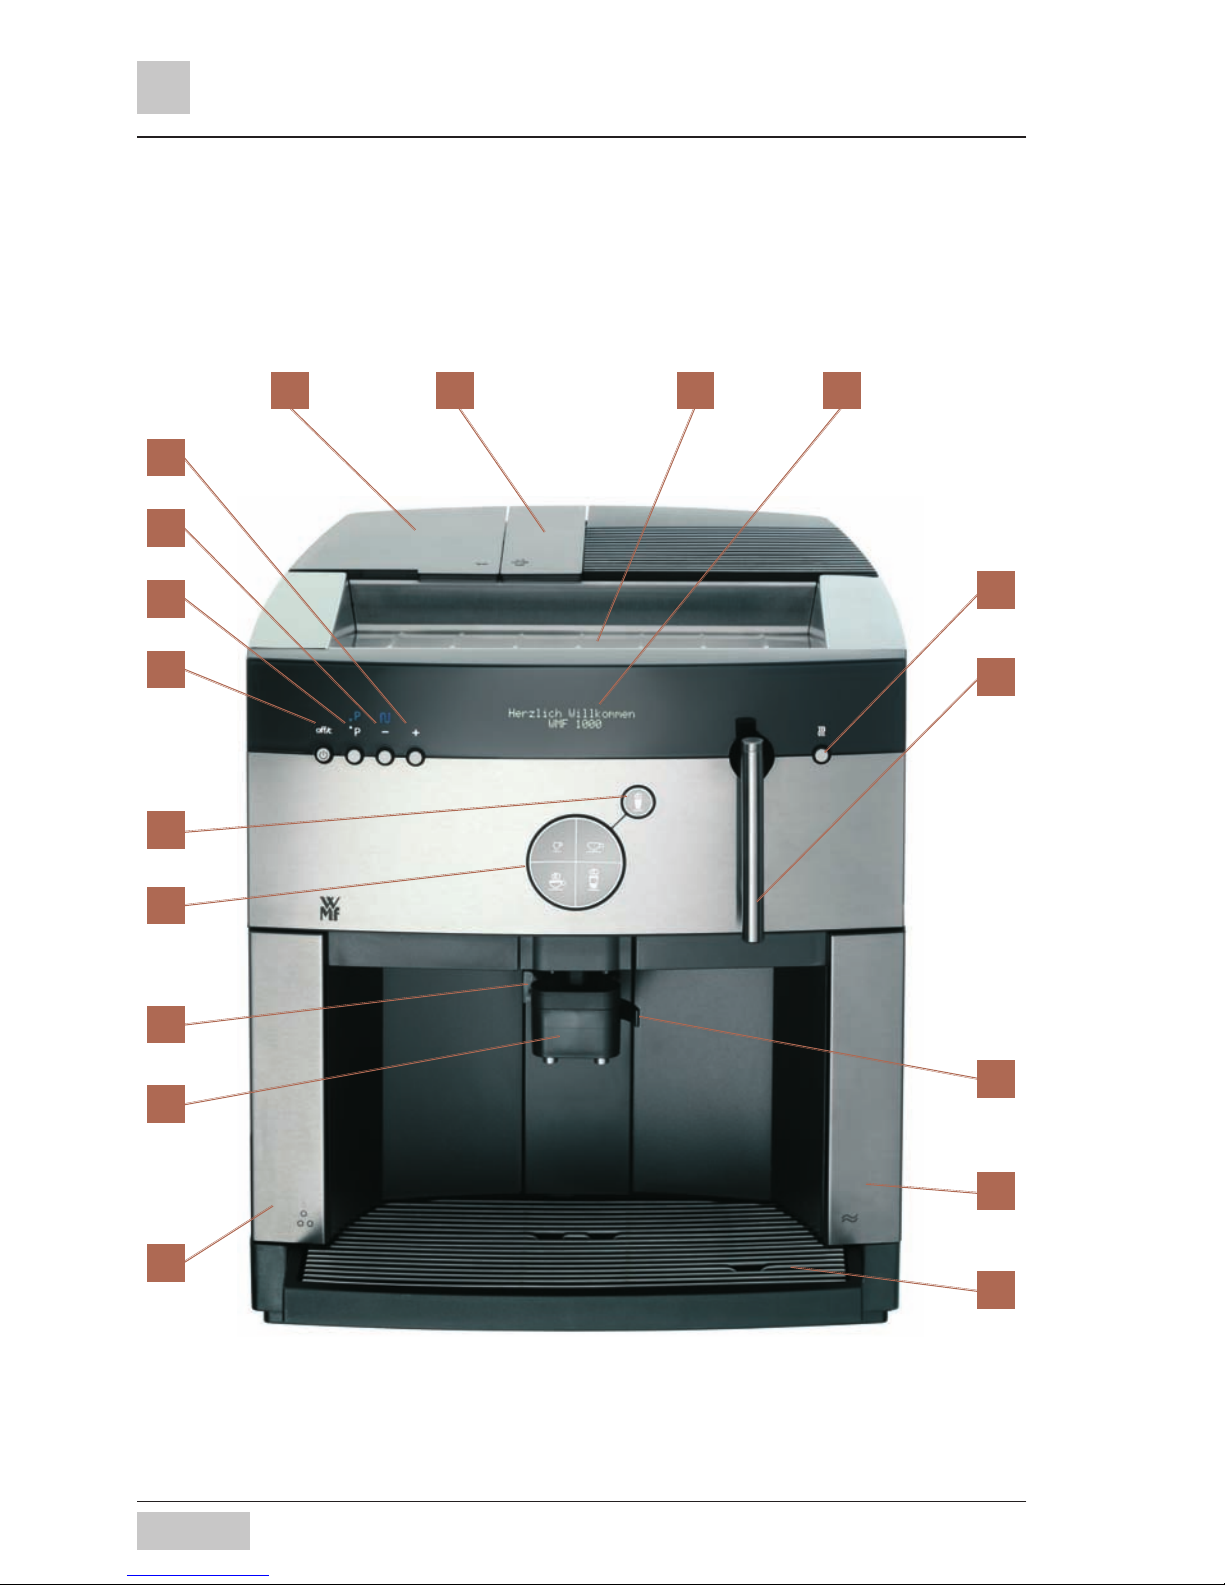
1.1 Parts of the machine 6
1.2 Overview of control buttons 8
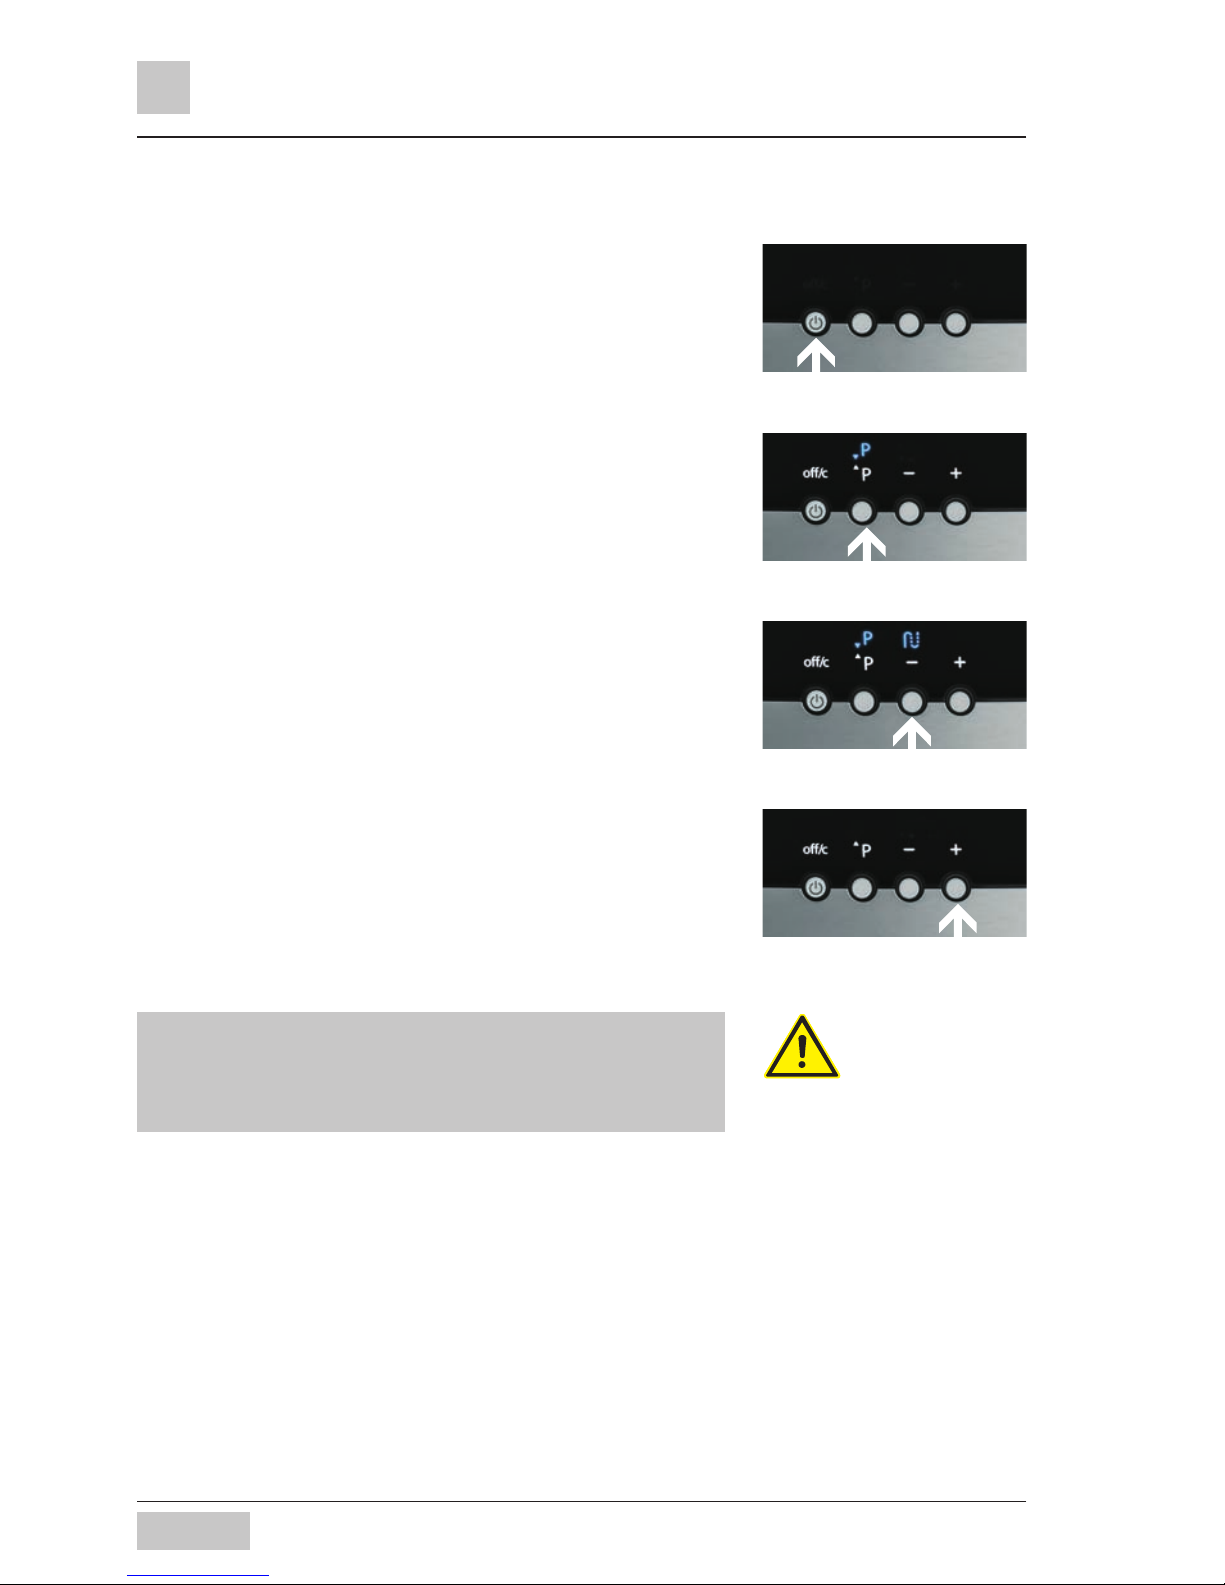
Off/C button . . . . . . . . . . . . . . . . . . . . . . . . . . . . . . . . . . . . . . 8
Program button/P cbutton ........................... 8
Minus button / Care button / Aroma button . . . . . . . . . . . . . . . 8
Plus button/Aroma button ............................ 8
1.3 Before starting 8
1.4 User manual signs and symbols 9
Hazard instructions. . . . . . . . . . . . . . . . . . . . . . . . . . . . . . . . . 9
Tips and hints . . . . . . . . . . . . . . . . . . . . . . . . . . . . . . . . . . . . . 9
1.5 Displaying the readiness state 10
1.6 Glossary 10
Chapter 2 Commissioning
2.1 Unpacking and Setting up 11
2.2 Testing the water hardness 11
2.3 Preparing the water tank 11
InserttheWMFtankfilter ...................................11
Assembling the milk hose . . . . . . . . . . . . . . . . . . . . . . . . . . . . . . . . . . .12
Fill the water tank. . . . . . . . . . . . . . . . . . . . . . . . . . . . . . . . . . . . . . . . .12
2.4 Connecting the milk hose to the milk 13
2.5 Filling the coffee bean hopper 13
2.7 Commissioning program 13
Basic Settings . . . . . . . . . . . . . . . . . . . . . . . . . . . . . . . . . . . . . . . . . . .14
Time............................................14
Date ............................................14
Water hardness....................................14
Tankfilter .......................................15
Chapter 3 Operation
3.1 Operating and Lighting concept 16
3.2 Preparing coffee beverages 16
Overview of beverage buttons................................16
Example: Preparing café crème . . . . . . . . . . . . . . . . . . . . . . . . . . . . . .17
Particularityofcafélatte ...................................17
Setting coffee strength for the next beverage . . . . . . . . . . . . . . . . . . . .18
Coffee preparation using the manual insert . . . . . . . . . . . . . . . . . . . . . .19
3.3 Dispensing milk and milk foam 20
Dispensingmilk-milkleverdown .............................20
Dispensing milk foam - milk lever up . . . . . . . . . . . . . . . . . . . . . . . . . . .20
3.4 Dispensing hot water 21
3.5 Beverage preparation in general 21
3.6 Cancel beverage dispensing 21
3.7 all-in-one spout 22
Adjustingtheheight.......................................22
Positions of the all-in-one spout . . . . . . . . . . . . . . . . . . . . . . . . . . . . . . .22
3.8 Switching on and off 23
Switchingon............................................23
Switching off ............................................23

4WMF 1000 user manual
Table of Contents
3.9 Switching coffee machineon and off in timer operation 24
Setting the automatic switch-on time . . . . . . . . . . . . . . . . . . . . . . . . . . .24
Display timer operation. . . . . . . . . . . . . . . . . . . . . . . . . . . . . . . . . . . . .24
Manual switch-on for timer operation . . . . . . . . . . . . . . . . . . . . . . . . . . .24
Manual switch-off for timer operation . . . . . . . . . . . . . . . . . . . . . . . . . . .24
Chapter 4 Setting
4.1 Cup size (Cup volumes) 26
Dispensingtest..........................................26
4.2 Beverage settings 26
Dispensingtest..........................................27
water volume............................................27
Coffeestrength..........................................27
Milk volume . . . . . . . . . . . . . . . . . . . . . . . . . . . . . . . . . . . . . . . . . . . . .27
Sequence of the dispensing of milk and coffee....................28
Pre brew . . . . . . . . . . . . . . . . . . . . . . . . . . . . . . . . . . . . . . . . . . . . . . .28
Dispensingtest..........................................28
4.3 Basic settings 29
Date/Time. . . . . . . . . . . . . . . . . . . . . . . . . . . . . . . . . . . . . . . . . . . . . .29
Automaticswitch-ontime...................................29
Switch-off time. . . . . . . . . . . . . . . . . . . . . . . . . . . . . . . . . . . . . . . . . . .29
Brewingtemperature......................................30
Factory settings. . . . . . . . . . . . . . . . . . . . . . . . . . . . . . . . . . . . . . . . . .30
4.4 Reading counters 30
Chapter 5 Other settings
5.1 Set the grinding degree 31
Chapter 6 care
6.1 General customer care programs 32
6.2 Overview of customer care 33
6.3 Calling Customer care programs 34
6.4 Customer care programs 34
Warm-up rinse/Coffee system rinse............................34
Rinsemilksystem ........................................35
Cleaning the machine - Cleaning program........................36
Change tank filter. . . . . . . . . . . . . . . . . . . . . . . . . . . . . . . . . . . . . . . . .38
Descaling ..............................................39
6.5 Manual cleaning 40
Cleaning milk hose ........................................40
Cleaningthemilksystem ...................................41
Cleaningthebrewingunit...................................43
6.6 Cleaning in general 45
Cleaning the coffee grounds container. . . . . . . . . . . . . . . . . . . . . . . . . .45
Cleaningthewatertank ....................................45
Cleaning the drip try and drip tray grid. . . . . . . . . . . . . . . . . . . . . . . . . .45
Cleaning the bean hopper . . . . . . . . . . . . . . . . . . . . . . . . . . . . . . . . . . .45
Chapter 7 HACCP cleaning schedule

5
WMF 1000 user manual
Table of Contents
Chapter 8 Messages and tips
8.1 Operating messages 48
Emptycoffeegroundscontainer..............................48
Refill water tank . . . . . . . . . . . . . . . . . . . . . . . . . . . . . . . . . . . . . . . . . .48
Emptydriptray..........................................48
Beanhopperisempty .....................................48
Insertcoff.grounds.......................................49
Change tank filter. . . . . . . . . . . . . . . . . . . . . . . . . . . . . . . . . . . . . . . . .49
Side door open ..........................................49
Lowerspout ............................................49
8.2 Error messages and faults 50
Faultmessagesonthedisplay ...............................50
8.3 Problems with no fault display 52
Chapter 9 Safety
9.1 Hazards for the user 54
9.2 Hazards for the coffee machine 55
9.3 Responsibilities of the operator 56
9.4 Warranty claims 56
No warranty is provided: . . . . . . . . . . . . . . . . . . . . . . . . . . . . 57
Chapter 10 Service and maintenance
10.1 WMF 1000 Service-Center 58
Procedure . . . . . . . . . . . . . . . . . . . . . . . . . . . . . . . . . . . . . . . . . . . . . .58
Service/maintenance/repair in the WMF 1000 Service-Center . . . . . . . . .58
Return delivery ticket WMF 1000 . . . . . . . . . . . . . . . . . . . . . . . . . . . . . .58
Technical data
Accessories and spare parts
Index

6
7
9
8
12
13
14
17
15
16
18
10
11
1 4
5
2 3
6
WMF 1000 user manual
Introduction and General Information
Chapter 1 Introduction and General Information
1.1 Parts of the machine

7
WMF 1000 user manual
Introduction and General Information
1Bean hopper
2Manual insert
3Heated cup storage
4Display
5Hot water button
6Hot water spout
7Plus button / Aroma button
8Minus button / Care button / Aroma button
9cP button / Confirm
10 Off/C button / Timer
11 Milk button / Milk foam button
12 Beverage buttons
13 Milk lever (conversion milk/milk foam)
14 Height-adjustable all-in-one spout with integrated milk foamer
15 Adjustment lever for all-in-one spout
16 Water tank
17 Removable drip tray with drip tray grid
18 Coffee grounds container

8WMF 1000 user manual
Introduction and General Information
1.2 Overview of control buttons
Off/C button
Switching on
Off
Cancel
Timer operation
Program button / cP button
Introduction to settings
Confirm a selection
Minus button / Care button / Aroma button
Browse back in the programs with minus
Select the care program
Reduce coffee strength for the next beverage
Plus button/Aroma button
Browse forwards with plus
Increase coffee strength for the next beverage
1.3 Before starting
Read this user manual before starting to prepare
coffee. Only then can you operate all functions and the
machine safely and spoil yourself with a wonderful coffee
beverage.
Additional components of the user manual:
Brief manual for beverage dispensing/care
•
•
•
•
•
•
•
•
•
•
•
•

9
WMF 1000 user manual
Introduction and General Information
1.4 User manual signs and symbols
Hazard instructions
Attention!
Risk to machine
Attention!
Risk to user
Attention!
Hot liquid
Attention!
Hot surface
Attention!
Danger of electric shock
Attention!
Danger of hand injuries
Tips and hints
Hint Cross-reference
[2] Note about the figure
Please always heed the safety instructions in Chapter 9.

10 WMF 1000 user manual
Introduction and General Information
1.5 Displaying the readiness state
The descriptions in the user manual always assume that
the coffee machine is ready to operate.
1.6 Glossary
Term Meaning
• Listings, selection options•
Individual activities, individual steps
Italics Description of coffee machine state and/or
explanations of steps carried out automatically
Beverage dispensing Dispensing of coffee, hot water, milk or milk foam
Main tap Water on/off valve, angle valve.
Carbonate hardness Indication in °dKH: Water hardness is an indicator of calcium
dissolved in the water.
Milk system All-in-one spout, milk nozzle and milk hose
O-rings Seals
Pre-infusion Prior to the brewing cycle, coffee is briefly infused to ensure
a more intensive release of its aromatic substances.
Press Automatic pressing of coffee grounds prior to brewing cycle.
Range For example: litre capacity of the tank filter
Rinsing Intermediate cleansing
your selection pls
24.10.2006 08:15
your selection pls
24.10.2006 08:15

11
WMF 1000 user manual
Commissioning
Chapter 2 Commissioning
2.1 Unpacking and Setting up
Unpack coffee machine and set up on a stable, hori-
zontal support
Check the coffee machine for possible transport
damage
Plug the connector into a grounded outlet
Assemble bean hopper attachment
Insert drip tray and drip tray grid
2.2 Test the water hardness
Briefly dip carbon hardness test strip into water
(approx. 1 second)
One minute later, read the degree of hardness on the
colour scale of the test strip package
The water hardness is set during commissioning.
2.3 Prepare the water tank
Remove the water tank from the coffee machine
Remove all accessories from the water tank
Rinse the water tank thoroughly with tap water
Do not put the water tank back into the machine yet. The
milk hose must be assembled first.
Insert the WMF tank filter
The WMF tank filter ensures the best coffee quality and
protects the coffee machine against calcification.
With water hardness 0-4, do not use a tank filter.
Remove the screen built into the water tank [1]
Place the cartridge adapter on the water spout
supports from above (lock pulled) and lock by
pressing the lock down [2]
Unpack the tank filter cartridge and place on the
cartridge adapter [3]
Keep the original packaging to
use for transport.
Please empty the water tank,
drip tray, filter sets and bean
hopper before transporting.
See
Tank filter instructions
Figures see next page
Fill water tank with drinking
water
Cable compartment

12 WMF 1000 user manual
Commissioning
Assemble the milk hose
The milk hose is already mounted on the all-in-one spout.
For refrigerated milk, use the transparent milk nozzle
(assembled on delivery)
For non-refrigerated milk, use the grey milk nozzle
from the accessories
Push the all-in-one spout to the lowest position
Insert the milk hose into the guide
Fill the water tank
Fill the water tank with cold tap water (max. 2.8 litres)
Slide the water tank back into the machine
Fill the water tank only with fresh, cold water. Never use
hot water, mineral water, milk or other liquids.
•
•
11 22 33
Set all-in-one spout:
Press the adjustment lever to
the right of the spout and then
move the spout.

13
WMF 1000 user manual
Commissioning
2.4 Connect the milk hose to the milk
Place the refrigerated milk directly to the right of the
machine
Place the milk hose with the milk nozzle on it into the
milk container. The hose end with the milk nozzle should
reach to the bottom of the milk container.
Milk is a very delicate food. When handling milk, always
heed hygiene.
Heed the HACCP cleaning shedule! See Chapter 7!
2.5 Fill the coffee bean hopper
Open the cover towards the back
Fill coffee beans (max. 320 g), can be expanded to
500 g with optional, attachable coffee bean hopper
Close the cover
Heed that no foreign bodies land in the coffee bean
hopper. Such foreign bodies can damage the grinders
of the coffee mill. This damage is excluded from the
warranty.
2.6 Commissioning program
Press the Off/C button
The commissioning program starts.
Set the desired language for the display guidance here.
The commissioning program uses the display to lead
you step by step through the commissioning. Follow the
display texts.
language: english
OK: P change: -/+
language: english
OK: P change: -/+
Only provide milk if necessary!

14 WMF 1000 user manual
Commissioning
The machine is switched on, the commissioning program
leads you through the basic settings.
Basic Settings
Set the desired values with the - and + buttons.
Use the cP button to confirm the values and inputs. After
confirmation, the program jumps to the next point of the
settings.
When exiting the program, the new values are saved.
Time
Set the current time here.
Format: hh=hour (two digits), mm= minute (two digits),
ss= seconds (two digits).
Date
Set the current date here.
dd= day two-digit,
mm= month two-digit
yyyy = year four-digit.
Water hardness
Set the result of the carbonate hardness test here.
initial setting up
of your WMF 1000
initial setting up
of your WMF 1000
time: hh:mm:ss
OK: P change: -/+
time: hh:mm:ss
OK: P change: -/+
date dd:mm:yyyy
OK: P change: -/+
date dd:mm:yyyy
OK: P change: -/+
water hardn.: 13-16
OK: P change: -/+
water hardn.: 13-16
OK: P change: -/+
cP
Select
Confirm
–
Care button
Browse backwards
Reduce value
+ Browse forwards
Increase value
The new values are saved
when you exit the program.
The set values can be changed
in the “Settings” program after
commissioning.
See
Chapter 4 Settings
The display goes out after 5
seconds.
Carbonate hardness test
See included accessories

15
WMF 1000 user manual
Commissioning
Tank filter
Enter here whether you are using a tank filter (recom-
mended with water hardness 5 °dKH and higher)
If “water filter” is set, then the filter should be rinsed now.
Set a container with approx. 3 litres capacity under
the hot water spout
When rinsing the filter, you will hear unusual noises. This
is normal. The noises will end during the filter rinse.
The machine now heats up.
After the machine is heated up, there is a coffee system
rinse. This warms up all the pipes.
Place a container for the rinse water under the all-in-
one spout (approx. 200 ml)
A coffee system rinse starts.
The coffee system rinse lasts approx. 40 seconds; after
this, the machine is ready to operate.
water filter: no
OK: P change: -/+
water filter: no
OK: P change: -/+
place 3l container
under h.w. spout
place 3l container
under h.w. spout
heating up ...heating up ...
Your selection pls
24.10.2006 08:15
Your selection pls
24.10.2006 08:15
Cup size and beverage settings
see Chapter 4 Settings
cP
Select
Confirm
–
Care button
Browse backwards
Reduce value
+ Browse forwards
Increase value
The new values are saved
when you exit the program.
Rinse filter:
Follow the display texts
see also change filter
in Chapter 6 Customer Care

16 WMF 1000 user manual
Operation
Chapter 3 Operation
Operation and lighting concept
Preparing coffee beverages
Example: preparing café crème
Dispensing milk and milk foam
Dispensing hot water
All-in-one spout
Control buttons
Functional parts
3.1 Operating and Lighting concept
The lighting system helps you with navigation. Only the
buttons which can be operated in the current situation
are lighted.
3.2 Preparation of coffee beverages
The WMF 1000 has four beverage buttons, each of which
has two functions.
Overview of beverage buttons
For 1st level beverages, press short
For 2nd level beverages, press long
short espresso
café crème short
long 2x espresso 2x café crème long
short cappuccino latte macchiato short
long 1x café latte 1x espresso macchiato long
•
•
•
•
•
•
•
•
•
•
Always heed the safety
instructions to operate the
WMF 1000 safely.
See Chapter 9 Safety

17
WMF 1000 user manual
Operation
Example: Prepare café crème
This description serves as an example for the prepara-
tion of all beverages. All steps are carried out for the
preparation of the other beverages according to the
example.
If necessary, adjust the height of the all-in-one spout
to the height of the drinking vessel.
Place an appropriate drinking vessel under the
all-in-one spout
Press the beverage button for for café crème short
See overview of beverage buttons
The beverage button pressed lights up white.
The display indicates:
Depending on the setting, the coffee beans are ground
appropriately for the selected beverage. The preparation
occurs as specified in the beverage settings.
The beverage is prepared and dispensed into the drinking
vessel underneath the spout.
The readiness display indicates:
Particularity of café latte
Select café latte by pressing 1 x long (see overview of
beverage buttons)
Before preparing café latte:
1x café creme1x café creme
Your selection pls
24.10.2006 08:15
Your selection pls
24.10.2006 08:15
1x café latte
milk lever down
1x café latte
milk lever down
cP
Select
Confirm
–
Care button
Browse backwards
Reduce value
+ Browse forwards
Increase value
The new values are saved
when you exit the program.
Set height
all-in-one spout
See page 22
Coffee preparation using the
manual insert
See page 19
Dispensing milk and milk foam
See page 20

18 WMF 1000 user manual
Operation
Press the milk lever to the left of the all-in-one spout
downwards
Confirm that the milk lever is pressed downwards by
pressing the lighted beverage button
Beverage preparation begins.
After preparing café latte:
Press the milk lever upwards
Confirm with the button cP
Setting coffee strength for the next beverage
Before each coffee preparation, you can decide how
strong you want the next coffee beverage to be.
Mild (approximately 15 % weaker than the saved
setting)
Normal (corresponds to your setting)
Strong (approximately 15 % stronger than the saved
setting)
Place an appropriate drinking vessel under the
all-in-one spout
Set the desired coffee strength with the - and +
buttons
Select the beverage
The beverage button selected lights up and the beverage
name is indicated on the display.
The selected beverage is prepared.
•
•
•
milk lever upmilk lever up
See preparing beverage
See
Preparing milk and milk foam
Page 20

19
WMF 1000 user manual
Operation
Coffee preparation using the manual insert
In addition to the coffee bean hopper, there is a manual
insert for a second type of coffee, so that, for example,
you can prepare decaffeinated coffee.
Place an appropriate drinking vessel under the
all-in-one spout
Open the cover of the manual insert
The display instructs:
Place the ground coffee for one brewing cycle in the
manual insert
Close the cover
Select the beverage with the beverage buttons
This procedure can be cancelled with the Off/C button.
Always use ground coffee for the manual insert (max.
15 g per preparation).
The coffee machine gets soiled inside if too much
ground coffee is put in at once.
Do not use water-soluble, freeze-dried instant coffee.
Each brewing cycle via the manual insert is measured
separately.
Coffee ground too fine can cause faults.
•
•
•
•
•
insert coff. grounds
select beverage
insert coff. grounds
select beverage
See Chapter 6
Customer Care
> Cleaning the brewing uni
See Chapter 6
Customer Care
> Cleaning the brewing uni

20 WMF 1000 user manual
Operation
3.3 Dispense milk and milk foam
At the touch of a button, the WMF 1000 dispenses hot
milk and milk foam.
press short press and hold
1 cup milk Milk/milk foam on request
Milk/milk foam is dispensed as
long as the button is pressed.
Dispensing milk - milk lever down
Place an appropriate drinking vessel under the
all-in-one spout
Press the milk button once short
Put the milk lever in the milk position
Confirm the beverage selection with the milk button
Milk is dispensed.
Afterwards, press the milk lever upwards again
Confirm with the cP button
Another press of the milk button ends the dispensing
prematurely.
Dispensing milk foam - milk lever up
Place an appropriate drinking vessel under the
all-in-one spout
Press the milk button until the desired quantity has
been dispensed
1x cup milk
milk lever down
1x cup milk
milk lever down
- refrigerated milk:
transparent milk nozzle
- unrefrigerated milk:
grey milk nozzle
Dispense milk:
Milk lever down
Dispense milk foam:
Milk lever up
Set cup size
see Chapter 4 Settings
Table of contents
Other WMF Coffee Maker manuals
Popular Coffee Maker manuals by other brands

Gevalia
Gevalia WS-02AT Care and use instructions

SEGAFREDO
SEGAFREDO NEW SZ Operation and maintenance

Capresso
Capresso 425 Instructions & warranty

Cuisinart
Cuisinart Brew Central Thermal DCC-1400C Series Instruction book

Philips
Philips 2000 PURO/VAPORE Service manual

Bartscher
Bartscher Coffeeline G1/6L manual