WOOD'S POWR-GRIP
®
GUIDE TO MAINTENANCE,
TROUBLESHOOTING AND REPAIR
THE ORIGINAL
& TRUSTED NAME
IN VACUUM LIFTING
EQUIPMENT
Wood's Powr-Grip products are sold
through authorized dealers.
800.548.7341
WPG.com
908 West Main - P.O. Box 368
Laurel, Montana 59044 U.S.A.
406.628.8231 (phone)
406.628.8354 (fax)
Rev. 4.6/ 10-21 Metal Troubleshooter 1MTS
%DVHGRQSURGXFWLQIRUPDWLRQDWWLPHRISXEOLFDWLRQ(QYLURQPHQWDOFRQGLWLRQVFDQDႇHFWSURGXFWSHUIRUPDQFHDQGORQJHYLW\
consult the product instructions on www.WPG.com or contact a Technical Sales Representative for more information.
General Maintenance
Inspect the Hand Cup Regularly:
0DNHVXUHWKHDLU¿OWHULVLQSODFHLIQRWGLVFRQWLQXHXVHXQWLOWKH¿OWHULVUHSODFHG
([DPLQHWKHSOXQJHUDVVHPEO\DQGKDQGOHIRUGHQWVFUDFNVRURWKHUGDPDJH
0DNHVXUHWKHIDFHRIWKHYDFXXPSDGIHHOVJULSS\QRWVOLFN2WKHUZLVHUHSODFHWKHSDG
• Examine the vacuum pad for cuts or roughness on the sealing edges (see Inspect the Sealing Edges below).
3HULRGLFDOO\WHVWWKHFXSIRUH[FHVVLYHOHDNDJHVHH/HDN7HVWWKH+DQG&XSEHORZVOXJJLVKQHVV
in plunger action or radical changes in the number of strokes needed to keep the red line hidden.
,IWKHFXSGRHVQRWIXQFWLRQQRUPDOO\UHYLHZWKH7528%/(6+227,1**8,'(RYHUOHDIWR
determine which corrective action is needed.
Clean the Vacuum Pad:
5HPRYHWKHDLU¿OWHUIURPWKHSDGIDFH
8VHDFOHDQVSRQJHRUOLQWIUHHFORWKWRDSSO\VRDS\ZDWHURUDQRWKHUPLOGFOHDQVHUWRWKHSDGIDFH
• Never use solvents or rubber conditioners as a cleaning agentVHH:$51,1*6
• To prevent liquid from contaminating the pump during cleaning, hold the cup facedown
RUFRYHUWKHVXFWLRQLQOHWLQWKH¿OWHUUHFHVV
• If the pad has a felt strip at the edge, be careful not to dampen it.
:LSHDOOUHVLGXHIURPWKHSDGIDFHDQGDOORZWKHFXSWRGU\
5HLQVWDOOWKHDLU¿OWHU
Inspecting and Testing the Cup for Leakage
Inspect the Sealing Edges:
6ORZO\GUDZ\RXU¿QJHUDORQJWKHHQWLUHOHQJWKRIWKHVHDOLQJHGJHVWRFKHFNIRUURXJKQHVVRU
foreign material.
([DPLQHWKHVHDOLQJHGJHVIRUFXWVE\EHQGLQJWKHHGJHRIWKHSDGIDFHWRZDUGV\RXWRFUHDWH
DKXPSWXUQLQJWKHKDQGFXSDVQHFHVVDU\
• If cuts or cracks are present in a sealing edge, a V-shaped gap will appear.
$Q\SDGWKDWH[KLELWVDJDSRUH[FHVVLYHURXJKQHVVLQDVHDOLQJHGJHPXVWEHUHSODFHG
Leak-Test the Hand Cup:
$WWDFKWKHFXSWRDFOHDQVPRRWKVFUDWFKIUHHSLHFHRIJODVVRUPHWDOIRUDSSUR[LPDWHO\KRXUV
• The red line on the plunger serves as a vacuum indicator:
ƒ,IWKHUHGOLQHdoes not appear during the test period, the cup is usable.
ƒ,IWKHUHGOLQHdoes appear, perform general maintenance and repeat the test.
,IWKHSUREOHPSHUVLVWVFKHFNWKH7528%/(6+227,1**8,'(RYHUOHDIWRLGHQWLI\SRVVLEOH
causes and appropriate corrective actions.
• If these measures do not restore the cup to normal performance, contact the Wood's Powr-Grip
&XVWRPHU6HUYLFHGHSDUWPHQWRUDQDXWKRUL]HGGHDOHUIRUDVVLVWDQFH
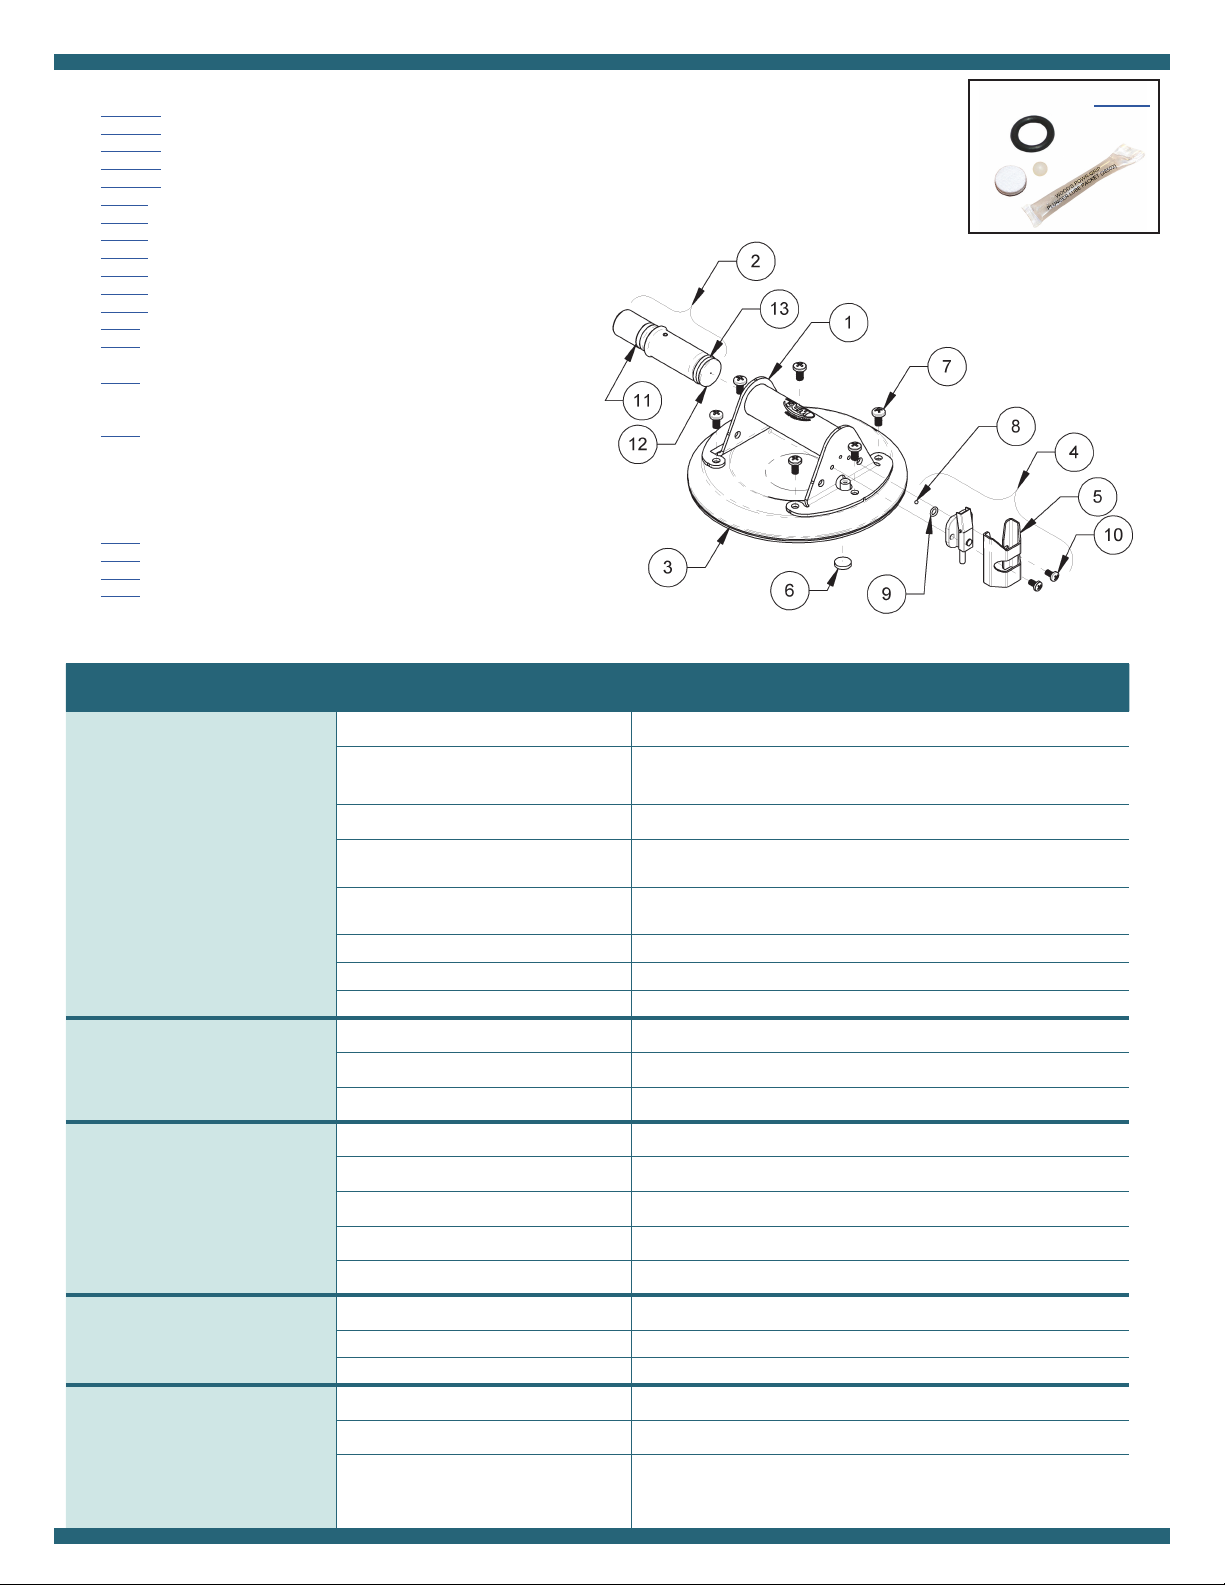
32620
N4950, N5450, N6450,
N4300*, N5300*, N6300*
N4950TS, N5450CS
Metal Handle Hand Cups
6RPHGHWDLOVPD\QRWDSSO\WRKDQG
cups with plastic plunger assemblies.