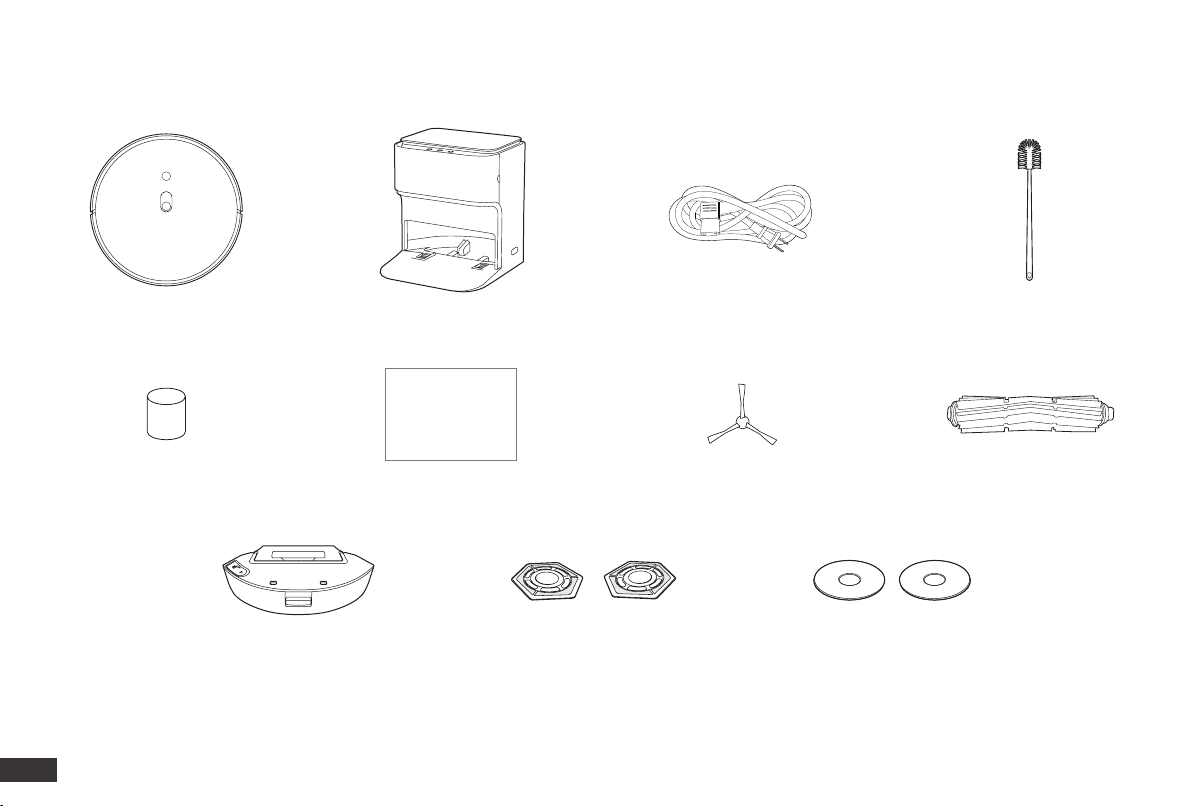
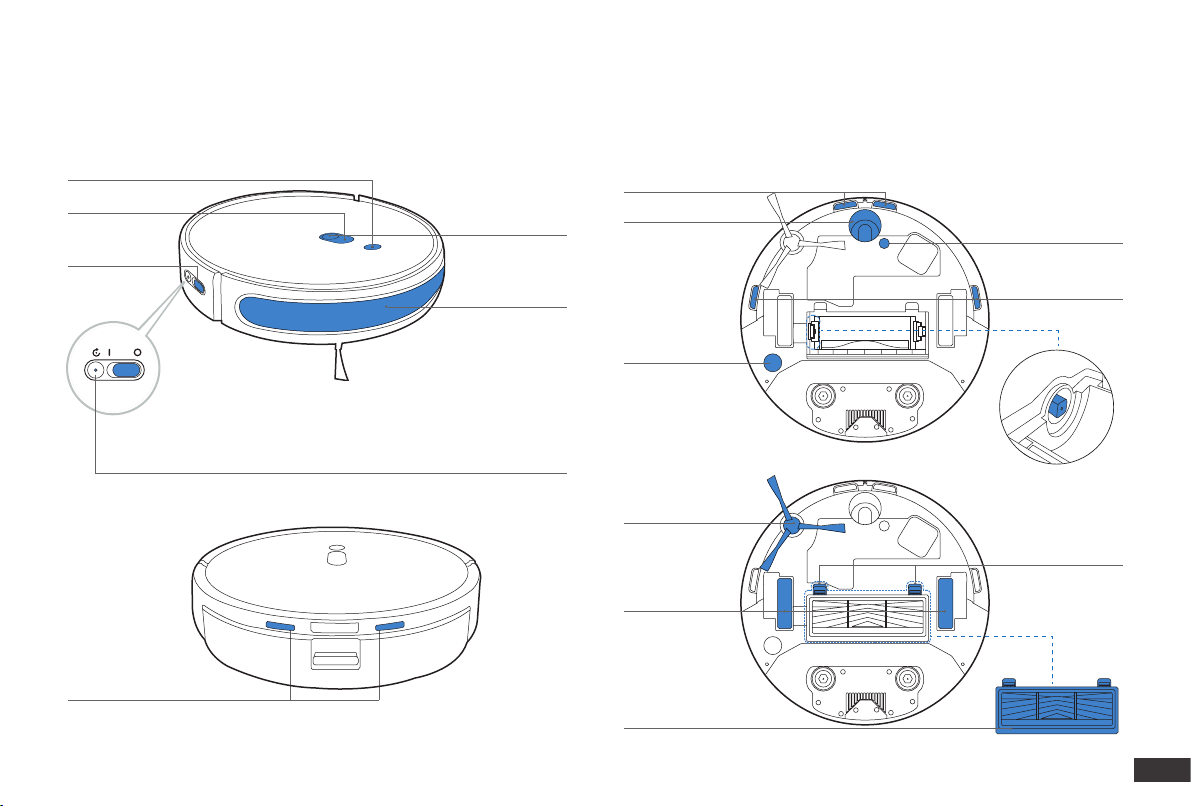
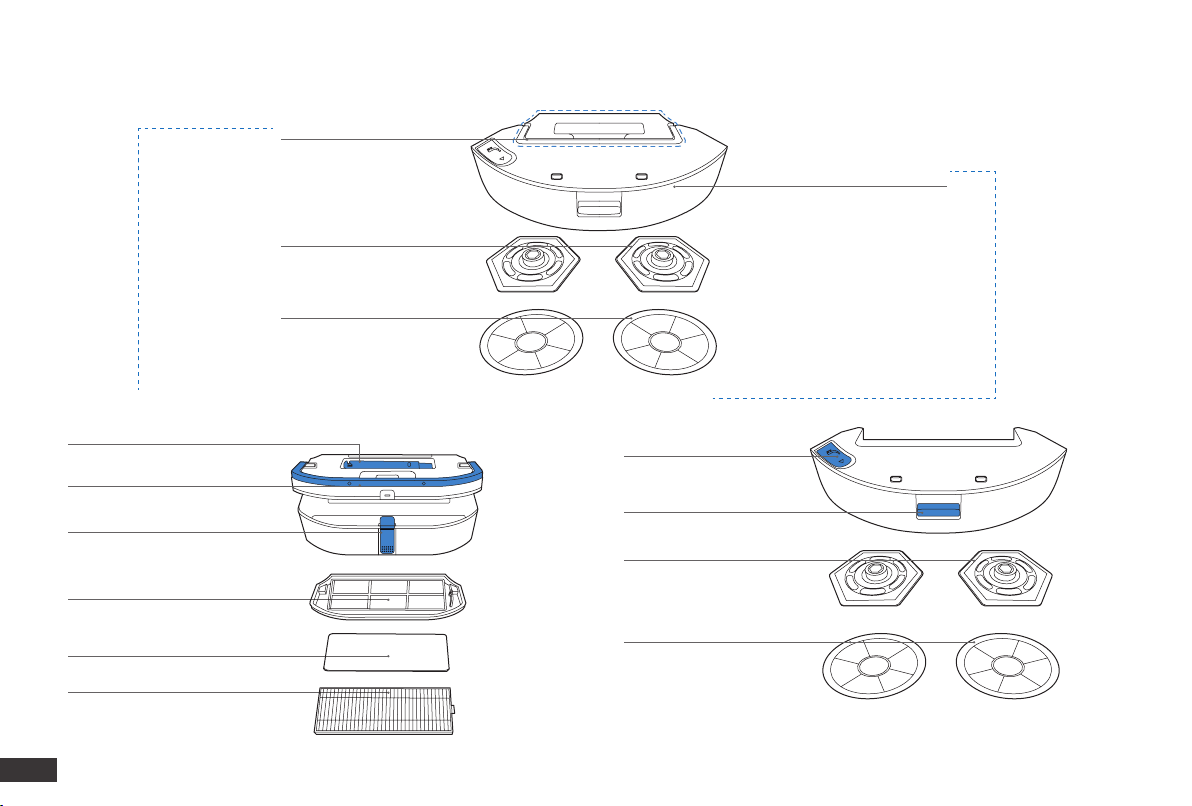
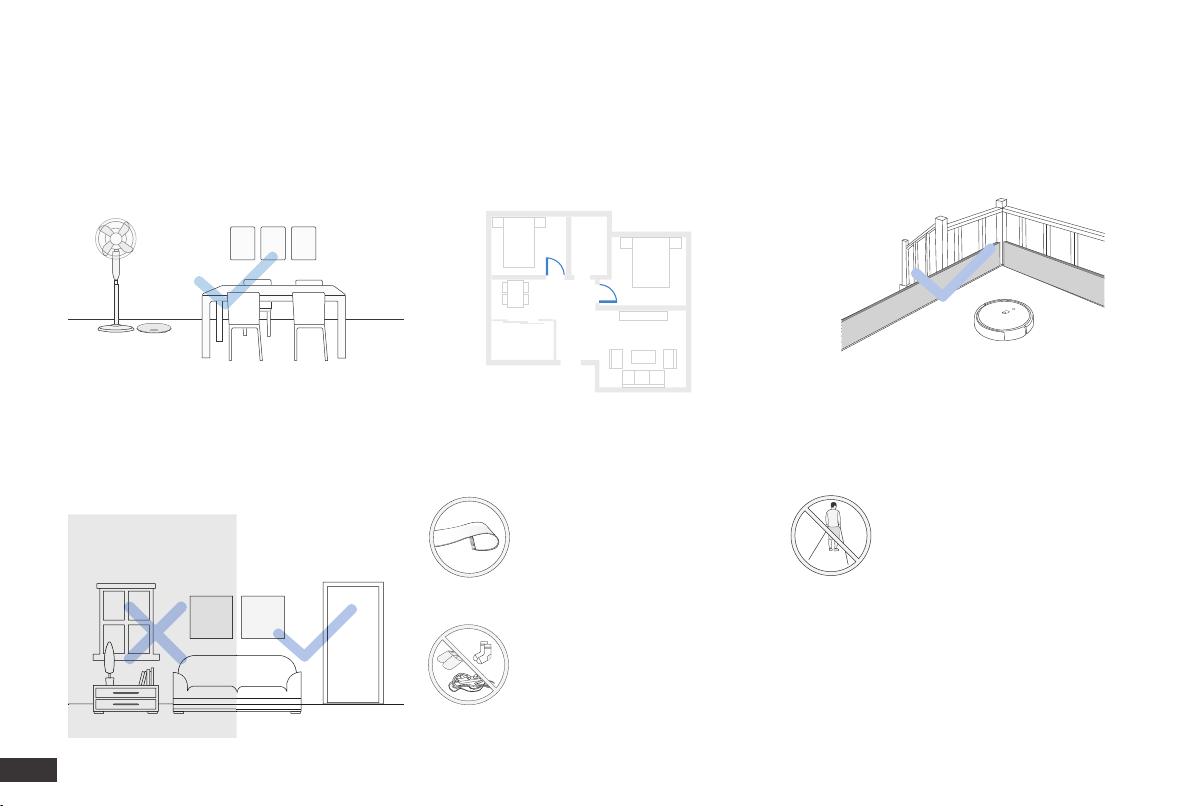
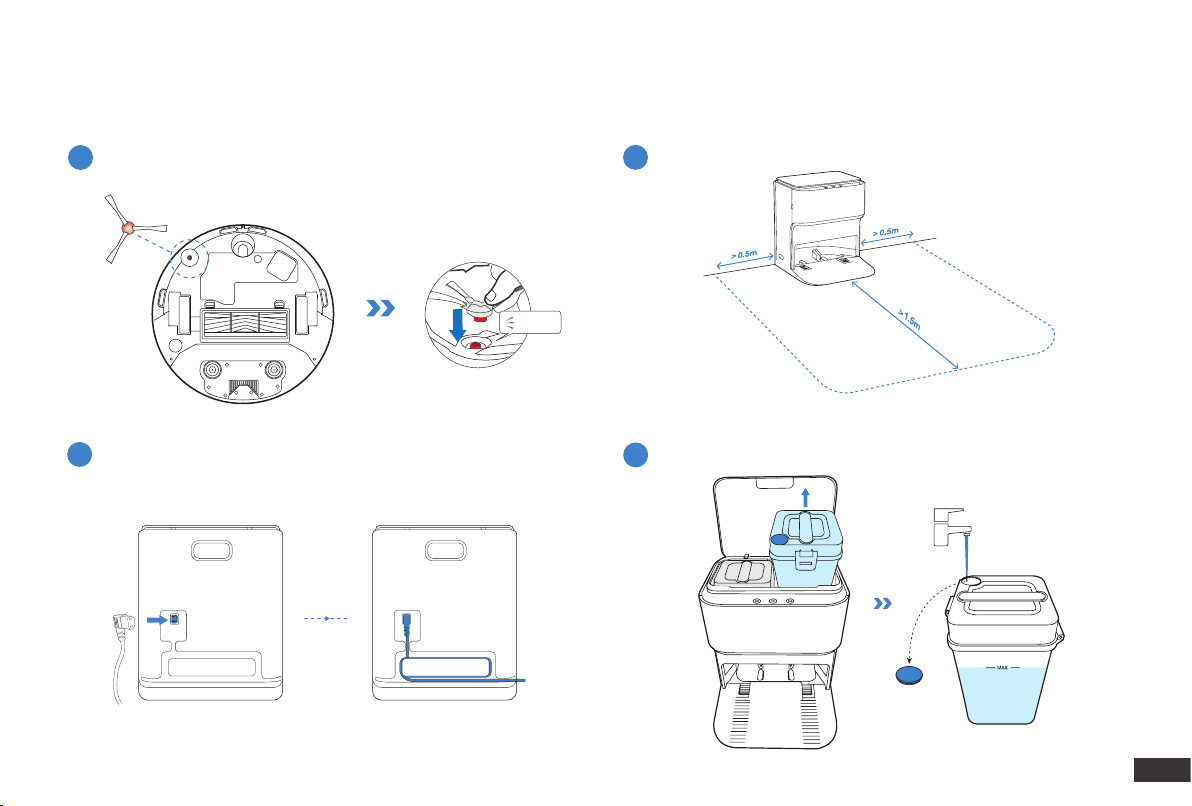
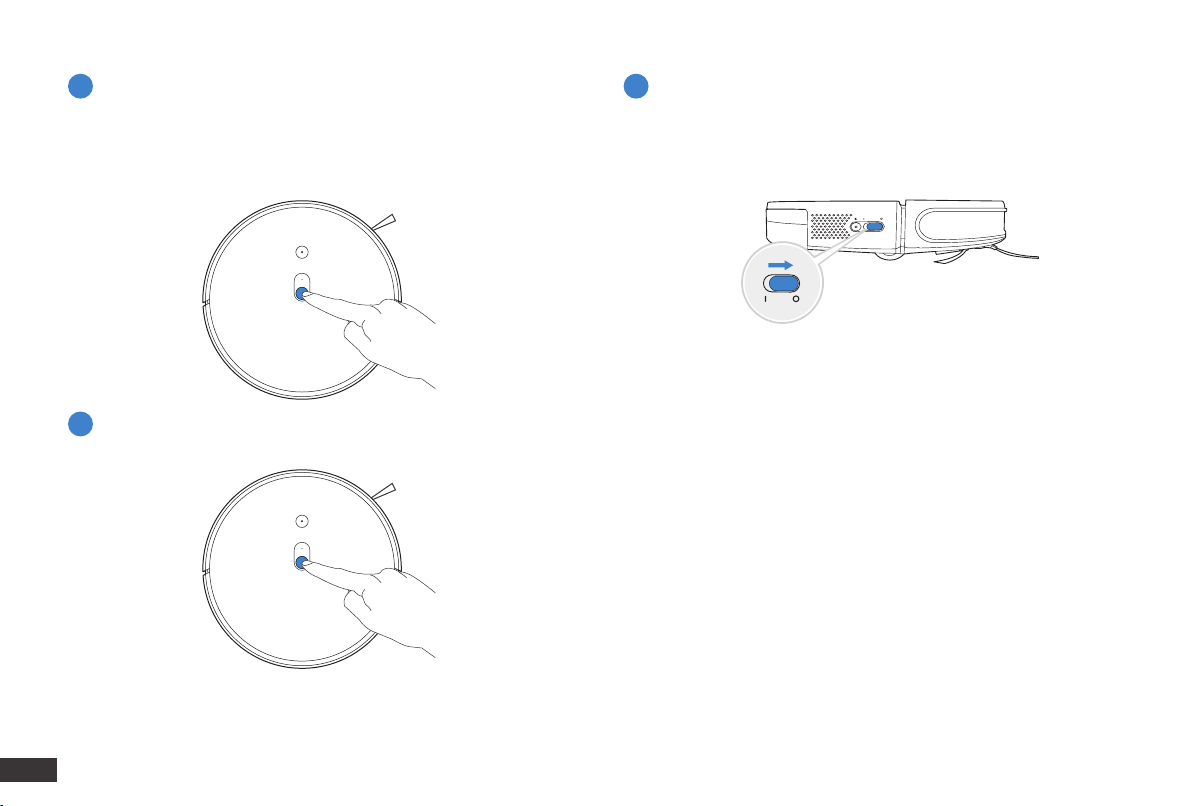
yeedi mop station User manual

yeedi mop station
INSTRUCTION MANUAL
GEBRAUCHSANWEISUNG
MANUAL DE INSTRUCCIONES
MANUEL D’INSTRUCTION
MANUALE DI ISTRUZIONI
РУКОВОДСТВО ПО ЭКСПЛУАТАЦИИ

8
EN
1. Package Contents/1.1 Package Contents
Robot
Dust Bin & Reservoir Mopping Pad Plates
(Pre-installed) Washable Mopping Pads
Instruction Manual Edge Brush Main Brush
(Pre-installed)
Self-cleaning Station Power Cords Cleaning Tool
Note: Figures and illustrations are for reference only and may differ from actual product appearance.
Product design and specications are subject to changes without notice.
Instruction Manual
Clean Water Bucket Filter
(Pre-installed)

9EN
Mapping Sensor Anti-drop Sensors
Universal Wheel
Main Brush
Edge Brush
Driving Wheels
Floor Tracking
Sensor
Anti-drop Sensors
Carpet Detection Sensor
Main Brush
Release Button
Shaft Sleeve
Wi-Fi Indicator
Power Switch
AUTO Mode Button
RESET Button
Anti-collision
Bumper
1. Package Contents/1.2 Product Diagram
Robot Bottom View
Charging Contacts

10
EN
Dust Bin ① Reservoir ②
Dust Bin ①
Reservoir②
Washable Mopping Pads
Mopping Pad Plates
Multi-function Cleaning Tool
Handle
Water Inlet
Release Button
Mopping Pad Plates
Washable Mopping Pads
Release Button
Filter Net
Sponge Filter
High-Efficiency Filter
Dust Bin & Reservoir

11 EN
Top Cover
Wastewater Bucket
Self-cleaning Button
Start/Pause Button
Cleaning Tool
Recall/Exit Button
Clean Water Bucket
Control Panel
Water Level Sensor
Self-cleaning Station
Water Inlet
Control Panel
Storage
Self-cleaning Station Pins

12
EN
2. Operating and Programming/2.1 Notes Before Cleaning
Tidy up the area to be cleaned by putting
furniture, such as chairs, in their proper place.
Make sure areas to be cleaned are well
illuminated so Mapping Sensor works
properly.
During the rst use, make sure each room door is
open to help Robot fully explore your house.
It may be necessary to place a physical
barrier at the edge of a drop to stop the
unit from falling over the edge.
Put away objects including wires,
cloths and slippers, etc. on the
oor to improve the cleaning
efciency.
Before using the product on a rug
with tasseled edges, please fold
the rug edges under.
Please do not stand in narrow
spaces, such as hallways, and
make sure not to block the
Detection Sensor.

13 EN
Assemble Self-cleaning Station
Self-cleaning Station Placement
Install Edge Brush
2
3
1
Before using Robot, please remove all protective films or protective strips on Robot and Self-cleaning Station.
2. Operating and Programming/2.2 Quick Start
Add Water to Clean Water Bucket
4
Click
Keep the area around the Station clear of objects and reective object
surfaces.

14
EN
6.5h
Power ON
Note: I = ON, O = OFF.
Robot cannot be charged when being powered OFF.
5
Charge Robot
6
2. Operating and Programming
/2.3 yeedi App
To enjoy all available features, it is recommended to control your
Robot via the yeedi App.
Before you start, make sure that:
• Your mobile phone is connected to a Wi-Fi network.
• The 2.4GHz band wireless signal is enabled on your router.
• The Wi-Fi indicator light on Robot is slowly ashing.
yeedi

15 EN
Wi-Fi Indicator Light
Tips:
If you have any problems during the Wi-Fi setup process, refer to the
Troubleshooting > Wi-Fi Connection section in this manual.
Please start mapping in Vacuum Mode to ensure efciency. Take off
the Mopping Pad Plates to switch to Vacuum Mode; Do not remove
the Reservoir.
Slowly flashing Disconnected to Wi-Fi or
waiting for Wi-Fi connection
Rapidly flashing Connecting to Wi-Fi
Solid Connected to Wi-Fi
2. Operating and Programming
/2.4 Operating Robot
OR
Start
1

16
EN
Pause Power OFF
Wake Up
2 4
3
Note: The robot’s Control Panel stops glowing after the robot is
paused for a few minutes. Press the AUTO Mode Button on Robot to
wake it up.
Note: When Robot is not working, it is recommended to keep it
switched ON and charging.

17 EN
2. Operating and Programming/2.5 Dust Bin & Reservoir
Note:
1. To prolong the service life of the reservoir, it is recommended to use puried water or softened water for the mopping system.
2. Empty the reservoir after Robot nishes mopping.
*Make sure the lid is tightened.
An untightened lid may cause water leakage.
Handle
1
2
2
1
5
3
4
Click
Add Water Install Dust Bin & Reservoir

18
EN
3s
2. Operating and Programming/2.6 Self-cleaning Station
Recall Robot/ Direct Robot to Exit
Self-cleaning Station
Start/Pause Robot
End Cleaning Task, Direct Robot
Back to Self-cleaning Station &
Start Cleaning Mopping Pads
3
1 2

19 EN
3. Maintenance/3.1 Regular Maintenance
To keep Robot running at peak performance, perform maintenance tasks and replace parts with the following frequencies:
Note: yeedi manufactures various replacement parts and ttings. Please contact Customer Service for more information on replacement parts.
Robot Part Maintenance Frequency Replacement Frequency
Washable Mopping Pads / Every 3 months
Edge Brush Once every 2 weeks Every 3-6 months
Main Brush Once per week Every 6-12 months
Sponge Filter/High Efciency Filter Once per week Every 3-6 months
Mapping Sensor
Universal Wheel
Anti-Drop Sensors
Bumper
Charging Contacts
Slef-cleaning Station Pins
Once per week /
Cleaning Tank Once every 2 weeks /
Clean Water Bucket Once every 3 weeks /
Wastewater Bucket After each use /
A multi-function Cleaning Tool is provided for easy maintenance. Handle with care, this cleaning tool has sharp edges.

20
EN
Before performing cleaning and maintenance tasks on Robot, turn the robot OFF and unplug Self-cleaning Station.
Note: After Robot nishes cleaning, empty the Reservoir.
Note:
1. Use the Self-cleaning Station to clean and dry the Washable Mopping
Pads. To extend the life of the Washable Mopping Pads, do not remove
them from the Mopping Pad Plates too often.
2. Rinse the Mopping Pad Plates with water. Do not use a cloth or any
other object to scrape the plates as this may shorten the life of its fastener.
3. Please replace the Washable Mopping Pads when yeedi APP prompts.
To purchase accessories, please visit https://us.yeedi.com.
3
4
1
2
3. Maintenance/3.2 Dust Bin & Reservoir
Reservoir
Handle

21 EN
1 4
2
5
3
Dust Bin
Note:
1. Please rinse the lter with water as shown above.
2. Do not use nger or brush to clean the lter.
3. Be sure to dry out the lter for at least 24 hours after washing.

22
EN
Add Water to Cleaning Tank
Clean Cleaning Tank
Drain the Water Out of Cleaning Tank
1
42
53
3. Maintenance/3.3 Self-cleaning Station
Clean the Clean Water Bucket Filter
Empty Wastewater Bucket

23 EN
1 1
2
2
3
3. Maintenance/3.4 Main Brush & Edge Brush
Main Brush Edge Brush
Note: If Shaft Sleeve of the Main Brush falls off, please clean up the
debris and reinstall it.

24
EN
*Please wipe the components with a clean, dry cloth.
3. Maintenance/3.5 Other Components
Note: Please be alert that Universal Wheel may result in oor damage
if it is clogged with hair and debris.
When the Universal Wheel cannot rotate even after cleaning it, please
stop any further use of the device and immediately contact customer
service for help.

25 EN
No. Scenario Possible Cause Solution
1
Robot is not able to
connect to the home
Wi-Fi network.
Incorrect home Wi-Fi username or password
entered. Enter the correct home Wi-Fi username and password.
Robot is not within range of your home Wi-Fi
signal. Make sure Robot is within range of your home Wi-Fi signal.
Network setup started before Robot was ready.
Turn ON Power Switch. Press the RESET Button for 3
seconds. Robot is ready for network setup when it plays a
musical tune and its Wi-Fi Indicator light flashes slowly.
Robot does not support 5 GHz Wi-Fi. Make sure the robot has been connected with 2.4 GHz Wi-
Fi network.
2 Robot is not charging.
Robot is not switched ON. Switch ON Robot.
Robot has not connected to the Docking Station. Be sure that the robot’s Charging Contacts have connected
to the Docking Station Pins.
The Docking Station is not connected to the
power supply.
Make sure the Docking Station is connected to the power
supply.
The battery is completely discharged. Please contact Customer Care for help.
3Robot cannot return to
the Docking Station.
The Docking Station is not correctly placed. Refer to Section 2.2 correctly place the Docking Station.
The Docking Station is not correctly connected. Make sure the Docking Station is correctly connected.
The Docking Station is manually moved during
the cleaning.
It is suggested not to move the Docking Station during the
cleaning.
Robot did not start cleaning from the Docking
Station. Make sure Robot starts cleaning from the Docking Station.
4. Troubleshooting/4.1 Troubleshooting

26
EN
No. Scenario Possible Cause Solution
4
Robot misses cleaning
spots to be cleaned,
or repeats cleaning the
area cleaned.
The cleaning cycle is interfered by small objects or
barriers on the floor.
Remove power cords and small objects from the floor
to ensure cleaning efficiency. Robot will automatically
clean the area missed, please avoid moving Robot
manually or block the path during the cleaning cycle.
Robot is working on slippery polished floors. Make sure the floor wax is dried before Robot starts
cleaning.
Robot is unable to reach certain areas blocked by
furniture or barriers.
Tidy up the area to be cleaned by putting furniture and
small objects in their proper place.
5Robot gets stuck while
working and stops.
Robot gets stuck while working and stops.
Robot will try various ways to free itself. If it is
unsuccessful, manually remove the obstacles and
restart.
Robot might be stuck under furniture with an
entrance of similar height. Please set a physical barrier.
6
Robot is making too
much noise when
cleaning.
Robot is tangled or blocked with debris.
Clean Robot as described in section Maintenance and
restart. If the trouble persists, please contact Customer
Care.
7Shaft Sleeve of the Main
Brush falls off.
Shaft Sleeve gets entangled by debris and falls off
during the cleaning. Please clean up the debris and reinstall it.
Other manuals for mop station
1
Table of contents
Other yeedi Vacuum Cleaner manuals

yeedi
yeedi Vac Max User manual

yeedi
yeedi Vac Max User manual

yeedi
yeedi vac 2 User manual

yeedi
yeedi mop station pro User manual

yeedi
yeedi K700 User manual

yeedi
yeedi yeedi vac 2 pro User manual

yeedi
yeedi cube User manual

yeedi
yeedi Vac Hybrid DVX34 User manual

yeedi
yeedi K781 User manual

yeedi
yeedi K651G User manual