Zelmer ZCM7255 User manual

ZCM7255
EKSPRES CIŚNIENIOWY DO KAWY
Экспресскофеварка
/ Expresso coffee maker
PL
EN
DE
CZ
SK
INSTRUKCJE UŻYTKOWANIA
Ekspres ciśnieniowy do kawy
USER MANUAL
Expresso coffee maker
BENUTZERHANDBUCH
Express kaffeemaschine
NÁVOD K POUŽITÍ
Espresso kávovar
NAVODILA ZA UPORABO
Espresso kávovar
HASZNÁLATI UTASÍTÁS
Expressz kávéfőzőgép
INSTRUCȚIUNI DE UTILIZARE
Mașină de cafea express
ИНСТРУКЦИЯ ПО ПРИМЕНЕНИЮ
Экспресскофеварка
ИНСТРУКЦИИ ЗА УПОТРЕБА
Експресна кафемашина
ІНСТРУКЦІЯ ПО ЗАСТОСУВАННЮ
Кавоварка еспресо
HU
RO
RU
UA
BG
ZCM7255

9
1
11
2
3
10
4
5
12
6
15
13
7
8
14
18
Fig. 1
16
17

DZIĘKUJEMY ZA WYBÓR MARKI ZELMER. MAMY NADZIEJĘ, ŻE PRODUKT SPEŁNI PAŃSTWA
OCZEKIWANIA.
OSTRZEŻENIE
Przed rozpoczęciem korzystania z produktu prosimy o uważne przeczytanie instrukcji obsługi i
przechowywanie jej w bezpiecznym miejscu, aby móc z niej skorzystać w przyszłości.
OPIS
1. Lampka kontrolna
2. Przycisk „jedna filiżanka”
3. Przycisk „dwie filiżanki”
4. Przycisk „On/Off” (Wł./wył.)
5. Przycisk ręcznego dozowania / gorącej wody
6. Przycisk pary
7. Wyjmowana tacka
8. Tacka ociekowa
9. Pokrywa zbiornika wody
10. Zbiornik wody
11. Pokrętło regulacji pary / gorącej wody
12. Dysza pary
13. Końcówka spieniająca
14. Miarka do kawy z tamperem
15. Kolba
16. Dociskacz (zabezpiecza metalowy filtr przed wypadnięciem podczas wylewania pozostałościkawy)
17. Metalowy lejek
18. Filtr ze stali nierdzewnej
INSTRUKCJE DOTYCZĄCE BEZPIECZEŃSTWA
Jeżeli przewód zasilania jest uszkodzony, dla
bezpieczeństwa musi zostać wymieniony przez
producenta, autoryzowany serwis lub odpowiednio
wykwalifikowaną osobę.
Urządzenie może być obsługiwane przez dzieci w
wieku od 8. roku życia pod warunkiem, że będą one
nadzorowane lub zostaną poinstruowane w zakresie
bezpiecznej obsługi urządzenia i będą rozumiały
zagrożenia związane z taką obsługą.
Nie należy dopuszczać, aby dzieci bawiły się
urządzeniem.
3
PL

Dzieci poniżej 8. roku życia nie mogą przeprowadzać
czynności czyszczenia ani konserwacji urządzenia bez
nadzoru. Urządzenie i jego przewód muszą się
znajdować w miejscu niedostępnym dla dzieci poniżej 8
roku życia.
Urządzenie może być obsługiwane przez osoby o
ograniczonej sprawności fizycznej, sensorycznej lub
psychicznej i osoby nieposiadające wystarczającego
doświadczenia oraz wiedzy pod warunkiem, że
będą one nadzorowane lub zostaną poinstruowane
w zakresie bezpiecznej obsługi urządzenia i będą
rozumiały zagrożenia związane z taką obsługą.
Urządzenie jest przeznaczone do użytku domowego.
Nie należy wykorzystywać go do takich zastosowań,
jak:
użytkowanie w pomieszczeniach kuchennych
przeznaczonych dla personelu sklepów, w biurach i
innych miejscach pracy;
użytkowanie w gospodarstwach rolnych;
użytkowanie przez klientów w pokojach hotelowych i
motelowych lub innych środowiskach mieszkalnych;
użytkowanie w pensjonatach oferujących nocleg z
wyżywieniem.
Urządzenie należy czyścić według wskazówek
znajdujących się w sekcji dotyczącej konserwacji
i czyszczenia.
Nigdy nie zanurzać urządzenia w wodzie ani innych
płynach.
Podczas parzenia kawy oraz po użyciu ekspresu
niektóre elementy urządzenia będą gorące.
Ostrzeżenie: nieprawidłowe użytkowanie może
skutkować obrażeniami ciała!
4
PL

WAŻNE OSTRZEŻENIA
Nieprawidłowe używanie lub niewłaściwa obsługa produktu powoduje unieważnienie gwarancji.
Przed podłączeniem urządzenia do sieci należy sprawdzić, czy napięcie zasilania jest takie samo, jak
wskazane na tabliczce znamionowej urządzenia.
W trakcie korzystania z urządzenia przewód zasilający nie może być zaplątany ani owinięty wokół
urządzenia. Nie używaj, nie podłączaj ani nie odłączaj urządzenia od sieci, mając mokre dłonie lub
stopy.
Nie ciągnij za przewód zasilający w celu odłączenia urządzenia. Nie używaj przewodu do wieszania
urządzenia.
Nigdy nie włączaj ekspresu bez uprzedniego napełnienia go wodą.
W przypadku jakiejkolwiek awarii lub uszkodzenia należy natychmiast odłączyć urządzenie
od sieci i skontaktować się z oficjalnym działem wsparcia technicznego.
Aby zapobiec jakiemukolwiek niebezpieczeństwu, nie należy otwierać obudowy urządzenia. Naprawy
lub procedury dotyczące urządzenia może wykonywać tylko wykwalifikowany personel z
autoryzowanego serwisu marki.
Firma Eurogama Sp. z o.o. zrzeka się wszelkiej odpowiedzialności za szkody poniesione przez ludzi,
zwierzęta lub przedmioty z powodu niestosowania się do ostrzeżeń.
UŻYTKOWANIE
Przed użyciem
Upewnij się, że wszystkie elementy opakowania zostały usunięte.
Przed pierwszym zaparzeniem kawy zalecamy dwukrotne użycie ekspresu z samą wodą w celu
wyczyszczenia układu.
Napełnianie wodą
Przed włączeniem urządzenia należy napełnić zbiornik (10) wodą.
Wyjmij zbiornik, otwórz pokrywę (9) i wlej wodę. Nigdy nie napełniaj zbiornika powyżej oznaczenia
„MAX”.
Zamknij pokrywę.
Poprawnie zainstaluj zbiornik w ekspresie.
Wstępne rozgrzewanie
Aby otrzymać wyśmienite espresso, warto rozgrzać urządzenie przed rozpoczęciem parzenia, tak aby
niska temperatura elementów nie zmieniła smaku kawy — dotyczy to również lejka, filtra i filiżanki.
Wybierz filtr przeznaczony do parzenia jednej filiżanki lub dwóch filiżanek (18) i włóż go (bez
wsypywania kawy) do metalowego lejka (17).
Pociągnij dociskacz (16) do tyłu i upewnij się, że położenie lejka jest wyrównane z rowkiem wylotu wody.
Następnie włóż lejek do wylotu wody w pozycji „mocowania” i zablokuj, obracając w kierunku przeciwnym
do ruchu wskazówek zegara, aż znajdzie się w pozycji „zablokowania” (rys. 1).
Postaw filiżankę na wyjmowanej półce (7).
Upewnij się, że pokrętło regulacji (11) znajduje się w położeniu „OFF”.
Podłącz urządzenie do źródła zasilania.
Naciśnij przycisk „On/Off” (Wł./wył.) (4), aby uruchomić ekspres.
Kontrolka (1) będzie migała niebieskim światłem przez ok. 2 minuty. Po tym czasie kontrolka przestanie
migać i będzie świeciła światłem ciągłym. Cykl rozgrzewania jest zakończony.
Naciśnij przycisk „ręcznego dozowania” (5), żeby uruchomić pompę. Przez lejek do filiżanki zacznie
wypływać woda.
Kiedy elementy urządzenia będą już rozgrzane, należy ponownie nacisnąć przycisk „ręcznego
dozowania” (5), żeby przerwać przepływ wody.
5
PL

Parzenie espresso
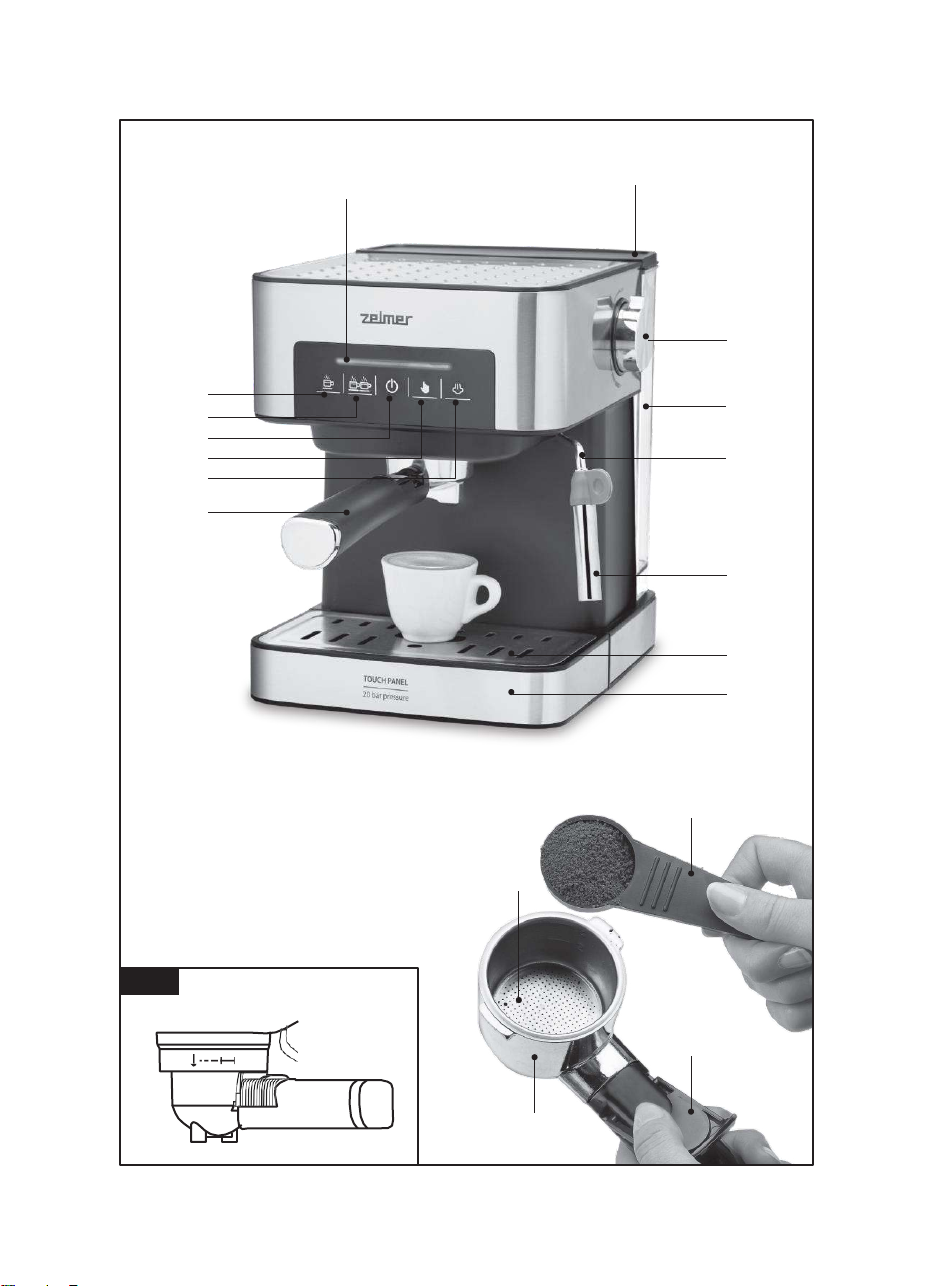
Wyjmij lejek (17) przez obrócenie go w kierunku zgodnym z ruchem wskazówek zegara.
Za pomocą miarki(14) wsyp dostalowegofiltra(18)mieloną kawę. Mocnoubijkawę tamperem (14).
Łyżka mielonej kawy wystarczy do przyrządzenia jednej filiżanki.
Pociągnij dociskacz (16) do tyłu i włóż do metalowego lejka (17) stalowy filtr (18) przeznaczony
do przygotowywania jednej filiżanki lub dwóch filiżanek.
Upewnijsię, że położenie lejka jest wyrównane z rowkiem wylotu wody. Włóż lejek dowylotu wody w
pozycji „mocowania” i zablokuj, obracając w kierunku przeciwnym do ruchu wskazówek zegara, aż
znajdzie się w pozycji „zablokowania” (rys.1).
Postaw filiżankę na wyjmowanej półce (7).
Naciśnij przycisk „jedna filiżanka” (2), aby otrzymać filiżankę kawy (ok. 60 ml). Kiedy kawa będzie
gotowa,rozlegną się 4sygnały dźwiękowe, aprzepływ napojuzostanieautomatyczniezatrzymany.
Ewentualnie:
Naciśnij przycisk „dwie filiżanki” (3), żeby otrzymać dwiefiliżanki kawy(ok. 100 ml). Kiedykawa będzie
gotowa, rozlegną się 4sygnały dźwiękowe, aprzepływ napoju zostanieautomatycznie zatrzymany.
Ewentualnie:
Naciśnij przycisk „ręcznego dozowania” (5), żeby otrzymać oczekiwaną ilość kawy. Aby zatrzymać
przepływnapoju,należy ponownienacisnąć przycisk„ręcznego dozowania”. Ostrzeżenie: Wprzypadku
korzystania ztryburęcznego nie należy zostawiać ekspresu beznadzoru podczas parzeniakawy.
Pozakończeniu parzeniakawynależy wyjąć metalowylejekprzezobróceniegowkierunkuzgodnym
z ruchem wskazówek zegara i wylać pozostałości kawy, przytrzymując stalowy filtr dociskaczem.
Zaczekaj do całkowitego wystygnięcia elementów i wypłucz je pod bieżącą wodą.
Spienianie mleka / przyrządzanie cappuccino
Żeby otrzymać cappuccino, należy wlać do filiżanki z espresso porcję spienionego mleka.
W pierwszej kolejności należy zaparzyć espresso zgodnie z instrukcjami zamieszczonymi w części
„PARZENIE ESPRESSO”.
Napełnij naczynie ok. 100 g mleka na jedną porcję przyrządzanego cappuccino. Zaleca się stosowanie
mleka pełnego, schłodzonego lub w temperaturze pokojowej (nie gorącego!).
Uwaga: średnica naczynia powinna wynosić przynajmniej 70±5 mm. Należy pamiętać, że mleko
zwiększy objętość dwukrotnie, dlatego wysokość naczynia również powinna być odpowiednia.
Upewnij się, że pokrętło regulacji (11) znajduje się w położeniu „OFF”.
Naciśnij przycisk funkcji pary (6). Kontrolka (1) będzie migała na czerwono, a następnie zacznie
świecić światłem ciągłym.
Włóż końcówkę spieniającą do mleka na głębokość ok. 2 cm i spień mleko, poruszając naczyniem od
góry do dołu oraz wykonując nim ruchy okrężne.
Powoli obrócić pokrętło regulacji (11) w kierunku przeciwnym do ruchu wskazówek zegara. Z końcówki
spieniającej zacznie wydobywać się para (13).
Uwaga: Nigdy nie obracaj pokrętła gwałtownie, ponieważ spowoduje to nagłe nagromadzenie pary, co
grozi rozlaniem napoju.
Po skończeniu spieniania obróć pokrętło regulacji (11) do pozycji „OFF”.
Uwaga: Wyczyść końcówkę spieniającą (13) za pomocą mokrej gąbki natychmiast po skończeniu
wytwarzania pary. Należy przy tym uważać, żeby się nie poparzyć!
Wlej spienione mleko do zaparzonego espresso. Cappuccino jest gotowe. Napój można teraz posłodzić
oraz posypać odrobiną kakao.
Naciśnij przycisk „On/Off” (Wł./wył.) (4), aby wyłączyć ekspres.
Uwaga: przed ponownym zaparzeniem kawy zalecamy odczekanie około 5 minut, aż ekspres
wystygnie.
W przeciwnym razie espresso może nabrać zapachu spalenizny.
Gorąca woda
Dysza pary (12) bez założonej końcówki spieniającej (13) może być używana do przyrządzania
gorących napojów, takich jak czekolada, gorąca woda czy herbata.
Zdejmij końcówkę spieniającą (13) z dyszy pary (12).
6
PL

Upewnij się, że pokrętło regulacji (11) znajduje się w położeniu „OFF”.
Naciśnij przycisk „On/Off” (Wł./wył.) (4), aby uruchomić ekspres.
Naciśnij przycisk gorącej wody (5). Kontrolka (1) zacznie świecić czerwonym światłem.
Zaczekaj na zagotowanie wody. Kiedy urządzenie będzie gotowe, kontrolka przestanie migać i zacznie
świecić światłem ciągłym.
Włóż dyszę (12) do filiżanki.
Powoli obróć pokrętło regulacji (11) w kierunku przeciwnym do ruchu wskazówek zegara. Z dyszy
zacznie wypływać gorąca woda.
Po otrzymaniu żądanej ilości wody obróć pokrętło regulacji (11) do pozycji „OFF”.
Naciśnij przycisk „On/Off” (Wł./wył.) (4), aby wyłączyć ekspres.
Wytwarzanie pary w celu podgrzewania płynów
Upewnij się, że pokrętło regulacji (11) znajduje się w położeniu „OFF”.
Naciśnij przycisk „On/Off” (Wł./wył.) (4), aby uruchomić ekspres.
Naciśnij przycisk funkcji pary (6). Kontrolka (1) zacznie świecić czerwonym światłem.
Zaczekaj na zagotowanie wody. Kiedy urządzenie będzie gotowe, kontrolka przestanie migać i zacznie
świecić światłem ciągłym.
Włóż dyszę (12) do podgrzewanego płynu.
Powoli obróć pokrętło regulacji (11) w kierunku przeciwnym do ruchu wskazówek zegara. Z dyszy
zacznie wydobywać się para.
Po osiągnięciu żądanej temperatury obróć pokrętło regulacji (11) do pozycji „OFF”.
Naciśnij przycisk „On/Off” (Wł./wył.) (4), aby wyłączyć ekspres.
KONSERWACJA I CZYSZCZENIE
Przed rozpoczęciem czyszczenia należy wyjąć wtyczkę przewodu z gniazda sieciowego.
Jeśli ekspres jest mokry, należy przetrzeć zewnętrzne powierzchnie miękką i suchą ściereczką. Nigdy
nie używaj past do polerowania metalu.
Elementy zdejmowane należy umyć w gorącej wodzie z detergentem. Przed ponownym założeniem
należy je wypłukać.
Wyjmij metalowy lejek przez obracanie go w kierunku przeciwnym do ruchu wskazówek zegara, żeby
usunąć pozostałości kawy. Następnie należy go umyć środkiem czyszczącym lub przynajmniej czystą
wodą.
Nigdy nie czyść żadnych elementów urządzenia w zmywarkach do naczyń.
Postaw ekspres w suchym miejscu, w umiarkowanej temperaturze.
UTYLIZACJA
To urządzenie jest oznaczone zgodnie z Dyrektywą Europejską 2012/19/UE
oraz polską Ustawa z dnia 11 września 2015 r. „O zużytym sprzęcie elektrycznym
i elektronicznym” (Dz.U. z dn. 23.10.2015 poz. 11688) symbolem
przekreślonego kontenera na odpady.
Takie oznakowanie informuje, że sprzęt ten, po okresie jego użytkowania nie może być
umieszczany łącznie z innymi odpadami pochodzącymi z gospodarstwa domowego.
Użytkownik jest zobowiązany do oddania go prowadzącym zbieranie zużytego sprzętu elektrycznego
i elektronicznego. Prowadzący zbieranie, w tym lokalne punkty zbiórki, sklepy oraz gminne jednostki,
tworzą odpowiedni system umożliwiający oddanie tego sprzętu.
Właściwe postępowanie ze zużytym sprzętem elektrycznym i elektronicznym przyczynia się do
uniknięcia szkodliwych dla zdrowia ludzi i środowiska naturalnego konsekwencji, wynikających z
obecności składników niebezpiecznych oraz niewłaściwego składowania i przetwarzania takiego
sprzętu.
Mamy nadzieję, że produkt przyniesie Państwu wiele satysfakcji.
7
PL

WE WOULD LIKE TO THANK YOU FOR CHOOSING ZELMER. WE WISH THE PRODUCT
PERFORMS TO YOUR SATISFACTION AND PLEASURE.
WARNING
Please read the instructions for use carefully prior to using the product. store these in a safe place for
future reference.
DESCRIPTION
1. Indicator light
2. “Single cup” button
3. “Double cup” button
4. “On/Off” button
5. “Manual cup / hot water” button
6. “Steam” button
7. Removable shelf
8. Drip tray
9. Water tank cover
10. Water tank
11. “Steam / hot water” control knob
12. Steam wand
13. Frothing nozzle
14. Measuring spoon and tamper
15. Funnel handle
16. Press bar (press steel mesh with it when pour coffee residue to avoid its slipping out)
17. Metal funnel
18. Stainless steel mesh
SAFETY INSTRUCTIONS
If the supply cord is damaged it must be replaced by
the manufacturer, its service agent or similarly qualified
persons in order to avoid a hazard.
This appliance can be used by children aged from 8
years and above if they have been given supervision
or instruction concerning use of the appliance in a safe
way and if they understand the hazards involved.
Children shall not play with the appliance.
Cleaning and user maintenance shall not be made by
children unless they are older than 8 and supervised.
8
EN

Keep the appliance and its cord out of reach of children
aged less than 8 years.
Appliances can be used by persons with reduced
physical, sensory or mental capabilities or lack of
experience and knowledge if they have been given
supervision or instruction concerning use of the
appliance in a safe way and understand the hazards
involved.
This appliance is intended to be used in household. It is
not intended to be used in applications such as:
staff kitchen areas in shops, offices and other working
environments;
farm houses;
by clients in hotels, motels and other residential type
environments;
Bed and breakfast type environments.
Proceed according to maintenance and cleaning
section of this manual for cleaning.
Never immerse the appliance in water or any other
liquid.
During brewing and after use due to residual heat some
parts of the machine are hot.
Warning: potential injury from misuse!
IMPORTANT WARNINGS
Any incorrect use or improper handling of the product shall render the warranty null and void.
Prior to plugging in the product, check that your mains voltage is the same as the one indicated on the
product label.
The mains connection cable must not be tangled or wrapped around the product during use. Do not use
the device, or connect and disconnect to the supply mains with the hands and / or feet wet.
Do not pull on the connection cord in order to unplug it or use it as a handle.
Never use your coffee machine without water in it.
9
EN

Unplug the product immediately from the mains in the event of any breakdown or damage and contact
an official technical support service.
In order to prevent any risk of danger, do not open the device. Only qualified technical personnel from
the brand´s Official technical support service may carry out repairs or procedures on the device.
Eurogama Sp. z o.o. disclaims all liability for damages that may occur to people, animals or objects, for
the non-observance of these warnings
INSTRUCTIONS FOR USE
Before use
Make sure that all the product’s packaging has been removed.
Before making coffee for the first time, we recommend using the coffee maker twice with water only, in
order to clean the system.
Filling with water
The water tank (10) must be filled with water before turning the appliance on.
Remove the detachable tank, open its cover (9) and fill the tank. Never fill beyond the level “MAX”.
Close the cover.
Replace the tank into the appliance properly.
Pre-heating
To make a cup of good hot espresso coffee, we recommend you preheating the appliance before making
coffee, including the funnel, mesh and cup, so that the coffee flavor cannot be influenced by the cold
parts.
Select the one cup or two cup mesh (18) and place it (without adding coffee) into the metal funnel (17).
Pull the press bar (16) backward and make sure that the funnel aligns with the groove in the water
outlet. Then insert the funnel into the water outlet from the “Insert” position and fix it firmly by turning it
counterclockwise until it is at the “lock” position (Fig.1).
Place a cup on the removable shelf (7).
Make sure that the control knob (11) is at the “OFF” position.
Connect the appliance to the power supply.
Press the “on/off” button (4) to switch the appliance on.
The indicator light (1) will flash in blue color for approximately 2 minutes. After this time, the indicator
light will stop flashing and will remain lit permanently. The warm-up cycle is completed.
Press the “manual cup” button (5) to make the pump work. Hot water will flow out through the funnel to
the cup.
After a time, when you consider that the parts are already pre-heated, press the “manual cup” button (5)
again to stop the water flow.
Make expresso coffee
Remove the funnel (17) by turning it in clockwise.
Add ground coffee to the steel mesh (18) with the measuring spoon (14). Then press the grounded
coffee tightly with the tamper (14). A spoon of grounded coffee can make about a cup of top-grade
coffee.
Pull the press bar (16) backwards and place the corresponding steel mesh (18) for one or two cups into
the metal funnel (17).
Make sure that the funnel aligns with the groove in the water outlet. Insert the funnel into the water outlet
from the “Insert” position and fix it firmly by turning it counterclockwise until it is at the “lock” position
(Fig.1).
10
EN

Place a cup on the removable shelf (7).
Press the “single cup” button (2) to prepare a cup of coffee (60ml approximately). When the coffee is
ready, 4 beeps will be heard, and coffee flow will stop automatically.
or
Press the “double cup” button (3) to prepare two cups of coffee (100 ml approximately). When the coffee
is ready, 4 beeps will be heard, and coffee flow will stop automatically.
or
Press the “manual cup” button (5) to prepare coffee as needed. To stop the coffee flow, press “manual
cup” button again. Warning: Do not leave the coffee maker unattended during making coffee while
operating manually.
After finishing making the coffee, take the metal funnel out by turning it clockwise, and then pour the
coffee residue out with the steel mesh pressed by the press bar. Let them cool down completely, then
rinse under running water.
Frothing milk/ making cappuccino
You get a cup of cappuccino when you top up a cup of espresso with frothing milk.
Prepare espresso first with according to the “MAKE ESPRESSO COFFEE” section.
Fill a jug with about 100 grams of milk for each cappuccino to be prepared. You are recommended to
use whole milk at refrigerator or room temperature (not hot!).
Note: it is recommended that the diameter of the jug is not less than 70±5mm, and bear in mind that the
milk increases in volume by 2 times, make sure the height of jug is enough.
Make sure that the control knob (11) is at the “OFF” position.
Press the steam button (6). The indicator light (1) will flash in red color until it remains lit permanently.
Insert the frothing nozzle into the milk about two centimeters, froth milk in the way moving vessel round
from up to down.
Turn the control knob (11) slowly counterclockwise. Steam will come out from the frothing nozzle (13).
Note: Never turn the control knob rapidly, as the steam will accumulate rapidly in short time which may
increase the potential of the risk of spillage.
When the frothing operation is finished, turn the control knob (11) to the “OFF” position.
Note: Clean the frothing nozzle (13) with a wet sponge immediately after steam stops generating, but
care not to hurt!
Pour the frothed milk into the espresso prepared. Now the cappuccino is ready. Sweeten to taste and if
desired, sprinkle the froth with a little cocoa powder.
Press the “on/off” button (4) to switch the appliance off.
Note: we recommend to allow the coffee maker to cool down at least for 5 min before making coffee
again.
Otherwise burnt odor may occur in your espresso coffee.
Producing hot water
The steam wand (12) without the frothing nozzle (13) can be used to make hot beverages like drinking
chocolate, water or tea.
Remove the frothing nozzle (13) from the steam wand (12).
Make sure that the control knob (11) is at the “OFF” position.
Press the “on/off” button (4) to switch the appliance on.
Press the “hot water” button (5). The indicator light (1) will be illuminated in red.
Wait for the heating time, the indicator light will stop flashing and will remain lit permanently when the
appliance is ready.
Dip the wand (12) into the cup.
Turn the control knob (11) slowly counterclockwise. Hot water will come out from the wand.
11
EN

When the required quantity is reached, turn the control knob (11) to the “OFF” position.
Press the “on/off” button (4) to switch the appliance off.
Producing steam to heat liquids
Make sure that the control knob (11) is at the “OFF” position.
Press the “on/off” button (4) to switch the appliance on.
Press the steam button (6). The indicator light (1) will be illuminated in red.
Wait for the heating time, the indicator light will stop flashing and will remain lit permanently when the
appliance is ready.
Dip the wand (12) into the liquid to be heated.
Turn the control knob (11) slowly counterclockwise. Steam will come out from the wand.
When the desired temperature is reached, turn the control knob (11) to the “OFF” position.
Press the “on/off” button (4) to switch the appliance off.
MANITENANCE AND CLEANING
Do not forget to remove the plug from the socket before cleaning the appliance.
Wipe outside with soft dry cloth when coffee machine is wet, never use metal polish.
The removable items should be washed in hot soapy water. Rinse them beforefixing.
Detach the metal funnel through turn it anticlockwise, get rid of coffee residue inside, then you can clean
it with cleanser, but at last you must rinse with clear water.
Never use a dishwasher to clean any parts from the machine.
Put the coffee maker in a dry and not very hot place.
PRODUCT DISPOSAL
This product complies with European Directive 2012/19/EU on electrical and electronic
devices, known as WEEE (Waste Electrical and Electronic Equipment), provides the legal
framework applicable in the European Union for the disposal and reuse of waste electronic
and electrical devices. Do not dispose of this product in the bin, instead going to the
electrical and electronic waste collection centre closest to your home.
We hope that you will be satisfied with this product.
12
EN

WIR DANKEN IHNEN, DASS SIE SICH FÜR ZELMER ENTSCHIEDEN HABEN. WIR HOFFEN, DASS
DAS PRODUKT ZU IHRER ZUFRIEDENHEIT FUNKTIONIERT.
WARNUNG
Bitte lesen Sie sich die Gebrauchsanweisung vor der Verwendung des Produkts aufmerksam durch.
Bewahren Sie diese für spätere Einsichtnahme an einem sicheren Ort auf.
BESCHREIBUNG
1. Kontrollleuchte
2. „Einzelne Tasse“-Taste
3. „Doppelte Tasse“-Taste
4. „On/Off“-Taste
5. „Manuelle Tasse/Heißwasser“-Taste
6. „Dampf“-Taste
7. AbnehmbareAblage
8. Abtropfschale
9. Abdeckung des Wassertanks
10. Wassertank
11. „Dampf-/Heißwasser-“Knopf
12. Dampfstab
13. Schaumdüse
14. Messlöffel und Stampfer
15. Trichtergriff
16. Pressstange (beim Gießen von Kaffeerückständen den Stahleinsatz drücken, um ein
Herausrutschen zu vermeiden)
17. Metalltrichter
18. Edelstahleinsatz
SICHERHEITSHINWEISE
Bei Beschädigung des Netzkabels muss dieses
vom Hersteller, seinem Servicepartner oder ähnlich
qualifizierten Personen ausgetauscht werden, um eine
Gefährdung zu vermeiden.
Dieses Gerät kann von Kindern ab 8 Jahren benutzt
werden, wenn sie beaufsichtigt werden oder in den
sicheren Gebrauch des Gerätes eingewiesen wurden
und die damit verbundenen Gefahren verstehen.
Kinder dürfen nicht mit dem Gerät spielen.
13
DE

Die Reinigung und Wartung durch den Benutzer dürfen
nur von Kindern vorgenommen werden, die älter als 8
Jahre sind und beaufsichtigt werden. Bewahren Sie das
Gerät und sein Kabel außerhalb der Reichweite von
Kindern unter 8 Jahren auf.
Geräte können von Personen mit eingeschränkten
körperlichen, sensorischen oder geistigen Fähigkeiten
oder mangelnden Erfahrungen und Kenntnissen benutzt
werden, wenn sie beaufsichtigt werden oder in den
sicheren Gebrauch des Gerätes eingewiesen wurden
und die damit verbundenen Gefahren verstehen.
Dieses Gerät ist für den häuslichen Gebrauch bestimmt.
Es ist nicht dafür geeignet, in folgenden Anwendungen
eingesetzt zu werden:
Küchenbereiche des Personals in Geschäften, Büros
und andere Arbeitsumgebungen;
Bauernhäuser;
von Kunden in Hotels, Motels und anderen
Wohngebieten;
Umgebungen wie Bed and Breakfast.
Verfahren Sie bei der Reinigung entsprechend des
Abschnitts bezüglich Wartung und Reinigung in diesem
Handbuch.
Tauchen Sie das Gerät nie in Wasser oder andere
Flüssigkeiten.
Während des Brühens und nach Anwendung sind
manche Teile der Maschine aufgrund der Restwärme
heiß.
Warnung: Mögliche Verletzungen aufgrund von
Missbrauch!
14
DE

WICHTIGE WARNHINWEISE
Jede unsachgemäße Verwendung oder unsachgemäße Handhabung des Produkts führt zum Erlöschen
der Garantie.
Überprüfen Sie vor dem Anschluss des Geräts, ob Ihre Netzspannung mit der auf dem Typenschild
angegebenen übereinstimmt.
Das Netzanschlusskabel darf während der Verwendung nicht verwickelt oder um das Produkt gewickelt
werden. Bei nassen Händen und/oder Füßen benutzen Sie das Gerät nicht, schließen Sie es nicht an
das Stromnetz an und trennen Sie es nicht vom Stromnetz.
Ziehen Sie nicht am Netzkabel, um den Stecker zu ziehen, und verwenden Sie es nicht als Griff.
Benutzen Sie Ihre Kaffeemaschine nie ohne Wasser in Inneren.
Trennen Sie das Produkt im Falle einer Panne oder Beschädigung sofort vom Stromnetz und wenden
Sie sich an einen offiziellen technischen Kundendienst.
Um Gefahren zu vermeiden, darf das Gerät nicht geöffnet werden. Reparaturen oder Eingriffe am Gerät
dürfen nur von qualifiziertem technischem Personal des offiziellen technischen Kundendienstes der
Marke durchgeführt werden.
Eurogama Sp. z o.o. lehnt jede Haftung für Schäden ab, die an Menschen, Tieren oder Gegenständen
entstehen könnten, falls diese Warnhinweise nicht beachtet werden.
GEBRAUCHSANWEISUNGEN
Vor der Anwendung
Stellen Sie sicher, dass die gesamte Verpackung des Produkts entfernt wurde.
Vor der ersten Zubereitung von Kaffee empfehlen wir, die Kaffeemaschine zweimal ausschließlich mit
Wasser zu verwenden, um das System zu reinigen.
Befüllen mit Wasser
Der Wassertank (10) muss vor dem Einschalten des Gerätes mit Wasser gefüllt werden.
Entfernen Sie den abnehmbaren Tank, öffnen Sie die Abdeckung (9) und befüllen Sie den Tank. Befüllen
Sie nie über den Füllstand „MAX”.
Schließen Sie die Abdeckung wieder.
Positionieren Sie den Tank wieder korrekt im Gerät.
Vorheizen
Um eine Tasse guten heißen Espresso-Kaffee zuzubereiten, empfehlen wir, das Gerät vor der
Zubereitung des Kaffees, mitsamt Trichter, Netz und Tasse, vorzuheizen, sodass die kalten Teile keinen
Einfluss auf den Kaffeegeschmack haben.
Wählen Sie den Einsatz (18) für eine oder zwei Tassen aus und positionieren Sie es (ohne Kaffeezusatz)
in den Metalltrichter (17).
Ziehen Sie die Druckstange (16) zurück und stellen Sie sicher, dass der Trichter auf die Rille im
Wasserablass ausgerichtet ist. Setzen Sie im Anschluss den Trichter in die Position „Einfügen“ in den
Wasserablass ein und befestigen Sie ihn, indem Sie ihn gegen den Uhrzeigersinn drehen, bis er sich in
der Position „Verriegelt“ befindet (Abb. 1).
Stellen Sie eine Tasse auf die abnehmbare Ablage (7).
Stellen Sie sicher, dass sich der Knopf (11) in der Position „OFF“ befindet.
Verbinden Sie das Gerät mit der Stromversorgung.
Drücken Sie die „On/Off“-Taste (4), um das Gerät einzuschalten.
Die Kontrollleuchte (1) blinkt etwa 2 Minuten in Blau. Nach dieser Zeit hört die Kontrollleuchte auf zu
blinken und leuchtet dauerhaft. Der Aufwärmzyklus ist abgeschlossen.
Drücken Sie die „Manuelle Tasse“-Taste (5), um die Pumpe in Betrieb zu nehmen. Heißes Wasser fließt
15
DE

durch den Trichter in die Tasse.
Falls Sie nach einer gewissen Zeit meinen, dass die Teile bereits aufgewärmt sind, drücken Sie erneut
die „Manuelle Tasse“-Taste (5), um den Wasserfluss zu stoppen.
Zubereitung von Espresso-Kaffee
Entfernen Sie den Trichter (17) durch Drehen im Uhrzeigersinn.
Fügen Sie mit dem Messlöffel (14) gemahlenen Kaffee zum Stahleinsatz (18) hinzu. Drücken Sie im
Anschluss den gemahlenen Kaffee mit dem Stampfer (14) fest an. Ein Löffel gemahlener Kaffee ergibt
circa eine Tasse erstklassigen Kaffees.
Ziehen Sie die Pressstange (16) zurück und positionieren Sie den entsprechenden Stahleinsatz (18) für
eine oder zwei Tassen in den Metalltrichter (17).
Stellen Sie sicher, dass der Trichter auf die Rille im Wasserablass ausgerichtet ist. Fügen Sie den
Trichter aus der Position „Einfügen“ in den Wasserablass ein und befestigen Sie ihn, indem Sie ihn
gegen den Uhrzeigersinn drehen, bis er sich in der Position „Verriegelt“ befindet (Abb.1).
Stellen Sie eine Tasse auf die abnehmbare Ablage (7).
Drücken Sie die „Einzelne Tasse“-Taste (2), um eine Tasse Kaffee (ca. 60 ml) zuzubereiten. Sobald der
Kaffee fertig ist, erklingen 4 Pieptöne und der Kaffeefluss stoppt automatisch.
oder
Drücken Sie die „Doppelte Tasse“-Taste (3), um zwei Tassen Kaffee (ca. 100 ml) zuzubereiten. Sobald
der Kaffee fertig ist, erklingen 4 Pieptöne und der Kaffeefluss stoppt automatisch.
oder
Drücken Sie die „Manuelle Tasse“-Taste (5), um den Kaffee nach Belieben zuzubereiten. Um den
Kaffeefluss zu stoppen, drücken Sie erneut die „Manuelle Tasse“-Taste. Warnung: Lassen Sie die
Kaffeemaschine während der Zubereitung von Kaffee nicht unbeaufsichtigt, wenn Sie diese manuell
bedienen.
Entnehmen Sie nach der Zubereitung des Kaffees den Metalltrichter, indem Sie ihn im Uhrzeigersinn
drehen, und gießen Sie die Kaffeerückstände mit dem Stahlnetz, das von der Pressstange gedrückt
wird, heraus. Lassen Sie sie komplett abkühlen und spülen Sie sie im Anschluss unter fließendem
Wasser ab.
Aufschäumen von Milch/Zubereitung von Cappuccino
Sie erhalten eine Tasse Cappuccino, wenn Sie eine Tasse Espresso mit schäumender Milch auffüllen.
Bereiten Sie zunächst Espresso zu, wie unter Abschnitt „ZUBEREITUNG VON ESPRESSO-KAFFEE“
beschrieben.
Befüllen Sie einen Becher mit etwa 100 Gramm Milch für jeden zu zubereitenden Cappuccino. Es
empfiehlt sich, Vollmilch bei Kühlraum- oder Raumtemperatur (nicht heiß!) zu verwenden.
Hinweis: es empfiehlt sich, einen Becher mit einem Durchmesser von nicht weniger als 70±5 mm zu
verwenden, und bedenken Sie, dass sich die Milch um das 2-fache ausweitet, stellen Sie sicher, dass
die Höhe des Bechers ausreicht.
Stellen Sie sicher, dass sich der Knopf (11) in der Position „OFF“ befindet.
Drücken Sie die Dampftaste (6). Die Kontrollleuchte (1) wird in roter Farbe aufblinken und leuchtet dann
permanent auf.
Fügen Sie die Aufschäumdüse etwa zwei Zentimeter in die Milch ein, schäumen Sie die Milch auf, indem
Sie das Gefäß von oben nach unten bewegen.
Drehen Sie den Knopf (11) langsam gegen den Uhrzeigersinn. Aus der Schaumdüse (13) tritt Dampf
aus.
Hinweis: Drehen Sie den Knopf nie schnell, da sich der Dampf innerhalb kurzer Zeit schnell ansammelt,
wodurch sich das Überlauf-Risiko erhöht.
Sobald das Aufschäumverfahren abgeschlossen ist, drehen Sie den Steuerknopf (11) in die Position
„OFF“.
Hinweis: Reinigen Sie die Schaumdüse (13) umgehend nach Beendigung des Aufschäumens mit einem
16
DE

nassen Schwamm, verletzen Sie sich jedoch nicht!
Gießen Sie die aufgeschäumte Milch in den zubereiteten Espresso. Nun ist der Cappuccino fertig.
Süßen Sie ihn nach Belieben und bestreuen Sie den Schaum mit etwas Kakaopulver.
Drücken Sie die „On/Off“-Taste (4), um das Gerät auszuschalten.
Hinweis: Wir empfehlen, die Kaffeemaschine mindestens 5 Minuten abkühlen zu lassen, bevor Sie
wieder Kaffee zubereiten.
Andernfalls kann in Ihrem Espresso-Kaffee ein verbrannter Geruch entstehen.
Heißwasserzubereitung
Der Dampfstab (12) ohne Schaumdüse (13) lässt sich zur Zubereitung von Heißgetränken wie
Trinkschokolade, Wasser oder Tee verwenden.
Entfernen Sie die Schaumdüse (13) vom Dampfstab (12).
Stellen Sie sicher, dass sich der Knopf (11) in der Position „OFF“ befindet.
Drücken Sie die „On/Off“-Taste (4), um das Gerät einzuschalten.
Drücken Sie die „Heißwasser“-Taste (5). Die Kontrollleuchte (1) leuchtet in Rot.
Warten Sie die Aufheizzeit ab, die Kontrollleuchte hört auf zu blinken und leuchtet dann permanent,
sobald das Gerät betriebsbereit ist.
Tauchen Sie den Stab (12) in die Tasse.
Drehen Sie den Knopf (11) langsam gegen den Uhrzeigersinn. Aus dem Stab tritt heißes Wasser.
Sobald die gewünschte Menge erreicht ist, drehen Sie den Knopf (11) in die Position „OFF“.
Drücken Sie die „On/Off“-Taste (4), um das Gerät auszuschalten.
Dampferzeugung zur Erwärmung von Flüssigkeiten
Stellen Sie sicher, dass sich der Knopf (11) in der Position „OFF“ befindet.
Drücken Sie die „On/Off“-Taste (4), um das Gerät einzuschalten.
Drücken Sie die Dampftaste (6). Die Kontrollleuchte (1) leuchtet in Rot.
Warten Sie die Aufheizzeit ab, die Kontrollleuchte hört auf zu blinken und leuchtet dann permanent,
sobald das Gerät betriebsbereit ist.
Tauchen Sie den Stab (12) in die zu erwärmende Flüssigkeit.
Drehen Sie den Knopf (11) langsam gegen den Uhrzeigersinn. Aus dem Stab tritt Dampf aus.
Sobald die gewünschte Temperatur erreicht ist, drehen Sie den Knopf (11) in die Position „OFF“.
Drücken Sie die „On/Off“-Taste (4), um das Gerät auszuschalten.
WARTUNG UND REINIGUNG
Vergessen Sie nicht, vor der Reinigung des Gerätes den Stecker aus der Steckdose zu ziehen.
Wischen Sie die Außenseite mit einem weichen, trockenen Tuch ab, wenn die Kaffeemaschine nass ist,
verwenden Sie nie eine Metallpolitur.
Die abnehmbaren Teile sollten in heißem Seifenwasser gewaschen werden. Spülen Sie diese ab, bevor
Sie sie wieder anbringen.
Entnehmen Sie den Metalltrichter durch Drehen gegen den Uhrzeigersinn, entfernen Sie die
Kaffeerückstände im Inneren, im Anschluss können Sie ihn mit Reinigungsmittel reinigen, spülen Sie ihn
schließlich mit klarem Wasser ab.
Verwenden Sie nie eine Geschirrspülmaschine, um Teile der Maschine zu reinigen.
Positionieren Sie die Kaffeemaschine an einem trockenen und nicht sehr heißen Ort.
17
DE

PRODUKTENTSORGUNG
Dieses Produkt entspricht der europäischen Richtlinie 2012/19/EG über Elektro- und
Elektronik-Altgeräte, bekannt als WEEE (Waste Electrical and Electronic Equipment),
die den in der Europäischen Union geltenden Rechtsrahmen für die Entsorgung und
Wiederverwendung von Elektro- und Elektronikaltgeräten schafft. Entsorgen Sie dieses
Produkt nicht in der Mülltonne, sondern in der Elektro- und Elektronik-Abfallsammelstelle in
der Nähe Ihres Hauses.
Wir hoffen, dass Sie mit diesem Produkt zufrieden sind.
18
DE

RÁDI BYCHOM VÁM PODĚKOVALI, ŽE JSTE ZVOLILI FIRMU ZELMER. DOUFÁME, ŽE VÁM BUDE
PRODUKT DOBŘE SLOUŽIT.
VAROVÁNÍ
Před použitím zařízení si nejprve přečtěte návod k obsluze a uložte jej na bezpečném místě pro budoucí
použití.
POPIS
1. Kontrolka
2. Tlačítko „jeden šálek“
3. Tlačítko „dvojitý šálek“
4. Tlačítko zapnutí/vypnutí
5. Tlačítko „vlastní šálek / horká voda“
6. Tlačítko „páry“
7. Vyjímatelná deska
8. Odkapávací zásobník
9. Kryt vodní nádrže
10. Vodní nádrž
11. Ovládací knoflík „páry / horké vody“
12. Parní trubice
13. Pěnová tryska
14. Měrná lžíce a pěchovadlo
15. Rukojeť nálevky
16. Tlaková lišta (její pomocí při nalévání zbytků kávy přitlačte ocelové sítko, abyste zabránili jeho
vyklouznutí)
17. Kovová nálevka
18. Sítko z nerezové oceli
BEZPEČNOSTNÍ POKYNY
Pokud dojde k poškození přívodního kabelu, musí
být vyměněn výrobcem nebo zástupcem servisu či
podobně kvalifikovanou osobou, aby se eliminovalo
nebezpečí.
Spotřebič mohou používat děti od 8 let a starší, pokud
jsou pod dozorem nebo byly poučeny o používání
spotřebiče bezpečným způsobem a rozumí případným
nebezpečím.
Děti si se spotřebičem nesmějí hrát.
19
CZ

Čištění a uživatelskou údržbu nesmí provádět děti,
pokud nejsou starší 8 let a pod dohledem. Uchovávejte
spotřebič a jeho kabel mimo dosah dětí mladších 8 let.
Spotřebič mohou používat osoby se sníženými
fyzickými, smyslovými či mentálními schopnostmi
nebo s nedostatkem zkušeností a znalostí, pokud
jsou pod dozorem nebo byly poučeny o používání
spotřebiče bezpečným způsobem a rozumí případným
nebezpečím.
Tento spotřebič je určen k použití v domácnosti. Není
určen k použití v prostředích, jako například:
v zaměstnaneckých kuchyňkách v obchodech,
kancelářích a dalších pracovních prostředích;
venkovských domech;
pro klienty v hotelech, motelech a jiných prostředích
obytného typu;
v zařízeních pro ubytování se snídaní.
Při čištění postupujte podle části o údržbě a čištění v
tomto návodu.
Nikdy neponořujte spotřebič do vody ani jiné kapaliny.
Během vaření a po použití v důsledku zbytkového tepla
jsou některé části přístroje horké.
Varování: hrozí nebezpečí zranění v důsledku špatného
užití!
DŮLEŽITÁ UPOZORNĚNÍ
Nesprávné použití nebo nesprávné zacházení s produktem bude mít za následek neplatnost záruky.
Před zapojením produktu zkontrolujte, zda je síťové napětí stejné jako napětí uvedené na štítku
produktu.
Během používání nesmí být síťový napájecí kabel zamotaný nebo omotaný kolem produktu.
Nepoužívejte zařízení ani jej nepřipojujte a neodpojujte od elektrické sítě s mokrýma rukama a nebo
nohama.
20
CZ
Table of contents
Languages:
Other Zelmer Coffee Maker manuals

Zelmer
Zelmer ZCM4821B User manual

Zelmer
Zelmer CM1001D User manual

Zelmer
Zelmer ZCM6255 User manual

Zelmer
Zelmer 13z012 User manual

Zelmer
Zelmer ZCM4822X User manual

Zelmer
Zelmer ZCM1111X User manual

Zelmer
Zelmer CM2005M Subito User manual

Zelmer
Zelmer 13z012 User manual

Zelmer
Zelmer CM2004M Quatro User manual

Zelmer
Zelmer Torrido 13Z018 User manual

Zelmer
Zelmer 13Z013 User manual

Zelmer
Zelmer 13Z015 User manual

Zelmer
Zelmer ZCM2184X User manual

Zelmer
Zelmer 13Z014 User manual

Zelmer
Zelmer 13Z015 User manual

Zelmer
Zelmer 13Z010 User manual

Zelmer
Zelmer 13Z016 User manual

Zelmer
Zelmer ZCM3821B User manual

Zelmer
Zelmer 13Z011 User manual

Zelmer
Zelmer ZCM7295 User manual