ZMODO H.264 User manual

H.264 Standalone DVR
16 CH
User Manual
DVR User Manual
For further help, please visit
kb.zmodo.com

16-Channel H.264 DVR User Manual
Chapter 1: Overview....................................................................................1
1.1Introduction.....................................................................................1
1.2Packaging and Accessories ...........................................................1
1.3Main Features.................................................................................1
1.5Product Appearance and Interface Definition.................................3
1.5.1 Front Panel ..........................................................................3
1.5.2 Back Panel...........................................................................3
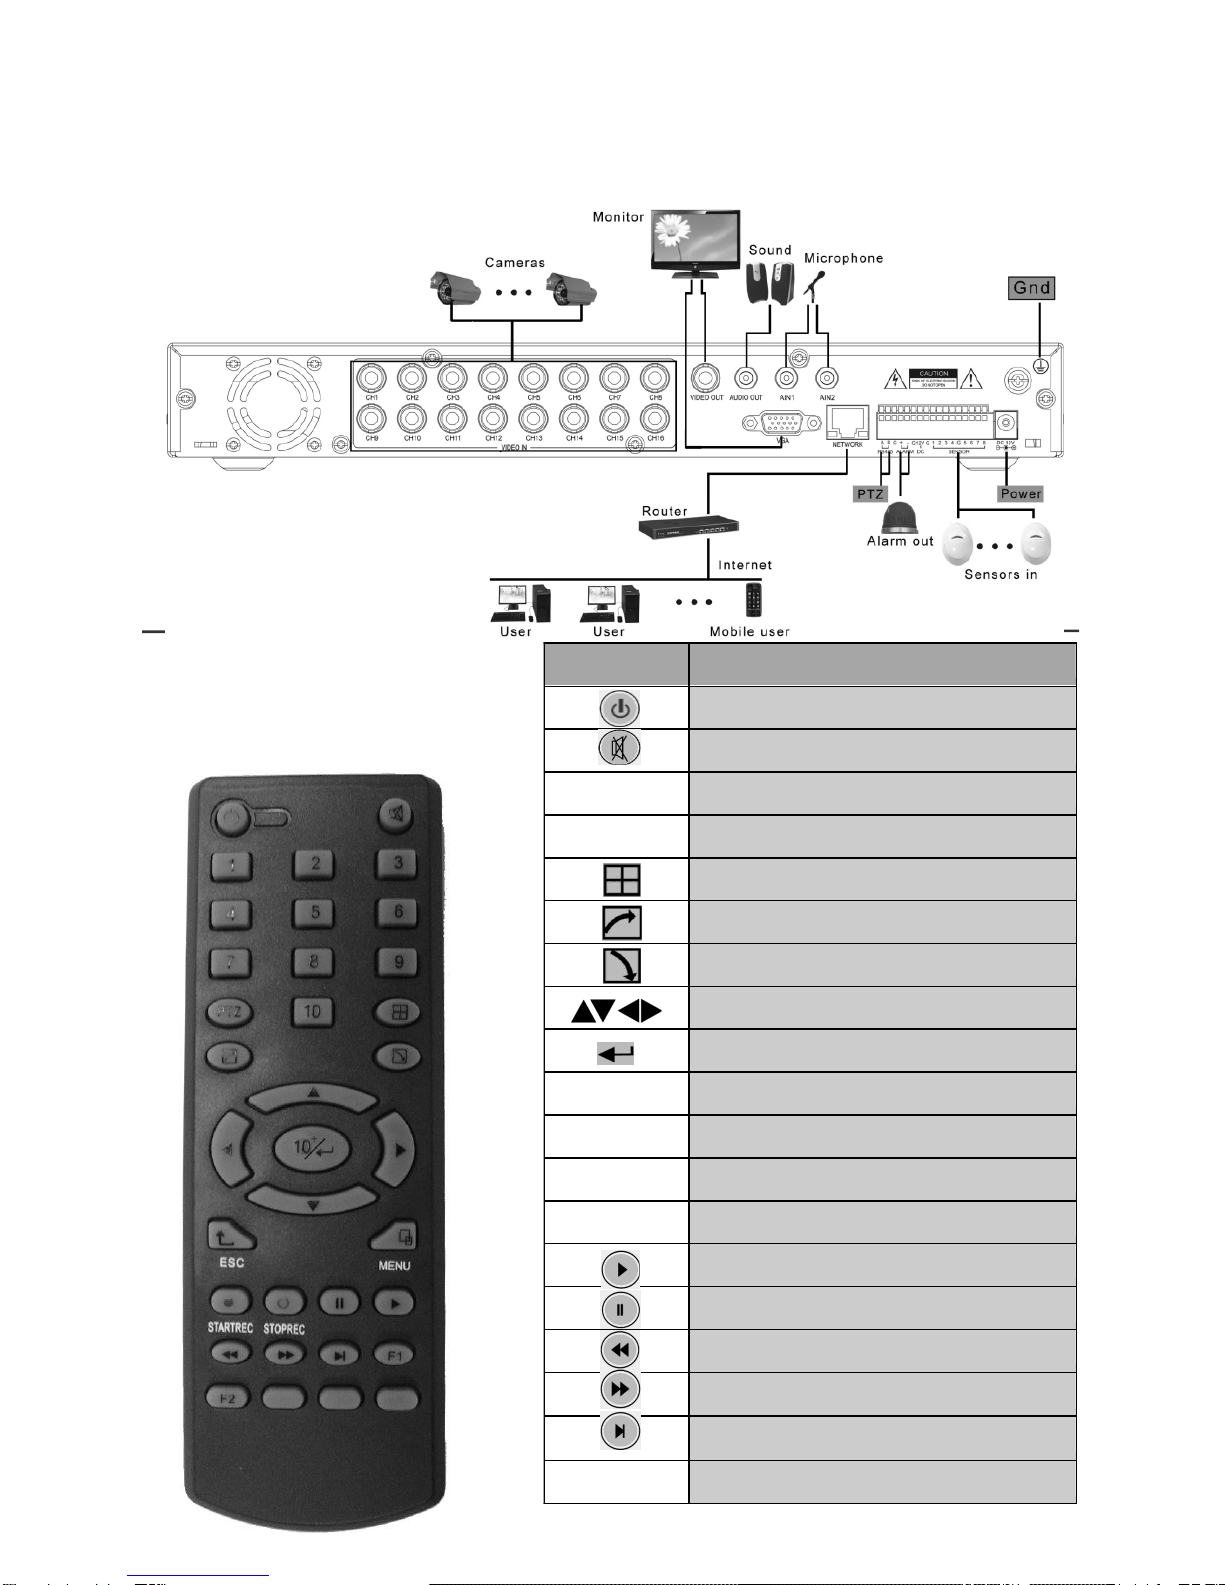
1.5.3 Setup Diagram.....................................................................4
1.6Remote Controller ..........................................................................4
1.7Mouse.............................................................................................5
Chapter 2: Quick Installation.......................................................................6
2.1HDD Installation..............................................................................6
2.2Boot ................................................................................................6
2.3System Login..................................................................................6
2.4Shortcut Menu ................................................................................7
2.4.1 Main menu...........................................................................7
2.4.2 Key Lock..............................................................................7
2.4.3 Channel Switch....................................................................7
2.4.4 Video Search .......................................................................7
2.4.5 Start Sequence....................................................................7
2.4.6 Start Cruise..........................................................................7
2.4.7 PTZ Control..........................................................................7
2.4.8 Mute.....................................................................................8
2.4.9 Manual Recording /Stop Recording.....................................8
2.4.10 Zoom..................................................................................8
2.4.11 PIP……………………………………………….…………...10
Chapter 3: Menu Settings .........................................................................10
3.1Main Menu ...................................................................................10
3.2Recording Mode ..........................................................................11
3.3Video Search ...............................................................................12
3.4Backup .........................................................................................13
3.5Hard Disk Management ...............................................................14
3.6Basic Setup ..................................................................................14
3.6.1 System Language .............................................................15
i

16-Channel H.264 DVR User Manual
3.6.2 Time setup ........................................................................15
3.6.3 User Password .................................................................16
3.6.4 Cameras ...........................................................................16
3.6.5 Video / Audio .....................................................................17
3.7: Advanced ...................................................................................18
3.7.1 Alarm .................................................................................18
3.7.2 System Info .......................................................................19
3.7.3 Motion Detection ...............................................................20
3.7.4 Mobile Phone Monitoring ..................................................21
3.7.5 System Maintenance ........................................................21
3.7.6 Zoom..................................................................................22
3.7.7 Network Setup ..................................................................22
Chapter 4: DVR Network ..........................................................................24
4.1Functional Characteristics ...........................................................24
4.2Installation and Download of Controls .........................................24
4.3IE Login ........................................................................................24
4.4Real-Time Preview ......................................................................25
4.5Record Playback .........................................................................25
4.6Recording Mode ..........................................................................26
4.7Alarm Setup .................................................................................27
4.8PTZ Control .................................................................................27
4.9Network Setup .............................................................................27
4.10System Setup .............................................................................28
4.11Host Info .....................................................................................28
Appendix A: Android Setup................................................................29
Appendix B: iOS Setup………………………………………………….30
Appendix C: FAQ ………………………………………………………..31

16-Channel H.264 DVR User Manual
Thank you for buying our DVR
Dear Customer,
Thank you for choosing to purchase and use our product! If while using this product you
encounter any technical problems or problems with quality, please contact us. We are ready to
serve you. Before using this product, please carefully review the warranty information.
1. Service Contract
This device may be returned for a refund from the seller within 30 days. Outside the return
policy and within 90 days of the purchase a defective device will qualify for a replacement at the
discretion of Zmodo. This device otherwise comes with a 1 year limited parts and labor
warranty.
2. Requirements for Return or Replacement
The products outward appearance should have no scratches, dirt, dents, blemishes, or
alterations of any kind. A copy of the purchase invoice and warranty certificate will be
required.
3. Warranty Restrictions
In the event of the following situations, regardless of expiration Date, location, repair or part
replacement, our company must receive payment, and is not liable for any payment to the
consumer. All resulting losses will be the consumer’s responsibility:
•In cases of use causing the product’s malfunction or damage, or if the environment is
not suitable for the product’s usage and causes malfunction or damage;
•In cases of natural disasters, as defined by law, or unavoidable circumstances that are
not related to the product’s quality that cause the product’s malfunction or damage;
•In cases that the consumer’s purchase receipt and the product ID number/model number
written on the warranty card are inconsistent;
•In cases that the consumer’s use, care, or protection inadvertently cause the machine’s
malfunction or damage;
•In cases that the product’s up-to-standard certificate is damaged;
In cases that there is no purchase receipt or warranty card;
•In cases that the repair warranty has already expired.
4. No other warranties, other than Zmodo’s repair warranty rules are acknowledged by Zmodo.
5. In order to ensure consumer’s rights, please carefully read the repair warranty content.
6. Zmodo reserves the right to update and change product software at any time without notice.
This manual may not directly reflect all aspects of your DVR or your DVR version. Software
updates (when available) can be found on kb.zmodo.com.
Best regards,
Zmodo Customer Care

16-Channel H.264 DVR User Manual
1
1.1 Introduction
Chapter 1: Overview
This SFN Series DVR is 16-channel standalone digital video record that uses H.264
video compression for playback main profile with multiplex functions: record, playback,
live preview, remote preview, and backup supported.
It is a professional, high performance, intelligent, audio & video solution with a
user-friendly GUI, and practical industrial design. This series DVR is suitable for use at
home, office, small business and most common security and surveillance applications.
1.2 Packaging and Accessories
Following parts are included in the package:
(1)ZMD-DR-SFN6 CCTV Safety DVR
(2) AA Batteries
(1)IR Remote Control & Mouse
(1)DVR Manual
(1) DC12V3A power adapter(12V5A is required if two HDDs are installed in DVR)
All relevant software can be downloaded at http://files.zmodo.com
1.3 Main Features
◎Standard H.264 video compression format
◎16-bit true-color semi-transparent graphical menu interface, menu option tips
◎Variety of recording modes including manual, timed, motion detected, and alarm
recording
◎Optimized 4-channel simultaneous playback
◎Multiple Backup Options (USB flash drive and network)
◎One USB 2.0 for data backup and one USB1.1 for the mouse operation
◎Multi-function operation, recording, playback, monitor, backup, and network
transmission can be realized at the same time
◎Dual stream technology
◎Supports network multi-screen, real-time viewing, parameter settings,
backup, or playback
◎Supports mobile phone monitoring
◎Supports event classification and precise time search and playback
◎Default settings recovery

16-Channel H.264 DVR User Manual
2
1.4 Technical Parameters
Features
Description
Operating System
Embedded LINUX
Video Compression
H.264
Video Input / Output
16channel BNC 1 VGA
Audio Input / Output
2/1 channel BNC
Alarm Input / Output
8 channel input 1 channel output (switch)
Display Split
1/4/9/16 channels
Multiplex Operation
Live, recording, network, mobile
phone, surveillance simultaneously
Recording Mode
Timer/Manual/Motion Detection/Alarm
Recording Frame Rate
PAL:25fps NTSC:30fps adjustable
Recording Quality
Best, Fine, Normal
Recording Resolution
CIF(352*288)
Recording Playback
4 channels playback simultaneously
(The playback channel is optional. Supports
remote playback)
Recording Backup
Supports USB drive backup, network backup,
backup files by time
HDD
Supports 2 SATA HDD,max capacity 2TB(ea.)
Network Transmission
16 channels with CIF resolution
Email Alarm
Send notification to the designated Email
PTZ Control
Supported
PTZ Protocol
PELCO-D, PELCO-P
PIP
Supported
Zoom
Supported
Network and Protocol
1 RJ-45 10/100M via Ethernet ,support
TCP/IP,DHCP,DNS,DDNS,SMTP,NTP, etc.
Capture Function
Supported
IE Browser
Supported, max 5 users on line
Client Software
Supported, max 5 users on line
Dual stream
Supported (main and secondary interchange)
Multi-language
Supported
Mobile Phone Surveillance
Supports iPhone and Android; max 3 users on
line
SDK Package
Optional
Mouse Interface
USB1.1
Backup Interface
USB2.0
Remote Controller
Support
User Authority
Support multi-level user authority distribution
Power Adapter
DC12V/5A(2 HDD) or 12V/3A(one HDD)
Working Temperature
-20℃- 60℃
Working Humidity
10%-90%
SIZE(mm)
354(W) * 230(D) * 45(H)

16-Channel H.264 DVR User Manual
3
1.5 Product Appearance and Interface Definitions
1.5.1 Front Panel
1 2 3 4 5 6 7 8 9 10 11 12 13 14 15
No.
Definition
No.
Definition
No.
Definition
1
Power Switch
7
Mute
9
PTZ Control
2
Rewind
8
Video Search
11
Exit/Return
3
Play
10
(Refers
to LED
Lights)
ALARM: Alarm Indicator
12
Display: Display Mode
Menu: Main Menu
4
Pause
ALARM: Network
Connection Indicator
13
Up, Down, Left, Right, and
Enter
5
Forward
REC: Video Recording
14
USB Port
6
Manual Start/Stop
Recording
PWR: Power
15
Remote Control Infrared
Receiver
1.5.2 Back Panel
No.
Physical Interface
Interface Description
1
1-16CH Video-in ports
Connect analog video(camera) signal input, standard BNC
2
Video out
Connect to BNC video output
3
AIN1,AIN2
Connect active audio signals, such as pickup
4
Audio out
Connect the audio output
5
VGA
Connect VGA monitor, such as computer monitor
6
NETWORK
Connect the Ethernet
7
RS485 /ALARM / DC
PTZ control, alarm switch output, DC 12V output for assistance
8
SENSOR 1-8
Connect alarm switch input
9
ALARM
Connect alarm switch output
10
DC12V
Power input: DC 12V/5Aor 12V/3A(one HDD)
11
G
Grounding

16-Channel H.264 DVR User Manual
4
Key
Functional definition
NotUsed
Mute
0~10
Channel Selection; Number Keys
PTZ
PTZ Control
Single and Multi-Split Screen
Quit Shortcut Menu
Shortcut Menu
Direction Buttons
OK or 10+x Channel(x=1-6)
ESC
Exit / Return
MENU
Enter the Main Menu
STARTREC
Start Recording
STOPREC
Stop Recording
Video Search
Stop Playing
Fast Backward
Fast Forward
Step Forward
F1, F2
NotUsed
1.5.3 SetupDiagram
1.6 Remote controller
For reference only

16-Channel H.264 DVR User Manual
5
1.7 Mouse
This equipment supports a wired USB mouse that is used to navigate the DVR’s
menus. Insert the USB plug directly into the USB port. Mouse operation is similar to
WINDOWS operations.
Mouse
Action Function
Right Button: Enter System Main Menu.From the Main Menu, pressing the Right
Mouse Button will return to the previous page.
Double-clicking will apply to both live preview and playback.
Double
Left-Click
Left-Click
Click and
Drag
Double-click on a desired channel to zoom the selected channel to
full screen. Double click the zoomed-in screen again to return the
viewing method to multi-channel viewing.
Channel Selection: Left clicking on a desired active video channel
will move the highlight to that channel and cause any commands from
the PTZ menu to affect that channel
Menu Use: Left clicking on any icon on the menu will cause the DVR
to act upon that selection.
Drop down boxes can be opened by clicking the downward facing
arrow on the box.
Functions as Enter/Select button in all purposes
Left clicking in a blank field in the menu will bring up the virtual
keyboard allowing. Left-click to select letters, numbers, and symbols
to insert in to the field.
Click and drag in certain screens to select an area. In motion
detection, this will block off an area that will not be used. In playback
this will create a digital zoom in to the selected area.

16-Channel H.264 DVR User Manual
6
Chapter 2: Quick Installation
2.1 HDD Installation
The manufacturer recommends that the hard disk be installed by a technician t o
avoid damage to the equipment and hard disk. The DVR must be powered off
before installation. This equipment supports a hard disk with a SATA interface. Please
see http://kb.zmodo.com for recommended hard drives and hard drive
requirements.
Installation procedures are as follows:
A. Unscrew the screws that secure the DVR cover and remove the cover. There will
be a bracket or an empty space where the hard drive will sit.
B. Connect the red data cable and multicolored power cable firmly.
C. Put the HDD into the bracket or open area above directly over the four screw
holes.
D. Affix the HDD onto the bracket or DVR base with screws and replace the DVR
housing.
Note: The new hard disk drive must be formatted to function with the DVR.
2.2 Boot
Connect the power adapter to the power cord socket in back panel, and press the
power button on front panel. The DVR will turn on, the power indicator POWER will light
up, and the monitor will display a 16-channel split image. If a non-formatted hard
disk exists in the DVR, it is required to format the HDD before recording video footage.
By default the DVR is set to begin immediately recording when turned on with a
working and formatted hard drive installed. The red REC LED light will confirm that the
DVR is recording.
Notes:
1. If hard disk is not installed when the DVR is powered on, or the newly installed hard
disk is not formatted on the DVR, the red H logo will be shown in video preview picture.
2.The newly installed hard disk cannot be used until formatted in the DVR as follows:
Main Menu → HDD → HDD Format. The system will be restarted after completion of
formatting.
2.3 System Login
The DVR Device ID is 000000 without any
password. The user can log in to the main
menu directly. The administrator can change
the DEVICE ID and PASSWORD in the Basic Settings –User Password menu. The
user can set an ordinary user password and administrator password. The
administrator has all the operating privileges, and an ordinary user can only monitor
video, search, and playback.
Note: Admin and User are differentiated solely by the password. Do NOT set them to
the same password as the system will default to the user and the DVR will be locked.

16-channel H.264 DVR User Manual
7
2.4 Shortcut Menu
Click the right button on the DVR interface or right-click on the mouse after system
startup to open the Quick Operations popup menu. This menu has the following setting
options: MAIN MENU, KEYLOCK, CHANNEL SWITCH, VIDEO SEARCH, START
SEQUENCE, START CRUISE, PTZ CONTROL, MUTE, MANUAL RECORD, STOP
RECORD and PIP MODE.
2.4.1 Main Menu
Click MAIN MENU to enter the main menu interface. See 3.1 for more information about
the main menu.
2.4.2 Key Lock
When the password function is enabled (please see 2.3), click the right button in
live preview and select KEYLOCK in the pop-up menu. The system interface
will be locked immediately, and the password is required to log in to access the
menus.
2.4.3 Channel Switch
Allows the user to select a specific channel.
2.4.4 Video Search
Please see Chapter 3.
2.4.5 Start Sequence
Start video channel automatic sequence function. Right-click to exit this feature.
2.4.6 Start Cruise
Begin the PTZ cruise set by the user. This will be replaced with Stop
Cruise when this function is enabled.
Note: This feature can only be used after the user sets up PTZ control
parameters and preset points.
2.4.7 PTZ Control
Click right button in main interface and select PTZ Control. The following interface
will appear:

16-channel H.264 DVR User Manual
8
PTZ speed (fast or slow) can be controlled in this interface. Zoom, focus, and aperture
are also adjustable in this menu.
Cruise Setting:
1. Select the PTZ channel.
2. Set the pause time(s).
3. Adjust the arrow keys to the position which needs to be monitored.
4. Select SET POINT. Repeat steps 2–4 to set additional presets.
5. Select the APPLY button to save the settings.
6. Exit to live screen and select START CRUISE.
Notes:
1. To set up more points, repeat steps 2-5.
2. To view the current points already set position press JUMP.
3. To delete the point has been set, enter the point number and select CLEAR.
2.4.8 Mute
Turn on / off sound.
2.4.9 Manual Recording / Stop Recording
If timed recording is on (please see Chapter 3), and manual record is enabled
manual record will override any timed recording schedule. If “Record When powered
On Mode”is enabled, then this function is not available.
2.4.10 Zoom
In single-channel full-screen mode, this function can be done by dragging the
mouse to marquee area to enlarge

16-channel H.264 DVR User Manual
9
2.4.11 PIP
In the single-channel full-screen mode, PIP enables floating images of other channels.
Chapter 3: Menu Settings
3.1 Main menu
The main menu has PLAYBACK, RECORD, HDD, BASIC, ADVANCED, and
EXIT options as shown below:
Notes:
1. The setup of all the submenus below will not take effect until ENTER is pressed..
2. When the cursor is moved to any option, a description message of this option will
be displayed in the lower part of the screen.

16-channel H.264 DVR User Manual
10
3.2 Recording Mode
Enter the “Recording Mode”screen from MAIN MENU—RECORD, as shown below:
Video Channel: Select either a specific channel or all channels.
Resolution: CIF (352 x 288).
Quality: Available in BEST, FINE, and Normal.
Frame rate: Adjust frames per second.
Audio: Enables or disables audio recording.Audio uses more storage space on the
hard disk drive.
REC.MODE: Available in WHEN POWERED UP and BY TIME.
WHEN POWERED UP: Will automatically begin recording as soon as the DVR is turned
on and will continue until this is changed to BY TIME. Individual channels can still be
turned off in this menu for this purpose.
BY TIME: Records based on a schedule determined by the user. When BY TIME is
selected, the SCHEDULE button will appear on the right. Move the cursor here and
press ENTER to enter the recording schedule, as shown below:
CHANNEL: Choose either ALL or a single channel.
Time configuration: First select one of the three modes of recording: TIMED,
ALARM RECORDING, and NO RECORD. After clicking on the desired record type,
the user may fill in the grid blocks that correspond to an hour of the day. Each block
can be configured into different recording modes by marking them into different
colors representing the respective record modes.
FILE LENGTH: Left-click or press Enter to select the recorded file length, with the 4
options of 15 min, 30 min, 45 min, and 60 min.

16-channel H.264 DVR User Manual
11
3.3 Video search
Enter the “Video Search” screen from SUB MENU →VIDEO SEARCH or MAIN
MENU→PLAYBACK as shown below: This unit supports 3 video search modes:
A. Time Based Playback
Time input: First, select the corresponding channel and then adjust the date
and time to be searched. Left-click or press Enter and the directional keys or enter
digits directly for year, month, date, hour, and minute, and then click Play to play back
the recording that covers this point in time. Up to four channels can play back
simultaneously.
B. Playback Based on Record Calendar
Mark the channel and enter the year, month, and date to be searched in the
DATE box and click SEARCH to load recorded videos in the calendar, as shown below:
Month: Displays recorded videos by month (Shown above as January). A green
block indicates normal recording, a red block indicates alarm recording, and the
background color indicates no recordings are on that day. Clicking or selecting a
day in the calendar will load that specific day’s recordings in the section below.
Date: Displays the recordings for a specified date (shown above as the 18th).
Color distinctions are the same as the month. Each hour is broken in to 2
segments and clicking one will take the user directly in to the playback for that time.
C. Playback Based on File list
Enter the year, month, and date to be searched in the DATE box, and click
SEARCH. Select the desired day of the MONTH bar and then FILE LIST and the
“File List” screen will pop up, as shown below:
Type: The user may narrow down the files shown by recording type (alarm,
timed, or all):

16-channel H.264 DVR User Manual
12
Notes:
1. In file list the user will be given information pertaining to the channel, time frame
of the recording, size of the individual file, and the recording type. The operation
of backing up files to the USB port can be performed by checking the BACKUP
checkbox at the far right side of the file. Only files from one page may be backed
up at a time. To back up files from another page, the user must select them
separately.
2. When you have selected a certain recorded file from the record list by moving
the cursor up and down, press Enter to enter the “Playback”screen.
3. If Record Time has already been enabled in the Setup section, the playback
screen will display the timestamp. If Record Time is set as “Off”in the “Setup”
screen, there will be no timestamp displayed on the playback “Playback.”
4. During playback the user may use the playback features bar located at the bottom
of the screen to slow, rewind, fast forward, or exit the current recordings playback.
3.4 Backup
Enter the “File List”(see 3.3 Video Search) screen for the backup operation.
The recorded file may be backed up by a USB storage device. Before the record
file is backed up, the user must insert the peripheral storage device into the USB2.0
slot of this unit. This product supports the plug-and-play operation of USB devices (The
DVR does not support devices that require a driver installation).
Move the cursor up and down in the “Detailed File List”screen to select a
certain recorded file. After Enter is pressed in the Backup check box, a will appear
in this box, indicating that this record file has been selected. At this point the user
may move to the backup option in the bottom right of the window and press select. A
pop-up notification will show the progress of the file backup:
Notes:
1. When the available space of the backup device is less than the capacity of the
recorded file, the system will prompt the user with Not Enough Space.
2. After the recorded file has been backed up, unplug the backup device directly. See
Chapter 4: DVR Network for network backup.

16-channel H.264 DVR User Manual
13
3.5 Hard Disk Management
Enter the “HDD Management”screen from MAIN MENU →HDD, as shown below:
STATUS: After connecting the hard disk, the system will automatically detect if the
hard disk is formatted. If the hard disk needs formatting, UNFORMATTED will be
displayed in the hard disk state. Check the format box and select FORMAT HDD to
have the DVR format the disk. If the system detects any available hard disk, the hard
disk state will be ONLINE.
ALL/FREE: Refers to the total storage capacity and current remaining storage
capacity of the hard disk;
TIME LEFT: Refers to the time remaining for recording based on the currently set
picture resolution and quality.
FORMAT: Click the check box and a will appear in this box, indicating that this
HDD has been selected.
OVERWRITE: ENABLE: The hard disk will overwrite the earliest recordings
when its memory is full; DISABLE: Recording will stop when the memory of the hard
disk is full.
HDD FORMAT: If the hard disk is used for the first time, it is necessary to format
the hard disk. Check the FORMAT box, then click the FORMAT HDD button, and
then click ENTER for formatting in the pop-up prompt message dialog box,
otherwise click CANCEL. After clicking FORMAT HDD, the system will prompt, “You
will lose all data by formatting the hard disk. Will you continue?”Press Enter, and the
system will state: “Formatting…” then “Format Successful.”The system will restart
automatically.
USB FORMAT: Allows the user to format a USB device that is not currently capable of
backup. The DVR must still be able to detect the device in order to do this.
The DEFAULT button is used to restore the factory default values.
Note: It is recommended that the hard drive be formatted before beginning recording
for the first time, even if it does not require it.
3.6 Basic Setup
Enter the “Basic Setup”screen from MAIN MENU →BASIC, as shown below:

16-channel H.264 DVR User Manual
14
The “Basic Setup”includes the 6 options of LANGUAGE, DATE/TIME, PASSWORD,
CAMERAS, VIDEO/AUDIO SETUP, and EXIT.
3.6.1 System Language
Move the cursor to the LANGUAGE option (The icon is enlarged and highlighted to
indicate selection.), and press ENTER to enter the “Setup”screen of this option, as
shown below:
The system supports 15 languages. After choosing the desired language, click APPLY
button to save, and it will go into effect after a system restart.
3.6.2 Time Setup
Move the cursor to the DATE/TIME option (The icon is surrounded by a yellow frame
to indicate selection.) and press Enter to enter the “Time Setup”screen of this
option, as shown below:
The system time, date format, time format, time zone and summer time can be set up
in this screen. If the DVR is networked it will automatically update to the set time zone.

16-channel H.264 DVR User Manual
15
3.6.3 User Password
DEVICE ID: Enter digits to set a desired Device ID. This number will act the same as a
username.
PASSWORD: Press Enter to select ENABLE or DISABLE for the user password. If
this option is enabled, the user has to enter his/her password when logging in to gain
access to menu functions. If it is disabled, the main menu of the system can be logged
in directly.
USERPASSWORD: Set the User password. This password will only allow basic
functions and access to the DVR.
ADMIN PASSWORD: Set the Admin password. This password will allow access to all
functions of the DVR.
IMPORTANT: DO NOT SET BOTH PASSWORDS TO BE THE SAME.
Notes:
1. This unit has no initial password. When the user sets passwords, it is
recommended that the two passwords are set up at the same time. If any set
password is forgotten (or both are set to the same), please, contact Zmodo.
Zmodo will not reset a password without proof of ownership.
2. Only the locking, channel changeover, video search, log search, backup, PTZ
control, mute, manual recording, and stopping recording functions are available to
normal users.
3.6.4 Cameras
Move the cursor to the CAMERAS option (The icon is surrounded by a yellow frame to
indicate selections), and press Enter to enter the “Setup”screen of this option, as
shown below:

16-channel H.264 DVR User Manual
16
Name: Move the cursor to the input box of this option, and press Enter to enter the
“Input”screen of this option. Numerical, English and Chinese pinyin input methods
are supported.
Position: Move the cursor to this option, and press Enter to change over between
name positions; there are 5 setup options: top left, bottom left, top right, bottom right
and off.
Color: Move the cursor to Setup on the corresponding channel, and press Enter to
enter the “Color Setup”screen as shown below:
Press Enter or drag the cursor to adjust the picture color, including the four options of
chromaticity, brightness, contrast, and saturation. Press Enter to exit and save the
parameters.
Preview:
On: The picture of this channel can be seen in the “Video Preview “screen;
Off: The Video Preview screen of this channel has been blocked, but the recording
settings do not change.
Preview Time: On: The system date and time are displayed in the “Live Preview”
screen.
Record Time: On: A timestamp can be displayed in the playback of a record file.
Channel SEQ: Adjust the channel sequence times and split view options.
3.6.5 Video / Audio
Move the cursor to the VIDEO/AUDIO option, (The icon is surrounded by a yellow
frame to indicate selection.) and press Enter to enter the “Setup”screen of this option,
as shown below:
CAMERASYSTEM: Left-click or press Enter to change over between PAL and NTSC.
(All Zmodo Cameras sold in the US are NTSC).
Volume setup: Move the cursor to Volume Setup, left-click or press Enter to enter
the Volume “Setup”screen, and press Left, Right or drag the cursor with the mouse
directly to adjust the volume.
Note: The system will restart when the VGA resolution or the camera
resolution is modified.
Other manuals for H.264
2
This manual suits for next models
2
Table of contents
Other ZMODO DVR manuals

ZMODO
ZMODO ZMD-DR-SFN6 User manual

ZMODO
ZMODO 8000 Series User manual

ZMODO
ZMODO ZMD-NV-SBN4 User manual

ZMODO
ZMODO ZMD-DT-SFN6 User manual

ZMODO
ZMODO DVR-H9114V User manual

ZMODO
ZMODO ZMD-DT-SJN6 Instruction manual

ZMODO
ZMODO SFN6 User manual

ZMODO
ZMODO 4CH User manual

ZMODO
ZMODO ZMD-DT-SJN6 User manual

ZMODO
ZMODO DVR User manual

ZMODO
ZMODO ZP-NE14-S User manual

ZMODO
ZMODO ZMD-NV-SBN4 User manual

ZMODO
ZMODO ZMD-DT-SCN4 User manual

ZMODO
ZMODO Funlux User manual

ZMODO
ZMODO H9108UV User manual

ZMODO
ZMODO 16CH DVR User manual

ZMODO
ZMODO DX-SIN8 User manual

ZMODO
ZMODO H9104V User manual

ZMODO
ZMODO ZP-NC14-P User manual

ZMODO
ZMODO H.264 User manual