ZMODO ZMD-DR-SFN6 User manual

16ChannelDVRQuickManual
0

16ChannelDVRQuickManual
1
Notes:
ThepowersupplyofthisDVRisprovidedthroughDC12V3Aadapter,pleasecheckthe
poweroutletbeforeinstallationandensureitcanmeettherequirementsofthe
adapter;
DonotplacetheDVRataplacesubjecttorainandmoisture;
DonotinstalltheDVRataplacesubjecttoviolentvibration;
DonotinstalltheDVRataplacesubjecttodirectsunlight,andbefarawayfromhigh
temperatureenvironment;
TheDVR’sbackpanelshouldbeplaced15cmormoreawayfromotherobjectsorwall
forcooling;
TheDVRshouldworkundertemperature,humidityandvoltageaccordingtoits
technicalspecifications;
ThespacewhereDVRisinstalledshouldnotbestoredwithcorrosivechemicalsthat
mayproducevolatilegasestoavoidaffectingtheDVR’slife.
TheDVRshouldbeinstalledinaspacewithoutmuchdust,andtheenvironment
shouldbekeptcleanandtidy.
Propergroundingshouldbeguaranteedduringoperation;
TheDVRshouldbeinstalledtoensureproperconnectionwithotherdevices.
PleasebuyHDDfromofficialchanneltomeetDVR’slong‐timeandlargedatareadingand
writingrequirements.
Statement
Thismanualonlyintroducesbasicoperation,andpleasereferstotheE‐manualinthe
CDfordetailedoperation.
Pleaserefertotherealproductandthismanualisjustforreference.
Productsupdatewithoutfurthernotice.Nuancesofpartialfunctionsarepermitted
afterupdating.
PleasecontacttheCustomerServiceDepartmentforthelatestprogramand
supplementaryinstructionfiles.
Thismanualisapplicabletovariousmodels,andthespecificoperationofeach
productisnotlistedhere.UserscanoperatetheDVRbasedonthismanualforthe
actualproducts.
Wehavetriedourbesttoensurethecompletenessandaccuracyofthismanual.
However,duetotheunstableenvironmentandotherreasons,therealvalueofsome
datamaydiffer.Ifanyproblemordisputearises,thecompany’sfinalexplanationwill
prevail.
Ifcarryingoutoperationnotaccordingtotheinstructionofthismanual,theusers
shallbearthelossessustained.

16ChannelDVRQuickManual
2
Contents
Chapter1Open‐caseinspectionandquickinstallation.....................................3
1.1Open‐caseinspection...........................................................................3
1.2Productappearanceandport..............................................................3
1.3QuickInstallation..................................................................................4
1.3.1HDDinstallation........................................................................4
1.3.2Poweron...................................................................................4
Chapter2Softwareinterfacebasicoperation...................................................5
2.1Poweronandlogin..............................................................................5
2.2Mainmenu...........................................................................................5
2.3Recordingmode...................................................................................5
2.4RecordingSearchandPlayback............................................................6
2.4.1Searchandplayback..................................................................6
2.4.2Recordingbackup......................................................................6
2.5AlarmSetup..........................................................................................7
2.5.1Alarmbasicsetup......................................................................7
2.5.2E‐mailalarmsetup....................................................................8
2.6PTZControl...........................................................................................8
2.7MotionDetection.................................................................................9
2.8Networksetup....................................................................................10
2.9Portmapping......................................................................................11
2.10Mobilephonesurveillance...............................................................12
2.10.1Mobilephonesurveillance....................................................12
2.10.2MobilePhoneendlogin........................................................13
2.11Clientendandplayingsoftware.......................................................13
2.11.1Clientendinstallation&running..........................................13
2.11.2Player.....................................................................................14
2.12IElogin..............................................................................................14
2.12.1Controlsinstallationdownload.............................................14
2.12.2IElogin...................................................................................15
2.13CentralManagementSoftware(CMS).............................................16
Appendix:SystemConnectionPicture.............................................................18

16ChannelDVRQuickManual
3
Chapter 1 Open-case inspection and quick installation
1.1Opencaseinspection
◆Whenyoureceivetheproducts,pleasecheckiftheDVRiscompleteormakesureif
thereisanyaccidentaldamageduringtransportation.
◆Then,pleaseopenthepackageandcheckiftheaccessoriesarecomplete.Youcan
removetheprotectivefilmoftheDVRpackage.
ThePackagecontainsthefollowingaccessories:
◎OneIRremotecontroller
◎Onepairofremotecontrollerbatteries
◎OnepieceofProductCertificate
◎OnepieceofproductWarrantyCard
◎OnepieceofUserManual
◎OneSATAHDDcable(alreadyinstalledinthecase)
◎OneDC12V3Apoweradapter
◎OneHDDbracket(alreadyinstalled)andasetofmountingscrews
◎OneHDDpowersupplycable(installedinthecase)
◎OnepieceofCD
Specificproductaccessoriesmaybedifferent,sopleaserefertotherealproducts.
1.2Productappearanceandport
Front panel:
1.Power switch 2.Rewind 3.Play 4.Pause 5.Foward 6.Manual start/stop recording
7.Mute 8.Video search 9.PTZ control 10.REC:Video recording indicator; PWR: Power
LED 11.ESC:Exit/Return 12.DISPLAY:Display mode; MENU: Main menu
13.up,down,left,right and Confirm 14.USB interface(the upper one for USB flash disk, the
one below for mouse connection) 15.Remote control infrared receiver
13
6
1 2 3 4 5 7 8 9 11 12 14 15

16ChannelDVRQuickManual
4
Back panel:
1. Video in 2. Video out (BNC port) 3. Audio out 4. Audio in 5. VGA output port
6.Network port 7.RS485 8.Public terminal 9. Alarm output 10. Alarm input 11.
Power input 12.Grounding terminal
.
1.3QuickInstallation
1.3.1HDDinstallation
HDDmustbeinstalledbytechnicianstoavoiddamagetotheequipmentandharddisk.The
DVRmainframemustbepoweredoffbeforeoperation.TheDVRsupportsHDDwithSATA
HDDinterface.
Installationproceduresareasfollows:
A.OpentheequipmentandaHDDbracketcanbeseen;
B.ConnecttheHDDdataandpowercablewell;
C.PuttheHDDintothebracketandtargetthescrewholesatthebracket;
D.FixtheHDDonthebracketwithscrews,andcovertheDVR.
Note: The newly installed HDD can be served for video recording after formatting on
the mainframe.
1.3.2Poweron
ConnecttheDC12V3Apoweradapterintothepowersocket,andpressthepowerbutton,
therecorderwillbeon.Thepowerindicator“POWER”isonatthistime,themonitorwill
display4/8/1 6 channelmonitoringimage.
Note:1.IftheHDDfailstobeinstalledwhenDVRmainframeispoweron,orthenewly
installedHDDfailstobeformattedonthemainframe,thered“H”logowillbeshownin
videopre‐viewpicture.
2.ThenewlyinstalledHDDcannotbeuseduntilformattedintheequipmentas
follows:MainMenu→HDD→HDDFormat.Thesystemwillberestartedaftercompletionof
formatting.
6
5(7、8、9、10)
1 2 3 4 12
11

16ChannelDVRQuickManual
5
Chapter 2 Software interface basic operation
2.1Poweronandlogin
TheDVR’sinitialdeviceIDis000000withoutanypassword,theusercanentermainmenu
directly.Userscansetordinarypasswordandadministratorpassword.Theadministrator
hasalltheoperatingprivileges,whileordinaryuserscanonlycarryoutmonitorandvideo
search/playbackoperations.(Themainframewillmatchautomaticallywhenyouenter
password,anddifferentpermissionswillbegivenaccordingtodifferentpasswords).
Ifyouwanttooperateinmainmenuafterthepasswordisset,thesystemwilldisplay“user
login”interface:
DeviceID:ItisjustokaytoenterdeviceIDdisplayed
ontherightsideincorrespondinginputbox.The
defaultIDwillbeguidedwhenmouseoperationis
done.Werecommendsettingapasswordwhen
remotecontrollerisoperatingmanytypesof
equipment,todistinguishthroughtargeted
equipmentcodeinput,ortheremotecontrollerwill
disturbtheadjacentmainframe.
2.2Mainmenu
Clickmouserightbuttonaftersystemstartup,andquickoperationsareavailabletoDVR
systeminthepop‐upmenu.Userscansetorcontrolparametersincludingmainmenu,key
lock,videosearch,PTZcontrolandvideo
recording.
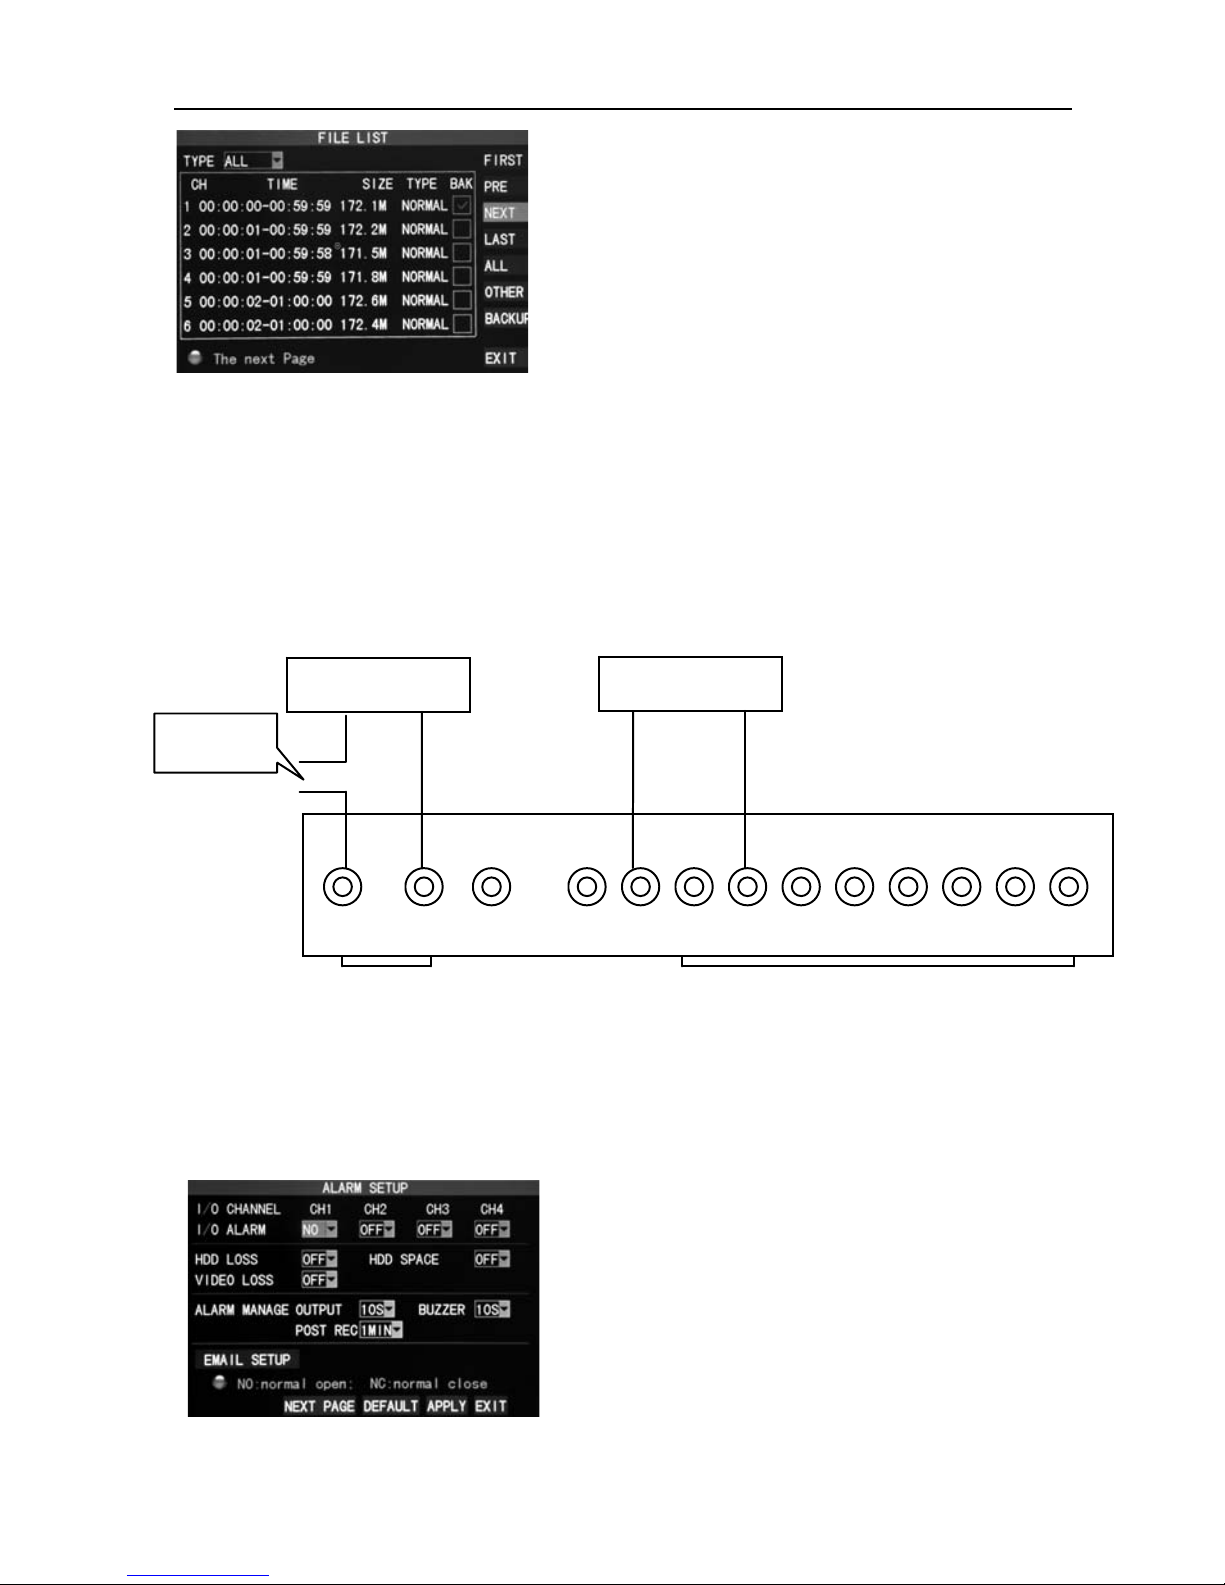
【Playback】:Searchdetailedrecordingfiles
【Record】:Settherecordingmodeincluding
channels,quality,framerate,etc.
【HDD】:CheckHDDcapacityandformatting
【Setup】:Setupofsystembasicinformation
includinglanguage,time,userpassword,etc.
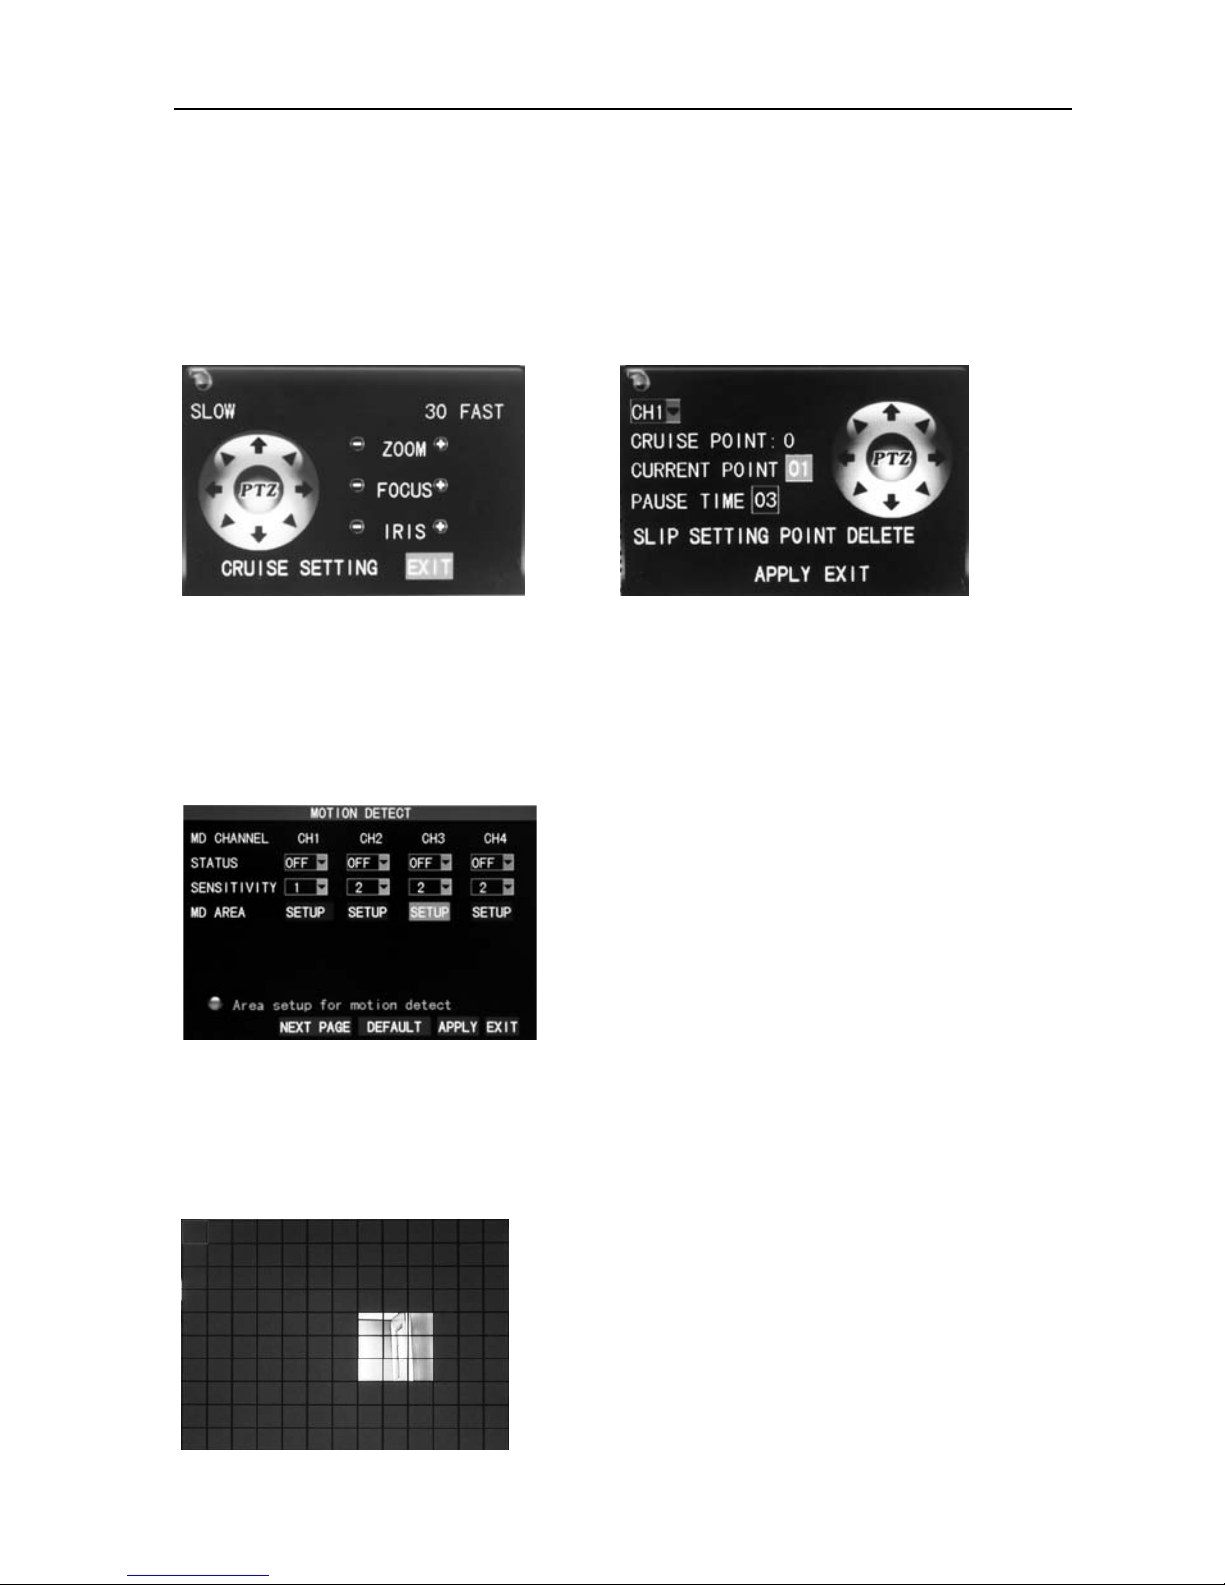
【Advanced】:Setupofalarm,motiondetection,
andmobilephonesurveillance,etc.
【Exit】:Exitmenu
Note: For detailed operation, please refer to the detailed operation manual in the CD.
2.3Recordingmode
Thedefaultrecordingmodeusedforthefirsttimeisthenormallyopenandcontinuous
video.EntertheRecordingmodefrom“Mainmenu”—>“Record”,asshownbelow:
Channel:Selectthecorrespondingvideochannelonoroff(16chDVRwith16channels).
Resolution:D1(704x576),Half‐D1(704x288)andCIF(352x288),amongwhichD1isofthe
highestresolution.
Quality:best,fine,andnormalquality,correspondingto3datastreamstandardsofhighest,
highandmediumbitrates

16ChannelDVRQuickManual
6
Framerate:Adjustvideoframerate
Note:Thetotalframeratefor4channelsDVRis
100fps,for8channelsis275fps,andfor16
channelsis400fps.
Audio:Settherecordswitch.
Filelength:Therearefouroptions‐15minutes,30
minutes,45minutesand60minutes.
RECmode:StartuprecordingandTimingrecording
Whenpoweredon:startingrecordingwhenthe
DVRisenergized(Itworksonlyifthecorrespondingchannelisenabledinthe“Channel”
option.)
Bytime:performingrecordingasscheduled.When“timingrecording”isselected,the
“RecordTimeConfiguration”buttonwillappearontheright.Movethecursorhereand
press“Enter”toentertheRecordTimeConfigurationscreen,asshownbelow:
Channel:Select"All"orselectasinglechannel
Timeconfiguration:Settherecordingtypeineach
timeintervalofeachday.Red,green,and
backgroundcolorrepresentthealarmrecording,
regularrecording,andnotrecording.
2.4RecordingSearchandPlayback
2.4.1Searchandplayback
EntertheVideoSearchscreenfrom“MainMenu”→“VideoSearch”,asshownbelow:
1)Enterthespecificdateandtimeinthetime
frameandclick
【PLAY】
,andtheDVRplaysbackthe
videofromtheinputtime.
2)Enterthespecificdateandtime,click
【SEARCH】todisplayallrecordingstatusthisday
(thetimescheduleintheabovepicture),thered
colorrepresentingalarmrecording,green
representingnormalrecording,thebackground
representingnorecording.Selectthetimeandclick
【PLAY】,playbacktherecording.
3)Click【FILELIST】,thedetailedfileofthevideolisted(asshowninthepicturebelow),
selectandplaybackthefileyouwantto.
2.4.2Recordingbackup
Enterthe"filelist"interface(picturebelow)forbackupoperations.
ThebackupofrecordingfilescanbeachievedthroughUSBstoragedevice.Beforebackup,
theusermustinsertstorageperipheraldevicestoUSB2.0slotfirst.Movethecursorupand

16ChannelDVRQuickManual
7
downintheinterfaceofdetailedfilelistandselect
"Backup".Thefileisundergoingbackupandthe
backupprogressisdisplayedonthescreen.
Note: 1. When the space of the backup device is
smaller than the recording file capacity, the
system will remind the user of insufficient space.
2. After finishing backup, exiting from the backup device directly is ok;
3. Please refer to the operation manual in the CD for network backup.
2.5AlarmSetup
Alarmportconnection
TheinputsideonthebackpanelofDVRasFigurebelow,pleaserefertothephysical
interfaceofthefaceplate:
Note: The above picture is the type of normally on alarm, and normally off is the
opposite way.
2.5.1Alarmbasicsetup
Enterfrom【MainMenu】→【Advanced】→【AlarmSetup】,asshownbelow:
I/OALARM:EachchannelcorrespondstoanI/O
alarmstatus,whichmeansthatalarmrecordingof
correspondingchannelwillbestartedwhenone
channelalarminputisvalid.
ON:indicatingthatexternalalarmcircuitisopen
circuitwithoutalarmbutclosedcircuitwithalarm.
OFF:externalalarmcircuitthatisclosedcircuitwithoutalarmbutopencircuitwithalarm.
Alarmin
p
ut
Alarmout
p
ut
+‐ G
12VG1 2 3 4 5 6 7 8
AlarmAlarmtrigger
Power

16ChannelDVRQuickManual
8
Note:Whenanalarmisvalid,aredletter"I"willdisplayonthecorrespondingscreen.
HDDLOSS:On:WhenthesystemcannotrecognizetheHDD,aredlogo“H”willdisplayon
thechannel.
HDDSPACE:On:WhentheremainingspaceoftheHDDislessthan500M,theDVRwill
havealarmindication.
VIDEOLOSS:On:Whenthevideoofacertainchannelislost,thischannelwilldisplayinthe
lowerpartoftheVideoPreviewscreen:“VideoLoss”.
ALARMMANAGEMENTOUTPUT:includingalarmoutput,buzzerandpostalarmrecording.
2.5.2E‐mailalarmsetup
EmailsetupPrerequisite:ThemainframemustbeconnectedtotheWAN.Pleasereferto
theChapterNetworkfornetworkconnection.
Whenmotiondetectionistriggered,thesystemwillcaptureapictureatthetimeof
triggeringandsendittothecorrespondingmailbox.
SSL:asecurelinktransmissionprotocol.“Off”is
usuallychosen.
SMTPPORT:themailingportofthemailboxserver,
usuallybeing25,withtheexceptionofafew
mailboxes,suchasthemailingportoftheGMAIL
serverwhoseportnumberis465.
SMTP:theserveraddressofthemailboxused,for
example,theSMTPservermailingaddressofthe
163mailboxissmtp.163.com;pleasecheckthisaddressfromyourmailboxsupplierfor
differentmailboxes.
SENDEMAIL:themailboxaddressusedtosendmails,theabove‐mentionedSMTPserveris
alsotheserverofthecorrespondingsenderaddress.
SENDPW:thepasswordofthemailboxusedtosendmails.
RECVEMAIL:theaddressusedtoreceivethepicturetransmittedaftertheDVRmotion
detectionalarm.Pleasepayattentiontothespaceofyourmailboxtimelylestthenormal
operationofthemailboxbeaffectedduetoanexcessnumberofpictures.
2.6PTZControl
Enterfrom"MainMenu"→"Advanced"tothe"PTZsetup"interface,asshownbelow:
CHANNEL:selectingthechanneltowhichthe
domecameraisconnected(toselectanyofthe
latter4channels,click“NextPage”)
PROTOCOL:selectingthedomeprotocolofthe
correspondingbrandandmodel,withthree
options,Pelco‐Dbydefault
BAUDRATE:selectingthebaudrateusedbythe

16ChannelDVRQuickManual
9
dome,withthe4optionsof1200,2400,4800and9600
DATABIT:withtheoptionsof5,6,7and8,8bydefault
STOPBIT:withtheoptionsof1and2,1bydefault
VERIFY:withthe5optionsofNone/Odd/Even/Mark/Space,Nonebydefault
ADDRESS:CompletethePTZcodeofthecorrespondingchannel.
Justset“protocol”,“baudrate”and“addresscode”inordertosetthePTZ.
Click"PTZcontrol"inthemaininterface,thefollowingscreenwillpopup(leftpicture):
OperatethePTZwithmousethroughthekeypadontheinterface.Setthecruisepointin
thecruisesetup,asshownontherightpictureabove.
2.7MotionDetection
EntertheMotionDetectionscreenfrom“MainMenu”→“Advanced”to“MotionDetection”,
asshownbelow:
STATUS:Eachchannelhasacorrespondingswitch.
Select“On”or“Off”.
SENSITIVITY:Eachchannelhasacorresponding
sensitivitysetting,withthe4levelsof1,2,3and4,
inwhich4isthehighest.Selectsensitivityfor
confirmation.
MDAREA:Eachchannelhasacorresponding
motiondetectionareasetting.Movethecursorto“Setup”ofthecorrespondingchannel,
andpress“Enter”toenterthemotionareasetupscreenofthischannel,wherearedblock
indicatesmotiondetectionisactivatedforthisareaandatransparentblockindicates
motiondetectionisnotactivated,asshownbelow.
Motiondetectionsetupprocedures:
A. Turn“On”thecorrespondingchannelinthe
“ChannelSwitch”option;
B. Setthesensitivitylevelasnecessary,usuallyset
at3or4;
C. Setthemotionareaofthecorresponding
channelinthe“AreaSetup”option;
D. Inthe“RecordingMode”screen,setthe
correspondingchannelto“On”inthe“Channel”
option;

16ChannelDVRQuickManual
10
E. Inthe“RecordingMode”screen,select“TimingRecording”inthe“RecordingMode”
option,alsoclick“RecordTimeConfiguration”toentertheRecordTime
Configurationscreenandsetthecorrespondingtimetoalarmrecording(seetiming
recordingin“RecordingMode”forthesetupmethod).
Afterthesetuphasbeendoneandmotiondetectionistriggered,aredletter“M”will
appearinthescreenofthischannel.See“Alarmprocesses”inSection2.5.1foralarm
processing.
Operatingprompt:
Remotecontrolleroperation:Use““(displaymode)toselectfullscreenorblank;
Mouseoperation:Left‐clickthemouseanddragthemotionboxtosettheareaofdynamic
detection.
Fordetailedoperationprocedures,pleaserefertothemanualintheCD.
2.8Networksetup
Enterthe“Network”screenfrom“MainMenu”→“Advanced”to“NetworkSetup”,as
shownbelow:
TYPE:with4options:STATIC,DHCP、PPPOEand3G.
STATIC:allocatinganIPaddressmanually.
DHCP:acquiringanIPaddressautomatically(leftpicturebelow).
AfterselectingtheDHCPmode,restartthesystemafterconfirmation.Afterstarting,the
systemwillestablishaconnectionwiththeDHCPserverautomatically.Whenthisis
successful,thisunitwillbeallocatedwithanIPaddress,whichwillbedisplayedonthe
screen.
PPPOE:broadbanddial‐upnetworkaccess,asshownontherightpicturebelow:
3G:3Gfunction(supportCDMA2000andWCDMA),selectWCDMA.Aftersuccesstoapply,
exitfrom3G,andthenyoucanseeIPinfo.
PPPOEnameandpassword:FillinthePPPOEuser
nameandpasswordprovidedbytheInternet
serviceprovider.
MEDIAPORT:theportnumberusedintheprivate
protocolcommunicationbetweentheDVRandPC,
usuallybeing9000bydefault.IfthisportofthePC
isoccupiedbyanyotherservice,pleasemodifyitto
anotherunusedport.
WEBPORT:thehttpport,usuallybeing80bydefault.Iftheadministratormodifiesthe

16ChannelDVRQuickManual
11
WEBporttoanyotherport,suchas88,youhavetopostfixtheIPwiththeportnumber,
andenter“http://192.168.1.223:88”intheaddressbarwhenaccessingtheDVRviatheIE.
IPADDRESS:allocatinganIPaddressaccordingtothenetworkenvironmentoftheDVR
SUBNETMASK:fillinginasubnetmaskaccordingtothenetworkenvironmentoftheDVR
GATEWAY:SettingthegatewayaccordingtothenetworkenvironmentoftheDVR.Ifthere
isnorouterdeviceinthenetwork,pleaseallocateanIPaddressonthesamenetwork.If
thereisarouterdevice,youhavetosetthecorrespondinggateway.
DNS1andDNS2:settingtheIPaddressofthedomainnameserver(DNSvariesfromcityto
city);youcanrefertothedomainnameserverconfigurationsofthePC.
UPNP:WhentheUPNPfunctionison(UPNPfunctionontherouterendisalsoon),then
theDVRwillmaptheportandIPintotherouterautomatically.
DDNSSETUP
Click“DDNSSetup”toenterthescreen(picturebelow):
DDNS(DynamicDomainNameServer):withthetwooptionsof“ON”and“OFF”;whena
dynamicdomainnameserverisavailable,pleaseselectDDNS"ON";
SERVICE:Theusermayselecthis/herdesiredDDNSserver,withthe6optionsof3322;
dyndns;changeip;no‐ip;leadingdvrandoray.
HOSTNAME:Enterthehostnameregisteredonthedynamicdomainnameresolution
server;
USERNAME:Entertheusernameregisteredonthedynamicdomainnameserver;
PASSWORD:Enterthepasswordregisteredonthedynamicdomainnameserver.Please
refertothedetailedmanualintheCDfortheapplicationofdomainname.
2.9Portmapping
(IftherouterandDVRbothswitchonUPNPfunctions,thisstepcanbesaved)
Mappingsteps:
1)SetthehostIPaddress,refertoNetworkSetup.
2)Logintherouter(takingCiscorouterforexample).IftheIPaddressoftherouteris
192.168.1.1andafterthisIPhasbeenenteredintheIEaddressbar,aloginpromptboxwill
appear,asshownbelow:

16ChannelDVRQuickManual
12
ClickOKtoentertheroutermaininterface,clickthe【Applications&Gaming】asshown
below:
PuttheDVR'sIPandport(WEBport,media
port,phoneport)tofillinthecorresponding
location,theprotocolis“Both”,andthestate
is“Enable”orReboot.Thenclick“Save
Settings”,addotherportsinthesameway.
15961ismobilephonemonitoringport,this
portmustbeaddedinordertousethemobile
phonesurveillancefunction.Asshownabove,
88,9000and15961portcanallbemodifiedin
theDVRmainmenu.
2.10Mobilephonesurveillance
2.10.1Mobilephonesurveillance
ThemobilephonesurveillancefunctionofthisseriesDVRissupportedbymobilephonesof
theWindowsMobileandSymbianoperatingsystems.
Hereyoucanchecktheusernameand
passwordofthemonitoringvideobyusingthe
mobilephonetologintheDVR.
Serviceport:Thesettingrangeis1024–65535.
Thisportneedstobemappedontherouter,
andthesettingmethodisthesameasthe
mappingmethodofnetworksetting.
Username:adminbydefault.
Password:emptybydefault

16ChannelDVRQuickManual
13
2.10.2MobilePhoneendlogin
TakingtheiPhoneforexample,runtheiPhone’sAPPStoreprogramandsearchKMEye,find
theinstallationpackageofapplicationprogram,andclicktoinstall.
OpenthemobilephonesoftwarekMEye.Forthefirst‐timeuse,modifytheparameters.
Click【Settings】toentertheparametersettinginterface(leftpicturebelow),andthe
defaultportnumberis15961.TheusercansetotherportnumberontheDVRend.The
defaultpasswordisempty.Settheparameterswellandconnecttheserver,mobilephone
previewinterfacewilldisplay(rightpicturebelow):
Note:PleaserefertotheMobilePhoneSurveillanceManualfordetailedinstallation
methodandapplicationinstruction.
2.11Clientendandplayingsoftware
2.11.1Clientendinstallation&running
Openclientendfile“ ”intheCDandrunoneofthesefiles.Afterthe
successfulinstallationprompts,runthedesktopprogram(NetDvr),itwillshowalogin
interface,asshownbelow:
IPaddress:enterIPaddressordomain
name.
Mediaport:enterDVRmediaport.
Password:enterDVRnetworkpasswordand
emptybydefault.
Network:
LAN:IfthecomputerandDVRareinthe
PublicIPadressor
domain name

16ChannelDVRQuickManual
14
sameLAN,choose“LAN”mode.Inthismode,theimagevideotransmissionformatisCIF
andframerateis25fps.
Internet:IfthecomputerandDVRareindifferentLAN,choose“Internet”.Inthismode,the
imagevideotransmissionformatisCIFandtheframerateis6fps.
Language:ChineseandEnglishareoptional.
OFFLINE:opentheattachedplayerandplaylocalbackupvideofile.
Note: After successful login, the interface is the same as IE end. Please refer to the
manual in the CD for detailed operation.
2.11.2Player
H.264formatvideocompressionisadopted,andaspecialplayerisneeded.Openthe
player’sinstallationprogram“PlaybackSetup.exe”intheCD.
Afterinstallingsuccessfullyasprompted,runthedesktopprogram(Playbacksoftware)
andtheplayerinterfacewillappear:
Enterfrom“Files”→”Openlocalfiles”,andopenthecontentswhererecordingfilesare
saved.Choosetheformatas.264,andselectandplaytherecordingfilerequired,the
playingrecordingfilewilldisplayontheabovescreen.Correspondingplayingoperationand
settingcanbecarriedout.PleaserefertothemanualintheCDfordetailedoperation.
2.12IElogin
2.12.1Controlsinstallationdownload
Forexample,iftheIPaddressoftheDVRis192.168.1.223:88.TheURLalsocanbeDomain
orthepublicIPaddress.
Clickhere

16ChannelDVRQuickManual
15
2.12.2IElogin
Afterfinishingtheplug‐inunitsinstallationandthenlogin.Forexample,theDVR’sdomain
nameisdvrtest001.3322.organdtheportis88,
enterthedomainname
http://dvrtest001.3322.org:88intheIEaddressbar,
asshownbelow:
Password:EntertheIEpasswordofDVR.This
passwordissetattheInternetend.Pleasereferto
themanualintheCDfordetails.
Network:
LAN:IfthecomputerandDVRareinthesameLAN,choose“LAN”mode.Inthismode,the
imagevideotransmissionformatisCIFandtheframerateis25fps.
Internet:IfthecomputerandDVRareindifferentLAN,choose“Internet”.Inthismode,the
imagevideotransmissionformatisCIFandtheframerateis6fps.
Language:ChineseandEnglishareoptional.
Login:ClicktologinintoDVRinternet.
Reset:Re‐entertheaboveinformation.
Afterlogin,thefollowingreal‐timepreviewscreenwilldisplay.UserscanpreviewattheIE
EnterURL:
http://192.168.1.223:88 Click“install”

16ChannelDVRQuickManual
16
endandperformthefunctionsofvideoplayback,videosetup,alarmingsetup,etc.Please
refertothemanualintheCDfordetailedoperation.
2.13CentralManagementSoftware(CMS)
ThissystemsupportsconnectiontoDVRthroughInternet,notthroughthesupportof
intermediateserver.Itisconvenientforuser’smanagement.
Softwareinstallation:DoubleclicktorunCDfile“DVRCMS.msi”,finishasprompted.After
successfulinstallation,doubleclickdesktopicon andrunsoftware.Displayasthe
followingpicture:
【username】:Createtheinitialusernamefor
login
【password】:Createtheinitialpassword
【Re‐enter】:Confirmtheinitialpassword
【Language】:ChineseandEnglishareoptional.
Note:Iftheearlierversionofthissoftwarehas
alreadybeeninstalled,pleasemanuallydeletetheinstallationmenu“user.cfg”.Thedefault
installationmenuisC:\ProgramFiles\DVRCMS\.
Pleaseenterintothemaininterfaceofmanagementsoftwareaftersuccessfullogin:

16ChannelDVRQuickManual
17
Inthemanagementsoftware,thereareaddingdevice,livepreview,videoplayback,
systemsetup,advancedsetting,PTZcontrolandsoon.Pleaserefertothedetailed
instructionofCMSintheCDforspecificoperation.
AddDVR
DelDVR
DVRlist
System configuration
DVR
configurationPlayback
Lock
PTZcontrol
Screen split Capture Volume
Recording
Stopvideo

16ChannelDVRQuickManual
18
Appendix: System Connection Picture
Table of contents
Other ZMODO DVR manuals

ZMODO
ZMODO KW-0005 User manual

ZMODO
ZMODO ZMD-NV-SBN4 User manual

ZMODO
ZMODO 16CH DVR User manual

ZMODO
ZMODO SFN6 User manual

ZMODO
ZMODO H.264 User manual

ZMODO
ZMODO ZMD-DT-SFN6 User manual

ZMODO
ZMODO DVR User manual

ZMODO
ZMODO DVR User manual

ZMODO
ZMODO ZMD-DD-SBN4 User manual

ZMODO
ZMODO ZMD-DT-SJN6 Instruction manual

ZMODO
ZMODO DVR-H9106UVD-SV User manual

ZMODO
ZMODO H.264 User manual

ZMODO
ZMODO Funlux Assembly instructions

ZMODO
ZMODO 4CH User manual

ZMODO
ZMODO DVR User manual

ZMODO
ZMODO ZM-KW0003-500GB User manual

ZMODO
ZMODO ZP-NC14-P User manual

ZMODO
ZMODO H9108UV User manual

ZMODO
ZMODO ZP-NE14-S User manual

ZMODO
ZMODO ZMD-NV-SBN4 User manual