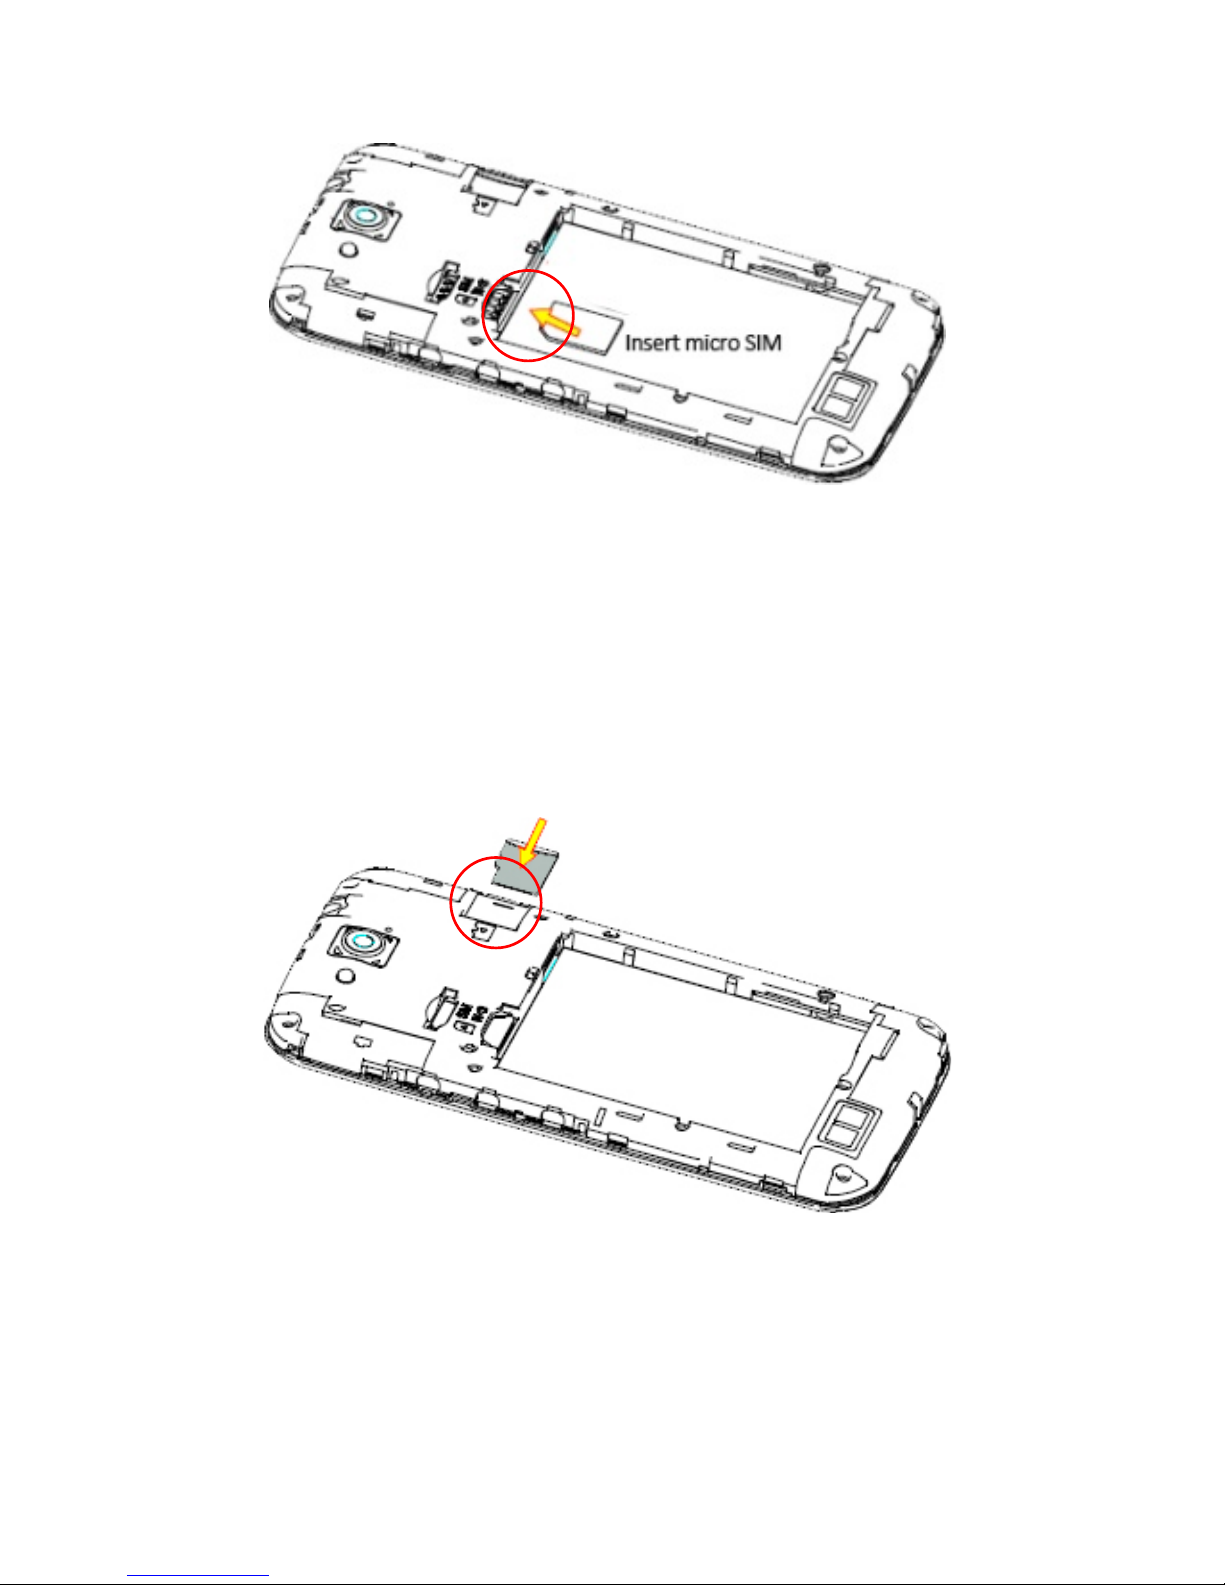
Zte 4G Fit Smart User manual

1
ZTE 4G Fit Smart
User Guide
Contents
Getting Started .............................2
Calls ..............................................9
Messages ............................10
Notifications ...............................12
Contacts ..............................14
Settings ................................18
Apps Menu ..........................19
Connect to a Computer ..............19
Connect to the Internet..............19
Using the Browser ...................... 20
Bluetooth ...................................21
Using Multimedia Functions ......21
Security ......................................24
Updating your device .................25
Troubleshooting .........................25
Warranty Information ................27
Technical Specifications.............. 28
Safety and Warning Notices.......29
ZTE Australia provides dedicated support with a local call centre and social media
outreach. Search ‘ZTE Australia’ on Facebook , Google+ and Twitter to keep in touch.
V1.0 April 2015
Copyright © 2015 ZTE CORPORATION.
All rights reserved.

2
Getting Started
Get to know your phone
TIP
The Back and Menu keys can be swapped by user configuration.
Go to Apps > Settings > Hard Key to change the default configuration.

3
Key Functions
Key Function
Power Key
•
Press to wake up your phone.
•
Press and hold to select Silent, Vibrate or Flight mode, or to power
on and off.
•
Press to switch your phone to Sleep mode.
Back
•
Touch to go to the previous screen.
Home
•
Touch to return to the Home Screen from any application or
screen.
•
Press and hold for Google Now
Menu /
Options
•
Press for Options on the current screen
•
Press and hold to view recent apps.
Volume Keys
•Press or hold to turn the volume up or down.
Apps
•
Access the device Applications and Widgets menu.
LED Status indicator
Red Less than 10% battery charge
Orange Between 10 – 70% charge
Green More than 70% charge
LED Flashing
Message or Missed Call Notification.
The colour represents the charge level shown above.
Insert your SIM Card
This device only supports micro SIM or 3FF size.
1. Remove the back cover.

4
2. Hold the SIM card with the cut corner as shown and push it fully into the SIM slot.
Install a microSD Card (optional)
A microSD card can be installed or removed while the phone is turned on. You need to
unmount the microSD card before removing it. The device supports microSD(HC) cards
up to 32GB.
1. Remove the back cover.
2. Hold your microSD card with the metal contacts facing down and push in until it
clicks into place.

5
Insert the Battery
Charge the Battery
1. Check the orientation of the charging jack and gently insert into the handset
charging port.
2. Connect the charger to a standard AC wall outlet.
3. Disconnect the charger when the battery is fully charged.
4. Battery life will improve after a few charge cycles.
5. Do not harshly pull on the USB charging lead as this could damge your device. Be
careful not to trip over the charging lead whilst it is plgged in.
Battery Warnings
Do not disassemble or short circuit the battery terminals.
Do not dispose of the battery in a fire, the battery may explode.
Only use genuine batteries and chargers.

6
Battery Tips
●After 2-3 charge / discharge cycles the battery life will improve.
●Use regular top up charging rather than letting the battery fully discharge.
●Always charge promptly when flat.
●To avoid the battery entering a deep discharged state charge the battery promptly
when flat.
●If the battery is deeply discharged it can take 30 minutes to start charging. Leave it
on charge to recover the battery.
●Keep your handset and battery cool. High temperatures degrade the battery more
quickly.
●Normal charge time is 3-4 hours. Do not charge more than 24hrs.
●When not using the phone for long periods charge to approx 40% and remove the
battery.
●Turn off Bluetooth and Wi-Fi when not in use, and set the screen brightness to
automatic to maximise battery life.
Important Notes:
●Only use the AC charger, battery and USB lead supplied.
●Insert the charger lead carefully.
●Check the plug and socket are aligned correctly.
●Do NOT use excessive force which may damage the USB port.
●Be careful to avoid tripping on the lead whilst it is plugged in.
●Physical damage to the USB port is NOT covered by warranty.
●Normal charge time is 3-4 hours.
●Do not leave on charge for more than 24hrs.
●To maximise battery life limit multimedia functions.
●Charge the battery between 0°C~45°C. Charge the battery promptly when
flat.
●With poor network conditions (less than 2 bars) battery life is reduced.
●When not using the phone for long periods remove the battery.

7
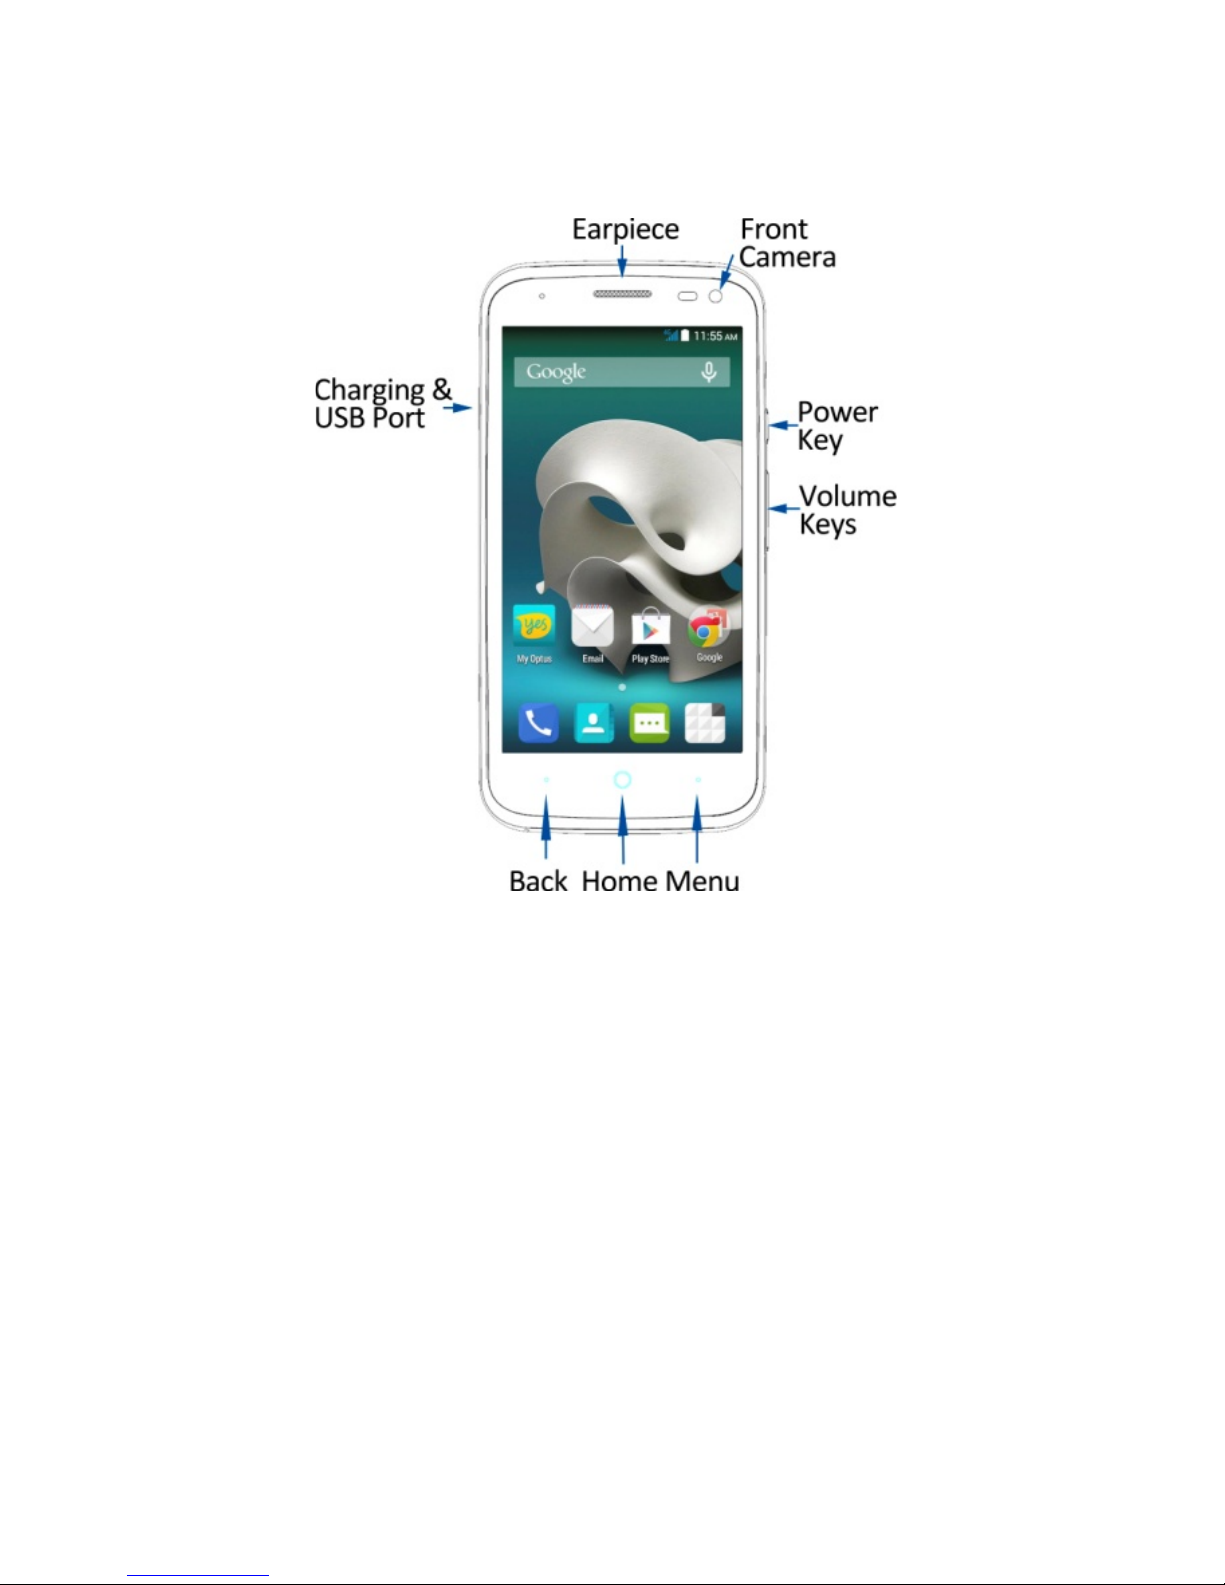
Power Your Phone On or Off
●Hold the Power Key to switch on your phone.
●To switch it off, hold the Power Key to view the options. Touch Power off, and then
touch OK.
Wake Up Your Phone
1. Press the Power Key to activate your screen display.
2. Long press on the screen to unlock the device.
NOTE: If you have set an unlock pattern, PIN or password for your phone, you’ll need
to draw the pattern or enter the PIN/password to unlock your screen.
First time power up, Google Account
It is recommended that you create or log in with a Google account. Creating an account
gives you access to the Google Play Store to update, download and manage your
applications, and can protect your account by backing up Contacts and other data. If
you lock your device and forget your unlock code (PIN, pattern etc.) then you can
unlock the device using your Google account password.
Using the Touch Screen
You can use the touch screen in various ways:
•Touch text entry fields to bring up the keyboard. Touch buttons, or icons to use
them
•Touch and Hold. A long press on some icons brings up further options. Ie In
Messaging, press and hold a message to Forward.
•Swipe horizontally or vertically on screens to move between screens.
•Drag, press and hold on an icon to move it on the screen. Release at the target
position.
•Pinch Zoom, on the Camera, Maps, Browser and Gallery you can zoom in and out by
placing two fingers on the screen at once and pinching together or spreading apart.
•Auto rotation when enabled will automatically rotate from portrait to landscape.
Access the Quick Settings Panel
Swipe down from the top of the screen and touch the Quick Setting icon. Tap to enable
or disable the features. Some icons can be configured with a long press (press and
hold).
Connect to a local Wi-Fi network
1. Touch Home > Apps > Settings > Wi-Fi, tap the switch to turn On.
2. Tap Wi-Fi to view available networks.
3. Touch a network name to connect to it.
4. Previously connected networks will connect automatically. If the network is secured

8
enter the password.
How to get to Settings
There are a few ways to get to the Settings menu:
1. Go to Apps > Settings
2. Pull down the Notifications panel and press >
From Settings you can customise all your phone settings to suit your needs.
Opening apps
Touch Home > Apps to open the Apps menu. Slide left or right to view more.
Place Apps on the Home Screen
Touch and hold an App icon from the Apps menu to copy it to your home screen. Drag
the icon and release at the required destination on your home screen.
Add Widgets to the Home Screen
Touch the Menu (Options) Key > Widgets to add various Widgets to your home screen.
Touch and hold the Widget and drag to the required destination on your home screen.
Phone Status Icons
The phone status icons are shown in the top right portion of the notifications panel:
4G 4G LTE network
No Signal
3G 3G network
Signal strength (no data)
E
Edge Network
Signal strength (data ready)
G
GSM network
Mobile data in use
Flight mode
Ringer off
Emergency calls only
Microphone off (muted)
Battery flat
Vibrate on
Battery low
Speaker on
Battery partially drained
Connected to a Wi-Fi network
Battery full
Wi-Fi data in use
/
Battery charging
Headset connected
Bluetooth on
Factory Reset - if you forget your PIN, password or unlock pattern
Switch the handset off. Press and hold the Volume Up key then the power key. The
handset will enter Android Recovery mode. Select wipe data/factory reset from the
menu and press the volume Up to confirm. Select OK from the next screen to confirm
the reset process.

9
Calls
Making Calls
1. Touch Home > > select the dialer tab
2. Enter the phone number using the keypad. Touch to delete wrong digits.
3. Press Options to add a Pause or Wait if required
4. Press and hold the 0 key to enter the plus (+) symbol for international dialling.
5. Touch the Phone icon below the keypad to dial.
Options during a call
Press to open the number pad
Press to use loudspeaker (Handsfree) mode
Press to mute the microphone
Press to put the current call on hold
Press to dial in another party (Conference)
Press to End the call
When you receive a phone call
The display shows the caller ID and any additional information about the caller saved in
Contacts.
swipe right to to answer the call,
swipe left to to reject the call,
swipe up to to reject the call and send an SMS which is displayed on screen.
Set this at Dialler > Options > Settings > Other Settings > Quick responses
TIP: You can silence the incoming ring by pressing either of the Volume keys.
Adjusting Volumes
The side volume keys work in three different ways:
1. When you are on a call use the volume keys to adjust the in call volume.
2. When you are using a media application, such as music, video or games, the volume
keys adjust the media volume.
3. At other times when you are not in either of the above states, the volume keys set
the ringtone volume or enable vibrate mode at minimum volume.
Enable Silent or Vibrate mode
Press and hold the Power Key and then touch to enable silent mode, touch
to enable vibrate mode, or touch to disable silent mode.
Go to Apps > Settings > Audio Profiles > > Vibrate to enable Vibrate on Ring.

10
Make a Call from Contacts, Messages, Email or the internet
Whenever you see a Phone icon or a phone number you can touch this to make a
call. This applies throughout your device.
Eg Contacts, touch the desired Contact to view their details then touch their phone
number to make a call.
Messages
You can use Messages to exchange text messages (SMS) and multimedia messages
(MMS) which contain attachments such as photos and videos.
Open the Messaging Screen
Touch in the Home Screen or from Apps
The Messaging screen opens, where you can create a new message, search for
messages, or open an ongoing message thread.
1. Touch to write a new message.
2. Touch to search within messages
3. Touch an existing message to open the thread.
Send a Text Message
On the Messaging screen, touch at the bottom to create a new message.
Enter the recipient’s number or, if the recipient is stored in Contacts the first letters of
their name. As matching contacts appear, you can touch a suggested recipient.
Touch the Type text message field, and enter your message using the keypad.
Touch to Send.
Reply to a Message
Messages you receive are appended to existing threads of the same number. A new
thread is created for new numbers.
1. On the Messaging screen, touch the thread that has the message you want to reply
to.
2. Type your reply in the text box at the bottom. You can touch the attach icon +if you
want to reply with an MMS.
3. Touch to Send.
View Message Details
1. Touch and hold a message in a thread.
2. Touch View message details to see the message type, sender or receiver, time and
date .

11
Send a Multimedia Message
On the Messaging screen, touch at the bottom to create a new message.
Enter the recipient and the text of the message, as you do when sending a text
message. Touch the icon to add an attachment:
Capture picture
Take a photo and add to your message.
Capture video
Shoot a video clip and add to your message.
Record audio
Record an audio file and add to your message.
Contact
Select a contact to add to your message as an attachment.
Pictures
Select a picture to add to your message.
Videos
Select a video clip to attach to your message.
Audio
Select an audio file to add to your message.
Calendar
Add a Calendar event such as an appointment or meeting (VCS).
Slideshow
Add a series of pictures
Touch to Send.
TIPS: The maximum MMS size is 300KB. Large images are automatically re-sized but
video files may be too large to send. Send large Video files by email instead or share
using Social Media.
Forward a Message
In Messaging touch the thread to open the SMS.
1. Touch and hold the message.
2. Touch Forward in the menu that opens.
3. Enter a recipient for the message and edit the content if you want.
4. Touch to Send.
Delete messages:
1. On the Messaging screen, touch a thread.
2. Touch Menu > Select item(s).
3. Touch the messages you want to delete.
4. Touch at the bottom.
5. Touch Delete.

12
Delete message threads:
1. On the Messaging screen, touch and hold the thread to delete.
2. If there are more threads you want to delete, touch them one by one.
3. Touch at the bottom.
4. Touch Delete.
Message Settings
Touch Menu > Settings in the Messaging screen to change Messaging settings.
Enable Group MMS
Go to Message Settings (see above) > Multimedia and check Group messaging. All
multi party SMS will be converted to MMS. Recipients can use Reply All to reply to the
whole group.
MMS requires the sender and receiver to have an active data account. Users without
data will not receive the MMS.
Notifications
Open/Close the Notification Panel
Notifications report the arrival of new messages, calendar events, and alarms, as well
as ongoing events, such as when you've configured your phone as a Wi-Fi hotspot. You
can open the notification panel to view the details of notifications.
•To open the notification panel, swipe your finger down from the top of the screen.
•To close the notification panel, swipe your finger up from the bottom of the screen
or touch the Back Key.
Respond to or Remove a Notification
In the notification panel, you can respond to a notification or remove the notifications.
•To respond to a notification, just touch it.
•To remove a notification, swipe it sideways.
•To dismiss all notifications touch in the top right corner
•Most apps that send notifications, such as Gmail and Hangouts, have notification
settings that you can adjust.

13
Notification Icons
The notification icons are shown in the top left portion of the notifications panel:
New SMS
microSD card not mounted
New MMS
microSD card removed
New Email
Upcoming event
New Gmail message
Call on hold
New Hangouts message
New Wi-Fi network detected
Problem with SMS/MMS
delivery Downloading data
Missed call
Uploading data
Call in progress
USB tethering is on
USB connected Portable Wi-Fi hotspot or Wi-Fi direct
is on
Song is playing
GPS is on
Updates available
Bluetooth is on
Connect to a computer
Connecting to a computer enables you to transfer music, pictures and other files to and
from your handset. There are various ways to do this.
1. Connect using a USB lead. Select MTP on the handset to browse the handset folders
on your PC.
First time use you can run the setup file to install the handset drivers (PC). MAC users
need to download the File Transfer app from Android onto your MAC device.
2. Use Google Drive to share files in the cloud
3. Connect via Bluetooth to share files with other devices.

14
Contacts
Add contacts to your phone and synchronise them with your Google account or other
accounts that support contact syncing.
To see your contacts, touch Home > . From there, touch the tabs on the top of the
screen to quickly switch to contact groups or favourites .
•Touch Home > and touch the all contacts tab to access your contact list.
•Scroll through the list to view all your contacts.
•Touch a contact to view its details.
TIP: There is a slider shown when you touch the right side of the screen. To go directly
to a letter, press and hold the slider and drag it to a letter.
Adding a New Contact
•Touch Home > and touch the all contacts tab .
•Touch to add a new contact.
•Touch the account to choose where to save the contact. If a sync account is selected,
the contacts will be synced automatically with your account online.
•Enter the contact name, phone numbers, email addresses, and other information.
•Touch DONE to save the contact.
Setting Up Your Own Profile
You can create your own name card in your phone.
•Touch Home > and touch the all contacts tab .
•Scroll to the top of the screen and touch Set up my profile.
•Edit your profile information and touch DONE.
Import, Export, and Share Contacts
You can import/export contacts from/to your SIM or Storage (microSD card). This is
useful when transferring contacts between different devices.
Import your SIM card Contacts to add more features such as dedicated Ringtone,
Photos etc.
Import Contacts From the SIM Card
•Touch Home > > Options (menu key) > Import/export
•Select Import from ‘Optus Mobile’ (SIM card)
•Tap Next to continue
•Tap to select individual contacts, or use the box in the top right to Select All. Tap OK
when done.

15
Import Contacts From the microSD Card
•Touch Home > > Options
•Touch Import/export > Import from Storage
•Select an account to save the contacts.
•Select the vCard file(s) in the microSD card and touch OK.
Export Contacts to the SIM Card
•Touch Home > > Options > Import/export
•Select to Copy Contacts From, press Next to continue
•Select Copy Contact To ‘Optus Mobile’, press Next,
•Tap individual contacts, or the box to Select All and then touch OK.
Share Contacts
•Touch Home > , touch the all contacts tab .
•Locate and touch the Contact
•Touch Options > Share
•Choose to share via Bluetooth, Email, Gmail, Messaging, etc
•To share Multiple contacts touch Options > Share visible contacts, select the
Contacts > OK, then select the Share path.
Add a Contact to Favourites
You can add the contacts used frequently to Favourites, so you can find them quickly.
•Touch Home > and touch the all contacts tab .
•Touch a contact and then touch to add to favourites.
•Contacts must be saved in Phone Storage, or your Google account to add to
Favorites.
Remove a Contact From Favourites
•Touch Home > > touch the favourites tab .
•Touch a favourite contact and then touch .
Using Groups
•Touch Home > and touch the contact groups tab .
•Touch to create a new group.
•Touch the account field on the top of the screen to choose an account for the group.
•Enter the group name and touch DONE.

16
Add Members to a Group
•Touch Home > and touch the contact groups tab .
•Touch a group and then touch .
•Touch to select the contacts to add as group members.
•Touch .
Delete a Group
•Touch Home > > touch the contact groups tab .
•Touch a group and then touch Options > Delete group.
•Touch OK to delete the group. The contacts in the group will not be deleted.
Edit a Group
•Touch Home > > touch the contact groups tab .
•Touch a group and then touch Options.
•Touch Edit group to edit the group name. Or touch Select item(s) to select the
members you don’t need and remove them.
Searching for a Contact
•Touch Home > .
•Touch on the bottom of the screen.
•Input the contact name to search. The contacts matched will be listed.
Edit Contact Details
•Touch Home > .
•Touch a contact to edit and then touch Options > Edit.
•Edit the contact and touch DONE when finished
Set a Ringtone for a Contact
•Touch Home > Touch a contact to set a ringtone and then touch Options > Set
ringtone (Contact must be saved on the phone)
•Select a ringtone and touch OK.
Delete a Contact
•Touch Home > .
•Touch a contact to delete and touch Options > Delete.
•Touch OK to confirm.

17
To delete several contacts:
•Touch Home >
•Touch Options > Delete contact
•Touch to select the Contacts, then touch OK to confirm.
Join Contacts
Your phone can synchronise with multiple accounts containing your contact
information (such as Google, Microsoft Exchange ActiveSync, Facebook and Twitter).
When you synchronise your phone with those accounts, each account adds a separate
contact entry in the Contacts list.
The Join and Separate feature is only available in the menu after synchronising multiple
contact sources.
You can merge all the separate information of multiple accounts into one record in the
Contacts list.
•Touch Home > .
•Touch a contact to set as the prime contact. This is the contact you will see in the list
after the joining.
•Touch Options > Edit> Options > Join. The phone will list the suggested contacts to
join.
•Touch the contact whose information you want to join with the first contact.
The information from the second contact is added to the first contact, and the second
contact is no longer displayed in the Contacts list.
Separate Contact Information
If contact information from different sources was joined in error, you can separate the
information back into individual contacts on your phone.
•Touch Home > .
•Touch a contact you want to separate, to view its details.
•Touch Options > Edit > Options > Separate.
•Touch OK to confirm.

18
Settings
How to get to Settings
There are a few ways to get to the Settings menu:
1. Go to Apps > Settings
2. Pull down the Notifications panel and press >
From Settings you can customise all your phone settings to suit your needs.
Settings Menu
Wi-Fi
Touch the switch to turn Wi-Fi on or off. Touch Wi-Fi to
view and connect to available networks.
Bluetooth
Touch the switch to turn Bluetooth on or off. Touch
Bluetooth to view and connect to available networks.
Data Usage
Track your data usage. Enable and disable data
connectivity. Set a data limit.
More…
Switch Flight mode on or off. Set your default SMS app.
Enable USB tethering and Wi-Fi hotspot. Set up VPN
connections. Check your available Mobile networks to
configure carrier specific options and APN settings.
Hard Key
Set your preferred key layout for the Back and Options
keys
Audio profiles
Personalise your Audio profiles such as Ringtone, Ring
Volume, Vibrate, and Sound Enhancement options.
Display
Set Wallpaper, Brightness, Display time out (Sleep), Font
size and Screen cast options.
Storage
View available phone storage and microSD (if fitted).
Battery
Check battery levels and see what is consuming the most
power. Enable Battery Percentage to be shown on the
Notificaitons bar.
Apps
View Downloaded Apps, Running apps and Cached
Processes.
Location
Set Location options, GPS and Google Location Reporting.
Security
Secure your device with a screen lock based on Voice
unlock, Pattern, PIN or Password.
Language & input
Set your default system language and keyboard options.
Backup & reset
Backup your data to Google. Factory Reset your phone.
Accounts (Google, Email)
View your active device accounts
Date & time
Set the Date and Time options
Scheduled power on & off
Set automatic power on and off times.
Accessibility
Set Accessibiliity options for
Printing
Connect your handset to Google cloud print services
About phone
Check for updates, view device status and software build
information.

19
Apps Menu
Touch Apps to view all your handset Apps. New Apps can be downloaded from Google
Play Store once you have created or logged in to your Google Account.
Drag any icon from the Apps menu to create a shortcut on the home screen.
Connect to a Computer
Transfer audio, video and picture files between your handset and your computer.
PC
Connect your handset using the USB data lead supplied.
First time, select Install driver on the handset notifications window.
On your PC, open CD Drive USB_Driver from Windows Explorer, then double click Setup
to install the handset.
Subsequently, select Media Device (MTP) from the notifications window, which will
open the handset in Windows Explorer.
MAC
On your MAC, download and install Android File Transfer.
Connect your handset using the USB data lead supplied.
Select Media Device (MTP) from the notifications window, which will open the handset
on your MAC.
Connect to the Internet
You can access the internet through the mobile network or via Wi-Fi. When logged on
to a Wi-Fi connection, all data will be sent via your Wi-Fi network.
To disable mobile network data slide down from the top of the handset screen to open
the quick settings panel, then switch off data connectivity using the Data conn. button.
Connect to a Wi-Fi network
Wi-Fi provides wireless Internet access over distances of up to 100 meters.
•Tap Home > Apps > Settings > Wi-Fi
•Touch the Wi-Fi switch to turn Wi-Fi on.
•Touch Wi-Fi
•The available Wi-Fi networks and security settings (open or secured) are displayed.
•Tap a network to connect.
•An open network will automatically connect,
•If you select a secured network you need to enter a password.
Check the Wi-Fi network status

20
•Check the Wi-Fi icon in the status bar.
•Tap Home > Apps > Settings > Wi-Fi, tap the current wireless network to view the
network status.
•Tap Options > Advanced > Wi-Fi sleep policy to leave Wi-Fi always on, or set other
options such as to disable the Network Notification.
Set up a Wi-Fi Hotspot
A Wi-Fi hotspot shares your network internet connection with other devices nearby.
For example, if you are travelling you can connect your laptop wirelessly to your
handset to use the internet.
Tap Home > Apps > Settings > more > Tethering & portable hotspot > Wi-Fi hotspot
Touch Wi-Fi hotspot > Set up Wi-Fi hotspot to change the SSID and password if
required.
Using USB tethering
Use USB tethering to connect a computer to the internet using your device network
connection.
Plug your handset to a computer using the USB lead supplied.
Tap Home > Apps > Settings > more > Tethering & portable hotspot > USB tethering.
Settings > More > USB Internet allows you to share a PC based internet connection
onto your phone. Selecting this will disable your mobile data.
On your PC you need to ‘share’ your internet connection to your phone.
Using the Browser
Use the Google Search bar on the Home Screen or use Google Chrome.
•Tap the Google Search box on the Home Screen.
•Enter your search request using the keypad.
•Press the arrow when done.
•Tap the microphone icon to use speech recognition. Speak your request
clearly into the handset microphone.
•You can also use Apps > Browser or Apps > Chrome.
The first time you open Chrome you are guided through how to use by on screen
instructions and demos. Enter any search directly in the top bar. Press Options for new
Tabs, Incognito browsing, Bookmarks and other Settings options.
Other manuals for 4G Fit Smart
1
Table of contents
Other Zte Cell Phone manuals