Zte Avid User manual

1
LEGAL INFORMATION
Copyright © 2012 ZTE CORPORATION.
All rights reserved.
No part of this publication may be quoted, reproduced, translated
or used in any form or by any means, electronic or mechanical,
including photocopying and microlm, without the prior written
permission of ZTE Corporation.
ZTE Corporation reserves the right to make modifications on
print errors or update specifications in this guide without prior
notice.
We offer self-service for our smart terminal device users. Please
visit the ZTE ofcial website (at www.zte.com.cn) for more infor-
mation on self-service and supported product models. Informa-
tion on the website takes precedence.
Version No. : R1.0
Edition Time : 20121022
Manual No. : 079584505074

2
is a trademark
of SRS Labs, Inc. SRS TruMediaTM technology is incorporated
under license from SRS Labs, Inc.
SRS TruMediaTM, a feature-rich audio solution tuned specically
for mobile devices, provides a cinema-like surround headphone
performance with deep, rich bass.

3
Table of Contents
Getting to Know Your Device.......................................................4
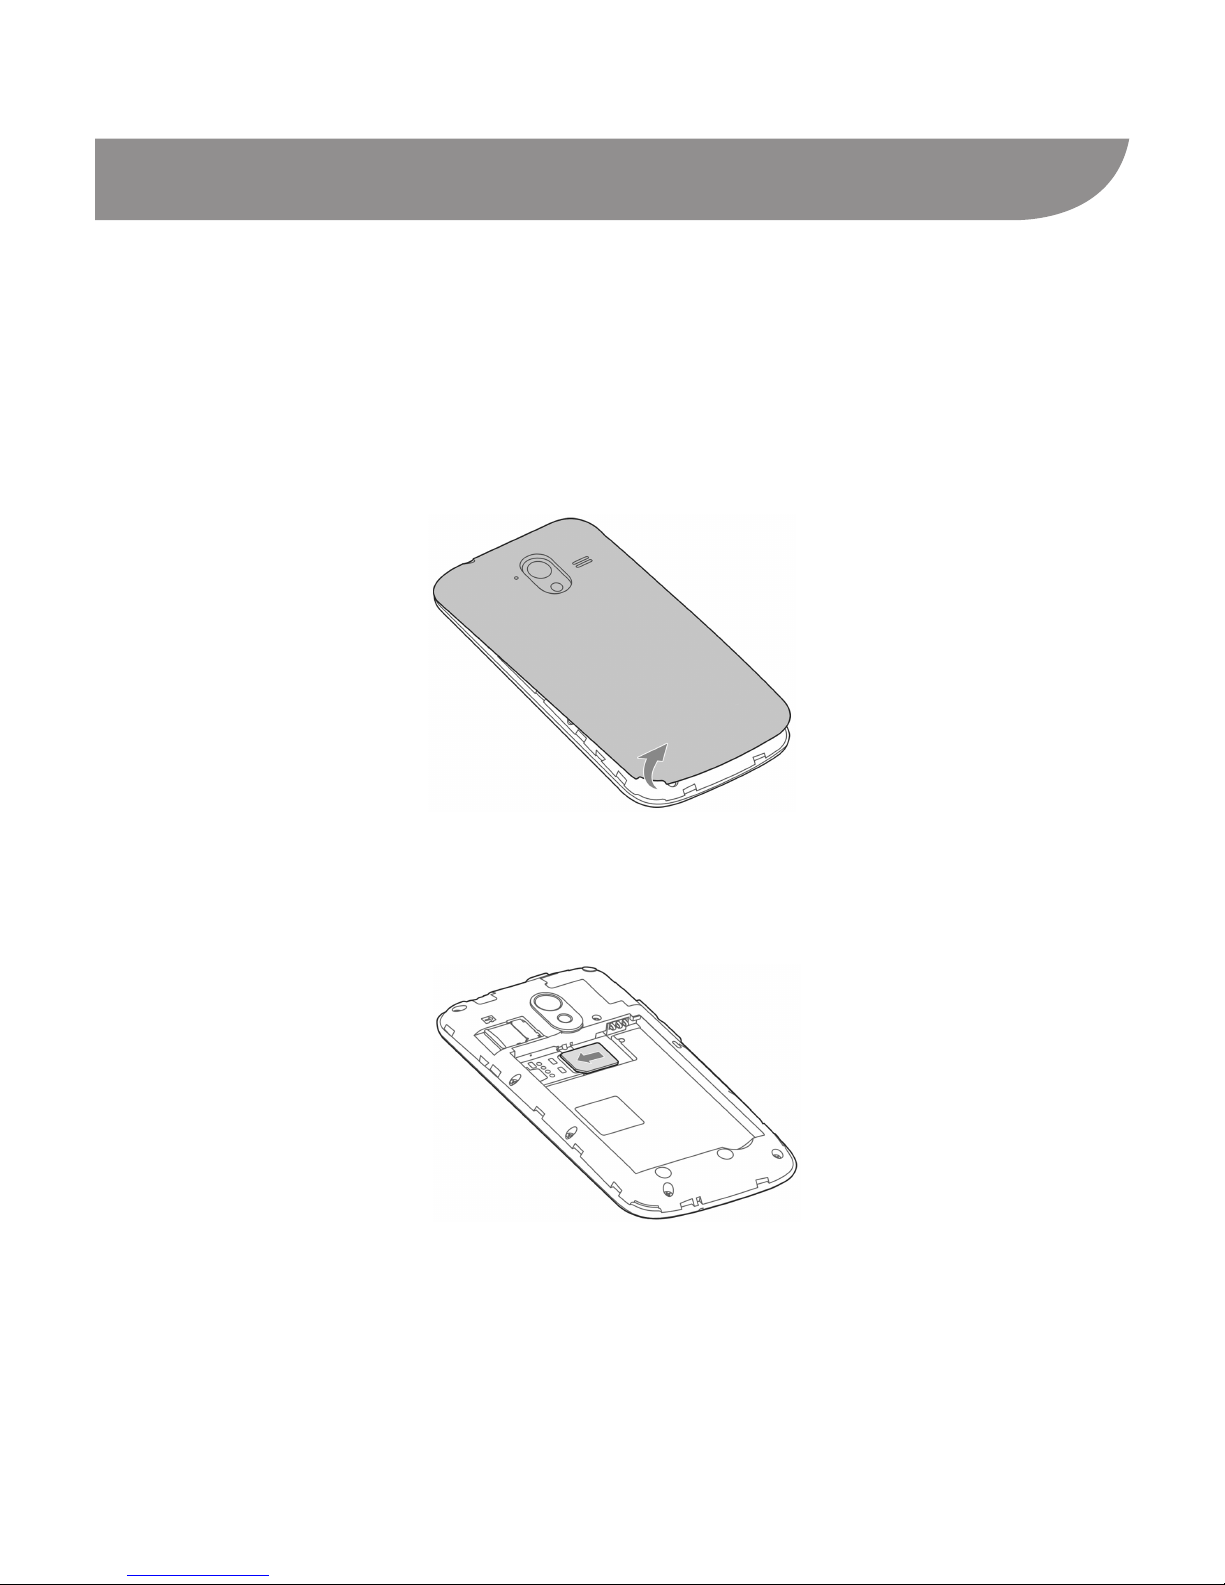
Starting Up...................................................................................6
Charging the Battery....................................................................8
Powering On/Off Your Phone ......................................................8
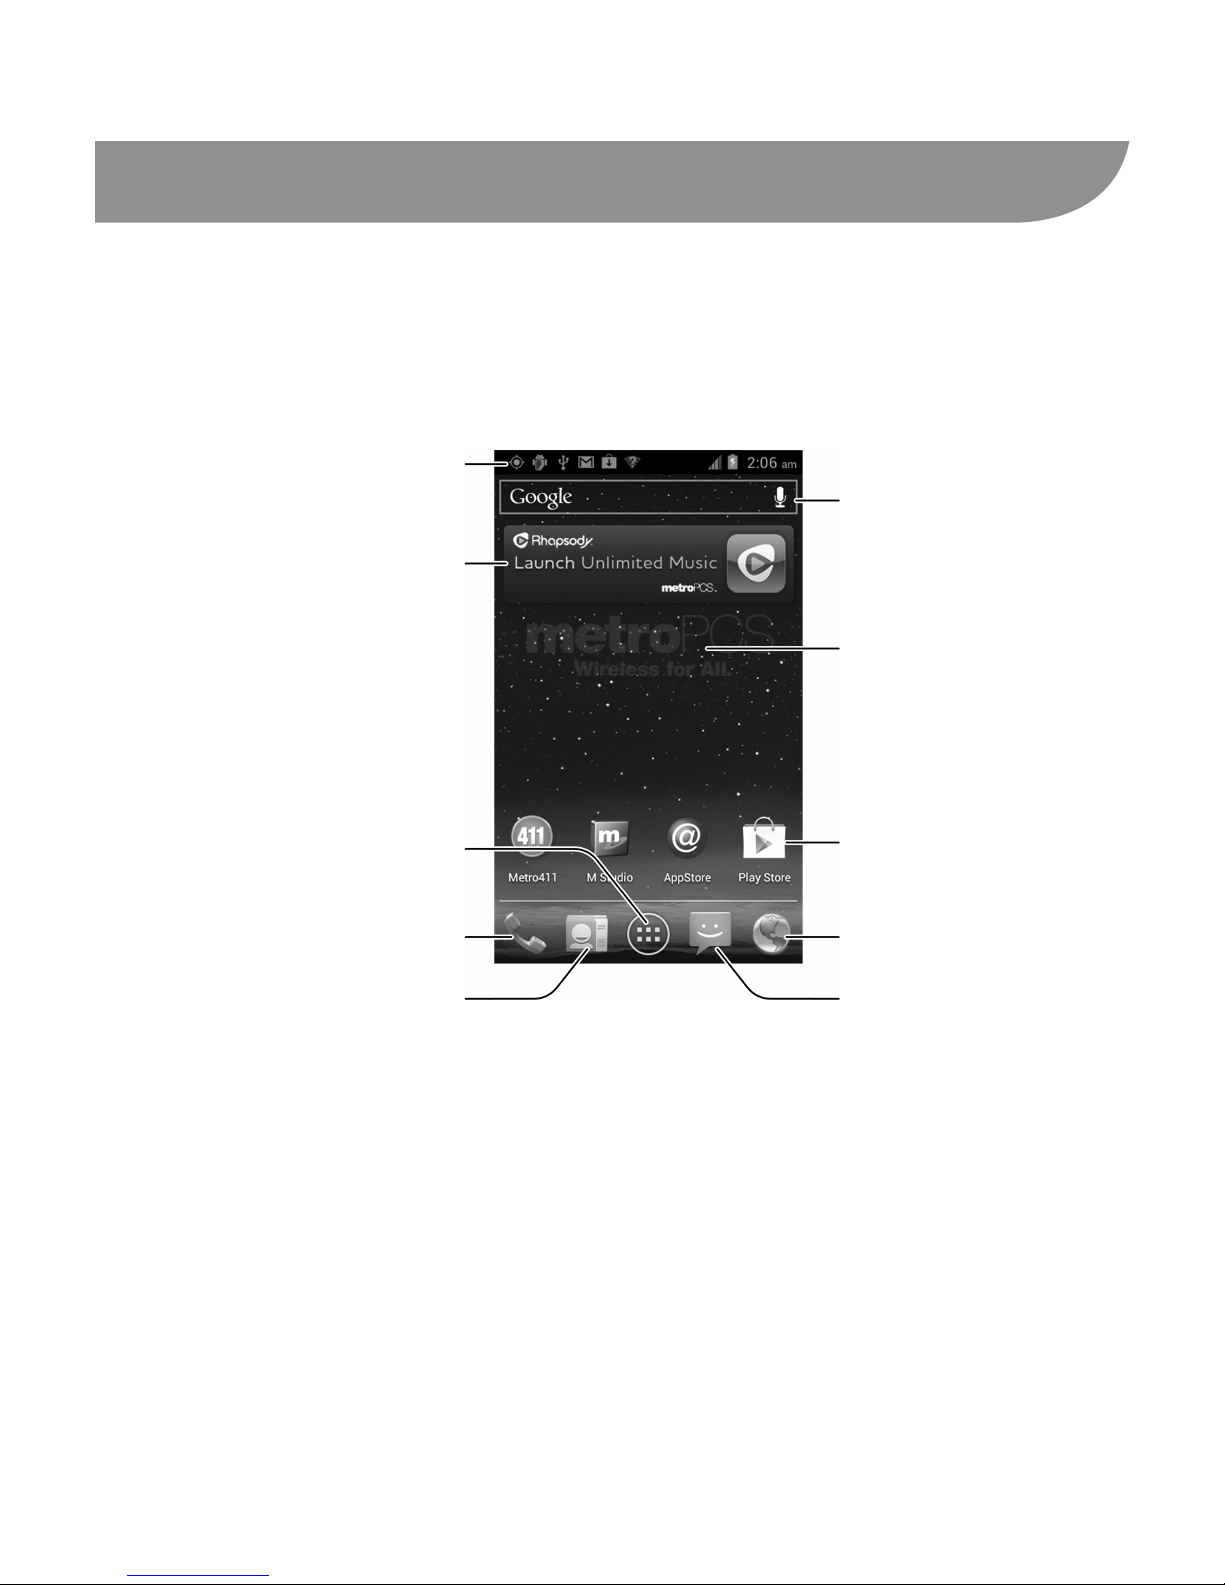
Getting to Know the Home Screen..............................................9
Locking/Unlocking the Screen & Keys.......................................10
Going Through the Initial Setup................................................. 11
Entering Text..............................................................................12
Adding Accounts........................................................................14
Making and Answering Calls .....................................................15
Adding Contacts ........................................................................16
Sending a Message...................................................................18
Browsing or Searching the Web ................................................19
Using the Google Play Store .....................................................20
Taking a Photo...........................................................................21
Capturing a Panoramic Photo ...................................................22
Recording a Video .....................................................................23
For Your Safety..........................................................................24

4
Getting to Know Your Device

5
Power Key
• Press and hold to power on, select phone modes, turn on/off
airplane mode, restart, or power off.
• Press to turn off or on the touch screen.
Home Key
• Touch to return to the home screen from any application or
screen.
• Touch and hold to see recently used applications.
Menu Key
Touch to get the options for the current screen.
Back Key
Touch to go to the previous screen.
Volume Keys
Press or hold to turn the volume up or down.

6
Starting Up
Switch off your phone before installing or replacing the battery
or the UICC card. The microSD card is optional and can be
installed and removed while the phone is turned on. Unmount
the microSD card before removing it.
1. Remove the back cover.
2. To use the 4G LTE network, insert the UICC card with the
gold-colored contacts facing down.
TIP: A soft block beside the UICC card bracket keeps the card
in place. You may need to gently press the block down when re-
moving the card from the phone.

7
3. Hold your microSD card with the metal contacts facing down
and slide it in.
NOTE: microSD logo is a trademark of the SD Card As-
sociation.
4. Insert the battery by aligning the gold contacts on the battery
with the gold contacts in the battery compartment. Gently
push down the battery until it clicks into place.
5. Press the cover gently back into place until you hear a click.

8
Charging the Battery
1. Connect the adapter to the charger jack. Ensure that the
adapter is inserted with the correct orientation. Do not force
the connector into the charger jack.
2. Connect the charger to a standard AC wall outlet.
3. Disconnect the charger when the battery is fully charged.
Powering On/Off Your Phone
Make sure the battery is charged before powering on.
• Press and hold the Power Key to turn on your phone.
• To turn it off, press and hold the Power Key to open the op-
tions menu. Touch Power off > OK.

9
Getting to Know the Home Screen
The home screen is the starting point for your phone’s
applications, functions, and menus. You can customize your home
screen by adding application shortcuts, folders, widgets, and
more.
Google Search
Status & Notications
Widgets
All apps
Phone
People
Wallpaper
Shortcuts
MetroWEB
Messaging
NOTE: Your home screen extends beyond the initial screen,
providing more space for shortcuts, widgets, and folders. Simply
swipe left or right to see the extended home screens.

10
Locking/Unlocking the Screen & Keys
You can quickly lock the screen and keys to prevent unwanted
operations and to protect your privacy.
To lock the screen and keys:
Press the Power Key, or leave the phone idle for a while before
it automatically gets locked.
To unlock the screen and keys:
1. Press the Power Key to turn the screen on.
2. Drag over and release your nger.
NOTE: If you have set a long press lock, a face unlock, an un-
lock pattern, a PIN or password for your phone, you’ll need to
touch and hold the lock icon, look at your phone, draw the pat-
tern or enter the PIN/password to unlock.

11
Going Through the Initial Setup
When you first power on your phone after you purchase it or
reset it to factory settings, follow the onscreen instructions to set
it up.
1. Touch the language eld to select the language you want to
use and then touch Start.
2. Touch Get an account to create a Google Account or touch
Sign in to sign in to your account.You can also touch Not
now to set up an account later.
After signing in, congure the Google backup and restore op-
tions and touch Next. If you are prompted and would like to
make any purchase from the Google Play Store, enter your
credit card information and touch Save.
3. Congure the Google location options and touch Next.
4. Enter your name which the phone uses to personalize some
apps and touch Next.
5. Touch Finish to complete the setup.
NOTE: If the phone cannot connect to a mobile network, it would
prompt you to connect to a Wi-Fi network.

12
Entering Text
You can enter text using onscreen keyboards. Touch a text eld
to display the keyboard.
Changing Input Methods
1. Touch a text eld to display an onscreen keyboard. The icon
appears on the status bar.
2. Swipe your nger down from the top of the screen to open
the notication panel and touch Select input method.
3. Touch the input method you need.
Swype Text Input
While you can touch the onscreen keyboard to enter text (similar
to the Android Keyboard), Swype Text Input can also speed up
text input by recognizing your tracing gestures. Just slide your
nger on the screen from letter to letter without lifting the nger,
until you reach the end of the word.
End of the word
Start of the word

13
Android Keyboard
The Android Keyboard provides a layout similar to a desktop
computer keyboard. In some applications, you can turn the
phone sideways to use a larger keyboard in landscape display.
TIPS:
• Touch to select numbers and symbols.
• Touch to use Google’s networked voice input.
• Touch and hold a key to nd more input options.

14
Adding Accounts
You can add multiple Google Accounts, email accounts, and
Microsoft Exchange ActiveSync accounts. You may also add
other accounts, depending on the apps installed on your
phone. These accounts may allow you to sync emails, calendar
schedules, contacts, or other information between your device
and the web.
1. From the home screen, touch the Menu Key > System set-
tings > Accounts & sync.
2. Touch ADD ACCOUNT.
3. Touch the type of account you want to add.
4. Follow the onscreen steps to enter the information about the
account. Most accounts require a username and password,
but the details may vary. You may also need to obtain some
information from IT support or your system administrator.
When the account is successfully added, it is displayed in the
Accounts & sync list.
To remove an account you have added, touch it in the Accounts
& sync list and then touch the Menu Key > Remove account >
Remove account.

15
Making and Answering Calls
Making a Call
1. Touch the Home Key, then touch .
2. In the dialer tab , enter the phone number with the on-
screen keypad. Touch to delete incorrect digits.
3. Touch the icon below the keypad to place the call.
Ending a Call
Touch to end the call.
Answering a Call
When you receive a phone call, drag over to answer the
call.
NOTE: To silence the ringer before answering the call, press the
Volume Keys up or down.
Rejecting a Call
When you receive a phone call, drag over to reject the
call.
You can also drag over to reject the call and send a
preset text message to the caller.
TIP: You can edit the content of the preset message. Touch the
Home Key > > Menu Key > Settings > Excuse Messages
and then touch the message you want to edit.

16
Adding Contacts
Importing Contacts From the microSD Card
This feature allows you to copy the contacts information in a
vCard le on the microSD card to the phone. Before that, you
may need to export contacts on another device to a vCard le
(see the device’s instructions on how to export) and copy it to the
phone’s microSD card.
1. Touch the Home Key, then touch .
2. Touch the Menu Key > Import/export > Import from SD
card.
3. Select an account in which to save the contacts.
4. If there are more than one vCard les on the microSD card,
choose whether to import one, multiple, or all of them, then
touch OK.
5. Select the vCard le(s) on the microSD card and touch OK to
begin importing.

17
Creating a New Contact
1. Touch the Home Key, then touch and touch the all con-
tacts tab .
2. Touch , or Create a new contact (if there are no con-
tacts).
3. Touch the account eld near the top of the screen to choose
where to save the contact. If a sync account is selected, the
contacts can be synced automatically with your account on-
line.
4. Enter the contact name, phone numbers, email addresses,
and other information.
5. Touch DONE to save the contact.

18
Sending a Message
1. Touch in the home screen and select Messaging, then
touch .
2. Touch the To eld and enter the recipient’s number or, if the
recipient is stored in People as a contact, the rst letters of
the recipient’s name. As matching contacts appear, you can
touch a suggested recipient.
3. Touch the Type message field, and enter the text of your
message.
4. If you want to send a multimedia message, touch the Menu
Key > Add subject to add a message subject, or touch the
paper clip icon beside the message text box to attach
various types of media les to the message (such as pictures,
videos, or audio).
5. Touch to send the message.
NOTE: You can also touch a conversation in the Messaging
screen to write a message to the number you have the conversa-
tion with.

19
Browsing or Searching the Web
1. Touch in the home screen and select MetroWEB. The
home page opens or the web page you opened last time is
displayed (if you used the app recently and did not exit from it).
2. Touch the address box at the top of the browser screen. If the
address box isn’t visible, swipe down a little to show it.
3. Enter the address (URL) of a web page. Or enter terms you
want to search for. You can also touch the microphone icon
to search by voice.
4. Touch a suggestion or touch Go on the keyboard to open the
web page or search results.
TIP: Touch the Menu Key > Stop if you want to stop opening the
page.

20
Using the Google Play Store
Touch in the home screen and select Play Store to buy
music, books, magazines, movies, TV shows, and apps and
download them to your phone.
NOTE: The content you can access in Play Store depends on
your region and your service provider.
Browsing and Searching for Apps
You can browse apps by category and sort them in different
ways. Touch a top-level category, such as Games and touch the
app from any subcategory.
You can also search for apps using an app’s name or descrip-
tion, or the developer’s name. Just touch and enter the
search terms.
Downloading and Installing Apps
When you nd the app you are interested in through browsing or
searching, touch it to open its details screen, where more infor-
mation about the app is displayed.
1. Touch Download (free apps) or the price (paid apps) in the
app details screen.
2. If the app is not free, you need to sign in to your Google Wal-
let account and select a payment method.
Table of contents
Other Zte Cell Phone manuals