Zte Vodafone 553 User manual


LEGAL INFORMATION
Copyright© 2010 ZTE CORPORATION.
All Rights Reserved
Your Vodafone 553 is made exclusively for Vodafone by ZTE
CORPORATION.
No part of this manual may be reproduced or transmitted in any form or
by any means without prior written consent of ZTE CORPORATION.
Trademarks
VODAFONE and the Vodafone logos are trademarks of the Vodafone
Group.
The Bluetooth® word mark and logos are owned by the Bluetooth SIG, Inc.
and any use of such marks by ZTE Corporation is under license. Other
trademarks and trade names are the property of their respective owners.
Notice
The information in this manual is subject to change without notice. Every
effort has been made in the preparation of this manual to ensure accuracy
of the contents, but all statements, information, and recommendations in
this manual do not constitute a warranty of any kind, expressed or implied.
Please read the Product Safety Information carefully to ensure the correct
and safe use of your mobile phone.
ZTE CORPORATION Address:
ZTE Deutschland GmbH, Am Seestern 18, 40547 Düsseldorf, Germany
NO. 55, Hi-tech Road South, ShenZhen, P.R.China
Postcode: 518057
Website: http://www.zte.com.cn

3
Product Safety Information
Read the Safety Information
section of this user guide on
page 37 Do not use while re-fuelling
Do not use hand-held while
driving
This device may produce a
bright or flashing light
For body-worn operation
maintain a separation of
1.5 cm Do not dispose of it in a fire
Small parts may cause a
choking hazard
Avoid contact with magnetic
media
This device may produce a
loud sound Avoid Extreme Temperatures
Keep away from pacemakers
and other personal medical
devices
Avoid any contact with liquid,
keep it dry
Switch off when instructed in
hospitals and medical
facilities
Do not attempt to
disassemble
Switch off when instructed in
aircrafts and airports
Do not rely on this device for
emergency communications
Switch off in explosive
environments
Only use approved
accessories

4
Contents
1 Getting Started.....................................................................................................5
2 Using the Phone ............................................................................................... 14
3 Messaging........................................................................................................... 17
4 E-mail ................................................................................................................... 20
5 Personal Information...................................................................................... 21
6 Settings................................................................................................................ 23
7 Experiencing Multimedia .............................................................................. 26
8 Getting Connected........................................................................................... 30
9 More Applications............................................................................................ 32
10 Specifications.................................................................................................. 35
11 Troubleshooting ............................................................................................ 36
12 Product Safety Information ....................................................................... 37
13 Attachment...................................................................................................... 46

5
1 Getting Started
Note: Some features described in this document are dependant of your
operator and may differ from what you have.
1.1 Starting Up
Battery
The lithium ion battery of the mobile phone can be immediately used
after unpacking. A new battery performs best after perfoming a full
charge/discharge 3 times.
Installing the battery
1. Align the battery's contact points in the direction of the arrow shown
and insert the battery into the slot.
2. Put on the battery cover and press it gently until you hear a click.
Removing the battery
1. Make sure that your mobile phone is switched off.
2. Remove the battery cover.
3. Pull the battery up and remove it from the mobile phone.

6
How to insert the SIM card
Insert the SIM card as follows:
1. Make sure that the phone is switched off and the charger is
disconnected from the phone.
2. Turn the phone over and remove the battery cover.
3. Remove the battery if it is already installed.
4. Hold your SIM card with the cut corner oriented as shown and then
slide it into the card holder with the gold-coloured contacts facing
downward.
5. Replace the battery first.
6. Replace the battery cover.
Caution:
•Do not bend, scratch the SIM card, or unnecessarily touch its metal
surface. It may damage the information stored.
•Do not force the cover down by pressing on it. This may damage the
cover.
How to charge the battery
The battery needs to be charged for at least 6-8 hours when you charge it
for the first time.
1. Connect your travel adapter to the side of your mobile phone as shown
in the diagram next page.

7
2. Connect the other end of the travel adapter to the mains socket.
3. When you charge the battery, the battery charging indicator appears.
4. When the battery is fully charged, the battery indicator is full and
doesn’t flicker any longer, disconnect the charger.
Inserting and Removing a Memory Card
Vodafone 553 supports microSD memory cards up to 8Gbyte. Please
follow the instructions from your microSD card vendor.
To insert a card,
1. Remove the battery cover.
2. Insert the memory card into the slot.
Before you take out the card, please open the battery cover and press the
card inward to unlock.
Powering On/Off
Make sure that your SIM card is inserted and the battery is charged.
Hold the Power key 2 or 3 seconds to turn your phone on or off.
Notes: You may need to enter the Personal Identification Number (PIN) or
phone password if you have enabled phone lock or PIN LOCK (See Section
6).

8
1.2 My Phone
Receiver
Send key
End/Power key
Space Key
Enter key
Backspace key
Function key
Navigation keys
Menu key
Shift/Caps lock key
Switch input method
Left soft key/Right
soft key
Symbol key
Camera
Volume keys
USB port
In idle screen, press
and hold this key to
switch profiles mode
between normal and
silent.
Loudspeaker

9
1.3 Idle screen
When you turn on the phone, it enters the idle screen. The following
indicators notify you with the phone status and alerts.
Indicator What it means Indicator What it means
Shows the phone’s
network signal strength Shows the phone’s
battery capacity
Call diverting The alarm clock is active
The phone is under
roaming status The alert type is set to
ring
You have unread
message The alert type is set to
vibration
Silent mode is activated The alert type is set to
vibration then ring tone
You have unheard voice
mail The alert type is set to
vibration and ring tone
A headset is connected
to the phone GPRS connection is active
EDGE connection is
active Audio player is on
The stopwatch is active Bluetooth®connectivity is
on
You have unread E-mail

10
1.4 Text Input
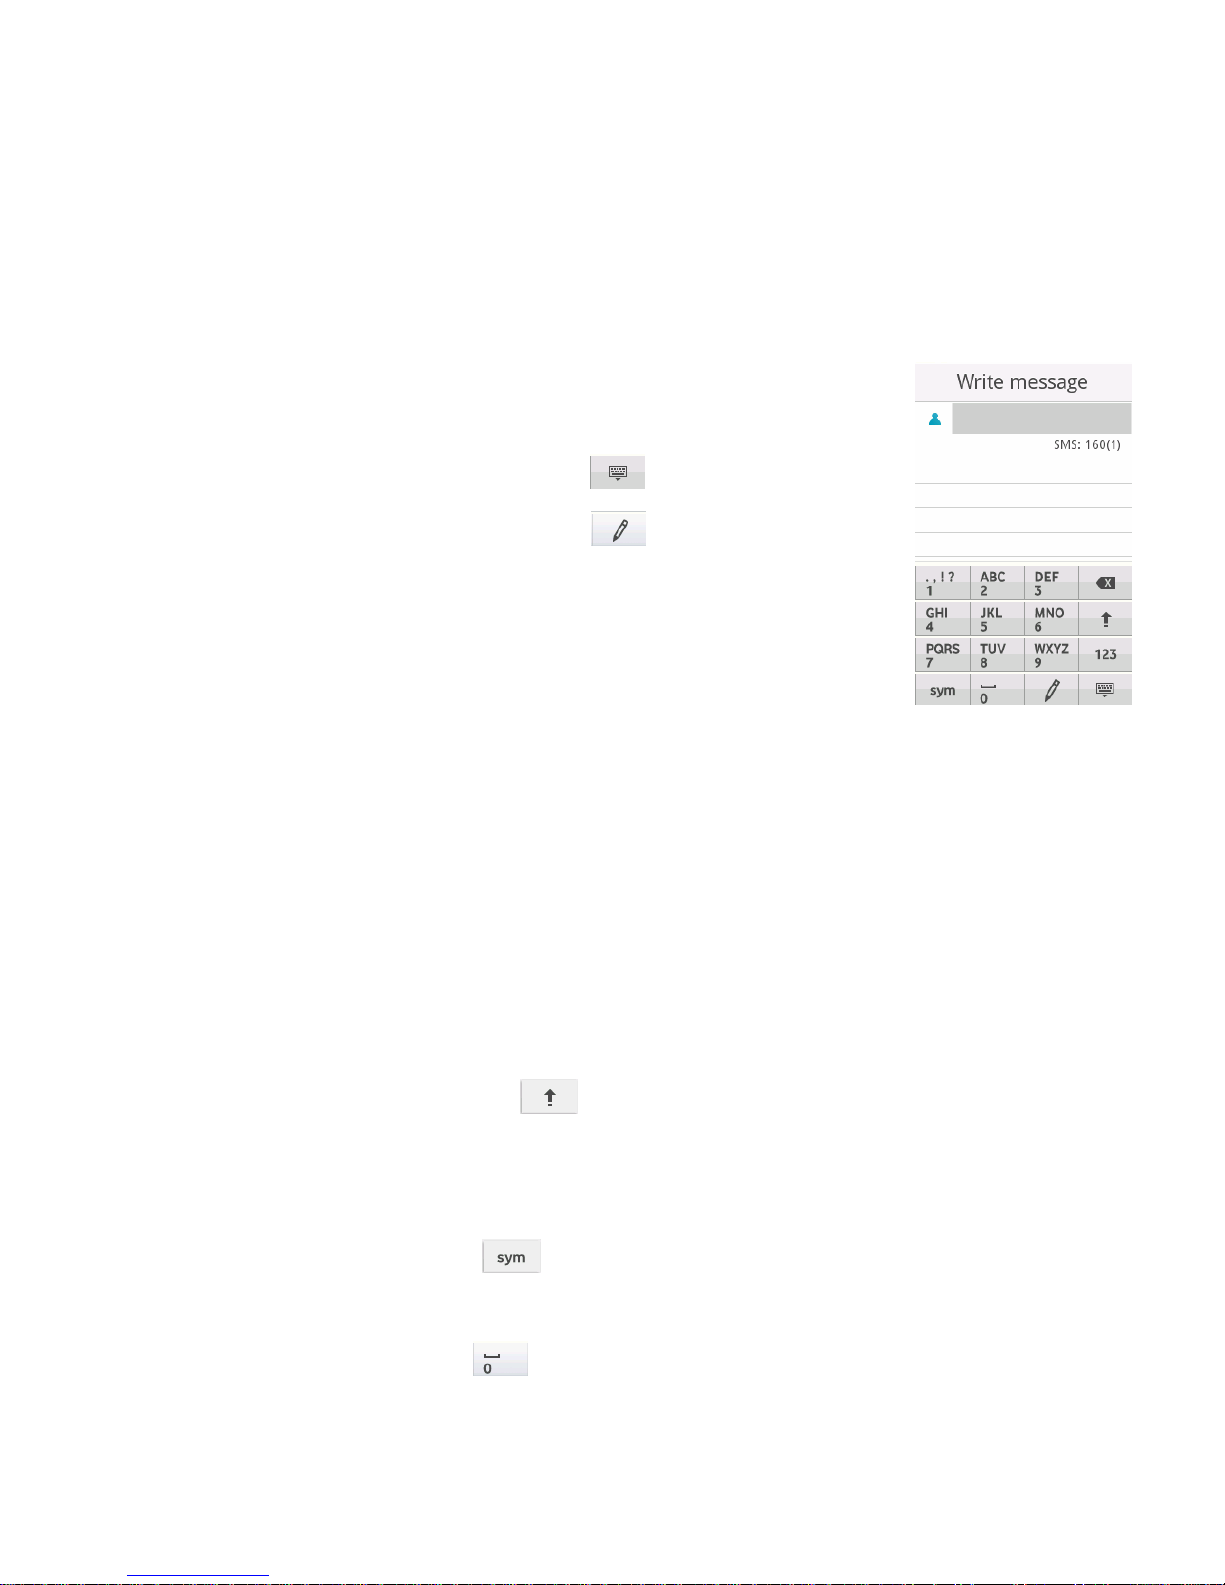
Using Virtual keyboard
As the slide is not opened, you could use the virtual keyboard to input.
•Show virtual keyboard: Click any place in the
text input area to show the virtual keyboard.
•Hide virtual keyboard: Click icon.
•Change input method: Click icon to
change the input method.
•Input Letters: In abc method, click the
corresponding letters to input your desired letter.
Each key is used to input multiple letters. Click the key quickly and
repeatedly until your desired letter appears.
•Input Words: In Smart abc method, click each key only once for every
letter. The word changes after each key stroke. When you finish
writing the word correctly, click the word to confirm. If the word
displayed on the screen is not what you want, click the arrow to view
other matching words, and then click the word to confirm. Predictive
text input is based on a built-in dictionary.
•Switch caps lock : Click icon.
•Input numbers: In 123 method, click the corresponding numbers on
the screen to input your desired numbers.
•Input symbols: Click icon to open the virtual keypad and
select the corresponding symbols to input.
•Insert a space: Click to input the space. It does not work in 123
method.

11
•Delete Character:Click to delete the previous character before
the cursor.
•Delete all Characters: Hold to delete all characters.
•Move Cursor: Among the text, tap in the position you want to move.
Using the keypad
As the slide is opened, you could use the keypad to input.
•Switch input method: Press the key
•Insert a space: Press the key.
•Delete: Press the key to delete the input before the cursor.
•Switch caps lock: Press the key.
•Line feed: Press the key.
•Input letters and common symbols: There are two symbols on the
keys. In abc/Abc/ABC method, press the key to input the symbol
located on the left part of the key; press the key and then press
the key to input the symbol located on the right part of the key; press
the key twice and then press the key to continuously input the
symbol located on the right part of the key.
In Smart abc/Abc/ABC method, your phone predicts the word as you
enter it, so you need input only the first few letters of the word.
•Input numbers: In 123 method, press the numeric keys to input the
corresponding numbers.
•Input symbols: During the text input, press key to display
symbol lists, press the Navigation keys to select the symbol, and press
OK to confirm.

12
1.5 Basic Operation
Menu Navigation
Press the Menu key to enter the main menu. Once at the main menu,
click the icon to select the submenu, press Back to return to the previous
menu, and press the Power key to return to the home screen.
Use the Touchscreen
Your phone supports touch screen functionality.
Slide up or down with your finger on the screen to move the highlight bar.
Tap any application to open it.
Widgets in Idle Screen
From the home screen, slide your finger to the left or right on the screen
to switch among the three interfaces.
Click to open the Widgets drawer. In the Widget drawer, slide your
finger up and down to display more function icons. You can drag the
function icons from the Widget drawer to the home screen, press and hold
the icon then drag it back to Widget drawer.
Keypad Lock
You can use the keypad lock to prevent the keys from being accidentally
pressed.
In the closed position, you can hold down the Menu key to lock the
screen. To unlock the screen, drag the icon on the screen to
the icon and a message will appear telling you the screen is unlocked.
In Menu > Settings > Security > Auto keypad lock, set the auto
keypad lock time. If the phone is not operated within this time, the
keypad will be locked.

13
Adjust the Volume
When you’re on the phone, listening to songs, watching movies or using
other media, you can press the Volume keys on the right side of your
phone to adjust the audio volume.
Otherwise, the keys are used to control the volume of the ringer, or used
for other sound effects.
Social Network Services
In idle mode, you can find the following icons in the widget drawer. You
can drag the icons from the Widget drawer to the home screen, and click
the icon to enter the service. You can also find these icons in Menu >
Games & Apps > Java or Menu > Social.
Facebook is a social utility that connects people with friends and
others who work, study and live around them.
Google Talk (GTalk) is a Java application for instant messaging,
offered by Google Inc.
Twitter is a social networking and microblogging service that
enables its users to send and read other user messages called tweets.
Windows Live Messenger (formerly named MSN Messenger) is an
instant messaging client created by Microsoft.
Yahoo! Messenger is an instant messaging client provided by
Yahoo!.

14
2 Using the Phone
2.1 Making a call
Making a call from Contacts
Go to Menu > Contacts, find the name of the person you want to call, and
press the Send key.
Making a call from Call History
Press the Send key or select Menu > Calls in idle screen to open call
history. Select the number you need. You can call the number directly or
select Options > Edit before call to modify the number before dialing.
Making a call from Messages
In idle screen, select Menu > Messaging > Inbox and select a message.
Then select Options > Call sender.
Making a Speed Dial Call
In idle screen, hold the number key (2`9) corresponding to the phone
number in the speed dial list to make a call.
Note: The number key 1 is reserved for your voice mail number.
Setting speed dial
1. In idle screen, select Menu > Contacts > Options > Contacts settings
> Speed dial > Set numbers.
2. Select a number between 2 and 9.
3. Press Edit.
4. Select a contact and press OK to confirm.
Make Emergency Calls
The available emergency numbers depend on the area you are in and the
service provider you use. Please contact your local service provider.
Tip: You can dial the emergency numbers when the SIM card is not
inserted or the keypad is locked.

15
2.2 Answering Incoming calls
When there is an incoming call, you can answer or reject it. You can also
tap the Silent icon to mute the ringtone.
Caution: Adjust the volume of the earpiece to a moderate level to avoid
injury to your ear.
2.3 In-call Options
During a call, you can select Options to enter the call options.
You can use the speakerphone by tapping the H-Free button.
You can put a call on hold, make a new call, and use applications such as
Messaging & Phonebook while you’re on a call.
2.4 Call History
In idle screen, select Menu > Calls to check recent calls and duration.
Use Left/Right Key to switch among All calls, Dialled calls, Received
calls and Missed calls. In each list, select a call record and tap it to view
its detail. You can press Send key or click to call the number, click
to send a message to the number, or select Options to find more
choices.
•Save to contacts: Save the current number to Contacts.
•Add to Blacklist: Add the current number to Blacklist. If you activate
Blacklist: function, the incoming call from the numbers in the Black
List will be rejected.
•Edit before call: Edit the number before you call.
•Delete: Delete the current call record.
•Delete all: Delete all your call records.
•Advanced includes:
Call timers: Check the duration of a call.
Call cost: Set Price per unit, and you can view the call cost..

16
2.5 Using SIM Card Services (STK)
STK is depending on your SIM card and please contact your operator.
To use the SIM card services, insert your SIM card into the phone at first.
SIM card information services rely on Vodafone networks.
Select Menu > Organizer > STK. The displayed name on the STK Service
is provided by Vodafone.
2.6 Flight Mode
In areas where the use of mobile devices is restricted, you can activate the
flight mode to disable the mobile phone function but still use other
functions of your phone such as calendar, music playback and games.
You will not be able to make/receive calls, send/receive messages, or
browse the Internet in flight mode.
To activate/deactivate the flight mode:
In idle screen, select Menu > Profiles > Flight mode. Choose Options >
Activate to activate the flight mode; choose Options >Deactivate to
deactivate the flight mode.

17
3 Messaging
Select Menu > Messaging to access your messages.
3.1 Composing and Sending a Message
In idle screen, select Menu > Messaging > Create new message.
1. Enter the phone number of the recipient or click to add
recipient from Contacts.
2. Write your message in the text field. The default message type is SMS.
3. If you want to change to MMS, you can press Options and choose
Switch to MMS; or you can press Options and choose Add subject to
directly insert multimedia contents to the message and it will switch to
MMS automatically.
4. You can select Options >Slide options to add a new slide.
5. When you finish writing, click to send the message. If you want
to save the MMS as a draft, select Options > Save to Drafts. If you are
writing an SMS, select Options > Save.
3.2 Other Actions Related to Messages
View messages
Upon receiving a message, the mobile phone will alert you with a ringtone,
prompt, or a new message icon.
Press View to open the Inbox. You can also go to Inbox through the main
menu to read the message.
While the message is open, click the icon at the bottom of the screen to
reply, forward or delete the message. You can also call back the sender.
You can view the message in the Messaging interface.
•Select Inbox to view received messages.
•Select Drafts to view unsent messages.
•Select Outbox to view unsuccessfully sent and saved messages.

18
•Select Sent to view successfully sent and saved messages.
To use numbers in a message
Open a message and select Options > Advanced > Use number to
extract all possible numbers from the message. You can select a number
and save it to contacts, send a message or make a call to the number.
To manage message templates
Go to Menu > Messaging > Templates. There are text templates and
multimedia message templates that you can insert to your messages.
Select Options > Use to create a new message with the selected
templates. You can also select User defined > Options > Add new
template to edit your own templates.
To configure message settings
Text message settings.
•Profile settings: This is automatically set. Please contact your
network provider if this is not available.
•Voicemail server: When you are unable to answer the call, you can
let the caller leave a message for you on voicemail to listen to later.
From the home screen, hold the “1” key to dial the voicemail number.
This service requires network support so please make sure you apply
for this it before use.
•Common settings: You can set Delivery report and Reply path on
or off. You can choose whether to save sent messages or not.
•Memory status: View the SIM or Phone memory status.
•Preferred storage: Set the preferred storage to SIM or Phone.
•Preferred connection: Set the preferred connection to prefer GPRS,
GSM or GSM only.

19
Multimedia message settings
•Profiles: Your mobile phone is preloaded with the Vodafone MMS
profiles and you can also add new ones.
•Common settings: You can choose the settings related to Compose,
Sending, Retrieval, Preferred storage and Memory status.
To receive cell broadcast messages
Go to Menu >Messaging > Cell Broadcast.
•Select Receive mode to turn on/off the service.
•Select Languages to choose the language of the broadcast messages
that you want to receive.

20
4 E-mail
The E-mail function allows you to set up Vodafone business E-mail
accounts and other personal E-mail accounts.
4.1 Configuring E-mail Account
If you want to send /receive E-mails through remote servers, you have to
set up a POP3/IMAP4 E-mail account first.
At first time when you enter E-mail > Create E-mail, it will come up with a
E-mail setup wizard. From the second time, if you want to set up more
E-mail account, please go to Menu > E-mail > E-mail account setup.
1. Select Options > Activate to activate Vodafone E-M@il or select New
account.
2. Enter your E-mail address, protocol, data account, and server
information, etc.
3. Activate your E-mail account.
4.2 Creating a New E-mail
Choose an E-mail account and select Create E-mail.
First, add E-mail recipients from Contacts or enter recipients’ addresses
directly. Press Done when you finish.
Click the Subject field or the Content field, enter text. When you finish
writing, select to send and/or save the E-mail.
4.3 Checking E-mails
Go to Inbox of your E-mail account and select Receive to start receiving
E-mails from the remote server.
Table of contents
Other Zte Cell Phone manuals