Zte TELSTRA EASYTOUCH DISCOVERY 3 User manual

TELSTRA EASYTOUCH®DISCOVERY 3
3G MOBILE PHONE
USER MANUAL
Copyright © 2011. All rights reserved.
No part of this publication may be excerpted, reproduced, translated or utilized in any form or by any means,
electronic or mechanical, including photocopying and microfilm, without the prior written permission of ZTE
Corporation.
The manual is published by ZTE Corporation. We reserve the right to make modifications on print errors or
update specifications without prior notice.
Version 2.0 October 2011
1

LET’S GET THIS SHOW ON THE ROAD
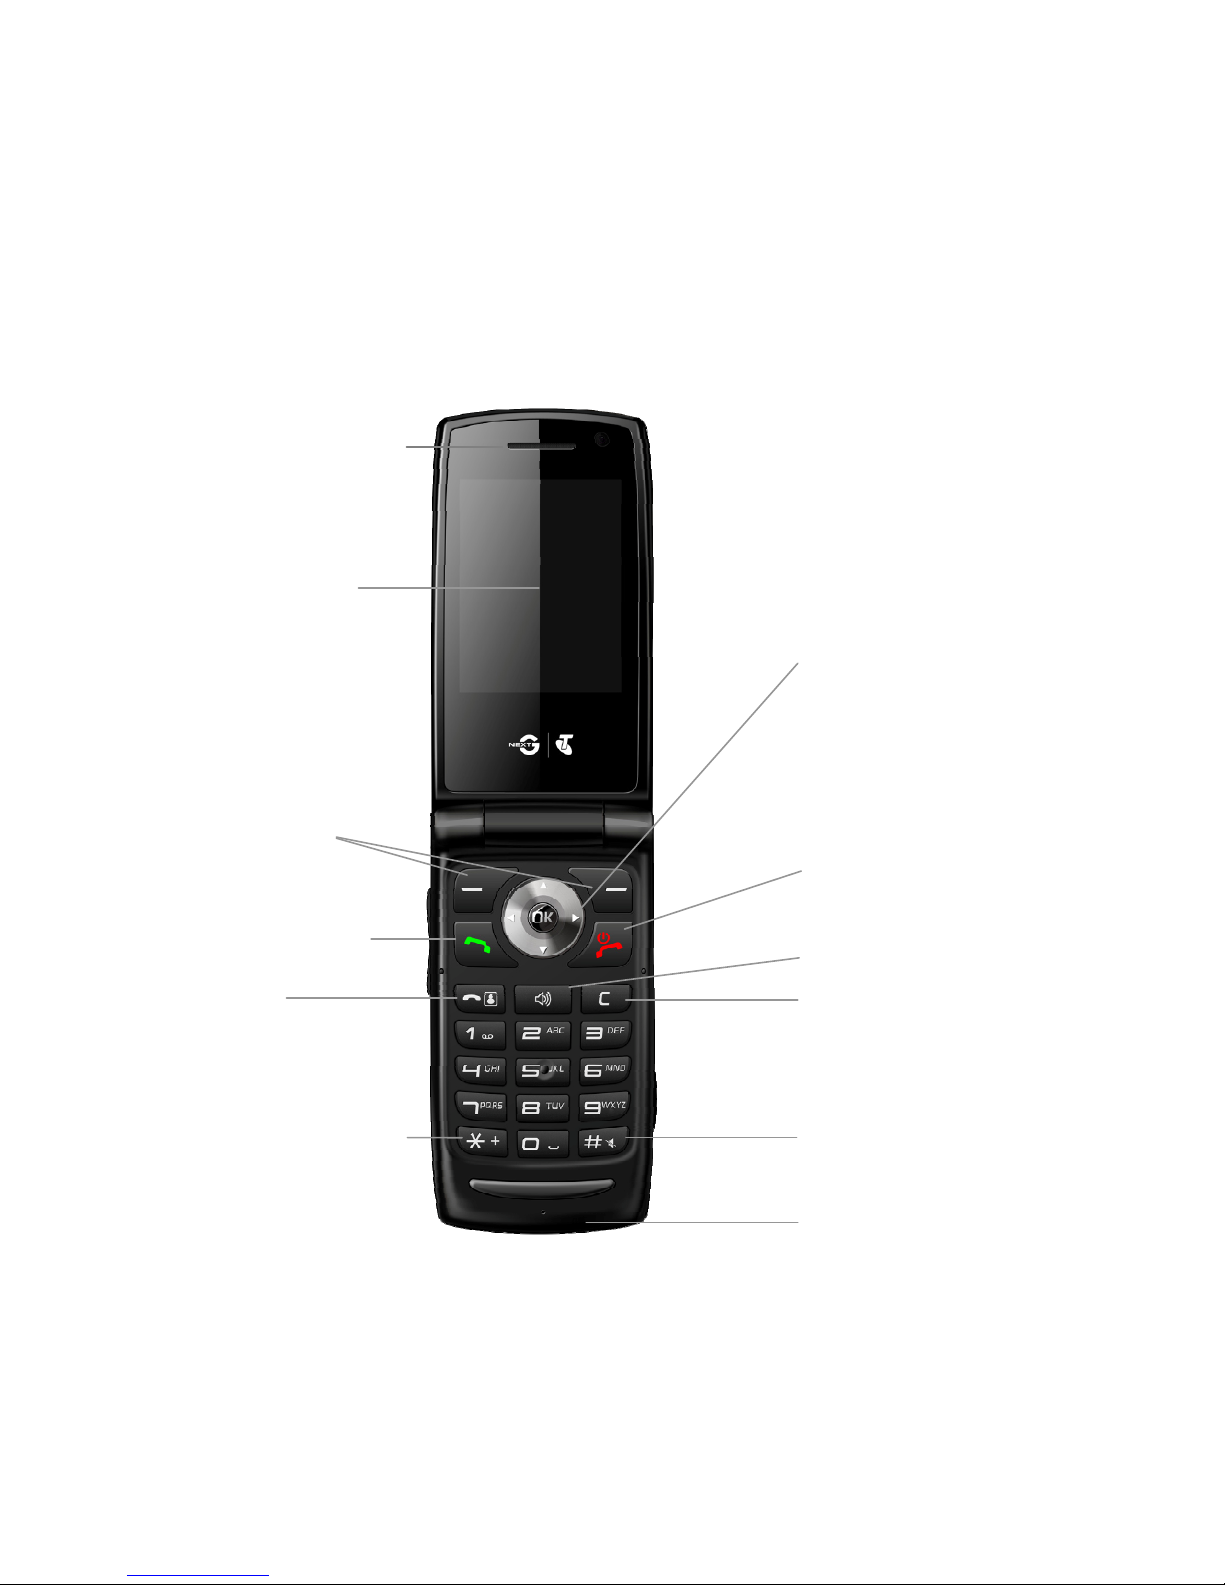
You must be excited about your brand new Telstra EasyTouch® Discovery 3.
You’ll soon be chatting, texting and sharing photos on the go.
This guide will help you get to know your mobile phone and all the fancy things
it can do. So you get the most out of your new Telstra EasyTouch®Discovery 3,
set aside some time to explore and play around with all its features.
By the way, your brand new phone is Blue Tick approved which means it’s
recommended for rural and regional handheld coverage.
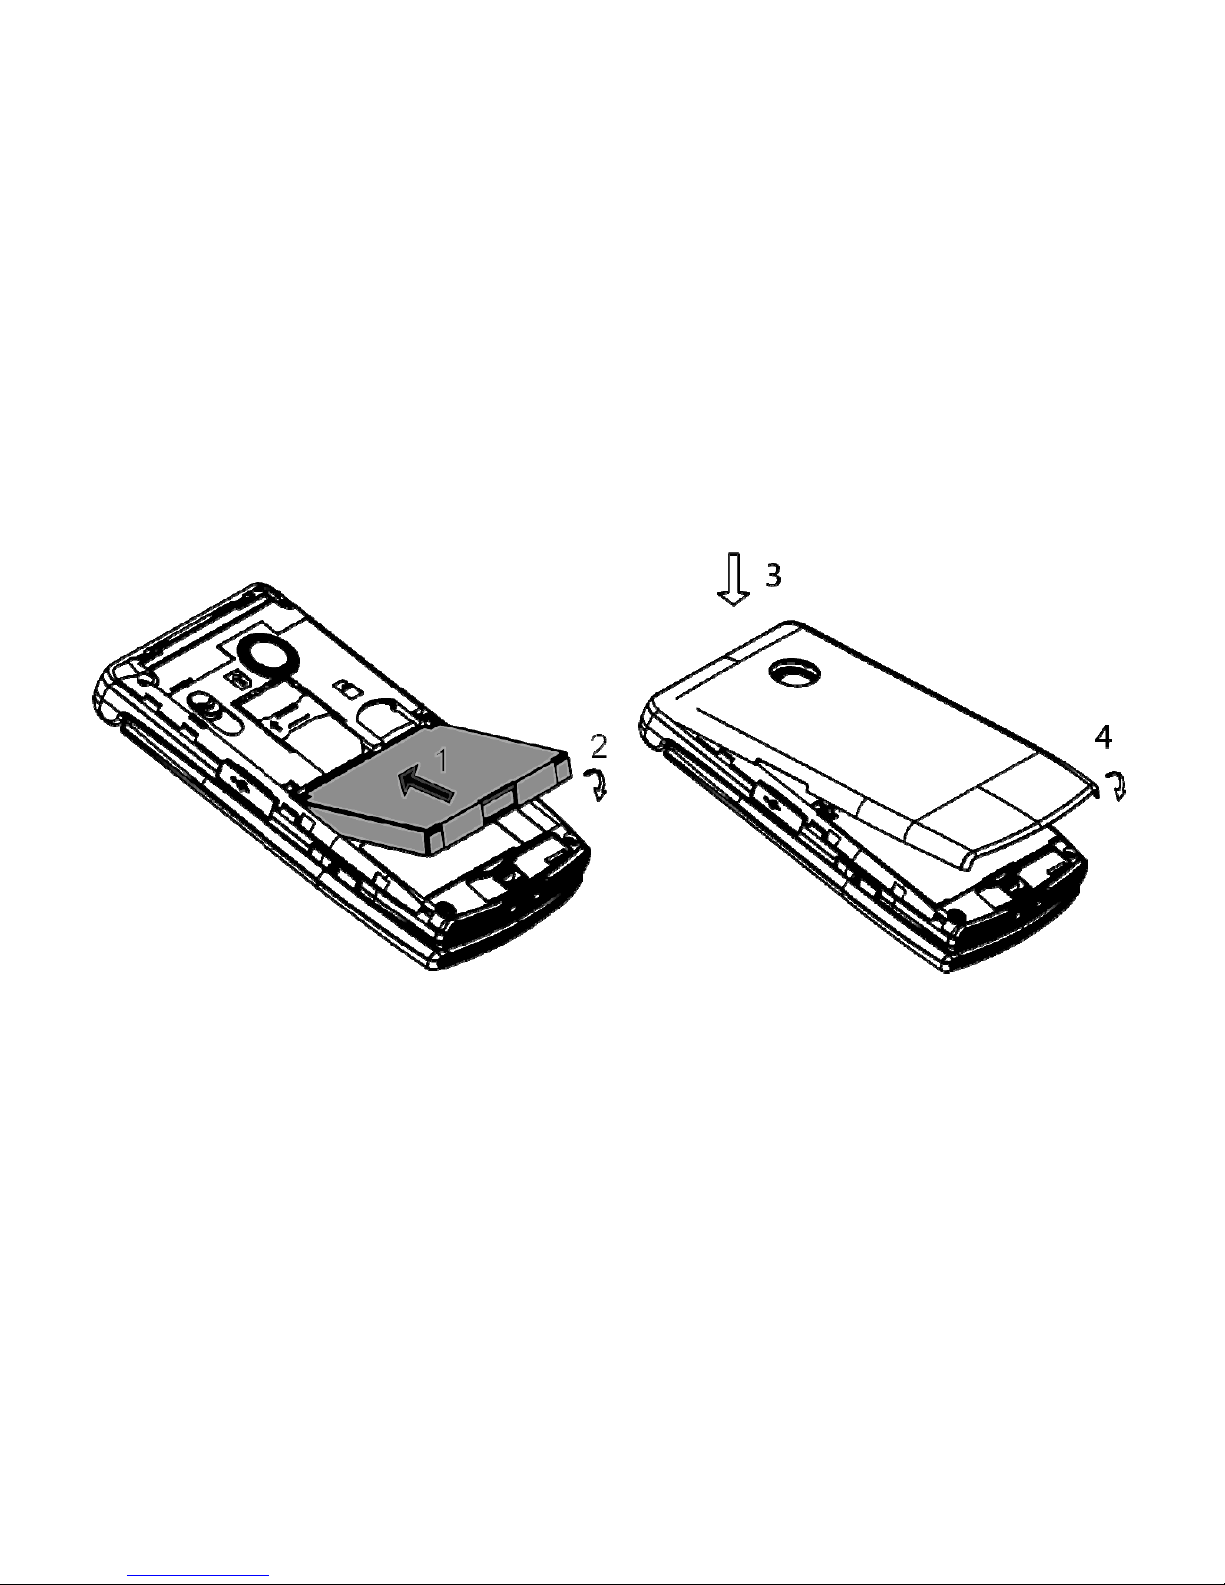
Before you get started ensure you have an active Telstra Next G®SIM card.
2

WHAT’S INSIDE
04 Getting to know your mobile phone
09 Getting Started
19 Contacts
22 Messages and Emails
30 Extra Features
36 Troubleshooting, Technical and Warranty
46 Extra bits you should know
3

GETTING TO KNOW YOUR MOBILE PHONE
Earpiece
Main
Display
Arrow
Keys,
OK
Key
Use the Arrow Keys
to navigate &
access shortcuts.
OK to confirm.
Left
&
Right
Soft
Keys
Performs the function
shown on the display
Call
Key
Dial a number, answer a
call, show Call History
Power
/
End
Key
Hold down to power
On or Off.
Press to End a call.
Speaker
key
Video
Call
Key
C
Key
Step back in
menus.
*
Key.
Access text symbols.
Insert a Pause or Wait
command.
#
Key
Switch to Meeting Mode
Change text modes
Micro
p
hone
4

GETTING TO KNOW YOUR MOBILE PHONE
Headset
&
Charging
Camera
Camera
button
Volume Keys
Thumb catch to open the battery cover
5

INFORMATION BAR ICONS
3G Signal Strength Battery Level Indicator
GSM Signal Strength Alarm is set
EDGE Signal Strength Missed Call
New SMS Message Bluetooth ON
Message Memory is Full Bluetooth h/s connected
New MMS Message Silent Mode
New Wap Push Message Vibrate mode enabled
New E-mail Call Forward is active
Headset Mode
Data channel active
(GPRS)
Headset and Vibrate Mode High Speed data access
Car Kit connected Roaming
Airplane Mode Memory card is inserted
6

MENU QUICK REFERENCE GUIDE
7

MENU QUICK REFERENCE GUIDE CONTINUED
8

GETTING STARTED
1. OPEN THE BACK COVER AND INSERT SIM CARD
Open the back cover using the thumb catch at the base of the handset.
Insert the SIM card with the gold chip facing down and the slanted edge on the
bottom right as shown. Carefully slide it under the silver bar.
IF YOUR HANDSET DISPLAYS:
Enter Handset unlock code The default code is 0000
Enter (U)SIM PIN Code cardEnter the PIN supplied with your SIM
No (U)SIM detected Check the SIM is inserted correctly.
Enter PUK code Contact your Service Provider
9

2. TTERY
1. Insert the battery as shown by lining up the gold bit on the battery with the
gold spikes on the handset.
INSERT THE BA
.Press the battery down flush into the case
2
3. Line the back cover up from the top
.Press down to close the case.
4
10

3. SWITCH THE PHONE ON OR OFF
witch the phone ON press and hold the
To s red key until the screen lights
key
up.
To switch the phone OFF press and hold the red until the shutdown
creen appears or until the screen switches off.
on or insert a new SIM card you are asked if
elect Yes when prompted to import SIM card contacts to the handset memory.
s
Enter SIM PIN code – supplied with your SIM card.
When you first switch your handset
you want to import your contacts.
S
Handy Hint
Before you can import your contacts to your new phone, you’ll need to make sure
they’re saved to the SIM card.
11

CONNECT THE CHARGER
The plug and socket are shaped so they will only fit together one way.
Open the charging port on the right hand side to insert the charging lead
arranty.
charger or USB cable is
inserted into the handset.
arging battery”
displayed. When ON the battery icon animates until charged.
Do NOT use excessive force which may damage the USB port.
Physical damage to the USB port is NOT covered by w
The phone can also be charged by connecting it to a
computer using the USB lead supplied.
A sound is played when the
NOTES ABOUT CHARGING
Only use the AC charger and USB lead supplied.
Normal charge time is 3-4 hours. Do not leave on charge for more than 24hrs.
When not using the phone for long periods remove the battery.
Charge the battery between 0°C~45°C. Charge the battery promptly when fl
With poor network conditions (less than 2 bars) battery life is reduced.
at.
ia functions.
Battery life is improved after a few charge / discharge cycles.
The phone can be charged in the ON or OFF state: When OFF “Ch
To maximise battery life turn off Bluetooth and limit multimed
is
12

HOW TO NAVIGATE THE MENU
The main menu is a list of items to access features on the phone.
From the home screen press OK to access the main menu. Use the arrow keys
o move up and down the menu list and press OK to select.
t
Handy Hint
Use the right soft key to select the bottom right hand of the screen and use the
left soft key to select the bottom left hand of the screen. Refer to page 4 for
location of soft keys.
13

SHORTCUTS
From the home screen press the arrow keys to launch the default shortcuts:
y Pla
s Alarm
Contacts
M ce
Mes ages
Handy Hint
Change default shortcuts: Menu > Settings > Handset > Shortcut keys
econds
>
at or to switch off
automatic update to manually set the time & date.
HOW TO SET THE TIME AND DATE
The time and date is set automatically from the network. It takes a few s
to update when the phone is first switched on. Select Menu > Settings
Handset > Time & date to change to 12 or 24 hr form
14

HOW TO CHANGE THE RINGTONE
Select Menu > Settings > Profiles
Choose one of four profiles which can be customised with individual settings
Use up and down arrow keys to scroll through and press
oose songs that
croll through list of ringtones
Press centre key to set ringtone
ile
lect volume level
ress centre key for ok
the highlighted profile. Select general for default
right soft key to edit
profile
one
Press centre key to open the audios folder
Press centre key to open ring
Press the centre key to modify voicecall ringt
folder or open My Audio to ch
have been manually loaded
Use up and down arrow keys to s
HOW TO ADJUST RINGTONE VOLUME
Select Menu > Settings > Profiles
Press right soft key to edit highlighted prof
ing volume
Press centre key to modify
Scroll down to option 3 for r
Scroll up and down to se
P
15

HOW TO MAKE A VOICE CALL
Enter the number on the keypad or select the downward facing arrow key to
access shortcut to contacts. Then press the green key to make the call.
Press
the Speaker y to activateke Speaker (Handsfree) mode during a call
Press the red key to end the call.
Handy Hint
The volume keys on the left hand side of the phone can be used to increase or
decrease the volume of the person no the other en
HOW TO ANSWER AN INCOMING CALL
d only during a call.
Press the green key
or OK to answer the call,
Press the Speaker y to activate Speaker (ke Handsfree) mode.
Press the red key or Reject to end the call.
Set open flip to answer from Menu > Settings > Call > Answer Call
ote that if voicemail is active pressing reject forwards the call to voicemail.N
16

CALL FEATURE SUMMARY
Check the table below to quickly find the Call Feature you require:
FUNCTION DESCRIPTION MENU SELECTION
Automatic call nswer ings > Call >
answer (flip)
Enable automatic call a
when opening the flip.
Menu > Sett
Answer Call
Call a Contact
tly from your chosen
Contact. e Contact > Call
Access your Contacts list and
dial direc
Down Arrow Key >
Scroll up or down to
chos a
Key
Call Barring f ings > Call >Restrict various categories o
incoming or outgoing calls.
Menu > Sett
Call barring
Call Divert oming calls to another tings > Call >Divert inc
number.
Menu > Set
Call divert
Caller ID our number when ettings > Call >Show or hide y
making calls.
Menu > S
Caller ID
Call Waiting
Press Options to
ings > Call >
Call waiting
During a call pips indicate an
incoming call.
switch calls.
Menu > Sett
Last number
redial
tory list. Press again to
redial.
Press the Green Call Key for the
Call His
Call Key , Call Key
17

FUNCTION DESCRIPTION MENU SELECTION
Missed Calls
Alert
Hear an alert tone at your
specified interval to remind you
of a missed call.
Menu > Settings >
Handset > Missed calls
alert
Search your
Contacts
Narrow down your Contacts list
by searching for the Contact
name
Down Arrow Key > press
the letter keys eg. 5 for
‘J’ to find John
Set Speed Dial Set your Contacts to be called
directly from the idle screen.
Menu > Contacts >
Select the Contact >
Options > Scroll down >
Speed Dial
Speakerphone Use hands-free or in loud
speaker mode.
During a call (or call
set-up) press Speaker
key
Speed Dial Call Press and hold the
corresponding key on the
number pad to quickly call a
Speed Dial Contact.
From the idle screen
press and hold a
number key.
Voice Call Enter the number on the keypad
and press the Green Call Key.
Enter the number, .
Press to End the
call
Volume Use the side Volume keys to
adjust the volume during a call
During a call press the
side volume keys.
18

CONTACTS
There are some numbers that you may want to call again and again so it makes
sense to add these to your Contacts. You can then access these numbers
quickly and easily and add special features such as Speed Dialling, a dedicated
Ringtone and a Photo.
When you insert a new SIM card the phone will ask if you want to import your
Contacts. Select Yes when prompted to import your SIM card contacts into the
handset memory.
Check the table below to quickly find the Contact Feature you require:
FUNCTION DESCRIPTION MENU SELECTION
Add a Contact
from a received
call
Access your All Calls list and
create a new Contact from an
incoming call record
Press the Call Key
> Select the call record
> Options > Save
Add a Contact
from an SMS
Go to your Inbox and select the
required SMS. Highlight the
number or object then select
‘Use item’ from the Options
menu
Menu > Messages >
Inbox > OK to view the
SMS > Options > Use
item > Insert contact
19

FUNCTION DESCRIPTION MENU SELECTION
Back up or Copy
Contacts to your
SIM card
Saving Contacts to your SIM
card creates a back up and you
can copy these to another device
Menu > Contacts >
Options > Advanced >
SIM card management >
Copy Contacts to SIM
Copy Contacts
from a SIM card
Insert the SIM card. Say ‘Yes’
when prompted to Copy
Contacts from the SIM to the
handset.
Menu > Contacts >
Options > Advanced >
SIM card management >
Copy Contacts from SIM
Enter a new
Contact
Enter the number on the keypad,
press the left soft key to Save
Number Entry >
Options > Save number
Search your
Contacts
Search for a Contact. Scroll or
use the letters on the number
pad
Menu > Contacts >
Scroll down or press a
letter key to search. eg
press 5 for ‘J’
Set a unique
Ringtone or
image to a
Contact
Add an existing image &
ringtone to a Contact. The
Contact must be stored in the
handset memory (see Copy
Contacts from SIM ).
Menu > Contacts >
Select the Contact
(stored on the handset)
> View > Edit > Select
the feature to add, Edit
> Navigate to the folder
> Select & Save.
20
Other manuals for TELSTRA EASYTOUCH DISCOVERY 3
2
Table of contents
Other Zte Cell Phone manuals