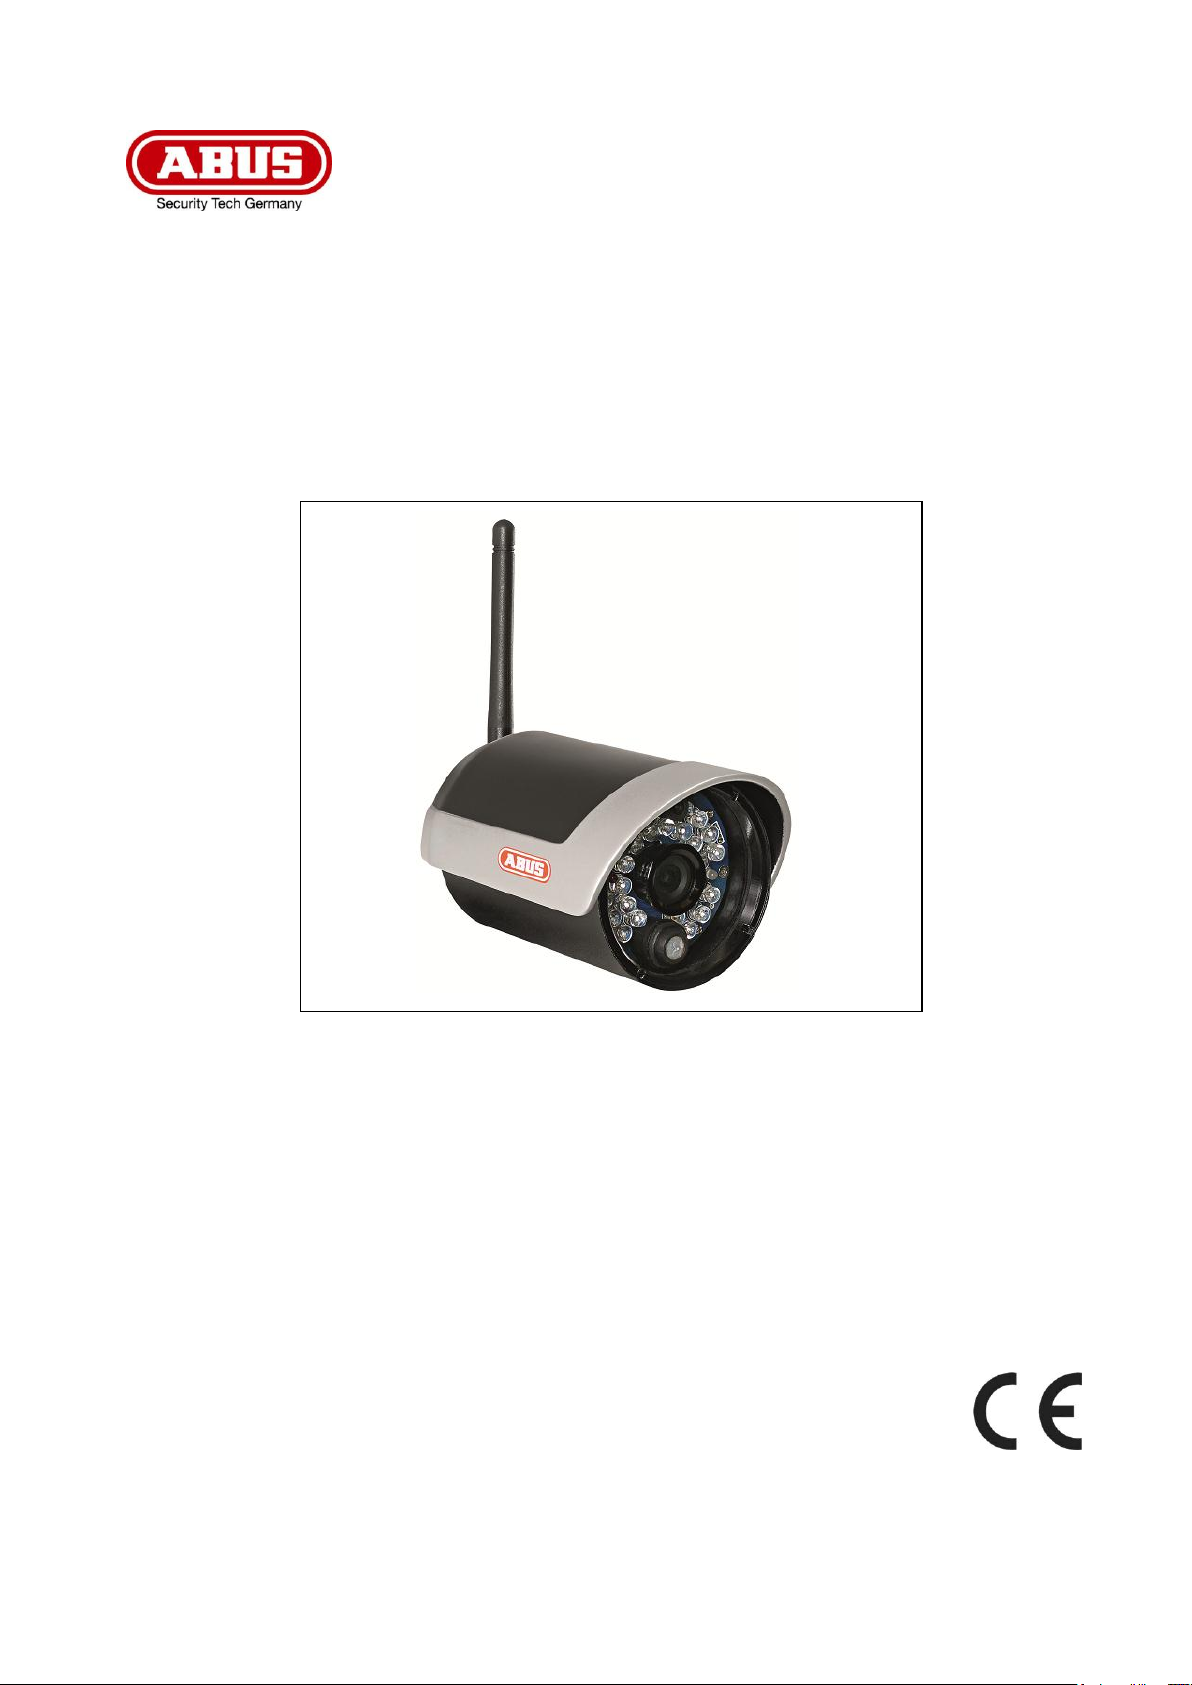
Abus TVAC15010B User manual

TVAC15010B
User guide
Betjeningsvejledning
Instrukcja obsługi
EManual de instrucciones
Version 04/2013

These user manual contains important information for installation and operation. This should be also
noted when this product is passed on to a third party.
Therefore look after these operating instructions for future reference!
A list of contents with the corresponding page number can be found in the index on page 5.
Denne manual hører sammen med dette produkt. Den indeholder vigtig information som skal bruges
under opsætning og efterfølgende ved service. Dette skal huskes også når produkter gives videre til
anden part. Læs derfor denne manual grundigt igennem også for fremtiden.
Indholdet kan ses med sideanvisninger kan findes i indekset på side 15.
Niniejsza instrukcja obsługi zawiera ważne wskazówki dotyczące uruchamiania i obsługi. Pamiętaj o
tym, także przekazując produkt osobie trzeciej.
Zachowaj instrukcję do wykorzystania w przyszłości!
Spis treści wraz z numerami stron znajduje się na stronie 25.
Este manual de instrucciones contiene indicaciones importantes para el manejo y la puesta en
funcionamiento del producto. Téngalas también en cuenta si entrega la máquina a terceros.
Por ello, consérvelas en un lugar adecuado para su posterior lectura.
En el índice de la página 35 encontrará un listado de los contenidos con las páginas donde podrá
consultarlos.
English
Dansk
Español
Polski

TVAC15010B
User manual
Version 04/2013
Original English user manual.
Keep for future use.

4
English
Introduction
Dear Customer,
Thank you for purchasing this product.
This device complies with the requirements of the applicable EU directives. The declaration of conformity can
be ordered from:
ABUS Security-Center GmbH & Co. KG
Linker Kreuthweg 5
86444 Affing
GERMANY
To maintain this condition and to ensure risk-free operation, you as the user must observe these operation
instructions!
Before initial start-up, read through the complete operating instructions observing operating and safety
instructions.
All company and product names mentioned in this document are registered trademarks.
All rights reserved.
If you have any questions, please contact your installer or your local dealer!
Disclaimer
This user manual was prepared with greatest care. If you should notice omissions or inaccuracies, please
inform us about these on the back of this manual given address.
The ABUS Security-Center GmbH assumes no liability for technical and typographical faults and reserves
the right to make at any time modifications to the product or user manual without a previous announcement.
The company is not liable or responsible for direct and indirect subsequent damages which are caused in
connection with the equipment, the performance and the use of this product.
No guarantee for the content of this document is taken.

5
English
Icon explanation
A flash in the triangle is used if there is danger for the health, e.g. by an electric shock.
An exclamation mark in the triangle points to an important note in this user manual which
must be minded.
This symbol can be found when you are to be given tips and information on operation.
Important safety advice
The warranty will expire for damage due to non-compliance with these operating
instructions. ABUS will not be liable for any consequential loss!
ABUS will not accept liability for damage to property or personal injury caused by
incorrect handling or non-compliance with the safety-instructions.
In such cases the warranty will expire.
The device has been manufactured in compliance with international safety standards. Please read these
safety advices carefully.
Safety advice
1. Mains supply
100–240 V AC, 50–60 Hz (via power adapter plug to 5 V DC)
Operate this product only from the type of power supply indicated on the marking label. If you are not sure
of the type of power supplied to your home, consult your local power company. Disconnect the product
from the mains before you start any maintenance or installation procedures.
2. Overloading
Do not overload a wall outlet, extension cord or adapter as this may result in electric fire or shock.
3. Liquids
Protect the device from any kind of liquids entering.
4. Cleaning
Disconnect the product from the wall outlet before cleaning. Use a light damp cloth (no solvents) to dust
the product.
5. Accessories
Do not use any unsupported accessories as these may be hazardous or cause damage the product.
6. Location
This device can be used in inside as well as outside.
The product will be damaged even it falls from a low height.
During the installation of the camera please take care that direct sunlight cannot fall onto the
image sensor of the device. Please follow the installation instructions in the corresponding
chapter of this user manual.
Do not place the device near a radiator or heat register.
Setup the device only in areas with the advised operating temperatures of -10° ~ 50°C.

6
English
7. Wireless transmission
The range of wireless transmission depends on various environmental factors. The local conditions at the
installation location can have a negative impact on the range. For this reason, if there is a clear line of
sight between the receiver and the transmitter, the range can be as much as 200 m, but in buildings it is
significantly less.
The following environmental factors impair both the range and the frame rate:
Mobile phone masts, high-tension electricity pylons, power lines, ceiling and walls, devices with the same
or similar radio frequency.
Warnings
Follow all safety and operating advises before starting-up the device!
1. Follow these directions in order to avoid damage of the power cord or plug:
Do not modify or process the power cord or plug arbitrarily.
Make sure to disconnect the power cord holding the plug.
Keep heating appliances as far as possible from the power cord in order to prevent the cover
vinyl from melting.
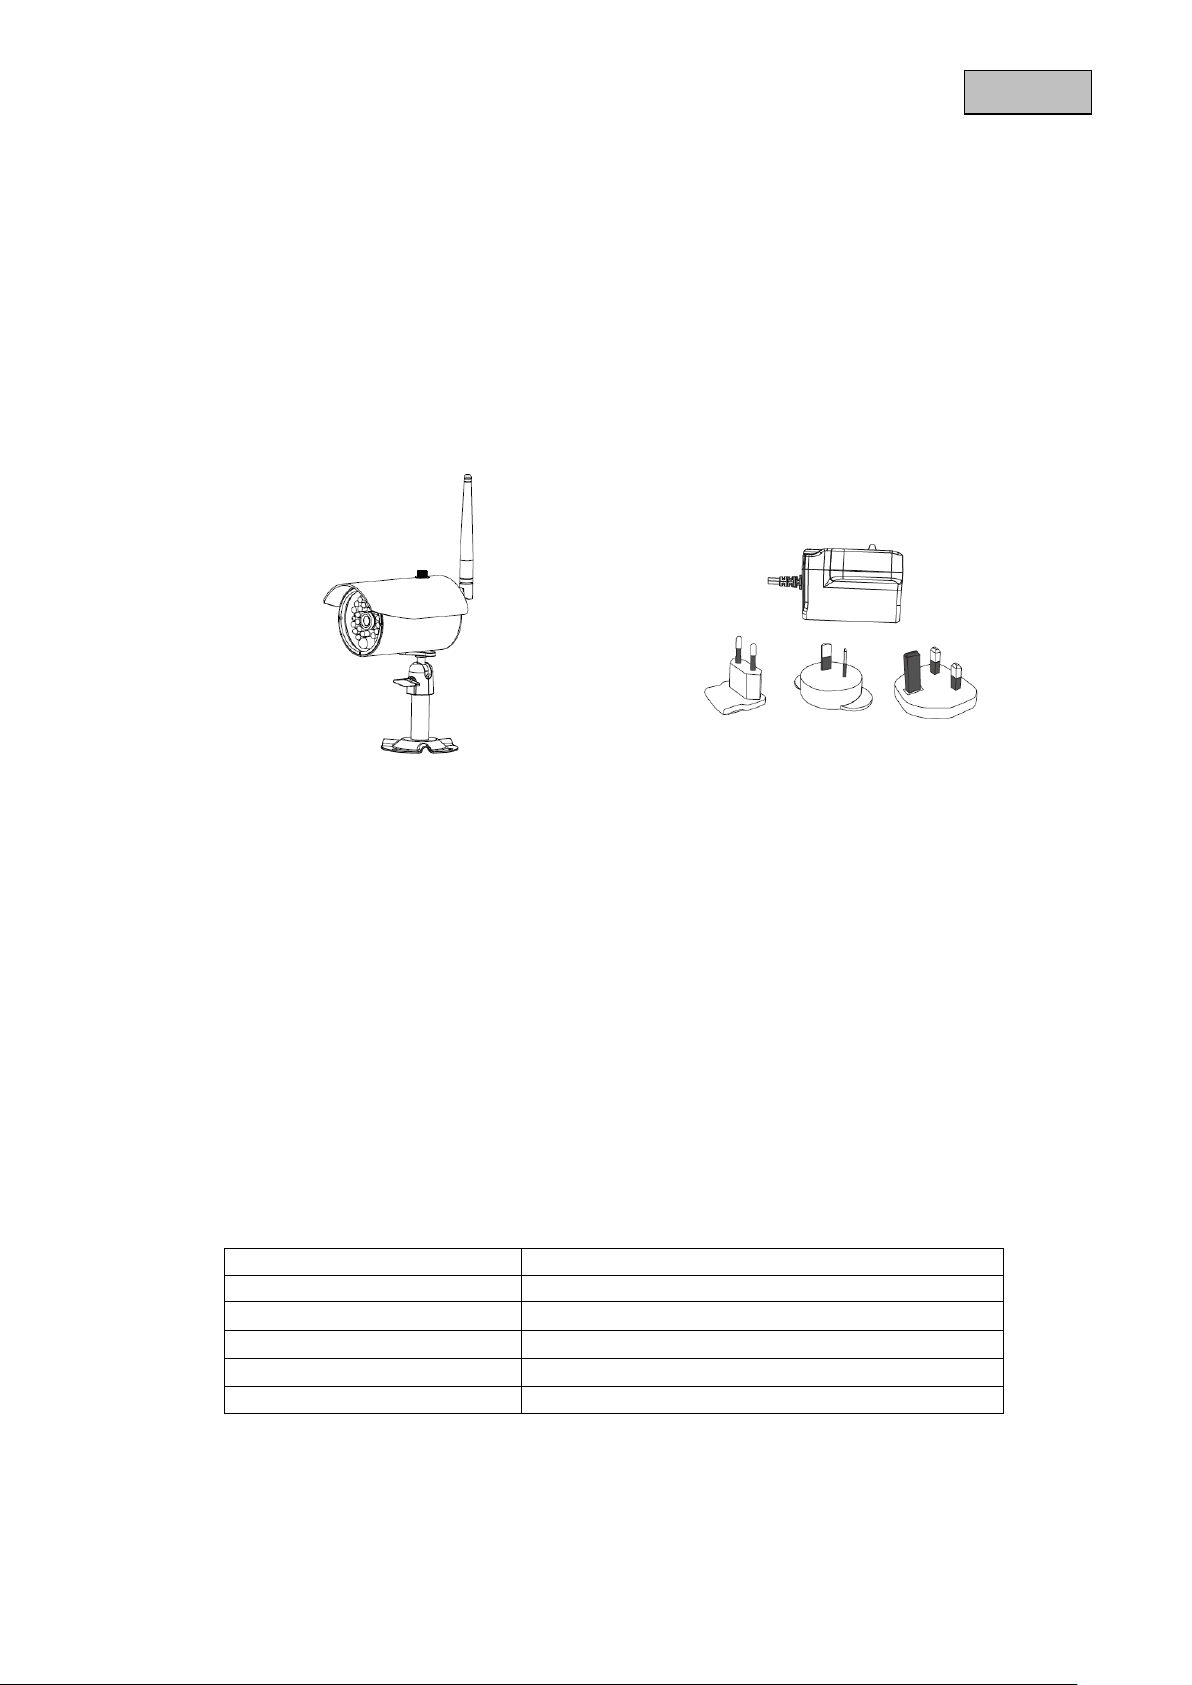
The outdoor camera’s power supply unit must be protected against humidity and damp.
2. Follow these directions. Failure to follow any of them may cause electrical shock:
Do not open the main body or the power supply.
Do not insert metal or inflammable objects inside the product.
In order to avoid any damage during lighting use a surge protection.
3. Do not use the product when it is out of order. If you continue to use the product when defective, serious
damage can be caused to it. Make sure to contact your local product distributor if the product is out of
order.
During the installation into an existing video surveillance system make sure that all devices are
disconnected from the low and supply voltage circuit.
If in doubt allow a professional electrician to mount, install and wire-up your device. Improper
electrical connection to the mains does not only represent at threat to you but also to other
persons.
Wire-up the entire system making sure that the mains and low voltage circuit remain separated
and cannot come into contact with each other in normal use or due to any malfunctioning.
Avoid using the device under the following unfavorable ambient conditions:
wetness or excessive air humidity
extreme cold or heat
direct sunlight
dust or combustible gases, vapors or solvents
strong vibration
strong magnetic fields, such as those found in the vicinity of machinery or loudspeakers
the camera must not be directed into the sun as this can destroy the sensor.
the camera may not be installed on unstable surfaces
Unpacking
While you are unpacking the device please handle it with utmost care.
If you notice any damage of the original packaging, please check at first the device.
If the device shows damages, please contact your local dealer.

7
English
Table of contents
1. Intended Use...........................................................................................................................................8
2. Scope of delivery....................................................................................................................................8
3. Features and functions..........................................................................................................................8
4. Description of device.............................................................................................................................8
4.1 Overview ........................................................................................................................................8
4.2 Camera description........................................................................................................................9
5. Installation...............................................................................................................................................9
5.1 Pairing the camera and monitor.....................................................................................................9
5.2 Installing the camera....................................................................................................................10
6. Maintenance and cleaning...................................................................................................................11
6.1 Maintenance.................................................................................................................................11
6.2 Cleaning.......................................................................................................................................11
7. Disposal.................................................................................................................................................11
8. Technical data.......................................................................................................................................12

8
English
1. Intended Use
This 2.4 GHz IR wireless outdoor camera with PIR is an optional accessory for the 3.5" TFT wireless
monitor. You have the option of connecting up to 4 cameras to the monitor. You can use this 2.4 GHz IR
wireless outdoor camera for easy wireless transmission of video signals to the wireless monitor.
Wireless signal transmission is an advantage in all locations where cables cannot be laid: the camera
transmits the video signal to the monitor without the need for wires. Faults and interference can be avoided
due to the conversion into digital signals.
A detailed function description can be found in chapter 3 (“Description and functions”).
2. Scope of delivery
IR wireless external 2.4 GHz camera, including
camera mount and installation material
Power supply units including EU,
AU and UK adapters
5 V DC/1 A
3. Features and functions
Compact IP66 outdoor camera with infrared night vision function
Integrated digital 2.4 GHz transmitter for encrypted wireless video data transmission
IR digital wireless outdoor camera for integrating in TVAC15000 wireless monitor
400 TVL resolution, 3.6 mm fixed lens
4. Description of device
4.1 Overview
Item number
TVAC15010B
Resolution
400 TVL
IR
IR cut filter (ICR)
PIR
Operating voltage
5VDC

9
English
4.2 Camera description
5. Installation
5.1 Pairing the camera and monitor
To connect a camera with the monitor, proceed as follows:
1. Connect the power supply to the cameras and monitor.
2. In the TFT monitor’s menu “Camera Setup -> Pairing” select the camera you require (1–4) and
confirm your choice with OK. The systems starts a 60 second countdown.
3. During the 60 seconds, press the PAIRING button on the camera cable until the green LINK LED on
the front of the camera starts to flash.
4. Once the connection is successful, the LINK LED on the camera lights up continuously.
Antenna
Light sensor
Fixed lens
Power LED
LINK LED
IR LED
PIR sensor
Camera mount
Pairing button
Power supply connection
5 V DC/1 A
Warning:
Please note that connection can take up to 60 seconds.

10
English
5.2 Installing the camera
Select a suitable place for installing the camera using the camera mount. Mark the drill holes on the base
and pre-drill them. Insert the wall plugs provided and attach the mount with the screws.
You now have the option of swivelling the mount by 90° to position it where you want it. Loosen the screw
at the side and set the angle of view required. Then tighten the screw in the required position to fasten.
Then screw the camera onto the mount and the power supply unit with the camera.
Warning:
Before you start with the installation, make sure that the wireless transmission range reaches
your desired installation location.
Warning:
Only use the antenna provided for the installation.

11
English
6. Maintenance and cleaning
6.1 Maintenance
Regularly check the product's physical state, e.g. check for damage of the housing.
If you suspect that safe operation cannot be guaranteed anymore, disconnect the product and ensure that
it cannot be used by mistake.
You can assume that safe operation is not possible anymore when
the device shows visible damage,
the device does not function anymore
Please note:
The product is maintenance free for you. Inside the product are no parts that can be checked
or repaired, so do not ever open it.
6.2 Cleaning
Wipe the product with a clean, dry cloth. If the device is very dirty, you can moisten the cloth with
lukewarm water.
Make sure that no liquids can enter the equipment as the device can be destroyed. Never use
chemical detergents as they could attack the surface of the device
7. Disposal
Important: The EU Directive 2002/96/EG regulates the proper return, treatment and
recycling of used electronic devices. This symbol means that in the interest of
environmental protection the device must be disposed of separately from household or
industrial waste at the end of its service life in accordance with applicable local legal
guidelines. Disposing of used devices can be done at official recycling centers in your
country. Obey local regulations when disposing of material. Further details on returns (also
for non-European countries) can be obtained at your local authority. Separate collection
and recycling saves natural resources and ensures that all the provisions for protecting
health and environment are observed when recycling the product.

12
English
8. Technical data
Model number
TVAC15010B
Frequency
2.4 GHz
Modulation
GFSK
Transmission power
16 dBm
Sensitivity
-82 dBm
TV lines
400 TVL
Image sensor
1/4" CMOS
Resolution
640 × 480 pixel (VGA)
No. of IR LEDs
27 IR LEDs
Lens
3.6 mm
Angle of view
56° (H)/43° (V)
PIR angle of view
60° (H)/50° (V)
PIR range
Max. 5 m
Night vision function range
approx. 10 m
IR swivel filter
Yes
IP protection class
IP66
Wireless range
approx. 100 m (clear sight line)*
Power supply
5 V DC/1 A
Power consumption
Max. 550 mA
Operating temperature
-10 °C–50 °C
Dimensions (L × W × H)
120 × 71 × 68 (without antenna and mount)
Weight
320 g
* The range depends on the ambient conditions (e.g. mobile phone masts, high-tension electricity pylons,
power lines, ceiling and walls, etc.).
If the conditions are unfavourable, the range may be very restricted.

TVAC15010B
Brugerhåndbog
Version 04/2013
Original betjeningsmanual på dansk.
Opbevares til fremtidige formål!

14
Dansk
Indføring
Kære kunde,
vi takker Dem fordi du har købt dette produkt.
Dette apparat opfylder kravene i gældende EU-direktiver. Overensstemmelseserklæringen kan rekvireres
hos:
ABUS Security-Center GmbH & Co. KG
Linker Kreuthweg 5
86444 Affing
GERMANY
For at opnå denne tilstand og sikre en idriftsætning uden farer må du som bruger sætte dig ind i denne
betjeningsvejledning!
Inden idriftsætning af produktet læs da hele betjeningsvejledningen, og se her om betjening og
sikkerhedsforskrifter!
Alle indeholdte firmanavne og produktbeskrivelser er varemærker hos den aktuelle producent og
der tages forbehold for alle rettigheder.
Ved spørgsmål henvend Dem da til din forhandler eller installatør!
Hæftelses udelukning
Denne betjeningsvejledning er lavet med den største omhu. Skulle der alligevel være udslag eller
unøjagtigheder så meddel os det venligst via den adresse der står på bagsiden af vejledningen.
ABUS Security-Center GmbH tager ikke ansvar for teknisk eller typografiske fejl, og forbeholder sig retten til
at til enhver tid og uden forudgående advisering at foretage ændringer ved produktet og
betjeningsvejledningen.
ABUS Security-Center kan ikke stilles til ansvar eller hæftelse for følgeskader ved brug af produktet såvel i
drift som ibrugtagning. Der gives ingen garanti for indholdet af dette dokument.

15
Dansk
Ikon forklaring
Et lyn i en trekant betyder at der er en helbredsrisiko forbundet med elektrisk stød.
Et udråbstegn I en trekant, betyder at man skal kigge i manualen efter vigtige
henvisninger..
Dette symbol findes når der bliver gives vigtige oplysninger.
Vigtige sikkerhedsinformationer
Garantien forsvinder hvis anbefalinger I manualen ikke følges nøjagtigt. ABUS er ikke
ansvarlig for konsekvenserne af dette!
ABUS vil ikke et ansvar for skader af egendom eller personlige skader forsaget af forkert
behandling eller uoverensstemmelse af sikkerhedsinstruktionerne.
I sådanne tilfælde ophører garantien.
Denne enhed er lavet efter internationale sikkerhedsstandarter, læs venligst sikkerheds instruktionerne
omhyggeligt.
Sikkerhedsinstruktioner
1. Hoved forsyning
100–240 V AC vekselspænding, 50–60 Hz (via strømforsyning til 5 V DC)
Forsyn dette produkt med en strømforsyningstype af typen der star på mærkaten. Hvis du ikke er sikker
på hvilken forsyning der findes i dit hjem, kontakt derfor dit lokale elforsyningsfirma. Fjern produktet fra
hovedforsyningen før du starter installationen.
2. Overbelastning
Lad vær med at overbelaste en vægkontakt, en forlænger eller en adapter. Dette kan resultere i elektrisk
ild eller stød.
3. Væsker
Installer kun enheden i tørre og støvbeskyttede rum, beskyt enheden imod alle slags former for væsker.
4. Rensning
Fjern enheden fra hovedforsyningen. Brug en let dampet klud(Ingen opløsningsmidler) til at støve af
produktet.
5. Tilbehør
Lad vær med at bruge tilbehør som ikke er godkendt, dette kan give skader på produktet.
6. Placering
Dette apparat er både udviklet til anvendelse i beskyttede udendørsområder og til anvendelse
indendørs.
Et fald selv fra lav højde kan beskadige produktet.
Monter produktet på en sådan måde, at apparatets billedoptager ikke udsættes for direkte sollys.
Vær opmærksom på monteringsoplysningerne i det pågældende kapitel i denne
betjeningsvejledning.
Beskyt enheden med alle former for væsker.
Placer ikke enheden nær radiatorer ikke varmeblæsere.
Placer enheden i miljøer med temperaturer imellem -10° ~ 50°C.

16
Dansk
7. Trådløs overførsel
Den trådløse overførsels rækkevidde afhænger af forskellige miljøpåvirkninger. De lokale forhold på
monteringsstedet kan påvirke rækkevidden negativt. Derfor kan ved frit udsyn opnås en strækning på
indtil 200 m mellem modtageren og senderen, men i bygninger betydeligt mindre.
Følgende miljøpåvirkninger begrænser både rækkevidden og billedhastigheden:
Mobiltelefonantenner, højspændingsmaster, elektriske ledninger, lofter og vægge, apparater med den
samme eller tilstødende trådløse frekvens.
Advarsler
Følg alle sikkerheds instruktioner før at installationen begynder!
1. Følg alle disse bestemmelser for at undgå skader af strømledningen og stikket.
Lad vær med at ændre strømledningen eller stikket vilkårligt.
Vær sikker på at afkoble ledningen når du holder i stikket.
Hold varme enheder så langt væk fra ledningen, for at undgå at vinyl kappen kan smelte.
Udendørskameraets strømforsyning skal beskyttes mod fugt og væde.
2. Følg disse instruktioner. Hvis ikke, kan det forsage elektrisk stød:
Åben ikke hovedenheden eller strømforsyningen.
Lad vær med at indsætte metal eller brandfarlige ting i enheden.
For at undgå skade ved lyn, brug derfor an overspændings beskytter.
3. Lad vær med at bruge produktet hvis det er gået i stykker. Hvis dette gøres, kan der ske større skade..
Kontakt den lokale leverandør hvis produktet er gået i stykker.
Under installationen i et eksisterende videoovervågnings system, vær da sikker på at alle
enheder er fjerne fra lav og 230 VAC strømforsyninger.
I tvivl, brug derfor en professionel elinstallatør til at installere og opsætte elektricitet til produktet.
Forkert installation er til fare for dig og andre.
Installer det således at ingen frie strømkabler kan komme I kontakt med personer under brug og
ved problemer.
Undgå følgende problematiske omgivelser ved betjeningen:
Våde omgivelser eller for høj luftfugtighed
Ekstrem kulde eller varme.
Direkte sollys
Støv eller brændbare gasser, dampe eller opløsningsmidler
kraftige rystelser
kraftige magnetfelter, som f.eks. i nærheden af maskiner eller højtalere.
Kameraet må ikke rettes mod solen. Det kan medføre ødelæggelse af sensoren.
Kameraet må ikke installeres på ujævne flader.
Udpakning
Når du pakker apparatet ud skal dette gøres med forsigtighed.
Ved en eventuel beskadigelse på forpakningen da tjek venligst om enheden også har synlige
tegn på skade. Såfremt at dette er tilfældet skal du hurtigst muligt returnere/ gøre opmærksom
på dette overfor leverandøren.

17
Dansk
Indholdsfortegnelse
1. Korrekt anvendelse..............................................................................................................................18
2. Leveringsomfang..................................................................................................................................18
3. Kendetegn og funktioner.....................................................................................................................18
4. Apparatbeskrivelse ..............................................................................................................................18
4.1 Overblik........................................................................................................................................18
4.2 Beskrivelse af kameraet...............................................................................................................19
5. Installation.............................................................................................................................................19
5.1 Forbindelse af kameraerne og monitoren....................................................................................19
5.2 Kameramontering.........................................................................................................................20
6. Vedligeholdelse og rengøring.............................................................................................................21
6.1 Vedligeholdelse...........................................................................................................................21
6.2 Rengøring....................................................................................................................................21
7. Vækanskaffelse ....................................................................................................................................21
8. Tekniske data........................................................................................................................................22

18
Dansk
1. Korrekt anvendelse
Dette trådløse IR-udendørskamera 2,4 GHz med PIR er ekstra tilbehør til den trådløse 3,5" TFT-monitor.
Du har mulighed for at forbinde indtil 4 kameraer med monitoren. Med dette trådløse 2,4 GHz IR-
udendørskamera kan du uden problemer overføre videosignaler trådløst til den trådløse monitor.
Den trådløse signaloverførsel er en fordel over alt, hvor det ikke er muligt at trække kabler: Kameraet
overfører videosignalet trådløst til monitoren. På grund af omformningen til digitale signaler kan
forstyrrelser og interferenser dermed undgås.
En udførlig funktionsbeskrivelse finder du i kapitel „3. Kendetegn og funktioner“.
2. Leveringsomfang
Trådløst IR-udendørskamera 2,4 GHz
inkl. kameraholder og monteringsmateriale
strømforsyning
inkl. EU-, AU- og UK-adapter
5 V DC/1 A
3. Kendetegn og funktioner
Kompakt IP66 udendørskamera med infrarød natsigtfunktion
Integreret digital 2,4 GHz sender til kodet trådløs overførsel af videodata
Digitalt, trådløst IR-udendørskamera til integration i TVAC15000 trådløs monitor
400 TVL opløsning, 3,6 mm fast objektiv
4. Apparatbeskrivelse
4.1 Overblik
Varenummer
TVAC15010B
Opløsning
400 TVL
IR
IR-drejefilter (ICR)
PIR
Driftsspænding
5VDC

19
Dansk
4.2 Beskrivelse af kameraet
5. Installation
5.1 Forbindelse af kameraerne og monitoren
Gå frem på følgende måde for at forbinde et kamera med monitoren:
1. Tilslut strømforsyningerne til kameraerne og monitoren.
2. Vælg det ønskede kamera (1-4) i TFT-monitorens menu “Camera Setup -> Pairing”, og bekræft valget
med OK. Systemet tæller nedad fra 60 sekunder.
3. Tryk på PAIRING-tasten på kameraets kabel i de 60 sekunder, indtil den grønne LINK LED på
forsiden af kameraet begynder at blinke.
4. Når forbindelsen er etableret, lyser LINK-LED på kameraet konstant.
Antenne
Lyssensor
Fast objektiv
Power LED
Link LED
IR-LED
PIR-sensor
Kameraholder
Pairing-tast
Tilslutning spændingsforsyning
5 V DC/1 A
Vigtigt:
Vær opmærksom på, at forbindelsesvarigheden kan vare indtil 60 sekunder.

20
Dansk
5.2 Kameramontering
Vælg et egnet sted til installationen ved hjælp af kameraholderen. Tegn nu boringshullerne på underlaget,
og bor dem. Sæt de vedlagte dyvler i, og fastgør nu holderen med skruerne.
Du har mulighed for at dreje holderen 90° for at vælge en ønsket position. Løsn først skruen på siden, og
indstil den ønskede synsnvinkel. Fastgør derefter skruen for at fastgøre den ønskede position.
Skru derefter kameraet på holderen, og forbind strømforsyningen med kameraet.
Vigtigt:
Før du påbegynder installationen, skal du sikre dig, at den trådløse overførsels rækkevidde
findes på stedet for den ønskede installation.
Vigtigt:
Anvend kun de vedlagte antenner til installationen.
Table of contents
Languages:
Other Abus Security Camera manuals

Abus
Abus TVCC12010 User manual

Abus
Abus TVHD71000 User manual

Abus
Abus TVCC71000 User manual

Abus
Abus HDCC75550 User manual

Abus
Abus PPIC36520 User manual

Abus
Abus HDCC62550 User manual

Abus
Abus Eyseo TVCC35000 User manual

Abus
Abus TVAC16001A User manual

Abus
Abus TVIP51500 User manual

Abus
Abus TVCC50030 User manual

Abus
Abus TVIP61500 User manual

Abus
Abus TVIP10055B User manual

Abus
Abus IPCB62515A User manual

Abus
Abus IPCS84550 User manual

Abus
Abus IPCB42500 User manual

Abus
Abus TVCC40020 User manual

Abus
Abus TVHD40000 User manual

Abus
Abus IPCB64515B User manual

Abus
Abus EasyLook PPDF17000 User manual

Abus
Abus PPIC31020 User manual