AEG SRC 4321 User manual

SRC 4321
Bedienungsanleitung/Garantie
Gebruiksaanwijzing • Mode d’emploi • Instrucciones de servicio
Manual de instruções • Istruzioni per l’uso • Bruksanvisning
Instruction Manual • Instrukcja obsługi/Gwarancja
Návod k použití • Használati utasítás • Руководство по эксплуатации
iPod Sound Machine mit Uhr
iPod geluidsinstallatie met klok • Enceinte Sound Machine pour iPod avec horloge
Reproductor de iPod con reloj • Leitor de Áudio para iPod com Relógio • Dispositivo
audio iPod con orologio • iPod lydmaskin med klokke • iPod Sound Machine with Clock
Urządzenie dźwiękowe iPod z zegarem • Rádiobudík iPod • iPod erősítőórával
Док-станция для iPod счасами
PERFECT IN FORM AND FUNCTION
SRC 4321 CD IM all languages 0921 1SRC 4321 CD IM all languages 0921 1 2008-9-30 18:18:172008-9-30 18:18:17

2
Inhalt
Norsk
Innholdsfortegnelse
Plassering av kontroller....................Side 3
Bruksanvisning.................................Side 45
Tekniske spesifikasjoner.................. Side 50
English
Contents
Location of Controls......................... page 3
User manual.....................................page 51
Technical Specifications………........ page 56
Język polski
Spis treści
Lokalizacja kontrolek........................strona 3
Instrukcja użytkowania.....................strona 57
Specyfikacje techniczne...…........... strona 62
Warunki gwarancji……………..........strona 62
Česky
Obsah
Umístění ovladačů........................... strana 3
Návod k obsluze.............................. strana 64
Technické specifikace……............... strana 69
Magyarul
Tartalom
A kezelőszervek elhelyezkedése..... oldal 3
Használati útmutató......................... oldal 70
Műszaki adatok…............................ oldal 75
Русский
Содержание
Расположение элементов..............стр. 3
Руководство пользователя............ стр. 77
Технические характеристики......... стр. 83
SRC 4321 CD IM all languages 0922 2SRC 4321 CD IM all languages 0922 2 2008-9-30 18:18:302008-9-30 18:18:30

3Übersicht der Bedienelemente
Locatie van bedieningselementen
Situation des commandes
Ubicación de los controles
Localização dos controlos
Posizione dei comandi
Plassering av kontroller
Location of Controls
Lokalizacja kontrolek
Umístění ovladačů
A Kezelőszervek Elhelyezkedése
Расположение элементов
SRC 4321 CD IM all languages 0923 3SRC 4321 CD IM all languages 0923 3 2008-9-30 18:18:302008-9-30 18:18:30

45
Generelle sikkerhetsanvisninger
Les nøye gjennom bruksanvisningen før bruk
og oppbevar den sammen med garantisertifi-
katet, kassalappen og hvis mulig, originalem-
ballasjen inklusive den innvendig emballasjen.
Hvis du overleverer utstyret til en tredjeperson,
skal også bruksanvisningen overleveres.
• For å unngå fare for elektriske støt, skal du
ikke utsette utstyret for regn eller fuktighet.
Ikke bruk utstyret i nærheten av vann (for
eksempel baderom, svømmebasseng, fuktige
kjellere).
• Utstyret skal kun brukes til tiltenkt formål.
• Utstyret skal kun plugges i en riktig montert
stikkontakt. Sørg for at spenningen på utstyret
tilsvarer gittermotstanden.
• Når du bruker eksterne gitteradaptere, skal
du være nøye med riktig polaritet og spen-
ning. Sett inn batteriene riktig.
• Unngå å dekke over utstyrets ventilasjon-
såpninger.
• Åpne aldri kassen på utstyret. Feilaktige
reparasjoner kan forårsake alvorlige skader
på brukeren. Hvis utstyret eller spesielt strøm-
ledningen er skadet, skal du lenger ikke bruke
utstyret og få det reparert av en kvalifisert
spesialist. Kontroller strømledningen for
skader med jevne mellomrom.
• For å unngå noen form for fare, må en skadet
strømledning kun skiftes ut av produsenten,
dens kundeservice eller en lignende kvalifisert
person med en lik ledning.
• Hvis utstyret ikke skal brukes over en lengre
tidsperiode, skal du koble fra strømledningen
og ta ut batteriene.
Disse symbolene kan du finne på utstyret og
skal vise følgende:
Barn og funksjonshemmede personer.
• For dine barns sikkerhet, skal du holde embal-
lasjedeler (plastposer, kartong, polystyrens-
kum etc.) utenfor deres rekkevidde.
Advarsel!
Ikke la små barn leke med folie da det er fare
for kvelning!
• For å verne barn eller svake personer fra fare
for elektrisk utstyr, skal du sørge for at dette
utstyret kun brukes under tilsyn. Dette utstyret
er ingen leke. Ikke la små barn leke med det.
Symboler i bruksanvisningen
Viktige notater for din sikkerhet er uttrykkelig
merket. Vær absolutt oppmerksom på dem for
å unngå uhell og skader p utstyret.
Advarsel!
Advarer mot helsefarer og indikerer potensi-
elle fare for skader.
Forsiktig:
Indikerer potensiell fare for utstyret og andre
gjenstander.
Merk:
Fremhever tips og informasjon for deg.
Det lyn - symbolet advarer brukeren
om farlige høyspenning inne i kas-
sen.
Utropstegnet påpeker viktige
instruksjoner eller vedlikeholdskom-
mentarer i veiledningene som følger
med.
Norsk
SRC 4321 CD IM all languages 09245 45SRC 4321 CD IM all languages 09245 45 2008-9-30 18:18:502008-9-30 18:18:50

46
Plassering av kontroller
1 iPod tilkobling
2 TUNING+/TUNING- knapper
3 SET AL1 knapp (stille inn alarm)
4 AL2 (2. alarmtid) knapp
5 SET AL2 knapp (stille inn 2. alarmtid)
6 MIN knapp (minutter)
7 HR knapp (timer)
8 Alarmintervall/knapp for forsinket slå av
(SNOOZE/SLEEP)
9 Tidsinnstilling (TIME SET) knapp
10 BBS knapp
11 FUNCTION (Funksjon) utvalgsknapp for
operasjoner
12 AL1 (alarm 1) knapp
13 STANDBY knapp
14 VOL+/VOL- volumkontrollknapper
Bakside
15 DIMMER L/H bryter
16 DC 15V tilkobling
17 LINE IN plugg
18 PHONE plugg
19 DST 0/+1 bryter (vinter/sommertid)
Fjernkontroll
20 FUNCTION utvalgsknapp for operasjoner
21 / knapper (søk fwd/bwd)
22 (Play/Pause) knapp
23 BBS knapp
24 VOL+/VOL- volumkontrollknapper
25 MUTE knapp
26 Forsinket slå-av knapp (SLEEP)
27 POWER knapp
28 12/24 knapp (klokketidsmodus)
Første gangs bruk av utstyret/
innledning
• Før første gangs bruk av utstyret, skal du lese
brukermanualen nøye.
• Finn en egnet plass for apparatet som er tørt
og som har en jevn og ikke glatt overflate slik
at du enkelt kan bruke apparatet.
• Sørg for at apparatet har tilstrekkelig med
ventilasjon.
• Hvis det framdeles er på, ta av beskyttelses-
folien fra skjermen.
Strømforsyning.
• Sett kontakten inn i en korrekt installert
tretanns støpsel med 230V, 50Hz Koble til
apparatet med koplingstykket ved å sette inn
pluggen i DC 15V plugg (16) på apparatet.
• Sørg for at nettspenningen samsvarer med de
oppgitte merkedata på typeskiltet.
Forsiktig:
• Koplingstykket som følger med må bare
bli brukt med dette apparatet. Ikke til bruk for
andre apparater.
• Bruk kun en strømadapter med 15V
( ), en annen adapter kan
ødelegge apparatet.
Merk:
Hvis apparatet ikke er i bruk over en lengre
periode må strømadapteren tas ut av støpse-
let.
Innsetting av batteri
Batterier følger ikke med apparatet.
I tilfelle strømstans eller hvis apparatet blir
plugget ut med batteriene innsatt, vil innstill-
ingene bli bevart.
1. Åpne batterilokket på bunnen av apparatet.
2. Sett inn 2 R03 “AAA” batterier 1.5V. Husk å
sett batteriene riktig vei (som vist i bunnen av
batteriboksen).
3. Lukk batteriboksen.
4. Hvis apparatet ikke skal brukes over en
lengre periode, ta ut batteriene for å unngå
lekkasje av batterisyre.
Merk:
Hvis strømnivået på batteriet er lavt eller at
batteriene ikke er satt inn, vil dette symbolet
“ ” vises på skjermen.
Forsiktig:
• Bruk aldri forskjellige batterityper eller nye
og brukte batterier sammen.
• Batterier må ikke kastes i avfallet. Vær
vennlig å levere brukte batterier på godkjente
miljøtorg eller tilbake til forhandler.
Norsk
SRC 4321 CD IM all languages 09246 46SRC 4321 CD IM all languages 09246 46 2008-9-30 18:18:512008-9-30 18:18:51

47
Advarsel:
Utsett ikke batteriene for høye temperaturer
eller direkte sollys, kast heller ikke batteriene i
åpne flammer. Fare for eksplosjon!
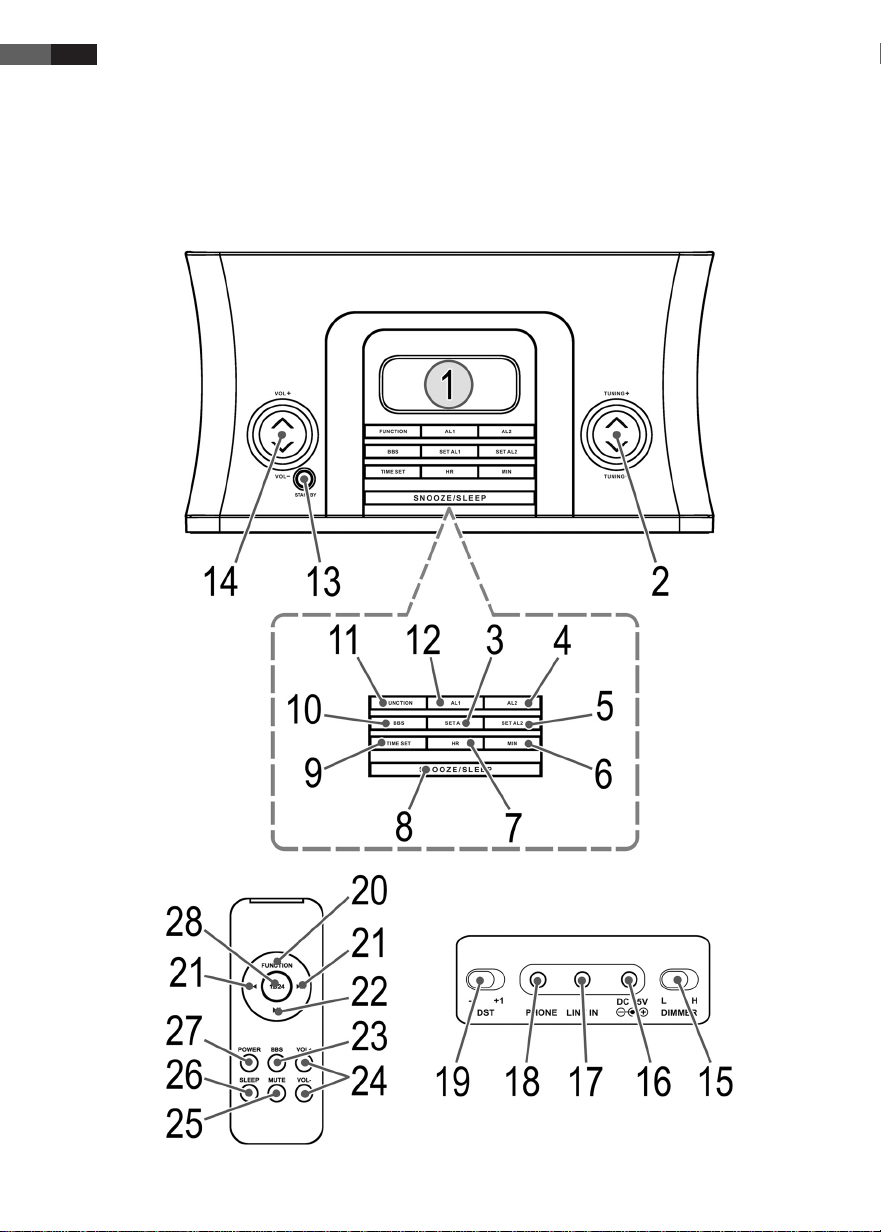
Hodetelefonplugg (18)
For bruk av hodetelefonen, bruk et hodetelefon-
sett med en 3,3mm stereo jack plugg. Denne
stikker du inn i tilkoblingen til hodetelefonen,
PHONE. Høytalerne vil bli dempet.
Generell bruk
Merk:
Noen av knappene kan man finne både på ap
paratet og på fjernkontrollen. Identiske knap-
per har samme funksjon.
Slå apparatet av/på (13/27)
Ved å trykke på STANDBY (POWER) knap-
pen, kan man sette apparatet i hvilemodus.
Hvis man trykker på knappen igjen slår man på
apparatet.
Skjermlysstyrke
Ved DIMMER L/H bryteren (15), kan man just-
ere lysstyrken på skjermen.
Volum
Ved å trykke på VOL+/VOL- (14/24) knappen
kan man justere til ønsket volum.
Infrarød fjernkontroll.
For trådløs kontroll innen en rekkevidde på
5m. Hvis avstanden reduseres bør man bytte
batteriene. For optimal bruk bør det være fri
sikt mellom fjernkontrollen og sensoren på ap-
paratet.
BBS (10/23)
Øker eller reduserer bassen. For å aktivere
eller deaktivere funksjon, trykk BBS knappen.
MUTE (25 på RC)
For øyeblikkelig muting av volumet. For å
avslutte funksjonen, trykk MUTE knappen igjen.
12/24 timers veksling på/av (28 på RC)
Ved å trykke på 12/24 knappen, kan man bytte
mellom 12 timers eller 24 timers skjermmodus.
Merk:
På 12 timers skjermen, PM = ettermiddag.
Vinter/sommertidsbytte (19)
DST 0/+1 bryteren bytter mellom vinter og som-
mertid.
Etter årstiden, flytt DST 0/+1 bryteren i rett still-
ing før du setter inn klokkeslettet.
0 = vintertid (normaltid), +1 = sommertid.
Stilling av klokken.
• Trykk TIME SET knappen (9) så vil skjermen
blinke.
• Trykk på HR knappen (7) for å stille timene.
Trykk inn og hold inn knappen til ønsket
timetall vises.
• For å stille minuttene, trykk på MIN knappen
(6). Trykk og hold inn knappen til ønsket
minuttall vises på skjermen.
• Trykk på TIME SET knappen igjen for å lagre
klokkeslettet.
Merk:
Etter ca. 8 sekunder vil tallene slutte å blinke
og klokkeslettet vil bli lagret automatisk.
Radio innstilling
• Trykk på STANDBY (POWER) knappen
(13/27) for å starte apparatet.
• Trykk på FUNCTION knappen (11/20) gjen-
tatte ganger til FM eller AM vises på skjermen.
FM (MHz) = eldig høy frekvens, AM (KHz) =
Medium bølgelengde
• Still inn kanalene ved å trykke på TUNING+/
TUNING- knappene (2). Skjermen vil vise
radiofrekvensen og, til venstre, radio kanalen.
• Stereokontrollampen (på skjermen) er opplyst
bare når det valgte programmet blir mottatt
i stereokvalitet. Hvis signalet er for dårlig og
støyende i det mottatte programmet, vil det
blinke. Prøv å forbedre mottakerforholdene
med innstillingen eller ved å trekke ut an-
tenna.
Norsk
SRC 4321 CD IM all languages 09247 47SRC 4321 CD IM all languages 09247 47 2008-9-30 18:18:512008-9-30 18:18:51

48
• For å motta AM signal er en a-ntenne inklud-
ert med apparatet. Apparatet kan justeres på
signal ved å vri på det. I denne frekvensen
kan signalet bare sendes i mono modus.
Alarm Funksjon
Still alarmen
Du kan stille inn to alarmtider, fortsett som
følgende:
• Trykk inn SET AL1 knappen (3). Den innstilte
alarmtiden blinker på skjermen.
• Nå, trykk og hold inn HR og MIN knappen
(7/6) for å stille inn den ønskede alarmtiden.
Merk:
Tallene slutter å blinke etter ca. 8 sekunder og
den nåværende tiden på skjermen er lagret.
• Trykk inn AL1 knappen (12); skjermen vil vise
ALARM1 og still inn alarmtiden. Den første
alarmtiden er aktivert.
Still andre alarm:
• Trykk inn SET AL2 knappen (5). Den innstilte
alarmtiden blinker på skjermen.
• Nå, trykk og hold inn HR og MIN knappen
(7/6) for å stille inn den ønskede alarmtiden.
Merk:
Tallene slutter å blinke etter ca. 8 sekunder og
den nåværende tiden på skjermen er lagret.
• Trykk inn AL2 knappen (4); skjermen vil vise
ALARM2 og still inn alarmtiden. Den andre
alarmtiden er aktivert.
Trykk inn SATNDBY (POWER) knappen for å
slå av alarmen til neste dag.
Deaktiver Alarm
• For å deaktivere den første alarmen, trykk
AL1 knappen (12) gjentatte ganger inntil
ALARM1 slåes av på skjermen.
• For å deaktivere den andre alarmen, trykk
AL2 knappen (4) gjentatte ganger inntil
ALARM2 slåes av på skjermen.
Våkne opp til radio
• Trykk på STANDBY (POWER) knappen for å
slå av apparatet etter å ha satt alarmen.
• Trykk på AL1 eller AL2 knappen gjentatte
ganger til RADIO vises på skjermen. Det
nåværende signalet vil vises. Trykk på
TUNING+/TUNING- (2) for å stille inn en an-
nen radio stasjon.
Merk:
Du har 8 sekunder på å stille inn en ny
radiostasjon før frekvensen blir lagret.
• Radioen slår seg automatisk på ved den
innstilte alarmtiden og den valgte radiostas-
jonen blir spilt. Volumet øker gradvis
Våkne opp til Buzzer
• Trykk på STANDBY (POWER) knappen for å
slå av apparatet etter å ha stilt inn alarmen.
• Trykk på AL1 eller AL2 knappen gjentatte
ganger til BUZZER vises på skjermen.
• Radioen starter automatisk med buzzeren i
stedet for radiostasjonen ved den inntilte alar-
mtiden. Volumet øker gradvis
Våkne opp til iPod
• Koble til iPoden til iPod tilkoplingen.
Merk:
Bruk en forskjellig tilkoplings adapter for å
sørge for en ordentlig tilkopling til din iPod.
• Trykk på AL1 eller AL2 knappen gjentatte
ganger til ”iPod” vises på skjermen. Forsikker
deg om at iPoden er ordentlig tilkoplet.
• iPoden starter i det innstilte modus til den
ønskede alarmtiden. Volumet øker gradvis
Merk:
• Følg din iPods brukermanual for å velge din
ønskede modus.
• Hvis iPoden ikke er tilkoplet vil apparatet
vekke deg med BUZZER modus.
Slumre Funksjon
Trykk på SNOOZE/SLEEP knappen (8) for å
deaktiver alarmen i ca. 10 minutter.
Norsk
SRC 4321 CD IM all languages 09248 48SRC 4321 CD IM all languages 09248 48 2008-9-30 18:18:522008-9-30 18:18:52

49
Slå av alarmen
Trykk inn STANDBY (POWER) knappen for å
slå av alarmen til neste dag.
Sovetimer (SNOOZE/SLEEP
knapp (8/26))
I løpet av PÅ modusen kan du automatisk sette
på sovetiden i 15-minutters intervaller mellom
90 og 15 minutter; etter denne perioden vil
apparatet gå inn i strandby modus. Trykk på
denne knappen gjentatte ganger til det har gått
ønsket tid. SLEEP vises dersom funksjonen er
aktivert. Ette r den bestemte tiden vil apparatet
automatisk slåes av.
Etter å ha stilt inn sovetiden trykk inn SNOOZE/
SLEEP for å forandre innstilingene.
Trykk på STANDBY (POWER) knappen for å
stoppe funksjonen.
Spill musikk fra iPod
(iPod ikke med)
1. Koble til iPoden til iPod tilkoplingen (1).
2. Trykk på STANDBY (POWER) knappen
(13/27) for å starte apparatet. Trykk på
FUNCTION knappen (11/20) gjentatte
ganger hvis iPod modusen ikke automatisk
blir valgt.
3. Trykk på knappen (22) for å spille
musikk.
4. Følg brukermanualen til iPoden for videre
bruk.
Forsiktig:
Gå tilbake til radiomodus før du kopler fra din
iPod for å unngå skader på din iPod.
Beskrivelse av iPod kontroller
(22)
Du kan pause og fortsette musikkavspilling.
Trykk igjen for å fortsette musikkavspilling.
Norsk
(21)
Trykk 1 x = Start sangen på nytt fra
begynnelsen.
Trykk 2 x = Gå til den forrige sangen.
Trykk 3 x = Gå til sangen før den forrige
sangen, og osv. Trykk og hold ned
under avspilling for å søke
gjennom sangen i revers.
(21)
Trykk for å hoppe over til neste sang og den
neste etter det. Trykk og hold ned under avspill-
ing for å søke gjennom sangen forover.
iPod lading
Etter tilkopling av iPoden til iPod stasjonen vil
batteriene til iPoden bli ladet. Apparatet må
være tilkoplet hovedstrømmen og må være i
STANDBY (POWER) modus.
Merk:
• Bruk en forskjellig tilkoplingsadapter for å
forsikre en ordentlig tilkopling til din iPod.
• Ikke alle iPod varianter kan bruke lademo-
dusen.
LINE IN støpsel (17)
Tilknytt hvilken som helst analog avspillingskil-
de som MP3 spiller, CD spiller, osv. Avspilling
skjer via høytalerne til apparatet.
1. Kople til det eksterne apparatet via en
3.5mm stereo plugg i LINE IN støpselet.
Apparatet vil automatisk bytte til AUX modus.
2. Till inn volumnivået med VOL+/VOL–
knappene (14/24) og lytt til musikk fra det
eksterne apparatet via høytalerne til dette
apparatet.
3. Du vil finne videre instruksjoner i brukerman-
ualen til ditt eksterne apparat.
Merk:
Still inn lydnivået på det eksterne apparatet til
et fornuftig nivå.
SRC 4321 CD IM all languages 09249 49SRC 4321 CD IM all languages 09249 49 2008-9-30 18:18:522008-9-30 18:18:52

50
Rengjøring
• Før rengjøring, koble fra strømforsyningen.
• Rengjør apparatet med en myk fuktig klut
uten vaskemidler.
• Senk ikke apparatet i vann.
Tekniske spesifikasjoner
Modell:...............................................SRC 4321
Strømforsyning: Ekstern strømadapter
Inngang:................................ AC 230V – 50 Hz
Utgang:...................................... DC 15V / 1.5 A
Polaritet: ..............................................
Reservebatteri:.....................2 x 1.5V, R03, AAA
Nytteeffekt:..................................30 Watt PMPO
Beskyttelsesklasse:..........................................II
Radio:
Frekvensområde:.................FM 87.5 ~ 108MHz
..................AM 522 ~ 1620kHz
Reservert mot teknisk modifikasjoner
Dette apparatet følger de nåværende CE direk-
tivene, som elektromagnetisk kompatibilitet og
spenningsdirektiver og er produsert i overens-
stemmelse med de siste sikkerhetsregulerin-
gene.
Kan endres uten forhandsvarsel!
Norsk
SRC 4321 CD IM all languages 09250 50SRC 4321 CD IM all languages 09250 50 2008-9-30 18:18:532008-9-30 18:18:53

51
English
General Safety Guidelines
Before using this device, carefully read this
user manual and keep it together with the
Warranty Certificate, cashier receipt and if pos-
sible, the original package inclusive its interior
packing. If you hand on the device to any third
person, include the user manual as well.
• To avoid the risk of fire or electric shock, you
should not expose the device to rain or hu-
midity. Do not use the device near water (e.g.
bathroom, swimming pool, humid cellars)
• Use the device only for the proposed purpose.
• Plug the device only into a properly installed
socket. Be sure the device voltage corre-
sponds to the grid voltage.
• When using external grid adaptors, pay atten-
tion to the correct polarity and voltage. Insert
batteries correctly.
• Avoid covering the device’s vent openings.
• Never open the device’s case. Improper
repairs can cause severe danger to the user.
If the device or particularly the power cord is
damaged, don’t use the device any further
and have it repaired by a qualified specialist.
Check the power cord regularly for damages.
• To avoid any danger, a damaged power cord
must be replaced only by the producer, its
customer service or a similarly qualified per-
son with an equal cord.
• If the device won’t be used over an extended
period of time, disconnect the power cord and
remove the batteries.
These symbols may be found on the device
and shall indicate the following:
Children and disabled persons
• For the safety of your children, keep any
packing parts (plastic bags, cartilage, Styro-
foam etc.) out of their reach.
Warning!
Don’t let small children play with foils for
danger of suffocation!
• To save children or frail persons from danger
of electric devices, make sure this device is
used only under supervision. This device is no
toy. Do not let small children play with it.
Symbols in this user manual
Important notes for your safety are marked
distinctively. Pay absolute attention to them to
avoid accidents and damage to the device.
Warning:
Warns of dangers for your health and indi-
cates potential risks of injury.
Attention:
Indicates potential dangers for the device or
other objects.
Note:
Highlights tips and information for you.
The lightning symbol warns the user
of dangerously high voltages inside
the case.
The exclamation mark symbol
points to important instruction or
maintenance remarks in the accom-
panying guidelines.
SRC 4321 CD IM all languages 09251 51SRC 4321 CD IM all languages 09251 51 2008-9-30 18:18:532008-9-30 18:18:53

52
Location of Controls
1 iPod connection
2 TUNING+/TUNING- buttons
3 SET AL1 button (set alarm)
4 AL2 (2nd alarm time) button
5 SET AL2 button (set 2nd alarm time)
6 MIN button (minutes)
7 HR button (hours)
8 Alarm Interval/button for delayed switch-off
(SNOOZE/SLEEP)
9 TIME SET button
10 BBS button
11 FUNCTION Operation selection button
12 AL1 (alarm 1) button
13 STANDBY button
14 VOL+/VOL- volume control buttons
Back Side
15 DIMMER L/H switch
16 DC 15V connection
17 LINE IN jack
18 PHONE jack
19 DST 0/+1 switch (winter/summer time)
Remote Control
20 FUNCTION operation selection button
21 / buttons (search fwd/bwd)
22 (Play/Pause) button
23 BBS button
24 VOL+/VOL- volume control buttons
25 MUTE button
26 Delayed switch-off button (SLEEP)
27 POWER button
28 12/24 button (clock time mode)
First Use of the Device/ Introduc-
tion
• Before the first use of the device, read the
user manual carefully.
• Select a proper place for the device such as
a dry, and even non slip area where you can
easily operate the device.
• Make sure the device is vented sufficiently.
• If still in place, remove the protection foil from
the display.
English
Power supply
• Insert the grid plug into a properly installed
three prong socket with 230V, 50Hz. Connect
the device with the plug connector by inserting
its plug into the DC 15V jack (16) of the
device.
• Make sure the grid voltage corresponds to the
figures on the rating plate.
Attention:
• The plug connector included must only be
used with this device. Don’t use for other
devices.
• Only use a power adapter with 15V
( ), a different adapter may damage
the device.
Note:
If the device is not used for an extended
period of time, the power adapter must be
removed from the socket.
Inserting the batteries
(Batteries are not included with the device)
In case of a power cut or if the device is un-
plugged, with batteries inserted, the settings
will be kept.
1. Open the battery case on the bottom of the
device.
2. Insert 2 R03 “AAA” batteries 1.5V. Mind the
correct polarity (indicated on the bottom of
the battery case).
3. Close the battery case.
4. If the device is not used for an extended
period of time, remove the batteries from the
device to avoid any leaking of battery acid.
Note:
If battery power is low or without batteries
inserted, the symbol “ ” appears on the
display.
SRC 4321 CD IM all languages 09252 52SRC 4321 CD IM all languages 09252 52 2008-9-30 18:18:542008-9-30 18:18:54

53
English
Attention:
• Never use different battery types or new and
used batteries together.
• Batteries must not be disposed of in the gar-
bage. Please bring used batteries to compe-
tent collection centers or back to the dealer.
Warning:
Never expose batteries to high temperatures
or direct sunlight or throw batteries into fire
for danger of explosion!
Headphone jack (18)
For headphone operation, use a headphone
with a 3.5mm stereo jack plug, connecting it to
the PHONE jack. The speakers will be muted.
General Operation
Note:
Some buttons you can find as well on the
device as on the remote control. Identical
buttons effect the same function.
Switch device on/off (13/27)
By pressing the STANDBY (POWER) button,
you can put the device into standby mode.
Pressing the button again will switch the device
on.
Display brightness
By the DIMMER L/H switch (15), you can set
the brightness of your display.
Volume
By pressing the VOL+/VOL- (14/24) buttons
you can adjust the desired volume.
Infrared Remote Control
For wireless control within a distance of 5m. If
the distance decreases you should change the
batteries. For proper operation mind a clear
view between the remote control and the sen-
sor on the device.
BBS (10/23)
Amplifies or reduces basses. To activate or
deactivate the feature respectively, press the
BBS button.
MUTE (25 on the RC)
For immediate muting of the volume. For
disabling the feature, press the MUTE button
again.
12/24 Hour Toggling (28 on the RC)
By pressing the 12/24 button, you can toggle
between the 12hour and 24hour display modes.
Note:
In the 12hour display, PM = afternoon.
Winter/Summer Time Switch (19)
The DST 0/+1 switch toggles between winter
and summer time.
According to the season, move the DST 0/+1
switch in the corresponding position before set-
ting the time.
0 = winter time (normal time), +1 = summer
time
Setting the time
• Press the TIME SET button (9) and the time
display will flash.
• Press the HR button (7) to set the hours.
Press and hold till the desired hour is
reached.
• To set the minutes, press the MIN button (6).
Press and hold the button till the desired
minutes setting is reached.
• Press the TIME SET button again to save the
clock time.
Note:
After about 8 seconds, the digits will stop
flashing and the time displayed at the
moment will be saved automatically.
SRC 4321 CD IM all languages 09253 53SRC 4321 CD IM all languages 09253 53 2008-9-30 18:18:552008-9-30 18:18:55

54 English
Radio Tuning
• Press the STANDBY (POWER) button (13/27)
to switch the device on.
• Press the FUNCTION button (11/20) repea-
tedly till FM or AM is shown on the display.
FM (MHz) = Very High Frequency, AM (KHz) =
Medium Wave
• Tune the program by pressing the TUNING+/
TUNING- buttons (2). The display will show
the radio frequency and, to the left, the radio
band.
• The stereo control lamp (in the display) is
illuminated only when the selected program
is received in stereo quality. If the signal is too
poor and noise in the received program, it will
flicker. Try to improve reception by turning and
unrolling or rolling the antenna up.
• For receiving AM programs, an antenna is
included in the device. The device can be
oriented to the signal by turning it. In this
frequency band, programs are broadcast only
in mono mode.
Alarm Function
Set Alarm
You can set two alarm times; proceed as fol-
lows:
• Press the SET AL1 button (3). The set alarm
time flashes on the display.
• Now press and hold the HR and MIN buttons
(7/6) to set the desired alarm time.
Note:
The digits stop flashing after approx. 8
seconds and the currently displayed time is
saved.
• Press the AL1 button (12); the display shows
ALARM1 and briefly the set alarm time. The
first alarm is activated.
Set Second Alarm:
• Press the SET AL2 button (5). The set alarm
time flashes on the display.
• Now press and hold the HR and MIN buttons
(7/6) to set the desired alarm time.
Note:
The digits stop flashing after approx. 8
seconds and the currently displayed time is
saved.
• Press the AL2 button (4); the display shows
ALARM2 and briefly the set alarm time. The
second alarm is activated.
Press the STANDBY (POWER) button to turn
off the alarm until the next day.
Deactivate Alarm
• To deactivate the first alarm repeatedly press
the AL1 button (12) until ALARM1 turns off on
the display.
• To deactivate the second alarm repeatedly
press the AL2 button (4) until ALARM2 turns
off on the display.
Wake Up to Radio
• Press the STANDBY (POWER) button to turn
the device off after setting the alarm.
• Repeatedly press the AL1 or AL2 button until
RADIO is displayed. The current frequency
is displayed. Press TUNING+/TUNING- (2) to
tune into a different radio station.
Note:
You have 8 seconds to tune into a new radio
station; the displayed frequency is saved.
• The radio automatically turns on at the set
alarm time and the tuned-in radio station is
played. The volume increases slowly.
Wake Up to Buzzer
• Press the STANDBY (POWER) button to turn
the device off after setting the alarm.
• Repeatedly press the AL1 or AL2 button until
BUZZER is displayed.
• The radio automatically turns on with the
buzzer instead of a radio station at the set
alarm time. The volume increases slowly.
Wake Up to iPod
• Connect the iPod to the iPod dock (1).
SRC 4321 CD IM all languages 09254 54SRC 4321 CD IM all languages 09254 54 2008-9-30 18:18:552008-9-30 18:18:55

55
Note:
Use a different docking adapter to ensure
proper conncection of your iPod.
• Repeatedly press the AL1 or AL2 button until
“iPod“ is displayed. Ensure that the iPod is
properly connected.
• Playback from your iPod starts in the set
mode at the set alarm time. The volume
increases slowly.
Note:
• Follow your iPod manual to select the
desired mode.
• If no iPod is connected the device wakes
you in BUZZER mode.
Snooze Function
Press the SNOOZE/SLEEP button (8) to deac-
tivate the alarm for approx. 10 minutes.
Turn Off Alarm
Press the STANDBY (POWER) button to turn
off the alarm until the next day.
Sleep Timer (SNOOZE/SLEEP
button (8/26))
During ON mode you can set the automatic
sleep timer in 15-minute steps between 90 and
15 minutes; after this period of time the device
turns into standby mode. Repeatedly press
this button until the desired time is displayed.
SLEEP is displayed if the function is activated.
After the set time the device automatically turns
off.
After setting the sleep timer press SNOOZE/
SLEEP to change the setting.
Press the STANDBY (POWER) button to can-
cel the function.
Music Playback from iPod
(iPod not supplied)
1. Connect your iPod to the iPod dock (1).
2. Press the STANDBY (POWER) button
(13/27) to turn the device on. Repeatedly
press the FUNCTION button (11/20) in case
the iPod mode is not selected automatically.
3. Press the button (22) to start music
playback.
4. Follow your iPod manual for further use of
the controls.
Attention:
Return to radio mode before disconnecting
your iPod from this device to avoid damages
to your iPod.
Description of iPod Controls
(22)
You can pause and continue music playback.
Press again to continue playback.
(21)
Press 1 x = Restart of the song from the
beginning.
Press 2 x = Skip to the previous song.
Press 3 x = Skip to the song before the
previous song, etc. Press and hold
during playback to search in
reverse through the song.
(21)
Press to skip to the next song and the follow-
ing songs. Press and hold during playback to
search forward through the song.
iPod Charging
After connecting your iPod to the iPod dock the
iPod battery is charged. The device must be
connected to mains power supply and must be
in standby mode.
Note:
• Use a different docking adapter to ensure
proper conncection of your iPod.
• Not all iPod generations support the charge
mode.
English
SRC 4321 CD IM all languages 09255 55SRC 4321 CD IM all languages 09255 55 2008-9-30 18:18:562008-9-30 18:18:56

56 English
LINE IN Socket (17)
Connect any analog playback source like MP3
player, CD player, etc. Playback takes place via
the speakers of this device.
1. Connect the external device via 3.5mm
stereo jack to the LINE IN socket. The device
automatically changes to AUX mode.
2. Set the volume level with the VOL+/VOL-
buttons (14/24) and lisen to music playback
from the external device via the speakers of
this device.
3. You will find further instructions in the manual
of your external sound source.
Note:
Set the volume of the external device to a
reasonable level.
Cleaning
• Before cleaning disconnect from mains power
supply.
• Clean the device with a soft damp cloth
without detergents.
• Do not submerge the device in water.
Technical Specifications
Model:...............................................SRC 4321
Power Supply: External Power Adaptor
Input:........................................AC 230V~ 50Hz
Output:.......................................DC 15V / 1.5 A
Polarity:..............................................
Back-up Battery:...................2 x 1.5V, R03, AAA
Power Output:...........................30 Watts PMPO
Protection Class:..............................................II
Radio:
Frequency Range:................FM 87.5 ~ 108MHz
.................AM 522 ~ 1620kHz
Technical modifications reserved!
This device complies with all current CE direc-
tives, such as electromagnetic compatibility
and low voltage directive and is manufactured
according to the latest safety regulations.
Subject to change without prior notice!
Meaning of the “Wheelie Bin“
Symbol
Take care of our environment, do not dispose of
electrical applicances via the household waste.
Dispose of obsolete or defective electrical ap-
pliances via municipal collection points.
Please help to avoid potential environmental
and health impacts through improper waste
disposal.
You contribute to recycling and other forms of
utilization of old electric and electronic appli-
ances.
Your municipality provides you with information
about collecting points.
SRC 4321 CD IM all languages 09256 56SRC 4321 CD IM all languages 09256 56 2008-9-30 18:18:572008-9-30 18:18:57

57
Generalne wskazówki dotyczące
bezpieczeństwa
Przed użyciem urządzenia, należy dokładnie
przeczytaćpodręcznik użytkowania i zachować
go wraz z gwarancją, paragonem oraz w razie
możliwości wraz z oryginalnym opakowaniem
zawierającym wewnętrzne elementy. W razie
przekazania urządzenia osobom trzecim,
należy dołączyćpodręcznik użytkowania.
• Aby uniknąć ryzyka porażenia prądem,
nie wolno narażaćurządzenia na działanie
deszczu ani wilgoci. Nie korzystaćz
urządzenia w pobliżu wody (np. w łazience, na
basenie, w wilgotnych piwnicach)
• Korzystaćz urządzenia wyłącznie zgodnie z
przeznaczeniem.
• Podłączyćurządzenie do prawidłowo zain-
stalowanego gniazda. Sprawdzić, czy
napięcie urządzenia odpowiada napięciu w
sieci.
• Podczas korzystania z zewnętrznych adapt-
erów sieciowych, uwzględnićprawidłowe
ułożenie biegunów oraz napięcie. Prawidłowo
włożyćbaterie.
• Nie przykrywaćotworów wentylacyjnych
urządzenia.
• Nie otwieraćobudowy urządzenia.
Nieprawidłowo wykonane naprawy mogą
stwarzaćniebezpieczeństwo dla użytkownika.
Jeśli samo urządzenie lub, w szczególności,
kabel zasilający, sąuszkodzone, nie korzystać
z urządzenia i zlecićjego naprawę
specjaliście z odpowiednimi kwalifikacjami.
Regularnie sprawdzaćkabel pod kątem
uszkodzeń.
• Aby uniknąć niebezpieczeństw, uszkodzony
kabel zasilający należy wymienićna kabel
tego samego rodzaju wyłącznie u producenta,
w serwisie konsumenckim lub u osoby z
podobnymi kwalifikacjami.
• Jeśli urządzenie nie jest używane przez
dłuższy okres czasu, odłączyćkabel zasilania
i wyjąć baterie.
Poniższe symbole znajdująsięna urządzeniu i
oznaczają:
Dzieci i osoby niepełnosprawne
• Ze względu na bezpieczeństwo dzieci,
trzymaćczęści opakowania (torby plastikowe,
kartony, styropian, itp.) poza ich zasięgiem.
Ostrzeżenie!
Małe dzieci nie mogąbawićsięfoliąze
względu na niebezpieczeństwo uduszenia!
• Aby uchronićdzieci i osoby chore przed
niebezpieczeństwem ze strony urządzeń
elektrycznych, sprawdzić, czy urządzenie
jest używane pod kontrolą. Urządzenie nie
jest zabawką. Nie pozwalaćmałym dzieciom
na bawienie sięnim.
Symbole użyte w instrukcji użytkowania
Ważne wskazówki dotyczące bezpieczeństwa
sąwyraźne zaznaczone. Należy wziąć je pod
szczególnąuwagę, aby uniknąć wypadków i
uszkodzeńurządzenia.
Ostrzeżenie:
Niebezpieczeństwo dla zdrowia oraz potenc-
jalne ryzyko obrażeńciała.
Uwaga:
Oznacza potencjalne zagrożenie urządzenia
lub innych obiektów
Uwaga:
Podświetlone wskazówki oraz informacje
Symbol błyskawicy ostrzega
użytkownika przed niebezpiecznie
wysokimi napięciami wewnątrz.
Symbol wykrzyknika wska-
zuje ważne instrukcje lub
uwagi dotyczące konserwacji w
dołączonych instrukcjach.
Język polski
SRC 4321 CD IM all languages 09257 57SRC 4321 CD IM all languages 09257 57 2008-9-30 18:18:582008-9-30 18:18:58

58
Lokalizacja kontrolek
1 Połączenie iPod
2 Przyciski TUNING+/TUNING- (strojenie)
3 Przycisk SET AL1 (ustawienie alarmu)
4 Przycisk AL2 (drugi alarm)
5 Przycisk SET AL2 (ustawienie drugiego
alarmu)
6 Przycisk MIN (minuty)
7 Przycisk HR (godziny)
8 Odstęp między alarmami/przycisk
opóźnionego wyłączenia (SNOOZE/SLEEP)
9 Przycisk TIME SET (ustawienia czasu)
10 Przycisk BBS
11 FUNCTION – przycisk wyboru funkcji
operacyjnej
12 Przycisk AL1 (pierwszy alarm)
13 Przycisk STANDBY (czuwanie)
14 VOL+/VOL- przycisk sterowania głośnością
Tylna część
15 Przycisk DIMMER L/H (ściemnianie)
16 Połączenie DC 15V
17 LINE IN -gniazdko typu jack
18 Gniazdko PHONE (telefoniczne)
19 Przycisk DST 0/+1 (czas zimowy/ letni)
Pilot
20 FUNCTION – przycisk wyboru funkcji
operacyjnej
21 / - przyciski wyszukiwania (do przodu/
do tyłu)
22 (Play/Pause) przycisk przerwy/
odtwarzania
23 Przycisk BBS
24 VOL+/VOL- przycisk sterowania głośnością
25 Przycisk MUTE (wyciszenie)
26 Przycisk opóźnionego wyłączania (SLEEP)
27 Przycisk POWER
28 Przycisk12/24 (tryb czasu zegarowego)
Pierwsze użycie urządzenia/
wprowadzenie
• Przed pierwszym użyciem urządzenia,
prosimy o dokładne przeczytanie instrukcji.
• Wybraćodpowiednie miejsce dla urządzenia,
np. suche, niezbyt śliskie miejsce, gdzie
można łatwo je obsługiwać.
• Sprawdzić, czy urządzenie jest odpowiednio
odpowietrzone.
• Usunąć folięochronnąz wyświetlacza, o ile
tam jeszcze jest.
Zasilanie
• Włożyćwtyczkęsieciowądo prawidłowo
zainstalowanego gniazda z trzema
bolcami o parametrach 230V, 50Hz.
Podłączyćurządzenie za pomocązłącza
wtyczki, wstawiając wtyczkędo gniazdka DC
15V (16) na urządzeniu.
• Sprawdzić, czy napięcie sieciowe odpowiada
parametrom na tabliczce znamionowej.
Uwaga:
• Należy korzystaćwyłącznie ze złącza
dołączonego do urządzenia. Nie stosowaćz
innymi urządzeniami.
• Korzystaćz adaptera zasilania o param
etrach 15V ( ), adapter innego
rodzaju może uszkodzićurządzenie.
Uwaga:
Jeśli urządzenie nie jest używane przez
dłuższy czas, należy wyjąć zasilacz z gniazda.
Wkładanie baterii
(Baterie nie sądołączone do zestawu
urządzenia).
W razie odcięcia zasilania lub jeśli urządzenie
jest odłączone, z wstawionymi bateriami,
wszelkie ustawienia zostanązachowane.
1. Otworzyćkomorębaterii w dolnej części
urządzenia.
2. Włożyć2 baterie R03 “AAA” 1,5V.
Uwzględnićprawidłowe ułożenie biegunów
(oznaczenie w dolnej części komory baterii).
3. Zamknąć komorębaterii.
4. Jeśli urządzenie nie jest używane przez
dłuższy czas, wyjąć baterie w celu uniknięcia
wycieku kwasów z baterii.
Uwaga:
Jeśli zasilanie baterii jest niskie lub brakuje
baterii, na wyświetlaczu pojawia sięsymbol
“ ”.
Język polski
SRC 4321 CD IM all languages 09258 58SRC 4321 CD IM all languages 09258 58 2008-9-30 18:18:592008-9-30 18:18:59

59
Uwaga:
• Nie używaćróżnych rodzajów baterii ani
nowych i używanych baterii razem.
• Nie wolno wyrzucaćbaterii wraz z odpada
mi. Prosimy odnieść baterie do odpow
iednich punktów zbiórki lub zwrócićje do
sprzedawcy.
Ostrzeżenie:
Nie narażaćbaterii na działanie wysokich
temperatur ani bezpośrednie nasłonecznienie,
ani nie wyrzucaćbaterii do ognia ze względu
na niebezpieczeństwo wybuchu!
Gniazdko do słuchawek (18)
Możliwe jest użycie słuchawek z gniazdkiem
stereo 3,5 mm typu jack, połączonego z gni-
azdkiem telefonicznym PHONE. Głośniki będą
wyciszone.
Ogólne funkcjonowanie
Uwaga:
Niektóre przyciski znajdująsięna urządzeniu
oraz na pilocie. Identyczne przyciski majątę
samąfunkcję.
Włączanie/ wyłączanie urządzenia (13/27)
Poprzez naciśnięcie przycisku STANDBY
(POWER) (tryb czuwania, zasilania),
urządzenie przechodzi w stan czuwania.
Naciśnięcie przycisku powoduje ponowne
włączenie urządzenia.
Jasność wyświetlacza
Za pomocąprzycisku ściemniania DIM-
MER L/H (15), można ustawićjasność na
wyświetlaczu.
Głośność
Poprzez naciskanie przycisków regulacji
głośności VOL+/VOL- (14/24), możliwe jest jej
ustawienie na wybranym poziomie.
Pilot podczerwieni
W celu kontroli bezprzewodowej na odległość
5m. Jeśli odległość maleje, należy zmienić
baterie. W celu prawidłowej obsługi, miećna
uwadze niezakłócony widok między pilotem a
czujnikiem na urządzeniu.
BBS (10/23)
Wzmacnia lub zmniejsza basy. Aby włączyć
lub wyłączyćtęcechęodpowiednio, nacisnąć
przycisk BBS.
MUTE – wyciszenie (25 na pilocie)
W celu natychmiastowego wyciszenia
głośności. Aby wyłączyćcechę, nacisnąć
ponownie przycisk MUTE.
12/24 – zmiana ustawienia czasu (28 na
pilocie)
Poprzez naciśnięcie przycisku 12/24, można
przechodzićmiędzy 12- a 24- godzinnym
trybem wyświetlania czasu.
Uwaga:
W trybie 12-godzinnym, PM = popołudnie.
Przełączanie między czasem zimowym/let-
nim (19)
Włącznik DST 0/+1 przełącza między czasem
zimowym a letnim.
Zależnie od pory roku, ustawićwłącznik DST
0/+1 w odpowiedniej pozycji przed ustawieniem
czasu.
0 = czas zimowy (normalny), +1 = czas letni
Ustawienie czasu
• Nacisnąć przycisk ustawiania czasu TIME
SET (9), a wyświetlacz czasu zacznie migać.
• Nacisnąć przycisk HR (7), aby ustawić
godziny. Nacisnąć i przytrzymaćażdo
ustawienia wybranej godziny.
• Aby ustawićminuty, nacisnąć przycisk MIN
(6). Nacisnąć i przytrzymaćażdo ustawienia
wybranych minut.
• Nacisnąć przycisk ustawienia godziny TIME
SET ponownie, aby zapisaćczas.
Uwaga:
Po około 8 sekundach, cyfry przestanąmigać,
a czas wyświetlony w tym momencie zostanie
automatycznie zapisany.
Język polski
SRC 4321 CD IM all languages 09259 59SRC 4321 CD IM all languages 09259 59 2008-9-30 18:19:012008-9-30 18:19:01

60
Strojenie radia
• Nacisnąć przycisk czuwania/zasilania
STANDBY (POWER) (13/27), aby włączyć
urządzenie.
• Nacisnąć przycisk funkcji FUNCTION (11/20)
kilkakrotnie, ażna wyświetlaczu pojawi sięFM
lub AM.
FM (MHz) = bardzo wysoka częstotliwość,
AM (KHz) = fale średnie
• Ustawićprogram za pomocąprzycisków
strojenia TUNING+/TUNING- (2). Na
wyświetlaczu pojawi sięczęstotliwość
radiowa, a z lewej strony- pasmo radiowe.
• Lampka kontrolna stereo (na wyświetlaczu)
pali siętylko, gdy wybrany program odbierany
jest z jakościąstereo. Jeśli sygnałjest zbyt
słaby, a odbierany program zakłócany jest
szumami, będzie migać. Spróbowaćpoprawić
odbiór poprzez obracanie oraz zwijanie czy
rozwijanie anteny.
• Antena dołączona jest do zestawu celem
odbioru programów AM. Urządzenie można
nakierowaćna sygnał, jeśli nim obracamy. W
tym paśmie częstotliwości programy
nadawane sąw trybie mono.
Funkcje alarmu
Ustawienie alarmu
Można ustawićdwie godziny alarmu; postąpić
zgodnie ze wskazówkami:
• Nacisnąć przycisku alarmu pierwszego SET
AL1 (3). Ustawiony czas alarmu miga na
ekranie.
• Następnie przycisnąć i przytrzymaćprzyciski
HR oraz MIN (7/6), aby ustawićwybrany czas
alarmu.
Uwaga:
Cyfry przestająmigaćpo około 8 sekundach,
a czas wyświetlony na bieżąco zostaje
zapisany.
• Nacisnąć przycisk AL1 (12); na
wyświetlaczu pojawia sięALARM1 oraz
ustawiony czas alarmu na krótki czas.
Uaktywnia siępierwszy alarm.
Ustawienie drugiego alarmu:
• Nacisnąć przycisku alarmu drugiego SET
AL2 (5). Ustawiony czas alarmu miga na-
ekranie.
• Następnie przycisnąć i przytrzymaćprzyciski
HR oraz MIN (7/6), aby ustawićwybrany czas
alarmu.
Uwaga:
Cyfry przestająmigaćpo około 8
sekundach, a czas wyświetlony na bieżąco
zostaje zapisany.
•Nacisnąć przycisk AL2 (4); na wyświetlaczu
pojawia sięALARM2 oraz ustawiony czas
alarmu na krótki czas. Uaktywnia siędrugi
alarm.
Nacisnąć przycisk czuwania/zasilania
STANDBY (POWER), aby wyłączyćalarm do
następnego dnia.
Dezaktywacja alarmu
• Aby dezaktywowaćpierwszy alarm,
kilkakrotnie nacisnąć przycisk AL1 (12), aż
ALARM1 zniknie z ekranu.
• Aby dezaktywowaćdrugi alarm, kilkakrotnie
nacisnąć przycisk AL2 (4), ażALARM2 zniknie
z ekranu.
Budzenie przy radiu
• Nacisnąć przycisk czuwania/zasilania
STANDBY (POWER), aby wyłączyć
urządzenie po ustawieniu alarmu.
• Kilkakrotnie nacisnąć przycisk AL1 lub AL2,
ażwyświetli sięRADIO. Wyświetla się
bieżąca częstotliwość. Nacisnąć przycisk
strojenia TUNING+/TUNING- (2), aby zmienić
stacjęradiową.
Język polski
SRC 4321 CD IM all languages 09260 60SRC 4321 CD IM all languages 09260 60 2008-9-30 18:19:022008-9-30 18:19:02

61
Uwaga:
Pozostaje 8 sekund na przełączenie na nową
stacje radiową; zapisana jest wyświetlona
częstotliwość.
• Radio automatycznie uruchamia sięo
ustalonej godzinie alarmu i włącza się
ustawiona stacja. Głośność powoli spada.
Budzenie przy sygnale dźwiękowym
• Nacisnąć przycisk czuwania/zasilania
STANDBY (POWER), aby wyłączyć
urządzenie po ustawieniu alarmu.
• Kilkakrotnie nacisnąć przycisk AL1 lub AL2,
ażwyświetli sięBUZZER.
• Radio automatycznie włącza sygnał
dźwiękowy zamiast stacji, o ustawionej
godzinie alarmu. Głośność powoli spada.
Budzenie przy urządzeniu iPod
• PodłączyćiPod do portu iPod (1).
Uwaga:
Skorzystaćz innego adaptera dokującego,
aby zapewnićprawidłowe podłączenie iPoda.
• Kilkakrotnie nacisnąć przycisk AL1 lub AL2,
ażwyświetli się“iPod”. Sprawdzićpołączenia
iPoda.
• Odtwarzanie z iPoda uruchamia sięz trybu
ustawieńo ustalonej godzinie alarmu.
Głośność powoli spada.
Uwaga:
• Skorzystaćz instrukcji IPoda, aby wybrać
odpowiedni tryb.
• Jeśli nie ma podłączonego iPoda,
urządzenie budzi w trybie BUZZER.
Funkcja drzemki
Nacisnąć przycisk funkcji drzemki/sen
SNOOZE/SLEEP(8), aby wyłączyćalarm na
około 10 minut.
Wyłączenie alarmu
Nacisnąć przycisk czuwania/zasilania
STANDBY (POWER), aby wyłączyćalarm do
następnego dnia.
Timer funkcji sen (przycisk funk-
cji drzemka/ sen SNOOZE/SLEEP
(8/26))
W trybie ON (urządzenie jest włączone),można
ustawićautomatyczny timer funkcji sen w
odstępach 15-minutowych między 90 a 15
minut; po tym czasie urządzenie przechodzi w
stan czuwania. Kilkakrotnie nacisnąć przycisk,
ażwyświetli sięwybrany czas. Wyświetla się
SLEEP, o ile funkcja jest aktywna. Po upływie
ustalonej godziny, urządzenie wyłącza się
automatycznie.
Po ustawieniu timera funkcji sen, nacisnąć
SNOOZE/SLEEP, aby zmienićustawienie.
Nacisnąć przycisk czuwania/ zasilania STAND-
BY (POWER), aby anulowaćfunkcję.
Odtwarzanie muzyki z iPoda
(iPod nie jest dołączony do zestawu)
1. PodłączyćiPod do portu iPoda (1).
2. Nacisnąć przycisk czuwania/zasilania
STANDBY (POWER) (13/27), aby włączyć
urządzenie. Kilkakrotnie nacisnąć przycisk
funkcji FUNCTION (11/20), jeśli tryb iPod nie
zostałautomatycznie wybrany.
3. Nacisnąć przycisk (22), aby rozpocząć
odtwarzanie muzyki.
4. Skorzystaćz instrukcji iPoda w celu
dalszego korzystania z kontrolek.
Uwaga:
Powrócićdo trybu radiowego przed
odłączeniem iPoda od urządzenia, aby
uchronićgo przed uszkodzeniami.
Opis kontrolek iPoda
(22)
Można zatrzymaći kontynuowaćodtwarzanie
muzyki. Nacisnąć ponownie w celu kontynuacji
odtwarzania.
(21)
Nacisnąć 1 x = Włączyćponownie utwór od
Język polski
SRC 4321 CD IM all languages 09261 61SRC 4321 CD IM all languages 09261 61 2008-9-30 18:19:042008-9-30 18:19:04
Other manuals for SRC 4321
1
Table of contents
Languages:
Other AEG Speakers System manuals