manuals.online logo
Brands
  1. Home
  2. •
  3. Brands
  4. •
  5. aFe Power
  6. •
  7. Automobile Accessories
  8. •
  9. aFe Power takeda 56-70043D User manual

aFe Power takeda 56-70043D User manual

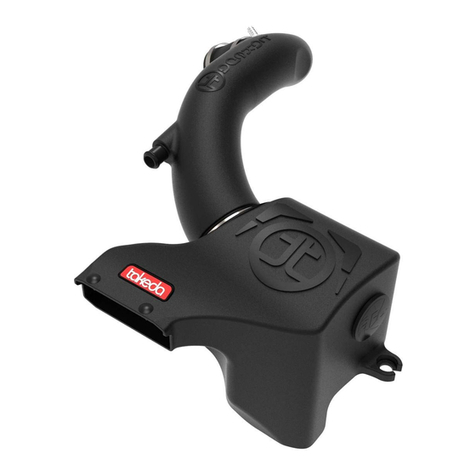
Takeda Momentum Cold Air Intake System
Instruction Manual P/N: 56-70043D / 56-70043R______________________________
Make: Subaru Model: Impreza Year: 2012-2016Engine: H4-2.0L
Page 2
• Please read the entire instruction manual before proceeding.
• Ensure all components listed are present.
• If you are missing any of the components, call customer support at 951-493-7100.
• Ensure you have all necessary tools before proceeding.
• Do not attempt to work on your vehicle when the engine is hot.
• Retain factory parts for future use.
Label
Qty.
Description
Part Number
A1
1
Air Filter (Pro 5R)
R24-90101
A2
1
Air Filter (Pro DRY S)
R21-90101
B
1
Tube 1 of 2
05-5670039B1
C
1
Tube 2 of 2
05-5670039B2
D
1
Housing
05-5670043B3
E
1
Coupling, Silicone Bellows: 2-3/4”ID x 3”L
05-01656
F
1
Coupling, Silicone Hump: 2-3/4”ID x 3”L
05-01501
G
4
Clamp 044
03-50019
H
2
Screw, Torx: M4
03-50491
J
1
Takeda Plug
05-01527
Installation will require the following tools:
Flat head screwdriver (or panel clip removal tool), #2 Philips screwdriver, T20 Torx driver, pliers, 10mm
wrench, 7mm, 8mm, and 10mm nut drivers.
Warranty Information available at https://afepower.com/contact#warranty
Emissions Disclaimer: This product is not currently CARB exempt and is not available for purchase in
California or for use on any vehicle registered with the California Department of Motor Vehicles.
Page 3
J
H
A1/A2
G
E
F
D
C
B
Page 4
Refer to Figure A for Steps 1-2
Step 1: Using a flat head screwdriver or panel clip removal tool, remove the two panel clips 1 holding on
the air scoop.
Step 2: Remove the air scoop from the vehicle and set aside.
REMOVAL
Figure A
1
Page 5
Refer to Figure B for Step 3-6
Step 3: Using a flat head screwdriver or panel clip removal tool, remove the panel clip 2 from the intake
tube mount.
Step 4: Using a pair of pliers, squeeze the spring clamp 3 and remove the crankcase vent hose from the
intake tube.
Step 5: Disconnect the Mass Air Flow (MAF) sensor harness 4 .
Step 6: Using a 7mm nut driver, loosen the clamps at the throttle body 5 and at the airbox 6 . Remove
the intake tube from the vehicle.
2
REMOVAL
Figure B
3
5
6
4
2
Page 6
Refer to Figure C for Steps 7-9
Step 7: Using a 10mm nut driver, remove the screw 7 from the airbox mount. Set aside screw for later
use.
Step 8: Using a 10mm wrench, remove the nut 8 from the airbox bushing mount.
Step 9: Lift up on the airbox and remove from the vehicle.
REMOVAL
Figure C
7
8
Page 7
Refer to Figure D for Step 10-11
Step 10: Locate the mounting grommet 9. Remove the grommet by pushing out the steel insert and
removing the rubber grommet from the airbox. Set aside the steel insert and bushing for later use.
Step 11: From the inside of the airbox using a 10mm nut driver, remove the nut 10 holding on the
mounting bushing to the airbox. Set aside the mounting bushing and bolts for later use.
*NOTE: Make sure to pay attention to the orientation of the tabs on the mounting bushing. This will be
needed for step 13. (Tab facing you should be at the 3 o’clock position)
9
REMOVAL
Figure D
10
\
Page 8
Refer to Figure E for Step 12-13
Step 12: Install the grommet and steel insert 11 removed in step 10 onto the bottom of the Takeda housing
in the location shown above.
Step 13: Install the mounting bushing 12 removed in step 11 onto the Takeda housing in the location
shown above.
*NOTE: Make sure to match the orientation of the tabs on the mounting bushing as it was removed from
the airbox in step 11. (Tab facing you should be at the 3 o’clock position)
INSTALL
Figure E
11
12
Page 9
Refer to Figure F for Steps 14-17
Step 14: Install the Takeda housing into the vehicle.
Step 15: Using a 10mm nut driver, install the screw 13 through the bushing on the bottom of the housing
and into the threaded mount on the vehicle’s frame.
Step 16: Using a 10mm wrench, install the nut 14 removed in step 8.
Step 17: Install the aFe POWER Air Filter and hose clamp into the Takeda airbox.
INSTALL
Figure F
14
13
Page 10
Refer to Figure G for Steps 18-20
Step 18: Install the bellows coupler (05-01656) and clamp (#044) 15 onto the B2 tube as shown in the
image above.
Step 19: Install the silicone hump coupler (05-01501) and clamp (#044) 16 onto the B2 tube as shown in
the image above.
Step 20: Slip a clamp (#044) over the exposed end of the bellows coupler and another clamp (#044) over
the exposed end of the silicone hump coupler 17 .
INSTALL
Figure G
15
16
17
Page 11
Refer to Figure H for Steps 21-23
Step 21: Install the B2 tube onto the throttle body and tighten the clamp.
Step 22: Install the panel clip 18 removed in step 3.
Step 23: Install the crank case vent hose 19 removed in step 4.
INSTALL
Figure H
18
19
Page 12
Refer to Figure I for Steps 24-25
Step 24: Using a #2 Phillips screw driver, remove the MAF sensor from the airbox 20 .
Step 25: Using a T20 torx driver, install the MAF sensor onto the Takeda B1 intake tube with the provided
M4 screws 21 .
INSTALL
Figure I
20
21
Page 13
Refer to Figure J for Steps 26-27
Step 26: Install the B1 intake tube into the bellow coupler 22 , but do not tighten clamp yet.
Step 27: Install the other end of the B1 intake tube into the air filter. Align the tube and tighten the clamps
using an 8mm nut driver.
INSTALL
Figure J
22
Page 14
Refer to Figure K for Steps 28-29
Step 28: Re-connect the MAF sensor 23 removed in step 5.
Step 29: Install the factory air scoop and panel clips 24 removed in steps 1 and 2. Your installation is now
complete. Thank you for choosing Takeda USA!
NOTE: Check all screws, clamps, and connectors are secure after 100-200 miles
INSTALL
Figure K
23
24
Page 15
Page Left Blank Intentionally
252 Granite Street Corona, CA 92879
TEL: 951.493.7100 • TECH: 951.493.7185
E-Mail:[email protected]

This manual suits for next models

1

Other aFe Power Automobile Accessories manuals
aFe Power Scorpion 79-21001L User manual

aFe Power

aFe Power Scorpion 79-21001L User manual

aFe Power SCORCHER 77-44008 User manual

aFe Power

aFe Power SCORCHER 77-44008 User manual

aFe Power SCORPION 79-21008L User manual

aFe Power

aFe Power SCORPION 79-21008L User manual

aFe Power Quantum 2500 User manual

aFe Power

aFe Power Quantum 2500 User manual

aFe Power 77-42008 User manual

aFe Power

aFe Power 77-42008 User manual

aFe Power 54-82039 User manual

aFe Power

aFe Power 54-82039 User manual

aFe Power 56-70058D User manual

aFe Power

aFe Power 56-70058D User manual

aFe Power advanced FLO engineering User manual

aFe Power

aFe Power advanced FLO engineering User manual

aFe Power advanced FLOW engineering User manual

aFe Power

aFe Power advanced FLOW engineering User manual

aFe Power 54-12742 User manual

aFe Power

aFe Power 54-12742 User manual

aFe Power MOMENTUM GT 50-70034S User manual

aFe Power

aFe Power MOMENTUM GT 50-70034S User manual

aFe Power 46-70022 User manual

aFe Power

aFe Power 46-70022 User manual

aFe Power 46-70049 User manual

aFe Power

aFe Power 46-70049 User manual

aFe Power Takeda 56-10005D User manual

aFe Power

aFe Power Takeda 56-10005D User manual

aFe Power 05-01016 User manual

aFe Power

aFe Power 05-01016 User manual

aFe Power 57-10018D User manual

aFe Power

aFe Power 57-10018D User manual

aFe Power 52-10001D User manual

aFe Power

aFe Power 52-10001D User manual

aFe Power Momentum GT User manual

aFe Power

aFe Power Momentum GT User manual

aFe Power Scorcher User manual

aFe Power

aFe Power Scorcher User manual

aFe Power 46-20299-B User manual

aFe Power

aFe Power 46-20299-B User manual

aFe Power 54-12208 User manual

aFe Power

aFe Power 54-12208 User manual

aFe Power SCORPION 79-21003L User manual

aFe Power

aFe Power SCORPION 79-21003L User manual

aFe Power 440-401006-N User manual

aFe Power

aFe Power 440-401006-N User manual
aFe Power 51-74201 User manual

aFe Power

aFe Power 51-74201 User manual

Popular Automobile Accessories manuals by other brands

Koolatron 401-596 owner's manual

Koolatron

Koolatron 401-596 owner's manual

Rightline Gear 100605 Directions

Rightline Gear

Rightline Gear 100605 Directions

Steinhof T-095 FITTING AND OPERATION MANUAL

Steinhof

Steinhof T-095 FITTING AND OPERATION MANUAL

Schrader SCH-BRK- 4PC Owner's instructions

Schrader

Schrader SCH-BRK- 4PC Owner's instructions

Whispbar K068W Fitting instructions

Whispbar

Whispbar K068W Fitting instructions

Bosch ABS M4 user manual

Bosch

Bosch ABS M4 user manual

VBG Onspot Mounting instructions

VBG

VBG Onspot Mounting instructions

Nokia CK-10 installation guide

Nokia

Nokia CK-10 installation guide

Curt Group 58975 installation manual

Curt Group

Curt Group 58975 installation manual

AMF-BRUNS EasyPull operating instructions

AMF-BRUNS

AMF-BRUNS EasyPull operating instructions

SKF TBK297AWP manual

SKF

SKF TBK297AWP manual

Arkon CM047-SRVC-2 user manual

Arkon

Arkon CM047-SRVC-2 user manual

Boyo VTC525R user manual

Boyo

Boyo VTC525R user manual

Yakima RidgeBack 4 manual

Yakima

Yakima RidgeBack 4 manual

Cruz Evo Rack Pro P35-158 Assembly instructions

Cruz

Cruz Evo Rack Pro P35-158 Assembly instructions

Neo Car Audio Universal iON instruction manual

Neo Car Audio

Neo Car Audio Universal iON instruction manual

Thule 138 Mounting & installation

Thule

Thule 138 Mounting & installation

Thule 1079 Fitting instructions

Thule

Thule 1079 Fitting instructions

manuals.online logo
manuals.online logoBrands
  • About & Mission
  • Contact us
  • Privacy Policy
  • Terms and Conditions

Copyright 2025 Manuals.Online. All Rights Reserved.