manuals.online logo
Brands
  1. Home
  2. •
  3. Brands
  4. •
  5. Agora Models
  6. •
  7. Motorized Toy Car
  8. •
  9. Agora Models FDNY Fire Truck Manual

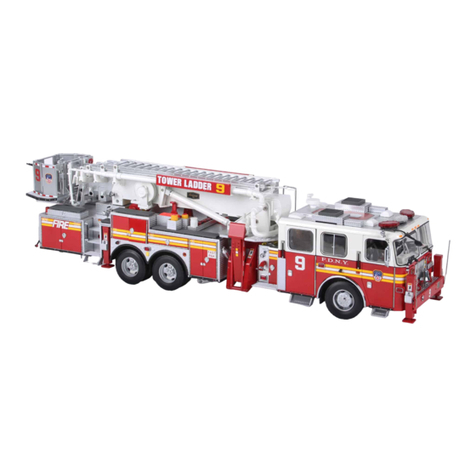
Agora Models FDNY Fire Truck Manual

STAGE 17: JUMP SEAT & FRONT RIGHT LIGHT
CLUSTER
STAGE 18: FRONT LEFT CAB DOOR
& CREW SEAT
STAGE 19: COMPONENTS FOR THE
DASHBOARD & ROOF
STAGE 20: JUMP SEAT, CAB EQUIPMENT
& FRONT LEFT LIGHT CLUSTER
STAGE 21: MAIN CAB BODY & DETAILS,
INSTALLING THE REAR CAB DOORS AND
INTERIOR CAB ROOF
STAGE 22: ASSEMBLE & FIT THE FRONT
LEFT WHEEL
STAGE 23: FITTING A CREW SEAT, INSTALLING
THE MAIN CIRCUIT BOARD, CONNECTING THE
DASHBOARD & LIGHTS, AND FITTING
THE FRONT CAB DOORS
Pack 03
BUILD INSTRUCTIONS
FIRE TRUCK
TOWER LADDER 9
AGORAMODELS FDNY FIRE TRUCK
2
Please keep ALL unused screws as they will be required in a later stage.
Please make sure you don’t mix up the screws. They look quite similar, but the threads do vary
slightly. Using the wrong screws may damage the parts.
When securing parts together using multiple screws, fit each screw loosely to ensure all the
parts are correctly aligned before gently tightening them firmly, but not overtight, in the order
in which you placed them.
The screwdriver can be magnetized by stroking it with a magnet (fridge magnet, etc.) enabling
it to hold the screws and make assembly easier.
If a screw is tight going into a metal part, do not force it as you may shear the head off. Remove
it and put a tiny smear of Vaseline, soap or light oil on the thread. That will lubricate it and make
it easier to drive home.
During the course of this build, you will receive many pieces that you will assemble immediately
– following the instructions in the corresponding stage – and other pieces that you should store
safely to one side, for use in future assembly stages.
Left and Right! When building your fire truck, the left or right hand side refers to each side as
you are sitting in the cab.
WARNING: Some parts are assembled using magnets. These magnets can cause serious injury
if they are swallowed. Keep away from children. If you suspect a magnet has been swallowed,
seek medical help straight away.
Advice from the experts
!
!
AGORAMODELS FDNY FIRE TRUCK
3
Name
Light cluster PCB
Jump seat
Front right light cluster
Seat support
Windshield wiper
Flood light
Portable radio
Flashlight
Portable radio charger
Turn signal lens (R)
LED diffuser x3
Headlight lens x2
Type H screws x2
Type M screws x2
STAGE 17 PARTS LIST
The first rearward-facing seat,
known as the jump seat and
typically used by passengers
rather than crew, is fitted in this
first stage of Pack 03. You’ll also fit
more accessories to the cab and
assemble a front light cluster.
Stage 17: Jump Seat & Front Right Light Cluster
Light cluster PCB
Front right light cluster
Jump seat
Seat support
Flashlight
Portable radio
Flood light
Windshield wiper
Poratble radio charger Turn signal
lens (R)
LED diffuser x3 Headlight lens x2
Type H screws x2 Type M screws x2
The Windshield wiper &
Floodlight will be used
in a later stage. Keep
them in a safe place
for now.
AGORAMODELS FDNY FIRE TRUCK
4
Stage 17: Jump Seat & Front Right Light Cluster
1
3
2
4
ASSEMBLING THE JUMP SEAT
Apply a little superglue to the underside of the seat, avoiding the two
rectanglular tabs. Take the seat support and align it with the seat as
shown. Check you have the seat support in the correct orientation
with the peg aligned with the back of the seat.
Align the peg and screw holes on the seat support with the
corresponding holes in the cab floor, just behind the engineer’s seat.
Firmly press the two parts together.
Press the jump seat seat firmly into position.
AGORAMODELS FDNY FIRE TRUCK
5
5
7
6
8
Holding the seat in position, turn the cab floor assembly over and fix it
in place from the underside with a type H screw.
Push the flashlight firmly in place.
ATTACHING THE FLASHLIGHT
Align the D-shaped pin on the flashlight with the hole in the center
console, just to the rear of the MDT keyboard. If the pin won’t fit, try
filing off a bit of excess paint (inset).
ATTACHING THE PORTABLE RADIO
Align the D-shaped pin on the back of the portable radio with the
D-shaped hole in the side of the center console, in front of the
captain’s seat.
Stage 17: Jump Seat & Front Right Light Cluster
Type H screw
AGORAMODELS FDNY FIRE TRUCK
6
9
11
10
12
Push firmly to fit.
Push firmly to fit.
ATTACHING THE BATTERY CHARGER
Align the pin on the portable radio charger with the hole in the center
console to the rear of the cab. This is a D-shaped fixing to ensure the
correct fit. See also picture 11.
ASSEMBLING THE FRONT LIGHT CLUSTER
Take one of the LED diffusers, holding it with the domed side facing
outwards, and align with the upper single hole between two pins on
the reverse side of the front light cluster.
Stage 17: Jump Seat & Front Right Light Cluster
AGORAMODELS FDNY FIRE TRUCK
7
13
15
14
16
Push the light into position so that the domed side projects through
to the other side.
Place the turn signal lens over the front light fixed in picture 13,
checking that the arrow is facing the direction shown.
Take the turn signal lens (R) and note the directional arrow.
Push firmly to fix in position.
Stage 17: Jump Seat & Front Right Light Cluster
AGORAMODELS FDNY FIRE TRUCK
8
17
19
18
20
Take another LED diffuser and push it into one of the lower pair of
holes at the rear side of the front light cluster.
Two more LED diffusers have been installed on the front light cluster.
Repeat to fix the third LED diffuser to the front light cluster.
Turn the front light cluster over so the front side faces up and align a
headlight lens over the projecting LED diffuser.
Stage 17: Jump Seat & Front Right Light Cluster
AGORAMODELS FDNY FIRE TRUCK
9
21
23
22
24
Push the headlight lens firmly into position.
Two headlights have now been installed.
Repeat to install the second headlight lens over the remaining LED
diffuser.
With the reverse side of the front light cluster facing up, line up the
PCB (Printed Circuit Board) so that the U-shaped cut out is in line
with the single pin (see picture 25). Check that the circuit board is the
correct way up as shown in the picture.
Stage 17: Jump Seat & Front Right Light Cluster
AGORAMODELS FDNY FIRE TRUCK
10
25
Press the circuit board firmly into place and fix in position with a type
M screw.
STAGE COMPLETE
Stage 17: Jump Seat & Front Right Light Cluster
Type M screw
AGORAMODELS FDNY FIRE TRUCK
11
Name
Outer door panel
Inner cab panel
Inner door panel
Outer door handle
Window winder
Gear
Crew seat
Seat support
Type H screws x2
STAGE 18 PARTS LIST
In this next stage, you’ll assemble a
seat used by the crew, and another
cab door.
Stage 18: Front Left Cab Door & Crew Seat
Outer door panel
Outer door handle
Window winder
Gear Crew seat Seat support
Type H screws x2
Inner cab panel Inner door panel
AGORAMODELS FDNY FIRE TRUCK
12
Stage 18: Front Left Cab Door & Crew Seat
1
3
2
4 5
ASSEMBLING THE SEAT
Apply a little superglue to the underside of the seat, avoiding the two
rectanglular tabs. Take the seat support and align it with the seat as
shown. Check you have the seat support in the correct orientation
with the vertical post aligned with the back of the seat.
Line up the post of the seat support with the
post-shaped hole on the rear right-hand side
of the cab floor.
Firmly press the two parts together.
Push the seat firmly into place. Secure the seat from the underside of the cab
floor using a type H screw.
Type H screw
AGORAMODELS FDNY FIRE TRUCK
13
76
8
Press firmly until you feel it click into place.ASSEMBLING THE FRONT LEFT CAB DOOR
Push the handle into the hole in the inner door panel.
Check that you have the gear the correct way up – the slightly raised
surface faces down (inset). Push it onto the square peg on the inside of
the inner door panel.
Stage 18: Front Left Cab Door & Crew Seat
9
The gear has been correctly fitted.
AGORAMODELS FDNY FIRE TRUCK
14
11
10
12
Align the three peg holes on the inner door panel with the three pegs
of the inner side of the outer door panel before pressing the parts
firmly together.
Apply a drop of superglue to each of the four peg holes, as indicated
(circled).
The inner door panel has been fixed to the outer door panel.
Stage 18: Front Left Cab Door & Crew Seat
AGORAMODELS FDNY FIRE TRUCK
15
13
15
14
16
Take the inner cab panel and note that there are four fixing pins that
correspond with four small holes on the cab door hinge (circled). It
might be easier if you test fit the parts first.
Align the four holes on the door hinge with the four pins on the inner
cab panel. Check that the raised screw hole (arrow) is positioned
centrally in the corresponding hole in the hinge before firmly pressing
the hinge and cab panel together.
Apply glue around the fixing pins that will push through the hinge.
Apply a drop of superglue to the recess for the door handle.
Stage 18: Front Left Cab Door & Crew Seat
AGORAMODELS FDNY FIRE TRUCK
16
17 18
Press the handle into position. This is a D-shaped fitting to ensure the
correct fit.
This shows the handle correctly fitted.
STAGE COMPLETE
Stage 18: Front Left Cab Door & Crew Seat
AGORAMODELS FDNY FIRE TRUCK
17
STAGE 19 PARTS LIST
Now you’ll start to assemble the
dashboard, adding PCBs that will
operate the siren, front lights, and
horn. You’ll also a few more details
to the cab roof.
Stage 19: Components for the Dashboard & Roof
Dashboard kick panel Dashboard
Type E screws x2
Map light
Circuit board cover
Steering column
Siren/Headlight switch PCB
Roof component d
Roof component c
Radio antenna Dashboard storage box
GPS display Turn signal button
Push button x4
Name
Dashboard kick panel
Dashboard
Horn switch PCB
Siren/Headlight switch PCB
Steering column
Circuit board cover
Map light
GPS display
Turn signal button
Roof component d
Roof component c
Radio antenna
Dashboard storage box
Push button x4
Type E screws x2
Horn switch PCB
The roof components c & d will be used in a later
stage. Keep them in a safe place for now.
AGORAMODELS FDNY FIRE TRUCK
18
Stage 19: Components for the Dashboard & Roof
1
3
2
4
ASSEMBLING THE DASHBOARD
Align the two pins on the dashboard with the two holes in the
dashboard kick panel (circled).
Flip the dashboard assembly over and check that the pins are
projecting through to the underside.
Push the pins firmly into the holes.
With the dashboard underside still facing you, position it so that the
kick panel is uppermost (arrow). Grip one of the push buttons with
tweezers and align it with the pair of holes on the kick panel in the
orientation shown.
AGORAMODELS FDNY FIRE TRUCK
19
5
7
6
8
Insert the push button into one of the holes and then repeat to
position another push button in the hole alongside.
FIXING THE CIRCUIT BOARD
Test fit the PCB (printed circuit board) with red, yellow & black cables
above the two push buttons installed in 4–6. The flat side of the board
rests on the two ledges (dotted line, also see picture 9). When you are
happy with the fit, apply a little superglue to the two ledges.
Two push buttons are now correctly fitted. Once connected, these two
push buttons will operate the siren and front lights.
Insert the PCB with the contact points facing down towards the push
buttons.
Stage 19: Components for the Dashboard & Roof
AGORAMODELS FDNY FIRE TRUCK
20
9
11
10
12
Press the PCB firmly to glue into position. When you press the buttons
you should be able to feel the switches on the circuit board working.
Take the double ended PCB. Insert the smaller circuit board with blue
and yellow cables through the opening from the reverse side to the
front side. The larger circuit board with red and green cables should
remain on the reverse side. Note: the cables for the two two boards can
be seperated by gently pulling them apart to allow for easier fitting.
With the dashboard facing you, note that there is an opening to the
right of the two push buttons (circled).
Pull the smaller circuit board through the opening, then put the
assembly to one side while you assemble the steering column.
Stage 19: Components for the Dashboard & Roof

Other Agora Models Motorized Toy Car manuals

Agora Models STEVE MCQUEEN'S ICONIC PORSCHE 917 KH Pack... Manual

Agora Models

Agora Models STEVE MCQUEEN'S ICONIC PORSCHE 917 KH Pack... Manual

Agora Models Mercedes 300SL Gullwing 1955 Manual

Agora Models

Agora Models Mercedes 300SL Gullwing 1955 Manual

Agora Models Pack 07 Manual

Agora Models

Agora Models Pack 07 Manual

Agora Models LONDON TRANSPORT ROUTEMASTER BUS Manual

Agora Models

Agora Models LONDON TRANSPORT ROUTEMASTER BUS Manual

Agora Models SHELBY COBRA 427 SEMI-COMPETITION 1965 Manual

Agora Models

Agora Models SHELBY COBRA 427 SEMI-COMPETITION 1965 Manual

Agora Models JAGUAR E-TYPE Manual

Agora Models

Agora Models JAGUAR E-TYPE Manual

Agora Models MERCEDES-BENZ W196R Manual

Agora Models

Agora Models MERCEDES-BENZ W196R Manual

Agora Models LAMBORGHINI MIURA Pack 01 Manual

Agora Models

Agora Models LAMBORGHINI MIURA Pack 01 Manual

Agora Models Lamborghini MIURA Pack 11 Manual

Agora Models

Agora Models Lamborghini MIURA Pack 11 Manual

Agora Models STEVE MCQUEEN'S ICONIC PORSCHE 917KH Manual

Agora Models

Agora Models STEVE MCQUEEN'S ICONIC PORSCHE 917KH Manual

Agora Models SHELBY COBRA 427 SEMI-COMPETITION 1965 Manual
Agora Models

Agora Models SHELBY COBRA 427 SEMI-COMPETITION 1965 Manual

Agora Models SHELBY COBRA 1965 Manual

Agora Models

Agora Models SHELBY COBRA 1965 Manual

Agora Models LAMBORGHINI MIURA Pack 12 Manual

Agora Models

Agora Models LAMBORGHINI MIURA Pack 12 Manual

Agora Models STEVE MCQUEEN'S ICONIC PORSCHE 917KH Pack 10 Manual

Agora Models

Agora Models STEVE MCQUEEN'S ICONIC PORSCHE 917KH Pack 10 Manual

Agora Models Steve McQueen's Iconic Porsche 917KH Pack 01 Manual

Agora Models

Agora Models Steve McQueen's Iconic Porsche 917KH Pack 01 Manual

Agora Models STEVE MCQUEEN'S ICONIC PORSCHE 917KH Pack 05 Manual

Agora Models

Agora Models STEVE MCQUEEN'S ICONIC PORSCHE 917KH Pack 05 Manual

Agora Models Hachette Mitsubishi A6MZERO FIGHTER User manual

Agora Models

Agora Models Hachette Mitsubishi A6MZERO FIGHTER User manual

Agora Models FDNY FIRE TRUCK TOWER LADDER 9 Manual

Agora Models

Agora Models FDNY FIRE TRUCK TOWER LADDER 9 Manual

Agora Models STEVE MCQUEEN'S ICONIC PORSCHE 917KH Pack 02 Manual

Agora Models

Agora Models STEVE MCQUEEN'S ICONIC PORSCHE 917KH Pack 02 Manual

Agora Models RM 857 Manual

Agora Models

Agora Models RM 857 Manual

Agora Models Jaguar E-Type Pack 10 Manual
Agora Models

Agora Models Jaguar E-Type Pack 10 Manual

Agora Models JAGUAR E-TYPE Manual

Agora Models

Agora Models JAGUAR E-TYPE Manual
Agora Models SHELBY COBRA 427 S/C User manual

Agora Models

Agora Models SHELBY COBRA 427 S/C User manual

Agora Models JAGUAR E-TYPE Pack 01 Manual

Agora Models

Agora Models JAGUAR E-TYPE Pack 01 Manual

Popular Motorized Toy Car manuals by other brands

Yngri KETTIL manual

Yngri

Yngri KETTIL manual

Team Magic 4SETH manual

Team Magic

Team Magic 4SETH manual

Jamara VW Käfer Instruction

Jamara

Jamara VW Käfer Instruction

Smoby AAP1482A user manual

Smoby

Smoby AAP1482A user manual

Tamiya Porsche 911 GT1 Street 1996 manual

Tamiya

Tamiya Porsche 911 GT1 Street 1996 manual

Traxxas 83056-4 owner's manual

Traxxas

Traxxas 83056-4 owner's manual

Jamara Bugatti Chiron 2,4GHz instructions

Jamara

Jamara Bugatti Chiron 2,4GHz instructions

Rayline 8004 manual

Rayline

Rayline 8004 manual

Little Tikes Tire Twister quick start guide

Little Tikes

Little Tikes Tire Twister quick start guide

Jamara Bagger J-Matic 2,4 GHz Instruction

Jamara

Jamara Bagger J-Matic 2,4 GHz Instruction

Traxxas XO-1 64077 owner's manual

Traxxas

Traxxas XO-1 64077 owner's manual

Reely ROAD 23 80 12 operating instructions

Reely ROAD

Reely ROAD 23 80 12 operating instructions

Radio Shack 60-4308 owner's manual

Radio Shack

Radio Shack 60-4308 owner's manual

Tameo Kits TMK 375 Assembly manual

Tameo Kits

Tameo Kits TMK 375 Assembly manual

Kyosho MINI-Z Racer MR-02 RM Type instruction sheet

Kyosho

Kyosho MINI-Z Racer MR-02 RM Type instruction sheet

Jamara 460447 Instruction

Jamara

Jamara 460447 Instruction

Baghera 838 Assembly instruction

Baghera

Baghera 838 Assembly instruction

GS Racing SUTCE Instructional manual

GS Racing

GS Racing SUTCE Instructional manual

manuals.online logo
manuals.online logoBrands
  • About & Mission
  • Contact us
  • Privacy Policy
  • Terms and Conditions

Copyright 2025 Manuals.Online. All Rights Reserved.