AGPtek A17 User manual

AGPTEK
User Manual
A17 MUSIC PLAYER
English 01-09 | Francais 10-19 |日本語 20-29

CONTENT
English
Important Notice...................................................................... 1
Product Overview..................................................................... 2
Main Functions......................................................................... 2
Help and Troubleshooting........................................................ 8
Specifications............................................................................ 9
Francais
Avis Important........................................................................ 10
Présentation du Produit......................................................... 11
Fonctions Principales.............................................................. 12
Aide et Dépannage................................................................. 18
Spécification............................................................................20
日本語
ご使用の前に...........................................................................21
各部の名称............................................................................. 22
主要な機能.............................................................................23
故障かな?と思ったら...............................................................28
仕様........................................................................................ 29
If you have any problems about this product, please feel free to
contact support@agptek.com.
Manufacturer: Shenzhen RuiZu Digital Technology Co., Ltd.
Address: 6/F, Building D, KeShang Mei park, Chongqing Road, Fuyong,
Bao’an District, shenzhen,China.

1
Important Notice
Thank you for purchasing AGPTEK Music Player. Please read the manual
carefully before using the product. Specifications are subject to change
without prior notice.
Charge the Player
•Charge by computer USB port.
•Use 5V/500mA charger (Charger not included).
Connect to the PC & Download audio files
1. Open the Windows Explorer or "This PC".
2. Using the USB cable, connect the player to a USB port on your PC.
3. Open the new "AGP-A17" folder under "This PC".
4. Copy files to the "AGP-A17" in which you want them to play.
5. In the left sidebar, right-click the "AGP-A17 " folder and select "Eject"
from the menu.
6. Wait until the computer confirms a safe ejection before you unplug the
USB cable.
7. Note: Please do not disconnect the USB plug during file transferring. It
may cause malfunction of the player and the files.

2
Product Overview
Buttons and Controls
1. TF Card Slot
2. Return
3. Submenu
4. Scroll Up
5. Previous/Fast Rewind
6. Play/Pause/Enter
7. Next/Fast Forward
8. Scroll Down
9. Vol +
10. Vol -
11. On/Off
12. Speaker
13. Earphone Jack
14. Reset Hole
15. Micro USB Port
Basic Operation
•Power On/Off. Hold On/Off button to turn on/off the player.
•Screen lock. Hold down the button to lock screen and all the
buttons will be unavailable. Repeat the above steps to unlock.
•Screen display. Press On/Off button to activate screen.
•Browse item. On home menu or list menu, press button / / /
to browse item, press button to enter.
•Back. When on any interface, press to go back; hold down to back
to home menu directly.
•Volume adjustment. On the non-list menu, press Vol+/Vol- to adjust
volume.
Main Functions
Home Menu
The home menu is the starting point of each application. There are 8

3
functions on the home menu: Music/FM Radio/Folder/Bluetooth/
Recorder/Video/E-book/Tools/Settings.
Music
Find “Music” on home menu with button to access to its function. A
related list will show:
•All Songs.
•Resume/Now Playing.
•Artists/Albums/Genres.
•Playlists. There are 3 default playlists on the player: Playlist [1]/[2]/[3].
•Update Playlist. Update music files.
•Local Folder/Card Folder. View music file in the local folder or card
folder. Note: These functions only available when memory card
inserted.
Play the music.
While it’s on music playing interface, hold down the button to fast
forward, and press it to skip to next track. Hold down the button to
fast rewind, and press it to play the previous track. Press button to
play/pause.
Back to Home/Play Mode/Sound Settings/Add to Playlist/Remove
from Playlist/ Delete/Bookmarks.
While it’s on music playing interface, tap button to access to the
submenu.
1. Back to Home. Choose to go to home menu.
2. Play Mode.
A. Play music from. Choose to play from All Songs/This
Artist/Album/Genre.
B. Repeat. Choose repeat mode: Repeat Off, Repeat 1, Repeat All.
C. Shuffle. Choose to turn on/off shuffle mode.
D. Repeat Settings.
a. Repeat Mode.
╶Enter. Press the button to enter.
╶Set. Press button to confirm the starting time A when A is flashing.
Then press button to set the ending time B when B is flashing. The

4
passage from time A to B will be repeated automatically. The icon for
A-B indication will appear on the screen. Press button again to
back to normal playback.
b. Replay Times. Set the replay times from 1 to 10.
c. Replay Interval. Set the replay gap from 1 to 10 (seconds).
3. Sound Settings. Choose to set Equalizer, Variable Speed Playback and
Volume Limit.
4. Add to Playlist/Remove from Playlist. Choose to add to or remove from
the 3 existing playlist.
5. Delete. Choose to delete the song that is playing now.
6. Bookmarks. Choose to add bookmark for the song that is playing now,
or go to/delete the bookmark you added.
FM Radio
Find “FM Radio” on Home menu with the button to access to its
function. A related list will show:
•Presets. All the saved stations will be listed here.
•Manual tune/Auto tune. When choose “Auto tune”, the searched
stations will be saved in “Presets” automatically.
•FM Recordings. View the radio recording files. You will need to choose
from local folder or card folder if the memory card is inserted. The
radio recordings will also be saved in Recordings> Recordings library.
Start FM Recording/Radio Background/Save to Presets/Clear
Preset/Auto Tune/Tuner Region/FM Recordings.
While it’s on radio playing interface, press button to switch among
preset stations, press the button / to find tune stations. Press
button to access to its submenu which includes:
1. Start FM Recording. Press button to pause/continue, press and
select “Yes” to save the recording file.
2. Radio Background. Choose to turn on/off radio background.
3. Save/Clear station/Auto tune.
4. Tuner Region. Choose from Common/European/Japan Band as needed.
5. FM Recordings.
Folder

5
Find “Folder” on Home menu with the button to access to its function.
All of the files in the player will be listed. If the Micro SD card is inserted,
you can choose to go to Local folder or Card folder.
Bluetooth
Find “Bluetooth” on Home menu with the button to access to its
function. A related list will show, including Bluetooth On/Off, Search
Devices, Device List. Select the device you want to connect/disconnect,
and then press to connect/disconnect. After successfully connected,
this player is ready to play music or FM radio via Bluetooth headphones,
Bluetooth speaker, etc.
Note:
1. When listen to radio by Bluetooth, wired headphones are needed as
radio antenna.
2. Recorder,Variable Speed Playback, Video, Pictures, Pedometer functions
are not available when Bluetooth is opened.
Recorder
Find “Recorder” on home menu with button to access to its function.
A related list will show:
•Start Voice Recording. Press button to start voice recording, press
again to pause. Press the button and choose “Yes” to save the
recording file.
•Recordings Library. Find the saved recordings in Recorder>Recordings
Library. You will need to choose from local folder or card folder if the
memory card is inserted. While it’s on recording playing interface,
press button and choose “Delete” to delete.
•Storage. Choose to store your recordings in internal or external
memory. Confirm your selection with button . (Only available when
TF card inserted)
•Rec Format. Choose the record format between MP3/WAV .
•Rec Settings. Set the recording bit rate as you need.
Videos

6
•Press button to access to its function. You will need to choose from
local folder or card folder if the memory card is inserted.
•Press button to watch videos, press the button / to go to
previous/next video or hold to fast backward/forward.
•When it’s on video playing interface, press button to access to its
submenu, including: Brightness, Repeat, Delete Video, Update Playlist.
Set according to your preference.
Tools
Find “Tools” on Home menu with the button to access to its function.
A related list will show:
•Photos.
Press to view pictures, press the / to go to previous/next
picture.
When it’s on picture viewing interface, press button to access to its
submenu, including: Brightness, Backlight Timer, Slideshow Settings,
Delete Photos, Update Playlist. Set according to your preference.
•Calendar.
Press the button to switch among year|month|day, press the button
/ to choose specific year|month|day.
•Stopwatch
Press to enter. Press again to start the timer, then press it again to
stop or press to resume. Press to start a new one. The maximum
Stopwatch list is 4.
•Clock.
Press button to enter, a related list will show: Alarm On/off, Alarm
Time, Alarm Cycle (Once/Daily/Work day), Alarm Music, Alarm Volume.
Set according to your preference.
•Pedometer.
Find "Pedometer" on Tools with the button to access to its function, a
related list will show:
1. Start. Press to start counting your daily steps. Press to exit the
current interface. Then choose Save and press to stop or save
counting steps. Find the saved step record in History.

7
2. Personal Info. Set your height, weight, and step length with button
to confirm.
3. History. All your saved step record will be listed here, and you can save
up to 7 records. If the history record is full, it will automatically cover
the previous one.
4. Clear history. You can choose to clear the history record you want or
clear all the history record.
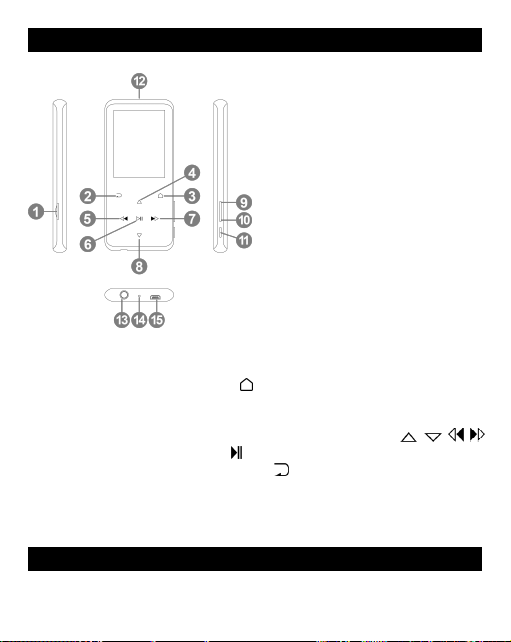
E-book
While it’s on text playing interface, press button / to turn the pages.
Press the button to play automatically, press again to stop. Press
/ to adjust the brightness of the display.
Submenu. While it ’s on text playing interface, press button to enter
its submenu and set your preference, including Autoplay Settings (2s-30s),
Set Font Size, E-book background, Delete E-book, Select Bookmark, Delete
Bookmark, Add Bookmark, Select Page, Local Folder and Card Folder (Only
available when TF card inserted).
Settings
Find “Settings” on Home menu with the button to access to its
function. A related list will show, including:
•Language/Language. Choose display language.
•Date and Time. Choose “Time Settings” to set time format and date.
To set time, press / to switch among hour | minute; Press button
/ to adjust the value of hour | minute. Set date under “Date
Settings > Set Date” and adjust the date like “Set Time”.
•Display Settings. Set Brightness, Backlight timer and Screensaver.
•Shutdown Settings.
1. Sleep Timer. The device will shut down automatically when reaches
the set time.
2. Power Off. When there is no operation on the device, the device will
shut off automatically when reaches the set time.
•Sound Settings. Choose to set Equalizer, Variable Speed Playback and
Volume Limit.

8
•Button Light. Set the button light to be always on, on and off.
•Information. Check the information and disk space about your player.
•Format Device/Factory Settings. Format the device or restore to
factory default settings. Note: Before formatting the device, please
backup the file so as not to lose any files.
Help and Troubleshooting
How to reset the language?
There are two ways to reset the language as shown below.
1. Find (Settings) in the home menu and confirm it by pressing button
. Select the first (upper) option and press button to confirm.
Scroll down and select the language you want to set.
2. Find (Settings) in the home menu, enter and scroll down to the last
menu. Press button to enter and choose the first (upper) option
which means "Yes" with button to confirm and restore to factory
settings. And then the player will power on automatically and then you
can choose language again.
Can’t turn on the player; the screen of player goes
blank/black; the player is crashed or has a firmware bug.
1. Power off the player and try again.
2. Update the firmware. Please contact our customer service or check our
website at https://www.agptek.com/blog to download the firmware.
Can’t download files from computer.
1. Please confirm whether it’s connected properly;
2. Please check whether the storage space of the internal memory is full;
3. Please check whether the USB cable is damaged.
Can’t recognize the player when connected to the
computer via USB cable.
1. Reconnect it.
2. Restart the computer and reconnect it.
3. Connect your player to another USB port.
4. Charge the player for about 10 minutes first.

9
Specifications
Screen
2.4”TFT
Housing
Zinc alloy
Unit Size
106*50*9mm
Net Weight
106g
Interface Type
USB 2.0
Internal Memory
16GB/32GB
SD Card Expansion
Up to 128GB
Format
Music
MP3/WMA/APE/FLAC/WAV/DRM/A
CELP
Bluetooth
MP3/WMA/WAVE/FLAC/APE/M4A
/AAC
Lyric
LRC
Video
AMV/AVI
Recording
MP3/WAV
E-book
TXT
Playtime
Music
Wired
48 hours
Bluetooth
12 hours
Video
Wired
9 hours
Radio
18 hours
Recording
48 hours
Battery
500 mAh lithium polymer battery
Charging time
2 hours (5V/500mA)

10
Avis Important
Merci d'avoir acheté AGPTEK Lecteur de Musique. Veuillez lire
attentivement le manuel avant d'utiliser le produit. Les spécifications sont
susceptibles de changer sans préavis.
Charger le Lecteur
•Chargez par le port USB de l'ordinateur.
•Utilisez un chargeur 5V/500mA (chargeur non inclus).
Connectez-vous au PC & Télécharger des fichiers audio
1. Ouvrez l'explorateur Windows ou "Ce PC".
2. Avec câble USB, connectez le lecteur à un port USB de votre PC.
3. Ouvrez le nouveau dossier «AGP-A17» sous «Ce PC».
4. Copiez les fichiers sur le "AGP-A17" dans lequel vous souhaitez qu'ils
soient lus.
5. Dans la barre latérale gauche, cliquez avec le bouton droit sur le
dossier «AGP-A17» et sélectionnez «Éjecter» dans le menu.
6. Attendez que l'ordinateur confirme une éjection sûre avant de
débrancher le câble USB.
7. Remarque: veuillez ne pas débrancher la prise USB pendant le transfert
de fichiers. Cela peut entraîner un dysfonctionnement du lecteur et des
fichiers.

11
1. Slot pour Carte TF
2. Retour
3. Sous-menu
4. Sélection Haut
5. Précédent/Retour Rapide
6. Lire/Pause/Entrer
7. Suivant/Avance Rapide
8. Sélection Bas
9. Vol+
10. Vol-
11. Allumer/Eteindre
12. Haut-parleur
13. Prise pour Ecouteurs
14. Trou de Réinitialisation
15. Port Micro USB
Présentation du ProduitAllumer/Eteindre
Boutons et Commandes
Opération de Base
1. Allumer/Eteindre. Maintenez le bouton Allumer/éteindre pour
allumer/ éteindre le lecteur.
•Verrouillage d'Ecran. Maintenez le bouton enfoncé pour
verrouiller l'écran et tous les boutons ne seront pas disponibles.
Répétez les étapes ci-dessus pour déverrouiller.
2. Écran d'Affichage. Appuyez sur Allumer/éteindre pour activer l'écran.
•Parcourir l'élément. Dans le menu d'accueil ou le menu liste, appuyez
sur le bouton / / / pour parcourir l'élément, appuyez sur le
bouton pour entrer.
•Retour.Sur n'importe quelle interface, appuyez sur pour revenir;
maintenez enfoncé pour revenir directement au menu d'accueil.
3. Volume +/-. Dans le menu sans liste, appuyez sur Vol+/Vol- pour régler
le volume.

12
Fonctions Principales
Menu d'Accueil
Le menu d'accueil est le point de départ de chaque application. Il y a 8
fonctions dans le menu d'accueil: Musique/Radio FM/Affich.dossier/
Bluetooth/Enregistre/Vidéo/Livre Electronique/Outils/Définir.
Musique
Trouvez «Musique» dans le menu d'accueil avec le bouton pour
accéder à sa fonction. Une liste associée affichera:
•Toutes les Titres.
•Artistes/Albums/Genres.
•Playlists. Il y a 3 listes de lecture par défaut sur le lecteur: Playlist
mobile [1]/[2]/[3].
•Mettre à Jour la Playlist. Mettez à jour les fichiers musicaux.
•Dossier local/Dossier de la Carte. Afficher le fichier de musique dans le
dossier local ou le dossier de la carte. Remarque: ces fonctions ne sont
disponibles que lorsque la carte mémoire est insérée.
Joue la musique.
Lorsqu'il est sur l'interface de lecture de musique, maintenez le bouton
enfoncé pour avancer rapidement, et appuyez dessus pour passer à la
piste suivante. Maintenez le bouton enfoncé pour rembobiner
rapidement, et appuyez dessus pour lire la piste précédente. Appuyez sur
le bouton pour lire/mettre en pause.
Retour à l'accueil/Mode de lecture/Réglages du son/Ajouter à
playlist/Supprimer de la playlist/Signets.
Lorsqu'il est sur l'interface de lecture de musique, appuyez sur le bouton
pour accéder au sous-menu.
1. Retour à l'accueil.Choisissez d'aller au menu d'accueil.
2. Mode de lecture.
A. Lire la musique de. Choisissez de lire toutes les chansons/cet
artiste/album/genre.
B. Répéter. Choisissez le mode de répétition: Répéter désactivé, Répéter
1, Répéter tout.

13
C. Aléatoire. Choisissez d'activer/désactiver le mode aléatoire.
D. Paramètre de Répétition.
a. Mode de Répétition.
╶Entrer. Appuyez sur le bouton pour entrer.
╶Paramètre. Appuyez sur le bouton pour confirmer l'heure de
démarrage A lorsque A clignote. Appuyez ensuite sur le bouton
pour régler l'heure de fin B lorsque B clignote. Le passage du temps A
au temps B sera répété automatiquement. L'icône d'indication A-B
apparaîtra à l'écran. Appuyez à nouveau sur le bouton pour revenir
à la lecture normale.
b. Nombre de fois de répetitions. Réglez les temps de relecture de 1 à
10.
c. Intervalle Re-lecture. Réglez l'intervalle de lecture de 1 à 10
(secondes).
3. Réglage du Son. Choisissez de régler l'égaliseur, la vitesse variable et la
limite de volume.
4. Ajouter à playlist/Supprimer de la playlist. Choisissez d'ajouter ou de
supprimer des 3 listes de lecture existantes.
5. Supprimer. Choisissez de supprimer la chanson en cours de lecture.
6. Signets. Choisissez d'ajouter un signet pour la chanson en cours de
lecture ou accédez à/supprimez le signet que vous avez ajouté.
Radio FM
Trouvez «Radio FM» dans le menu d'accueil avec le bouton pour
accéder à sa fonction. Une liste associée affichera :
•Présel. Toutes les stations enregistrées seront répertoriées ici.
•Réglage manuel/Réglage auto. Lorsque vous choisissez «Réglage
auto», les stations recherchées seront automatiquement enregistrées
dans «Présel».
•Enregistrements FM. Affichez les fichiers d'enregistrement radio. Vous
devrez choisir un répertoire principale/répertoire de carte si la carte
mémoire est insérée. Les enregistrements radio seront également
sauvegardés dans Enregistrements> Bibliothèque d'enregistrements.
Démarrez l'enreg. radio FM/Radio en tâche de fond/Enreg dans

14
présélec/Effacer présélection/Réglage auto/Plage Fréquences/
Enregistrement FM.
Lorsqu'il est sur l'interface de lecture de la radio, appuyez sur le bouton
pour basculer entre les stations préréglées, appuyez sur le bouton
/ pour rechercher les stations de réglage. Appuyez sur le bouton
pour accéder à son sous-menu qui comprend:
1. Démarrez l'enreg. radio FM. Appuyez sur le bouton pour mettre en
pause/continuer, appuyez sur et sélectionnez «Oui» pour
sauvegarder le fichier d'enregistrement.
2. Radio en tâche de fond. Choisissez d'activer/désactiver la radio en
tâche de fond.
3. Signet/Effacer présélection/Réglage auto.
4. Plage Fréquences. Choisissez parmi la bande fréquence
ordinaire/européenne/japonaise selon vos besoins.
5. Enregistrements FM.
Affich. dossier
Trouvez «Affich. dos» dans le menu Accueil avec le bouton pour
accéder à sa fonction. Tous les fichiers du lecteur seront répertoriés. Si la
carte Micro SD est insérée, vous pouvez choisir d'aller dans le répertoire
Principale ou dans le répertoire de Carte.
Bluetooth
Trouvez «Bluetooth» dans le menu Accueil avec le bouton pour
accéder à sa fonction. Une liste associée s'affiche, y compris Bluetooth
On/Off, recherche un appareil, liste d'appareil, mise à jour BT.
Sélectionnez l'appareil que vous souhaitez connecter/déconnecter, puis
appuyez sur pour vous connecter/déconnecter. Une fois la connexion
réussie, ce lecteur est prêt à lire de la musique ou une radio FM via un
casque Bluetooth, un haut-parleur Bluetooth, etc.
Remarque:
1. Lorsque vous écoutez la radio par Bluetooth, des écouteurs filaires sont
nécessaires comme antenne radio.
2. Les fonctions d'enregistrement, de lecture à vitesse variable, de vidéo,

15
d'images et de podomètre ne sont pas disponibles lorsque Bluetooth
est ouvert.
Enregist
Trouvez «Enregist» dans le menu d'accueil avec le bouton pour
accéder à sa fonction. Une liste associée affichera:
•Démarrer l'enregistrement vocal. Appuyez sur le bouton pour
démarrer l'enregistrement vocal, appuyez à nouveau pour mettre en
pause. Appuyez sur le bouton et choisissez «Oui» pour
sauvegarder le fichier d'enregistrement.
•Bibliothèque d'enreg. Recherchez les enregistrements enregistrés
dans Enregistrements> Bibliothèque d'enregistrements. Vous devrez
choisir un répertoire principal ou un répertoire de carte si la carte
mémoire est insérée. Pendant l'enregistrement de l'interface de
lecture, appuyez sur le bouton et choisissez «Supprimer» pour
supprimer.
•Stockage. Choisissez de stocker vos enregistrements dans la mémoire
interne ou externe. Confirmez votre sélection avec le bouton .
(Uniquement disponible lorsque la carte TF est insérée)
•Format d'Enreg. Choisissez le format d'enregistrement entre
MP3/WAV.
•Config d’Enreg. Réglez le débit binaire d'enregistrement selon vos
besoins.
Vidéos
•Appuyez sur le bouton / pour accéder à sa fonction. Vous devrez
choisir un dossier local ou un dossier de la carte si la carte mémoire est
insérée.
•Appuyez sur le bouton pour regarder des vidéos, appuyez sur le
bouton/pour aller à la vidéo précédente/suivante ou maintenez-le
enfoncé pour avancer/reculer rapidement.
•Lorsqu'il est sur l'interface de lecture vidéo, appuyez sur le bouton
pour accéder à son sous-menu, y compris: Luminosité, Répéter, Effacer
la vidéo, Créer liste de lecture. Réglez selon vos préférences.

16
Outils
Trouvez «Outils» dans le menu Accueil avec le bouton pour accéder à
sa fonction. Une liste associée affichera :
•Photos.
Appuyez sur pour afficher les images, appuyez sur / pour aller à
l'image précédente/suivante.
Lorsqu'il est sur l'interface de visualisation des images, appuyez sur le
bouton pour accéder à son sous-menu, y compris: Luminosité,
Minuterie de rétroéclairage, Réglage du diaporama, Supprimer l'image,
Mettre à jour la liste de lecture. Réglez selon vos préférences.
•Calendrier.
Appuyez sur le bouton pour basculer entre année | mois | jour,
appuyez sur le bouton / pour choisir une année | mois | jour
spécifique.
•Chronomètre.
Appuyez sur pour entrer, appuyez de nouveau pour démarrer la
minuterie, puis appuyez de nouveau pour arrêter ou appuyez sur
pour reprendre. Appuyez sur pour en créer un nouveau. La liste
maximale du chronomètre est de 4.
•Réveil.
Appuyez sur le bouton pour entrer, une liste associée affichera:
Alarme activée/désactivée, Heure alarme, Cycle alarme (Une fois/
Quotidien/Jours de travail),sonnerie alarme, Volume alarme. Réglez selon
vos préférences.
•Podomètre.
Trouvez "Podomètre" sur Outils avec le bouton pour accéder à sa
fonction, une liste associée affichera:
1) Démarrer le Podomètre. Appuyez sur pour commencer à compter
vos pas quotidiens. Appuyez sur pour quitter l'interface actuelle.
Ensuite, choisissez Enregistrer et appuyez sur pour arrêter ou
enregistrer les étapes de comptage. Recherchez l'enregistrement
d'étape enregistré dans l'historique.
2) Infos Personnel. Réglez votre taille, poids et longueur de pas avec le
bouton pour confirmer.

17
3) Histoire. Tous vos enregistrements d'étape enregistrés seront
répertoriés ici, et vous pouvez enregistrer jusqu'à 7 enregistrements.Si
l'enregistrement d'historique est plein, il couvrira automatiquement le
précédent.
4) Supprimer l’histoire. Vous pouvez choisir d'effacer l'enregistrement
d'historique souhaité ou d'effacer tout l'enregistrement d'historique.
Livre Electronique
Lorsqu'il est sur l'interface de lecture de texte, appuyez sur le bouton
/ pour tourner les pages. Appuyez sur le bouton pour jouer
automatiquement, appuyez à nouveau pour arrêter. Appuyez sur /
pour régler la luminosité de l'écran.
Sous-menu. Lorsqu'il est sur l'interface de lecture de texte, appuyez sur le
bouton pour entrer dans son sous-menu et définir vos préférences, y
compris les Paramètres de lecture automatique (2s-30s),Taille de la police,
Définir la taille de la police, Fond de Livre Electronique, Supprimer Livre
Electronique,Sélectionnez un Signet, Supprimer un Signet, Ajouter un
Signet, Sélectionner une Page, un Dossier Local et un Dossier de
Carte(Uniquement disponible lorsque la carte TF est insérée).
Définir
Trouvez «Définir» dans le menu Accueil avec le bouton pour accéder à
sa fonction. Une liste associée apparaîtra, comprenant:
•Langue/Language. Choisissez la langue d'affichage.
•Date et heure. Choisissez «Paramètres de l'heure» pour définir le
format de l'heure et la date. Pour régler l'heure, appuyez sur /
pour basculer entre les heures | minute; Appuyez sur le bouton
/ pour régler la valeur de l'heure | minute. Réglez la date sous
«Paramètres de date> Régler la date» et ajustez la date comme «Régler
l'heure».
•Réglages de l’affichage. Réglez la luminosité, la minuterie de
rétroéclairage et l'économiseur d'écran
1. Paramètres d'arrêt.1. minuterie de sommeil. L'appareil s'éteindra
automatiquement lorsqu'il atteindra l'heure définie.

18
2. Mise hors tension. Lorsqu'aucune opération n'est effectuée sur
l'appareil, celui-ci s'éteint automatiquement lorsqu'il atteint l'heure
définie.
•Réglages du son. Choisissez de régler l'égaliseur, la lecture àvitesse
variable et la limite de volume.
•Eclairage des touches. Réglez le voyant du bouton pour qu'il soit
toujours allumé, allumé et éteint.
•Informations.
•Vérifiez les informations et l'espace disque de votre lecteur.
•Paramètres sonores. Choisissez de régler l'égaliseur, la lecture à vitesse
variable et la limite de volume.
•Formater périphérique/Réglage d'usine. Formatez l'appareil ou
restaurez les Réglage d'usine par défaut.
•Remarque: Avant de formater l'appareil, veuillez sauvegarder le fichier
afin de ne perdre aucun fichier.
Aide et Dépannage
Comment réinitialiser la langue ?
Il existe deux façons de réinitialiser la langue comme indiqué ci-dessous.
1. Recherchez (Réglage) dans le menu d'accueil et confirmez-le en
appuyant sur le bouton . Sélectionnez la première option
(supérieure) et appuyez sur le bouton pour confirmer. Faites défiler
vers le bas et sélectionnez la langue que vous souhaitez définir.
2. Recherchez (Réglage) dans le menu d'accueil, entrez et faites
défiler jusqu'au dernier menu. Appuyez sur le bouton pour entrer
et choisissez la première option (supérieure) qui signifie "Oui" avec le
bouton tpour confirmer et restaurer les Réglage d'usine. Ensuite, le
lecteur s'allumera automatiquement et vous pourrez à nouveau choisir
la langue.
Impossible d'allumer le lecteur; l'écran du joueur devient
Blanc/Noir ; le lecteur est en panne ou a un bogue du
firmware.
1. Mettez le lecteur hors tension et réessayez.
Table of contents
Languages:
Other AGPtek MP3 Player manuals
Popular MP3 Player manuals by other brands

Sony
Sony Walkman NWZ-B103FBLK quick start guide

RCA
RCA RD2765 - Lyra 5 GB Digital Jukebox Specifications

IRiver
IRiver iFP-790 Hardware instruction manual

Verbatim
Verbatim Store 'n' Play VM-205 user manual

Emprex
Emprex MP-1003 user manual

Sony
Sony NWZ-S716FRNC - 4gb Walkman Video Mp3 Player quick start guide