Antar AT51111 User manual

AT51111
Lightweight Wheeled Walker

Instruction Manual
2
1. INTRODUCTORY REMARK
We are thankful that you decided on the AT51111 lightweight wheeled
walker.
The quality of the wheeled walker will not disappoint you.
Please read through the instruction manual thoroughly before using the
wheeled walker for the first time.
It contains important safety information and valuable tips for the proper
use and maintenance of the wheeled walker. If you have questions or
need additional information, refer to your specialized dealer who
delivered AT51111 your wheeled walker. They will be happy to give
you advice.
The instruction manual is also available for download and can be used
in your desired format, even for people with vision problems.

AT51111
3
2. TABLE OF CONTENTS
1. INTRODUCTORY REMARK.................................................................................2
2. TABLE OF CONTENTS........................................................................................3
3. GENERAL INFORMATION..................................................................................5
Specific Function...................................................................................................................5
Indications ............................................................................................................................5
Contraindications..................................................................................................................5
Duration of Use.....................................................................................................................6
Liability .................................................................................................................................6
Declaration of Conformity.....................................................................................................6
Symbols ................................................................................................................................6
4. PRODUCT AND DELIVERY SUMMARY ...............................................................7
Delivery Inspection ...............................................................................................................7
Scope of Delivery ..................................................................................................................7
Identification ........................................................................................................................7
Overview of CLASSIC Pocket..................................................................................................8
5. CLASSIC POCKET Setup .....................................................................................9
Handle Height.......................................................................................................................9
Pouch....................................................................................................................................9
Brakes.................................................................................................................................10
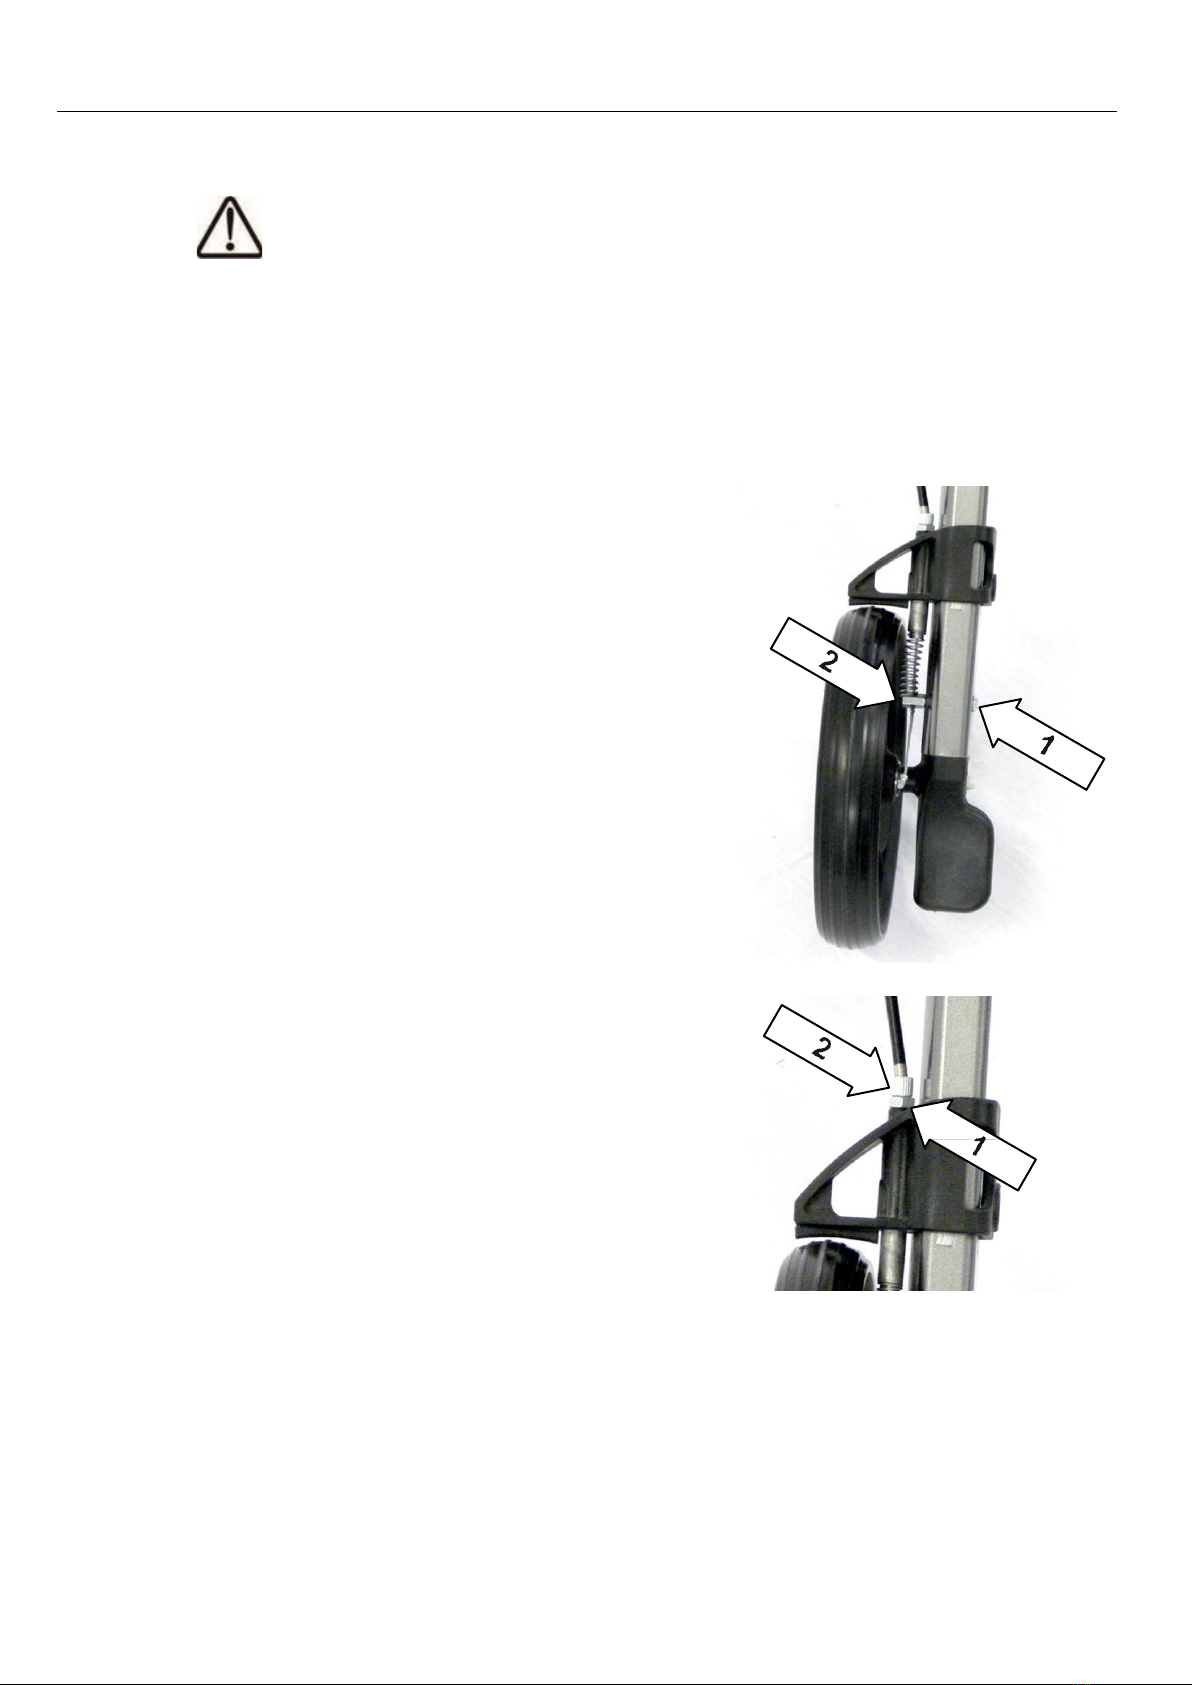
Increase/lessen brake effect ...............................................................................................10
6. USE OF CLASSIC POCKET.................................................................................11
Opening and Folding Up......................................................................................................11
Transporting and Storage....................................................................................................12
Running with the Wheeled Walker......................................................................................13
Tilting Aid............................................................................................................................13
Brakes and Parking Brake....................................................................................................14
Wheeled Walker as a Seat...................................................................................................14
Lighting.............................................................................. Błąd! Nie zdefiniowano zakładki.
Carrying the Wheeled Walker .............................................................................................15
Safety Information..............................................................................................................15
7. CLEANING AND DISINFECTION .......................................................................15

Instruction Manual
4
Cleaning..............................................................................................................................15
Disinfection.........................................................................................................................16
8. RE-USE............................................................................................................16
9. DISPOSAL........................................................................................................16
10. TECHNICAL DATA .....................................................................................17
11. REPAIR AND MAINTENANCE FOR THE SPECIALIZED SHOP........................18
12. WARRANTY ..............................................................................................19

AT51111
5
3. GENERAL INFORMATION
The instruction manual at hand will help you to be more familiar with
the operation and handling of the wheeled walker. This instruction
manual is a fixed and necessary component of the wheeled walker.
Keep this instruction manual handy and give it to the next person if
passing the wheeled walker over to someone else. Please read the
instruction manual through completely prior to the first use of the
wheeled walker.
Specific Function
The wheeled walker AT51111 is designed for indoor and outdoor
spaces. It is designed exclusively as a walker with seating for one
person. Carrying of more than one person is not allowed. If not
otherwise described, this instruction manual is directed to the patients
as the operator.
Indications
The wheeled walker is suited for people with limited mobility who still
have sufficient ability, strength and stability to be able to leave their
residence with support of the wheeled walker.
Contraindications
Use of the wheeled walker is not suitable with
•Perception issues
•Severe equilibrium issues
•Limb loss of the arms
•Inability to sit

Instruction Manual
6
Duration of Use
The expected life span of the wheeled walker is up to 5 years with use,
safety, care and maintenance in accordance with regulations. Beyond
this time period, the wheeled walker can still be used as long as still in
proper condition.
Liability
As the manufacturer, we can only be considered liable for the safety,
dependability and usability of the wheeled walker if modifications,
upgrades, repairs and maintenance work are completed only by certain
people who are authorized by us and the wheeled walker is used
allowing for all handling information.
Declaration of Conformity
Medical Medizin- und Rehaprodukte GmbH [a limited liability company]
declares as manufacturer of the product that the wheeled walker
CLASSIC Pocket conforms to the requirements of the European
Guidelines 93/42/EEC.
Symbols
Important! Particular safety-related information.
Non-observance can lead to injury of defects on the
product.
Information! Particularly useful information.
Follow instruction manual
CE marking

AT51111
7
4. PRODUCT AND DELIVERY SUMMARY
Delivery Inspection
The AT51111 wheeled walker is delivered completely assembled in a
box. After unpacking, retain the box and the packaging material if
possible. They can be used for subsequent possible storage of the
wheeled walker.
Inspect the delivered contents upon receipt for completeness and
sound condition. In the case of damages, do not use the product yet.
First notify the dealer.
Scope of Delivery
Contents consist of the following main components:
•1 outer packaging
•Wheeled walked including back belt and tilt support
•Mesh pocket with reflector and zipper
•2 cane holders with inner shell
•Instruction manual
•1 LED position lamp
Optionally included:
•Large transporting case
•Tray
Identification
Each wheeled walker is furnished with a label. This is located on
the interior of the left frame. Please produce the serial number on
the warranty section.
Figure 1: Label

Instruction Manual
8
Overview of AT51111
13
12
11
10
9
8
7
6
1 Seat back
2 Pouch
3 Front wheels mounting
4 Front wheels (steerable)
5 Brake adjusting screw
6 Rear wheels
7 Tilt support (left and right)
8 Rear wheels mounting
9 Lighting
(optional)
10 Sitting surface
11 Sliding height adjustment handle
12 Brake handle
13 Sliding handle
1
2
3
4
5
Figure 2: Product overview

AT51111
9
5. AT51111 Setup
We recommend you setup the wheeled walker together with your
specialized dealer. With enough manual skills, you can also complete
this by yourself.
Be aware of the increased risk of entrapment during
setup of the wheeled walker.
Handle Height
You can fit the height of the handle to your body size. This does not
require any tools.
A red latch (Figure 3) is found
beneath every handle. Push the
latch in and keep it pressed. Now
you can raise or lower this handle.
Let go of the button. Pull or push
yet again until you hear and notice
that the handle clicks into place
and can no longer be adjusted.
Repeat the process on the other
side until both handles are set to
the same height. Figure 3
Pouch
The wheeled walker is delivered
with an assembled pouch. The
pouch can simply be taken off or
hung above the hanger (Figure 4).
Figure 4

Instruction Manual
10
Brakes
Setup of the brakes should be completed by a trained
specialist. However, if you have sufficient experience, you
can complete this job by yourself. Keep in mind though
that incorrectly installed brakes can have life-threatening
consequences.
Increase/lessen brake effect
1. Loosen Allen screw (Figure 5, arrow
1).
2. Retighten or untighten Bowden
cable by pulling out or pushing in
(Figure 5, arrow 2).
3. Refasten Allen screw.
4. Small adjustments:
Loosen counter nut (Figure 6, arrow
1) so that the setup screw (Figure 6,
arrow 2) can be turned.
Turn the setup screw clockwise:
brake effect lessens. Turn the setup
screw counterclockwise: brake
effect increases.
Finally, retighten the counter nut.
Complete this step again with the other
brake.
Adjust the brakes so that when moving it
does not rub and it is easy to operate. With
actuator brakes, you are not able to move the
walker.
Figure 5
Figure 6

AT51111
11
6. USE OF AT51111
Be aware of risk of entrapment, especially
during opening and folding up as well as when
preparing to transport
Opening and Folding Up
The wheeled walker can be stored in a folded up position for space
savings.
In order to be able to use it, open it up by pushing on the seat from the
outer edges (Figure 7). On the bottom side of the wheeled walker find the
locking device in order to prevent unintended folding of the walker. When
opening the walker up a certain click is heard, the locking device is
properly engaged. To fold, pull handle up on the seat (Figure 8).
Figure 7 Figure 8

Instruction Manual
12
Transporting and Storage
In order to be able to transport and store the
wheeled walker for space savings, it is
possible to pivot the front wheels up and take
off the mounting bracket of the rear wheels
(Figure 9).
Figure 9
Front Wheels
Press the red latch (Figure 10) in order to
loosen the lock on the front wheels. Then
pull the front wheels forward and turn 180°
upwards.
In order to use the wheeled walker again,
pull the front wheel forwards and pivot it
downwards.
It audibly clicks in place; control the fixed
seat.
Figure 10
Rear Wheels
Next, fold down the lever (Figure 11).
Finally, press the push-button and pull out
the rear wheel assembly downwards. Be
aware that the rear wheel is still always
connected to the wheeled walker by the
brake cable.
To assemble, simple push the rear wheel
assembly back into the frame. It audibly
clicks in place. Now fold the lever back.
Make sure that the rear wheel is securely
fixed and the brakes function correctly.
Figure 11

AT51111
13
Running with the Wheeled Walker
First test the use of the wheeled walker on a level, dry surface. Allow
yourself to be accompanied by another person if possible. Practice
after the first attempt –if you feel safe –using it on sloped surfaces.
Pay attention when going with the wheeled walker to remain
close to the sliding handles. Only in doing so, can the
wheeled walker effectively reduce the risk of falling. Eliminate
a slouched back.
You determine the speed and direction by pushing the wheeled walker.
Use both brakes in order to slow down your speed. Pay attention when
braking to always engage both brakes. The wheeled walker will
otherwise turn with the unbraked wheel and you can fall.
Attempt to go around obstacles in your path. With steps, look for a
ramp; with stairs, take the elevator. If this is not possible, the wheeled
walker has to be carried over the obstacle. When possible, try to find
another person to help you.
Tilting Aid
Your wheeled walker is equipped with two tilting
aids (Figure 12), which should ease getting over
curbs for you. As you step on the tilting aid with
your foot and pull back the on the handles at the
same time, raise the front wheels. In this
manner, you can get over curbs and other small
obstacles with little effort.
Please pay attention when doing so for a fixed
condition.
Figure 12

Instruction Manual
14
Brakes and Parking Brake
Your wheeled walker is equipped with a
charged operating brake and with a parking
brake to prevent accidental rolling away.
In order to easily and safely bring the
wheeled walker to a stop, pull both brake
handles upwards (Figure 13).
The brake effect depends on how hard the
brakes are pressed. Use the parking brake by
pushing the brake handles downwards until
they lock into place with an audible click.
(Figure 14).
To loosen the parking brake, pull the brake
handles back up. (Figure 15).
Wheeled Walker as a Seat
Your wheeled walked is equipped with a
sitting surface and a seat back. Before
sitting, you absolutely must put on the
parking brake. The wheeled walker can
otherwise roll away and you could fall. Do
not use any additional seat cushions; it
could slip and you could fall.
Figure 14
Figure 15
.
Figure 13

AT51111
15
Carrying the Wheeled Walker
If you would like to carry the wheeled walker, over a curb for example,
fold it together. Carry the wheeled walker with both hand grips or by
the frame. Be aware of the risk of entrapment.
Safety Information
Prior to each use, the wheeled walker must be examined for damages
and the brakes must be inspected for proper function.
The wheeled walker is not suitable for use on escalators (risk of
falling!).
The wheeled walker’s material is not flame-retardant.
The maximum operator weight is 136 kg [300 pounds]; the maximum
load capacity of the carrying pouch is 5 kg [11 pounds]. The wheeled
walker cannot be used for the transportation of loads. The carrying
pouch is not suitable for transporting animals.
The wheeled walker can be folded together for space savings. Please
be aware that there is risk of entrapment while folding up and opening.
Do not pull on attached pieces (brakes, wheels, basket, etc.) while
folding or unfolding the wheeled walker, but rather always on the
walker’s frame.
Please be aware that cushion parts that are placed directly in the
sunlight heat up and could cause injury to the skin upon contact.
Therefore, cover these parts or protect the wheeled walker from solar
radiation
7. CLEANING AND DISINFECTION
Cleaning
The frame pieces can be wiped with a damp cloth. For heavy dirt, a
mild cleaning agent can be used.
The wheels can be cleaned with a damp brush with plastic bristles (do
not use wire brushes!)
The seat back, seat and transporting pouch can be washed with a mild
soap.

Instruction Manual
16
Disinfection
The wheeled walker can be disinfected with a common household
disinfectant. Use an approved alcohol based spray disinfectant or wipe
disinfectant. The Robert Koch list of approved disinfectants can be
found at http://www.rki.de.
Allow the wheeled walker to air dry and be aware manufacturer’s
treatment time for the disinfectant.
8. RE-USE
The AT51111 wheeled walker is suitable for re-use. The wheeled
walker is to be initially cleaned and disinfected according the attached
care and hygiene information. During the transfer of the wheeled
walker, think about handing over all necessary technical documents to
the new user for safe handling. The wheeled walker must be inspected
by an authorized specialist and be transferred in proper condition.
9. DISPOSAL
When your wheeled walker will no longer be used and should be
disposed, please contact your specialized dealer. If you would like to
undertake disposal for yourself, ask the local waste management
company for the disposal guidelines of your residence.
Do not use a high pressure or steam cleaner!
Dry the wheeled walker afterwards with a towel or let it air
dry.

AT51111
17
10. TECHNICAL DATA
Size and Weight
Seat width
450 mm
Seat height
540 mm
Total width
653 mm
Total length
706 mm
Total height/
Height of handle (adjustable
at 6 levels)
810 –936 mm
Empty weight
(without accessories)
7,85 kg
Maximum load capacity
136 kg
Maximum load capacity
of mesh pouch
5 kg
Folding size (cm)
706 x 250 x 810 mm (L x B x H)
Wheels (fail-safe)
Steering wheels (front)
250 x 35 mm
Braking wheels,
fixed (rear)
210 x 35 mm
Turn radius
1770 mm
Materials
Frame
Aluminum (corrosion protection)
Seat
Nylon, black
Seat back
Nylon, black
Tire
Polyurethane
Operating Conditions
Temperature
0 - 50 °C
Humidity
20 - 80 %
Storage Conditions
Temperature
-20 bis + 60 °C
Humidity
45 - 60 %

Instruction Manual
18
11. REPAIR AND MAINTENANCE FOR THE
SPECIALIZED SHOP
It is recommended that the AT51111 undergo an inspection by the
specialized dealer at least once a year. For errors or defects, the
AT51111 is to be immediately handed over the the specialized dealer
for repair.
Ask the specialized dealer if a replacement device is available,
if necessary.
Upon request, make necessary information and documents
available to the specialized dealer for repair and maintenance.
GENERAL
COMMENTS
The wheeled walker open and folds up easily.
The wheeled walker goes in a straight line.
Handles are not loose
BRAKES
Tires do not touch during walk
Brakes are easy to engage
The brakes have no play
SEAT
Seat is not loose
WHEELS
No lateral play
No cracks on the surface
Back
Back covering is free of tears
Back fastening is not loose
G = inspected inspected by:
E = replaced R = repair

AT51111
19
12. WARRANTY
Model: . . . . . . . . . . . . . . . . . . . . . . . . . . . . . . . . . . . . . . . . . . . . . . . . . . . . . . . . . . . . . . . .
Serial number: . . . . . . . . . . . . . . . . . . . . . . . . . . . . . . . . . . . . . . . . . . . . . . . . . . . . . . . . . .
Stamp of the point of sale
and legible signature of the Seller: . . . . . . . . . . . . . . . . . . . . . . . . . . . . . . . . . . . . . . . . . . .
1) ANTARGeneral Partnership, 03-068 Warsaw, Zawiślańska Street, No. 43 hereby grants
a 12 month warranty on the wheelchair from the date of the purchase of the product
by the Buyer. For products, the purchase of which was reimbursed by the National
Health Fund, the warranty period is extended and equals to half the period of use,
specified in the Regulation on guaranteed benefits, provided that the period of use
was specified in the Regulation to months or years.
2) During the warranty period, ANTAR Company undertakes to make the necessary
repairs, in order to restore the proper functioning of the system, within 14 days of
receipt ofthe product by the service, along withthe proof of purchase andthe warranty
card.
3) ANTAR reserves the right to replace the product if it considers that the repair costs make
it unviable. Repair or replacement of defective products does not extend the warranty
period.
4) If it is determined that the product functions improperly, it shall be immediately send to
the ANTAR’s address (shown in point 1) or contact the point of purchase.
5) Beforeoperating, please read the instructions and follow them closely. Useof the product
contrary to its purpose and recommendations causes irreversible loss of warranty.
6) The warranty does not cover damages caused by piercing or cutting the product with the
use of a sharp object; damages due to the influence of external mechanical forces;
pressure exceeding the maximum permissible weight of the user, as described in the
manual; contact the product with alcohol, fatty and oily substances or gasoline.
Warranty does not cover parts subject to normal wear during use, such as: tires, soft
fabrics, armrests, bearings, rubber elements and others.
7) The product being sent to the service as part of the complaint cannot cause epidemics.
8) THIS WARRANTY IS VALID ONLY WITH THE PROOF OF PURCHASE (RECEIPT,
BILL, INVOICE). PLEASE ATTACH THE PROOF OF PURCHASE IN CASE OF THE
SUBMISSION OF ANY CLAIM. FOR RECOGNITION OF EXTENDED PERIOD OF
WARRANTLY FOR PRODUCTS, WHICH PURCHASE WAS REIMBURSED BY THE
NATIONAL HEALTH FUND, PLEASE ATTACH THE COPY OF ‘ORDERS FOR
MEDICAL SUPPLIES BEING ORTHOPEDIC ITEMS AND AUXILIARIES’.
9) Claims submitted without the proof of purchase and the warranty card along with the
serial number of the product will not be considered
Manufacturer:
ANTAR Sp. J.
03-068 Warszawa
Ul. Zawiślańska 43
Poland
Tel.: +48 22 518 36 00
Fax: +48 22 518 36 30
www.antar.net
Other manuals for AT51111
2
Table of contents
Other Antar Mobility Aid manuals

Antar
Antar AT51031 User manual

Antar
Antar AT51003 User manual

Antar
Antar AT51013 User manual

Antar
Antar AT51002 User manual

Antar
Antar AT51113 User manual

Antar
Antar AT51112R User manual

Antar
Antar AT51001 User manual

Antar
Antar AT51111 User manual

Antar
Antar AT51040 User manual

Antar
Antar AT51038 User manual
Popular Mobility Aid manuals by other brands

Amylior
Amylior Stella owner's manual

Ki Mobility
Ki Mobility Little Wave "Flip" XP User instruction manual & warranty

ADAPT SOLUTIONS
ADAPT SOLUTIONS SP-CHRG05 installation manual

NRS Healthcare
NRS Healthcare Easylift Home Over-Bed Table User instructions

Core
Core LifeGlider user manual

Gordon Ellis & CO
Gordon Ellis & CO DERBY Instructions for use