Aqara Smart Home Starter Kit User manual

Smart Home Starter Kit
Quick Start Guide
HomeKit Setup Code

Thank you for choosing Aqara Smart Home Starter Kit.
Visit aqara.com for installation videos or follow the quick start guide below.
Aqara Smart Home Starter Kit is a smart home system with the hub as its control
center and it includes a motion sensor, a door and window sensor, a wireless
mini switch, a smart plug and a hub. It enables functions, such as, pushing alert
notifications, turning on the light automatically when motion is detected at night,
and controlling the smart plug remotely with the tap of the wireless switch.
Simply set up automations in the app and more interesting scenes can be
achieved.
Smart Home Starter Kit Quick Start Guide
English
Aqara Hub
It is a bridge that supports Apple HomeKit and a smart home control center.
1
Motion Sensor
It is a sensor that detects human movement with passive infrared.
2
Door and Window Sensor
It is a sensor that monitors the status of doors or windows.
3
Wireless Mini Switch
It is a new type of remote switch with low-power consumption that supports
single press, double press, or long press options.
4
Smart Plug
It schedules appliances to turn on or off and can be controlled remotely.
5
1
3
4
5
2

English
1. Download app
Search for “Aqara Home” in the App Store/Google Play, or scan the QR code
below to download and install Aqara Home app.
* Aqara accessories can also be connected to Mi Home app.
Quick Setup
2. Add Hub
Connect to power supply, wait for 30 seconds until the yellow indicator light
blinks quickly. Make sure your phone is connected to a 2.4GHz Wi-Fi network.
Please open the Aqara Home app, go to “Accessories” page and tap “+” in the
top right corner.
iOS Users: Select “Aqara Hub”. Follow on-screen instructions to scan or
manually enter the HomeKit Setup Code to add the Hub. It will automatically
sync to Apple Home app.
Android Users: Search “Aqara Hub” and follow the instructions to add the Hub.
If it fails to connect, press the button on the Hub for 10 seconds until the yellow
light blinks quickly to reconnect the Hub.
If you still have problems adding the Hub, please go to “Profile” > “Help and
Feedback” in the app, or visit www.aqara.com for help.
3. The kit is set up successfully after the Hub is added.
Once the Hub is succesfully added to the app, other accessories in the same
kit will be added automatically.
* If you are using a dual band router, please disable the 5GHz Wi-Fi network.
1
2
3
4
English
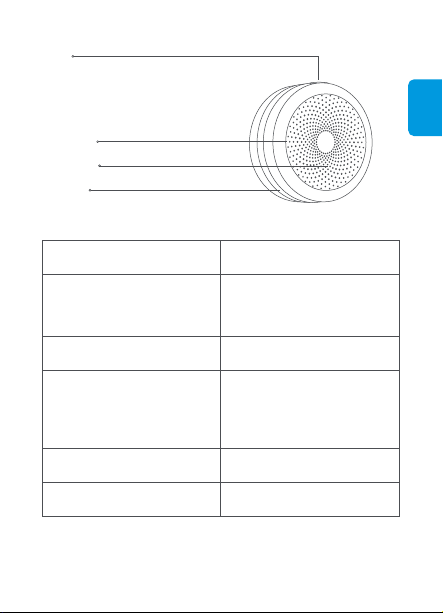
Aqara Hub
Button
Single Press: Turn on/off night light
Triple Press: Add accessories
Long press: Press for 10 seconds to reset the Hub
Light Sensor
Audio Output
Night Light
Indicator Light Status
Yellow light blinks quickly
It appears when you connect the
Hub for the first time or when you
reset the Hub
Status Description
Yellow light blinks slowly Firmware update
Purple light blinks slowly Allow to add accessories
Red light blinks quickly Alarm has been triggered
Blue light blinks quickly
It appears when Wi-Fi is connecting,
the network is disconnected or the
Hub reconnects after the plug is
re-plugged
Indicator Light Description

English
Smart Plug
Push Button
Short Press Once: Turn on/off
Long Press for 5s: Reset
Quick Press 5 Times: Effective Range Test Indicator Light
Power Outlet
Indicator Light Status Status Description
Indicator Light Description
Blue light blinks quickly
Blue light keeps on
Red light blinks slowly
Zigbee network is connecting
Zigbee network works properly
Overload and high temperature alarm
Zigbee network is not connected
Red light blinks quickly
Wireless Mini Switch
Reset Button
Long Press for 3s: Reset
Single Press: Effective Range Test
Push Button
Indicator Light

English
Effective Range Test: Single press the reset button on the accessory at your
desired position. If the Hub makes voice prompts, it indicates that the
accessory can communicate effectively with the Hub.
Option 1: Place it directly in the desired position.
Installation
Option 1: Place the Motion Sensor where you need it.
Effective Range Test: Single press the reset button on the accessory at your
desired position. If the Hub makes voice prompts, it indicates that the
accessory can communicate effectively with the Hub.
Installation
Motion Sensor
Option 2: Remove the protective film, and stick it to the desired position.
Indicator Light/
Fresnel Lens Reset Button
Long Press for 3s: Reset
Single Press: Effective
Range Test

English
Option 2: Remove the protective film (the round sticker is in the box), and stick it
to the desired position.
Option 3: Stick the Motion Sensor to the stand, and stick the stand to where you
need it.
* Keep the surface clean and dry.
The recommended installation height is 4 feet to 6 feet 6 inches(1.2 to 2.1m). If the
installation height is below 1.2 m, the detection area will decrease; if above 2.1 m, the
detection area might have blind spots.
*
7m (23')4.5m (15')
2.1m (6'8")
2m (6'4")
Effective Detection Area — Side View
1 2

English
Effective Detection Area — Top View
170°
Note that the lens should be aligned with the detection area when installing, and placed
or pasted as close as possible to the edge of a table or cabinet.
*
Sensor Unit Magnet
Effective Range Test: Single press the reset button on the accessory at your
desired position. If the Hub makes voice prompts, it indicates that the accessory
can communicate effectively with the Hub.
1. Remove the protective film.
Installation
Door and Window Sensor
Indicator Light
Reset Button
Long Press for 3s: Reset
Single Press: Effective Range Test
Remove the protective film

English
2. During installation, try to align the marker line of the sensor unit and the magnet.
Try to align the marker line
3. Stick to doors or windows (It is recommended to install the sensor unit on the
unmovable surface, the magnet on the movable surface, and make sure the
installation gap is less than 22 mm when doors or windows are closed).
Aqara Hub
Model: ZHWG11LM
Dimensions: 80×80×41.5mm (3.15×3.15×1.63 in.)
Wireless Protocol: Wi-Fi IEEE 802.11 b/g/n 2.4GHz, Zigbee
Input: 100-240 V AC, 50Hz/60Hz
Operating Temperature: -10°C – +40°C (14°F - 104°F)
Operating Humidity: 0 – 95% RH, no condensation
Smart Plug
Model: ZNCZ12LM
Dimensions: 67×47×35mm (2.64×1.85×1.38 in.)
Wireless Protocol: Zigbee
Electrical Rating: 1875 W,15 A,100-125V AC, 60Hz
Operating Temperature: -10°C – +40°C (14°F - 104°F)
Operating Humidity: 0 – 95% RH, no condensation
Specifications
Installation gap less than 22 mm (0.86 in.)

English
Wireless Mini Switch
Model: WXKG11LM
Dimensions: 45×45×12mm (1.77×1.77×0.47 in.)
Wireless Protocol: Zigbee
Battery: CR2032
Operating Temperature: -10°C – +50°C (14°F - 122°F)
Operating Humidity: 0 – 95% RH, no condensation
Motion Sensor
Model: RTCGQ11LM
Dimensions: 30×30×33mm (1.18×1.18×1.30 in.)
Wireless Protocol: Zigbee
Battery: CR2450
Operating Temperature: -10°C – +45°C (14°F - 113°F)
Operating Humidity: 0 – 95% RH, no condensation
Door and Window Sensor
Model: MCCGQ11LM
Dimensions: 41×22×11mm (1.61×0.87×0.43 in.)
Wireless Protocol: Zigbee
Battery: CR1632
Operating Temperature: -10°C – +50°C (14°F - 122°F)
Operating Humidity: 0 – 95% RH, no condensation
Legal Notice
1. Controlling this HomeKit-enabled accessory automatically and away from home
requires a HomePod, an Apple TV with tvOS 11.0 or later, or an iPad with iOS
11.0 or later set up as a home hub.
2. Communication between iPhone, iPad, or iPod touch and the HomeKit-enabled
Aqara Hub is secured by HomeKit technology.
3. Use of the Works with Apple HomeKit badge means that an electronic
accessory has been designed to connect specifically to iPod touch, iPhone, or
iPad, respectively, and has been certified by the developer to meet Apple
performance standards. Apple is not responsible for the operation of this device
or its compliance with safety and regulatory standards.
Notes
* Avoid metal surface to maximize signal strength.
* Keep the surface clean and dry.
Table of contents
Languages:
Other Aqara Home Automation manuals


