manuals.online logo
Brands
  1. Home
  2. •
  3. Brands
  4. •
  5. Argos
  6. •
  7. Indoor Furnishing
  8. •
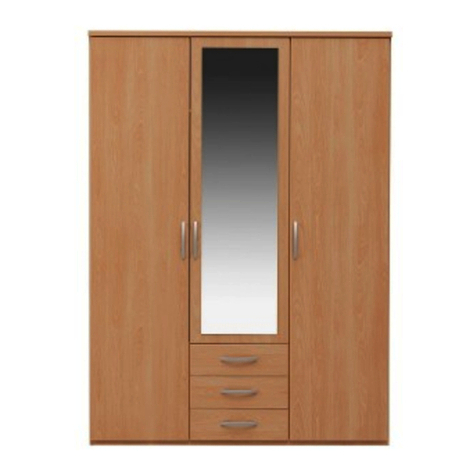
  9. Argos Canterbury 3 DR Robe User manual

Argos Canterbury 3 DR Robe User manual

max.
lbs
kg25
55
lbs
kg20
44
lbs
kg30
66
Canterbury 3 DR ROBE
Assembly Instructions - Please keep for future reference 460/8453
464/4682
457/4501
Dimensions
Width - 152.8cm
Depth - 52.7cm
Height - 189.3cm
71937 Version D Date 14/06/2016
Important – Please read these instructions fully before starting assembly
If you need help or have damaged or missing parts, call the Customer Helpline:
Argos = 0345 6400800
1
Safety and Care Advice
Important – Please read these instructions fully before starting assembly
Note: if required the next
page can be cut out and used
as reference throughout the
assembly. Keep this page with
these instructions for future
reference.
• Check you have all the
components and tools listed on
the following pages.
• Remove all fittings from the
plastic bags and separate them
into their groups.
• Keep children and animals
away from the work area, small
parts could choke if swallowed.
• Make sure you have enough
space to lay out the parts before
starting.
• During assembly, do not stand
or put weight on the product,
this could cause damage.
• Assemble the item as close
to its final position (in the same
room) as possible.
• Assemble on a soft level
surface to avoid damaging the
unit or your floor.
• Parts of the assembly will be
easier with 2 people.
• We do not
recommend the use
of power drivers for
inserting screws, as
this could damage
the unit. Only use hand screw
drivers.
• Only clean using a damp cloth
and mild detergent, do no use
bleach or abrasive cleaners.
• From time to time check that
there are no loose screws on
this unit.
• This product should not be
discarded with household waste.
Take to your local authority
waste disposal centre.
Care and maintenance
• The provided tip-over restraint
must be installed in order to
optimize user safety.
Safety
1
Components - Panels
Please check you have all the panels listed below
2
If you have damaged or missing components, call the
Customer Helpline:
Argos = 0345 6400800
UA Fixed shelf
(47 x 47.9 xcm) x3
D 09786 Back panel
(188.7 x 97.4cm) E 09787 Back panel
(188.7 x 48.9cm)
H 18730 Frame door
A 76431 Front Profile (152 x 4cm) x2
C 76458 Side Profile
(52 x 2.5 xcm) x2
B 76459 Side Profile
F Side panel L/R
U Fixed shelf (95.5 x 47.9cm)
IA Bottom / Top panel (152.8 x 52.4cm) x2
G Divide Panel
(186 x 48 cm)
(52 x 2.5 xcm) x2
(186 x 48cm ) x2
(178.9 x 48.2cm) x3 2
3
Please check you have all the fittings listed below
Note: The quantities below are the correct amount to complete the assembly. In some cases more fittings
may be supplied than are required.
Components - Fittings
Tools required
Ruler - Use this ruler to help correctly identify the screws
Cross head screwdriver
(medium & large) Wooden block
Books X6
Tape measure
Flathead screwdriver
(medium)
Ruler
Eye protection
(when using a
hammer or glue)
01 02 03 04 05 06 07 08 09 0 100 110 120 130 140 150
01 23 45 6
Hammer
Holder x2 Cover x1 Bracket x16
Screw (ø5 x 7mm) x16 Dowel (ø5 x 30mm) x12 Nails x3
Big nail x17 Flat head screw (ø3 x 12mm) x2 Screw (ø4 x 13mm) x2
Connector bolt (ø7 x 50mm) x12 Flat head screw (ø6,3 x 27mm) x20 Screw (ø7 x 8mm) x24
Machine screw (M4 x 7mm) x12 Wedges x4
Hinge plate x12 Floor glider x6
Handle x3 Lock x2 Strap x2
Stop x6 Allen key x1
Hanger x1
2255ppccss
10601 10901 11229
11230 20203 23006
23010 25215 25440
25610 26033 26071
26211 32204
50491 63008
81040 92811 94009
96203 97642
72509
Machine screw (M4 x 23mm) x3
26232
Hinge x12
52291
3
4
Assembly Instructions
Step 1
Step 2
Insert dowles
Insert dowels 20203
into outer holes on the
ends of side panel F
and divide panel G.
Attaching hinge plate
Fixing each hingplate
50491 with screw
2x 26071 .
Insert machine screw
26211 in center of
hinge plate.
Fittings you will need for this step:
Dowel
# 20203 X12
Screw
# 26071 X24 Machine screw
# 26211 X12 Hinge plate
# 50491 X12
G
F
(x2)
G
FF
4
5
Assembly Instructions
Step 3
Step 4
F
G
F
G
Attach holder 10601 with
flat head screw 25215 on
side panel Fand divide
panel G.
Attaching hanger holder
Attach screw 11230 as
shown.
Attach screw 11230 as
shown.
Fittings you will need for this step:
Screw
# 11230 X12
Holder
# 10601 X2 Flat head screw
# 25215 X2 Screw
# 11230 X4
5
B
IA
C x2
Assembly Instructions
6
Step 6
Step 5
B
A
C
x2
Fittings you will need for this step:
Wedges
# 33204 X4
Gathering profiles
Insert wedges 33204
into slots on the angle
ends of side profile C
+ front profile A + side
profile B .
Use a hammer.
Flat head screw
# 26033 X20
Attaching panels
Place bottom panel IA
as shown, insert flat head
screw 26033 .
Top
Bottom
6
Assembly Instructions
Step 8
Step 7
Attaching panels
Insert connector bolt
25610 with ally key
97642 into bottom
panel IA to bottom end
of side panels Fand
divider panel G.
Using books, supporting
side panels and divider
panel.
Insert connector bolt
25610 with allen key
97642 into top panel IA
to top end of side panel
F and divider panel G.
Fittings you will need for this step:
Connector bolt
# 25610 X6
Connector bolt
# 25610 X6
Allen key
# 97642 X1
Allen key
# 97642 X1
IA F
G
IA
F
G
IA
F
F
7
U
F
IA
G
F
UA
UA
UA
IA
Assembly Instructions
Step 9
Step 10
Attaching bracket
Insert bracket 11229
into fixed shelf Uand
UA .
Attaching fixed shelf
Place fixed shelf Uand
UA as picture and slide
down over screw.
Then tighten.
Bracket
# 11229 X16
Fittings you will need for this step:
(x3)
UA
U
8
Assembly Instructions
Step 11
Attaching big nails
By using a hammer place
the big nails 23010 in
center of divider panel
G.
Important:
See warning with
gap between big nail
and divider panel.
Big nail
# 23010 X4
Fittings you will need for this step:
IA
IA
F
UG
UA
F
UA
UA
9
Assembly Instructions
Step 12
25
pcs
Fixing back panel
Slide the back panels D
and Eas shown, so that
they meet in the center of
divider panel G .
Fix the back panels
D+ Ewith big nails
23010 and nail
23006 .
Nail
# 23006 X3 Big nail
# 23010 X13
Fittings you will need for this step:
Important:
The unit MUST be
square when the
back is attached.
IA
E
D
F
D
E
FIA
G
10
Assembly Instructions
Step 14
Step 13
Use a piece of wood
between hammer and
floor glider 63008 .
Attaching floor glider
Fixing to wall
Fix unit to wall with strap
The screw supplied
together with the
anti-topple bracket is
to be used only for
fixing the
anti-topple bracket
to the furniture. In
addition to this you
will need to choose
a screw or fitting
which is suitable for
securing the bracket
to the kind of wall
you have. If you are
unsure about what
type of screw to use
contact your local
hardware store.
Fittings you will need for this step:
Floor glider
# 63008 X6
Strap
# 94009 X2 94009
3 cm
F
D
U
UA
UA
UA
IA
G
IA
F
IA
F
D
E
11
Assembly Instructions
Step 16
Step 15
Insert hanger 72509
Screw
# 25440 X2
Fittings you will need for this step:
Lock
# 92811 X2
FF
G
D
IA
IA
U
UA
DF
FUA
UA
G
Insert lock 92811 with
screw 25440 .
Hanger
# 72509 X1
12
Assembly Instructions
Step 18
Step 17
Insert stop 96203 on
divider panel Gand lock
92811
Attach hinge
Press hinge 52291 into
the large holes on the
door H. Drive the
pre-attached screws into
the holes on the door.
F
IA
D
FG
UA
UA
UA
U
Fittings you will need for this step:
Stop
# 96203 X4
Hinge
# 52291 X12
H
(x3)
13
Assembly Instructions
Step 20
Step 19
Attach door
Slide the pivoting part
of the two hinges over
the hinge plates. Tighten
the screw on the hinge
plate until the door
is supported by the
hinges. The door can be
adjusted in and out by
pulling or pushing the
door then retightening
this screw
To adjust the door hinges
up and down: Loosen
the two large screws on
the hinge plate to adjust
the door up and down,
then retighten.
To adjust the doors left
or right, rotate the small
screw on the hinge in or
out.
Attach door handles
Pass machine screw
26232 through the door
then into the handle
81040 and tighten.
Machine screw
# 26232 X3 Handle
# 81040 X3
IA
F
U
F
G
IA
D
H
H
H
IA
F
U
F
IA
G
H
H
H
D
Fittings you will need for this step:
14
Assembly Instructions
Step 21
Assembly is complete.
If you need help or have damaged or missing parts, call the Customer Helpline:
Argos = 0345 6400800
Attaching cover
Place the cover 10901
in the top and bottom
panel IA to cover holes.
Attach stop 96203 on
fixed shelf U.
Fittings you will need for this step:
Cover
# 10901 X1 Stop
# 96203 X2
x8
IA
F
U
HH
H
15
2.
3.
1.
3.
1.
2.
1.
2.
3.
16

Other manuals for Canterbury 3 DR Robe

2

This manual suits for next models

3

Other Argos Indoor Furnishing manuals

Argos Attalia 617/3742 User manual

Argos

Argos Attalia 617/3742 User manual

Argos Athina 1000 Wall Unit User manual

Argos

Argos Athina 1000 Wall Unit User manual

Argos 609/0131 User manual

Argos

Argos 609/0131 User manual

Argos Alex Headboard 634/1880 User manual

Argos

Argos Alex Headboard 634/1880 User manual

Argos Aruba 614/3868 User manual

Argos

Argos Aruba 614/3868 User manual

Argos Camden 305/0710 User manual

Argos

Argos Camden 305/0710 User manual

Argos New Sywell 427/1237 User manual

Argos

Argos New Sywell 427/1237 User manual

Argos Sywell 643/8047 User manual

Argos

Argos Sywell 643/8047 User manual

Argos REAGAN FAB LH CRN CHAISE SOFABED CHARCOAL... User manual

Argos

Argos REAGAN FAB LH CRN CHAISE SOFABED CHARCOAL... User manual

Argos White Tongue & Groove 2 Drawer Unit User manual

Argos

Argos White Tongue & Groove 2 Drawer Unit User manual

Argos Dutch Glam 846/1108 User manual

Argos

Argos Dutch Glam 846/1108 User manual

Argos 228/7591 User manual

Argos

Argos 228/7591 User manual

Argos 558/8228 User manual

Argos

Argos 558/8228 User manual

Argos 609/2201 User manual

Argos

Argos 609/2201 User manual

Argos Jenson Mirror User manual

Argos

Argos Jenson Mirror User manual

Argos Curve 377/3585 User manual

Argos

Argos Curve 377/3585 User manual

Argos Arizona 461/6366 User manual

Argos

Argos Arizona 461/6366 User manual

Argos Denver 352/9045 User manual

Argos

Argos Denver 352/9045 User manual

Argos 338/8619 D User manual

Argos

Argos 338/8619 D User manual

Argos Malibu 282/2736 User manual

Argos

Argos Malibu 282/2736 User manual

Argos 719/3484 User manual

Argos

Argos 719/3484 User manual

Argos 617/2516 User manual

Argos

Argos 617/2516 User manual

Argos 6172633 User manual

Argos

Argos 6172633 User manual

Argos Rattan 4 User manual

Argos

Argos Rattan 4 User manual

Popular Indoor Furnishing manuals by other brands

EQ3 3020-131 Assembly instructions

EQ3

EQ3 3020-131 Assembly instructions

FLORABEST 103443 Instructions for use

FLORABEST

FLORABEST 103443 Instructions for use

Simpli Home REDMOND 3AXCADM-01 Assembly instructions

Simpli Home

Simpli Home REDMOND 3AXCADM-01 Assembly instructions

HAMPTON BAY FCA60401BM Use and care guide

HAMPTON BAY

HAMPTON BAY FCA60401BM Use and care guide

SouthShore 727 Assembly instructions

SouthShore

SouthShore 727 Assembly instructions

PB TEEN Locker Bed Queen and Full Assembly manual

PB TEEN

PB TEEN Locker Bed Queen and Full Assembly manual

Simpli Home WyndenHall Brooklyn+Max AXCB222-BL USER ASSEMBLY GUIDE

Simpli Home

Simpli Home WyndenHall Brooklyn+Max AXCB222-BL USER ASSEMBLY GUIDE

Homebase CONSOLE TABLE Quick start manual

Homebase

Homebase CONSOLE TABLE Quick start manual

Home Styles 5050-13 manual

Home Styles

Home Styles 5050-13 manual

Closet Maid Indoor Furniture 3571 instruction sheet

Closet Maid

Closet Maid Indoor Furniture 3571 instruction sheet

Twin Star Home SB6839 manual

Twin Star Home

Twin Star Home SB6839 manual

System Build 7014500COM Assembly instructions

System Build

System Build 7014500COM Assembly instructions

HAMPTON BAY CRESTRIDGE FTS61215E Use and care guide

HAMPTON BAY

HAMPTON BAY CRESTRIDGE FTS61215E Use and care guide

PB TEEN Chelsea Assembly

PB TEEN

PB TEEN Chelsea Assembly

System Build 6383337COM manual

System Build

System Build 6383337COM manual

Simpli Home DRAPER AXCDRP41-WH manual

Simpli Home

Simpli Home DRAPER AXCDRP41-WH manual

LOWE'S Smartcore quick guide

LOWE'S

LOWE'S Smartcore quick guide

PB TEEN GIRLS BEDROOM CHAIR Assembly instructions

PB TEEN

PB TEEN GIRLS BEDROOM CHAIR Assembly instructions

manuals.online logo
manuals.online logoBrands
  • About & Mission
  • Contact us
  • Privacy Policy
  • Terms and Conditions

Copyright 2025 Manuals.Online. All Rights Reserved.