ASCOM OFFICE 130PRO User manual

Ascotel Office Terminals by a
Office 130/130pro
Operating instructions


I
Congratulations!
Congratulations on the purchase of your
Ascom Office 130/130pro. This handset
affords you the freedom of movement
you desire. The digital technology of the
Office 130/130pro guarantees excellent
speech quality.
Contents
Operation and display elements..................1
Concept of operation .................................3
Safety Advice..............................................5
Installation and putting into service ............7
Before you telephone for the first time.....10
Telephoning..............................................12
Using the extended-feature functions.......17
Programming your telephone ...................28
Troubleshooting........................................39
Function codes .........................................40
Index ........................................................44
English

II
123
456
789
0
A
B
C
D
E
F
G
H
I
J
K
L
M
N
O
P
Q
R
S
T
U
V
W
X
Y
Z
M
C
13
12
3
11
10
987
55
6
4
3
2
1

III 20317845en_ba_a0
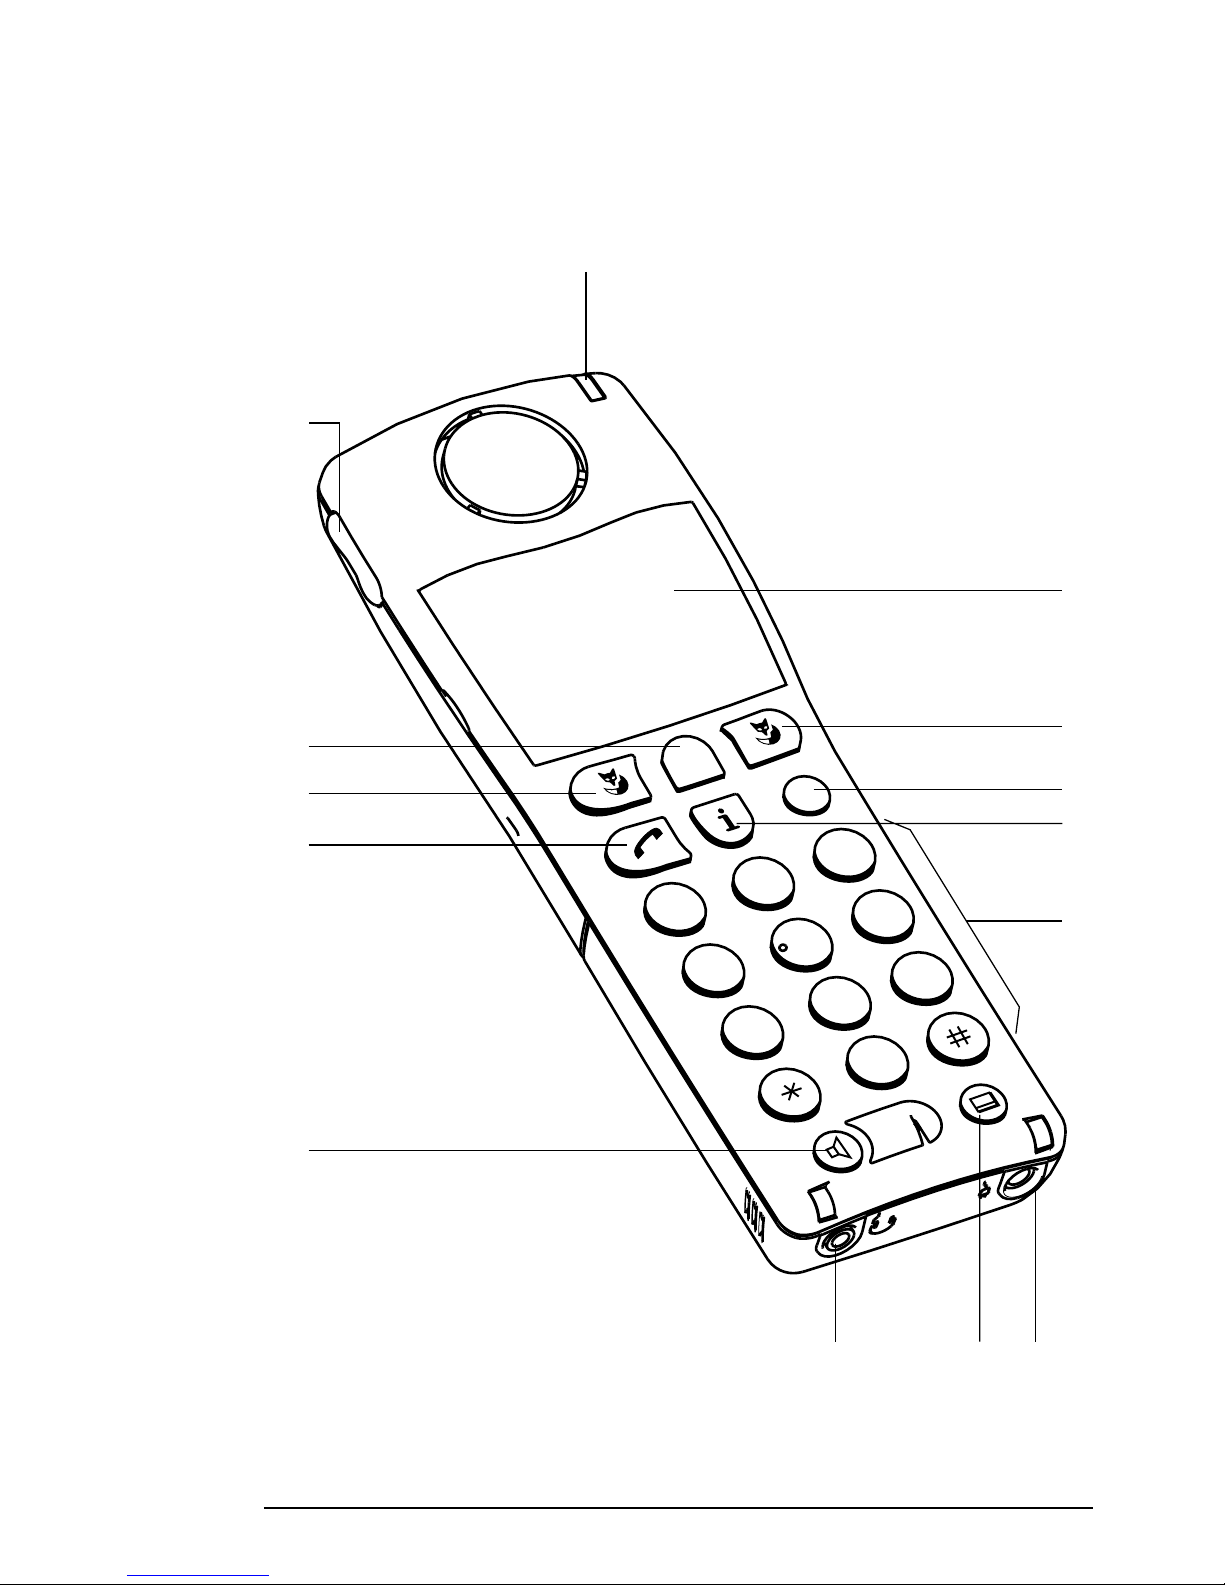
1 LED
Visual display during call, incoming message and in handsfree / open listening
mode.
2 Display
The backlit display consists of 3 lines of text, each with 15 symbols/characters.
The first line consists only of symbols, the two others consist of information or
menu options.
3 Foxkeys
The current function is indicated in the bottom display line.
4 C/End key (delete / correct or disconnect key)
Delete / correct or disconnect key (clear). Return to previous menu option or to the
idle state. Seizure for dialling anew.
5 i-key (information key)
Pressed to obtain further information (active i-symbol).
6 Keypad with 0 to 9 (A to Z), * and #
Used for entering characters, selecting extended-feature functions utilising */#
procedures.
Input of names and/or texts in alpha mode. The keypad is backlit1).
7 Hotkey
Freely-programmable key for up to 6 numbers/names or functions.
8 Charge socket1)
For direct-charging the inserted batteries with the appropriate plug-in power
supply2).
9 Headset socket1)
For connecting a headset2) to the handset.
10 Loudspeaker key
Switches the loudspeaker respectively the handsfree mode on/off.
11 Call key
Has the same effect as lifting or replacing the handset of a corded terminal.
Also used for switching on the handset.
12 M-key (menu key)
This key is used to search for a menu option you desire. It operates cyclically, i.e.
each depression of the menu key will scroll you through the menu options.
13 Volume adjustment keys
Adjust the volume during conversation in handset or in handsfree / open listening
mode.
1) Office 130pro only
2) Optional accessory
Operation and display elements
Specifications subject to change without notice.
The usable services and features depend on the installed software release.


20317845en_ba_a0 1
English
Operation and display elements
Special display symbols
Charge state of batteries
Battery icon full:Charge is ok, handset is ready
for operation.
Battery icon 3/4 /1/2: Batteries are almost charged /
half charged
Battery icon 1/4,
slowly blinking: Charge is low (warning)
Battery icon empty,
slowly blinking + warning tone: Charge is very low
Fast-blinking battery icon:Batteries are being charged
Antenna symbol
Not displayed: Outside of radio coverage range
Continuous display: Ready for incoming and outgoing calls.
Quality of the radio connection (only on idle display)
HVery good connection quality
GGood connection quality
FTelephone calls possible, interference probable
ETelephone calls possible only in part, severely restricted
INo telephone calls possible
You can also obtain the connection quality reading using "Long
Click 4". The number of the relevant radio unit is displayed at the
same time.
Continuous display: Handset is registered and ready for
operation in system A (B, C, or D).
Blinking: Handset is not ready for operation.
Blinking: Handset is not registered in any system.
Continuous display: Alpha dial feature is activated
Supplementary information (accessed by pressing i-key)
A function stored under the Hotkey/Foxkey is active.
a
b/c
d
e
m
A(B,C,D)
ABCD
ABC
i
j

220317845en_ba_a0
Operation and display elements
Further menus (trigger with M-key)
Microphone on/off
Programming mode
Handsfree or open listening active
Continuous display: Connection made
Blinking: Visual signal indicating a call
Trembler on
LED signalling
In addition to acoustic signalling, Office 130 also features visual signalling via a light emit-
ting diode (LED). There are three different ways of signalling, each indicating a particular
operating state:
– Slowly blinking: During a call or receipt of a message
– Fast blinking: Re-entry into radio range within 20 seconds of disconnection
– Interval blinking: Handsfree or open listening is active
Other symbols on the information or menu line:
Scrolling forwards through a list (the digit shows the entry’s number)
Call for user group (internal subscriber group)
Diverted call
Function is active
M
o/n
P
l
h
v
12¥
S
U
|

20317845en_ba_a0 3
English
Concept of operation
You can program your new handset to meet your own requirements. Besides mobility, it
offers you every telephony function you could wish for. The menu technique and the
clever Foxkeys see to that. To make full use of the extended-feature functions, please refer
to the chapter "How to program your telephone" and the special programming instruc-
tions. Note: The number of characters used for individual menu items depends on the
software and the PBX type (applies to all the operating instructions).
General rules of operation
There are two types of menus:
– Everyday operating menus for telephony functions.
– Programming menus for setting your telephone to meet your requirements.
Display in idle state In the idle state the display features a number of symbols, the qual-
ity indicator, the date and time as well as a personal standby text
(e.g. name, department, tel. no., etc.). (The display immediately
switches to "Discreet" or to "Enqui" "Micro" if a call comes in or
during a call.)
—> —> —> Press the M-key (briefly once or several times) to proceed to the
menu option you desire.
————————> A "Long click" of the M-key (at least 2 seconds) takes you to the
programming mode.
————————> A "Long click" of the Foxkey under "¥" changes the search direc-
tion to "ß".
Idle state
Call up the desired menu using the M-key
Press M-key once
Press M-key a second time
Press M-key a third time
Press M-key a fourth time
Press M-key a fifth time
1) Office 130pro only
M
M
M
M
M
10.Apr 11:55
10.Apr 11:55
ABC Redial
10.Apr 11:55
Div. Discr
10.Apr 11:55
Pick_up Page
10.Apr 11:55
Msg. Announ
10.Apr 11:55
Programming

420317845en_ba_a0
0
2
6
1
M
C
5
8
9
4
Concept of operation
Entering names or texts in alpha mode
There are letters and symbols on the * key, the # key and the numeric keys to allow you
to enter names or texts in alpha mode. After selecting a particular menu item (e.g. storing
names in the private file) the system automatically returns to alpha mode.
Key Symbol
1-.?1
2ABC2
3DEF3
4GHI4
5JKL5
6MNO6
7PQRS7
8TUV8
9WXYZ9
0+0
**/()
# SPACE #
Examples: 1x key 3 = D, 2x key 3 = E, 3x key 2 = C, 1x key 8 = T
4x key 8 = 8, 1x key 0 = +, 1x key # creates a blank space
"Long click" functions
A "long click" is a click on a key which you keep pressed for at least 2 seconds. This
makes it possible to directly skip to certain menus, show information on the display or
immediately carry out certain functions.
"Long click" Function Page
Handset off 35
Set PBX system 11
Display IPEI and PARK 11
Connection quality 1
SW version number 11
Charge state 9
Key lock (variant 1) 31
Key lock (variant 2) 31
Tone dialling (DTMF) on 22
#Set display contrast 10
Programming mode 3, 23
Return to the previous menu 30
Trembler on 38
Hotkey programming 32, 33
Programming of Foxkeys 34
Change search direction 3

20317845en_ba_a0 5
English
Safety advice
Read this operating instructions booklet carefully and keep it in a safe place. Please make
a thorough study of the safety advice presented here. Not following these guidelines may
be hazardous and may violate existing laws.
Medical devices
Your telephone should not be used near pacemakers, hearing aids or other per-
sonal medical devices of this type.
Availability of service
The base network is not always available. Do not depend on a mobile phone as
your only means of communication in critical situations.
Ambient conditions
Only use your telephone in a temperature range from +5°C to approx. +40°C.
Avoid exposing it to direct sunlight and other heat sources.
Protect your telephone from moisture, excessive dust, aggressive liquids and
vapours.
Do not place your telephone near electromagnetic fields (electrical motors,
household appliances). The voice quality could be reduced. Avoid positioning it
close to computers, radios, TVs, video players and phones, in order to avoid
noise during a call .
Do not use your telephone in areas where there is a risk of explosions.
Do not use your telephone in areas where blasting work is going on. Observe the
restrictions and follow the pertinent regulations.
Maintenance and repairs
Use original accessories only. Call on an expert to do installation and repairs.
Never touch the recharging contacts with optioned, metallic and/or greasy ob-
jects.
Clean your telephone with a soft, slightly moist or antistatic cloth. Do not use
cleaning solvents or other chemical substances.

620317845en_ba_a0
Safety advice
Important information
There is a constant code exchange between radio base and handset to ensure that no one
with another handset can telephone at your expense. If the codes do not match, the call
is disconnected or no connection is established.
Locking the keypad
Your handset can be locked to prevent the accidental activation of keys. You can still re-
ceive calls using the Call key. The keypad must be unlocked before outgoing calls can be
made.
Changing the code/password
When the handset is turned on for the first time, the code/password is "0000". We rec-
ommend that you immediately programme a personal code consisting of 2 to 10 digits so
the personal settings of your handset and the data stored in it are protected from unau-
thorized use.
Batteries
The handset is supplied with two rechargeable batteries.
• Using other types of batteries or non-rechargeable batteries/primary cells may be
hazardous and could cause your phone to malfunction or be damaged.
• Always insert the batteries in the correct position!
• Do not immerse batteries in water or throw into a fire.
• For the charging base and for direct charging1) use only the plug-in power supply
provided with the telephone.
• The batteries must be charged for at least 9 hours without interruption before being
used for the first time.
Notes
• Batteries may become warm during charging; this is normal and perfectly safe.
• It takes several days for batteries to reach their full capacity and thus the full standby
and calling time.
After a prolonged period of non-use as a result of a power shutoff (e.g. while you are on
holiday), the handset (i.e. the batteries) should be recharged prior to being used again.
Please dispose of defective batteries correctly (they are not household refuse).
1) Office 130pro only

20317845en_ba_a0 7
English
Bedienungsanleitung
Mode d'emploi
Istruzioni per l'uso
Operating instructions
123
456
789
0
A
B
C
D
E
F
G
H
I
J
K
L
M
N
O
P
Q
R
S
T
U
V
W
X
Y
Z
M
C
Installation and putting into service
Contents of package, handset
The following items are included with your telephone in the package:
• Handset
• Clip
• 2 batteries
• Operating instructions booklet
Contents of package, charging base
• Plug-in power supply
for charging base
• Charging base
Connecting the plug-in power supply
Feed the cord through the channel, placing it under the tabs so that it cannot be pulled
out. The cord can be routed through any one of the four outlet positions shown.
Connecting the headset and the plug-in power supply for direct charge1)
On the inside of the clip there are cable retention tabs to prevent the headset cable from
being pulled out.
1) Optional accessory; for connection to Office 130pro only

820317845en_ba_a0
Installation and putting into service
Optional accessories
• Headset1)
• Leather case
• Replacement clip
• Spare batteries
• Plug-in power supply for direct charge1)
1) For connection to Office 130pro only

20317845en_ba_a0 9
English
Installation and putting into service
Installation and charging of battery packs in handset
Installing the batteries
1. Remove the battery compartment cover of the handset by applying light pressure
to the lateral ribs and then pulling it downward.
2. Insert the two batteries in the compartment as indicated in the figure. Make sure
the poles are placed as shown in the compartment.
3. Slide the cover to the handset battery compartment over the batteries until it snaps
audibly into place.
Warning
When inserting the batteries be sure to maintain correct polarity as shown. Incorrect inser-
tion of the batteries may damage your handset.
Charging the batteries
The batteries are delivered uncharged. To charge them, place the handset in the charging
base.
For direct charging (charging the batteries without the charging base) connect the plug-in
power supply directly to the handset1).
One battery charge lasts for approx. 120 hours of standby or
for approx. 12 hours of talk time
Charging takes approx. 1 hour for 1 day in use
approx. 4 hours for a full charge
Note
Press "Long click 6" to show the charge state. After a change of batteries, reliable
information on the charge state is only available after 10–15 minutes charge time.
1) Office 130pro only

10 20317845en_ba_a0
Before you telephone for the first time
Setting the display language
The language spoken in the area is usually preset in your handset. If you prefer another
one, you can select among several different languages.
Press the M-key repeatedly in programming
mode1) until, "*Language" appears. (look for the
"*" symbol with a foreign language). Press the
Foxkey under "*Language". By pressing the
Foxkey under "¥" select the desired language.
Confirm the selected language by pressing the
Foxkey under "Ok". Press the C/End key to re-
turn to the standby display.
Setting the display contrast
For improved legibility of the display under various light conditions, you can change the
display contrast.
"Long click” the # key to skip to the menu item
”Contrast”.
Press the Foxkey under "¥" repeatedly until the
desired contrast is obtained
Press the Foxkey under "OK" to confirm the
contrast setting.
Register the PBX system
You can register your handset for as many as 4 different PBX systems (A, B, C, D). So, you
can be reached on your handset even while you are at a branch of your company.
Press the M-key repeatedly in programming
mode1) until "System" appears. Then press
Foxkey under "System". "Auto" or the current
system (A, B, C, or D) will appear in the display.
Press the M-key. If "Register: A" and "Delete"
appear, the handset is registered with PBX system
"A" (this registration could be canceled by press-
ing the Foxkey under "Delete").
Using the Foxkey under "¥", the handset can be
registered with another three PBX systems (B, C
or D). The display then changes to "Register: B (C
or D)" and "New". Pressing the Foxkey under
"New" and "Home" causes the handset to be
registered in system "B" (provided this is allowed
and the system is available).
1) See section Programming mode, page 23
System
*Lang ¥
M
Ok
C
M
¥
New Home
Delete
M
¥
OK
#

20317845en_ba_a0 11
English
Before you telephone for the first time
The handset can also be registered with a PBX
system from a different manufacturer by using
GAP (Generic Access Profile) and the required
"Authentication code.
Press the Foxkey under "New" and "GAP".
When "AC: _____" appears, enter the authenti-
cation code and acknowledge by pressing the
Foxkey under "Ok".
GAP log-on, compatibility with other DECT products
Ascotel DECT supports all the basic telephony features as defined in the Generic Access
Profile (GAP) standard (end 1997 version). They include setting up and clearing down out-
going and incoming calls, inquiry call, DTMF and */# procedures. In other words:
• You can log on and use your DECT system terminal on a third-party PBX. The only re-
quirement to be able to use all the basic features defined in the GAP standard is that
they are fully implemented on the relevant PBX.
• Third-party DECT handsets that comply with the GAP standard can also be logged on
to and used on your system. However, they will provide only the functionality limited
by the GAP standard and not the same quality of radio connection. In particular the
software for Mobility Management with handover/roaming is virtually fully dependent
on the handset used and cannot be adapted 100% to your system.
Setting the PBX system
Press the M-key repeatedly in programming
mode1) until "System" appears. Then press
Foxkey under "System". "Auto" or the current
system (A, B, C, or D) will appear in the display.
Select the desired system or „Auto“ with the
Foxkey under "¥" and confirm by pressing "Ok".
(If more than one system is available, and "Auto"
is selected the handset automatically establishes
a connection with the system that offers the best
radio connection.)
Notes
• With "Long Click 1" (min. 2 seconds) you can switch your handset over to the next
available PBX system (A, B, C or D). Provided the switchover is not set on "Auto",
manual switchover of the PBX system is compulsory to ensure that your handset is
ready to operate in the new PBX system.
• "Long Click 2" is used to display the International Portable Equipment Identity (IPEI)
and PARK (Portable Access Right Key).
• "Long Click 5" displays the software version number of the handset along with the
date.
¥Ok
M
System
Ok
New GAP
0
7 98
4 65
1 32
1) See section Programming mode, page 23

12 20317845en_ba_a0
Telephoning
Answering an incoming call
An incoming call is signalled on the handset.
If the handset is not in the charging base, simply
press the Call key to answer the call.
Or
The handset is in the charging base. The call can
be answered directly by lifting the handset (see
"How to program your telephone", "Direct sei-
zure").
Note
The call can also be answered by activating the handsfree mode (see "Handsfree mode").
Pick up a call
Under "Pick_up" the system offers you "Sub" (Subscriber), "Bell" (Central bell with
coded ringing) and "Page" (paging system).
To answer for instance a call directed to a terminal of a absent subscriber, press the M-key
repeatedly until "Pick_up" appears, press the Foxkey at this position and enter the sub-
scriber number of the called terminal.
During the call
During a call, you can use the M-key to execute other functions, for example, initiating an
enquiry call, muting the microphone ("Mic mute"), switching the volume on the receiver
from "Quiet" to "Loud" (or vice versa)
Press the M-key once or twice in order to execute
other functions.
Ending a call
A call is ended by pressing the Call key, the C/End key or by returning the handset to the
charging base. Of course, the party you are talking to can also end the call. The handset
returns to idle state shortly afterwards.
Adjusting the receiver volume during a call
The volume can be set to ”loud” ”medium” or ”quiet” via the volume adjustment keys
on the side of the handset or via the menu.
Press the M-key repeatedly until "Loud" appears.
Press the Foxkey under "Loud" or ”Quiet” once
or several times.
Note
The new setting is retained until changed back.
Qu et Loud
M
M

20317845en_ba_a0 13
English
Telephoning
Handsfree mode
Handsfree mode allows you to make a call without having to hold the handset (e.g. while
it is in the charging base). Furthermore, several people can take part in a call.
Before call setup or during a call, press the Loudspeaker key and
adjust the volume as desired.
Note
• You can answer a call directly by activating handsfree mode:
– The handset is in the charging base: press the Loudspeaker key or the Call key.
– The handset is not in the charging base: press the Loudspeaker key.
• In the case of long-distance calls or in a noisy environment, the quality obtained in
handsfree mode may not be optimal. If this is the case, continue the call in ”normal
mode”:
– The handset is in the charging base: as soon as it is removed, the handset auto-
matically changes to ”normal mode”.
– The handset is not in the charging base: press the Loudspeaker key to quit
handsfree operation without ending your call.
• In handsfree mode the call is not terminated when the handset is placed in the charg-
ing base.
• If handsfree mode is active and the handset is in the charging base, to end a call press
the Loudspeaker key or the Call key.
Open listening
In the open listening mode, information services (e.g. currency exchange rates) can be
called up and listened to at the same time by several people in the room. In this way, par-
ticularly in a noisy environment, reduction of the loudspeaker volume is avoided. (Note:
open listening corresponds to handsfree operation with the microphone switched off.
Open listening can only be activated via handsfree mode.)
Press the Loudspeaker key to activate open listening.
Press the Foxkey under ”Microphone” to activate open listening
and adjust the volume as desired.
Note
To reactivate handsfree mode, press the Foxkey under ”Microphone” again.
M kro

14 20317845en_ba_a0
Telephoning
Dialling with dialling preparation
Dialling preparation reduces the chance of misdialling.
Without pressing the Call key or the Loudspeaker key beforehand, enter the desired
number, check it and make any corrections using the C-key. Then press the Call key or the
Loudspeaker key. It is only at this point that the number is dialed.
Dialling using digits
This is just like traditional dialling, but dialling is not commenced until you press the Call
key or the Loudspeaker key.
Enter digits and press the Call key or the
Loudspeaker key.
Dialling using repeat dialling function (redial)
The numbers and the names of up to the last 10 subscribers called are stored in the "Last
Number Redial" memory.
Press the M-key.
Press the Foxkey under "Redial". The display
shows the number and possibly the name of the
last subscriber called.
Press Foxkey under "¥" until the number of the
desired subscriber appears. Press the Call key or
the Loudspeaker key.
Note
The i-symbol refers to additional information, which you can call up by pressing this key.
Dialling using the Hotkey
You can store up to 6 names/numbers of frequently called subscribers in the Hotkey
memory.
Press the Hotkey repeatedly until the desired
name is displayed.
Press the Foxkey under the desired name and
then press the Call key or the Loudspeaker key.
Redial
M
0
7 98
4 65
1 32
or
¥
or
Meier
or
This manual suits for next models
2
Table of contents
Other ASCOM Handset manuals

ASCOM
ASCOM d81 Messenger User manual

ASCOM
ASCOM d41 DECT User manual

ASCOM
ASCOM d81 Messenger User manual

ASCOM
ASCOM I75 Instruction sheet

ASCOM
ASCOM d41 DECT Instruction sheet

ASCOM
ASCOM d43 User manual

ASCOM
ASCOM I62 - User manual

ASCOM
ASCOM Ascotel Office 100 User manual

ASCOM
ASCOM d41 DECT User manual

ASCOM
ASCOM d83 User manual

ASCOM
ASCOM d81 Messenger Installation instructions

ASCOM
ASCOM d81 Messenger User manual

ASCOM
ASCOM I75 User manual

ASCOM
ASCOM d63 User manual

ASCOM
ASCOM I62 - User manual

ASCOM
ASCOM I62 - User manual

ASCOM
ASCOM d63 User manual

ASCOM
ASCOM d62 Talker User manual

ASCOM
ASCOM d62 Talker User manual

ASCOM
ASCOM d62 Talker User manual