manuals.online logo
Brands
  1. Home
  2. •
  3. Brands
  4. •
  5. Assa Abloy
  6. •
  7. Control Unit
  8. •
  9. Assa Abloy Securitron B100 User manual

Assa Abloy Securitron B100 User manual

Other Assa Abloy Control Unit manuals

Assa Abloy TRAKA UD0011 User manual

Assa Abloy

Assa Abloy TRAKA UD0011 User manual

Assa Abloy Norton ADAEZ User manual

Assa Abloy

Assa Abloy Norton ADAEZ User manual

Assa Abloy Securitron NL4 User manual

Assa Abloy

Assa Abloy Securitron NL4 User manual

Assa Abloy EffEff 1340-20 User manual

Assa Abloy

Assa Abloy EffEff 1340-20 User manual

Assa Abloy EffEff 1338-14 User manual

Assa Abloy

Assa Abloy EffEff 1338-14 User manual

Assa Abloy Incedo InControl 3270 User manual

Assa Abloy

Assa Abloy Incedo InControl 3270 User manual

Assa Abloy effeff 720-40 Quick start guide

Assa Abloy

Assa Abloy effeff 720-40 Quick start guide

Assa Abloy LCU9101 User manual

Assa Abloy

Assa Abloy LCU9101 User manual

Assa Abloy Medeco XT AIM Operation manual

Assa Abloy

Assa Abloy Medeco XT AIM Operation manual

Assa Abloy OneSystem Service Module User manual

Assa Abloy

Assa Abloy OneSystem Service Module User manual

Assa Abloy HES iCLASS IC0020 Owner's manual

Assa Abloy

Assa Abloy HES iCLASS IC0020 Owner's manual

Assa Abloy LCU9101IV User manual

Assa Abloy

Assa Abloy LCU9101IV User manual

Assa Abloy OneSystem N5952 User manual

Assa Abloy

Assa Abloy OneSystem N5952 User manual

Assa Abloy Effeff ePED 1386CMC User manual

Assa Abloy

Assa Abloy Effeff ePED 1386CMC User manual

Popular Control Unit manuals by other brands

Festo Compact Performance CP-FB6-E Brief description

Festo

Festo Compact Performance CP-FB6-E Brief description

Elo TouchSystems DMS-SA19P-EXTME Quick installation guide

Elo TouchSystems

Elo TouchSystems DMS-SA19P-EXTME Quick installation guide

JS Automation MPC3034A user manual

JS Automation

JS Automation MPC3034A user manual

JAUDT SW GII 6406 Series Translation of the original operating instructions

JAUDT

JAUDT SW GII 6406 Series Translation of the original operating instructions

Spektrum Air Module System manual

Spektrum

Spektrum Air Module System manual

BOC Edwards Q Series instruction manual

BOC Edwards

BOC Edwards Q Series instruction manual

KHADAS BT Magic quick start

KHADAS

KHADAS BT Magic quick start

Etherma eNEXHO-IL Assembly and operating instructions

Etherma

Etherma eNEXHO-IL Assembly and operating instructions

PMFoundations Attenuverter Assembly guide

PMFoundations

PMFoundations Attenuverter Assembly guide

GEA VARIVENT Operating	 instruction

GEA

GEA VARIVENT Operating instruction

Walther Systemtechnik VMS-05 Assembly instructions

Walther Systemtechnik

Walther Systemtechnik VMS-05 Assembly instructions

Altronix LINQ8PD Installation and programming manual

Altronix

Altronix LINQ8PD Installation and programming manual

Eaton Powerware Series user guide

Eaton

Eaton Powerware Series user guide

WAGO 750-407/040-000 manual

WAGO

WAGO 750-407/040-000 manual

Sony CCU-590 Operation manual

Sony

Sony CCU-590 Operation manual

Graco 25D614 instructions

Graco

Graco 25D614 instructions

Task Force Tips YE-RF-900 Instructions for installation, safe operation and maintenance

Task Force Tips

Task Force Tips YE-RF-900 Instructions for installation, safe operation and maintenance

Shini SPV-U Series manual

Shini

Shini SPV-U Series manual

manuals.online logo
manuals.online logoBrands
  • About & Mission
  • Contact us
  • Privacy Policy
  • Terms and Conditions

Copyright 2025 Manuals.Online. All Rights Reserved.

Securitron®B100
Secondary Voltage Module
Quick Start Guide
Specifications and more details
found in the full manual here.
(Downloadable pdf)
Overview
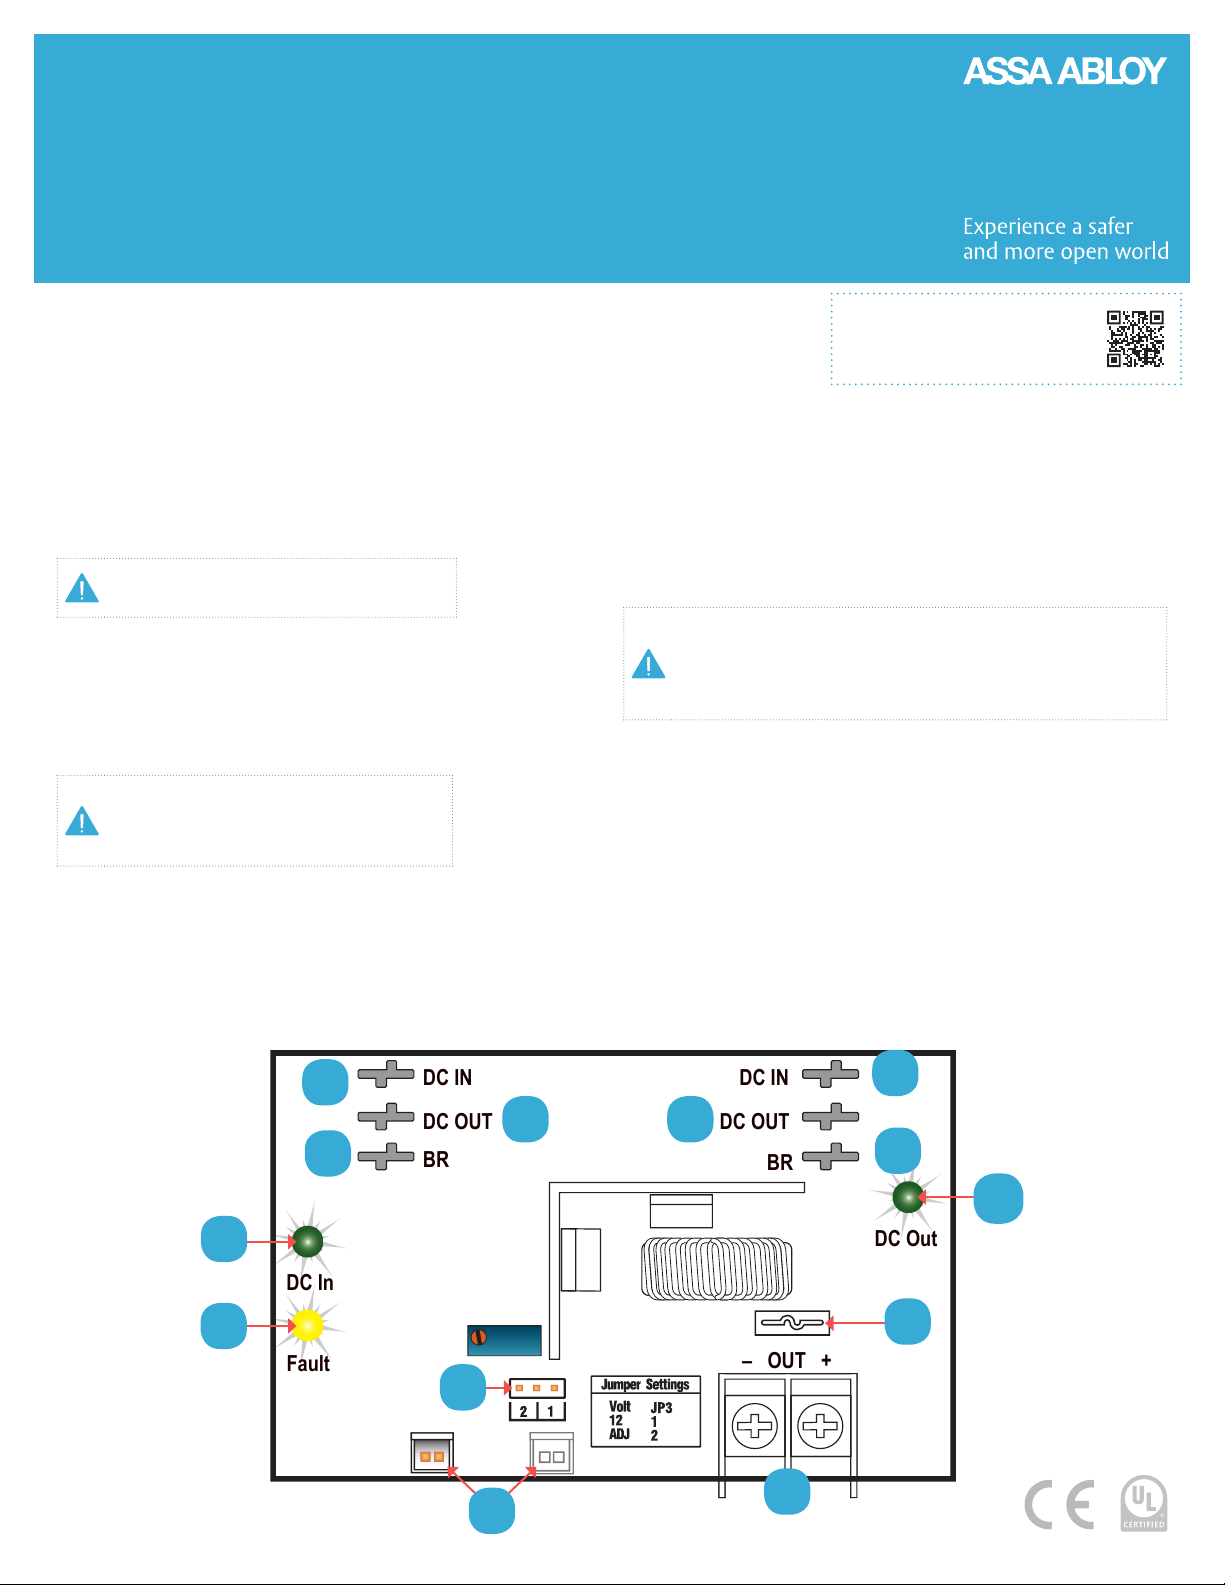
1 DC IN Connectors (J1 & J4) – These fastons are the input to the Securitron
B100. Either faston may be used as the input. Two connections are
provided to allow this voltage to pass through to other accessory boards
in the system. This input voltage must always be at least 3 volts above the
output voltage setting for the Securitron B100 to maintain its output.
2 DC OUT Connectors (J2 & J5) – These fastons are the output
of the Securitron B100 for connection to other accessories in
the system. This output may be considered as an equivalent
to the main output of an Securitron AQL power supply. Either
or both DC OUT fastons may be used in the system.
Ensure there are no other voltage sources
connected to the buss before powering
the system or damage WILL occur.
3 BR Connectors (J3 & J6) – The DC Common buss in the
system. All boards in the system must have their BR
fastons wired together for proper operation.
4 DC IN LED (D1) (BLUE/GREEN) –This LED indicates the availability
of voltage on the DC IN Buss. When voltage is available on the
buss, the LED is lit. This LED is bi-color and indicates the input
voltage as follows: GREEN – 12 V Input | BLUE – 24 V Input
NOTE LED colors are range based. Voltage Less
than 13 V will show Green. Voltage above 20V
will show Blue. Voltage between 13 and 20 may
show either voltage or a combination Green &
Blue. Always verify voltage with a voltmeter
5 FAULT LED (D7) (YELLOW) – This LED lights when the
Securitron B100 detects a fault condition. This fault condition
also transmits to the Securitron AQL power supply. Fault
conditions detected include ruptured output fuse, no output,
output overload, or output voltage out of regulation.
6 FlexIO Connectors (JP1 & JP2) – These connectors allow the fault status of
the Securitron B100 to be transmitted to the Securitron AQL power supply
and pass the FlexIO buss on to other accessory boards in the system.
7 Output Voltage Selection (JP3 & VR1) – This jumper selects the
output voltage for the Securitron B100 and the potentiometer
sets the output voltage when in the adjustable range. In
adjustable range, voltage may be set from 5 to 18 VDC.
Possible jumper settings are as follows:
• 12 V Out JP3 Position 1
• Adjustable Output JP3 Position 2
The VR1 potentiometer will have no effect unless
the jumper is set for the adjustable range
NOTE that the input must be at least 3 V above the output voltage
setting or the Securitron B100 will display a fault condition. It may be
helpful to temporarily set the input power supply to 24 V (Remove load
devices first) before setting the Securitron B100 output voltage.
8 DC Output – This is the output terminal strip. This terminal strip is
nonremovable and accepts wire sizes from AWG 12 – AWG 22. The
terminals are labeled on the PC board by the terminal strip.
9 Output Fuse (F1) – This fuse protects the DC Output
terminals. It does not protect the DC OUT faston.
10 DC OUT LED (D4) (GREEN) – This LED indicates the availability of voltage
on the DC OUT Buss. When voltage is available on the buss, the LED is lit.
DC IN
DC OUT
BR
DC IN
BR
DC OUT
– OUT +
Fault
DC In
DC Out
11
2 2
33
8
5
4
10
9
6
7
techsupport.esh@assaabloy.com | assaabloyesh.com
800 626 7590 | 10027 S. 51st Street Phoenix, AZ 85044 USA
Patent pending and/or patent www.assaabloydss.com/patents
Copyright © 2020, Hanchett Entry Systems, Inc., an ASSA ABLOY Group company.
All rights reserved. Reproduction in whole or in part without the express written
permission of Hanchett Entry Systems, Inc. is prohibited. M001-013_1
Connecting the
Securitron B100
DC IN
DC OUT
BR
DC OUT
BR
DC IN
– OUT +
FlexIO continues to other accessories
BR continues to other accessories
BR in from System
FlexIO
in from System DC OUT terminals to
device to be powered
Required Connections
Optional Connections
DC Input from System
(Typically the main output
of the power supply)
Securitron B100’s output to other
accessories (typically to B2 Buss – ensure
no other voltage sources on this buss)
Input voltage continues to other
accessories (typically to B1 Buss – ensure
no other voltage sources on this buss)
Remove all AC and battery power from
the Securitron AQL system before adding
or replacing a Securitron B100 board.
Observe polarity of the DCIN
and BR Connections or damage
to the system could occur.
The DC In, DC Out, and BR
terminals run through the board
for daisy chaining and each
terminal set is interchangeable
from a functional standpoint.
Either DC IN may be used, either
DC Out may be used or either BR
may be used interchangeably.
Specifications
Certifications
• UL 294 Listed
• UL 603 Listed
• UL 1076 Listed
• ULC-S318 Listed
• ULC-S319 Listed
• CSA C22.2 #107.1
• CSA 22.2 #60950
• RoHS Compliant
• CSFM Approved
• FCC Part 15, Subpart B
Electrical
• Input Voltage (from
AQL power supply):
12 or 24 VDC
• Output Voltage* (jumper
select): 12 VDC or 5-18
VDC (user adjustable)
• Output Current (Class 2
power limited): 4 Amps
• 91% efficiency
• Output Ripple
(12 V at 4 A): 82 mVp-p
• Line Regulation
(12 V at 4 A): < ± .1%
• Load Regulation: ± .56%
*Input voltage must be a
minimum of 3 V higher
than output voltage
Shipping Weight
• .5 lbs
Dimensions
• 4" x 2.5" x 1.5"
[101.6mm x 63.5mm
x 38.1mm]