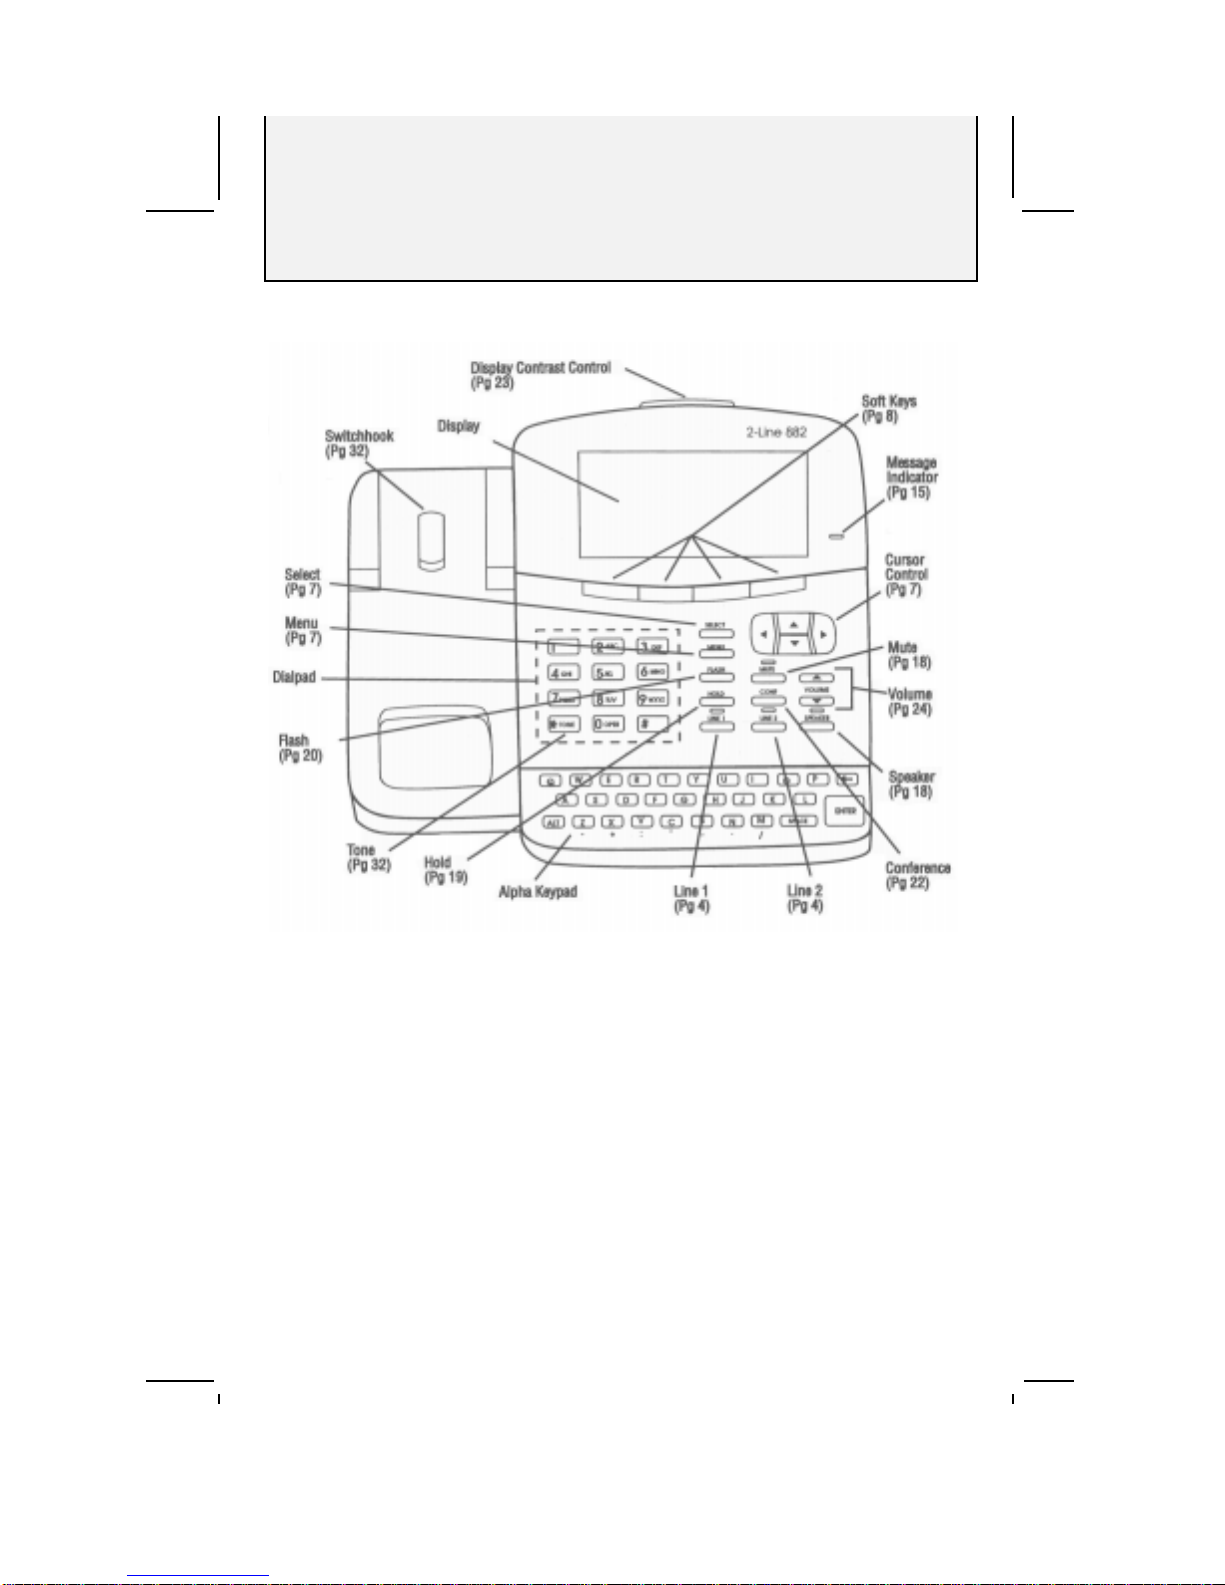
AT&T 882 User manual

Table of Contents
AT&T 882 Manual
2-Line Speakerphone 882
Personal Information Center
User's
Manual
Part 2

Table of Contents
i
AT&T 882 Manual
Introduction........................................................ii
Features..............................................................iii
Section 1 - Installation ....................................1
Parts Checklist..................................................2
Install Batteries................................................3
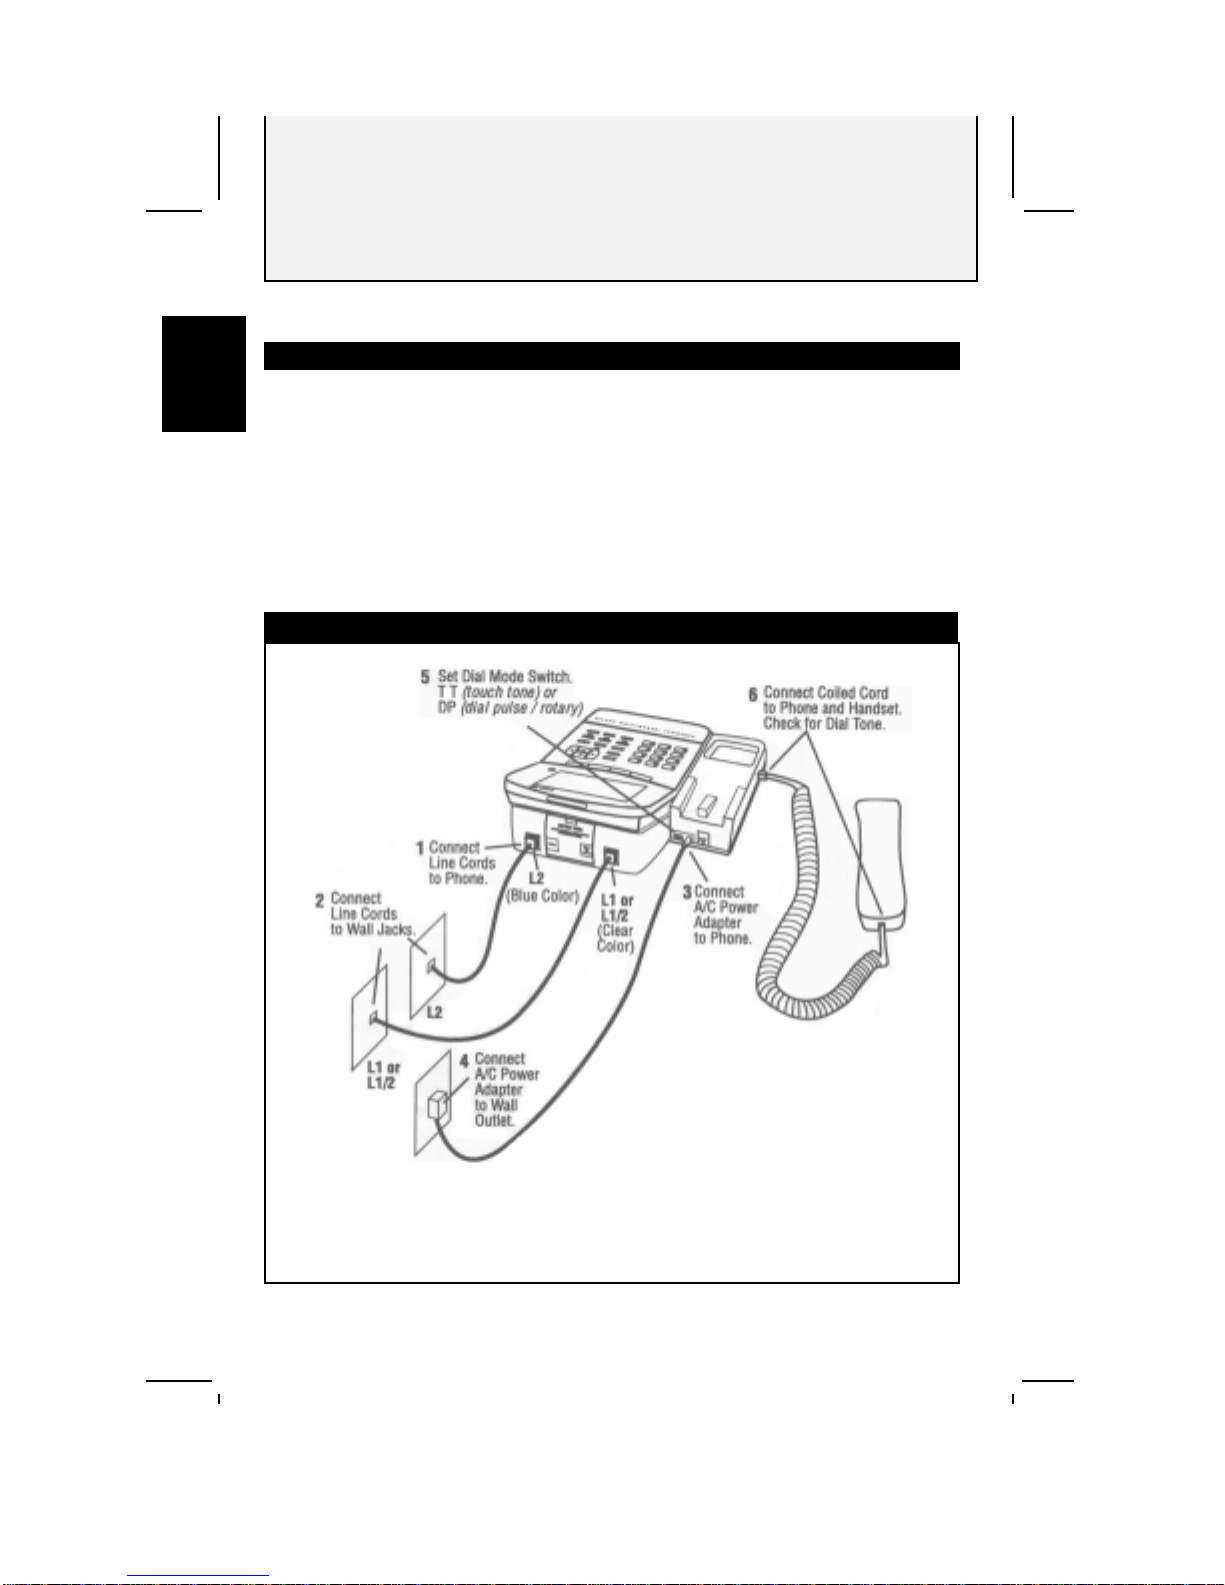
Connect Line Cords and AC Power...............4
Telephone Jacks and Lines.............................4
Modular Jack Test............................................5
Setting Up the Phone.......................................6
Setting the Clock............................................6
Entering Your Home Phone Numbers........6
Determining Line 1 and Line 2....................6
One Phone Number Operation.....................6
Getting To Where You Want To Go...............7
Soft Key Labels...............................................8
Menus................................................................9
Add/Edit Displays...........................................10
Menu Items.....................................................11
Main Menu .....................................................11
Set-Up Menu...................................................12
Section 2 - Operation ....................................13
Light Indicators..............................................15
Telephone Displays........................................15
Making a Call .................................................16
Answering a Call............................................17
Speakerphone for Hands-free Conversation
..........................................................................18
Mute.................................................................18
Hold..................................................................19
Switching Between Lines .............................19
Flash................................................................20
Temporary Tone Dialing ...............................20
Monitoring the Length of a Call..................20
Redial...............................................................21
ADial................................................................22
Conference Call .............................................22
Conference Call Options...............................23
Adjusting the Display Contrast.....................23
Ringer Volume ...............................................24
Handset Volume.............................................24
Section 3 - Directory .....................................25
Overview..........................................................26
Renaming Directories....................................27
Renaming a Directory .................................27
Adding and Editing a Name in a Directory 28
Adding a Name .............................................28
Editing a Name.............................................29
Removing a Name from a Directory..........30
Making a Call from a Directory ...................30
Making a Call from the Current Directory
........................................................................30
Using ADial when Making a
Directory Call ...............................................30
Dialing Another Number for an Individual
........................................................................31
Making a Call from Another Directory....31
Special Dialing Features...............................32
Dialing Long Phone Numbers....................32
Entering a Dialing Delay............................32
Storing a Temporary Tone..........................32
Storing a Switchhook Flash........................32
Storing Custom Calling Codes ...................32
Section 4 - Calendar/Reminder.................33
Overview..........................................................34
Creating Reminders.......................................34
Viewing, Adding, Editing, and
RemovingReminders.........................................35
Viewing a Day’s Reminders........................35
Calendar View..............................................35
Entering Reminders.....................................36
Viewing Reminders......................................37
Removing a Reminder.................................37
Editing a Reminder......................................37
Section 5 - Incoming Call Log...................38
Overview..........................................................39
Incoming Call Messages
...................ERROR! BOOKMARK NOT DEFINED.
Incoming Call Log .........................................40
Reviewing InLog ............................................40
Reviewing InLog ..........................................40
Making a Call from InLog.............................40
Making a Call ...............................................41
Using ADial when Making an InLog Call
........................................................................41
Removing a Call from InLog ........................41
Removing a Call...........................................41
Removing Entire InLog...............................41
Section 6 - Appendices .................................42
Customizing the Phone .................................43
Opening the Set-Up Menu........................43
Set Clock .......................................................43
Memory Lock................................................43
Change Password .........................................44
Rename Directory........................................44
Enter Home Phone Numbers .....................44
Caller ID........................................................44
Button Tone..................................................45
Removal Confirm .........................................45
Preferred Line...............................................45
Line Choice...................................................46
In Case of Difficulty.......................................47
Maintenance...................................................48
Index................................................................52

Introduction
ii
AT&T 882 Manual
2-Line
Speakerphone 882,
Personal
Information
Center
The 2-Line Speakerphone 882, Personal Information Center has
been designed to meet standards for convenient, reliable service.
To get the most from this telephone, please read this manual
carefully. It explains in simple steps how to install, use and care
for this 882 phone.
You can use the phone as a personal directory, storing names with
phone numbers and other important information. The 882 also
provides a calendar to assist in time management.
The 882 has unique keys that make setting up your directory or
using other functions very easy. It is important to understand how
to use these keys - especially the Cursor Control and the Soft Keys
- so you can perform these functions successfully. The Cursor
Control moves to a location where you will type in your
information. (See page 7 for further explanations of the 882 keys.)
If you subscribe to Caller ID service from your local telephone
company, your 882 makes using this service more convenient. The
882 displays the name and number of the calling party after the
second ring and keeps a log of the calls.
Caller Identification Service is provided by your local telephone
company. There is a fee for this service and it may not be
available in all areas. This product cannot identify calls from areas
not served by your local telephone company. It can display
information only if both you and the caller are in areas offering
Caller Identification Service and if both telephone companies use
compatible equipment.
The 882 provides you with the following telephone features:
Speakerphone for hands-free talking
Speakerphone Volume Control
Enhanced Handset Volume Control
Ringer Volume Controls
Redial Log (DiLog) of last five numbers dialed
AutoDial, Hold, Mute
Keyboard for easy entry of names and information
Personal Directory for storing names, numbers and information
Calendar/Reminder for storing 50 timed reminders
Alerts you when reminders occur
Call Identification stores records of 64 incoming calls
Dial any number from Incoming Call Log

Features
iii
AT&T 882 Manual

Installation
1
AT&T 882 Manual
Page
2 Parts Checklist
3 Installing Batteries
4 Connecting the
Phone
6 One Phone Number
Operation
7 Getting to Where
You Want to Go
9 Using the Menus
SECTION1
This Personal Information Center phone
may operate differently from other
telephones you have used. Read this
section carefully to become familiar
with the many unique features of the
882.
Getting Started at a Glance
•Installing batteries and
connecting the phone.
•Getting around the system.
•Setting the clock.
•Entering your area code and
phone numbers.
1

Installation
2
AT&T 882 Manual
Every 882 telephone should
include the following
components:
1Telephone
2Handset
3Coiled handset cord
4(2) 7’ line cords
5AC power transformer
64 AA heavy duty batteries
NOTE: Remove the labels on the
handset and the display before
using the phone.
DIAL MODE
This telephone has a push-button
dial which will work with tone or
dial pulse (rotary) telephone service.
Even when set to dial pulse service,
the phone can be switched
temporarily to tone for access to
services that require tone signaling,
including some tone-activated
computer systems.
This telephone is
hearing-aid compatible.
Check the list to make sure you have all
the correct parts included with the
telephone. You should save your protective
packaging materials to reuse if you move or
need to ship the telephone.
We have provided all necessary parts.
However, if you need additional parts to
modernize or expand your telephone
wiring, we offer a complete line of
accessory products - including jacks, cords
and adapters - to make any job quick, safe
and inexpensive. Ask for them where you
purchased your 882, or call 1-800-722-
9125.
1

Installation
3
AT&T 882 Manual
1 Install Batteries
Install Batteries
DO NOT UNPLUG AC POWER WHILE CHANGING BATTERIES.
The phone may lose information stored in memory if there is no AC power while
installing batteries.
When replacing the batteries insert four heavy duty AA batteries.
Always use four new batteries
NOTE: The phone WILL NOT WORK
without AC power.
1

Installation
4
AT&T 882 Manual
2 Connect Line Cords and AC Power
Telephone Jacks and Lines
This phone is designed to work with two telephone lines. In some
homes, both lines are wired into the same jack. If you are not sure if
your jack is wired for two lines (two different phone numbers from
one jack), perform the modular jack test on the opposite page.
If you have two different phone numbers coming from one jack,
youÕre all set to proceed with installing the line cords and AC
power.
Connect Line Cords and AC Power
You should install the phone within 7 feet of both jacks. If either jack is more
than 7 feet away you’ll need a longer line cord.
1

Installation
5
AT&T 882 Manual
Modular Jack Test
If you know the type of modular jacks you will be using, this
test is not necessary.
1Plug the line cord, with the clear modular plugs, into the
jack labeled L1 or L1/L2 on the back of the phone. Plug the
other end into the modular jack you intend
to use.
1Connect coiled cord to phone and handset and hang up.
2Pick up the handset. You are on Line 1. Listen for a dial
tone, then press LINE 2 and listen again.
•If you hear a dial tone on both lines, the jack you’ve
chosen is wired for two lines (two different phone
numbers coming from one jack).
You should follow directions for two-line jack.
•If you hear a dial tone on only one line, the jack has
only one line. Locate the jack for your other line. You
should follow directions for two
separate jacks.
Connect Line Cord for a
Two-line Jack Connect Line Cords for Two
Separate Jacks
1Use the line cord with the clear
modular plugs.
2Connect one end of the line cord to
the L1 or L1/L2 on the back of the
phone.
3Connect the other end to the wall
jack.
You will use both line cords.
1Connect cord with clear plugs to
L1or L1/L2 on back of phone.
2Connect cord with blue plugs to L2
on back of phone.
3Connect line cord with clear plug
to jack for Line 1.
4Connect line cord with blue plug to
jack for Line 2.
If you have only one phone number, you can have another line installed.
If you prefer to have both lines in the same jack, you can have a
two-line RJ-14 installed.
1

Installation
6
AT&T 882 Manual
3 Setting Up the Phone
When the phone is first plugged into the power plug, the
ÒSet-UpÓ menu will appear. You may have to adjust the
Display Contrast. (see page 23)
Setting the Clock 1SELECT “Set Clock” from the Set-Up menu.
2Enter the time then Afor AM or Pfor PM.
3Press .
4Enter the current date.
5Press .
6When you are done press the soft key below Done.
Entering Your Home Phone Numbers
1Highlight “Enter Home Phone Numbers”.
2Press SELECT.
3Enter your 3 digit area code, then press .
4Enter the phone number for Line 1, then press .
5Enter the phone number for Line 2, then press .
6Press the soft key below Done.
Determining Line 1 and Line 2
If you have a two-line jack follow the procedure below to
determine which line is Line 1 and Line 2.
•Press LINE 1 and call one of your phone numbers.
If you hear a busy signal, Line 1 is the number
you called. If Line 2 rings, it is the number you called.
One Phone Number Operation
If you have only one telephone number make line choice MANUAL.
1Highlight “Line choice is”.
2Press SELECT to alternate between AUTOMATIC
and MANUAL.
3Press the soft key below Done when you are done changing
settings.
1

Getting to Where You Want to Go
7
AT&T 882 Manual
Cursor A blinking character or light character on dark background
showing what choice an action would act on.
Cursor Control Moves the cursor to the next or previous
item on a display.
While viewing a menu, moves to the next or
previous display.
While adding or editing information, moves
one character left or right
MENU Opens and closes the 882’s Main Menu.
SELECT Chooses highlighted information or alternates between two
choices.
Soft Key Labels These commands (functions) change depending on what action
you are performing, or what the phone is doing.
Soft Keys Press these soft keys to activate the commands.
1

Getting to Where You Want to Go
8
AT&T 882 Manual
Soft Key Labels
Below is the chart listing the soft key labels and what each one does. These labels
appear on a display depending on what activity you are performing or what the phone
is doing.
Label What it does
Add lets you add an entry to the highlighted choice.
ADial repeatedly redials a phone number that is busy or not answered
and requires pressing SPEAKER or lifting the handset when the
far-end answers. (see page 22)
Back shows the previous display.
Cancel cancels changes you have made.
Dial dials number highlighted on the display.
DiLog displays the ReDi al Log on the display. (see page 21)
Done saves information and returns to previous display.
Edit lets you edit information on the display.
Exit leaves an operation and returns to telephone display.
InLog displays the Incoming Call Log on the display.
(see page 39)
More displays the next menu display, for those menus with more than
one menu. (see page 11)
Refer lets you view information for numbers in your
ReDial Log (DiLog). (see page 21)
Remind displays the month, beginning with the current month.
Use and to move back or forward to other months. (see
page 35) Add reminders from Calendar View display.
Remove erases the highlighted item on the display.
Review lets you view items in a highlighted category.
RmAll allows erasing of entire InLog, or Directory.
SetUp lets you customize the phone.
Timer turns the timer ON and OFF. (see page 20)
1

Using the Menus
9
AT&T 882 Manual
Menus A menu is a list of choices.
Parts of a Menu
•The top line of a menu is its title.
•The next six lines are its choices.
•The bottom line contains up to four labels for the
“Soft Keys” that are directly below the display. These
labels are for different actions, which vary by menu.
Cursor
A blinking or reverse video character indicating your
location on a menu. When the cursor is on a choice it is
“highlighted”. The highlighted choice can be acted on in
different ways, depending on the menu.
Reverse Video
Information displayed with a shaded or dark background and
light letters.
•Press SELECT to view the menu for the
highlighted choice.
•Press one of the “Soft Keys” to produce its label’s
action. For example, press the soft key below Dial to
dial the highlighted phone number, or Add to open the
display that lets you add a new directory entry.
1

Using the Menus
10
AT&T 882 Manual
Add/Edit
Displays Some displays are for adding or changing information.
On these displays, you:
•Type information for directory entries and reminders
using the alpha keypad or the dial pad.
OR
•Press SELECT to alternate between two choices.
Choices that let you alternate are in ÒReverse VideoÓ or all
capital letters.
1

Using the Menus
11
AT&T 882 Manual
Menu Items
When a menu has more than 6 selections, or if there is a second
display, More appears at the bottom of the display. This
indicates the display continues to a second display.
Press the soft key below More to view the second display. On
the second display Back replaces More. Press Back to return
to the first display.
Choosing a
Menu Item 1Use the or buttons to move the cursor to highlight
an option.
2Press SELECT or one of the soft keys.
Main Menu The Main Menu lets you view different directories.
•Press MENU to view the Main Menu.
•Press SELECT to select the choice you have highlighted.
The screen for that directory will appear. You will then be
able to add or select individual entires.
•Press MENU again to exit from the Main Menu to the
regular phone display.
The soft keys available on the Main Menu are:
SetUp customize phone features
Remind display the Calendar for the current month and
add and review reminders.
InLog view Incoming Call Log. (see page 40)
DiLog view the ReDial Log. (see page 21)
Main Menu
Main Menu
-Directory
-
-
-
-
-
SetUp Remind InLog DiLog
1

Using the Menus
12
AT&T 882 Manual
Set-Up Menu After you install the batteries and connect all the cords, use
Set-Up to customize some of the phoneÕs features. You can
customize the 882 at any time.
Viewing the
Set-Up Menu 1Press Menu. Main Menu appears.
2Press the soft key below SetUp.
The Set-Up menu appears.
Moving Around
Menus •Press or to move among choices.
•Press More, or to view second menu.
•Press Back, or to view first menu.
Set-Up Menu 1
Set-Up
Set Clock
Memory is UNLOCKED
Change Password
Rename Directories
Enter Home Phone Numbers
Caller ID is ON
More Exit
Set-Up Menu 2
Set-Up
Button Tone is ON
Removal Confirm is ON
Prefered Line is LINE 1
Line Choice is AUTO
Back Exit
1

Operation
13
AT&T 882 Manual
Page
15 Light Indicators
16 Making a Call
17 Answering a Call
18 Using the Speakerphone
18 Using Mute
19 Using Hold
19 Switching Between Lines
20 Using Flash
20 Monitoring the Length of a
Call
21 Using Redial
22 Using ADial
22 Using Conference Call
23 Adjusting the Display
Contrast
24 Adjusting the Ringer and
Handset Volume
SECTION2
This Personal Information Center phone
may operate differently from other
telephones you have used. Read this
section carefully to become familiar with
the many unique features of the 882.
Operation at a Glance
•Making and answering a call.
•Using speakerphone, conference
calling, hold and redial.
•Using the Personal Directory, see
page 25.
•Making a conference call.
•Switching between lines.
•Adjusting ringer and handset
volume.
2

Operation
14
AT&T 882 Manual
2

Operation
15
AT&T 882 Manual
Light Indicators
Light Activity Meaning
LINE 1 Yellow-green
and flashing The line is ringing.
or Red and
flashing The line is on Hold.
LINE 2 Red and on
steady The line is in use at this phone or another
phone.
Message ON There is Caller ID or Reminder information on
the display.
or
There can be information on the display about
one of the events in the “Telephone Displays”
table below.
Telephone Displays
When the display is not being used for the Directory, Reminders, Calendar, Redial Log
or Incoming Call Log, one of the ÒnormalÓ phone displays appears. These displays
have the time and date on the top line and soft key labels on the bottom line. There are
also indications about the following things that appear on the display:
Message What it means
Low Battery The batteries need to be changed. Replace the batteries promptly to
prevent memory loss. See page 3.
Ring 1 OFF
Ring 2 OFF You can make or answer calls when the ringer is OFF. The
yellow-green LINE IN USE light for the ringing line still flashes.
Other phones on this line will still ring. When ringer is OFF, the
message light does not come on. See page 24.
No Line 1
No Line 2 The phone lines may be disconnected or not working properly.
Check the connections and look at the “In Case Of Difficulty
Section” on page 47.
Message If you subscribe to Message Waiting service “Message” appears
when you have a message. In some areas Message Waiting is
known as Voice Messaging or Voice Mail.
2

Operation
16
AT&T 882 Manual
Making a Call
You can make a call from the dial pad or by pressing Dial on
the directory, DiLog or InLog displays. Pages 21 and 22
explain in detail how to make a Redial or ADial call.
Sections 3 and 5 explain how to dial numbers from the
directories or InLog.
When you make a call, the ÒPreferred LineÓ is always selected
when both lines are free. If you did not change this setting in
Set-Up, the preferred line will be the line connected to
Line 1 on the back of the phone.
Makin
g
a Call from
the Dial Pad 1Lift handset or press SPEAKER.
Override Automatic Line Selection:
Press LINE 1 or LINE 2. Pressing the line button turns on
the speakerphone. You can then lift the handset if you
wish.
2Dial the number from the dial pad. You can insert a hyphen,
pause or wait by pressing the space bar on the alpha pad once
for a hyphen, twice for a 3-second pause, and 3 times for a 30
second wait.
Making a Call
From a Directory,
DiLog or InLog
Using Dial
1Locate the display where the number you want to dial
appears.
2Use the or buttons to highlight the number.
3Press the soft key below Dial. The label changes to ADial.
The speakerphone indicator comes ON and the phone
begins to dial the number after a few seconds.
2
Table of contents
Other AT&T Telephone manuals

AT&T
AT&T CL80119 User manual

AT&T
AT&T Trimline 205 User manual

AT&T
AT&T 1070 User manual

AT&T
AT&T 7640 User manual

AT&T
AT&T System 75 User manual

AT&T
AT&T Trimline TR1909 User manual

AT&T
AT&T 1855 - AT&T Corded Phone User manual

AT&T
AT&T MLS-Series User manual

AT&T
AT&T CL84100 User manual

AT&T
AT&T 135 User manual

AT&T
AT&T Four-Line Intercom Speakerphone 955 User manual

AT&T
AT&T 2634DA User manual

AT&T
AT&T Definity Callmaster II Operating instructions

AT&T
AT&T E1113B User manual

AT&T
AT&T CL83215 User manual

AT&T
AT&T Definity Generic 3 User manual

AT&T
AT&T 1820 User manual

AT&T
AT&T 831 Series User manual

AT&T
AT&T Merlin Legend 7102 User manual

AT&T
AT&T U-verse TV User manual