AT&T 983 User manual

User’s manual
983
Two-line speakerphone

Model #: 983
Product name: Two-line speakerphone
Serial #:
(found on the bottom of the telephone base)
Purchase date:
Place of purchase:
Congratulations
on purchasing your
new AT&T product.
Before using this AT&T product, please
read the Important product information
on pages 26-27 of this manual.
Please thoroughly read the user’s
manual for all the feature operations
and troubleshooting information necessary to install
and operate your new
AT&T product. You can also visit our
website at www.telephones.att.com
or call 1 (800) 222-3111.
In Canada, dial 1(866) 288-4268.
© 2007 Advanced American Telephones. All rights reserved.
AT&T and the AT&T logo are trademarks of AT&T Knowledge Ventures,
licensed to Advanced American Telephones.

See page 5
for easy instructions.
You must install the bat-
tery before using the tel-
ephone.
For customer service or product information, visit our website at www.telephones.
att.com or call 1 (800) 222-3111.In Canada, dial 1 (866) 288-4268.
CAUTION: To reduce the risk of fire or injury to persons or damage to
the telephone, read and follow these instructions carefully:
• Use four AA alkaline batteries (purchased separately).
• Do not dispose of the battery in a fire. Like other batteries of this type, it could
explode if burned. Check with local codes for special disposal instructions.
• Do not open or mutilate the battery. Released electrolyte is corrosive and may
cause damage to eyes or skin. It may be toxic if swallowed.
• Exercise care in handling batteries in order not to create a short circuit. Do not
allow conductive materials such as rings, bracelets, or keys to touch the battery.
The battery or conductor may overheat and cause harm.
• Do not disassemble your telephone. There are no user-serviceable parts
inside. Refer to qualified service personnel for servicing.
STOP!

Getting started
Quick reference guide.........................2
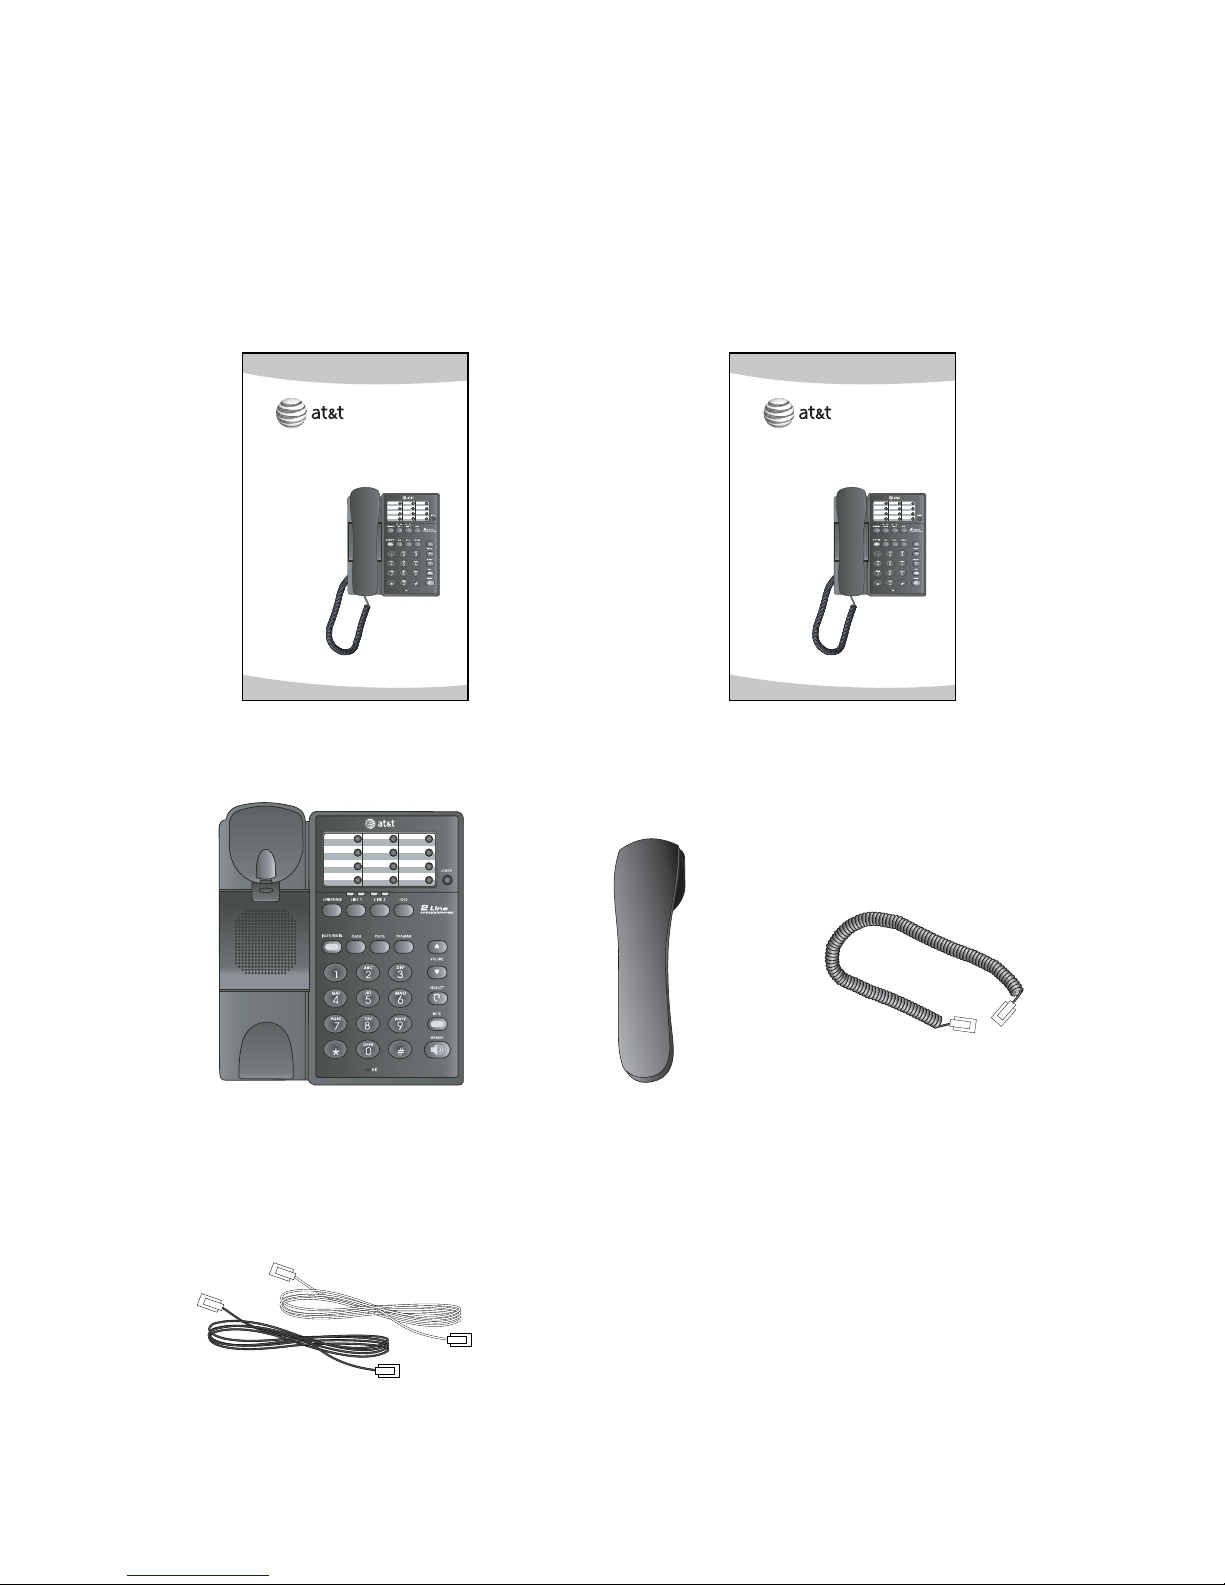
Parts checklist.........................................3
Before you install ..................................4
Battery installation ...............................5
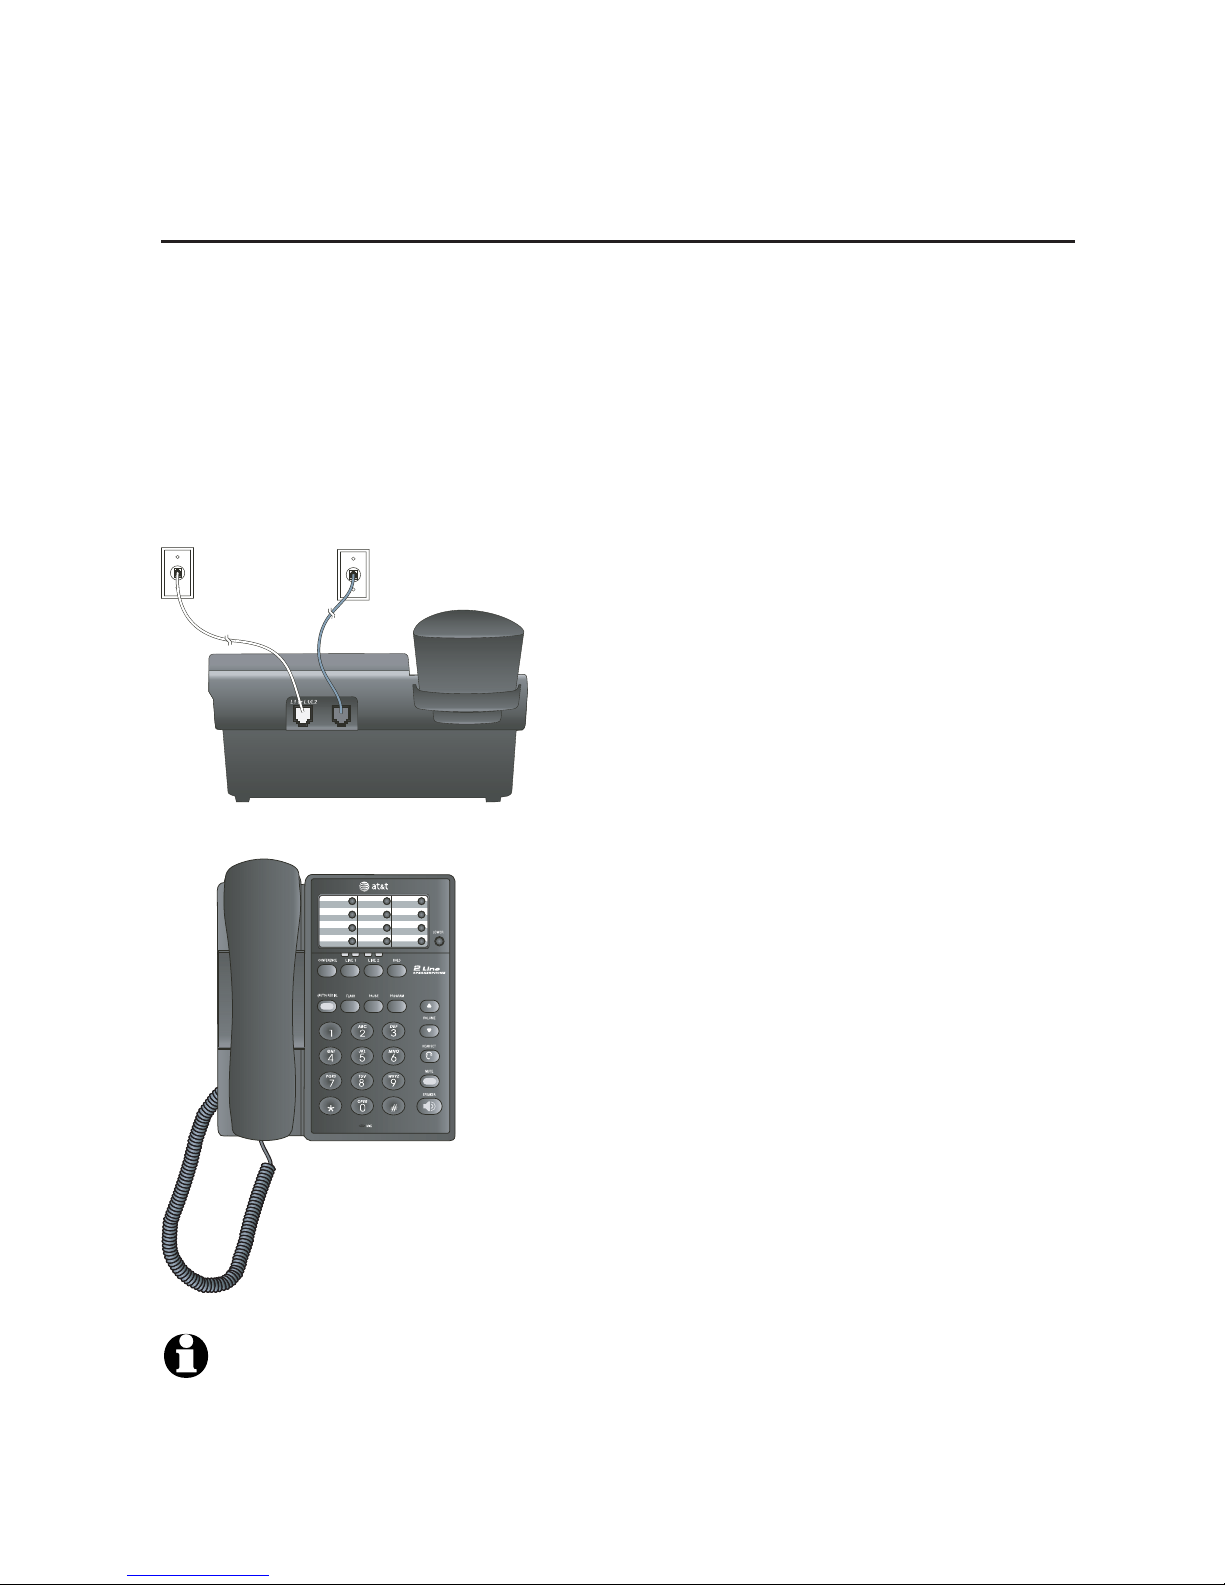
Tabletop installation ............................6
Wall mounting.........................................8
Data port & optional headset.......10
Telephone operation
Base settings.........................................11
Choose dial mode........................11
Check for dial mode...................11
Telephone operation.........................12
Making and answering calls.....12
Ringer volume................................12
Switch between handset,
headset, and speakerphone
mode.................................................13
Last number redial ......................13
Erase redial memory ..................14
Automatic redial ...........................14
Options while on calls.....................15
Set handset, speakerphone,
headset volume ............................15
Mute.....................................................15
Flash ....................................................15
Temporary tone dialing.............15
Hold .....................................................16
Switch between lines during a
call........................................................15
Three-way conference calls ...15
Directory
Directory..................................................18
Timeouts and error messages....18
Speed dialing ........................................19
To store a number in speed dial.....19
To call a speed dial number.....19
To delete a speed dial number...19
Appendix
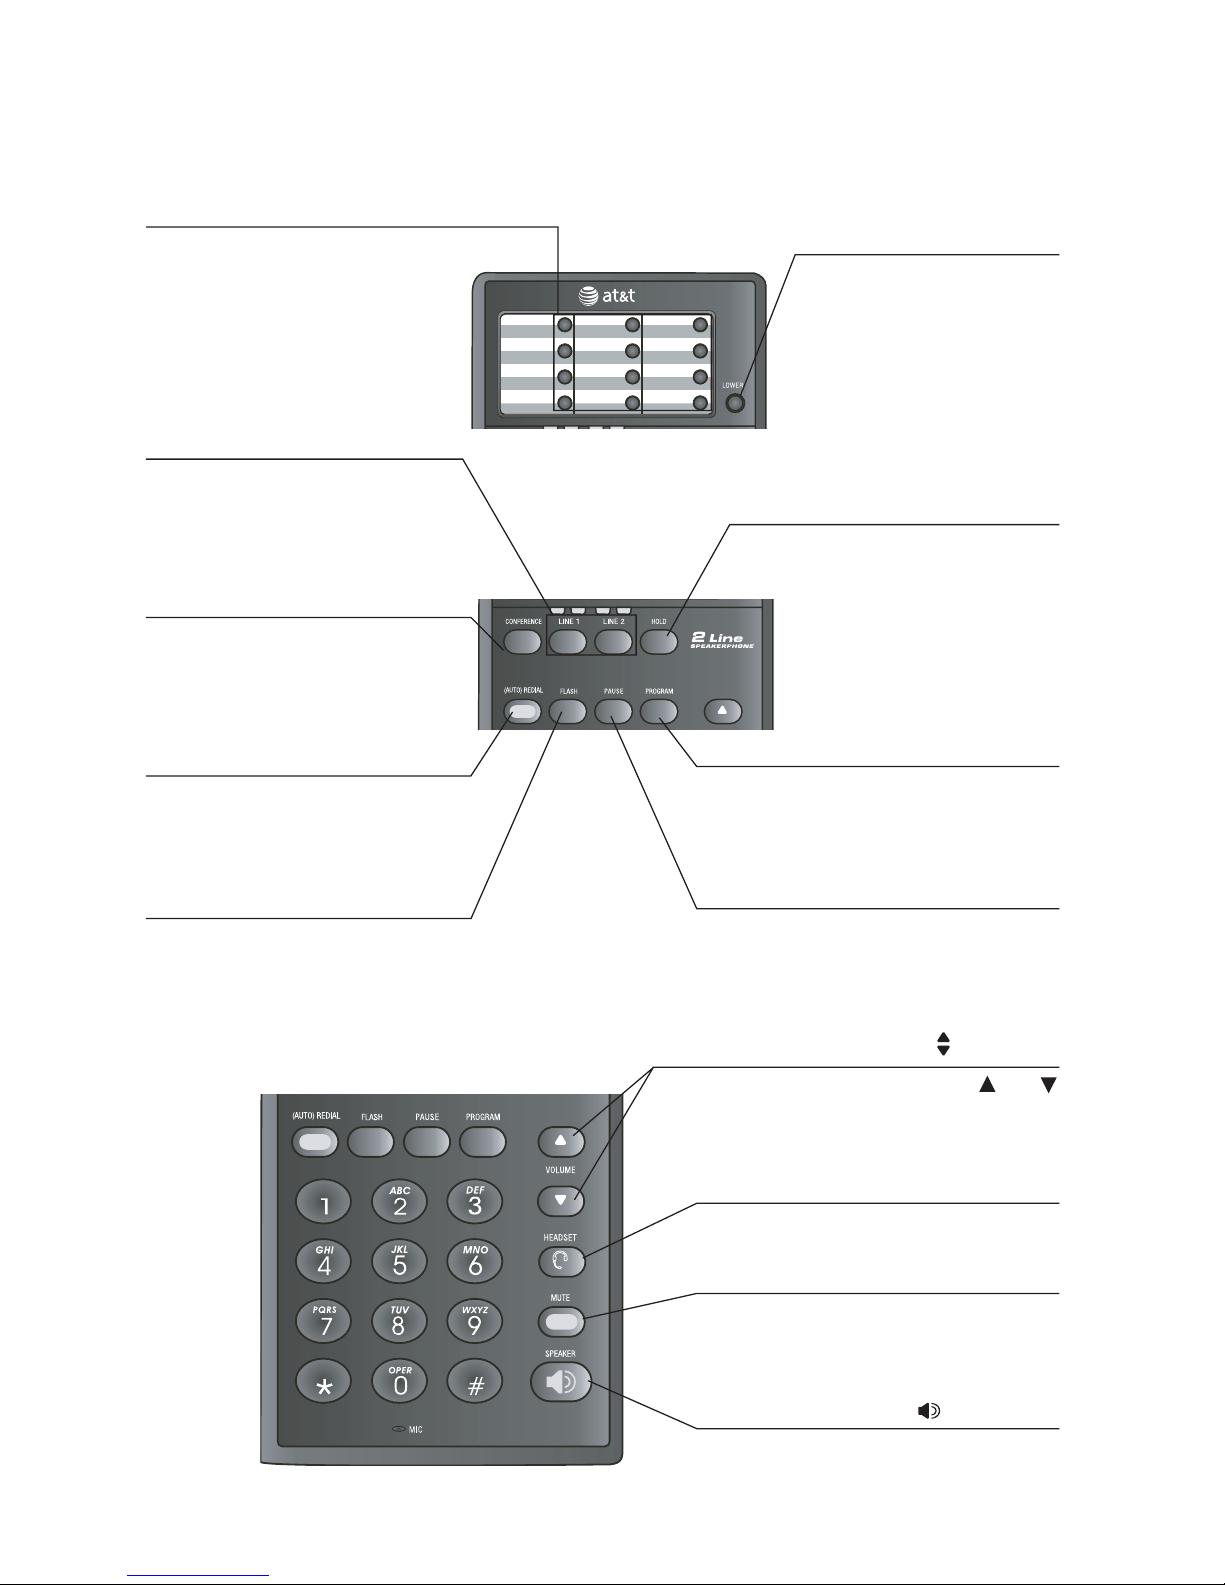
Alert tones & indicator lights.......21
Alert tones .......................................21
Indicator lights...............................21
Troubleshooting...................................22
Important product information...26
FCC and ACTA information............28
Part 15 of FCC rules .........................30
Limited warranty .................................31
Technical specifications ..................34
Index ..........................................................35
1
Table of contents
User’s manual
983
Two-line speakerphone

2
Getting started
(AUTO) REDIAL
Lift the handset. Press
to dial the last number
dialed (page 13).
LINE 1, LINE 2
Press, then lift handset
to make or answer a call
on line 1 or 2 (page 12).
CONFERENCE
Press to enter three-way
conference call (page
17).
FLASH
During a call, press to
receive an incoming call
if call waiting is activated
(page 15).
HOLD
Press to place call on
hold (page 16).
PROGRAM
Press to program
memory dial numbers
(page 19).
PAUSE
Press to insert a dialing
pause (page 19).
VOLUME
During a call, press or
to adjust listening volume
(page 15).
HEADSET
Press to activate headset
(page 12). MUTE
Press to silence the micro-
phone. Press again to
resume telephone conver-
sation (page 15).
SPEAKER
Press to turn the speaker-
phone on or off (begin or
end a call, page 12).
One-touch keys
Press to dial the number
stored (page 20).
Quick reference guide
LOWER
Press LOWER, then
the desired one-
touch key to dial the
number stored in lower
locations (page 20).

3
Getting started
User’s manual
983
Two-line speakerphone
Parts checklist
Save your sales receipt and original packaging in case it is necessary to ship
your telephone for warranty service.
Check to make sure the telephone package includes the following:
User's manual Quick start guide
Telephone base with wall
mount bracket attached. Handset Handset coiled cord
Long black line cord (4-pin connector)
Long clear line cord (2-pin connector)
Quick start guide
983
Two-line speakerphone

4
Getting started
Choose a central location close to a telephone jack. The telephone base can be
placed on a flat surface or mounted on a standard wall plate.
Avoid placing the telephone base too close to:
• Excessive heat sources.
• Excessive dust sources such as a workshop or garage.
• Excessive moisture.
• Extremely low temperature.
• Mechanical vibration or shock such as on top of the washing machine or
work bench.
Before you install
To use this product as a two-line telephone, you must have a two-line modular
wall jack or two separate one-line modular wall jacks. To use both lines of a
two-line telephone, your local telephone company must provide two telephone
numbers.
This product is designed to operate optimally with two telephone lines. If you
choose to install only one telephone line, the telephone will continue to oper-
ate normally as long as the unused line is not selected. For example, if you
press LINE 2 when there is only one line installed and that line is connected to
the L1 or L1/L2 jack, the telephone does not function properly. Simply press
LINE 1 and begin again.

5
Getting started
Battery installation
Before using the telephone, you should install four AA alkaline batteries
(purchased separately). You can use the telephone without batteries to dial
and receive calls. However, the line lights and the automatic redial feature will
not work, and the speakerphone and optional headset may not work properly
in all conditions. To use the speakerphone without batteries, you must press
and hold SPEAKER for one second.
NOTES:
• If you do not install batteries, you will hear a low battery warning tone every
time you lift the handset or press SPEAKER.
• Use disposable alkaline batteries only. Do not use rechargeable batteries.
CAUTION: Always unplug the line cord, before installing new batteries.
1. The wall mount bracket
should be flipped into
the downward position.
Place the telephone on
the wall mounting plate
and pull down until it is
held securely.
2. Push the tab as shown and
lift to remove the battery
cover. Insert four new AA
alkaline batteries (purchased
separately) following the
polarity markings in the
battery compartment.
3. Replace the
battery cover.
The following symptoms indicate that the batteries in your telephone are low and
need to be replaced, even though there is no low battery warning yet:
• The automatic redial feature does not work or is not working properly, or
• HEADSET cannot be used to make or answer calls.
If you experience either of these symptoms, try replacing the batteries following
the instructions above.

6
Getting started
Tabletop installation
A single two-line wall jack
If there is a single two-line wall jack, use only the black (4-connector) line cord.
Plug one end into the jack labeled L1 or L1/L2 on the back of the telephone.
Plug the other end into the wall jack. Make sure the telephone line cord is
plugged firmly into the telephone base and the wall jack.
1. Connect the telephone line cord to
the telephone and wall jack.
2. Plug one end of the handset coiled
cord into the handset. Plug the other
end into the jack on the left side of
the telephone base.
NOTE: This product is designed to operate optimally with two telephone lines.
If you choose to install only one telephone line; the telephone will continue to
operate normally as long as the unused line is not selected. If you experience diffi-
culty, make sure you have pressed the correct LINE key.
After installing the batteries, if you wish to use the telephone on a tabletop, flip
the wall mounting bracket upward.

7
Getting started
Tabletop installation
Two one-line wall jacks
If there are two one-line wall jacks, use both long line cords. Plug one end of
the clear cord into the jack labeled L1 or L1/L2 on the back of the telephone.
Then, plug the other end into the wall jack for Line 1. Plug one end of the black
line cord into the jack labeled L2 or DATA on the back of the telephone base.
Then, plug the other end into the wall jack for Line 2. Make sure the telephone
line cord are plugged firmly into the telephone base and the wall jack.
1. Connect the line cords to the
telephone and wall jacks.
2. Plug one end of the handset cord
into the handset. Plug the other
end into the jack on the left side
of the telephone base.
3. To determine which line is in
use, press LINE 1 and call one
of the telephone numbers. If
there is a busy signal, Line 1 is
the number you called. If Line
2 rings, it is the number you
called.
NOTE: This product is designed to operate optimally with two telephone lines.
If you choose to install only one telephone line, the telephone will continue to
operate normally as long as the unused line is not selected. If you experience diffi-
culty, make sure you have pressed the correct LINE button.
L2 or DATA

8
Getting started
Wall mounting
A single two-line wall jack
If there is a single two-line wall jack, use only the black line cord. Install the
telephone as shown below:
2. The wall mount bracket should
be flipped into the downward
position. Place the telephone
on the wall mounting plate
and pull down until it is held
securely.
3. When mounting the telephone on a wall,
you must reverse the handset tab to
hold the handset in place. Hold down the
switchhook, and slide the tab up and out
of its slot. Turn the tab so that the end
with the lip is up. Insert the tab back into
its slot.
NOTE: This product is designed to operate optimally with two telephone lines.
If you choose to install only one telephone line, the telephone will continue to
operate normally as long as the unused line is not selected. If you experience diffi-
culty, make sure you have pressed the correct LINE button.
1. Plug one end of the black
line cord into the jack labeled
L1 or L1/L2 on the back of
the telephone. Place the cord
in the channel under the
telephone as shown. Plug the
other end into the wall jack.
Make sure the cord snaps
firmly into place.

9
Getting started
Wall mounting
Two one-line wall jacks
If there are two separate one-line wall jacks, use both line cords.
1. Plug one end of the clear cord into
the jack labeled L1 or L1/L2 on
the back of the telephone. Plug one
end of the black cord into the jack
labeled L2 or DATA on the back of
the telephone base. Place the line
cords in the channels under the
telephone as shown. Plug the free
end of the line cord for line 1 into
the line 1 wall jack. Plug the free
end of the line cord for line 2 into
the line 2 wall jack. Make sure the
cords snap firmly into place at both
ends.
2. The wall mount bracket should
be flipped into the downward
position. Place the telephone
on the wall mounting plate
and pull down until it is held
securely.
NOTE: This product is designed to operate optimally with two telephone lines.
If you choose to install only one telephone line, the telephone will continue to
operate normally as long as the unused line is not selected. If you experience diffi-
culty, make sure you have pressed the correct LINE button.
3. When mounting the telephone on a wall,
it is necessary to reverse the handset tab
to hold the handset in place. Hold down
the switchhook, and slide the tab up and
out of its slot. Turn the tab so that the end
with the lip is up. Insert the tab back into
its slot.

10
Getting started
Data port & optional headset
If you want to connect another device (such as a modem or fax machine) to
the wall jack, use the jack labeled L2 or DATA on the back of the telephone
base. A call picked up at another extension on the line used by the data port
may interrupt a fax, modem or message transmission.
Data port
For hands-free telephone conversations, use any industry 2.5mm headset (pur-
chased separately). For best results, use an AT&T 2.5mm headset. To order an AT&T
2.5 mm headset, visit our website at www.telephones.att.com or call 1 (800)
222-3111. In Canada, dial 1 (866) 288-4268.
Plug 2.5mm headset into
the jack on the right side
of the telephone base
(beneath the small rubber
flap).
NOTES:
1. If the sound quality of the headset is unsatisfac-
tory, try unplugging it, and firmly plugging it in
again.
2. Four AA alkaline batteries (purchased separately)
must be installed in the telephone base for the
headset to work correctly in all conditions.

11
Telephone operation
Base settings
Choose dial mode
The factory default setting is TONE. If you do not
have touch tone dialing service in your area, it will
be necessary to change the setting to PULSE.
To set your telephone for dial pulse (rotary) service:
Lift the handset (or press SPEAKER) and press
a LINE key.
Press PROGRAM, #, #, #, 3.
To change back to touch tone service:
Lift the handset (or press SPEAKER) and press
a LINE key.
Press PROGRAM, #, #, #, 8.
To switch from pulse to tone dialing during a call,
see Temporary tone dialing on page 15.
Check for dial tone
Ensure there is a handset connected to the
telephone base and that the batteries are
installed.
1. Lift the handset and press LINE 1.
2. Press SPEAKER or press HEADSET and listen
for a dial tone.
-THEN-
3. Lift the handset and press LINE 2.
4. Press SPEAKER or press HEADSET and listen
for a dial tone.
If there is no dial tone, refer to Trouble-shooting
on page 22.
NOTE: If you press HEADSET when there is
no headset connected to the telephone base,
ensure the batteries are properly installed, or else,
there will be a warning tone.
1.
2.
1.
2.

12
Telephone operation
Telephone operation
Making and answering calls
To make a call:
• Press LINE 1 or LINE 2 to select a line. Lift the
handset, then dial a number.
• To end, replace the handset in the telephone
base.
-OR-
• Press LINE 1 or LINE 2 to select a line. Press
SPEAKER, then dial a number.
• To end, press SPEAKER.
-OR-
• Press LINE 1 or LINE 2 to select a line. Press
HEADSET (if a headset is connected), then dial a
number.
• To end, press HEADSET.
You can press the other LINE key any time to end
a call in any mode.
To answer a call:
• Press the flashing LINE key and lift the handset.
-OR-
• Press the flashing LINE key. Press SPEAKER.
-OR-
• Press the flashing LINE key. Press HEADSET (if a
headset is connected).
Ringer volume
There is a RINGER switch for each line on the right
side of the telephone base.
You can set each switch to OFF, LO or HI to control
the ringer volume for each line.
NOTES:
1. You can dial and answer calls normally with
one or both ringer switches set to off.
2. Each line has its own distinctive ring.

13
Telephone operation
Telephone operation
Switch between handset, headset, and speaker-
phone mode
While using the handset:
• Press HEADSET to switch to headset (if a
headset is connected) or press SPEAKER to
switch to speakerphone.
While using the headset:
• Lift the handset and the headset is automati-
cally turned off. Or press SPEAKER to switch
to speakerphone.
While using the speakerphone:
• Press HEADSET to switch to headset (if a head-
set is connected). Or lift the handset and the
speakerphone is automatically turned off.
Last number redial
Press one of the LINE keys to select a line, then
lift the handset.
Press (AUTO) REDIAL to call the last number
(up to 24 digits) dialed on that line.
-OR-
Press one of the LINE keys to select a line,
then press SPEAKER.
Press (AUTO) REDIAL to call the last number
(up to 24 digits) dialed on that line.
-OR-
Press one of the LINE keys to select a line, then
press HEADSET (if a headset is connected).
Press (AUTO) REDIAL to call the last number
(up to 24 digits) dialed on that line.
1.
2.
1.
2.
1.
2.

14
Telephone operation
Telephone operation
Erase redial memory
Press a LINE key to select the line.
Lift the handset or press SPEAKER or press
HEADSET (if a headset is connected).
Press PROGRAM, (AUTO) REDIAL, PROGRAM.
Automatic redial
This telephone can automatically and repeatedly
redial the last number you dialed. While in idle mode,
press LINE 1 or LINE 2, then press (AUTO) REDIAL.
You will hear the number being dialed on that line.
When the call is answered, lift the handset, or press
SPEAKER, or press HEADSET (if a headset is con-
nected) to speak with the other person.
If the number dialed is busy, the telephone will dis-
connect after 10 busy signals and will redial every
40 seconds up to 10 times.
To stop automatic redialing before the call is con-
nected, press (AUTO) REDIAL again. Lifting the
handset and returning it to the telephone base, or
pressing SPEAKER or HEADSET (if a headset is
connected) twice will also cancel the automatic
redial.
To stop the automatic redial after the call is con-
nected, press SPEAKER or HEADSET (if a head-
set is connected) twice, or lift the handset and
replace it in the telephone base.
NOTES:
1. The automatic redial feature will not work if
CONFERENCE or HOLD is pressed.
2. The automatic redial feature works only when
the handset is not in use and the batteries are
installed.
1.
2.
3.

15
Telephone operation
Options while on calls
Set handset, speakerphone, headset volume
While on calls, press VOLUME to increase or
decrease the listening volume.
There will be a triple-beep when you reach the
maximum or minimum volume setting.
Mute
While on a call, press MUTE to silence the micro-
phone during a conversation. You will be able to
hear the person at the other end, but that person
cannot hear you until you press MUTE again to
resume the conversation.
Flash
Press FLASH to activate services such as call
waiting or three-way calling. You may have to
press other keys before or after pressing FLASH
as explained in the custom-calling instructions
provided by your local telephone company.
If you subscribe to call waiting service with your
local telephone company, there will be a beep if
there is an incoming call while already on a call.
Press FLASH to put the current call on hold and
take the new call. Press FLASH anytime to switch
back and forth between calls.
Temporary tone dialing
If there is dial pulse (rotary) service, you can
change from pulse to tone dialing during a call by
pressing *. This can be useful if it is necessary to
send tone signals for long-distance services.
After you hang up, the telephone automatically
returns to dial pulse (rotary) service.

16
Telephone operation
Options while on calls
Hold
Press HOLD to put a call on hold. You can place
the handset in the telephone base after a call is
put on hold.
To return the call:
Press the appropriate LINE key and lift the handset.
-OR-
Press the appropriate LINE key then press
HEADSET if a headset is connected.
-OR-
Press the appropriate LINE key then press
SPEAKER.
Switch between lines during a call
During a call, you can make or answer a call on the
other line by pressing HOLD. Use the HOLD and
LINE keys to switch back and forth between calls
as often as necessary.
Examples:
While using Line 1, and Line 2 rings:
Press HOLD to put Line 1 on hold.
Press LINE 2 to answer the other call.
To disconnect Line 2 and return to the first call,
press LINE 1.
While using Line 2, Line 1 rings:
Press HOLD to put Line 2 on hold.
Press LINE 1 to answer the other call.
To disconnect Line 1 and return to the first call,
press LINE 2.
•
•
•
1.
2.
3.
1.
2.
3.

17
Telephone operation
Options while on calls
Three-way conference calls
You can use both lines at the same time to set up
a three-way conference call.
Make or answer a call and press HOLD.
Make a call on the other line.
Press CONFERENCE.
To end a conference call, hang up.
If one caller hangs up during a conference call,
there may be a dial tone. Press the LINE button
of the other call to disconnect the other line and
eliminate the dial tone.
Put a conference call on hold:
• Press HOLD to put both lines on hold.
• Press CONFERENCE to release the hold, then lift
the handset, or press SPEAKER or HEADSET (if
a headset is connected) and continue the con-
ference call.
Talk privately with one caller during a conference
call:
• Press HOLD. Both lines are put on hold.
• Press the LINE key of the person with whom
you want to speak privately, then lift the hand-
set or press SPEAKER or HEADSET (if a head-
set is connected).
• Press CONFERENCE to release the hold and
continue the conference call.
Drop one party from a conference call:
To disconnect one party from a conference call
and keep the other on the line, press the LINE key
of the call to keep.
1.
2.
3.
NOTE: If you leave
CONFERENCE button
down after a conference
call, then dial another
number, your call might
be completed, but you
may be hear a busy
signal from the other
line. Press HOLD, then
press each LINE button
until you identify the
line being used for your
completed call.
Other manuals for 983
1
Table of contents
Other AT&T Telephone manuals

AT&T
AT&T MS2085 User manual

AT&T
AT&T Merlin Legend MLX-10D User manual

AT&T
AT&T CRL82112 User manual

AT&T
AT&T 1450 User manual

AT&T
AT&T Classic Mail Reference guide

AT&T
AT&T TRIMLINE 265 User manual

AT&T
AT&T MERLIN 206 User manual

AT&T
AT&T Definity 7313H User manual

AT&T
AT&T CL2940 User manual

AT&T
AT&T CL81211 User manual