Auriol H4286A User manual

3
24.02.11 12:18
3
H4286A
H4286B
INDOOR/OUTDOOR THERMOMETER
Operation and Safety Notes
INOMHUS-/UTOMHUSTERMOMETER
Bruksanvisning och säkerhetsanvisningar
SISÄ- JA ULKOLÄMPÖMITTARI
Käyttö- ja turvallisuusohjeet
INDEN-/UDENDØRS TERMOMETER
Betjenings- og sikkerhetshenvisninger
24.02.11 12:18
GB/IE Operation and Safety Notes Page 4
FI Käyttö- ja turvaohjeet Sivu 22
SE Bruksanvisning och säkerhetsanvisningar Sidan 40
DK Brugs- og sikkerhedsanvisninger Side 57
24.02.11 12:18
24.02.11 12:18
3
A
1,5V AAA x 1
B
8
13
14
15
9
10
11
12
1
2
3
4
5
6
7
24.02.11 14:55
4 GB/IE
Introduction
Intended use ...........................................Page 5
Description of parts ................................Page 6
Technical data ........................................Page 7
Scope of supply......................................Page 7
Safety notes.....................................Page 8
Battery Safety Instructions......................Page 10
Getting started
Inserting/changing the battery.............Page 12
Positioning/installing the device...........Page 13
Mounting the device on a wall..............Page 15
Temperature memory .............................Page 16
Setting the time .......................................Page 17
Troubleshooting......................................Page 18
Cleaning and Care......................Page 19
Disposal................................................Page 19
24.02.11 14:55

5GB/IE
Indoor/outdoor thermometer
Introduction
Familiarise yourself with the product
before using it for the first time. In
addition please refer carefully to
the operating instructions below and the safety
advice. Use the product only as described
and for the indicated purpose. Keep these
instructions in a safe place. If you pass the
product on to anyone else, please ensure that
you also pass on all the documentation.
Intended use
The thermometer measures the inside and
outside temperature in Celsius (°C). The main
unit is placed indoor, and sensor can be put
outdoor. The thermometer also displays the
highest and lowest measured temperature
and the time in 24-hour format. Other uses or
changes to the device are considered to be
contrary to the intended use and may result
24.02.11 14:55

6 GB/IE
in personal injury and/or damage to the
device. The manufacturer accepts no liability
for damage caused through the use of the
device in contradiction of its intended use.
The device is not intended for commercial use.
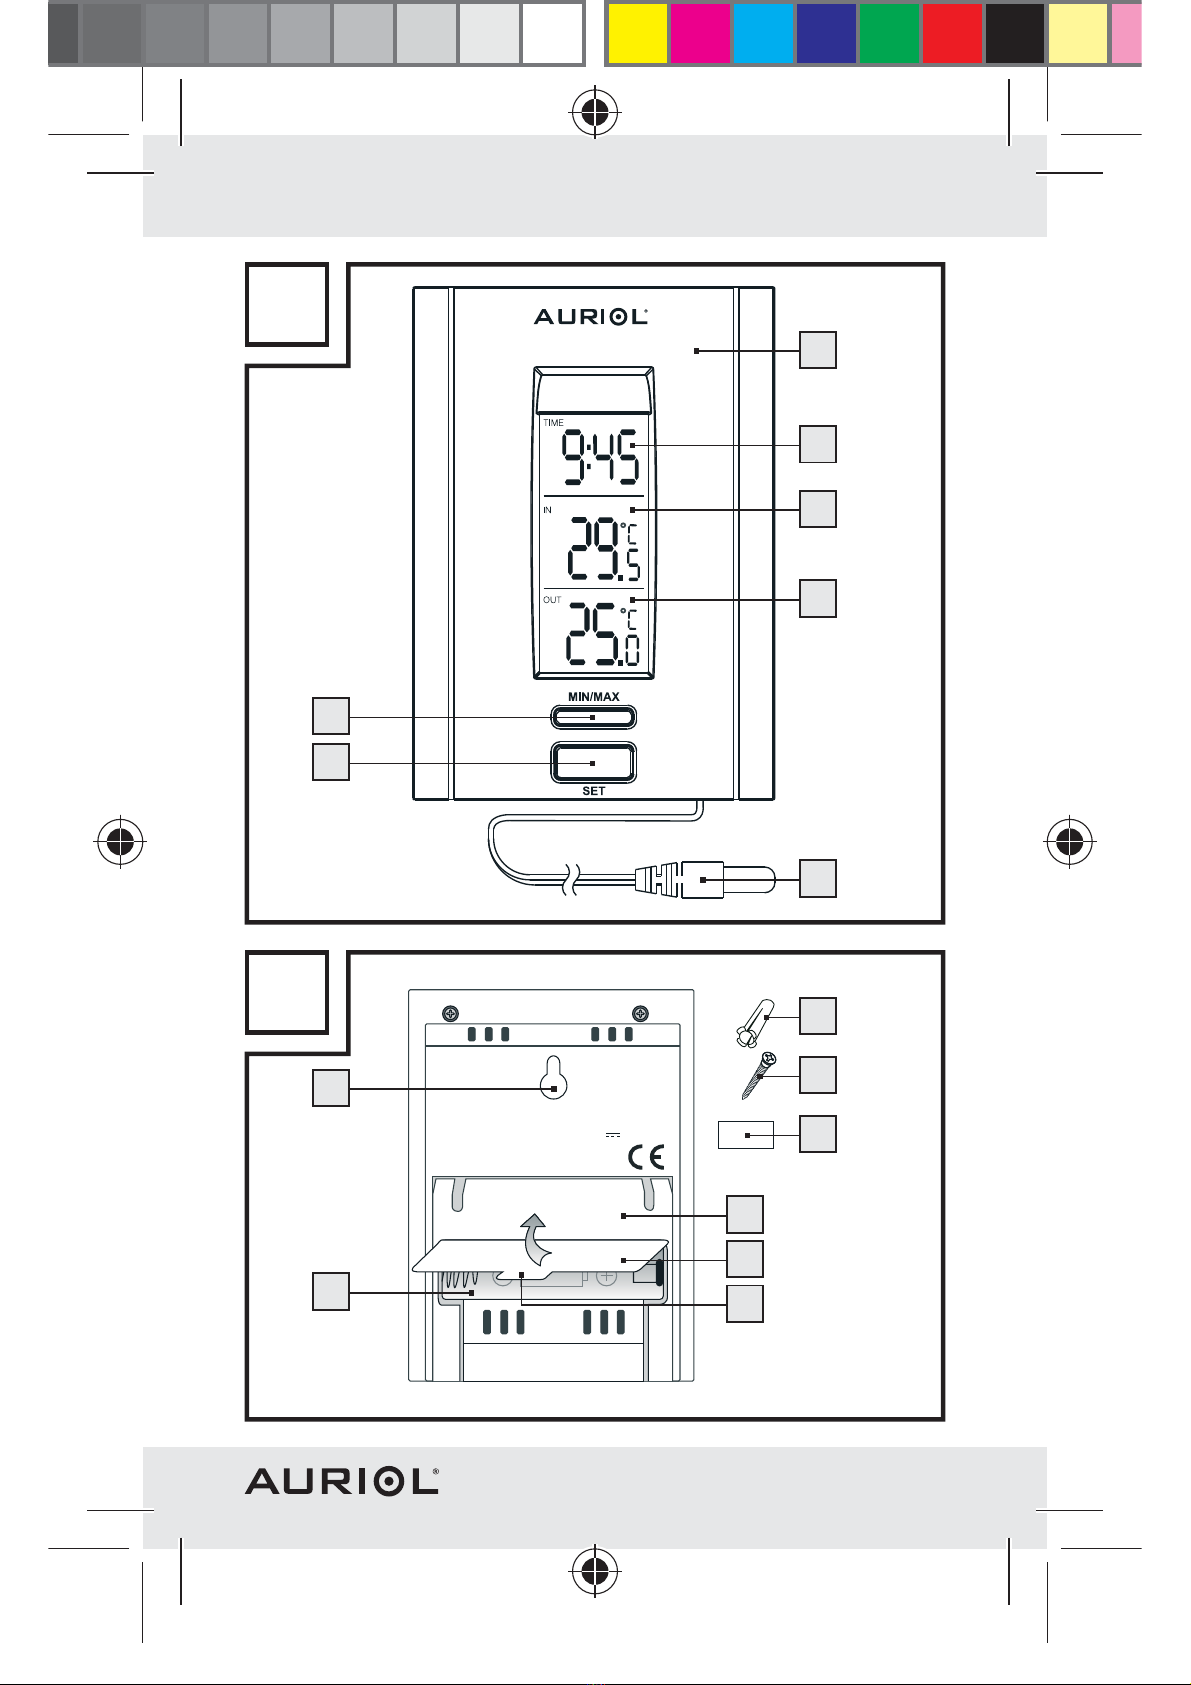
Description of parts
1In/outdoor thermometer
2“TIME” display
3“IN” indoor temperature display
4“OUT” outdoor temperature display
5External sensor
6“SET” button
7MIN/MAX button
8Stand
9Battery compartment cover
10 Extension of battery compartment cover
11 Battery compartment
12 Hanger
13 Dowel
14 Screw
15 Self-adhesive pad
24.02.11 14:55
7GB/IE
Technical data
Operating voltage: 1.5V (DC)
Power supply: 1x 1.5V AAA
battery (included)
Temperature range: Indoor: –10°C to
+40°C
Outdoor: –40°C to
+60°C
External sensor lead: approx. 2.8m
Liquid crystal display: 21x 50mm
Scope of supply
Please check the supplied items immediately
after unpacking the device to ensure that
there is nothing missing and that the product
and all of its parts are in perfect condition.
Do not under any circumstances install the
product if the delivery scope is incomplete.
1 Indoor/outdoor thermometer
1 1.5V AAA battery
1 Dowel
1 Screw
24.02.11 14:55
8 GB/IE
1 Self-adhesive pad
1 Operating manual
Safety notes
KEEP ALL THE SAFETY ADVICE AND
INSTRUCTIONS IN A SAFE PLACE FOR
FUTURE REFERENCE!
DANGER
OF FATAL INJURY AND
ACCIDENTS FOR INFANTS
AND CHILDREN! Never leave children
unattended with the packaging material,
as it poses a risk of suffocation. Keep the
product out of the reach of children. The
product is not a toy.
Children or anyone who does not have
the knowledge or experience to handle
the device, or anyone whose physical,
sensory or mental capacities are limited,
may only use the device under supervision
24.02.11 14:55
Other manuals for H4286A
1
This manual suits for next models
2
Table of contents
Languages:
Other Auriol Thermometer manuals

Auriol
Auriol 4-LD3030 User manual

Auriol
Auriol H4286A User manual

Auriol
Auriol 89178 User manual

Auriol
Auriol 315731_1904 User manual

Auriol
Auriol Z31269 User manual

Auriol
Auriol H14269 User manual

Auriol
Auriol 4-LD3443 User manual

Auriol
Auriol AFT 77 A1 User manual

Auriol
Auriol Z31714 User manual

Auriol
Auriol 111022 User manual


