manuals.online logo
Brands
  1. Home
  2. •
  3. Brands
  4. •
  5. Avaya
  6. •
  7. IP Phone
  8. •
  9. Avaya 1220 User manual

Avaya 1220 User manual

Please contact Telecom Administration x3-3546, with
questions regarding features or to schedule training.
Telephone User Guide
1220 IP Phone
AVAYA
SOFT KEY DESCRIPTIONS
Soft key Description
Cancel Cancel action.
Choose Select a symbol.
Clear Clear the input field.
Case Switch the next character to either
uppercase or lowercase.
Delete Backspace one character.
Done/Select/Enter Application dependent.
More Access additional soft keys.
Volume adjustment Adjusts volume of ringer, handset listen, handsfree
listen, headset listen and buzzer.
Contrast adjustment Adjusts contrast on display screen.
Language Choose language to display.
Date/Time format Choose from several different ways to display date/
time.
Local Dial pad Tone When you press a key on the dial pad you can
choose between sound or no sound.
Ring type Choose from eight different ring tones.
Call Timer Measures duration of call.
On hook default path Choose between Headset or Handsfree.
Change Feature Key
label
Rename the label that corresponds to the feature
key, specifically auto dial.
Live Dial Pad Make a call without lifting handset or pressing the
Handsfree key.
TELEPHONE OPTIONS MENU
Updated 11/20/2012
To access Telephone Options Menu
 Press the Services key. Telephone Options is now displayed on the
screen.
 Press Select. You can now scroll through the menu and make changes to
any of the options as needed.
 Press Quit to exit the Services.
REDIAL LIST logs up to 20 outgoing calls. When the list is full the system
overwrites the oldest entry. Use this feature to review calls made and to re-
dial any of these phone numbers.
 To view the log press the REDIAL key. Use the up or down navigation
keys to scroll through the list.
 To dial one of the phone numbers, use the up or down navigation keys to
scroll and select the desired entry. Press the Dial soft key.
 To delete one entry press the REDIAL key. Use the up or down naviga-
tion keys to scroll and select the desired entry. Press the Del soft key.
Delete Current Item? will display on the screen. Press the Yes soft key to
delete the entry or choose the No soft key to return to the previous
screen without deleting the entry.
 To delete the entire list press the REDIAL key. Press the Del soft key.
Delete Current List? will display on the screen. Press the Yes soft key to
delete the entire list or choose No to return to the previous screen.
RING TYPE ...change the ring tone on your phone.
There are eight different rings to choose from. Press the Services key and
select Telephone Options. Use the down navigation key to scroll through the
menu. Select Ring Type. Ring type 1 will flash. Press the Play soft key to
listen to that ring.
Use the down navigation key to go to the next ring type and press the Play
soft key to listen to that ring. Repeat to select and listen to each ring type.
When you have decided on the RING TYPE, press the Select soft key to save
it. Press Quit to exit the Options List.
TRANSFER …..transfer a caller to another Mason phone number.
With the call in progress, press the Trans soft key. The caller is automatically
placed on hold. Dial the five-digit phone number where the call is being
transferred. Announce the caller, then press Trans again to complete the
transfer.
If the called party does not answer, press Goodbye, then press the flashing
line key to return to caller.
VOICE MAIL
. . . retrieve voicemail messages from your campus phone.
Lift the handset and press the Message key. This key is programmed to auto-
matically dial voicemail.
. . . retrieve voicemail message from your home phone.
Dial 703-993-4500. Enter *#, then enter your seven-digit Mason phone
number.
Features . . .
(listed in alphabetical order)
AUTODIAL …...program one phone number per key for quick dial.
Without lifting the handset, press the autodial key you want to program. The
indicator next to this key will flash. The following information is displayed:
Programming autodial
Enter number
Enter the phone number you want to save, then press the autodial key to
save the phone number. When programming external phone numbers re-
member to enter 9 before the phone number.
Examples: Local call, 97031234567
Domestic long distance, 918161234567
International, 9011 + Country Code + phone number
(City Code may also be required)
To dial a phone number using the autodial key, lift the handset and press the
autodial key where the phone number is stored.
CALL PARK. . . . place a call on hold and retrieve it from another
phone.
While on an active call, press the Park soft key. You will see a 5-digit
number on the display. This is the number you will use to retrieve the call.
Remember this number. Press Park again. Go to the phone where you will
retrieve the call. Lift the handset and dial the 5-digit number where the call is
parked.
CALL PICKUP . . . answer a ringing telephone located in the next
workstation, without leaving your desk.
You must be in the same CALL PICKUP group with the ringing telephone. Lift
the handset and press the Pickup soft key. If your telephone does not have a
call pickup key, lift your handset and dial *11.
CALLING PARTY PRIVACY. . . place a call to an external phone number
without your phone number displaying on the called party’s Caller ID.
Lift the handset and dial *67 BEFORE you place your call. This feature must
be activated on a per call basis. If the phone number you are calling does not
accept calls from phone numbers that have CALLING PARTY PRIVACY acti-
vated the call will not go through. Instead you will hear a recorded message
stating they party you are calling does not accept calls from blocked phone
numbers.
CALLERS LOG…... can store up to 100 incoming calls. When the list is full,
the oldest entry is overwritten. The list contains the following information for
each call:
- caller’s first and last name (if available)
- extension or phone number of the caller
- time and date of the call
- the number of times the caller called
To access the CALLERS LOG press the Caller soft key. Use the up or down
navigation keys to scroll through the list. You can configure the Callers List to
store all incoming calls or only unanswered calls.
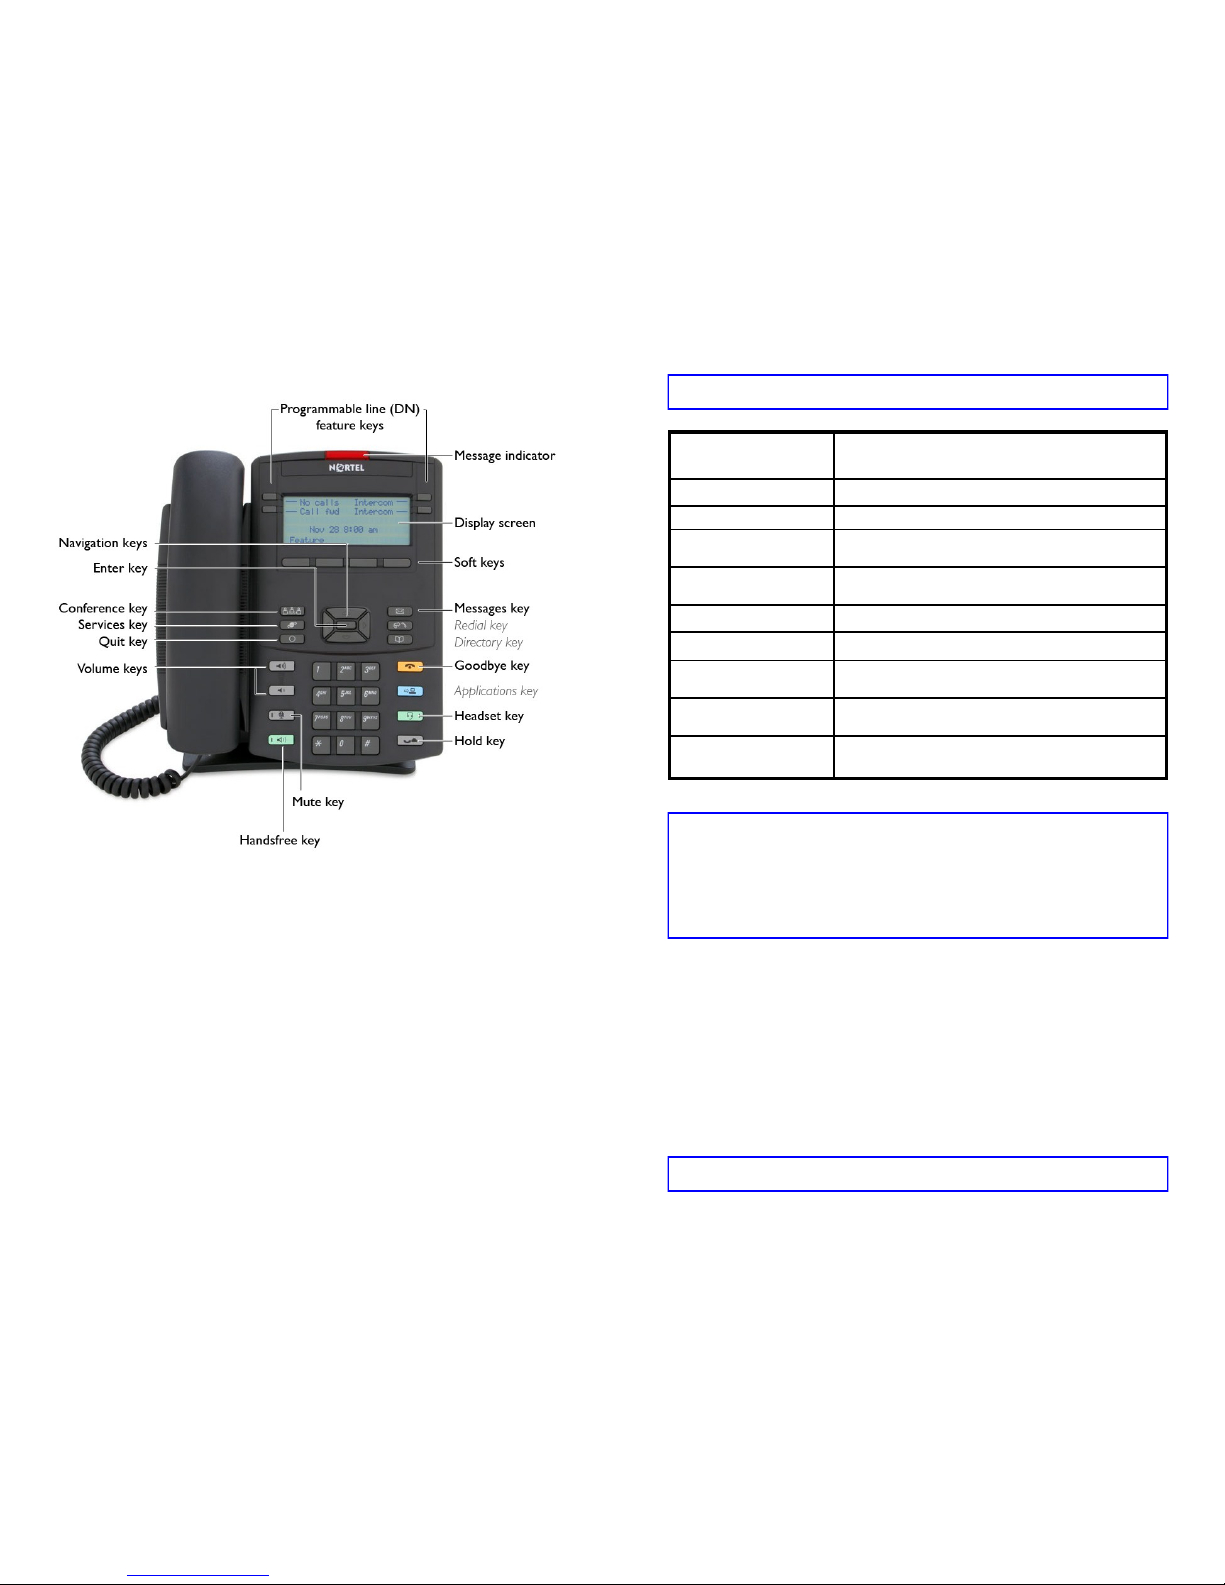
To configure the Call Log options:
- Press the Services key, then select Telephone Options.
- Use the up and down navigation keys to scroll through the menu, then
select Call Log Options.
- Select Incoming Calls.
- Select Log Mode. Use the up and down navigation keys to scroll between
Log All Calls and Log Unanswered Calls. Press the Enter key when the
option you want is displayed on the screen. The Enter key is located in
the center of the navigation keys.
CONFERENCE CALL…... (five people + you).
Dial the first number, when the person answers let them know you are
setting up a conference call. Press the Conf soft key, this places the
person on hold and gives you dial tone. Dial the second number. When
the person answers let them know you want to add them to a conference call.
Press the Conf soft key to bring the three of you together. Repeat to add addi-
tional people. If the person does not answer, press the Goodbye key and re-
turn to the call by pressing the flashing line key.
CALL JOIN. . . join a caller on another line to the current conference
call.
Place the caller on hold and return to the conference call. Press the Conf soft
key and return to the to the caller. Press the Conf soft key. The caller is now
joined to the conference call.
FEATURE KEY LABEL. . . change the AutoDial KEY LABEL to display a
name.
You can change the KEY LABEL on any line key, with the exception of your
main line.
 Press the Services key and select Telephone Options.
 Use the up and down navigation keys to scroll through the menu until you
see Change Feature Key Label and press the Select soft key.
 Change Feature Key Label will flash. Press the Select soft key.
 A message will display asking you to select a feature key. Press the key
you want to re-label. Press the Clear soft key. Edit feature key label will
display.
 Use the dial pad to enter the new label to display.
 Press the More soft key. To switch between upper and lower case press
the Case soft key. When you have completed entering the new label,
press the Select soft key. The new key label will display.
 Press Quit to exit.
FORWARD…. send calls directly to your voice mail or to another Mason
phone.
Without lifting the handset, press the Fwd soft key. Enter the 5-digit Mason
phone number where you want your calls forwarded. Press the Fwd soft key
again. There will be a solid indicator next to the Fwd soft key to remind you
that your phone is forwarded. To cancel the forward press the Fwd soft key.
The indicator next to Fwd will go out and you will now receive calls on your
phone. Example: To forward directly to voice mail, press the Fwd soft key
and dial 34500. Press the Fwd soft key again to activate forward.
HOLD. . . place a caller on HOLD
There are two ways to place a caller on hold.
 Press the HOLD key (located on the bottom right corner of the phone).
To return to the caller press the flashing line key. OR
 While on an active call and another line on your phone rings, press the
ringing line key. This places the first caller on hold. To go back to the
first caller, press the flashing line key. The second caller is now on hold.
INTERCOM. . . talk to another department staff member without call-
ing their five-digit phone number?
If your department has requested the INTERCOM feature there will be an
INTERCOM key on your phone. Lift the handset and press the INTERCOM
key. Dial the two-digit intercom number of the staff member you want to
intercom. For additional information on the INTERCOM feature, contact Tele-
com Admin, x3-3546.
PERSONAL DIRECTORY….. allows you to store up to 100 contacts to include
first name, last name, and phone number.
ADD entry, press the Directory key and select PERSONAL DIRECTORY.
Press the Add soft key. Use the dial pad to enter the name. Press the up
navigation key to enter special characters. Press the Next soft key. Use the
dial pad to enter the phone number. Press Done soft key to save the entry or
press Cancel to return to the Add screen without saving the new entry.
EDIT entry, press the Directory key and select PERSONAL DIRECTORY.
Press the up or down navigation keys to scroll and select the entry to edit.
Press the Edit soft key and make the necessary changes. To save your
changes press Done soft key or press Cancel to return to the directory.
DELETE entry, press the Directory key and select PERSONAL DIRECTORY.
Press the up or down navigation keys to scroll to the entry you want to delete.
Press the More soft key, then press the Del soft key.
Delete Current Item? will display on the screen. Select the Yes soft key to
delete the entry.
REDIAL …..the last number that you called
Lift the handset and press your main line key.
OR
Without lifting the handset press your main line key twice.

Other manuals for 1220

5

Other Avaya IP Phone manuals

Avaya J159 User manual

Avaya

Avaya J159 User manual

Avaya 9610 User manual

Avaya

Avaya 9610 User manual

Avaya J139 Installation and operating instructions

Avaya

Avaya J139 Installation and operating instructions

Avaya 9620 Deskphone Edition User manual

Avaya

Avaya 9620 Deskphone Edition User manual

Avaya one-X 4610SW User manual

Avaya

Avaya one-X 4610SW User manual

Avaya J179 User manual

Avaya

Avaya J179 User manual

Avaya one-X 9670G User manual

Avaya

Avaya one-X 9670G User manual

Avaya IP Office 1608 User manual

Avaya

Avaya IP Office 1608 User manual

Avaya 9640 Series User manual

Avaya

Avaya 9640 Series User manual

Avaya one-X 4610SW Manual

Avaya

Avaya one-X 4610SW Manual

Avaya 4620 User manual

Avaya

Avaya 4620 User manual

Avaya IP Office 9650 User manual

Avaya

Avaya IP Office 9650 User manual

Avaya IP Office 9620 User manual

Avaya

Avaya IP Office 9620 User manual

Avaya 1408 User manual

Avaya

Avaya 1408 User manual

Avaya one-X 4610SW User manual

Avaya

Avaya one-X 4610SW User manual

Avaya 9630 Deskphone Edition User manual

Avaya

Avaya 9630 Deskphone Edition User manual

Avaya IP Office 1416 User manual

Avaya

Avaya IP Office 1416 User manual

Avaya 1408 User manual

Avaya

Avaya 1408 User manual

Avaya Vantage K175 User manual

Avaya

Avaya Vantage K175 User manual

Avaya ArgentWAN3 Quick user guide

Avaya

Avaya ArgentWAN3 Quick user guide

Avaya 5601 User manual

Avaya

Avaya 5601 User manual

Avaya 9620 Deskphone Edition User manual

Avaya

Avaya 9620 Deskphone Edition User manual

Avaya IP Office 9508 User manual

Avaya

Avaya IP Office 9508 User manual

Avaya T3 Comfort User manual

Avaya

Avaya T3 Comfort User manual

Popular IP Phone manuals by other brands

Polycom SOUNDPOINT 3804-11530-222 Release notes

Polycom

Polycom SOUNDPOINT 3804-11530-222 Release notes

Cisco 6800 Series quick start guide

Cisco

Cisco 6800 Series quick start guide

LG-Nortel IP8830 user guide

LG-Nortel

LG-Nortel IP8830 user guide

Cisco 6941 - Unified IP Phone Slimline VoIP quick start guide

Cisco

Cisco 6941 - Unified IP Phone Slimline VoIP quick start guide

Well 3130IF user manual

Well

Well 3130IF user manual

ooma telo quick start guide

ooma

ooma telo quick start guide

Grandstream Networks GXP2130 Series quick start guide

Grandstream Networks

Grandstream Networks GXP2130 Series quick start guide

iPECS LDP-9240 user guide

iPECS

iPECS LDP-9240 user guide

Mitel Mitel 5330 Quick reference guide

Mitel

Mitel Mitel 5330 Quick reference guide

Mitel 112 installation guide

Mitel

Mitel 112 installation guide

Telecom ZIP 33i Quick reference guide

Telecom

Telecom ZIP 33i Quick reference guide

Yealink Star2Star SIP-T22P Quick user guide

Yealink

Yealink Star2Star SIP-T22P Quick user guide

Cisco Small Business Pro SPA 504G quick start guide

Cisco

Cisco Small Business Pro SPA 504G quick start guide

Obihai 1022 quick start guide

Obihai

Obihai 1022 quick start guide

LG-Nortel IP8815 user guide

LG-Nortel

LG-Nortel IP8815 user guide

Cisco 504 Administrator's guide

Cisco

Cisco 504 Administrator's guide

Zed-3 CN2x4 user manual

Zed-3

Zed-3 CN2x4 user manual

Grandstream Networks GXV-3140 user manual

Grandstream Networks

Grandstream Networks GXV-3140 user manual

manuals.online logo
manuals.online logoBrands
  • About & Mission
  • Contact us
  • Privacy Policy
  • Terms and Conditions

Copyright 2025 Manuals.Online. All Rights Reserved.