Avonic CM60-IP User manual

Avonic
CM60-IP / CM61-IP / CM63-IP
HD Video Conferencing IP Camera with PoE
User Manual
Version 2.1
Update notes:
•Visca over IP commands
Join Avonic
linkedin.com/company/avonic
twitter.com/avonic1
facebook.com/avonic

www.avonic.eu
2
Contents
Introduction...........................................................................................4
Congratulations....................................................................................................................................................................................................................................4
Safety Notes ...............................................................................................................................................................................................................................................4
Package contents and Accessories .........................................4
Product Overview...............................................................................5
Features...........................................................................................................................................................................................................................................................5
Main Unit..........................................................................................................................................................................................................................................................6
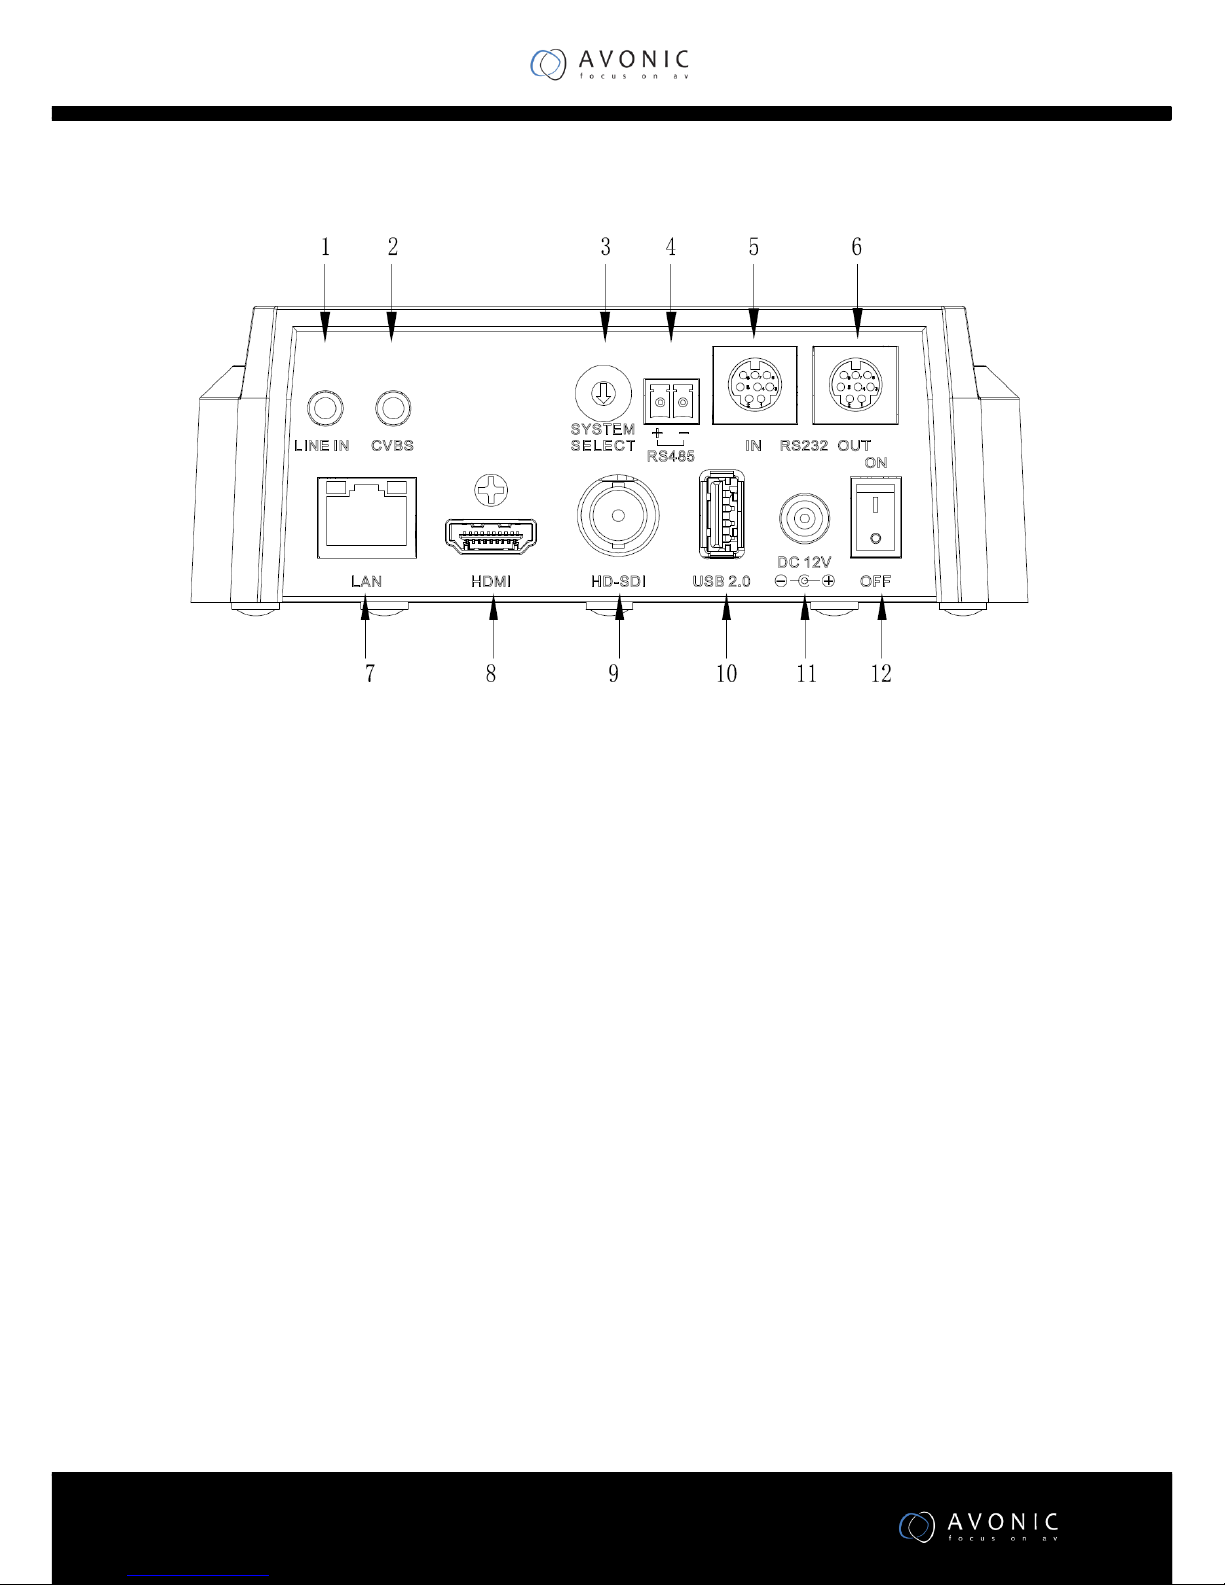
Input and Output Description.........................................................................................................................................................................6
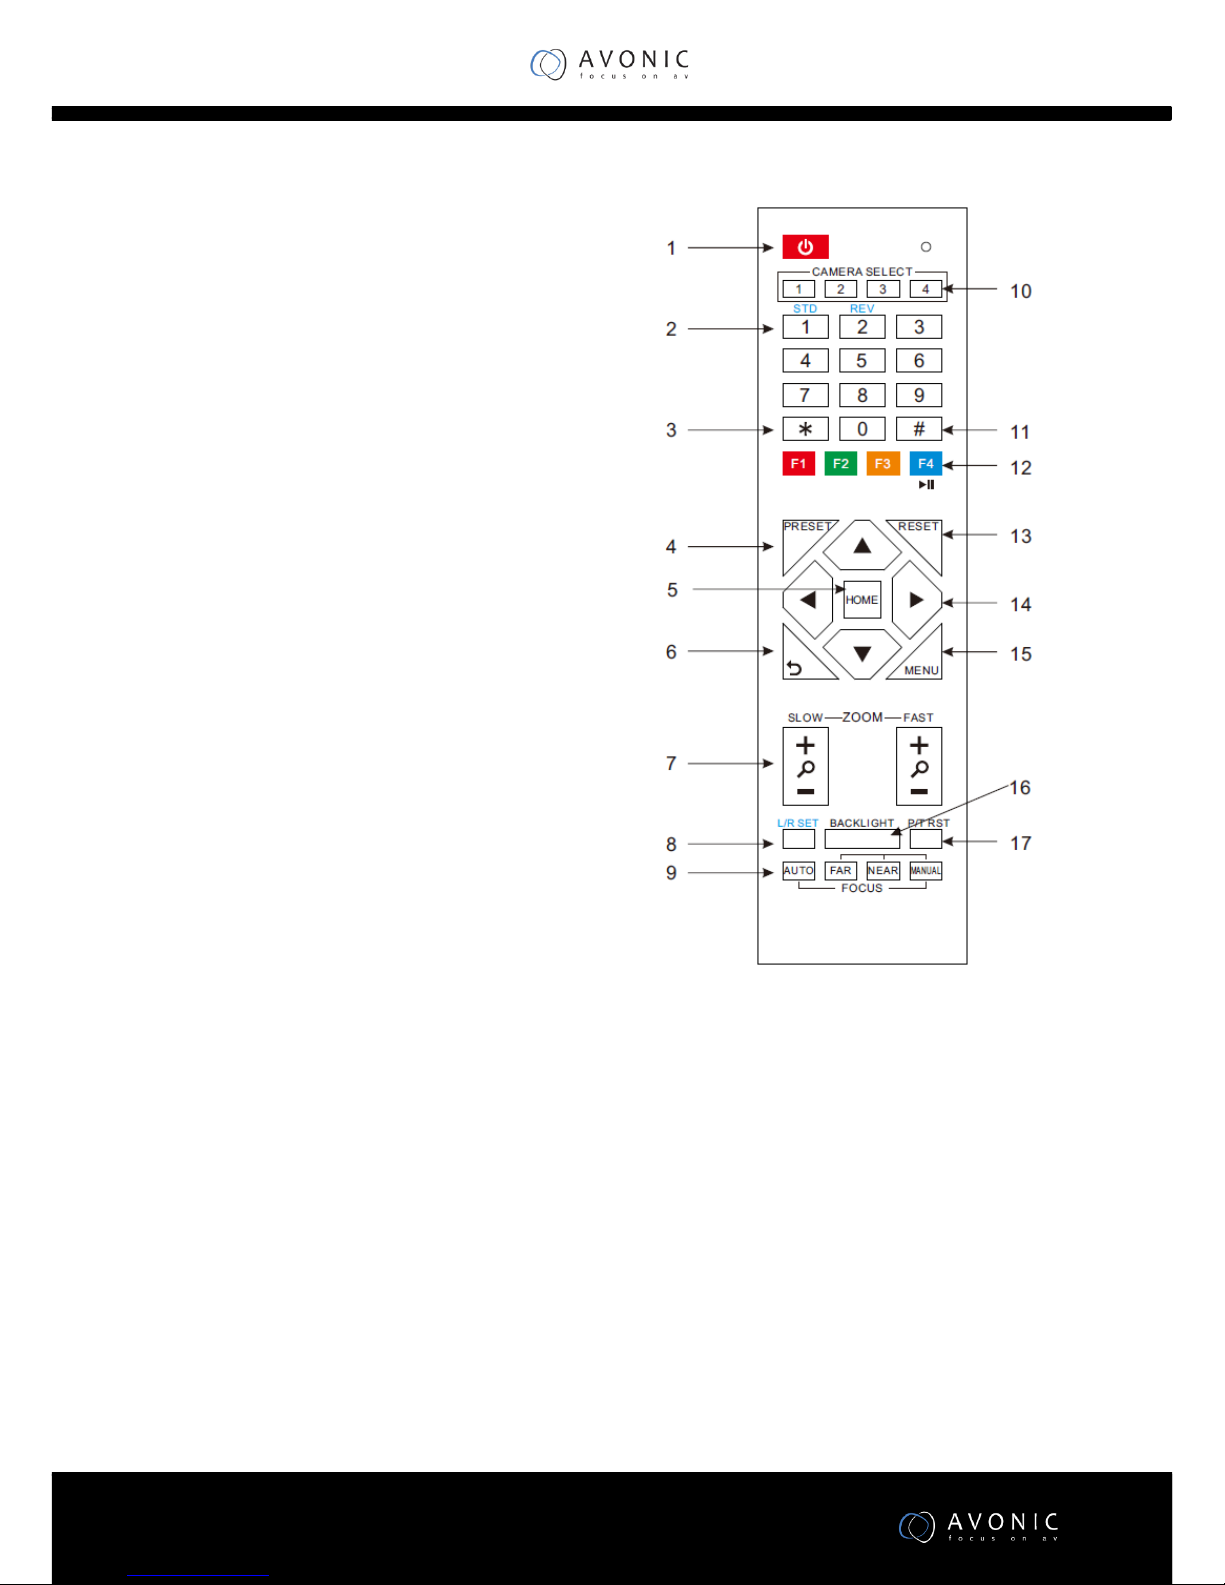
IR Remote Controller.....................................................................................................................................................................................................7
Installation .............................................................................................9
Connection Diagram......................................................................................................................................................................................................................9
System Select Switch......................................................................................................................................................................................................................9
Power adapter.......................................................................................................................................................................................................................................10
RS232 Interface......................................................................................................................................................................................................................................10
VISCA network connection diagram........................................................................................................................................................................11
Operation...............................................................................................12
OSD Menu......................................................................................................................................................................................................................................................12
Serial Communication Control.......................................................................................................................................................................................17
COM port settings...........................................................................................................................................................................................................17
Command List........................................................................................................................................................................................................................................18
Network Function................................................................................................................................................................................................................................19
Operating Environment..........................................................................................................................................................................................19
Equipment Installation.............................................................................................................................................................................................19
LAN Access and Control.........................................................................................................................................................................................19
Visit/Access IP Camera.........................................................................................................................................................................................20
TCP/UDP Control................................................................................................................................................................................................................21
WebGUI Homepage........................................................................................................................................................................................................................21

www.avonic.eu
3
Menu..................................................................................................................................................................................................................................................21
Video...............................................................................................................................................................................................................................................23
Image Setup.........................................................................................................................................................................................................................24
Audio Setup...........................................................................................................................................................................................................................25
System Setting..................................................................................................................................................................................................................26
Network Setting.................................................................................................................................................................................................................27
RTSP stream media player...............................................................................................................................................................................28
IP Port parameters.......................................................................................................................................................................................................28
Device Information.....................................................................................................................................................................................................28
Maintenance......................................................................................30
Camera Maintenance..............................................................................................................................................................................................................30
Unqualified Application...........................................................................................................................................................................................................30
Troubleshooting...............................................................................30
Image...............................................................................................................................................................................................................................................................30
Control...............................................................................................................................................................................................................................................................31
Contact .................................................................................................. 31
Appendix A .......................................................................................... 32
VISCA Camera Return Command List................................................................................................................................................................32
VISCA Camera Control Command List..............................................................................................................................................................33
VISCA Query Command List..............................................................................................................................................................................................37
Pelco-D Protocol Command List ................................................................................................................................................................................42
Pelco-P Protocol Command List.................................................................................................................................................................................42
VISCA over IP commands.....................................................................................................................................................................................................43
Appendix B Quick Start.................................................................50
Appendix C Dimensions................................................................ 51

www.avonic.eu
4
Introduction
Congratulations
Thank you for purchasing the Avonic CM6x-IP HD PTZ Camera. Before beginning to operate this
device, please read the manual in order to make sure the best performance is obtained. Save
this manual for future reference.
Safety Notes
•Installation and servicing should only be done by Qualified Service Personnel and
conform to all local codes.
•This unit is designed for indoor use only and it must not be installed where exposed to
water or other liquids and moisture.
•Before powering on the device, check the input power voltage carefully.
•Avoid shock and vibration when transporting and installing the device.
•Use wall mount brackets or ceiling mount brackets available at Avonic for safe
installation.
•Electronic devices produce heat. Do not block the ventilation slots of the device and
make sure the installation environment is well ventilated to avoid overheating.
•Before cleaning, unplug the power cable. Use a soft, damp cloth to clean the device, do
not use strong or abrasive detergent to clean that will damage the device.
•If you wish to dispose this product, please contact Avonic to obtain info about the take-
back procedure.
Package contents and Accessories
Quantity
Decription
Avonic SKU
1 pc
PTZ Camera
CM6x-IP
1 pc
Power Supply 12V/A
CM-PSU
1 pc
Remote Control
CM-RC
1 pc
RS232 9-pin male to 8-pin male
CM-RS232

www.avonic.eu
5
Product Overview
The Avonic CM-series cameras are designed for fixed installations. Without concessions on
quality, these cameras are an affordable choice for many installations. The cameras are
equipped with a Panasonic CMOS sensor combined with a glass high-quality glass lens with
12x /20x /30x optical zoom. Control these cameras over RS232/485 with the Avonic CM-CON100
PTZ controller or any third party controller that supports VISCA, Pelco-P/D protocols.
These high-quality conference video cameras, with resolutions up to 1080p/60 and h.265
encoded ultra-low bandwidth video streams, have adopted Panasonic’s HD CMOS sensor,
which produces high-quality images. The high SNR (55db) of the CMOS sensor combined with
2D and 3D noise reduction algorithms, effectively reduce the noise, even under low light
conditions. Supports HDMI, SDI and CVBS output with high effective transmission distances.
Using RS232/485 interface or over IP, all the parameters of the camera can be remote-
controlled.
Features
•H.265 encoding support, enabling full HD 1080p/60 video stream by ultra-low
bandwidth.
•Apply Panasonic's 1/2.7 inch, 2.07 million effective pixels high quality HD CMOS sensor,
can reach maximum Full HD 1920 x 1080 high resolution and achieve quality image.
•The output frame rate up to 60fps in 1080P, up to 120fps output in 720P
•AAC audio encoding, better sound quality and smaller bandwidth.
•High SNR of CMOS sensor combined with 2D and 3D noise reduction algorithm,
effectively reduce the noise, even under low illumination conditions, picture can still
keep clean and clear.
•HDMI output, 3G-SDI interface, effective transmission distance up to 100 meters. SD
CVBS output.
•20x Optical (CM60-IP).
•12x Optical (CM61-IP)
•30x Optical (CM63-IP)
•Remote Control Using RS232/485 interface, all the parameters of the camera can be
remote controlled by the high-speed communications.
•"Freeze During Preset" function, can masked image when calling the preset.

www.avonic.eu
6
Main Unit
Input and Output Description
1. Audio LINE IN Interface
2. CVBS Interface
3. System select switch
4. RS485 interface
5. RS232 IN interface
6. RS232 OUT interface
7. Network Interface
8. HDMI Interface
9. SDI Interface
10. USB2.0 (update only)
11. DC 12V jack
12. Power switch

www.avonic.eu
7
IR Remote Controller
1. Standby Button
Press this button to enter standby mode.
Press it again to enter normal mode. (Note:
Power consumption in standby mode is
approximately half of the normal mode)
2. Position Buttons
To set preset or call preset
3. *Button
Used with other buttons
4. Set/Preset Buttons
Set preset: Store a preset position
[SET PRESET] + Numeric button (0-9): Setting
a corresponding numeric key preset
position
5. Pan-Tilt control Buttons
Pressing the Pan-Tilt back to the middle
position
6. Back buttons
Press the OSD menu return to the superior.
7. Zoom Buttons
Slow Zoom: Zoom In [+] or Zoom Out [-]
slowly
Fast Zoom: Zoom In [+] or Zoom Out [-] fast
8. 8. Pan-Tilt L/R set
Press with 1 buttons and 2 buttons setting
the direction of the Pan-Tilt
L/RSet +1[STD]: set the Pan-Tilt turnthe same
direction as the L/R Set
L/R Set +2[REV]: set the Pan-Tilt turn the opposite direction as the L/R Set
9. 9. Focus Buttons
Used for focus adjustment.
Press [AUTO] adjust the focuses on the center of the object automatically. To adjust the
focus manually. Press [MANUAL] adjust the focus on the center of the object manual
MANUAL button, and adjust it with [Far] (Focus on far object) and [NEAR] (Focus on near
object)
10. Camera Select Buttons
Press the button corresponding to the camera you want to operate with the remote
controller.
11. # Button
Used with other buttons
Set Camera IR Address Buttons
[*]+[#]+[F1]: Address1

www.avonic.eu
8
[*]+[#]+[F2]: Address2
[*]+[#]+[F3]: Address3
[*]+[#]+[F4]: Address4
13. Clear Preset Buttons
Clear preset: Erase a preset position
[CLEAR PRESET] + Numeric button (0-9)
Or: [*]+[#]+[CLEAR PRESET]: Erase all the preset individually
14. Pan/Tilt Control Buttons
Press arrow buttons to perform panning and tilting. Press [HOME] button to face the
camera back to front
15. MENU
MENU: enter or exit OSD MENU
16. BLC (Backlight Compensation) Button
BLC ON/OFF: Press this button to enable the backlight compensation. Press it again to
disable the backlight compensation.(NOTE: Effective only in auto exposure mode)
Note: If a light behind the subject, the subject will become dark. In this case, press the
backlight ON / OFF button. To cancel this function, press the backlight ON / OFF button.
17. Pan/Tilt reset
Preset Pan/Tilt self-test.
18. Image freezing function
Manually freeze: Open the freezing function after press the remote control [F4], display
"Freeze" on the left upper corner character, after 5 seconds display disappear
automatically. If you want to cancel the freeze, press [F4] key and then can return to
normal, display "Unfreeze" on the left upper corner, after 5 seconds display disappear
automatically.
Recalling the Preset image Freeze:By the OSD Menu Setting "Recalling the Preset image
Freeze" function. After the function is opened, the screen will stay in before Recalling
the Preset when Recalling the Preset, the screen can be switched to the preset position
screen until the camera points to the preset position.
19. Shortcut Set
[*]+[#]+[1]: OSD menu default English
[*]+[#]+[3]: OSD menu default Chinese
[*]+[#]+[4]: Default IP address
[*]+[#]+[5]: Save OSD
[*]+[#]+[6]: Quickly recover the default
[*]+[#]+[8]: Look the camera version
[*]+[#]+[9]: Quickly set up inversion

www.avonic.eu
9
Installation
Connection Diagram
System Select Switch
Setting of the system select switch. The option of video format:
VIDEO SYSTEM
0
1080p60
8
720p30
1
1080p50
9
720p25
2
1080i60
A
-
3
1080i50
B
-
4
720p60
C
-
5
720p50
D
576i

www.avonic.eu
10
6
1080p30
E
480i
7
1080p25
F
-
CAUTION:
a. After changing the switch, you need to restart the camera to take effect.
b. 720 p30 and 720 p25 only under the HDMI output.
Power adapter
This equipment is equipped with a 12V/2A DC power supply. Insert the power supply according
to the requirements, turn on the power switch.
RS232 Interface

www.avonic.eu
11
VISCA network connection diagram

www.avonic.eu
12
Operation
OSD Menu
1. MENU
Press [MENU] button to display the main menu on the normal screen, using arrow button to
move the cursor to the item to be set. Press the [HOME] button to enter the corresponding sub-
menu.
2. EXPOSURE
Move the cursor to the Exposure item in the main menu and press [home] button, EXPOSURE
menu appears, as shown in the following figure.
MENU
Exposure
Color
Image
P/T/Z
Noise Reduction
Setup
Restore Default
[Home] Enter
[Menu] Exit
EXPOSURE
Mode Auto
ExpCompMode Off
Backlight Off
Gain Limit 3
Anti-Flicker 50Hz
DRC 4
Select Item
Change Value
[Menu] Back

www.avonic.eu
13
Mode: Exposure mode. Optional items: Auto,Manual, SAE, AAE, Bright
ExpCompMode: Exposure compensation mode, Optional items: On, Off (Effective only in Auto
mode) ExpComp: Exposure compensation value, Optional items: -7 ~ 7(Effective only in
ExpComp Mode item to On)
Backlight: Set the backlight compensation, Optional items: On, Off (Effective only in Auto mode )
Gain Limit: Maximum gain limit. Optional items: 0 ~ 15 (Effective only in Auto, AAE ,Bright
mode)
DRC: DRC strength, Optional items: 0 ~ 8. Bright: Intensity control, Optional items:00~17. (Effective
only in Bright mode)
Anti-Flicker Flicker: Anti-flicker. Optional items: Off, 50Hz, 60Hz (Effective only in Auto, Bright
mode)
Iris: Aperture value. Optional items: F1.8,
F2.0,F2.4,F2.8,F3.4,F4.0,F4.8,F5.6,F6.8,F8.0,F9.6,F11.0,Close(Effective only in Manual, AAE mode)
Shutt: Shutter value. Optional items:
1/30,1/60,1/90,1/100,1/125,1/180,1/250,1/350,1/500,1/725,1/1000,1/1500,1/2000,1/3000,1/4000,1/6000,1/10000
(Effective only in Manual, SAE mode)
3. COLOR
Move the cursor to the Color item in the main menu and press [home] button, COLOR menu
appears, as shown in the following figure.
WB-Mode: White balance mode. Optional
items: Auto, 3000K/Indoor, 4000K,5000K/
Outdoor, 6500K-1,6500K-2,6500K-3,One Push, Manual
RG: Red gain. Optional items: 0~255(Effective
only in Manual mode)
BG: Blue gain. Optional items: 0~255
(Effective only in Manual mode)
RG Tuning: Red gain fine-tuning, Optional items: -10 ~ +10(Effective only in AWB sens is Low)
BG Tuning: Blue gain fine-tuning, Optional items: -10 ~ +10(Effective only in AWB sens is Low)
COLOR
WB Mode Auto
RG Tuning 0
BG Tuning 0
Saturation 90%
Hue 7
AWB sens Low
Select Item
Change Value
[Menu] Back

www.avonic.eu
14
Sat.: Saturation. Optional items: 60% ~ 200%.
Hue: Chroma adjustment, Optional items:0 ~ 14
AWB sens: The white balance sensitivity,
Optional items: Normal, High, Low.
4. IMAGE
Move the cursor to the Image item in the main menu and press [home] button, IMAGE menu
appears, as shown in the following figure.
Luminance: Brightness adjustment. Optional items: 0 ~ 14
Contrast: Contrast adjustment. Optional items: 0 ~ 14
Sharpness: Sharpness adjustment. Optional items: Auto, 0 ~ 15
Flip-H: Image flipped horizontally. Optional items: On, Off.
Flip-V: Image Flip Vertical. Optional items: On, Off
B&W-Mode: Image color. Optional items: On, Off
Gamma: Optional items: Default, 0.45, 0.5, 0.56, 0.63
Style: Optional items: Norm, Clarity, Bright, Soft, V500.
LDC: Optional items: On, Off.
Note:
1080p60 and 1080p50 not support the lens distortion.
5. P/T/Z
IMAGE
Luminance 6
Contrast 6
Sharpness 1
Flip-H Off
Flip-V Off
B&W-Mode Off
Gamma Default
Style Norm
LDC Off
Select Item
Change Value
[Menu] Back

www.avonic.eu
15
SpeedByZoom: The depth of field scale switch, Optional items: On, Off
AF-Zone: Interested in focusing area, Optional items: Top, Center, Bottom
AF-Sense: Automatic focusing sensitivity options, Optional items: Low, Normal, High
L/R Set: Optional items: STD, REV
Image Freeze: Optional items: On, Off
Fast Zoom: Optional items: On, Off
6. NOISE REDUCTION
Move the cursor to the Noise Reduction item in the main menu and press [home] button, NOISE
REDUCTION menu appears, as shown in the following figure.
NR2D-Level: 2D noise reduction. Optional items: Off, Auto, 1 ~ 5
NR3D-Level: 3D noise reduction. Optional items: Off, 1 ~ 8
D-HotPixel: Dynamic bad points, Optional items: Off, 1 ~ 5
P/T/Z
SpeedByZoom On
AF-Zone Center
AF-Sense
High
L/R Set STD
Image Freeze Off
Fast Zoom Off
Select Item
Change Value
[Menu] Back
NOISE REDUCTION
NR2D-Level 3
NR3D-Level 3
D-HotPixel Off
Select Item
Change Value
[Menu] Back

www.avonic.eu
16
7. SETUP
Move the cursor to the Setup item in the main menu and press [home] button, SETUP menu
appears, as shown in the following figure.
Language: menu language, Optional items: EN, Chinese, Russian
DVI Mode, Optional items: DVI, HDMI
Protocol: Control protocol type. Optional items: AUTO, VISCA, PELCO-D, PELCO-P
V_Address: Protocol address, To be decided according to the agreement, AUTO, VISCA
protocol Optional items: 1 ~ 7
P_D_Address: PELCO-D protocol Optionalitems: 0 ~ 254
P_P_Address: PELCO-P protocol Optionalitems: 0 ~ 31
V_AddrFix: If I can change through the serial port of infrared switch, Optional items: On, Off
(When set to On, useless in 88 30 01 FF
Command)
Net Mode: Set the serial port control networking, Optional items: Serial, Paral
Baudrate: Serial port baud rate. Optional items: 2400, 4800, 9600
8. RESTORE DEFAULT
Move the cursor to the Restore Default item in the main menu and press [home] button,
RESTORE DEFAULT menu appears, as shown in the following figure.
SETUP
Language EN
DVI Mode DVI
Protocol VISCA
V_Address 1
V_AddrFix Off
Net Mode Serial
Baudrate
9600
Select Item
Change Value
[Menu] Back

www.avonic.eu
17
Restore: Confirm restore factory settings.
Optional items: Yes, No
Note: Press [HOME] button to confirm, All
parameter restore default, Include IR Remote
address and VISICA Address
Save: Save Options. Optional items: Yes, No
Serial Communication Control
COM port settings
In default working mode, the camera is able to connect to a VISCA controller with RS232C serial
interface.
RS232 Communication Control:
The camera can be controlled via RS232 ,the parameters of RS232C are as follows:
•Baud rate: 2400/4800/9600 bit/s.
•Start bit: 1 bit.
•Data bit: 8 bits.
•Stop bit: 1bit.
•Parity bit: none.
RS485 Communication Control:
The camera can be controlled via RS485, Half-duplex mode:
•Baud rate: 2400/4800/9600 bit/s.
•Start bit: 1 bit.
•Data bit: 8 bits.
•Stop bit: 1bit.
•Parity bit: none.
Pan-Tilt will rotate to the maximum position of top right after the camera started, then it return
to the center, the process of initialization is finished. (Note: If the position preset 0 has been
RESTORE DEFAULT
Restore? No
Change Value
[Home] OK
[Menu] Back

www.avonic.eu
18
stored, the position preset 0 will be called up after initialization) Then the users can control the
camera with commands in the command list.
Command List
See Appendix A

www.avonic.eu
19
Network Function
Operating Environment
•Operating System: Windows 2000/2003/XP/vista/7/8/10
•Network Protocol: TCP/IP
Equipment Installation
1. Connect IP camera to your ethernet or to your PC directly via ethernet cable.
2. The camera can be Powered over Ethernet if the switch is PoE. The camera can also be
powered by its power supply.
3. Theorangelight of ethernet port lit on, green light flashing, andthe physical connection
finished.
Connection ways between IP camera and computer, as picture 1.1 and picture 1.2 shown:
Picture 1.1 connect by ethernet cable
Picture 1.2 Connect by router /interchanger
LAN Access and Control
IP camera default IP address"192.168.100.88"
user "admin", password "admin".
To find camera IP, press * and # and 4 on remote controller one by one, IP address will be
shown on screen.
Change IP address:
On web control page, find "Network"--->Change IP---->Click "Apply"----> Restart camera

www.avonic.eu
20
Visit/Access IP Camera
Input http://192.168.100.88 to web browser, a login window pop up, input
login name: admin
password: admin
A window like the following will appear:
This manual suits for next models
2
Table of contents
Other Avonic IP Camera manuals

Avonic
Avonic AV-CM22-VCU User manual

Avonic
Avonic CM44-VCUC-B User manual

Avonic
Avonic CM60-IP-BOX User manual

Avonic
Avonic AV-CM44-VCUC-B User manual

Avonic
Avonic AV-CM44-VCUC User manual

Avonic
Avonic AV-CM22-VCU User manual

Avonic
Avonic CM50-IP User manual

Avonic
Avonic CM63-IP User manual

Avonic
Avonic AV-CM22-VCU User manual