BabySafe Mastiff User manual

1
GROUP 1536 KG 3Y12Y
INSTRUCTION
EN
Friend of the child and family

2 3
1: GENERAL SAFETY NOTES
!!!Take the time to carefully read throngh these instruction, and always keep them
ready to hand in the designated pocket on the child seat
!!!For the protection of all vehicle occupants
In the case of an emergengy stop or an accident, persons or objects which are not
properly secured in the car can cause injury to other vehicle occupant. For this re-
ason, please always check that:
• The backrests of the vehicle seats are locked(e.g .that the latch on a folding rear
seat bench is engaged )
• All heavy or sharp-deged objects in the vehicle(e.g.on the parcel shelf )are secured.
• All persons in the vehicle have thier seat belts fastened.
• The child safety car seat is always secured in the car via the ISOFIX anchoring,the
3-piomt belt(Vehicle belt ),even when there is on child in the seat.
!!!For the protection of your child
• The more snugly 3-piont belt t over your child’s body,the safer your child will be.
• Please do not ever leave your child unattended in the child safety seat in the
vehicle.
• Use on the rear seat:
Move the front seat forward far enough that your child’s feet can not t the backrest
of the front seat(to prevent risk of injury)
• The child safety seat can get hot in direct sunshine.
CAUTION: Children’s skin is delicate and could be injured as a result. Protect the
child seat against intensive direct sunlinght when it is not currently in use.
• Only allow your child to enter and exit the vehicle on the pavement side.
• Make stops during longer journeys to give your child an opportunity to run abo-
ut and play.
!!!To protect your vehicle
Some vehicle seat coverings made of more delicate materials(e.g.velour,leather.
ect.)may develop wear marks when child seats are used. For optimum protection of
your seat covers,we recommend using the our Car Seat Protection,which is available
from our rang of accessories.

4 5
2. USE IN THE VEHICLE
Please observe the instruction on the use of child restraint systems described in
your vehicle owner’s manual.
The seat may be used in vehicle equipped with ISOFIX,and 3-piont belt(see type
list).Please consult your vehicle owner’s manual for information about the ISOFIX
and the instruction with 3-point belt.Also check your vehicle owner’s manual for
seats which are approved for child safety seats in weight classes 15-36kg.
You can use your child car seat follows:
In the direction of travel, see chart 1 Yes
Against the direction of travel, see chart 1 No (1)
With 2-point belt teafuring (Vehicle belt, see chart 2 No
On seat featuring:
ISOFIX attachments (between seat surtace and back-rest,
and 3-point belt (vehicle belt, dee chart 2 and 3
Yes (2) (3)
Use is permitted on a rearward -facing wehicle seat(e.g. in a van or minibus)only if
the vehicle seat is also approved for use by adults.The seat must not be positioned
anywhere where it is in rang of an airbag which is being deployed
2) The safety belt must be approved to ECE R 16 or a comparable standard(see test
label on belt with an“E”or“e”in a circle).
3) If there is a front airbag:Slide the passenger seat a long way back and refer to any
instructions in vehicle owner’s manual.
(please observe the applicable regulations in the your country)
8
910
11

6 7
3: APPROVAL
Child Safety Seat
Tasted anf certied according to ECE﹡R 44/04,Group Body weight 15-36 KG
The child safety seat has been designed,tested and certied according to the require-
ments of the European Standard for Child Safety Equipment(ECE R44-04).The test mark
E(in a circle)and the certication number are located on the orange certication sticker(-
sticker on the child safety seat).
• This certication will be invalidated if you make any modications to child safety seat.
• The Masti child safety seat must only be used to secure your child in the vehicle.It
must never be used as a seat or a toy in the home.
Risk of injury due to unauthorised modications!
Unauthorised technical modications may reduce or entirely void the seat’s properties.
• Do not make any technical modications to the child seat
• Use the child seat only as described in these user instructions.
The Masti oers a variety of mounting options, the following table indicates the types
of installation for the respective groups:
Group Installation Child
instalation
User guide
chapter
(15-36 kg) ISOFIX (3-point belt)
vehicle belt 6.2
4. CARE AND MAINTENANCE
4.1 Cleaning
CAUTION please be sure to use only genuine Masti replacement seat covers,as the
seat covers is an integral part of the child safety seat which plays an important role in
ensuring that the system works properly.Replacement seat covers are available from
your retailer.
CAUTION! The child seat must not be used without its cover.
• The cover can be removed and washed with a mild detergent using the washing
machine’s cycle for delicate items(30°C).
• The plastic parts can be cleaned using soapy water.Do not use harsh cleaning agents
(such as solvents).
4.2 Removing the cover
A) Headrest
1. Move the headrest of the child seat to the upper position.
2. Take o the cover from belt holder of headrest rst, then remove the cover of the
headrest.
B) Take o the cover from backrest and base.
4.3 Adjusting the headrest
Pull the headrest height adjuster 06 and headrest 01at same time, select the correct
height of the headrest and engage it in the positon that ts for your child by releasing
the adjuster.
6

8 9
4.4 Adjusting the headrest in vehicle belt installation A correctly adjusted headrest 01ensures that the diagonal seat belt section 08 is opti-
mally positioned,and gives your child the optimal protection.
The headrest 01 must be adjusted so that there is a space two ngers wide between the
headrest 01 and your child’s shoulders.
To adjust the height of the headrest to t your child:
1: Pull the headrest height adjuster and headrest at same time................This unlocks the
headrest
2: You can now move the unlocked headrest 01 to the desired height.As soon as you
release the adjustment 06, the headrest 01will lock into place
3: Place the child seat on the vehicle seat.
4: Have your child sit down in the child seat and check the height.Repeat this process
until the headrest 01 is at the optimal height.
5. PREPARATORY WORK
Please read the chapter with your desired installation method in chapter 6 rst.
4
8
10
9
12
9

10 11
1. If your vehicle is not equipped with the ISOFIX insert guides as standard,clip the two
insert guides 13 which are included with the seat.
﹡ With the cut-out facing upwards onto the two ISOFIX attachment points 11 of
your vehicle.
Tip:The ISOFIX attachment points are located between the surface and the backrest
of the vehicle seat.
2. Move the head restraint on the vehicle seat to the upper position.
3. Pull the ISOFIX adjuster 02 to pull out both locking arms 07. Pull the locking arm
to and fro untill you hear a click sound which indicate they are fully engaged.
4. On both sides of the locking arms,the button turn into green safety color.
﹡ The insert guides make it easier to install the child safety seat with the aid of the
ISOFIX attachment points and prevent damage to the seat covering.When not in
use,they should be removed and stored in a safe place.On vehicles with a folding
backrest the insert guides must be removed before the backrest is folded.Any
problems which occur are usually caused by dirt or foreign objecrts on the insert
guides and on the hooks. Clean of any dirt or foreign objects to remedy this type
of problem.
13
11
07
02
14
5. PREPARATORY WORK
Please read the chapter with your desired installation method in chapter 6 rst.
Prepare ISOFIX
6. INSTALLATLON
6.1 I Installation of ISOFIX
1. Follow the steps in section 5.
2. Follow the steps in section4.4.
3. Place the child sear facing in the direction of travel on the wehicle seat.
4. Pull the ISO-FIX adjuster, let the ISO-FIX locking arm longer.Pull the locking arm to
and fro to ensure that the locking arm keep in nal locked situation.
5. Grasp the child seat with both hands and slide the two locking arms 07 rmly into the
insert guides 13 until the locking arms engage with a clicking noise on both sides.The
green safely button must now be visible on both sides.

12 13
CAUTION! The locking arms are only correctly engaged if both of the safety buttins
are completely green .
6. Pull the ISOFIX adjuster,and push the child seat towards the backrest applying
rm, even pressure on both sides.
7. Shake the child safety seat to make sure it is safely attached and re-check the
green safety buttons 14 to make sure that both of them are completely green.
6.2 GROUP 2 and GROUP 3 {IOSFIX & Vehicle belt }
1. Follow the steps in section 5.
2. Follow the steps in section 4.4.
3. Place the child seat facing in the direction of travel on the vehicle seat.
4. Grasp the child seat with both hands and slide the two locking arms 07 rmly into
the guides 13 until the locking arms engage with a clicking noise on both sides.
The green safety button must now be visible on both sides.
CAUTION! The locking arms are only correctly engaged if both of the safety buttons
are completely green.
5. Push the child seat towards the backrest applying rm,even pressure on both
sides.
6. Shake the child safety seat to make sure it is safely attached and re-check to the
green safety buttons to make sure that both of them are completely green.
7. Pull out the vehicle seat belt and guide it in front of your child to the vehicle seat
buckle.
CAUTION!
8. Engage the buckle tongue in the vehicle seat buckle CLICK!
9. Place the diagonal seat belt section 9 and lap belt section 10 on the vehicle seat
belt buckle under the armrest and into the light red belt guide 12 of the child
seat.
CAUTION! The vehicle seat belt buckle must not be positioned between the light
red guide 12 and the armrest.
10. Place the lap belt section 10 on the other side of the child seat in the light red
guide 12.
CAUTION! The lap belt section 10 must lie as low as possible over your child’s hips
on both sides.
11. Guide the diagonal seat belt section 8 into the dark red belt holder 04 of the
headrest 01 until it lies completely in the belt holder 04 and is not twisted.
Tip!If the backrest conceals the belt holder 04,you can adjust the headrest 01
upwards. The diagonal seat belt section 8 can be easily inserted .Now return the
headrest 01 to the proper height,as in Section 4.4.
4
9
8
1
2
3
4
6.2 GROUP 2 and GROUP 3 { IOS-FIX & Vehicle belt }
13
9
10
12

14 15
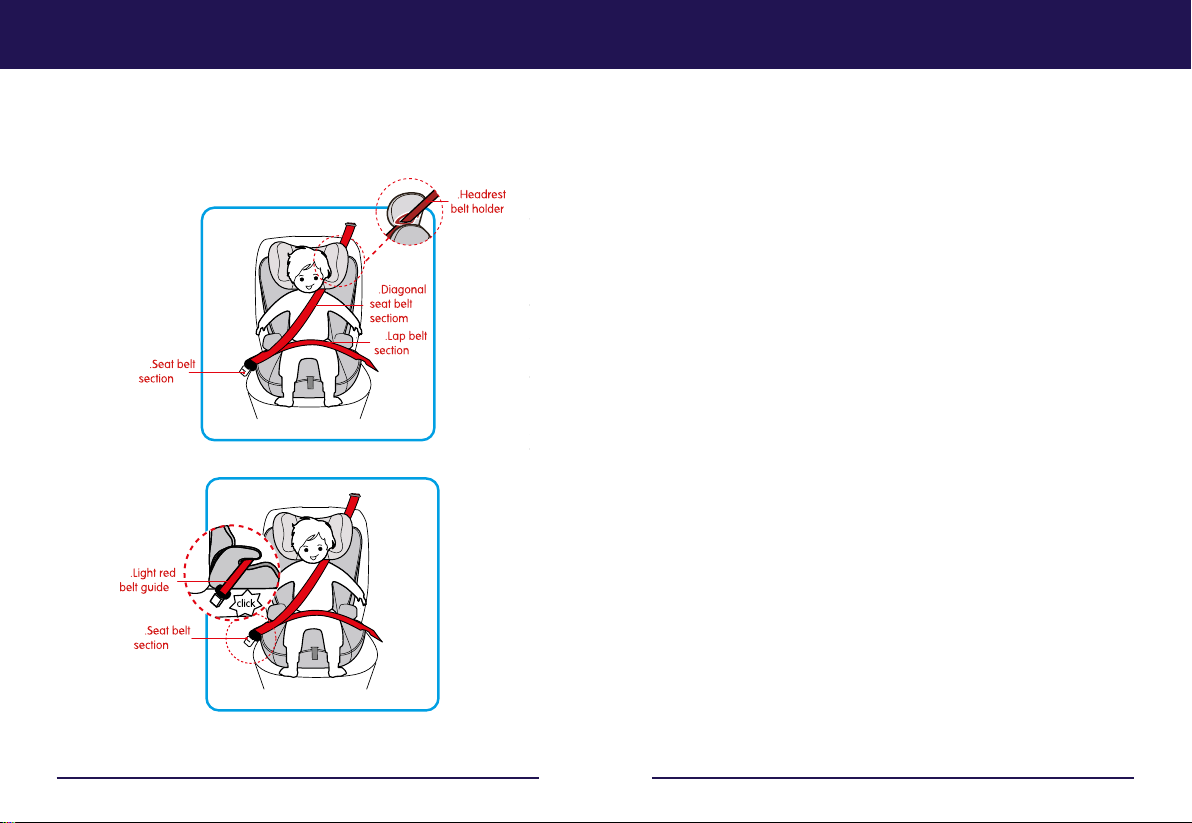
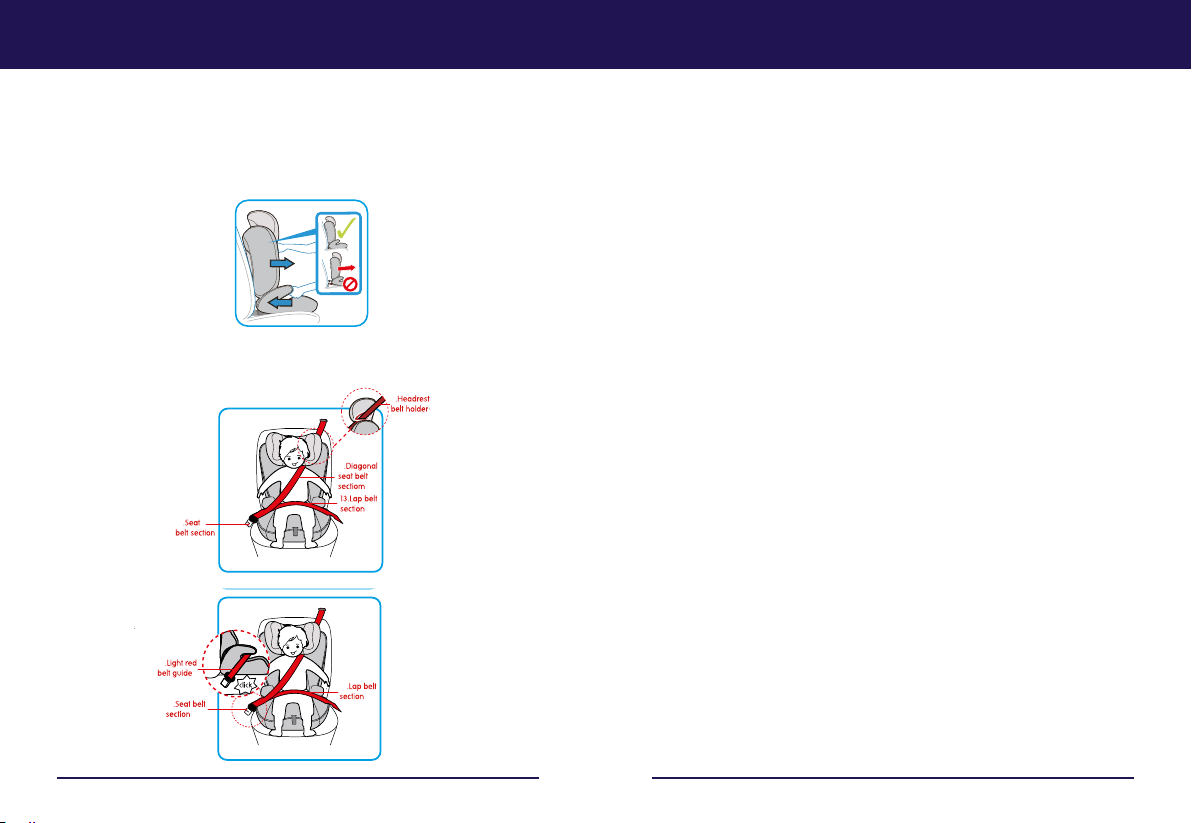
12. Make sure that the diagonal seat belt section 8 runs over your child’s shoulder
bone,and not in front of his or her neck.
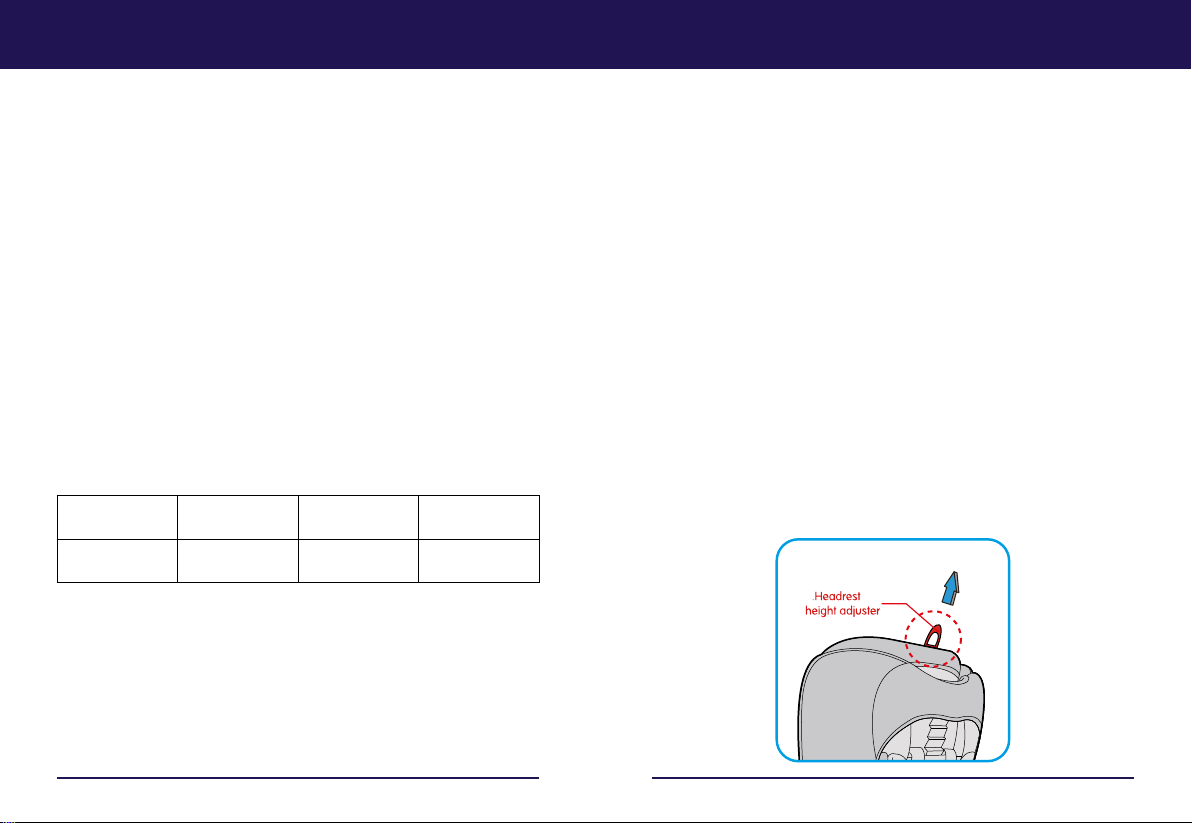
Tip! You can still adjust the height of the headrest 01 again here in the vehicle.
CAUTION! The diagonal seat belt section 8 must run diagonally backward.You can
adjust the course of the belt with your vehicle’s adjustable belt deector.
CAUTION! The diagonal seat belt section 08 must never lead forward to the vehicle’s
belt deector. In this case ,only use the child seat on the rear seat.
For the safety of your child,before every journey in the car check that:
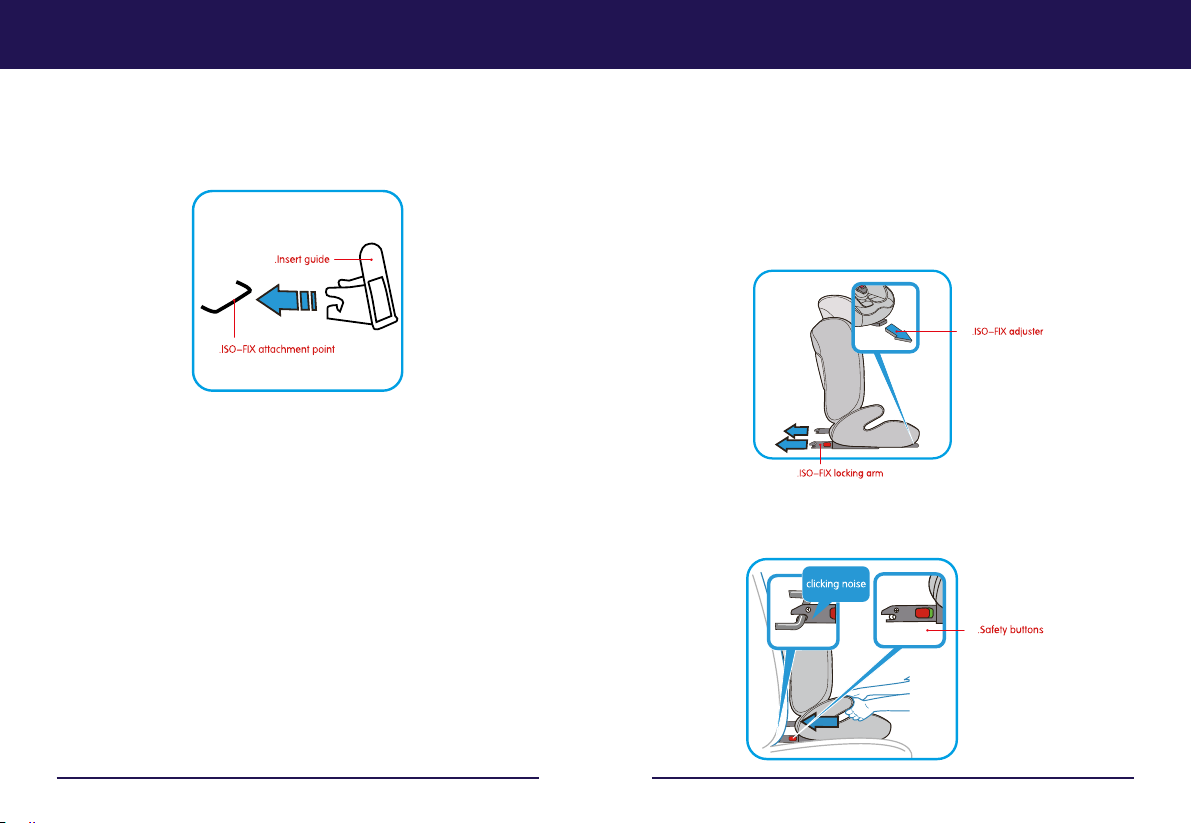
• the child safety seat is engaged on both sides with the ISOFIX locking arms 7 in
the ISOFIX
• attachment points 11 and that both green safety buttons 14 are completely
green ;
• the child safety seat is securely fastened;
• the lap belt section 10 runs through the light red belt guides 12 on both sides of
the seat cushion;
• the diagonal seat belt section 8 on the side of the vehicle seat belt buckle also
runs through the light red belt guide 12 of the seat cushion;
• the diagonal seat belt section 8 runs through the dark red belt holder 04 of the
headrest;
• the diagonal seat belt section 8 runs diagonally backward,
• the straps are tight and twisted;
• the vehicle seat belt buckle is not positioned between the light red belt guide 12
and the armrest of the seat cushion.
CAUTION! If your child attempts to open the safety buttons 14,make sure to stop at
the earliest opportunity. Check that the child safety seat is correctly attached and
make sure that your child is properly secured.Teach your child about the dangers
involved
To remove the child seat follow the steps in section 8
7.CARE INSTRUCTIONS
To ensure the full protective eect of child safety seat:
• In the event of an accident with an impact speed above 10km/h it is possible that
the child safety seat may have been damaged,but that the damage may not be
immediately obvious. In this case the child safety seat must be replaced.
• Please dispose of it properly.
• Regularly check all important parts for damage. Make sure that the mechanical
components in particular are all in perfect working order.
• To prevent damage,ensure that the child safety seat does not become jammed
between hard objects (car door ,seat runners etc ).
• Always have the child safety seat checked if it has been damaged (e.g. if it is drop-
ped ).
• Never lubricate or oil parts of the child seat.
• In order to properly protect your baby,it is imperative that you install and use the
Masti exactly as described in this manual
Disposal of packaging Container for cardboard
Cover Residual waste,thermal utilisation
Plastic parts In accordance with the labelling in
the designated container
Metal parts Container for metals
Harness straps Container for polyester
Buckle Residual waste
8. REMOVAL OF THE CHILD SEAT
CAUTION! Remove the child seat from the vehicle.The child seat must never be
transported in the car if it is not properly secured.
Group 2 and Group 3 (ISOFIX &Vehicle belt )
1. Release vehicle seat buckle if securing the child seat.
2. To release the ISOFIX fastening,squeeze the green safety button and the red rele-
ase button together,rst on one side,then on the other.
3. Slide the ISOFIX locking arms back into the seat shell.

1
GRUPA WIEKOWA 15 36 KG 3 12 LAT
INSTUKCJA
PL
Przyjaciel dziecka i rodziny

2 3
1: OGÓLNE UWAGI DOT. BEZPIECZEŃSTWA
!!!!Przeczytaj uważnie niniejszą instrukcję obsługi, a następnie włóż ją do dedyko-
wanej kieszeni fotelika.
!!!!W celu ochrony wszystkich osób znajdujących się w pojeździe
W razie awaryjnego hamowania lub wypadku wszystkie osoby i przedmioty, które
nie są właściwie zabezpieczone, mogą spowodować obrażenia innych użytkowni-
ków pojazdu. Dlatego zawsze upewnij się, że:
• Oparcie siedzeń pojazdu jest zablokowane (np. zatrzask tylnych siedzeń jest w
pozycji blokującej).
• Wszystkie ciężkie i ostre przedmioty w pojeździe (np. na tylnej półce) są unieru-
chomione.
• Wszystkie osoby w pojeździe mają zapięte pasy.
• Fotelik dziecięcy jest zabezpieczony poprzez mocowanie ISOFIX oraz 3-punkto-
wy pas (pas pojazdu), także wtedy, gdy w foteliku nie ma dziecka.
!!!!W celu ochrony twojego dziecka
• Aby zapewnić jak największe bezpieczeństwo swojemu dziecku, upewnij się, że
pas przylega jak najdokładniej do ciała dziecka.
• Nie pozostawiaj swojego dziecka w foteliku bez opieki.
• Korzystanie z fotelika na tylnym siedzeniu:
• Przesuń siedzenie pasażera do przodu w taki sposób, aby dziecko w foteliku nie
mogło go dosięgnąć nogami (zapewni to ochronę przed obrażeniami).
• Fotelik może się nagrzewać pod wpływem bezpośredniego działania promieni
słonecznych.
UWAGA: Skóra dziecka jest delikatna, dlatego może ulec uszkodzeniu. Chroń fotelik
przed intensywnym działaniem promieni słonecznych, kiedy go nie używasz.
Pozwalaj dziecku wchodzić do pojazdu jedynie od strony chodnika.
Rób postoje podczas dłuższych podróży, aby dać dziecku możliwość ruchu i zabawy.
!!!!W celu ochrony pojazdu
Na obiciach siedzeń niektórych pojazdów wykonanych z delikatniejszych materia-
łów (np. welur, skóra itd.) mogą pozostać ślady po użytkowaniu fotelika. Aby zapew-
nić optymalną ochronę siedzeń, zalecamy używanie Osłony Siedzeń Samochodo-
wych, która jest dostępna w naszej ofercie akcesoriów.
1. Zagłówek
2. Regulator ISO–FIX
3. Osłona boczna SIP
(Element opcjonalny)
4. Uchwyt na pasy
5. Podstawa
6. Regulacja wysokości
zagłówka
7. Ramiona blokady
ISO–FIX

4 5
2. UŻYWANIE W POJEŹDZIE
Przestrzegaj informacji dotyczących używania fotelików dziecięcych zawartych w
instrukcji obsługi twojego pojazdu.
Fotelik może być używany w pojazdach wyposażonych w ISOFIX oraz 3-punktowy
pas (patrz lista typów). Zapoznaj się z informacjami na temat ISOFIX oraz 3-punk-
towego pasa, które są umieszczone w instrukcji obsługi twojego pojazdu. Sprawdź
także zawarte tam informacje na temat fotelików dziecięcych w kategorii wagowej
15–36 kg.
Możesz używać fotelika samochodowego:
Zgodnie z kierunkiem jazdy, patrz Rysunek 1 Tak
Przeciwnie do kierunku jazdy, patrz Rysunek 1 Nie (1)
Z 2-punktowym pasem (Pas samochodowy),
patrz Rysunek 2 Nie
Na siedzeniach z:
Zaczepami ISOFIX (pomiędzy powierzchnią siedzenia i
oparciem) oraz 3-punktowym pasem (pas samochodowy),
patrz Rysunek 2 oraz 3
Tak (2) (3)
1) Użycie na siedzeniu zwróconym tyłem do kierunku jazdy (np. w vanie lub mikro-
busie) jest dopuszczalne wyłącznie wtedy, gdy siedzenie jest także dopuszczone do
użytku przez dorosłych. Fotelika nie należy umieszczać w zasięgu otwierającej się
poduszki powietrznej.
2) Pas bezpieczeństwa musi spełniać standard ECE R16 lub porównywalny (patrz
etykieta na pasie z literą„E” bądź„e” w kółku).
3) Jeżeli w pojeździe jest przednia poduszka powietrzna: Przesuń siedzenie pasażera
do tyłu i stosuj się do zaleceń zamieszczonych w instrukcji obługi pojazdu
(Stosuj się do przepisów obowiązująych w twoim kraju)
Rysunek 1
Rysunek 2
8. Odcinek ukośny
pasa bezpieczeństwa
9. Odcinek pasa
bezpieczeństwa
poprawnie niepoprawnie
10. Odcinek udowy
pasa bezpieczeństwa
Rysunek 3
11. Punkt mocowania
ISO–FIX

6 7
3: DOPUSZCZENE DO UŻYCIA
Fotelik dziecięcy samochodowy
Testowany i certykowany zgodnie z ECE﹡ R 44/04, kategoria wagowa 15–36 KG
Fotelik dziecięcy został zaprojektowany, przetestowany oraz certykowany według wy-
mogów Europejskiego Standardu Sprzętu Bezpieczeństwa Dzieci (ECE R 44/04). Ozna-
czenie testu E (w kółku) oraz numer certykacyjny umieszczone są na pomarańczowej
naklejce certykacyjnej (naklejka umieszczona jest na foteliku).
• Certykat ulegnie unieważnieniu, jeśli dokonasz jakichkolwiek zmian w foteliku.
• Fotelika Masti używaj wyłącznie w celu zabezpieczenia dziecka w pojeździe, nigdy
jako siedzenia lub zabawki w domu
Ryzyko obrażeń związanych z nieautoryzowanymi zmianami!
Nieautoryzowane zmiany techniczne mogą zmniejszyć bądź w całości zniwelować wła-
ściwości ochronne fotelika.
• Nie dokonuj żadnych zmian technicznych fotelika.
• Używaj fotelika wyłącznie w sposób przedstawiony w niniejszej instrukcji.
Model Masti umożliwia różne rodzaje montowania. Poniższa tabela przedstawia ro-
dzaje montażu w zależności od kategorii:
Kategoria Metoda
montażu
Zabezpieczenie
dziecka
Rozdział Instrukcji
Użytkownika
(15-36kg) ISOFIX (3-punktowy pas)
pas samochodowy 6.2
4. UTRZYMANIE I KONSERWACJA
4.1 Czyszczenie
UWAGA Upewnij się, że używasz jedynie oryginalnych pokryć wymiennych do fotelika
Masti. Pokrycie fotelika jest jego integralną częścią i odgrywa znaczącą rolę w prawi-
dłowym działaniu systemu. Pokrycia wymienne są dostępne u sprzedawców.
UWAGA! Nie używaj fotelika bez pokrycia.
• Pokrycie można zdjąć i umyć łagodnym środkiem chemicznym, używając programu
pralki dla materiałów delikatnych (30 °C).
• Elementy plastikowe można wyczyścić za pomocą wody zmieszanej z mydłem. Nie
używaj silnych środków chemicznych (takich jak rozpuszczalniki).
4.2 Zdejmowanie pokrycia
A) ZAGŁÓWEK
1. Ustaw zagłówek fotelika w górnej pozycji.
2. Najpierw zdejmij pokrycie z uchwytu na pasy zagłówka, a następnie z samego za-
główka.
B) Zdejmij pokrycie z oparcia pleców oraz podstawy.
4.3 Regulowanie zagłówka
Pociągnij jednocześnie regulację wysokości zagłówka 06 oraz zagłówek 01, ustaw po-
prawną wysokość zagłówka i zablokuj ją w pozycji dopasowanej do dziecka poprzez
zwolnienie regulacji.
6. Regulacja wysokości
zagłówka

8 9
4.4 Regulowanie zagłówka przy zapinaniu pasa samochodowego Prawidłowo dopasowany zagłówek 01 sprawia, że odcinek ukośny pasa bezpieczeń-
stwa ułoży się w optymalnej pozycji i zapewni tym samym najlepszą ochronę twojemu
dziecku.
Zagłówek 01 należy dopasować tak, żeby pomiędzy zagłówkiem 01 oraz barkami two-
jego dziecka znajdowała się przestrzeń o szerokości dwóch palców.
Aby dopasować wysokość zagłówka do dziecka:
1. Pociągnij jednocześnie regulację wysokości zagłówka oraz zagłówek. Dzięki temu
zagłówek odblokuje się.
2. W tym momencie masz możliwość ustawienia odblokowanego zagłówka 01 na pre-
ferowaną wysokość. W chwili zwolnienia regulacji 06, zagłówek 01 zablokuje się w
danej pozycji.
3. Umieść fotelik na siedzeniu samochodu.
4. Posadź dziecko w foteliku i sprawdź wysokość. Powtarzaj cały proces, aż zagłówek 01
będzie się znajdował na optymalnej wysokości.
4. Uchwyt
na pasy
w zagłówku
8. Odcinek ukośny
pasa bezpieczeństwa
9. Odcinek pasa
bezpieczeństwa
13. Odcinek udowy
pasa bezpieczeństwa
12. Jasnoczerwona
prowadnica pasa
9. Odcinek pasa
bezpieczeństwa
10. Odcinek udowy
pasa bezpieczeństwa

10 11
1. Jeżeli twój pojazd nie jest wyposażony w prowadnice ISOFIX w standardzie, użyj
dwóch prowadnic 13 dołączonych do fotelika.
﹡ Wycięcie powinno być skierowane w górę na dwa punkty mocowania 11 pojazdu.
WSKAZÓWKA: Punkty mocowania ISOFIX znajdują się pomiędzy powierzchnią siedze-
nia i oparciem.
2. Ustaw zagłówek siedzenia samochodowego w pozycji górnej.
3. Pociągnij regulator ISO–FIX 02, aby wyciągnąć oba ramiona blokady 07. Poruszaj ra-
mionami blokady w dwie strony, aż usłyszysz kliknięcie, które oznacza prawidłowe
zablokowanie ramion.
4. Przyciski bezpieczeństwa po obu stronach ramion blokady zmienią kolor na zielony.
﹡ Prowadnice sprawiają, że montaż fotelika za pomocą punktów mocowania ISOFIX
jest łatwiejszy, a pokrycie fotelika chronione jest przed uszkodzeniami. Kiedy nie uży-
wasz prowadnic, wyjmij je i umieść w bezpiecznym miejscu. W pojazdach z rozkłada-
nym oparciem należy usunąć prowadnice przed rozłożeniem oparcia.
Zwykle przyczyną występujących problemów jest brud oraz przedmioty obce znajdu-
jące się w prowadnicach i na hakach. Aby rozwiązać ten problem, wyczyść prowadnice
z brudu oraz usuń przedmioty obce.
11. Punkt mocowania
ISO–FIX
13. Prowadnica
2. Regulator ISO–FIX
7. Ramię blokady ISO–FIX
Odgłos
kliknięcia
14. Przyciski
bezpieczeństwa
5. PRACE PRZYGOTOWAWCZE
Przeczytaj najpierw rozdział poświęcony wybranej przez ciebie metodzie montażu w
rozdziale 6.
Przygotowanie ISOFIX
6. MONTAŻ
6.1 Montaż ISOFIX
1. Wykonaj kroki z sekcji 5.
2. Wykonaj kroki z sekcji 4.4.
3. Umieść fotelik zgodnie z kierunkiem jazdy na siedzeniu samochodu.
4. Pociągnij za regulator ISO-FIX. Pozwól, aby ramię blokady ISO-FIX się wydłużyło. Po-
ruszaj ramieniem blokady w dwie strony, aż usłyszysz kliknięcie, które oznacza prawi-
dłowe zablokowanie ramienia.
5. Złap fotelik obiema rękami, a następnie wsuń oba ramiona blokady 07 w prowadnice
13, aż usłyszysz klinięcie, a ramiona zablokują się z obu stron. Po obu stronach musi
być widoczny zielony przycisk bezpieczeństwa.

12 13
UWAGA! Ramiona blokady są prawidłowo zablokowane wyłącznie wtedy, gdy oba
przyciski są w całości zielone. .
6. Pociągnij regulator ISO–FIX, a następnie popchnij fotelik w kierunku oparcia ple-
ców, wywierając zdecydowany i równy nacisk po obu stronach.
7. Potrząśnij fotelikiem, aby upewnić się, że jest bezpiecznie zamocowany, a na-
stępnie sprawdź, czy oba przyciski bezpieczeństwa 14 są w całości zielone.
6.2 K ategoria 2 oraz kategoria 3 {ISO–FIX i pas samochodowy}
1. Wykonaj kroki z sekcji 5.
2. Wykonaj kroki z sekcji 4.4.
3. Umieść fotelik zgodnie z kierunkiem jazdy na siedzeniu samochodowym.
4. Złap fotelik obiema rękami, a następnie wsuń oba ramiona blokady 07 w pro-
wadnice 13, aż usłyszysz klinięcie, a ramiona zablokują się z obu stron. Po obu
stronach musi być widoczny zielony przycisk bezpieczeństwa.
UWAGA! Ramiona blokady są prawidłowo zablokowane wyłącznie wtedy, gdy oba
przyciski są w całości zielone
5. Popchnij fotelik w kierunku oparcia pleców, wywierając zdecydowany i równy
nacisk po obu stronach.
6. Potrząśnij fotelikiem, aby upewnić się, że jest bezpiecznie zamocowany, a na-
stępnie sprawdź, czy oba przyciski bezpieczeństwa są w całości zielone.
7. Wyciągnij pas samochodowy i poprowadź go przed dzieckiem do zapięcia.
UWAGA!
8. Zablokuj pas poprzez włożenie zaczepu klamry w zapięcie. Usłyszysz odgłos klik-
nięcia.
9. Poprowadź odcinek poprzeczny pasa 9 oraz odcinek udowy pasa 10 po stronie
zapięcia pasa, pod podłokietnikiem, do jasnoczerwonej prowadnicy pasa 12
fotelika.
UWAGA! Zapięcie pasa nie może się znajdować pomiędzy jasnoczerwoną prowad-
nicą pasa 12 oraz podłokietnikiem.
10. Umieść odcinek udowy pasa 12 po drugiej stronie fotelika w jasnoczerwonej
prowadnicy pasa 12..
UWAGA! Odcinek udowy pasa 10 powinien znajdować się jak najniżej ponad bio-
drami twojego dziecka po obu stronach.
11. Poprowadź odcinek poprzeczny pasa 8 do ciemnoczerwonego uchwytu na
pasy 04 zagłówka 01, aż będzie w całości znajdował się w uchwycie na pasy 04 i
nie będzie skręcony.
Wskazówka! Jeżeli oparcie przykrywa uchwyt na pasy 04, możesz ustawić zagłówek
01 wyżej. Wtedy łatwiej jest wsunąć odcinek poprzeczny pasa 8. Następnie ustaw
zagłówek 01 z powrotem na poprawnej wysokości, jak przedstawiono w sekcji 4.4.1.
4. Uchwyt
na pasy
w zagłówku
8. Odcinek ukośny
pasa bezpieczeństwa
9. Odcinek pasa
bezpieczeństwa
13. Odcinek udowy
pasa bezpieczeństwa
12. Jasnoczerwona
prowadnica pasa
9. Odcinek pasa
bezpieczeństwa
10. Odcinek udowy
pasa bezpieczeństwa

14 15
12. Upewnij się, że odcinek poprzeczny pasa 8 biegnie nad barkami, a nie przy szyi
dziecka.
Wskazówka! Wciąż możesz ponownie ustawić wysokość zagłówka 01 w pojeździe.
UWAGA! Odcinek poprzeczny pasa 8 musi być poprowadzony poprzecznie. Możesz
dopasować położenie pasa korzystając z regulowanego odchylenia pasa w swoim
samochodzie.
UWAGA! Odcinek poprzeczny pasa 08 nie może być pochylony w przód w stosunku
do odchylenia pasa pojazdu. W takim wypadu używaj fotelika wyłącznie na tylnym
siedzeniu
Aby zapewnić bezpieczeństwo swojemu dziecku, przed każdą podróżą sprawdź, czy
• fotelik jest zablokowany po obu stronach za pomocą ramion blokady ISOFIX 7 w
punktach mocowania ISOFIX 11 oraz czy przyciski bezpieczeństwa 14 są w cało-
ści zielone;
• fotelik jest bezpiecznie przypięty;
• odcinek udowy pasa 10 jest poprowadzony przez jasnoczerwoną prowadnicę
pasa 12 po obu stronach poduszki siedzenia;
• odcinek poprzeczny pasa 8 również jest poprowadzony przez jasnoczerwoną
prowadnicę pasa 12 poduszki siedzenia;
• odcinek poprzeczny pasa 8 jest poprowadzony przez ciemnoczerwony uchwyt
na pasy 04 zagłówka;
• odcinek poprzeczny pasa 8 jest poprowadzony poprzecznie do tyłu;
• pasy przylegają ściśle i nie są skręcone;
• zapięcie pasa pojazdu nie znajduje się pomiędzy jasnoczerwoną prowadnicą
pasa 12 oraz podłokietnikiem poduszki siedzenia;
UWAGA! Jeżeli twoje dziecko będzie próbowało otworzyć przyciski bezpieczeństwa
14, powstrzymaj je jak najszybciej. Sprawdź wtedy, czy fotelik jest prawidłowo za-
blokowany i upewnij się, czy twoje dziecko jest właściwie zabezpieczone. Poinfor-
muj dziecko o możliwych zagrożeniach.
Aby wyjąć fotelik, wykonaj kroki przedstawione w sekcji 8.
7. ZASADY KONSERWACJI
Aby zapewnić pełne właściwości ochronne fotelika:
• w razie wypadku przy prędkości uderzenia powyżej 10 km/h fotelik może ulec
uszkodzeniu, chociaż uszkodzenia te mogą nie być od razu widoczne. W takim
przypadku fotelik należy wymienić. Wyrzuć produkt zgodnie z przepisami.
• Regularnie sprawdzaj wszystkie ważne części pod kątem uszkodzeń. W szczegól-
ności upewnij się, że elementy mechaniczne działają prawidłowo.
• Zawsze oddaj fotelik do sprawdzenia, jeżeli uległ uszkodzeniu (np. jeżeli został
upuszczony).
• Nigdy nie nawilżaj ani nie naoliwiaj części fotelika.
• Aby zapewnić uchronę swojemu dziecku, ściśle przestrzegaj zasad montażu
i użycia przedstawionych w niniejszej instrukcji.
Pozbywanie się opakowania Pojemnik na makulaturę
Pokrycie Pozostałe odpady, utylizacja
termalna
Części plastikowe Zgodnie z oznaczeniem na
właściwym pojemniku
Części metalowe Pojemnik na metale
Paski uprzęży Pojemnik na poliestry
Zapięcie Pozostałe odpady
8. WYJMOWANIE FOTELIKA
UWAGA! Wyjmij fotelik z pojazdu. Fotelika nigdy nie należy przewozić w samocho-
dzie, jeżeli nie jest prawidłowo zabezpieczony.
1. Zwolnij zapięcie pasa pojazdu, jeśli zabezpiecza fotelik.
2. Aby zwolnić zapięcie ISOFIX, przyciśnij jednocześnie zielone przyciski bezpie-
czeństwa oraz czerwony przycisk zwolnienia blokady, najpierw z jednej strony,
a następnie z drugiej.
3. Wsuń ramiona blokady ISOFIX z powrotem do skorupy fotelika.

LOGIS S.A.
ul. Mszczonowska 36
96-200 Rawa Mazowiecka
POLSKA
Tel.: +48 46 814 73 13
Fax: +48 46 814 73 00
e-mail: biuro@babysafe.eu
www.babysafe.eu
Table of contents
Languages:
Other BabySafe Car Seat manuals

BabySafe
BabySafe Westie User manual

BabySafe
BabySafe Westie User manual

BabySafe
BabySafe Westie User manual

BabySafe
BabySafe Schnauzer User manual

BabySafe
BabySafe Chart User manual

BabySafe
BabySafe Collie User manual

BabySafe
BabySafe Corgi User manual

BabySafe
BabySafe Rhodesian User manual

BabySafe
BabySafe Golden 360 User manual

BabySafe
BabySafe Corso User manual