BabySafe Corso User manual

Read the instruction carefully before using the baby car seat.Keep this instruction well for future reading.
This corporate is certificated by ISO9001:2008.
Applicable for
9- 36 KG
Corso
9-36 kg, 9 M-12 lat

2

3
Nota informacyjna
•Produkt jest uniwersalnym fotelikiem z pasami dla dziecka. Produkt posiada
zatwierdzenie wg Rozporządzenia 44, seria poprawek 04, do użytku ogólnego
w pojazdach i będzie on pasował do większości, jednak nie do wszystkich foteli
samochodowych.
•Właściwe dopasowanie jest możliwe, jeżeli producent pojazdu zadeklarował
w instrukcji pojazdu, że pojazd może obsługiwać uniwersalne mocowania dla
dziecka w wyznaczonej grupie wiekowej.
•Fotelik został zaklasykowany jako zabezpieczające urządzenie „uniwersalne”
w warunkach o wyższych wymaganiach niż te zastosowane dla wcześniejszych
wzorów, które nie uwzględniają tej noty.
•Produkt jest kompatybilny wyłącznie w przypadku, jeżeli zatwierdzony pojazd
jest wyposażony w 3-punktowe pasy bezpieczeństwa zatwierdzone na podsta-
wie Rozporządzenia UN/ECE nr 16 lub innych ekwiwalentnych norm.
•Instrukcja dotyczy SYSTEMU MOCOWANIA DZIECKA W POJEŹDZIE Z UŻYCIEM
SYSTEMU PASÓW ISOFIX. Produkt posiada zatwierdzenie wg Rozporządzenia 44,
seria poprawek 04, do ogólnego użytkowania w pojazdach z systemami moco-
wania ISOFIX.
•Fotelik pasuje do pojazdów z pozycjami zatwierdzonymi jako pozycje ISOFIX (wg
instrukcji pojazdu), w zależności od kategorii fotelika i mocowania.
•Grupa wagi ciała i klasa wielkości ISOFIX, dla których zaprojektowano urządzenie:
Grupa I, klasa wielkości ISOFIX B1.
• W razie wątpliwości, skonsultować się z producentem pasów dla dziecka lub
sprzedawcą pasów.
•
Ostrzeżenie
Zapoznać się z treścią niniejszej instrukcji i odpowiednią częścią instrukcji produ-
centa pojazdu. Przestrzegać zaleceń instrukcji podczas montażu i użytkowania
fotelika. Nieprzestrzeganie niniejszej instrukcji może prowadzić do poważnych
uszkodzeń ciała, a nawet śmierci dziecka. Zachować instrukcję w bezpiecznym
miejscu na wypadek potrzeby skorzystania z niej w przyszłości.
Rysunki produktu przedstawione w instrukcji przedstawiono poglądowo i mogą
się one delikatnie różnić od posiadanego modelu.

4
SPIS TREŚCI
1. Zakres zastosowania 3
2. Nota dotycząca użytkowania 3
3. Tabela porównawcza zastosowań i metod montażu 4
4. Części fotelika 5
5. Główne funkcje fotelika 6
5.1 Regulacja kąta 6
5.2 Regulacja oparcia pleców 7
5.3 Instrukcja przechowywania i korzystania z kieszeni schowka 7
5.4 Regulacja pasa części krokowej 7
6. Montaż fotelika i zabezpieczanie dziecka - Grupa 1 7
6.1 Mocowanie fotelika ze złączem ISOFIX
i górnym paskiem zabezpieczającym 7
6.2 Mocowanie dziecka za pomocą systemu pasów 5-punktowych 9
7. Demontaż fotelika 10
8. Montaż fotelika i zabezpieczanie dziecka - Grupa 2, 3 10
9. Konserwacja fotelika 11
9.1 Uwaga 12
9.2 Czyszczenie pokrowca materiałowego 12
9.3 Zdejmowanie pokrowca i 5-punktowych pasów 12
9.4 Zakładanie pokrowca i 5-punktowych pasów 13

5
1. Zakres zastosowania
Fotelik posiada certykat ECE R44/04 i GB27887-2011 i zaklasykowany jest do Gru-
py III.
Fotelik dla dziecka Grupy Waga ciała
BC788F I II III 9-36kg
Certykacja
•Fotelik został zaprojektowany i przetestowany zgodnie z europejską normą doty-
czącą systemów pasów dla dzieci (ECE R44/04). Zapewniono znak certykacji („E”
w kółku) z numerem zatwierdzenia.
•Wprowadzanie modykacji lub uzupełnień do urządzenia bez zgody jednostki
ds. zatwierdzenia typu stwarza zagrożenie. Niebezpieczne jest również nieprze-
strzeganie warunków instrukcji montażu dostarczonej przez producenta uprzęży
dla dziecka.
2. Nota dotycząca użytkowania
Ostrzeżenie
•Przed rozpoczęciem użytkowania fotelika należy dokładnie zapoznać się
z instrukcją. Nieprzestrzeganie niniejszej instrukcji może prowadzić do poważ-
nych uszkodzeń ciała, a nawet śmierci dziecka.
•Używanie fotelika w sposób właściwy jest bardzo ważne dla bezpieczeństwa
dziecka.
•Zachować instrukcję na wypadek potrzeby skorzystania z niej w przyszłości.
•Nie pozostawiać dziecka bez nadzoru w foteliku.
•Zabrania się montażu fotelika w fotelu pojazdu wyposażonego w system SRS.
•Wszystkie pasy przymocowujące fotelik do pojazdu powinny być ciasno za-
pięte, a pasy uprzęży dziecka powinny być wyregulowane do rozmiarów jego
ciała. Żaden z pasów nie może być skręcony.
•Upewnić się, że pasy części biodrowej nie są zużyte, aby część miednicowa
była zawsze dokładnie dociśnięta.

6
•Nie używać fotelika w pozycji zabezpieczonej przez aktywną przednią poduszkę
powietrzną.
•Nie podejmować prób usunięcia naklejek z fotelika, ponieważ zawierają one
ważne informacje.
•Fotelik może być stosowany wyłącznie na fotelach pojazdów z zatwierdzeniem
ECE R16 lub zatwierdzeniem wg innej normy ekwiwalentnej i musi być wyposa-
żony w system pasów bezpieczeństwa.
•Po wypadku pojazdu uszkodzenia fotelika mogą nie być widoczne, jednak nie
jest on już bezpieczny, dlatego należy go zastąpić nowym fotelikiem.
•Fotelik należy przymocować odpowiednio za pomocą pasów bezpieczeństwa ze
złączem ISOFIX z paskiem górnym, ponieważ nawet jeżeli fotelik nie jest używany
dla dziecka, w przypadku kolizji lub nagłego hamowania niezabezpieczony fote-
lik może spowodować uszkodzenia ciała u innych pasażerów.
•Nie smarować części ruchomych fotelika.
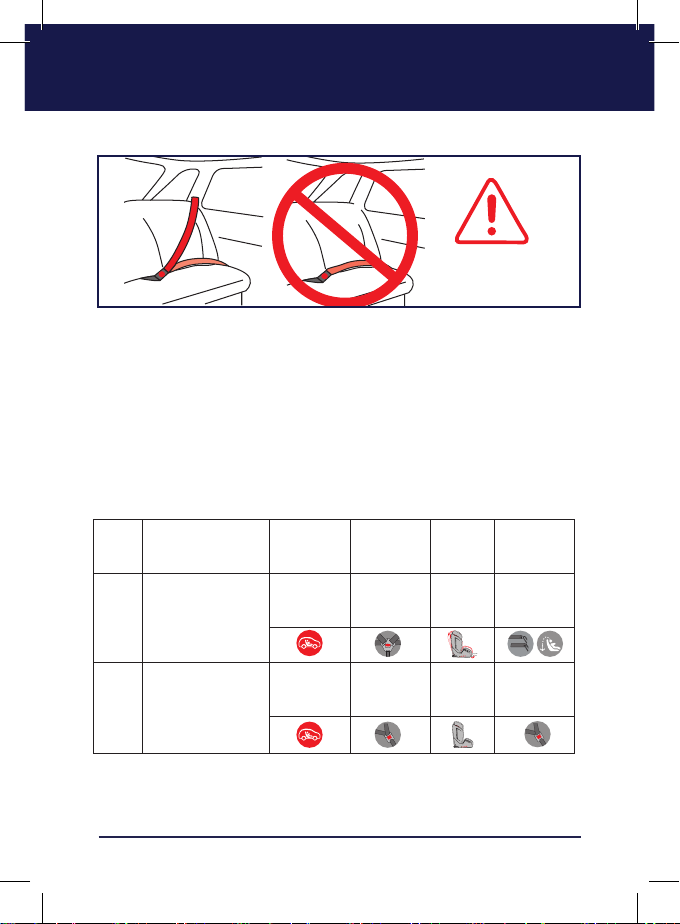
•Nie używać fotelika w pozycji dziecka twarzą w bok lub w tył (1a 1b na rysunku
powyżej). Stosować fotelik wyłącznie na fotelach w pozycji dziecka twarzą do
kierunku jazdy. Możliwość używania wyłącznie w pozycji twarzą dziecka do kie-
runku jazdy. Statystyki wypadków wskazują, że dzieci są bardziej bezpieczne na
fotelach tylnych (1c, 1d).
Sztywne części i części plastikowe systemu uprzęży dziecka powinny być odpo-
wiednio rozmieszczone i podłączone, eliminując ryzyko zakleszczenia przez części
fotela lub drzwi przy normalnym użytkowaniu pojazdu.
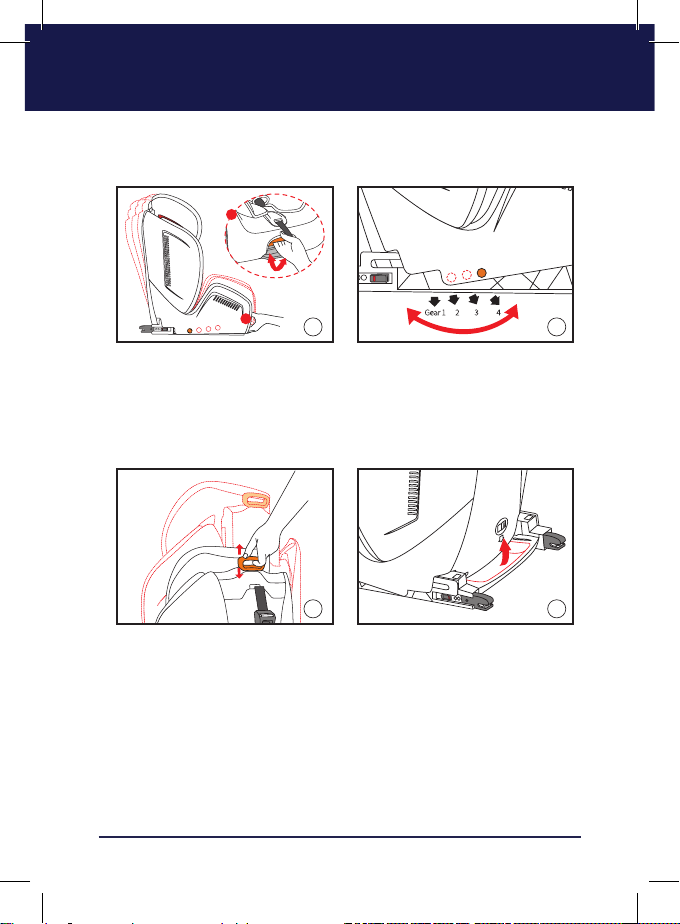
9.4 Installation of cloth cover and 5 points harness 16
0403
User manualBaby safety seat
This baby safety seat is designed and tested with the European Children
Ristraint System standard (ECE R44/04) a. The certification stamp E- mark (in
the round circle) with approvalnumber .
It ’s dangerous to make any alterations or additions to the device
without the approval of the Type Approval Authority, also dangerous
not to follow closely the installation instructions provided by the child
restraint manufacturer.
2.Using Note
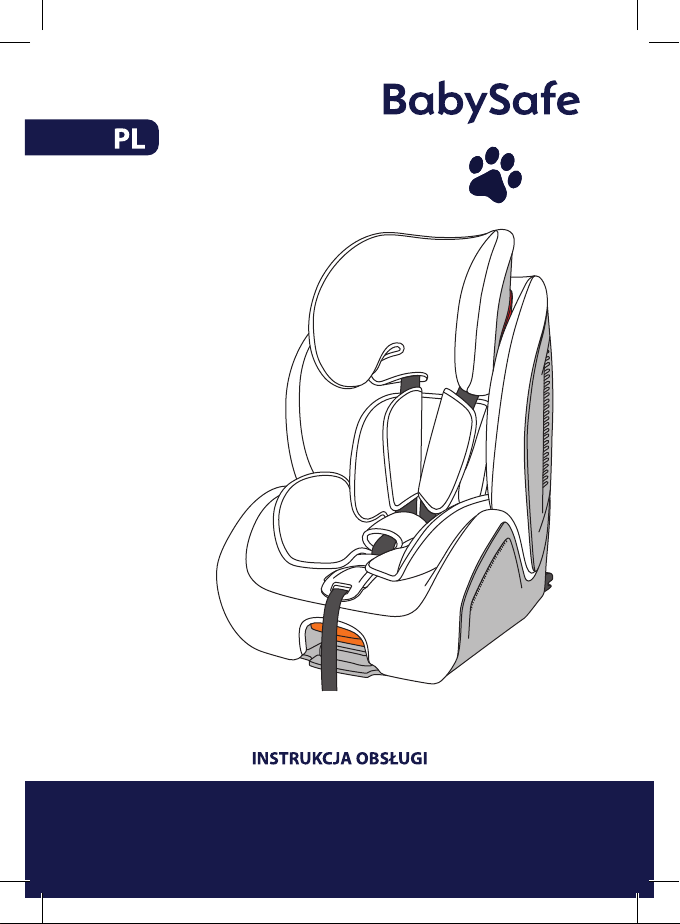
Range of baby weight
9-36kg
1. Application scope
Certificated by ECE R44/04 and GB27887-2011, this baby safety seat is
applicable for GroupⅠⅡⅢ.
Baby Safety Seat
BC788F
Group
Please read this instruction very carefully before using this car seat.
Not following this instruction may lead to a injury to your baby.
Using car seat correctly is very important to your baby.
Please keep the instruction well of convenience in the future.
Do not leave your baby alone in this baby safety seat in your car.
Installing to a seat of your car which hasa SRS system is forbidden.
Any straps holding the restraint to the vehicle should be tight, that any straps restraining
the child should be adjusted to the child'sbody, and that straps should not be twisted.
Ensure that any lap strap is worn low down, so that the pelvis is firmly engaged, shall be
stressed.
Warning
DO NOT use the product in seating positions where an active frontal
airbag installed.
Do not attempt to remove the child car seat label, containing important
information on the label.
This baby car seat must be used in the car seat approved by ECE R16 or
other equivalent standardsand must be equipped with safety belt system.
After crash accident, the damage of the baby car seat may not be found
instantly, but it is not safe anymore, therefore, please change a new one.
This baby car seat need to be fixed well with safety belt or ISOFIX +Top
tether, because even if they don't use baby car seat, in the crash or the brake,
unsecured baby car seat may hurt the other passengers.
Do not use any lubricant to the moving partsof the car seat.
DO NOT use this seat on side-facing or rear-facing car seats (1a 1b in
drawingabove). Only applicable for forward-facing car seats. Can be only
used as a front facing child safety seat. Crash statics shows that children are
safer in backrow seats(1c, 1d).
The rigid parts and plastic parts of child restraint system should be
correctly placed and installed to ensure that child restraint system is not
jammed by active seat or door in normal vehicle use.
?
??

7
•Nie zabezpieczać dziecka samochodowymi pasami 2-punktowymi.
•Nie pozostawiać dziecka bez nadzoru w foteliku.
•Jeżeli fotelik nie jest wyposażony w pokrowiec materiałowy, chronić go przed
bezpośrednim wpływem światła słonecznego, ponieważ jego elementy mogą
się rozgrzewać do temperatury niebezpiecznej dla ciała dziecka.
•Nie używać fotelika bez pokrowca, ani pokrowców dostarczanych przez innych
producentów ze względu na wpływ na własności użytkowe fotelika.
•Nie używać innych punktów obciążającego kontaktu z fotelikiem, poza punktami
opisanymi w instrukcji i oznaczonymi na uprzęży fotelika.
3. Tabela porównawcza zastosowań i metod montażu
Grupa Waga Kierunek
montażu
Przygotowa-
nie dziecka
Poziom
kąta
Montaż
fotelika dla
dziecka
I9-18kg
(9 miesięcy-4 lat)
Montaż
twarzą
w przód
Pasy bezpie-
czeństwa
5-punktowe
Poziom
1/2/3/4
ISOFIX+
górny pasek
mocujący
II
III 15-36kg (3-12 lat)
Montaż
twarzą
w przód
Pasy bezpie-
czeństwa
samochodu
Poziom 1 Pasy bezpie-
czeństwa
0605
User manualBaby safety seat
3.Comparison table of children's range of
application and installation methods
GroupWeight
9-18kg(9 months-4yo)
15-36kg(3-12yo)
Forward facing
installation
Forward facing
installation
5-point safety belt ISOFIX+Top Tether
Safety seat belt
Installation
Direction Children Fixation Angle LevelBaby safety Seat
Installation
Car seat belt Level 1
Level 1/2/3/4
2
134
2
134
2-point car belt is forbidden to fix your baby.
Do not leave baby alone on the car seat.
When the chair is not provided with a textile cover, the chair should be
kept away from sunlight, otherwise it may be too hot for the child's skin.
Car seat without cloth cover cannot be used, cloth cover not provided by
manufacturer cannot be used, it influencesthe performance of car seat.
DO NOT use any load bearing contact points other than those described
in the instructionsand marked in the child restraint.
Danger
Niebezpieczeństwo
2
134
2
134

8
4. Części fotelika
0605
User manualBaby safety seat
3.Comparison table of children's range of
application and installation methods
GroupWeight
9-18kg(9 months-4yo)
15-36kg(3-12yo)
Forward facing
installation
Forward facing
installation
5-point safety belt ISOFIX+Top Tether
Safety seat belt
Installation
Direction Children Fixation Angle LevelBaby safety Seat
Installation
Car seat belt Level 1
Level 1/2/3/4
2
134
2
134
2-point car belt is forbidden to fix your baby.
Do not leave baby alone on the car seat.
When the chair is not provided with a textile cover, the chair should be
kept away from sunlight, otherwise it may be too hot for the child's skin.
Car seat without cloth cover cannot be used, cloth cover not provided by
manufacturer cannot be used, it influencesthe performance of car seat.
DO NOT use any load bearing contact points other than those described
in the instructionsand marked in the child restraint.
Danger
1. Prowadnica pasa w oparciu głowy
2. Nakładka ramienna
3. Podkładka
4. Pas bezpieczeństwa
5. Sprzączka
6. Nakładka podstawy
7. Przycisk blokady regulacji pasa
8. Pas regulowany
9. Uchwyt regulacji kąta
10. Przycisk zwolnienia ISOFIX
11. Osłona prowadnic ISOFIX

9
08
1
4
3
2
1
5.Main Functions of Baby Safety Seat
5.1 Angle Adjustment Hold the angle adjustment puller in the front
part ofthe base, push the car seat forward or backward to recline ( Picture 1).
Make the Indicator Arrow indicating position "1" "2" "3" "4" , release the
angle adjustment puller until you hear a "click" (Picture 2).
5.2 Backrest Adjustment 10-level backrest adjustments, pull the
headrest adjustment puller in the back of the headrest, and release the puller
until it matches Children's height (Picture 3).
system.
5.3 Instructions Storage Cover When you are not using the
Instructions,Pull thecar seat to Gear 4 and you can take it out (Picture 4).
Note:Toavoidtheriskofloss, please keep theUser'sInstruction inthe Storage Cover whenyouare
not usingit.
2
2
134
a
a
3 4
User manual
1
2
3
4
Press
Push
A
B
12 3
12. Uchwyt regulacji oparcia głowy
13. Układ regulacji górnego paska
14. Pasek górny
15. Zaczep paska górnego
16. Osłona tylna
17. Złącza ISOFIX
18. Stopnie regulacji
19. Prowadnica pasa
Ostrzeżenie
•Stan fotelika pokazano na rysunku 1. Zdjąć zabezpieczenie ISOFIX przed uży-
ciem fotelika - metoda pokazana jest na rysunkach 2, 3).

10
5. Główne funkcje fotelika
08
1
4
3
2
1
5.Main Functions of Baby Safety Seat
5.1 Angle Adjustment Hold the angle adjustment puller in the front
part ofthe base, push the car seat forward or backward to recline ( Picture 1).
Make the Indicator Arrow indicating position "1" "2" "3" "4" , release the
angle adjustment puller until you hear a "click" (Picture 2).
5.2 Backrest Adjustment 10-level backrest adjustments, pull the
headrest adjustment puller in the back of the headrest, and release the puller
until it matches Children's height (Picture 3).
system.
5.3 Instructions Storage Cover When you are not using the
Instructions,Pull thecar seat to Gear 4 and you can take it out (Picture 4).
Note:Toavoidtheriskofloss, please keep theUser'sInstruction inthe StorageCover whenyouare
not usingit.
2
2
134
a
a
3 4
User manual
1
2
3
4
Press
Push
A
B
12 3
5.1 Regulacja kąta
•Pociągnąć za uchwyt regulacji kąta z przodu podstawy i przesunąć fotelik
w przód lub w tył ustalając jego przechylenie (rysunek 1).
•Ustawić strzałkę stopni w pozycji„1”„2”„3”„4” i zwolnić uchwyt regulacji kąta, aż
będzie można usłyszeć charakterystyczne kliknięcie (rysunek 2).
08
1
4
3
2
1
5.Main Functions of Baby Safety Seat
5.1 Angle Adjustment Hold the angle adjustment puller in the front
part ofthe base, push the car seat forward or backward to recline ( Picture 1).
Make the Indicator Arrow indicating position "1" "2" "3" "4" , release the
angle adjustment puller until you hear a "click" (Picture 2).
5.2 Backrest Adjustment 10-level backrest adjustments, pull the
headrest adjustment puller in the back of the headrest, and release the puller
until it matches Children's height (Picture 3).
system.
5.3 Instructions Storage Cover When you are not using the
Instructions,Pull thecar seat to Gear 4 and you can take it out (Picture 4).
Note:Toavoidtheriskofloss, please keep theUser'sInstruction inthe StorageCover whenyouare
not usingit.
2
2
134
a
a
3 4
User manual
1
2
3
4
Press
Push
A
B
12 3
5.2 Regulacja oparcia pleców
•10-stopniowa regulacja oparcia: pociągnąć uchwyt regulacji oparcia z tyłu opar-
cia i zwolnić uchwyt po dopasowaniu oparcia do wzrostu dziecka (rysunek 3).
Uwaga: Podczas regulacji wysokości oparcia należy zwolnić lub podłączyć system
pasów 5-punktowych.
5.3 Instrukcja przechowywania i korzystania z kieszeni schowka
•Jeżeli fotelik nie jest używany, ustawić fotelik w pozycji 4 i zdemontować fotelik
(rysunek 4).
Uwaga: Aby uniknąć ryzyka utrata instrukcji, przechowywać ją w specjalnej kieszeni.

11
5.4 Regulacja pasa części krokowej
•Cześć zabezpieczająca krocze jest do-
ciśnięta dokładnie do rowka w oparciu.
Podczas umieszczania dziecka w fote-
liku i wyczucia, że osłona znajduje się
zbyt blisko krocza dziecka, zacisnąć
pas krocza w pozycji skręconej i prze-
prowadzić go przez otwór szczelinowy
(rysunek 5).
Uwaga: Upewnić się że paski nie są zawi-
nięte.
6. Montaż fotelika i zabezpieczanie dziecka - Grupa 1
6.1 Mocowanie fotelika ze złączem ISOFIX i górnym paskiem
zabezpieczającym
(Dotyczy grupy 1, waga 9-18 kg, wiek od 9 miesięcy do 4 lat)
1009
Pull the ISOFIX release key,
ISOFIX Connection Parts will pop
out (Picture 6,7).
Fix ISOFIX guide sleeves in the
car seat anchors (Picture 8).
6 7
5.5 Crotch belt position
adjustment
Crotch belt clings tightly with the
backrest groove when it is produced.
when you put baby in the car seat
and feel it is too close to baby's
crotch, pinch the crotch belt to a
twisted status and make it through
the slot (Picture 5).
Note: Make sure they are not wrapped.
5
1
2
3
Day
buckle
Rear slot
Front slot
6.1 Baby Car Seat ISOFIX+Top Tether Fixation (Applicable for
Group 1, Weight 9-18kg, Age 9 months to 4 years old)
8
User manualBaby safety seat
1
9
13
11
Push the Car Seat Base (Picture
9).Until you hear the "Click", which
indicates that ISOFIX connectors
are locked with car seat anchors
(Picture 10).
adjust thebackrest angle suitable for children.
234
1
10
12
Check the ISOFIX unlock key,
"Green" indicates "Locked" and
"Red" indicates " Unlocked" (Picture
16).
Press top tether adjustment
button, and pull the top tether until
the hook is locked with the anchor
in the back of the vehicle seat
(Picture 17).
Note: Possibly there are 4 top tether anchors
inthebackofthe vehicle seatA/B/C/D,youcan
chooseaproperone.
Hold the other end of the top
tether and tighten it (Picture 18).
Note: "Green" in the release key indicates "
Fixedwell" "Red" indicates "Not FixedWell" .
•Pociągnąć przycisk blokady ISOFIX. Ele-
menty zostaną zwolnione (rysunki 6,7).
•Przymocować prowadnice ISOFIX do
końcówek pasów pojazdu (rysunek 8).

12
1009
Pull the ISOFIX release key,
ISOFIX Connection Parts will pop
out (Picture 6,7).
Fix ISOFIX guide sleeves in the
car seat anchors (Picture 8).
6 7
5.5 Crotch belt position
adjustment
Crotch belt clings tightly with the
backrest groove when it is produced.
when you put baby in the car seat
and feel it is too close to baby's
crotch, pinch the crotch belt to a
twisted status and make it through
the slot (Picture 5).
Note: Make sure they are not wrapped.
5
1
2
3
Day
buckle
Rear slot
Front slot
6.1 Baby Car Seat ISOFIX+Top Tether Fixation (Applicable for
Group 1, Weight 9-18kg, Age 9 months to 4 years old)
8
User manualBaby safety seat
1
9
13
11
Push the Car Seat Base (Picture
9).Until you hear the "Click", which
indicates that ISOFIX connectors
are locked with car seat anchors
(Picture 10).
adjust thebackrest angle suitable for children.
234
1
10
12
Check the ISOFIX unlock key,
"Green" indicates "Locked" and
"Red" indicates " Unlocked" (Picture
16).
Press top tether adjustment
button, and pull the top tether until
the hook is locked with the anchor
in the back of the vehicle seat
(Picture 17).
Note: Possibly there are 4 top tether anchors
inthebackofthe vehicle seatA/B/C/D,youcan
chooseaproperone.
Hold the other end of the top
tether and tighten it (Picture 18).
Note: "Green" in the release key indicates "
Fixedwell" "Red" indicates "Not FixedWell" .
•Sprawdzić położenie przycisku zwal-
niającego złącze ISOFIX. Kolor zielony
oznacza pozycję zablokowania, a ko-
lor czerwony oznacza pozycję odblo-
kowania (rysunek 16).
•Nacisnąć przycisk regulacji górne-
go paska i pociągnąć za pasek do
momentu zablokowania zaczepu
w końcówce przymocowanej do pasa
pojazdu (rysunek 17).
Uwaga: W pojeździe mogą się znajdo-
wać 4 końcówki górnego paska (A/B/
C/D). Należy wybrać odpowiednią z nich.
•Przytrzymać drugą końcówkę paska
górnego i naciągnąć go (rysunek 18).
Uwaga: Kolor zielony oznacza prawi-
dłowe zablokowanie, a kolor czerwony
oznacza nieprawidłowe zablokowanie.
•Docisnąć podstawę fotelika (rysunek
9) do momentu usłyszenia kliknięcia,
które potwierdza że złącza ISOFIX są
zablokowane w końcówkach pasów
pojazdu (rysunek 10).
Uwaga: Przed umieszczeniem dziecka
w foteliku należy wyregulować kąt opar-
cia pleców według wzrostu dziecka.

13
1211
Pull the baby car seat outward,
and make sure both sides are
securely locked (Picture 21).
14
6.2 Children Fixation on 5-Point Harness System ( Applicable
for Group 1, Weight 9-18kg, Age 9 months - 4years old)
15
17
16
Extend the safety belt push
the central adjuster with one hand
and pull outward the safety belts
bcde
with the other hand(Note! Do not
pull the shoulder pad) (Picture
15b).Press the red buckle button
and open the buckle (Picture15c).
Put the belt on two sides separately,
and place the baby inside the car seat
and make baby's shoulders go below
the belts (Picture 16d).Put two buckle
tongues together and insert them into
the buckle until you hear the
"Click"(Picture 16e).
Tighten the safety belt (Picture
17).
Press
Push
1
2
18
hook (Picture 18).
ISOFIX unlock key button, at the
same time, with the hand push
ISOFIX unlock button, red, is to
unlock, can make children car seats
and car seat(Picture 19).
Adjust the baby car safety seat
backrest to suit children height
(Picture 21).
19
21
20
(applicable for 2,3 group, 15-36 kg
body weight, age from 3 to 12 years old)
User manualBaby safety seat
•Rozciągnąć pas bezpieczeństwa na-
ciskając centralny przycisk regulacji
jedną ręką i pociągać pas do zewnątrz
drugą ręką.
(Uwaga! Nie ciągnąć za nakładkę ramien-
ną (rysunek 15b).
Nacisnąć czerwony przycisk sprzączki
i otworzyć sprzączkę (rysunek 15c).
•Założyć pas po obu stronach oddziel-
nie i umieścić dziecko w foteliku. Ra-
miona dziecka powinny znajdować
się poniżej pasów (rysunek 16d). Obie
końcówki sprzączki wsunąć usunąć
w klamrę do usłyszenia kliknięcia (ry-
sunek 16e).
•Naciągnąć pas bezpieczeństwa (rysu-
nek 17).
•Pociągnąć fotelik do zewnątrz i upewnić
się, że po obu stronach jest on prawidło-
wo przymocowany (rysunek 21).
6.2 Mocowanie dziecka za pomocą systemu pasów 5-punktowych
(Dotyczy grupy 1, waga 9-18 kg, wiek od 9 miesięcy do 4 lat)

14
7. Demontaż fotelika
8. Montaż fotelika i zabezpieczanie dziecka - Grupa 2, 3
(Dotyczy grupy 2,3, waga 15-36 kg, wiek od 3 lat do 12 lat)
1211
Pull the baby car seat outward,
and make sure both sides are
securely locked (Picture 21).
14
6.2 Children Fixation on 5-Point Harness System ( Applicable
for Group 1, Weight 9-18kg, Age 9 months - 4years old)
15
17
16
Extend the safety belt push
the central adjuster with one hand
and pull outward the safety belts
bcde
with the other hand(Note! Do not
pull the shoulder pad) (Picture
15b).Press the red buckle button
and open the buckle (Picture15c).
Put the belt on two sides separately,
and place the baby inside the car seat
and make baby's shoulders go below
the belts (Picture 16d).Put two buckle
tongues together and insert them into
the buckle until you hear the
"Click"(Picture 16e).
Tighten the safety belt (Picture
17).
Press
Push
1
2
18
hook (Picture 18).
ISOFIX unlock key button, at the
same time, with the hand push
ISOFIX unlock button, red, is to
unlock, can make children car seats
and car seat(Picture 19).
Adjust the baby car safety seat
backrest to suit children height
(Picture 21).
19
21
20
(applicable for 2,3 group, 15-36 kg
body weight, age from 3 to 12 years old)
User manualBaby safety seat
•Poluzować zaczep mocowania gór-
nego paska (rysunek 18).
•Odblokować złącze Isox. Nacisnąć
czerwony przycisk odblokowania
złącza (rysunek 19).
•Złożyć elementy mocujące ISOFIX
(rysunek 20).
•Wyregulować pozycję oparcia do
wzrostu dziecka (rysunek 21).
1413
22
Put the adjusted child car seat on the car seat, put the children in the child
car seat, pull out the car seat belt, let the car seat belt shoulder strap pass
through the headrest seat belt guide slot (Picture 22). Keep the belt
strap passing through the base belt guide slot, buckle up the car seat belt
buckle, until you hear "click"(Picture 23).
The car seat belt shall pass under the red base belt guide groove, not
through above the guide groove(Picture 24,25).
23
f
f
24 25
child car seat on the car seat is the
backrest ofthe car seat (Picture 26).
26
9.3 Dismantlement of cloth cover and 5 points harness
Put hands onto the bottomofthe chair, and pull out the cover, then, it open
the back cover on the back ofthe chair(Picture27, 28).
Accidents happened when the car speed higher than 10km/h,may cause invisible
damage to the baby safety seat.Please change your baby safety seat after crash
accident.
Checkall important parts regularly,make sure all mechanismfunctions properly.
Toavoid damage,makesure no partofthisbaby seat isstuck bycar door,foldable
car seat or anyother objects.
Store your baby car seat in safe place when not using.Avoid heavy objects, direct
sunshine ordirect heat on it.
Cloth cover can be removed.Wash it with a mild detergent in warm water(water
temperature does not exceed30℃),natural dry,not dehydration.
Plastic parts can be cleaned with soap and water, do not use strong detergents
(such as solvent). Eat belt can apply mild soap to clean.
Shoulder strap can be removedwith mild soap waterto clean.
9.2 Cleaning of cloth cover
Do not use baby car seat without cloth cover.
9.1 Attention
27 28
User manualBaby safety seat

15
•Umieścić wyregulowany fotelik na fotelu pojazdu, umieścić dziecko w foteliku,
przeprowadzić pas naramienny przez otwór prowadzący w oparciu (rysunek 22).
•Przeprowadzić pas przez otwór prowadzący w podstawie, zapiąć sprzączkę pa-
sów do usłyszenia kliknięcia (rysunek 23).
•Pas powinien przebiegać poniżej czerwonego rowka prowadzącego, nie powy-
żej niego (rysunek 24,25).
•Fotelik powinien opierać się o oparcie fotela (rysunek 26).
1413
22
Put the adjusted child car seat on the car seat, put the children in the child
car seat, pull out the car seat belt, let the car seat belt shoulder strap pass
through the headrest seat belt guide slot (Picture 22). Keep the belt
strap passing through the base belt guide slot, buckle up the car seat belt
buckle, until you hear "click"(Picture 23).
The car seat belt shall pass under the red base belt guide groove, not
through above the guide groove(Picture 24,25).
23
f
f
24 25
child car seat on the car seat is the
backrest ofthe car seat (Picture 26).
26
9.3 Dismantlement of cloth cover and 5 points harness
Put hands onto the bottomofthe chair, and pull out the cover, then, it open
the back cover on the back ofthe chair(Picture27, 28).
Accidents happened when the car speed higher than 10km/h,may cause invisible
damage to the baby safety seat.Please change your baby safety seat after crash
accident.
Checkall important parts regularly,make sure all mechanismfunctions properly.
Toavoid damage,makesure no partofthisbaby seat isstuck bycar door,foldable
car seat or anyother objects.
Store your baby car seat in safe place when not using.Avoid heavy objects, direct
sunshine ordirect heat on it.
Cloth cover can be removed.Wash it with a mild detergent in warm water(water
temperature does not exceed30℃),natural dry,not dehydration.
Plastic parts can be cleaned with soap and water, do not use strong detergents
(such as solvent). Eat belt can apply mild soap to clean.
Shoulder strap can be removedwith mild soap waterto clean.
9.2 Cleaning of cloth cover
Do not use baby car seat without cloth cover.
9.1 Attention
27 28
User manualBaby safety seat

16
9. Konserwacja fotelika
9.1 Uwaga
•Wypadki i kolizje przy prędkości powyżej 10km/h mogą powodować niewidocz-
ne uszkodzenia fotelika. W przypadku kolizji lub wypadku należy wymienić fo-
telik.
•Regularnie sprawdzać ważne części i działanie wszystkich mechanizmów.
•Aby uniknąć uszkodzeń, upewnić się, że elementy fotelika nie są zakleszczane
przez drzwi, składane elementy foteli lub inne przedmioty.
•Przechowywać nieużywany fotelik w bezpiecznym miejscu. Nie umieszczać na
nim ciężkich przedmiotów. Unikać kontaktu fotelika z bezpośrednimi promienia-
mi słonecznymi i wysoką temperaturą.
9.2 Czyszczenie pokrowca materiałowego
Nie używać fotelika bez pokrowca materiałowego.
•Pokrowiec można zdejmować. Przemywać ciepłą wodą z delikatnym detergen-
tem (temperatura wody nie może przekraczać 30C), suszyć na powietrzu, nie
powodować przesuszenia.
•Części plastikowe powinny być czyszczone wodą z mydłem. Nie używać silnych
detergentów (na przykład rozpuszczalnika).
•Pasy czyścić delikatnym roztworem z mydłem.
•Pas naramienny można zdejmować i czyścić delikatnym roztworem wody z my-
dłem.
9.3 Zdejmowanie pokrowca i 5-punktowych pasów
•Wsunąć dłonie pod podstawę fotelika i ściągnąć pokrowiec, następnie zdjąć po-
krowiec z części oparcia (rysunek 27, 28).
1413
22
Put the adjusted child car seat on the car seat, put the children in the child
car seat, pull out the car seat belt, let the car seat belt shoulder strap pass
through the headrest seat belt guide slot (Picture 22). Keep the belt
strap passing through the base belt guide slot, buckle up the car seat belt
buckle, until you hear "click"(Picture 23).
The car seat belt shall pass under the red base belt guide groove, not
through above the guide groove(Picture 24,25).
23
f
f
24 25
child car seat on the car seat is the
backrest ofthe car seat (Picture 26).
26
9.3 Dismantlement of cloth cover and 5 points harness
Put hands onto the bottomofthe chair, and pull out the cover, then, it open
the back cover on the back ofthe chair(Picture27, 28).
Accidents happened when the car speed higher than 10km/h,may cause invisible
damage to the baby safety seat.Please change your baby safety seat after crash
accident.
Checkall important parts regularly,make sure all mechanismfunctions properly.
Toavoid damage,makesure no partofthisbaby seat isstuck bycar door,foldable
car seat or anyother objects.
Store your baby car seat in safe place when not using.Avoid heavy objects, direct
sunshine ordirect heat on it.
Cloth cover can be removed.Wash it with a mild detergent in warm water(water
temperature does not exceed30℃),natural dry,not dehydration.
Plastic parts can be cleaned with soap and water, do not use strong detergents
(such as solvent). Eat belt can apply mild soap to clean.
Shoulder strap can be removedwith mild soap waterto clean.
9.2 Cleaning of cloth cover
Do not use baby car seat without cloth cover.
9.1 Attention
27 28
User manualBaby safety seat

17
•Podłączyć pas bezpieczeństwa od sprzączki T i odłączyć zaczep od pasa polipro-
pylenowego na nakładce ramiennej (rysunek 29).
•Cofnąć fotelik i odłączyć złącze T, następnie zdjąć pas (rysunek 30).
1615
polypropylene belt on shoulder pad (Picture 29).
(Picture 30).
29 30
1
Ribbon
2
31
33 belt and warp it, and using I-shaped
31).
Pull out of head rest, backrest,
fabric on the base, release the fabric
whole fabric on chair (Picture 32,33).
32
9.4 Installation of cloth cover and 5 points harness
Put the safety belt go through the hole of the safety belt on the base of chair,
and using tools to pull out the safety belt from the backrest, and usingTri-glide
1
2
34 35
36 37
Put the shoulder pad on the safety belt, and take both the safety belt and
shoulder pad polypropylene belt through the hole on the backrest of the chair,
T-buckle, and install the back cover on the backrest ofthechair (Picture 36).
User manualBaby safety seat
•Palcami ścisnąć i zawinąć pas części
krokowej i wyciągnąć go przez podłuż-
ny otwór (rysunek 31).
•Zdjąć materiał z oparcia głowy, oparcia
pleców i podstawy, odpiąć sprzączkę
mocowania materiału i elastyczną lin-
kę, a następnie zdjąć cały pokrowiec
z fotela (rysunek 32,33)

18
9.4 Zakładanie pokrowca i 5-punktowych pasów
•Założyć materiał na główną część fotelika, przełożyć go przez krawędzie fotelika
i przymocować elastyczną linką i sprzączką (rysunek 34).
•Przełożyć pas bezpieczeństwa przez otwór w podstawie fotelika i używając spe-
cjalnych narzędzi wyciągnąć pas bezpieczeństwa z oparcia i przymocować go za
pomocą złącza T (rysunek 35).
•Założyć nakładkę ramienną na pas i przeprowadzić pas bezpieczeństwa i pas
propylenowy nakładki ramiennej przez otwór w oparciu fotelika, przymocować
zaczep pasa polipropylenowego nakładki ramiennej i przymocować pas bezpie-
czeństwa ze sprzączką T. Założyć pokrowiec tylny na oparcie (rysunek 36).
•Połączyć złącze T ze złączem podłużnym w kształcie„I”, pociągnąć w przód, a na-
stępnie zakończyć montaż fotelika (rysunek 37).
1615
polypropylene belt on shoulder pad (Picture 29).
(Picture 30).
29 30
1
Ribbon
2
31
33 belt and warp it, and using I-shaped
31).
Pull out of head rest, backrest,
fabric on the base, release the fabric
whole fabric on chair (Picture 32,33).
32
9.4 Installation of cloth cover and 5 points harness
Put the safety belt go through the hole of the safety belt on the base of chair,
and using tools to pull out the safety belt from the backrest, and usingTri-glide
1
2
34 35
36 37
Put the shoulder pad on the safety belt, and take both the safety belt and
shoulder pad polypropylene belt through the hole on the backrest of the chair,
T-buckle, and install the back cover on the backrest ofthechair (Picture 36).
User manualBaby safety seat

19
Rozwiązanie w przypadku nagłego rozłączenia złącza ISOFIX
1817
Baby safety seat
1
2
Press
Push
Green is locked state
Red is the unlockstate
1
3 4
5 6
2
Warning ISOFIX connector accidentally pops out when it is
Please attach the key (on the top tether of the backrest) of top
Note: the ISOFIX connectorshows green as thelockingstate and redas theunlockingstate.
Push the ISOFIX connector to the inner side of the baby car seat and
press to unlock it,in order to match the car seat ISOFIX U type
When returning the ISOFIX connector, be sure to push it to the innermost
state so that it can be released normally when used next time .
1 2
Warning When installing the baby car seat ISOFIX connector
connector is not completely recovered, ISOFIX connector cannot be
ISOFIX connector will be popped out .
User manual
Ostrzeżenie
•Jeżeli złącze ISOFIX nagle się rozepnie, podłączenie całego pasa od nowa nie
jest konieczne (rysunek 1).
•Przymocować przycisk (górnego paska oparcia) do zaczepu ISOFIX (rysunek 2),
tak aby złącze ISOFIX się zablokowało (rysunek 3, 4).
•Uwaga: Złącze ISOFIX oznaczone jest na zielono po zamknięciu, a na czerwono
po rozpięciu.
•Wcisnąć złącze ISOFIX po wewnętrznej stronie w fotelika. Nacisnąć złącze
w celu odblokowania i dopasowania zaczepu typu„U” (rysunek 5,6).

20
1817
Baby safety seat
1
2
Press
Push
Green is locked state
Red is the unlockstate
1
3 4
5 6
2
Warning ISOFIX connector accidentally pops out when it is
Please attach the key (on the top tether of the backrest) of top
Note: the ISOFIX connectorshows green as thelockingstate and redas theunlockingstate.
Push the ISOFIX connector to the inner side of the baby car seat and
press to unlock it,in order to match the car seat ISOFIX U type
When returning the ISOFIX connector, be sure to push it to the innermost
state so that it can be released normally when used next time .
1 2
Warning When installing the baby car seat ISOFIX connector
connector is not completely recovered, ISOFIX connector cannot be
ISOFIX connector will be popped out .
User manual
Środki ostrożności podczas zabezpieczania dziecka w foteliku
Podczas ponownego podłączenia złącza ISOFIX upewnić się, że wciśnięte jest mak-
symalnie, aby ułatwić późniejsze zwolnienie.
Podczas zwalniania złącza ISOFIX: jeżeli złącze nie wyskakuje w sposób naturalny,
pociągnąć za złącze ręcznie.
Ostrzeżenie
•Podczas przygotowywania dziecka foteliku za pomocą złącza iSOFIX i zaczepu
stałego ISOFIX po stronie pojazdu, jeżeli złącze ISOFIX nie jest dokładnie zapię-
te, może wystąpić problem z jego zwolnieniem (rysunek 1).
•Docisnąć złącze ISOFIX do pozycji z rysunku 2, które spowoduje jego odblo-
kowanie.
Table of contents
Other BabySafe Car Seat manuals

BabySafe
BabySafe Westie User manual

BabySafe
BabySafe Golden 360 User manual

BabySafe
BabySafe Saluki User manual

BabySafe
BabySafe Chart User manual

BabySafe
BabySafe Rhodesian User manual

BabySafe
BabySafe Alaskan User manual

BabySafe
BabySafe Westie User manual

BabySafe
BabySafe Collie User manual

BabySafe
BabySafe Westie User manual

BabySafe
BabySafe Schnauzer User manual
Popular Car Seat manuals by other brands

Porsche
Porsche ISOFIX operating instructions

Titaniumbaby
Titaniumbaby i Safety Vector Isofix Instructions for use

Britax
Britax BABY-SAFE User instruction

Britax
Britax PIONEER user guide

Specter OFF-ROAD
Specter OFF-ROAD 310-73D installation instructions

Next generation
Next generation 4050/A/2013 Instructions for installation