BabySafe Westie User manual

1
GRUPA WIEKOWA 0+ 1 ISOFIX
INSTRUKCJA
PL
Westie
Przyjaciel dziecka i rodziny
EN
DE
Pull

2 3
Ważne wskazówki ..................................................................................... 03
Przegląd......................................................................................................... 05
Użytkowanie fotelika samochodowego BABYSAFE WESTIE..... 06
Informacje ogólne ..................................................................................... 07
ISOFIX przeznaczony dla pojazdów ................................................... 08
Wymontowanie siedziska z bazy ......................................................... 09
Montaż fotelika w samochodzie........................................................... 09
Montaż fotelika tyłem do kierunku jazdy (od urodzenia do 18 kg) ...... 10
Montaż fotelika przodem do kierunku jazdy (od 9 do 18 kg) ... 12
Zabezpieczenie dziecka w foteliku ..................................................... 14
Korzystanie z regulacji odchylenia oparcia ...................................... 17
Usuwanie wkładki zmniejszającej........................................................ 19
Konserwacja, pielęgnacja fotelika ....................................................... 19
Warunki gwarancji .................................................................................... 20
Uwaga!
Przed przewozem dziecka w samochodzie zapoznaj się z zasadami montażu
fotelika zawartymi w instrukcji obsługi pojazdu. Zwrócić szczególną uwagę na
wszystkie informacje dotyczące korzystania z fotelików dziecięcych, w połączeniu
z poduszkami powietrznymi.
Ostrzeżenie!
• Dzieci często noszą drobne przedmioty (np. zabawki) w kieszeniach kurtki
lub spodni, a także mogą nosić ubrania ze sztywnymi elementami (np. szelki,
klamry). Upewnij się, że elementy te nie są wciśnięte pomiędzy dzieckiem,
a pasami fotelika, ponieważ może to spowodować niepotrzebne urazy w razie
wypadku. Takie samo zagrożenia występuje również dla dorosłych.
• Bezpieczeństwo Twojego dziecka może być zagwarantowane tylko wtedy, gdy
fotelik samochodowy jest zainstalowany i używany zgodnie z instrukcją obsługi.
• Wszystkie pasy muszą być założone, napięte, bez żadnych skręceń i muszą być
chronione przed uszkodzeniem.
• Chroń elementy systemu mocowania niepokryte tkaniną przed bezpośrednim
działaniem promieni słonecznych aby uchronić swoje dziecko przed oparzeniem.
• Nie próbuj żadnych zmian w systemie mocowania, ponieważ mogą one zagrażać
bezpieczeństwu dziecka.
• Po wypadku cały fotelik należy wymienić.
• Pamiętaj aby poinstruować pasażera, w jaki sposób wyjąć dziecko z fotelika
w razie wypadku lub zagrożenia.
• Fotelika nie wolno stosować na siedzeniach z aktywowaną przednią
poduszką powietrzną. (Zagrożenie życia)!

4 5
• Nigdy nie zostawiaj dziecka bez opieki w foteliku.
• Upewnij się, że zabezpieczyłeś bagaż i luźne elementy, aby zmniejszyć ryzyko
obrażeń w razie wypadku.
• Instrukcja musi być zawsze przewożona wraz z fotelikiem.
• Wykorzystanie nieoryginalnych akcesoriów lub części zamiennych jest
zabronione, a w wyniku stwierdzenia niezgodności powoduje wygaśnięcie
wszelkich roszczeń z tytułu gwarancji i odpowiedzialności.
• Części zużyte powyżej 6 miesięcy od daty zakupu w normalnej eksploatacji nie są
wymieniane w ramach gwarancji.
• Należy skontaktować się z odpowiednim sprzedawcą w specjalistycznym sklepie
z produktami dla dzieci lub serwisem twojego fotelika samochodowego, który
sprzedaje części zamienne na podstawie katalogu. Punkty te będą mieć pełną
gamę produktów BabySafe, fotelików dziecięcych oraz akcesoriów do wyboru.
• Fotelik BabySafe Westie został przetestowany w symulacji zderzeniowej
przy prędkości do 50 km/h ze stałą przeszkodą. Wyniki badań są zgodne
z międzynarodową normą ECE R44/04. Test ten znajduje zastosowanie
dla wszystkich badanych systemów fotelika, gdy jest używany zgodnie
z przeznaczeniem i zgodnie z instrukcją montażu i obsługi. Fotelik powinien
zapobiegać lub minimalizować obrażenia u dzieci o masie ciała do 18 kg w razie
wypadku, w zależności od rodzaju i ciężkości wypadku.
• Fotelik dla dziecka nie zastąpi odpowiedzialnego i ostrożnego zachowania
w ruchu drogowym.
Pull
02
A
08
06
B
01
09
11
13
15
14
16
03
04
05
07
10
12

6 7
PRZEGLĄD
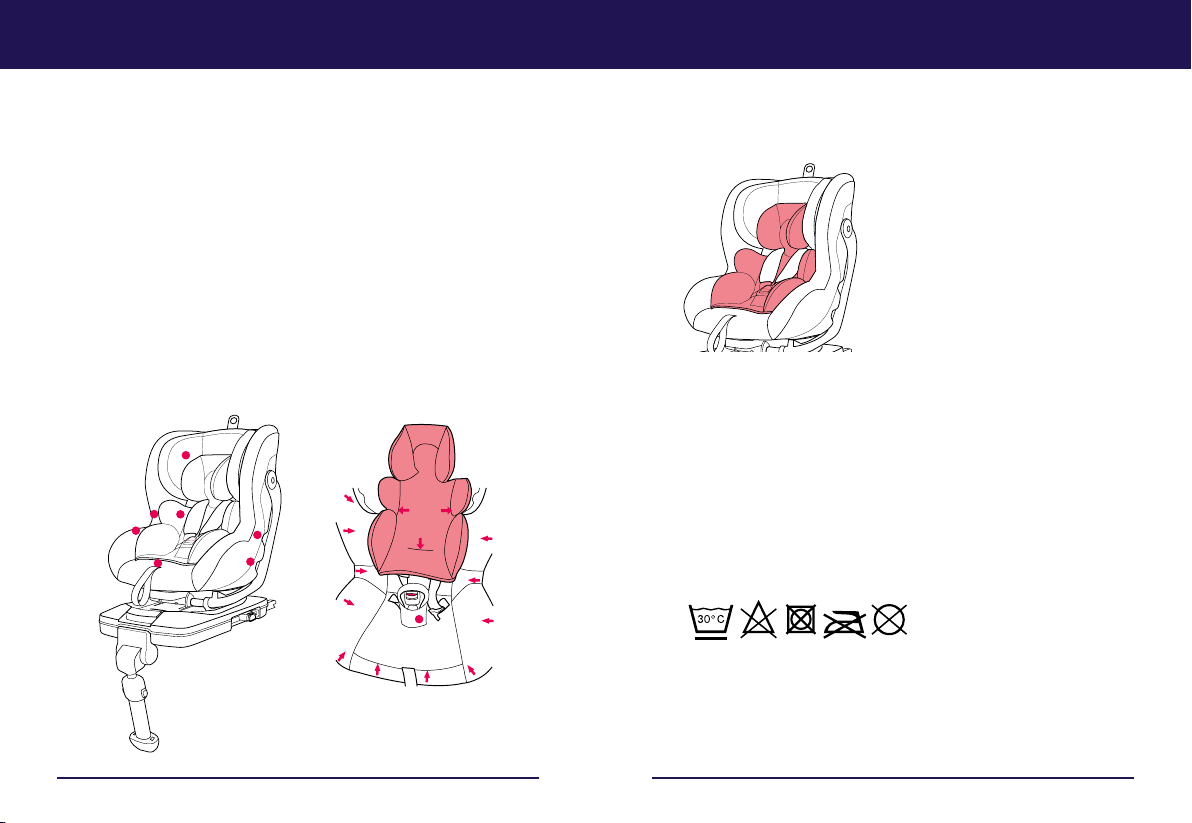
01. Uchwyt regulacji wysokości zagłówka
02. Zagłówek
03. Klamra pasów
04. Blokada regulacji długości pasów
05. Regulacja długości pasów
06. Dźwignia do regulacji pochylenia oparcia
07. Dźwignia zwalniająca/blokująca fotelik w bazie
08. Znacznik zielony/czerwony prawidłowego montażu fotelika w bazie
09. Przycisk regulacji długości podpory
10. Podpora
11. Znacznik zielony/czerwony kontaktu podpory z podłogą
12. Blokada przednia
13. Blokada tylna
14. Złącza ISOFIX (lewy i prawy)
15. Przycisk odblokowania systemu Isox (lewa i prawa)
16. Przycisk do wysuwania i chowania prowadnic ISOFIX (lewa i prawa)
UŻYTKOWANIE FOTELIKA SAMOCHODWEGO BABYSAFE WESTIET
Dziękujemy za zakup naszego fotelika BabySafe Westie. Produkt jest wytwarzany pod
ścisłą kontrolą warunków jakości. Jego optymalne cechy bezpieczeństwa są skuteczne
tylko wtedy, gdy fotelik jest używany prawidłowo. W rezultacie powinno się stosować
ściśle do zaleceń instrukcji montażu i użytkowania. BabySafe Westie jest przeznaczony
dla dzieci w wieku do około 4 lat lub do 18 kg. Nadaje się do stosowania w pojeździe z
ISOFIX na zatwierdzonych miejscach (patrz lista pojazdów), zgodnie z odpowiednim
urządzeniem przytrzymującym dla dzieci w kategorii wagowej lub wiekowej. Na
podstawie statystyki wypadków, zaleca się stosowanie fotelika na tylnym siedzeniu.
Fotelik składa się z 2 części: siedziska (A) i bazy ISOFIX (B).
INFORMACJE OGÓLNE
• Fotelik przeznaczony jest do użytkowania w pojazdach wyposażonych w system
mocowania ISOFIX zgodny z normą ECE R44/04 - klasa wielkości Isox: D i B1.
• Fotelik należy wyłącznie montować w miejscach do tego przeznaczonych przez
producenta pojazdu i w tym celu odpowiednio oznaczonych (zapoznaj się
z instrukcją obsługi pojazdu).
• Fotelik przeznaczony jest dla dzieci w kategorii wagowej od 0 – 18 kg.
• Fotelik posiada oznakowanie SEMIUNIWERSAL i nadaje się do montażu na
wyznaczonych siedzeniach w pojeździe. W osobnej broszurze (Lista sprawdzonych
samochodów) można znaleźć przegląd miejsc, na których można montować fotelik.
• UWAGA! W PRZYPADKU MONTAŻU FOTELIKA TYŁEM DO KIERUNKU JAZDY NIE
NALEŻY MONTOWAĆ W MIEJSACH CHRONIONYCH PODUSZKĄ POWIETRZNĄ,
CHYBA ŻE MOŻNA JĄ WYŁĄCZYĆ.
ISOFIX PRZEZNACZONY DLA POJAZDÓW
„BABYSAFE WESTIE” z systemem ISOFIX został zatwierdzony do użytku w pojazdach
(SEMIUNIWERSAL) i jest odpowiedni do montażu na przeznaczonych do tego celu
siedzeniach . Dodatek LISTA POJAZDÓW zawiera przegląd pojazdów i siedzeń, które
zostały zatwierdzone do stosowania z systemem ISOFIX BabySafe Westie z dołączoną
podporą. Przeczytaj instrukcję dostarczoną przez producenta pojazdu i instrukcją
montażu i bezpieczeństwa zawartą w niniejszej instrukcji obsługi.

8 9
WYMONTOWANIE SIEDZISKA Z BAZY.
Fotelik (A) BabySafe Westie można usunąć z bazy ISOFIX (B).
Zawsze najpierw należy wyjąć dziecko z fotelika przed jego demontażem z bazy!
Uchwyt blokujący znajduje się pod siedzeniem, w przedniej części bazy ISOFIX. Pociągnij
uchwyt blokady do przodu, jak widać odblokowuje rurę z przodu pod siedzeniem.
MONTAŻ FOTELIKAW SAMOCHODZIE
Aby ułatwić montaż, zaleca się najpierw montaż bazy ISOFIX, a następnie wpięcie
siedziska do bazy ISOFIX. Zawsze wyjmij dziecko przed montażem lub demontażem
siedziska BabySafe Westie w bazie ISOFIX!
Krok 1. Montaż bazy ISOFIX
Pociągnij przycisk Isox, aby wyciągnąć prowadnice Isox do tyłu w całości.
Należy to zrobić po obu stronach (lewa i prawa).
Skieruj złącza w kierunku łączników Isox w samochodzie do momentu zablokowania.
Gdy usłyszysz kliknięcie, a znacznik zmieni kolor z czerwonego na zielony po obu stro-
nach baza jest zamontowana (lewa i prawa).
Odblokuj tył – blokada pokazana na zdjęciu - podnieść siedzisko i zdejmij go z bazy.
Pull
Pull
ll
ll

10 11
Montaż siedziska w bazie ISOFIX.
UWAGA!
Nie stosować fotelika tam gdzie jest poduszka powietrzna. Zagrożenie dla życia!
Zawsze instalować fotelik bez dziecka w środku.
Krok 2.1 Montaż fotelika na bazie ISOFIX tyłem do kierunku jazdy
od urodzenia do 18 kg
a) Zablokować metalową rurkę w przednim zaczepie, następnie unieść siedzisko,
aby je zablokować w tylnej blokadzie znajdującej się w bazie ISOFIX.
b) Pociągnąć uchwyt blokady z przodu i przesunąć tylną krawędź fotelika w dół, aby
włożyć metalową rurę w przednią blokadę bazy ISOFIX.
c) Zwolnić uchwyt blokady i zablokować metalową rurkę, upewnić się czy znacznik
bezpieczeństwa ma kolor zielono w przedniej części bazy ISOFIX.
Pociągnij przycisk prowadnicy Isox, aby przesunąć bazę do tyłu, aż fotelik będzie
blisko tylnej części oparcia pojazdu, upewnij się, że luka została wyeliminowana.
Regulacja podparcia - nogi.
Wciśnij przyciski zwalniające po obu
stronach i przedłuż podporę do
podłogi, aż w pełni osiągnie kontakt
z powierzchnią. Upewnij się patrząc na
znaczniki po obu stronach czy pokazują
kolor ZIELONY.
UWAGA!
• Fotelik musi być zamocowany w systemie
ISOFIX, nawet jeśli dziecko w nim nie
podróżuje.
• Oba złącza ISOFIX muszą być wpięte,
a znaczniki mają pokazywać kolor zielony.
• Fotelik ma być wpięty w bazę Isox,
a znaczniki mają pokazywać kolor zielony.
• Podpora - noga musi w pełni dotykać do
podłogi, a znaczniki mają pokazywać kolor
zielony.
Pull
pull
click

12 13
Krok 2.2 Montaż fotelika na bazie ISOFIX przodem do kierunku jazdy
od 9 kg do 18 kg
a) Zablokować metalową rurkę w przednim zaczepie, unieść siedzisko, aby je
zablokować w tylnej blokadzie znajdującej sie w bazie ISOFIX.
b) Pociągnąć uchwyt blokady z przodu i przesunąć tylną krawędź fotelika w dół, aby
włożyć metalową rurę w przednią blokadę bazy ISOFIX.
c) Zwolnić uchwyt blokady i zablokować metalową rurkę, upewnić się czy znacznik
bezpieczeństwa ma kolor zielono w przedniej części bazy ISOFIX.
Pociągnij przycisk prowadnicy Isox, aby przesunąć bazę do tyłu, aż fotelik będzie
blisko tylnej części oparcia pojazdu, upewnij się, że luka została wyeliminowana.
Regulacja podparcia - nogi.
Wciśnij przyciski zwalniające po
obu stronach i przedłuż podporę do
podłogi, aż w pełni osiągnie kontakt
z powierzchnią. Upewnij się patrząc na
znaczniki po obu stronach czy pokazują
kolor ZIELONY.
UWAGA!
• Fotelik musi być zamocowany w systemie
ISOFIX, nawet jeśli dziecko w nim nie
podróżuje.
• Oba złącza ISOFIX muszą być wpięte,
a znaczniki mają pokazywać kolor zielony.
• Fotelik ma być wpięty w bazę Isox, a
znaczniki mają pokazywać kolor zielony.
• Podpora - noga musi w pełni dotykać do
podłogi, a znaczniki mają pokazywać kolor
zielony.
UWAGA!
• Upewnij się, że fotelik jest prawidłowo przymocowany do obu punktów wpięcia,
a znaczniki pokazują kolor ZIELONY.
• Jeżeli masa ciała dziecka przekracza 9 kg, fabrycznie zainstalowana wkładka
zmniejszająca powinna zostać usunięta. (Patrz „Zdejmowanie wkładki
zmniejszającej”).
• Zawsze instalować fotelik bez dziecka w środku.
Pull
click
pull

14 15
ZABEZPIECZENIE DZIECKA W FOTELIKU BABYSAFE WESTIE
UWAGA!
Sprawdź czy fotelik BabySafe Westie jest zamontowany prawidłowo, czy wszystkie
pasy mają prawidłowe napięcie, czy wszystkie mechanizmy blokujące są zabezpie-
czone i wszystkie znaczniki mają kolor zielony.
Sprawdzanie Punktów.
- Upewnij się, że klamra jest prawidłowo zamknięta, a żaden z pasów nie jest
skręcony.
- Sprawdź czy zagłówek jest dostosowany do wzrost dziecka i czy głowa jest
w prawidłowej pozycji.
- Sprawdzić, czy osłona na pasach znajduje się nieco powyżej ramion dziecka. Pasy
powinny znajdować się na środku między szyją dziecka i zewnętrzną krawędzią
ramienia.
Regulacja długości pasów.
W przedniej części siedziska fotelika pod
poszyciem jest przycisk regulacji pasów, przy
pomocy którego regulowane jest napięcie pasów.
Nacisnąć przycisk regulacji pasów, naciskając go
ciągnąć w górę za pasy do przodu (nie ciągnąć za
osłonki pasów).
Regulacja zagłówka.
Aby wyregulować zagłówek, pociągnij za uchwyt
na górze. Należy ustawić właściwą pozycję, co
oznacza, że pasy powinny być około 1 cm nad
ramieniem dziecka.
Umieszczenie dziecka w foteliku.
- Otwórz klamrę pasów poprzez naciśnięcie czerwonego przycisku, rozłóż
zatrzaski pasów na boki.
- Umieścić dziecko w siedzisku, założyć pasy barkowe / pasy biodrowe, dopasować
zatrzaski do klamry, następnie zapiąć zatrzaski w klamrze.
- Pociągnąć centralny pas krokowy, aby upewnić się, że pasy zabezpieczają
dziecko w odpowiedni sposób, podłożyć dwa palce pod pas barkowy i sprawdzić
czy nie ma luzu. Upewnij się, że Twoje dziecko siedzi wygodne i jest dobrze
zabezpieczone.
11
2

16 17
DEMONTAŻ FOTELIKA BABYSAFE WESTIE
Aby zdemontować fotelik BabySafe Westie szybciej radzimy najpierw wymontować
siedzisko (A) (patrz„WYMONTOWANIE SIEDZISKA Z BAZY”).
Zawsze montować i wymontowywać siedzisko bez dziecka w środku!
REGULACJA NACHYLENIA OPARCIA.
Pociągnąć uchwyt znajdujący się z przodu pod spodem siedzenia, ustawić oparcie
w żądanym położeniu, potwierdzeniem zablokowania oparcia będzie„kliknięcie”.
Nacisnąć przycisk zwalniający do środka i przesunąć
podporę do góry.
Pociągnij przycisk prowadnicy Isox, aby przesunąć
Isox do przodu po obu stronach.
Przesunąć przycisk odblokowania systemu Isox po
obu stronach bazy do przodu, wtedy złącza ISOFIX są
uwalniane z punktów wpięcia.
Wyjmij bazę BabySafe Westie z pojazdu.
Pull
ll

18 19
DEMONTAŻ / MONTAŻ TAPICERKI
Aby zdjąć tapicerkę z siedziska (A) najpierw musi być ono usunięte z bazy (B) (patrz
„Demontaż siedziska z bazy”)
1. Poluzować pasy przy pomocy centralnego przycisku.
2. Rozpiąć klamrę pasów, a następnie wyjąć wkładkę zmniejszającą .
3. Najpierw należy zdjąć tapicerkę z zagłówka.
4. Za pomocą płaskiego przedmiotu (listewka, linijka) zdjąć tasiemki
zabezpieczające. Tasiemki popychać ku dołowi.
5. Przełożyć przez korpus sprzączkę klamry krokowej obracając ją o kąt 90 stopni.
6. Wyciągnąć elastyczną taśmę, która znajduje się w miejscach zaznaczonych
czerwonymi strzałkami , a następnie zdjąć tapicerkę .
Sprawdź, czy wszystkie blokady są zamknięte i wszystkie wpięcia są
prawidłowo przymocowane.
USUWANIE WKŁADKI ZMNIEJSZAJĄCEJ
Kiedy masa ciała dziecka przekracza 9 kg,
zamontowana wkładka zmniejszająca po-
winna zostać wyjęta.
JAK DBAĆ
Lekkie zabrudzeniamożnałatwousunąćwilgotnąszmatką.Tapicerkęmożnarównież
zdjąć i prać w temperaturze 30°C. Prać ręcznie. Wyjmij wkładkę zmniejszającą przed
praniem. Tapicerka podczas prania lub gdy jest mokra może delikatnie farbować.
Nie używać rozpuszczalników do czyszczenia tapicerki!
1
2
3
4
4
56
1
2
3
4
4

20 21
WARUNKI GWARANCJI:
Okres gwarancji rozpoczyna się w momencie zakupu.
Okres gwarancji udzielany jest zgodnie z prawem obowiązującym w kraju zakupu.
Warunki gwarancji obowiązują zgodnie z dołączoną kartą gwarancyjną.
Roszczenia gwarancyjne nie są ważne, jeżeli:
· Produkt został zmodykowany.
· Produkt jest zwracany niekompletny, bez oryginalnego dokumentu zakupu,
zwracany do sprzedawcy powyżej 14 dni od wykrycia usterki.
· Wystąpiła wada spowodowana niewłaściwym przechowywaniem lub
konserwacją, ze względu na inne działania, które powstały z winy użytkownika
w szczególności w przypadku, gdy użytkownik nie stosował się do zaleceń
instrukcji.
· Naprawy produktu były prowadzone przez osoby trzecie.
· Wada została spowodowana wypadkiem.
· Numer seryjny został uszkodzony lub usunięty.
LOGIS S.A.
ul. Mszczonowska 36
96-200 Rawa Mazowiecka
POLSKA
Tel.: +48 46 814 73 13
Fax: +48 46 814 73 00
e-mail: biuro@babysafe.eu
www.babysafe.eu

1
GROUP 0+ 1 ISOFIX
INSTRUCTION
EN
Westie
Friend of the child and family
Pull

2 3
Important Notes ......................................................................................... 03
Overview ....................................................................................................... 05
Using the BabySafe Westie Child Car seat......................................... 06
General Guidelines .................................................................................... 07
For Isox-Suitable Vehicles .................................................................... 07
Removing the seat .................................................................................... 08
Mounting the BabySafe Westie............................................................. 09
Mounting the Seat Opposite to the driving direction
(From Birth to 18kg) .................................................................................. 10
Mounting the seat in the driving direction (From 9 to 18kg)..... 12
Securing your child in the BabySafe Westie .................................... 14
Using the reclining adjustment ............................................................ 17
Removing the insert reducing .............................................................. 19
Care Instructions ........................................................................................ 19
Warranty conditions ................................................................................. 20
Caution!
Make sure you observe the relevant instructions in the user manual of your vehicle
before transporting children.Take particular note of all information provided for the
use of child seats in connection with airbags.
Warning!
• Children often carry small objects (e.g.toys) in jacket or trouser pockets, and may
also wear clothes with rigid components (e.g. belt buckle). Make sure that these
objects are not clamped be tween the child and the safety harness, as this might
cause unnecessary injuries in case of an accident. The same hazards also apply for
adults.
• Naturally young children are often lively. Make sure to explain the importance
of safety when in a vehicle. Your child will then understand that the harness lock
should not be opened and the harness should not be removed, giving you more
peace of mind.
• Your child’s safety can only be guaranteed if the safety system is installed and
used in accordance with the instruction manual.
• All system harness straps must be worn taut and without any twists, and must be
protected from demage.
• Protect any parts of the restraint system not covered with fabric against direct
sunlight to prevent your child from suering burns.
• The child restraint system must not be damaged or crushed by moving parts in
the vehicle or by the vehicle doors.
• Do not attempt any modications to the restraint system as they might endanger
your child’s safety.
• After an accident, the entire child restraint system must be replaced or sent to the
manufacturer for testing, along with an accident report.
• Make sure to instruct your passenger on how to remove the child from its safety
seat in case of an accident or danger.
• The lap belts of the harness system must be tted as low down as possible so that
the child’s hips are held correctly.
• The child seat must not be used on seats with activated front airbags. (Dan-
ger to life)!

4 5
• Never leave your child unsupervised in the car seat – whether harnessed or not.
• Make sure you secure any luggage and loose items to reduce the risk of injury in
case of an accident.
• The manual must always be carried with the child safety seat.
• The use of any accessories or replacement parts is prohibited, and non-complian-
ce with result in the lapse of all warranty and liability claims.
• The child safety seat is to be used with original se at covers only.
• If the restraint system is used extensively it is normal for the seat covers and other
parts to suer varying degrees of wear, depending on the duration and intensity
of use, and they will then have to be replaced. We can therefore not provided any
blanket warranty beyond 6 months for wear parts.
• Please contact your specialists shop for baby and children’s products and the
relevant section of department stores, your car accessory specialist shop or a
catalogue company for replacement parts. They will have a complete product
portfolio for BabySafe child seat accessories to choose from.
• The child seat BabySafe Westie has been tested in crash simulations for impacts
of up to 50 km/h agai nst a solid obstacle. Test results are compliant with the in-
ternational test standard ECE R44.04, which is applicable for all tested child safety
seat systems.When used as intended and in compliance with the installation and
ope rating instructions, the child safety seat should prevent or minimize injuries
to children up to a body weight of 18k g in case of an accident, depending on the
type and severity of accident.
• A child safety device does not replace responsible and careful behavior in road
trac.
Pull
02
A
08
06
B
01
09
11
13
15
14
16
03
04
05
07
10
12

6 7
OVERVIEW
01. Headrest adjustment handle
02. Headrest
03. Harness buckle
04. Central adjusting device
05. Central harness
06. Operating handle for adjusting the reclining system
07. Locking handle for the seat lock
08. Safety display seat lock
09. Support leg operating button
10. Support leg
11. Safety display for support leg
12. Front-Lock
13. Rear-Lock
14. Isox connectors (left and right)
15. Isox release button (left and right)
16. Isox slide button (left and right)
USING THE BABYSAFE WESTIE CHILD CAR SEAT
Thank you for purchasing our car seat BabySafe Westie. The product is manufactured
under strict quality control conditions. Its optimum safety characteristics are only eec-
tive if the seat it used correctly. As a result you should ensure strict adherence with the
mounting and usage instructions.
The BabySafe Westie is suitable for children up to the age of approx. 4 or up to 18kg. It
is suitable for use in vehicle with Isox-approved seats (see vehicle list) in accordance
with the relevant child restraint and anchoring category. As a result of accident statistics,
however, we recommend using the seat behind the front passenger seat.
The seat consists of 2 parts: the seat (A) and Isox base (B).
GENERAL INFORMATION
• This is an Isox child restraint. It has been approved for general use in vehicle equip-
ped with Isox anchoring in compliance with ECE regulation 44.04
• It is suitable for use in vehicle with Isox-approved seats (see vehicle list) accordance
with the relevant child restraint and anchoring category.
• This child safety restraint is compliant with the Isox weight category: up to 18kg and
Isox size categoris: D and B1
• If you have any questions or doubts, please contact the manufacturer of the child
safety unit or your retailer.
FOR ISOFIX SUITABLE VEHICLES
The BabySafeWestie with Isox system has been approved for semi-universal’s use, and
is suitable for mounting on specic vehicle seats.
The appendix VEHICLE LIST contains an overview of vehicles and vehicle seats that have
been approved for using the BabySafe Westie with Isox system in connection with a
support le g. Should your vehicle not be listed, please ensure that the BabySafe Westie
can be properly mounted in your car / on the desired seat before you purchase the child
seat.
Read the user manual provided by the manufacturer of your vehicle and the mounting
and security instructions contained i n this user manual.

8 9
REMOVING THE SEAT
The seat (A) of BabySafe Westie can be re moved from the Isox-Basis (B). Always remo-
ve the child rst before removing the seat!
The Locking Handle is located underneath the seat and on the fr ont top of the Isox
base. Pull the Locking Handle forwards, as you can see the front lock unlocks the mental
tube on the front of seat.
MOUNTING THE BABYSAFE WESTIE
To make mounting easier, we recommend to mount the Isox base rst, then to lock
the seat to Isox base . Always mount and remove the BabySafe Westiewithout
a child in it!
Step 1. Mount the Isox base
Pull the Isox slide button to slide the Isox backwards unfolding the connectors fully.
Do this for both connectors(left and right).
Unlock the Rear-lock as photo shows, and lift the seat up and take it o from the base.
Pull
Pull
ll
ll
Guide the connectors towards the Isox anchors in your vehicle until they lock together
by clicking into place and the indicator changes from red to green on both side of the
base(left and right).

10 11
Lock the seat shell to the Isox base.
Depending on the age of the child, then decide to lock the seat in rearward position
(Birth to 18kg) or forward position (9 to 18kg).
CAUTION!
Do not use on seats with airbags. Danger to life! Always mount the seat without a
child i n it.
Step 2.1 Locking the seat to the Isox base in REARWARD POSITION:
Birth-18kg
a) Lifting the seat, lock the mental tube in the underneath of the front side of the to
lock into the REAR-LOCK on Isox base.
b) Pull the LOCKING-HANDLE forward, and push the back edge of the seat down-
wards, and lock the mental tube in the underneath of the rear side of the seat to lock
into FRONT-LOCK on Isox base.
c) Release the LOCKING-HANDLE, and lock the mental tube in the rear side, make
sure you see the Safety display shows GREEN on the top front side of Isox base.
Pull the Isox slide button to slide the Isox backwards until the seat close as possi-
ble to the back rest of the vehicle’s seat, make sure the gap has eliminated.
Adjusting the Support Leg.
Push the release buttons on both side to
the center direction, and extending the
support leg to the surface of oor until
it fully reaches, make sure you see the
safety display shows GREEN on both side.
CAUTION!
• The seat must be secured with the Isox sys-
tem even if there is no child is travelling.
• Both Isox connectors must be anchored
securely and safety displays are all show
GREEN.
• The seat shell are fully locked on the Isox
base and safety displays are all show GREEN.
• The support leg must fully reaches surface
of oor and the safety displays are all show
GREEN.
Pull
pull
click

12 13
Step 2.2 Locking the seat to the Isox base in
FORWARD POSITION: 9 to 18kg
a) Lifting the seat, lock the mental tube in the underneath of the front side of the to
lock into the REAR-LOCK on Isox base.
b) Pull the LOCKING-HANDLE forward, and push the back edge of the seat down-
wards, and lock the mental tube in the underneath of the rear side of the seat to lock
into FRONT-LOCK on Isox base.
c) Release the LOCKING-HANDLE, and lock the mental tube in the rear side, make
sure you see the Safety display shows GREEN on the top front side of Isox base.
Pull the Isox slide buon to slide the Isox backwards until the seat close as possi-
ble to the back rest of the vehicle’s seat, make sure the gap has eliminated.
Adjusting the Support Leg.
Push the release buttons on both side to
the center direction, and extending the
support leg to the surface of oor until
it fully reaches, make sure you see the
safety display shows GREEN on both side.
CAUTION!
• The seat must be secured with the Isox sys-
tem even if there is no child is travelling.
• Both Isox connectors must be anchored
securely and safety displays are all show
GREEN.
• The seat shell are fully locked on the Isox
base and safety displays are all show GREEN.
• The support leg must fully reaches surface
of oor and the safety displays are all show
GREEN.
CAUTION!
• Make sure that the seat is correctly anchored to both anchoring points and the
safety display shows GREEN.
• If the child’s body weight exceeds 9kg, the pre-installed pelvis insert should be
removed. (See “Removing the Pelvis Insert”)
• Always mount the seat without a child in it.
Pull
click
pull

14 15
SECURING YOUR CHILD IN THE BABYSAFE WESTIE
CAUTION!
Check that the BabySafe Westie is mounted properly and that all belts have proper
tension, also that all locking mechanisms are secured and all safety displays show
GREEN.
Checking Point.
- Check that the buckle is fully closed, and none of the harness straps are twisted.
- Check that the headrest must be adjusted to the size of the child at proper po-
sition for child’s head.
- Check that the shoulder pad should be located slightly above the child’s shoul-
der. The shoulder harness should lie in the middle between the child’s neck and
the outer edge of the shoulder.
Adjusting the central device
At the front of the seat under the cover there is the
central adjusting device, which clamps the central
harness tight. Loosen the central adjusting device
by pushing the cap of the central adjusting device
up and pull the harness forward (do not pull on the
harness cushion).
Adjusting the headrest.
To adjust the headrest by pulling the handle on
the top. It should be set the right position, this me-
ans that the shoulder harness should
come out approximately 1 cm above the child’s
shoulder.
Placing your child in the seat.
- Open the harness buckle by pushing the re d button, and parting the buckle
tongue to the sides.
- Place your child as far back into the seat as possible, bring the shoulder/lap har-
ness and central harness in the front of the child and match the tongue rst, then
insert into main body of the buckle.
- Pull the central harness on the adjusting device to make sure the harness secures
your child at proper tightness, by checking with your two ngers gap between
harness and your child’s front shoulder point. Make sure your child is comfortable
and secured.
11
2

16 17
REMOVING THE BABYSAFE WESTIE
To make the removal of BabySafe Westie easier we recommend you rst remove
the seat (A) (See“Remove the Seat”) Always mount and remove the seat without
a child in it!
USING THE RECLINING ADJUSTMENT
Pull the reclining handle underneath of front seat forward, release the handle at
your required position until you hear a “CLICK” to make sure it’s locked.
Push the release button to the central direction, and move
the support leg into its top-most position.
Pull the Isox slide button to sli de the Isox forward for
both sides.
Pull the Isox system unlocking buttons on both side of
the base in forward direction, so the Isox connectors
are released from the vehicle’s anchoring point.
Lift the BabySafe Westie out of the vehicle’s seat.
Pull
ll
Other manuals for Westie
2
Table of contents
Languages:
Other BabySafe Car Seat manuals

BabySafe
BabySafe Husky Limited User manual

BabySafe
BabySafe Westie User manual

BabySafe
BabySafe Corgi User manual

BabySafe
BabySafe Schnauzer User manual

BabySafe
BabySafe Chart User manual

BabySafe
BabySafe Corso User manual

BabySafe
BabySafe Golden 360 User manual

BabySafe
BabySafe Mastiff User manual

BabySafe
BabySafe Booster cushion unit User manual

BabySafe
BabySafe Alaskan User manual