Bauhn P64172 User manual

User Manual
2.1 DOLBY ATMOS SOUNDBAR
WITH WIRELESS SUBWOOFER
P64172

Dok./Rev.-Nr. IMA MD44172 Cover V2.0
Overview ......................................................................................... 3
Use.................................................................................................... 4
Device parts.....................................................................................6
About these operating instructions...............................................9
Proper use ...................................................................................... 11
Safety information .........................................................................12
Package contents...........................................................................15
Inserting the batteries into the remote control ...........................16
Mounting the Soundbar ................................................................16
Connecting audio devices .............................................................19
Setting up the Soundbar ...............................................................21
Establishing a Bluetooth connection ........................................... 23
Establishing a USB connection ..................................................... 24
Audio playback in USB/Bluetooth®mode.................................... 24
Setting sound effects .................................................................... 25
Setting Vertical Surround ............................................................. 25
Adjusting the display.................................................................... 25
Maintenance.................................................................................. 26
Cleaning......................................................................................... 26
Troubleshooting............................................................................ 27
Declaration of Conformity............................................................. 27
Disposal.......................................................................................... 28
Technical data................................................................................ 29
Privacy statement .........................................................................30
Service information .......................................................................31
Legal Notice ................................................................................... 32
Warranty Details ............................................................................ 34
Repair and Refurbished Goods or Parts Notice........................... 35
Contents

3
Overview
A
aux
123
4
5
6
7 8 9 10 11 12 13
14 15 16

4
D
4
720 mm
1
2
720 mm
3
4
Remove
the screws
Install the wall
mounting screws
E
Use
B
1
4
7
21
22
23
24
25
26
17
18
19
20
C

5
F
AV equipment
HDMI IN
HDMI (ARC)
OR
HDMI OUT
G
.KGJVNUTK
H I
56:/)'2
Use

6
Device parts
Device parts
1Indicator light 14 AC~ Connecting socket for power
cord
2Display 15 PAIR
Establish connection between
subwoofer and speaker
3Fixing point for wall
mounting bracket 16 Subwoofer connection
display
4Switch on/off 17 OPT/COA Select audio source
5Select audio source 18 TREBLE Increase/decrease treble
6/ Set volume 19
/
Mute/set volume
7AC~ Connecting socket for po-
wer cord 20 DIMMER Adjust background lighting
of display
8COAXIAL Coaxial connection for TV
and other audio devices 21
MOVIE,
VOICE,
SPORT,
MUSIC
Select sound effect
9OPTICAL Optical connection for TV
and other audio devices 22 Vertical
Surround Set Surround effect
10 USB USB connection for exter-
nal storage devices 23 BASS Increase/decrease bass
11 AUX Connection port for TV and
other audio devices 24 /Previous title/next title
12 HDMI ARC Select HDMI ARC
connection 25 Start/pause audio playback
13 HDMI 1 / 2 Select HDMI 1 or HDMI 2
connection 26 Switch on/off

Contents
7
Contents
Overview ......................................................................................................... 3
Use ................................................................................................................... 4
Device parts..................................................................................................... 6
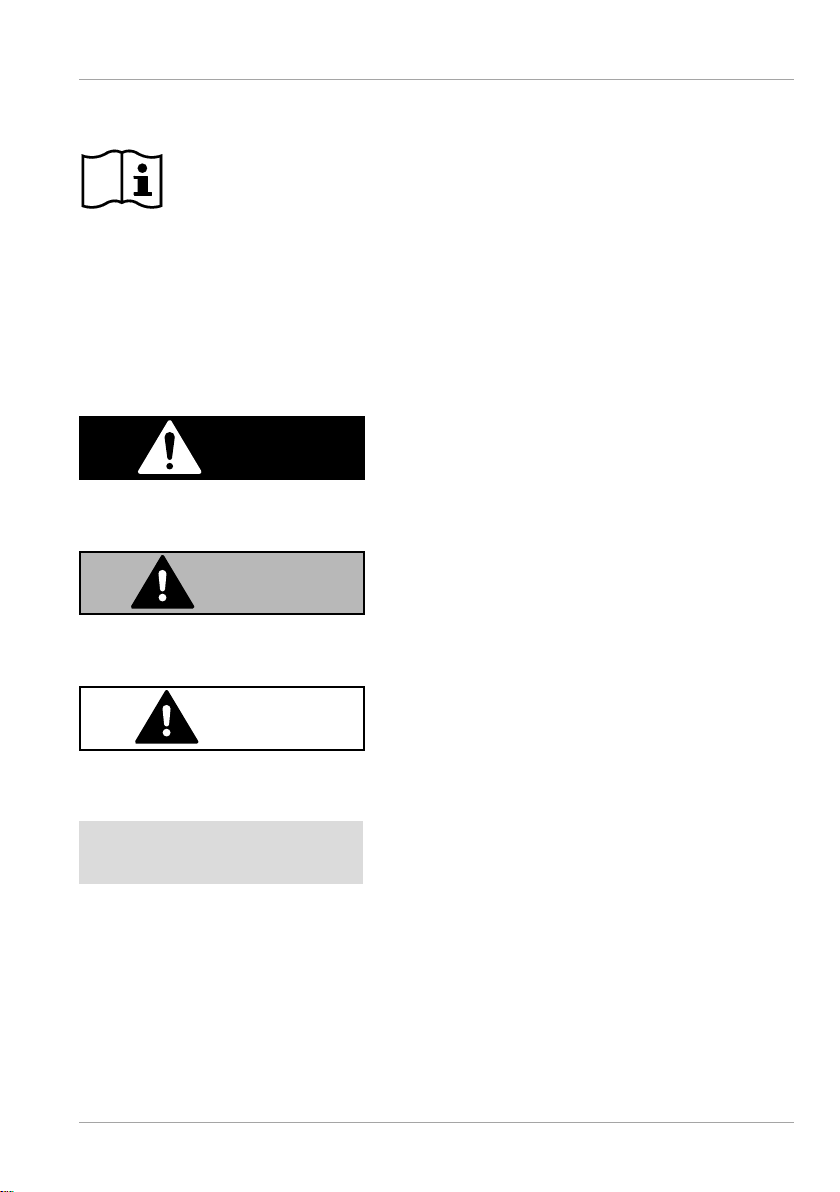
About these operating instructions ............................................................... 9
Proper use ...................................................................................................... 11
Safety information ......................................................................................... 12
Safely setting up the device .............................................................................12
Power supply ......................................................................................................13
Handling batteries .............................................................................................14
Repair...................................................................................................................15
Package contents ...........................................................................................15
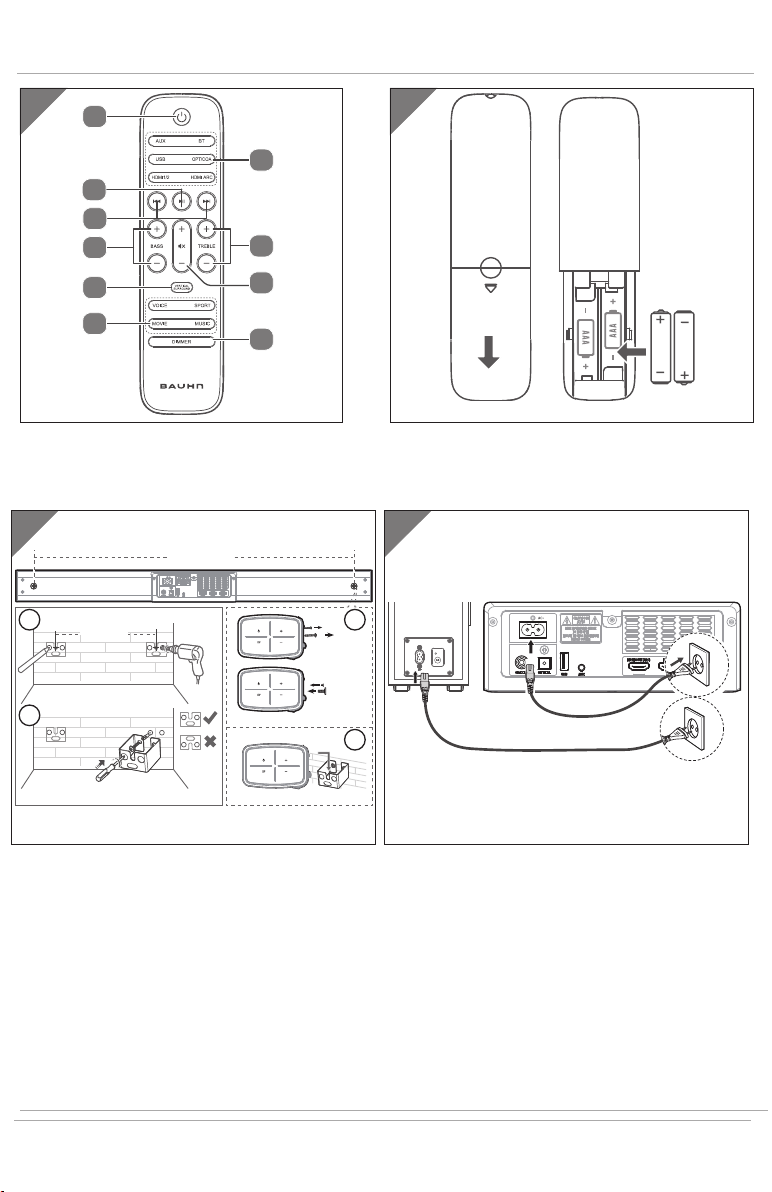
Inserting the batteries into the remote control............................................16
Mounting the Soundbar.................................................................................16
Option (A) horizontal Soundbar.......................................................................17
Option (B) Soundbar mounted on the wall....................................................17
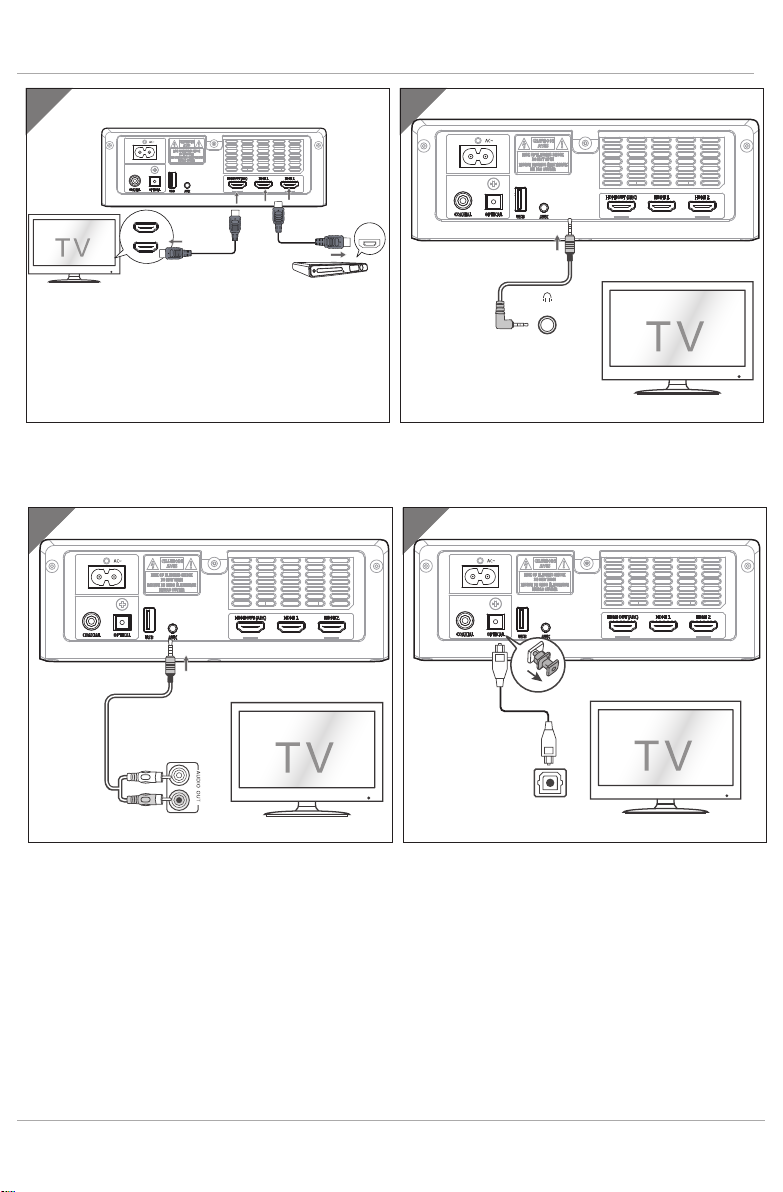
Connecting audio devices..............................................................................19
Connecting a device via AUX ........................................................................... 19
Connecting devices via the optical connection ............................................20
Connecting devices via the coaxial connection............................................20
Connecting devices via HDMI (ARC) ................................................................20
Setting up the Soundbar................................................................................ 21
Connecting the Soundbar and subwoofer to the power.............................21
Establishing a Bluetooth connection.............................................................23
Establishing a USB connection...................................................................... 24
Audio playback in USB/Bluetooth®mode..................................................... 24
Changing folder ................................................................................................25
Setting sound effects .....................................................................................25
Setting Vertical Surround...............................................................................25
Adjusting the display .....................................................................................25
Maintenance.................................................................................................. 26
Cleaning......................................................................................................... 26
Troubleshooting.............................................................................................27
Declaration of Conformity..............................................................................27

Contents
8
Trademark information .................................................................................... 27
Disposal ......................................................................................................... 28
Technical data................................................................................................ 29
Privacy statement ......................................................................................... 30
Service information........................................................................................ 31
Legal Notice ....................................................................................................32
Warranty Details ............................................................................................ 34
Repair and Refurbished Goods or Parts Notice............................................ 35

About these operating instructions
9
About these operating instructions
Thank you for choosing our product. We hope you enjoy using it.
Read the safety instructions carefully before using the device for the first
time. Note the warnings on the device and in the operating instructions.
Always keep the operating instructions close to hand. If you sell the device
or give it away, please ensure that you also pass on these operating instructions. They
are an essential component of the product.
Explanation of symbols
If a block of text is marked with one of the warning symbols listed below, the hazard
described in that text must be avoided to prevent the potential consequences de-
scribed there from occurring.
DANGER!
This signal word indicates a hazard with a high level of risk which, if not avoided, will
result in death or serious injury.
WARNING!
This signal word indicates a hazard with a medium level of risk which, if not avoided,
could result in death or serious injury.
CAUTION!
This signal word indicates a hazard with a low level of risk which, if not avoided, could
result in minor or moderate injury.
NOTICE!
This signal word warns of possible damage to property.

About these operating instructions
10
This symbol gives you useful additional information on assembly or
operation.
Protection class II
Electrical appliances in protection class II are electrical appliances that
permanently have double and/or reinforced insulation and do not
have any connection options for a protective earth. The housing of
an electrical appliance in protection class II that is enclosed in insu-
lated material can partially or fully act as the additional or reinforced
insulation.
The Australian Regulatory Compliance Mark (RCM) is a single compli-
ance mark used by suppliers after establishing compliance with all
applicable regulations, including EMC, telecoms, radiocoms, electro-
magnetic radiation (EMR) and electrical safety.
Manufactured under license from Dolby Laboratories. Dolby, Dolby At-
mos, Dolby Audio, and the double-D symbol are trademarks of Dolby
Laboratories.

Proper use
11
Proper use
The device is used for playback of audio signals. The Soundbar is
intended to be connected to televisions; other devices such as port-
able CD or MP3 players, computers/notebooks, smartphones and
stereo systems can also be connected.
The device is only intended for private use and not for industrial/
commercial use.
Please note that no liability will be accepted if the device is used for
an improper purpose:
− Do not modify the device without our express agreement and
do not use any accessories that have not been supplied or ap-
proved by us.
− Only use replacement parts or accessories that we have sup-
plied or approved.
− Observe all the information in these user manuals, especially
the safety information. Any other use is deemed improper and
may cause personal injury or damage to property.
− Do not use the device in areas where there is a risk of explo-
sion. This includes e.g. fuel pumps, fuel storage areas or areas
in which corrosive agents are processed. This device should
also not be used in areas where the air is contaminated with
particles (e.g. flour or sawdust).
− Do not expose the device to extreme conditions; it is only in-
tended for use in internal rooms.
Avoid:
• high humidity or wet conditions
• extremely high or low temperatures
• direct sunlight
• open flame

Safety information
12
Safety information
WARNING!
Risk of injury due to improper handling.
− This device is not intended to be used by people (including
children) with reduced physical, sensory or mental capacity or
with a lack of experience and/or knowledge unless they use
the device under the supervision of a person responsible for
their safety or if they have been given instructions about how
to use the device safely.
− Do not allow children to play with electrical devices without
adult supervision. Children may not always be able to properly
identify possible hazards.
Safely setting up the device
WARNING!
Risk of injury due to electric shock!
There is a risk of electric shock due to live wires.
− Select a suitable location to set up the device and make sure
not to damage covered electrical wires or installation cables
when drilling.
− Do not place any containers filled with liquid, such as vases, on
or near the device and power cord. The container may tip over
and the liquid may adversely affect electrical safety.
− Protect the device and all connected devices from moisture,
drips or splashes of water. Avoid dust, heat and direct sunlight
in order to prevent malfunctions.
− Do not place any sources of open flame, such as burning can-
dles, on or near the devices.
− Do not cover the device with objects (newspapers, blankets,
etc.) to prevent overheating.

Safety information
13
− Do not place any objects on the cords because they may be
damaged.
− Place and operate all components on a stable, level and vibra-
tion-free surface to prevent the device falling over.
− All multimedia devices that are connected to the device must
meet the requirements of the EU Low Voltage Directive.
Power supply
DANGER!
Risk of injury due to electric shock!
− The power point must be near the device and be easily accessi-
ble. Lay the cord in such a way that no-one can step on it or trip
over it.
− To disconnect your device from the power supply, switch off the
power point and unplug the device. Always hold on to the plug
itself when unplugging the device. To prevent damage, never
pull on the cord itself.
− Only operate the device from an earthed power point with a
voltage of 220–240V ~ 50/60 Hz. If you are not sure about the
electricity supply at the location where you are setting up the
device, check with your local electricity supply company.
− Do not use the plug of the device if the housing or the cord to
the device are damaged.
− Do not under any circumstances open the housing of the de-
vice. Any contact with live parts or modifications to the electri-
cal and mechanical structure are dangerous and may lead to
device malfunctions.

Safety information
14
NOTICE!
In the event of a storm or if you do not intend to use the device for
some time, disconnect it from the mains power supply.
− When the device is not in use, switch off the power point and
pull out the plug or use a master/slave power board to avoid
using electricity when the device is turned off.
Handling batteries
The remote control is operated with a battery. Please observe the
following advice concerning the battery:
− Keep new and used batteries away from children. Do not swal-
low batteries; there is the risk of chemical burns.
WARNING!
Risk of chemical burns!
The remote control contains two batteries. If these batteries are
swallowed, they can cause severe internal chemical burns within 2
hours that may lead to death.
− If you suspect that batteries may have been swallowed or en-
tered any part of the body, immediately seek medical attention.
− Do not use the remote control if the battery compartment no
longer closes securely and keep it away from children.
− Only insert new batteries of the same type. Never use old and
new batteries together.
− Note the polarity (+/-) when inserting the batteries.
− There is a risk of explosion if batteries are not changed prop-
erly. Only ever replace batteries with batteries of the same or
equivalent type.
− Never attempt to recharge the batteries. There is a risk of
explosion!

Package contents
15
− Never expose the batteries to excessive heat (such as sunlight,
fire or similar).
− Store batteries in a cool and dry place. Extreme direct heat can
damage the batteries. Do not expose the device to extreme
sources of heat.
− Do not short-circuit batteries.
− Do not throw batteries into a fire.
− Remove flat batteries from the device immediately. Clean the
contacts before inserting new batteries. Avoid contact with
skin, eyes and mucous membranes. Rinse areas affected by
battery acid immediately with plenty of clear water and imme-
diately seek medical advice. There is a risk of chemical burns
due to battery acid!
− Remove flat batteries from the device as well.
− If you are not going to use the device for a longer period, re-
move the batteries.
Repair
Please contact our Service Centre if you are having technical prob-
lems with your device.
Package contents
After unpacking the device, make sure that the following parts have been included:
• Soundbar
• Subwoofer
• Remote control
• 2 × AAA LR03 batteries
• 2 × power cords
• Audio cable (3.5 mm jack)
• HDMI cable
• Wall mounting kit
• User manuals including warranty card

Inserting the batteries into the remote control
16
DANGER!
Risk of choking and suffocation!
There is a risk of choking and suffocation from packaging!
− Keep the plastic packaging away from children.
Inserting the batteries into the remote control
Before using the device for the first time, if the device does not respond to the remote
control or does not respond well, the batteries must be replaced. To do so, proceed as
shown in Fig. C and as described below:
− Slide the battery compartment cover off the remote control. Dispose of the old
batteries as required by law.
− Insert two new AAA LR03 batteries. Pay attention to the polarity when inserting
the batteries.
− Push the battery compartment cover completely onto the remote control until it
locks into position.
Mounting the Soundbar
There are two options for using the Soundbar:
Horizontal (A) or mounted on the wall (B).
AB

Mounting the Soundbar
17
Option (A) horizontal Soundbar
− Position the Soundbar and the subwoofer on a stable
and level surface near power points. Ensure that the
devices cannot fall down.
Option (B) Soundbar mounted on the wall
− First connect the Soundbar to the power cord.
− Position the subwoofer close to the Soundbar and
connect the subwoofer to the power cord as well.
NOTICE!
Before mounting the Soundbar on the wall, check whether the wall has the necessary
weight-bearing capacity. Medion AG does not assume any liability for damages that
occur due to incorrect or improper mounting.
WARNING!
Risk of injury due to electric shock!
There is a risk of electric shock due to live wires.
− Select a suitable location to set up the device and make sure
not to damage covered electrical wires or installation cables
when drilling.

Mounting the Soundbar
18
− Drill 4 holes into the wall in a parallel
line (5.5–6 mm diameter depending on
the wall type). The distance between
the holes must be 720 mm.
720 mm
− Insert wall plugs into each of the holes.
Screw the wall mounting bracket firmly
onto the wall as shown. Ensure that the
opening of the Soundbar bracket, as
shown adjacent, is facing upwards.
− Remove the two larger screws 3
from the Soundbar.
− Screw the button head screws into the
Soundbar only to the point where it is
possible to hang the Soundbar on the
wall mounting bracket.
− Place the Soundbar on the wall mount-
ing bracket and then gently push the
Soundbar downwards until the screws
lock into the wall mounting bracket.

Connecting audio devices
19
Connecting audio devices
− Follow the operating instructions for the device that you would like to connect to
the Soundbar.
− Switch all devices off before connecting them to one another.
You can connect a number of different audio devices to this device such as MP3 and
CD players, receivers, computers, televisions or even USB flash drives.
Connecting a device via AUX
Audio cable with 2 × 3.5 mm diameter jack
You need an audio cable with a 2 × 3.5 mm diameter jack (included in delivery) to con-
nect to the headphone connection of CD or MP3 players or similar devices.
− Set the volume on the MP3 player to medium.
− Insert the jack plug into the AUX input 11 on the Soundbar as shown in Fig. G.
− Insert the plug into the headphone output of the MP3 player.
Audio cable with RCA connectors
You need an audio cable with RCA connectors (1 × 3.5 mm jack → 2 × connectors).
− Set the volume on the audio device to medium.
− Insert the individual jack plugs into the AUX input 11 on the Soundbar as shown
in Fig. H.
− Then insert the red and the white connectors on the other end of the cable into
the audio output channels on the output device with the corresponding colours.
NOTICE!
Devices such as stereo receivers or televisions usually have a red and a white audio
out jack. These are generally identified with OUT, AUDIO OUT, LINE OUT or similar.

Connecting audio devices
20
Connecting devices via the optical connection
You can connect digital amplifiers or televisions via the OPTICAL connection. You need
a digital optical cable (fibre optic cable, not included with delivery, available in spe-
cialist shops).
− Set the volume on the audio device to medium.
− Remove the protective cap from the OPTICAL connection 9.
− Insert the plug into the OPTICAL input 9on the Soundbar as shown in Fig. I.
− Insert the plug into the corresponding digital output jack of your digital receiver
or television.
NOTICE!
If you do not hear an audio signal, switch the audio output format to PCM mode (Pulse
Code Modulation) on your output device.
Connecting devices via the coaxial connection
You can connect digital amplifiers or televisions via the COAXIAL connection.
− Set the volume on the audio device to medium.
− Insert the plug into the COAXIAL 8input on the Soundbar.
− Insert the plug into the corresponding output jack of your digital receiver or
television.
Connecting devices via HDMI (ARC)
You need the supplied HDMI cable.
− Set the volume on the audio device to medium.
− Connect the HDMI OUT ARC connection 12 with the HDMI IN connection of your
television as shown in Fig. F.
− Activate the ARC and CEC functions and switch the audio output to PCM or
another type of audio output on the connected devices.
− Connect the playback device to the HDMI 1 13 or HDMI 2 connection 13 of the
Soundbar as shown in Fig. F, making sure to follow the user manuals for the
connected devices.
Other manuals for P64172
1
Table of contents
Other Bauhn Speakers System manuals

Bauhn
Bauhn ASBBS-0322-B User manual

Bauhn
Bauhn ASB-0418 User manual

Bauhn
Bauhn SoundMax User manual

Bauhn
Bauhn ADDSB-0122 User manual

Bauhn
Bauhn AFSB-0320-B User manual

Bauhn
Bauhn ASBBS-0922 User manual

Bauhn
Bauhn ASB-0120 User manual

Bauhn
Bauhn ASBBS-0921-B User manual

Bauhn
Bauhn ASB-0417 Guide

Bauhn
Bauhn ASB-0119 User manual

Bauhn
Bauhn ASBB-114 User manual

Bauhn
Bauhn MD 44055 User manual

Bauhn
Bauhn ACSB-0122 User manual

Bauhn
Bauhn ACSB-0422-B User manual

Bauhn
Bauhn ASBW-0718 User manual

Bauhn
Bauhn ASBBS-0421-B User manual

Bauhn
Bauhn ASBEB-0121 User manual

Bauhn
Bauhn ACSB-1022-B User manual

Bauhn
Bauhn ASBBS-1020 User manual

Bauhn
Bauhn ASBWS-0321-B User manual