manuals.online logo
Brands
  1. Home
  2. •
  3. Brands
  4. •
  5. BDI
  6. •
  7. Indoor Furnishing
  8. •
  9. BDI Mirage 8222 User manual

BDI Mirage 8222 User manual

Other BDI Indoor Furnishing manuals

BDI CENTRO User manual

BDI

BDI CENTRO User manual

BDI Avion User manual

BDI

BDI Avion User manual

BDI 6521 User manual

BDI

BDI 6521 User manual

BDI Sequel 6005 User manual

BDI

BDI Sequel 6005 User manual

BDI MARGO 5229 User manual

BDI

BDI MARGO 5229 User manual

BDI CORRIDOR 6501 User manual

BDI

BDI CORRIDOR 6501 User manual

BDI CIRRUS 8157 User manual

BDI

BDI CIRRUS 8157 User manual

BDI MÜV 1252 User manual

BDI

BDI MÜV 1252 User manual

BDI CIRRUS 8158 User manual

BDI

BDI CIRRUS 8158 User manual

BDI SOLA 6853 User manual

BDI

BDI SOLA 6853 User manual

BDI SEQUEL 20 6117 User manual

BDI

BDI SEQUEL 20 6117 User manual

BDI Avion 8527 User manual

BDI

BDI Avion 8527 User manual

BDI ZONA User manual

BDI

BDI ZONA User manual

BDI Avion 8528A User manual

BDI

BDI Avion 8528A User manual

BDI Sweep User manual

BDI

BDI Sweep User manual

BDI CORA 1172 User manual

BDI

BDI CORA 1172 User manual

BDI STANCE MODESTY PANEL 6657 User manual

BDI

BDI STANCE MODESTY PANEL 6657 User manual

BDI 8239 User manual

BDI

BDI 8239 User manual

BDI 8177 User manual

BDI

BDI 8177 User manual

BDI CORRIDOR User manual

BDI

BDI CORRIDOR User manual

BDI 6414 User manual

BDI

BDI 6414 User manual

BDI Revo 9980 User manual

BDI

BDI Revo 9980 User manual

BDI Novia 8428 User manual

BDI

BDI Novia 8428 User manual

BDI LINQ 9186 User manual

BDI

BDI LINQ 9186 User manual

Popular Indoor Furnishing manuals by other brands

Homelegance California 1662PEK-1CK Assembly instruction

Homelegance

Homelegance California 1662PEK-1CK Assembly instruction

Osmond Ergonomics FLO instructions

Osmond Ergonomics

Osmond Ergonomics FLO instructions

OVE ELOISE 42 installation manual

OVE

OVE ELOISE 42 installation manual

overstock MF286255 Assembly instructions

overstock

overstock MF286255 Assembly instructions

Sonoma 160-801 Assembly instructions

Sonoma

Sonoma 160-801 Assembly instructions

BOLERO Wicker Side Chair CF158 Care Instructions

BOLERO

BOLERO Wicker Side Chair CF158 Care Instructions

Coaster 4799N Assembly instructions

Coaster

Coaster 4799N Assembly instructions

Stor-It-All WS39MP Assembly/installation instructions

Stor-It-All

Stor-It-All WS39MP Assembly/installation instructions

Lexicon 194840161868 Assembly instruction

Lexicon

Lexicon 194840161868 Assembly instruction

Next AMELIA NEW 462947 Assembly instructions

Next

Next AMELIA NEW 462947 Assembly instructions

impekk Manual II Assembly And Instructions

impekk

impekk Manual II Assembly And Instructions

Elements Ember Nightstand CEB700NSE Assembly instructions

Elements

Elements Ember Nightstand CEB700NSE Assembly instructions

JWA CARY 68429 Assembly instruction

JWA

JWA CARY 68429 Assembly instruction

VIPACK AMORI AMKB9014 Assembly instructions

VIPACK

VIPACK AMORI AMKB9014 Assembly instructions

Rowico SANNA Assembly instructions

Rowico

Rowico SANNA Assembly instructions

Southern Enterprises CK556000TX Assembly instructions

Southern Enterprises

Southern Enterprises CK556000TX Assembly instructions

hygena 314/5041 Assembly instructions

hygena

hygena 314/5041 Assembly instructions

VINNOVA Kinsley 536060S manual

VINNOVA

VINNOVA Kinsley 536060S manual

manuals.online logo
manuals.online logoBrands
  • About & Mission
  • Contact us
  • Privacy Policy
  • Terms and Conditions

Copyright 2025 Manuals.Online. All Rights Reserved.

1
1.
2.
3.
3.
1.
2.
2.
C
1
2
B
E
Your Mirage Home Theater Furniture is engineered for easy assembly.
Carefully follow this procedure to prevent any damage.
Placement and Maintenance
Your Mirage Home Theater Furniture is designed for indoor use on level
floors. Clean glass with glass cleaner; steel parts and wood veneer with a
moist cloth.
Step 1
Unpack and Identify
Unpack and identify the components at left. Note that some components
are shipped inside the cabinet. The assembly workspace should be a non-
marring surface such as carpet. For missing hardware pieces, please
contact BDI Customer Service at [email protected]. For all
other concerns, please contact your BDI Retailer.
Step 2
Shelves Installation
Adjustable Shelf Pins may be repositioned, allowing you to raise or lower
the adjustable shelf to the desired level.
Install Adjustable Shelf (B) inside the left and right cabinet area. *Note:
To place the adjustable shelf inside the cabinet, the shelf may be tilted
sideways to clear the door opening.
Component List
Designed by Al Glass and Cristian Wicha.
These distinctive product configurations are protected by US and international
patents, trade dress, and/or copyright laws.
BDI are trademarks of Becker Designed, Inc.
All Rights reserved. ©2015, BDI
Made in China. 8222REV070915v3
Mirage
8222
a s s e m b l y instructions
bdiusa.com customerservice@bdiusa.com
A
D - Phillips Screwdriver
x 1
1.
2.
3.
3.
1.
2.
2.
1.
2.
3.
3.
1.
2.
2.
1.
2.
3.
3.
1.
2.
2.
B - Adjustable Shelf x 4
C - Removable Back Panel
x 1
A - Cabinet Assembly
x 1
E - Allen Wrench x 1
Level your cabinet (if needed)
The adjustable leveler glides on the bottom of the cabinet are
accessible from inside the cabinet using the Allen Wrench
(E). If your floor is uneven, you may extend one or more of the
levelers (with the provided Allen Wrench (E))to attain a level,
stable cabinet placement.
2
assembly instructions
bdiusa.com customerservice@bdiusa.com
Step 3
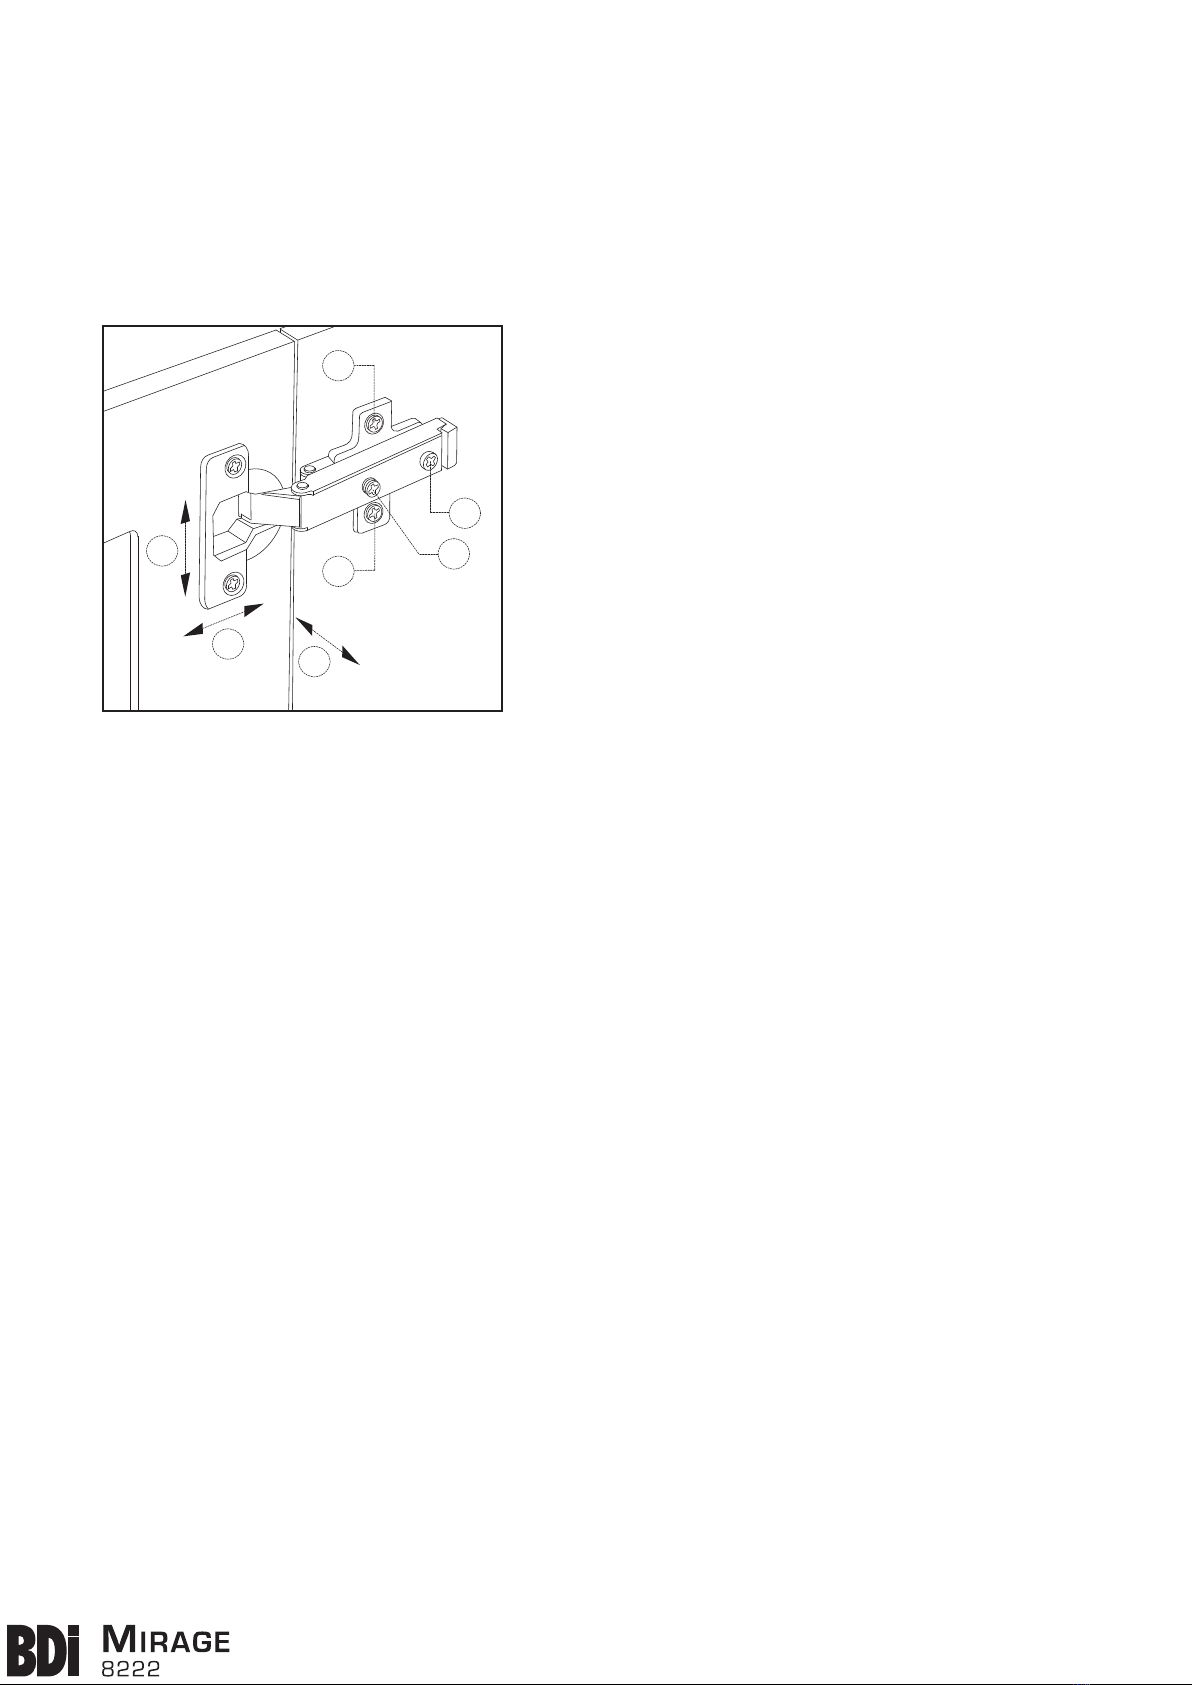
Adjust Door Hinges (if needed)
If the cabinet’s door appears out of alignment, this can be corrected
with minor adjustment to the European hinges on each door.
Because these hinges are infinitely adjustable, adjusting one hinge
element can sometimes cause the need for adjustments to other
elements. But with a few adjustments, you can modify the orientation of
the cabinet door to make sure that it hangs evenly.
1.
2.
3.
3.
1.
2.
*
2.
*
Step 4
Reverse Door-Swing (if desired)
Mirage Tower features a reversible door assembly so that you can
open either from the left or the right.
To reverse the door’s orientation,
1. Remove the Door by actuating all of its quick-release hinges;
carefully place the detached Door aside.
2. Using a Philips head screwdriver, remove all Hinge Plates from
the interior wall of the cabinet by loosening the screws holding it in
place.
3. Install all Hinge Plates to the opposite interior wall at the pre-
determined locations.
4. Re-install the Door by connecting each Door Hinge to the
relocated Hinge Plates.
The Mirage 8222 features an opening at the top area of the back
surface that can accommodate a small fan for the purpose of active
cooling. BDI does not supply fans, but you may find several on the
market which are compatible with the size and shape of this opening.
Use a Phillips screwdriver to adjust Mirage’s door hinges:
• By adjusting Screw 1, the door will move LEFT or RIGHT
within the frame. Make minor adjustments at both top and
bottom hinges for best results.
• By adjusting Screw(s) 2, the door will move UP or DOWN
within the frame (the top and bottom hinges must be adjusted
the same degree).
NOTE: Loosen Screws 2 one complete turn, raise or lower
door, then hold in position while tightening Screws 2 (on
both hinges).
• By adjusting Screw 3 the entire door will move IN or
OUT, opening or closing the gap between the door frame and
cabinet. (This screw rarely needs adjustment.)