manuals.online logo
Brands
  1. Home
  2. •
  3. Brands
  4. •
  5. BDI
  6. •
  7. Indoor Furnishing
  8. •
  9. BDI Novia User manual

BDI Novia User manual

NoviaTM
Assembly Instructions
HIGH PERFORMANCE
FURNITURE FOR YOUR
HOME THEATER
Install glass panel (H) on top of assembled cabinet (I).
Novia™Home Theater Furniture
Placement and Maintenance
Novia™Home Theater Furniture is designed for
indoor use on level floors. Clean glass with glass
cleaner, and steel parts and wood veneer with a
moist cloth.
Step 1
G- Back Panel x 2
www.bdiusa.com
customerser[email protected]
For more information about the adjustable levelers and troubleshooting
assembly, be sure to check out “Fine tuning your new BDI Avion Home
Theater Furniture” at the end of these instructions.
B- Phillips Screwdriver x 1
A- Allen Wrench x 1
H- Glass Panel x 1
I- Assembled Cabinet x 1
C- Leveler Wrench x 1
F- Adjustable Shelf x 2
D- Knob Screw x 4
E- Knob x 4
Unpack and identify the parts listed above.
The assembly workspace should be a non-marring surface
such as carpet. For missing hardware pieces, please contact
BDI Customer Service at: customerser[email protected]
For all other concerns please contact your local BDI Retailer.
Designed by BDI Design Studio.
‘Novia’ is a trademark of Becker Designed, Inc. All
rights reserved. ©2006 Becker Designed, Inc.
Your Novia™Home Theater Furniture is engineered
for easy assembly. Carefully follow this procedure to
prevent any damage.
Step 2
Install knob (E) to the front side of
door and drawer faces using knob
screw (D) and Phillips screwdriver (B).
The shelf pins located inside the left
and right cabinet space may be
repositioned, allowing you to raise or
lower the shelf to the desired level.
Install adjustable shelf (F) inside
the left and right cabinet area. Note:
To place the adjustable shelf inside the
cabinet, the shelf must be tilted side-
ways to clear the door.
Step 3
Install back panel (G) to the rear side of cabinet. Velcro straps are included as
wire management for your convenience.
F- Adjustable Shelf x 2
1.
2.
Step 5
Center channel speaker option A.
The upper center drawer assembly may be removed in order
to accommodate a larger center channel speaker. In order to
do this, follow the steps below.
Fully extend drawer and locate plastic lever
on drawer slide.
Simultaneously on the LEFT side of drawer, lift UP on plastic lever AND on the RIGHT side
of drawer, push DOWN on plastic lever and pull STRAIGHT OUT the entire drawer assembly.
Remove drawer slides from interior side panels using a Phillips screwdriver.
+
Step 4 Leveling
There are a total of 6 adjustable levelers on the bottom of the
cabinet, which may be adjusted depending on your leveling
situation.
Four of the six leveler glides are accessible near the bottom of
the side panels using the leveler wrench (C).
Two of the six adjustable leveler glides on the bottom, mid section
of the cabinet are accessible from inside the cabinet using the
Allen wrench (A).
Fine tuning your new BDI Novia Home Theater Furniture
These steps are to be followed after you have unpackaged and completed the simple assembly instructions for your Novia
AV stand. Due to jostling in freight or perhaps an uneven floor, the doors and drawers on your Novia stand may not ap-
pear to be in perfect alignment. Making a few minor adjustments can rectify this situation. Be aware that depending on
your situation, patience and a bit of trial and error are required. The high-quality European hinge hardware is infinitely
adjustable, but changing one element can cause the need for further adjustments. Through a little adjustment, you can
modify the orientation of the cabinet doors to make sure that they are sitting perfectly on your Novia unit.
STEP 1 - Level your Novia unit (as shown on previous page)
The levelers which are located within the center cabinet area may be adjusted from inside the cabinet to compensate for an
uneven floor or to secure your cabinet so that it does not roll. If you are having difficulty with misaligned doors, it is rec-
ommended that you first retract all levelers and make sure that the unit is resting on it’s wheels. If the center section of hte
cabinet appears to be sagging, raise the levelers on both of the center legs to compensate for this.
STEP 2 - Adjust Door Hinges (if needed)
The doors on your Novia stand should be perfectly spaced and the doors should open and close freely without
rubbing against the door frame. Adjustments may be made to the Novia door hinges with the use of the Phillips head
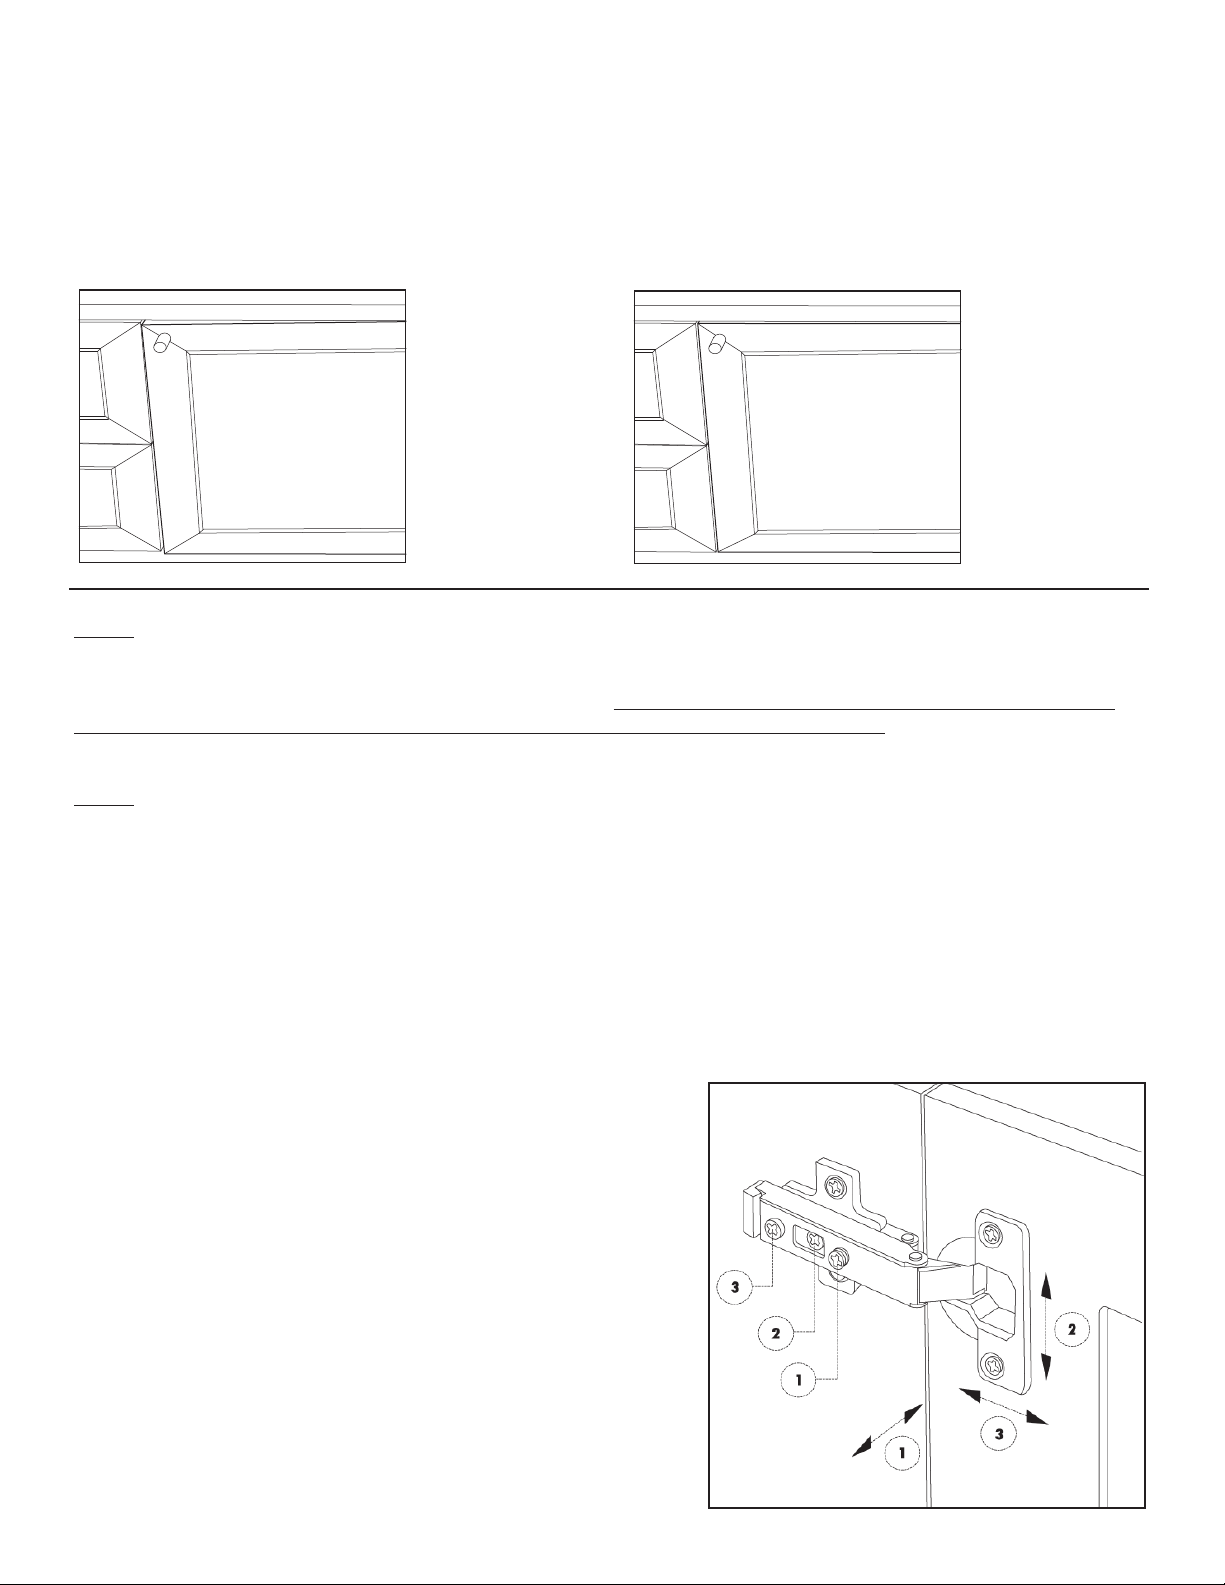
screwdriver. The hinge hardware has three adjustment screws.
• By adjusting Screw 1, the door will move left and right within the frame. For best results, make minor adjustments to top
and bottom hinge for best results.
• If adjusting Screw 1 has not achieved the desired result, you can adjust Screw 2 and the door will move up and down
within the frame (the top and bottom hinges need to be adjusted the same amount).
• Adjusting Screw 3 will cause the entire door to move in and out, opening and closing the gap between the door frame
and cabinet. This screw rarely needs adjustment.
Step 2: Adjust Door Hinges.
INCORRECT! Door is
out of alignment with
the rest of the unit.
CORRECT! Door is
sitting squarely and
evenly spaced on tops
and sides.

Other BDI Indoor Furnishing manuals

BDI Icon 9424 User manual

BDI

BDI Icon 9424 User manual

BDI CLOUD 9 1182 User manual

BDI

BDI CLOUD 9 1182 User manual

BDI REVEAL 1192 User manual

BDI

BDI REVEAL 1192 User manual

BDI 6414 User manual

BDI

BDI 6414 User manual

BDI KRONOS 6729 User manual

BDI

BDI KRONOS 6729 User manual

BDI Corridor 6531 User manual

BDI

BDI Corridor 6531 User manual

BDI BRADEN 8828 User manual

BDI

BDI BRADEN 8828 User manual

BDI SIGMA 6907 User manual

BDI

BDI SIGMA 6907 User manual

BDI Deploy User manual

BDI

BDI Deploy User manual

BDI CENTRO 6402 User manual

BDI

BDI CENTRO 6402 User manual

BDI CORRIDOR SV 7128 User manual

BDI

BDI CORRIDOR SV 7128 User manual

BDI SEQUEL 20 6107 User manual

BDI

BDI SEQUEL 20 6107 User manual

BDI vertica User manual

BDI

BDI vertica User manual

BDI CLOUD 9 1183 User manual

BDI

BDI CLOUD 9 1183 User manual

BDI KITE 5305 User manual

BDI

BDI KITE 5305 User manual

BDI SEQUEL 20 6114 User manual

BDI

BDI SEQUEL 20 6114 User manual

BDI CORA 1176 User manual

BDI

BDI CORA 1176 User manual

BDI OLA 8137 User manual

BDI

BDI OLA 8137 User manual

BDI TANAMI 7109 User manual

BDI

BDI TANAMI 7109 User manual

BDI SOMA 6331 User manual

BDI

BDI SOMA 6331 User manual

BDI BEVEL 6743 User manual

BDI

BDI BEVEL 6743 User manual

BDI LINEA 6220 User manual

BDI

BDI LINEA 6220 User manual

BDI CENTRO 6451 User manual

BDI

BDI CENTRO 6451 User manual

BDI Avion 8528A User manual

BDI

BDI Avion 8528A User manual

Popular Indoor Furnishing manuals by other brands

Regency LWMS3015 Assembly instructions

Regency

Regency LWMS3015 Assembly instructions

Furniture of America CM7751C Assembly instructions

Furniture of America

Furniture of America CM7751C Assembly instructions

Safavieh Furniture Estella CNS5731 manual

Safavieh Furniture

Safavieh Furniture Estella CNS5731 manual

PLACES OF STYLE Ovalfuss Assembly instruction

PLACES OF STYLE

PLACES OF STYLE Ovalfuss Assembly instruction

Trasman 1138 Bo1 Assembly manual

Trasman

Trasman 1138 Bo1 Assembly manual

Costway JV10856 manual

Costway

Costway JV10856 manual

moss DESIGN Caisson Credenza Assembly instructions

moss DESIGN

moss DESIGN Caisson Credenza Assembly instructions

Aquaglide FULL DECK 15.0 owner's manual

Aquaglide

Aquaglide FULL DECK 15.0 owner's manual

AREBOS AR-HE-SW30 user manual

AREBOS

AREBOS AR-HE-SW30 user manual

Till-Hilft Fulda 87005.330 Assembly instructions

Till-Hilft

Till-Hilft Fulda 87005.330 Assembly instructions

Twoey Outside 2010 quick start guide

Twoey Outside

Twoey Outside 2010 quick start guide

Hettich Easys 200 operating instructions

Hettich

Hettich Easys 200 operating instructions

The bedboss RELAX 404 Series owner's manual

The bedboss

The bedboss RELAX 404 Series owner's manual

Oeseder Möbelindustrie Bern 991 720 Assembly instructions

Oeseder Möbelindustrie

Oeseder Möbelindustrie Bern 991 720 Assembly instructions

Costway HW68469 user manual

Costway

Costway HW68469 user manual

Next ALIX A27743 Assembly instructions

Next

Next ALIX A27743 Assembly instructions

BROSA Hans Assembly guide

BROSA

BROSA Hans Assembly guide

Prodigg MINIKA PBA015T-FUR installation manual

Prodigg

Prodigg MINIKA PBA015T-FUR installation manual

manuals.online logo
manuals.online logoBrands
  • About & Mission
  • Contact us
  • Privacy Policy
  • Terms and Conditions

Copyright 2025 Manuals.Online. All Rights Reserved.