7
6
.
.
K
H
G
JI
L
EC
F
D
DH
K
F
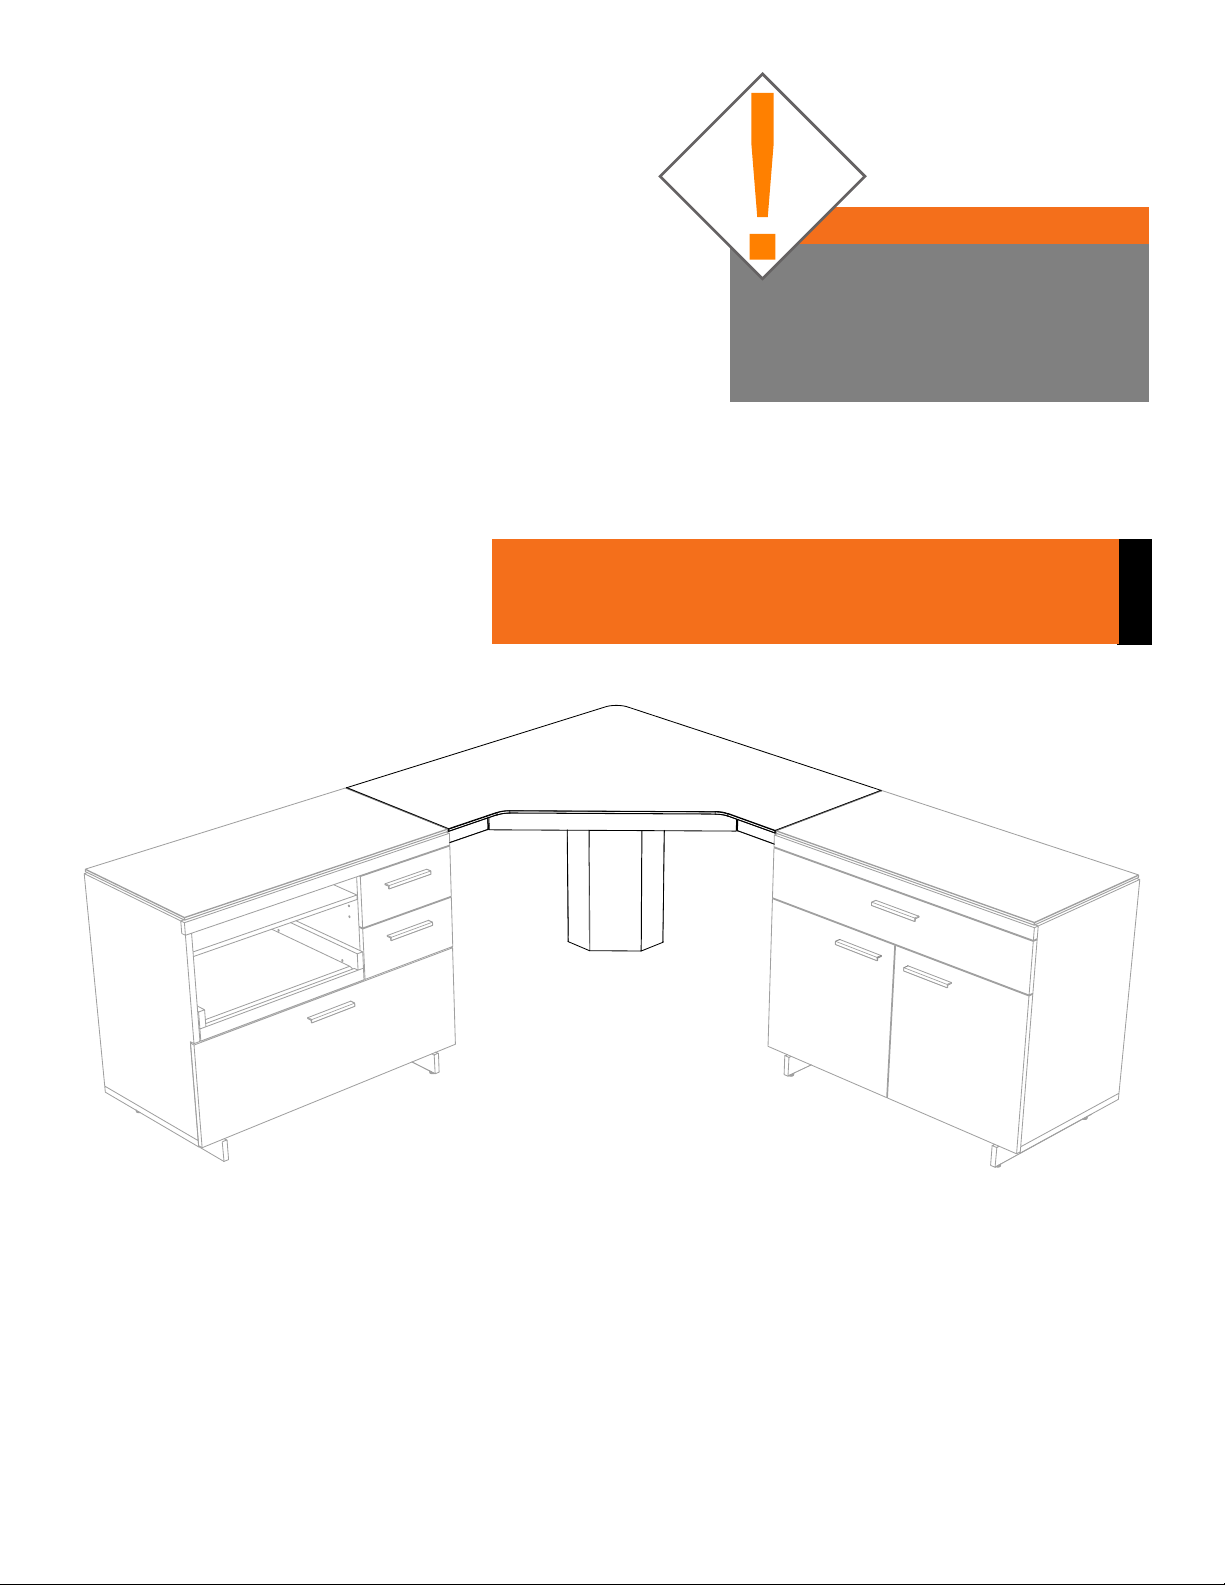
Corner Desk
Model 6019
Your SEQUEL®6019 Furniture is engineered
for easy assembly.
Carefully follow this procedure to prevent
any damage.
Placement and
Maintenance
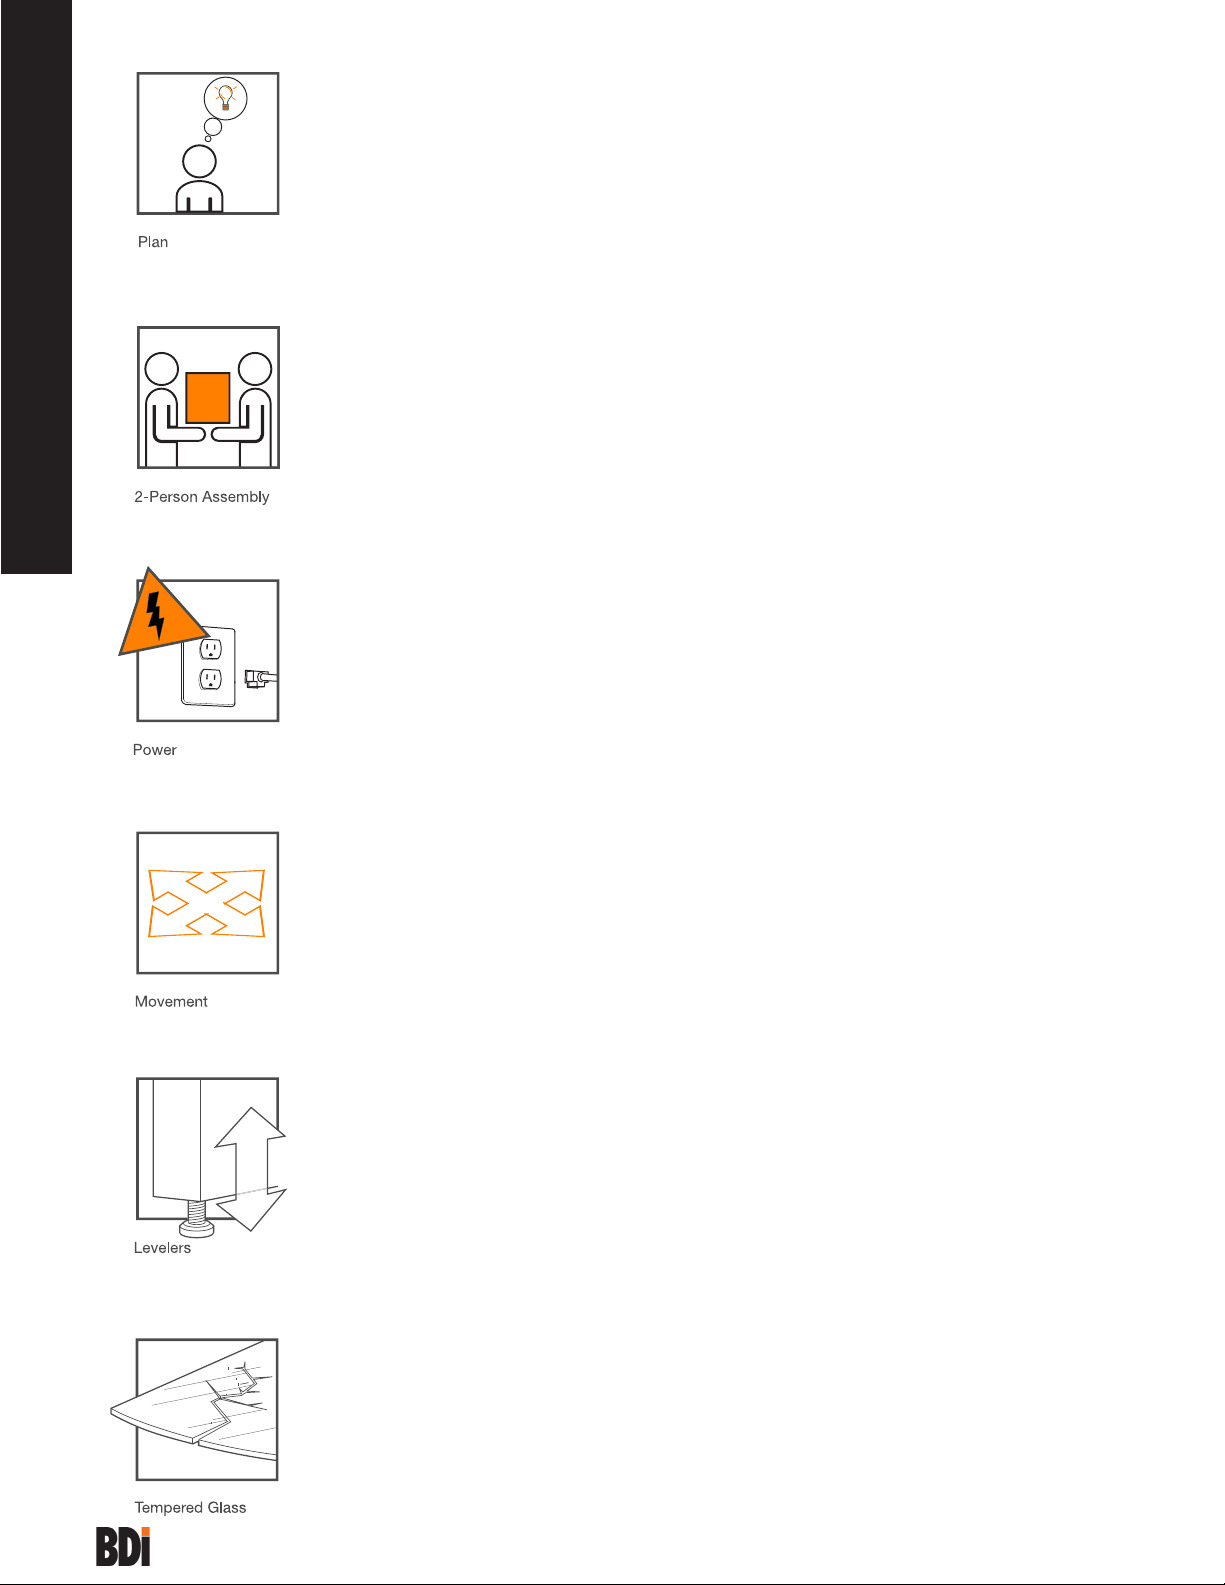
SEQUEL®6019 Furniture is designed for
indoor use on level floors. Clean glass with
glass cleaner, and steel parts and wood
veneer with a moist cloth.
Unpack and identify the components.
The assembly workspace should be a
non-marring surface such as carpet. For
missing hardware pieces, please contact
BDI Customer Service at customerservice@
bdiusa.com. For all other concerns, please
contact your BDI Retailer.
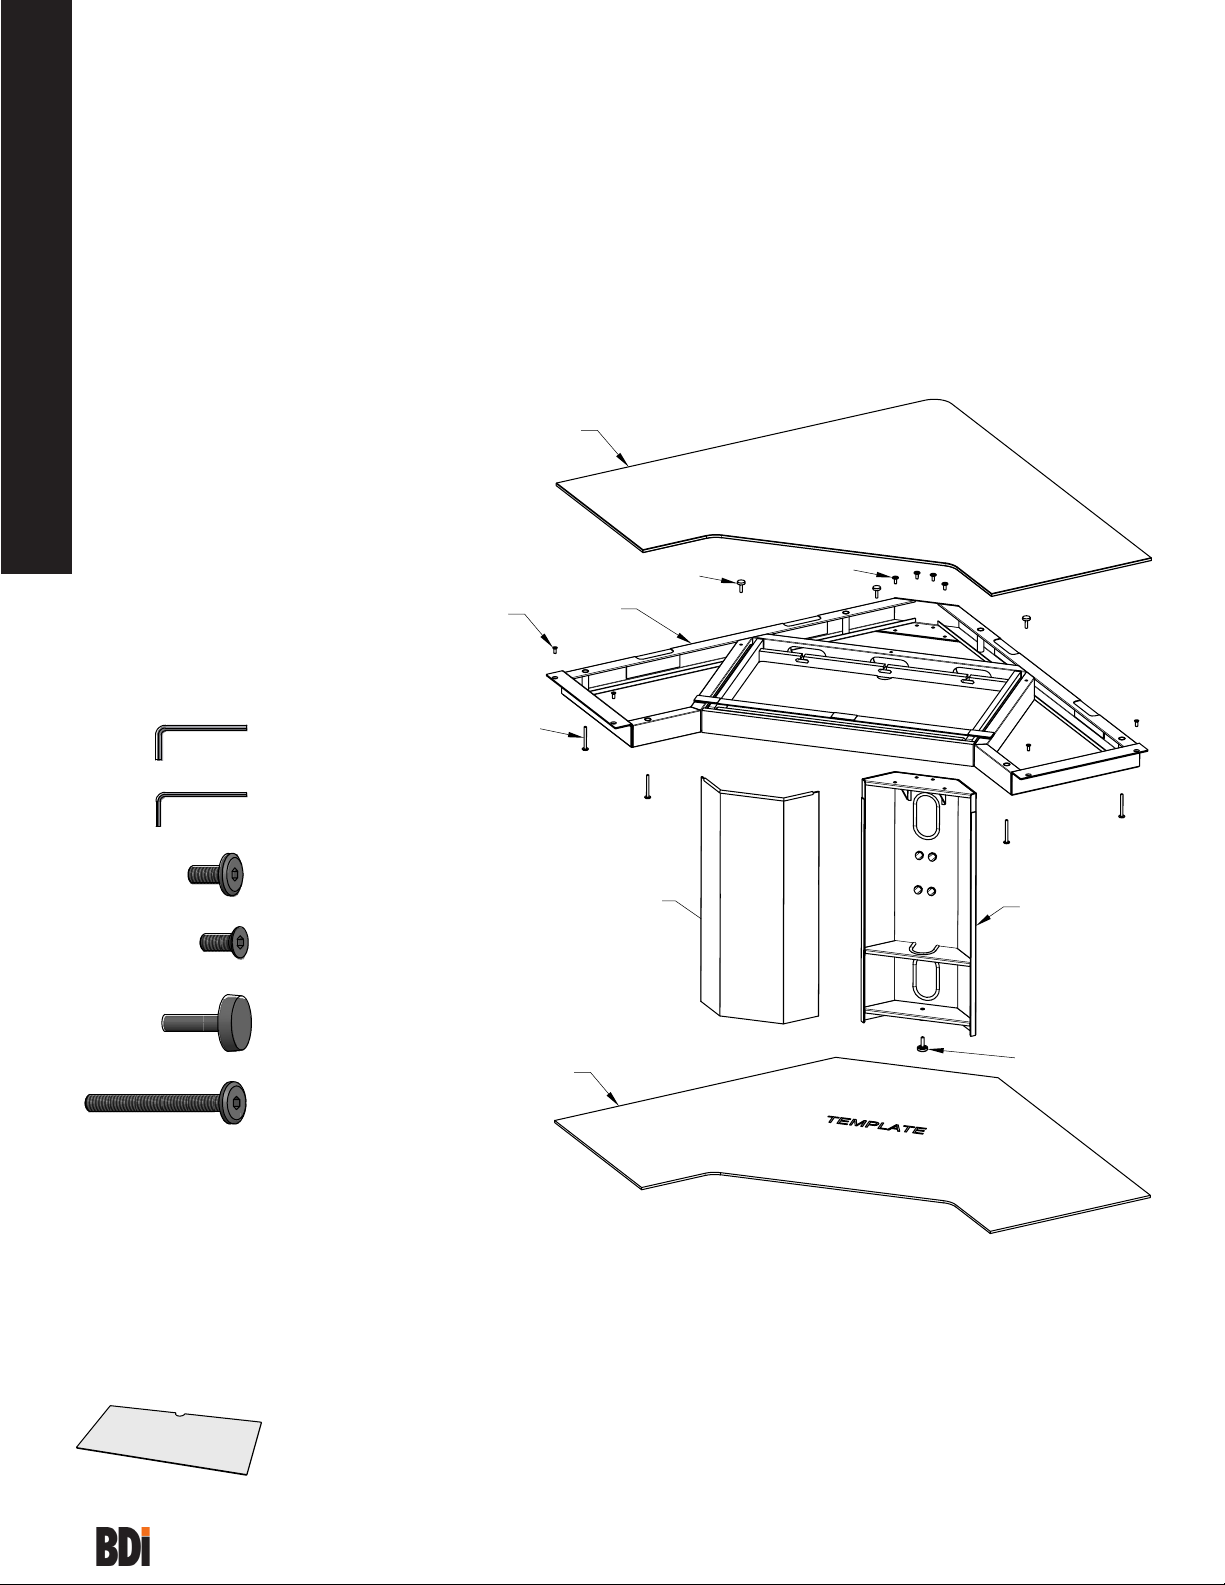
A - Hex Wrench 4mm
x 1
C - 1/4-20 x 5/8" Screws
4mm Socket Drive
x 4
F - 1/4-20 x 60mm Screws
4mm Socket Drive
x 6
B - Hex Wrench 3mm
x 1 (for Leveler adjustment)
E - Rubber Stem Bumpers
x 3
D - 1/4-20 x 1/2" Flat Head Screws
4mm Socket Drive
x 4
SEQUEL
Designed by Matthew Weatherly
These distinctive product configurations are protected by US and international
patents, trade dress, and/or copyright laws.
BDI are trademarks of Becker Designed, Inc.
All Rights reserved. © 2011 BDI
6019 Corner Desk Rev: 04-29-11
Component List
SEQUEL 6019 Corner Desk is engineered for easy assembly. Carefully follow this procedure to prevent any damage.
Unpack and identify the components. The assembly workspace should be a non-marring surface such as clean carpet.
For missing hardware pieces, please contact BDI Customer Service at customerservice@bdiusa.com.
For all other concerns, please contact your BDI Retailer.
6019 Corner Desk
ASSEMBLY INSTRUCTIONS
1
BDIUSA.COM CUSTOMERSERVICE@BDIUSA.COM
Placement and Maintenance
SEQUEL 6019 Corner Desk is designed for indoor use on level floors.
Clean glass with glass cleaner, and shelf with a moist cloth.
G- Cardboard Template x 1
H- Desk Frame Assembly x 1
I- Corner Leg x 1
J - Corner Leg Cover x 1
K- Glass Top Assembly x 1
L- Leveler x 1
K
SEQUEL 6019 Corner Desk
shown with SEQUEL Cabinets sold seperately
H
G
JI
L
EC
F
D
AHex Wrench 4mm x 1
A - Hex Wrench 4mm
x 1
C - 1/4-20 x 5/8" Screws
4mm Socket Drive
x 4
F - 1/4-20 x 60mm Screws
4mm Socket Drive
x 6
B - Hex Wrench 3mm
x 1 (for Leveler adjustment)
E - Rubber Stem Bumpers
x 3
D - 1/4-20 x 1/2" Flat Head Screws
4mm Socket Drive
x 4
SEQUEL
Designed by Matthew Weatherly
These distinctive product configurations are protected by US and international
patents, trade dress, and/or copyright laws.
BDI are trademarks of Becker Designed, Inc.
All Rights reserved. © 2011 BDI
6019 Corner Desk Rev: 04-29-11
Component List
SEQUEL 6019 Corner Desk is engineered for easy assembly. Carefully follow this procedure to prevent any damage.
Unpack and identify the components. The assembly workspace should be a non-marring surface such as clean carpet.
For missing hardware pieces, please contact BDI Customer Service at customerservice@bdiusa.com.
For all other concerns, please contact your BDI Retailer.
6019 Corner Desk
ASSEMBLY INSTRUCTIONS
1
BDIUSA.COM CUSTOMERSERVICE@BDIUSA.COM
Placement and Maintenance
SEQUEL 6019 Corner Desk is designed for indoor use on level floors.
Clean glass with glass cleaner, and shelf with a moist cloth.
G- Cardboard Template x 1
H- Desk Frame Assembly x 1
I- Corner Leg x 1
J - Corner Leg Cover x 1
K- Glass Top Assembly x 1
L- Leveler x 1
K
SEQUEL 6019 Corner Desk
shown with SEQUEL Cabinets sold seperately
H
G
JI
L
EC
F
D
B
Hex Wrench 3mm
x 1 (for Leveler
adjustment)
A - Hex Wrench 4mm
x 1
C - 1/4-20 x 5/8" Screws
4mm Socket Drive
x 4
F - 1/4-20 x 60mm Screws
4mm Socket Drive
x 6
B - Hex Wrench 3mm
x 1 (for Leveler adjustment)
E - Rubber Stem Bumpers
x 3
D - 1/4-20 x 1/2" Flat Head Screws
4mm Socket Drive
x 4
SEQUEL
Designed by Matthew Weatherly
These distinctive product configurations are protected by US and international
patents, trade dress, and/or copyright laws.
BDI are trademarks of Becker Designed, Inc.
All Rights reserved. © 2011 BDI
6019 Corner Desk Rev: 04-29-11
Component List
SEQUEL 6019 Corner Desk is engineered for easy assembly. Carefully follow this procedure to prevent any damage.
Unpack and identify the components. The assembly workspace should be a non-marring surface such as clean carpet.
For missing hardware pieces, please contact BDI Customer Service at customerservice@bdiusa.com.
For all other concerns, please contact your BDI Retailer.
6019 Corner Desk
ASSEMBLY INSTRUCTIONS
1
BDIUSA.COM CUSTOMERSERVICE@BDIUSA.COM
Placement and Maintenance
SEQUEL 6019 Corner Desk is designed for indoor use on level floors.
Clean glass with glass cleaner, and shelf with a moist cloth.
G- Cardboard Template x 1
H- Desk Frame Assembly x 1
I- Corner Leg x 1
J - Corner Leg Cover x 1
K- Glass Top Assembly x 1
L- Leveler x 1
K
SEQUEL 6019 Corner Desk
shown with SEQUEL Cabinets sold seperately
H
G
JI
L
EC
F
D
C1/4-20 5/8” Screws 4mm
Socket Drive x 4
A - Hex Wrench 4mm
x 1
C - 1/4-20 x 5/8" Screws
4mm Socket Drive
x 4
F - 1/4-20 x 60mm Screws
4mm Socket Drive
x 6
B - Hex Wrench 3mm
x 1 (for Leveler adjustment)
E - Rubber Stem Bumpers
x 3
D - 1/4-20 x 1/2" Flat Head Screws
4mm Socket Drive
x 4
SEQUEL
Designed by Matthew Weatherly
These distinctive product configurations are protected by US and international
patents, trade dress, and/or copyright laws.
BDI are trademarks of Becker Designed, Inc.
All Rights reserved. © 2011 BDI
6019 Corner Desk Rev: 04-29-11
Component List
SEQUEL 6019 Corner Desk is engineered for easy assembly. Carefully follow this procedure to prevent any damage.
Unpack and identify the components. The assembly workspace should be a non-marring surface such as clean carpet.
For missing hardware pieces, please contact BDI Customer Service at customerservice@bdiusa.com.
For all other concerns, please contact your BDI Retailer.
6019 Corner Desk
ASSEMBLY INSTRUCTIONS
1
BDIUSA.COM CUSTOMERSERVICE@BDIUSA.COM
Placement and Maintenance
SEQUEL 6019 Corner Desk is designed for indoor use on level floors.
Clean glass with glass cleaner, and shelf with a moist cloth.
G- Cardboard Template x 1
H- Desk Frame Assembly x 1
I- Corner Leg x 1
J - Corner Leg Cover x 1
K- Glass Top Assembly x 1
L- Leveler x 1
K
SEQUEL 6019 Corner Desk
shown with SEQUEL Cabinets sold seperately
H
G
JI
L
EC
F
D
D
1/4-20 1/2” Flat Head
Screws 4mm Socket
Drive x 4
A - Hex Wrench 4mm
x 1
C - 1/4-20 x 5/8" Screws
4mm Socket Drive
x 4
F - 1/4-20 x 60mm Screws
4mm Socket Drive
x 6
B - Hex Wrench 3mm
x 1 (for Leveler adjustment)
E - Rubber Stem Bumpers
x 3
D - 1/4-20 x 1/2" Flat Head Screws
4mm Socket Drive
x 4
SEQUEL
Designed by Matthew Weatherly
These distinctive product configurations are protected by US and international
patents, trade dress, and/or copyright laws.
BDI are trademarks of Becker Designed, Inc.
All Rights reserved. © 2011 BDI
6019 Corner Desk Rev: 04-29-11
Component List
SEQUEL 6019 Corner Desk is engineered for easy assembly. Carefully follow this procedure to prevent any damage.
Unpack and identify the components. The assembly workspace should be a non-marring surface such as clean carpet.
For missing hardware pieces, please contact BDI Customer Service at customerservice@bdiusa.com.
For all other concerns, please contact your BDI Retailer.
6019 Corner Desk
ASSEMBLY INSTRUCTIONS
1
BDIUSA.COM CUSTOMERSERVICE@BDIUSA.COM
Placement and Maintenance
SEQUEL 6019 Corner Desk is designed for indoor use on level floors.
Clean glass with glass cleaner, and shelf with a moist cloth.
G- Cardboard Template x 1
H- Desk Frame Assembly x 1
I- Corner Leg x 1
J - Corner Leg Cover x 1
K- Glass Top Assembly x 1
L- Leveler x 1
K
SEQUEL 6019 Corner Desk
shown with SEQUEL Cabinets sold seperately
H
G
JI
L
EC
F
D
ERubber Stem Bumpers
x 3
A - Hex Wrench 4mm
x 1
C - 1/4-20 x 5/8" Screws
4mm Socket Drive
x 4
F - 1/4-20 x 60mm Screws
4mm Socket Drive
x 6
B - Hex Wrench 3mm
x 1 (for Leveler adjustment)
E - Rubber Stem Bumpers
x 3
D - 1/4-20 x 1/2" Flat Head Screws
4mm Socket Drive
x 4
SEQUEL
Designed by Matthew Weatherly
These distinctive product configurations are protected by US and international
patents, trade dress, and/or copyright laws.
BDI are trademarks of Becker Designed, Inc.
All Rights reserved. © 2011 BDI
6019 Corner Desk Rev: 04-29-11
Component List
SEQUEL 6019 Corner Desk is engineered for easy assembly. Carefully follow this procedure to prevent any damage.
Unpack and identify the components. The assembly workspace should be a non-marring surface such as clean carpet.
For missing hardware pieces, please contact BDI Customer Service at customerservice@bdiusa.com.
For all other concerns, please contact your BDI Retailer.
6019 Corner Desk
ASSEMBLY INSTRUCTIONS
1
BDIUSA.COM CUSTOMERSERVICE@BDIUSA.COM
Placement and Maintenance
SEQUEL 6019 Corner Desk is designed for indoor use on level floors.
Clean glass with glass cleaner, and shelf with a moist cloth.
G- Cardboard Template x 1
H- Desk Frame Assembly x 1
I- Corner Leg x 1
J - Corner Leg Cover x 1
K- Glass Top Assembly x 1
L- Leveler x 1
K
SEQUEL 6019 Corner Desk
shown with SEQUEL Cabinets sold seperately
H
G
JI
L
EC
F
D
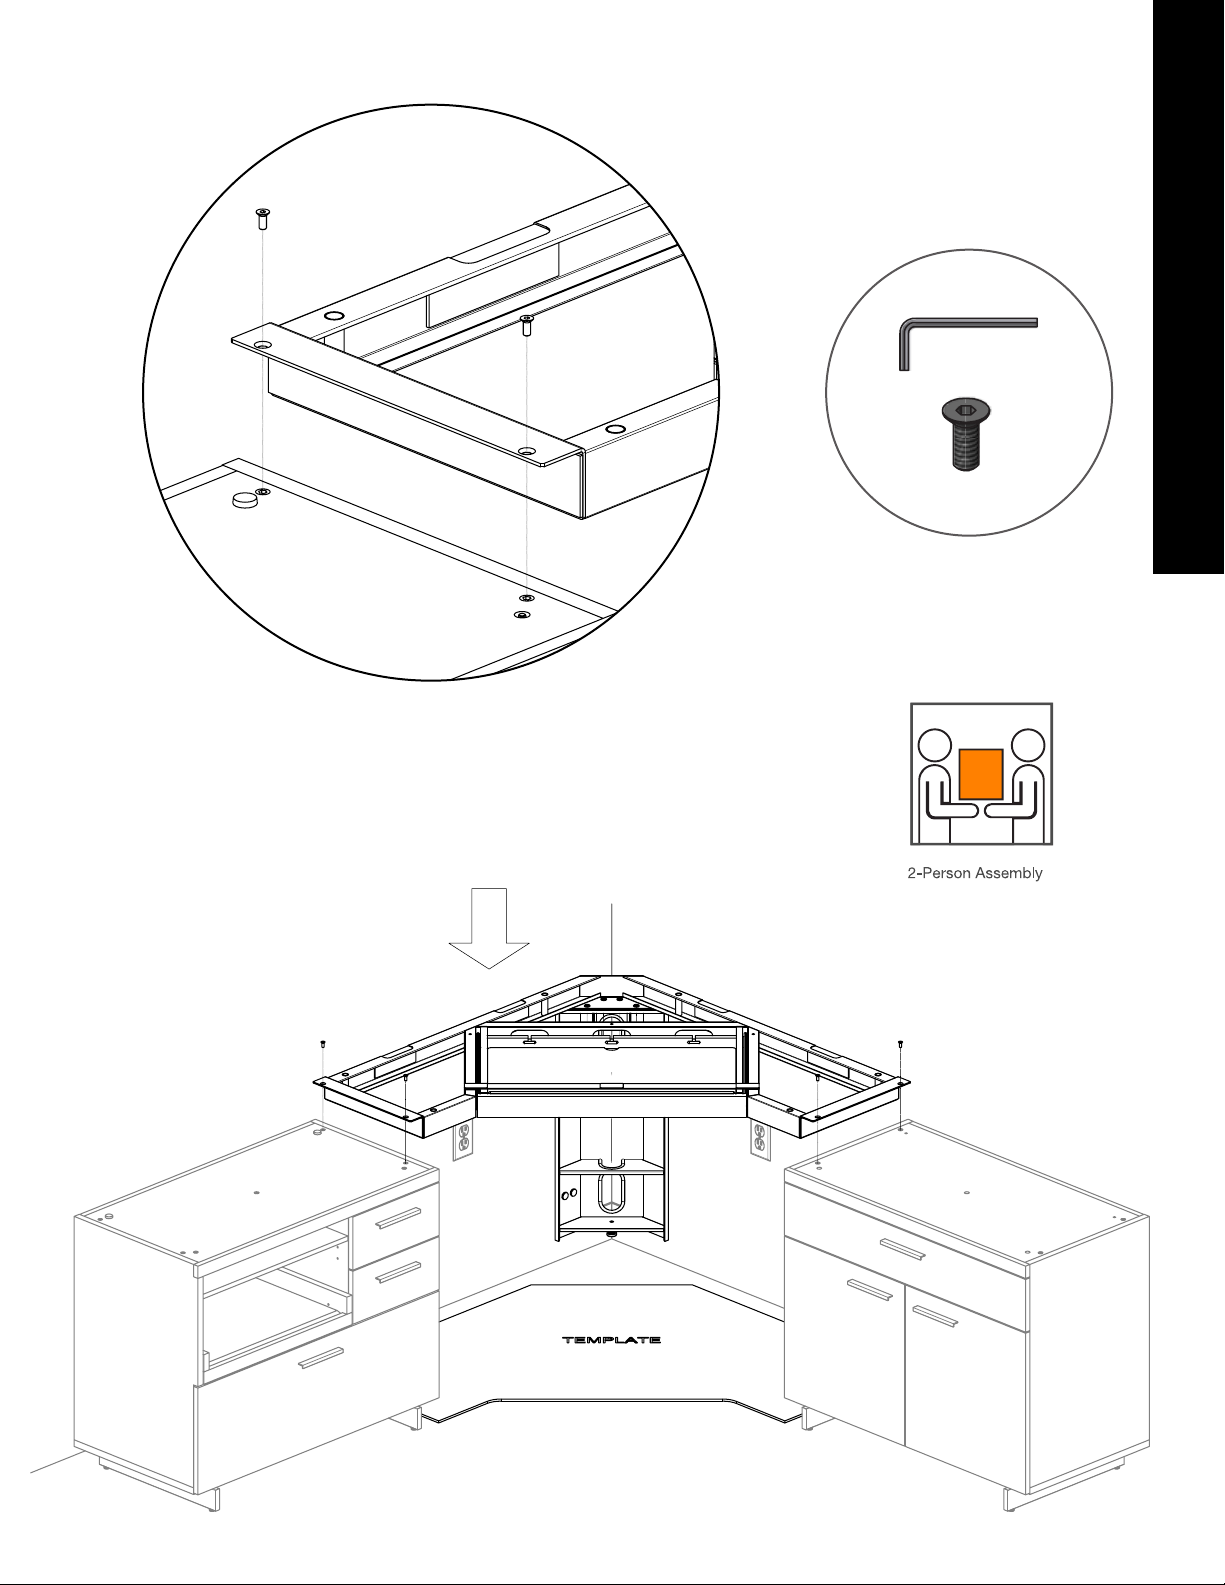
F1/4-20 60mm Screws
4mm Socket Drive x6
GCardboard Template x 1
HDesk Frame Assembly x 1
ICorner Leg x 1
JCorner Leg Cover
KGlass Top x 1
LLeveler x 1
MVelcro Strap x 6
NDrawer Liner x 1
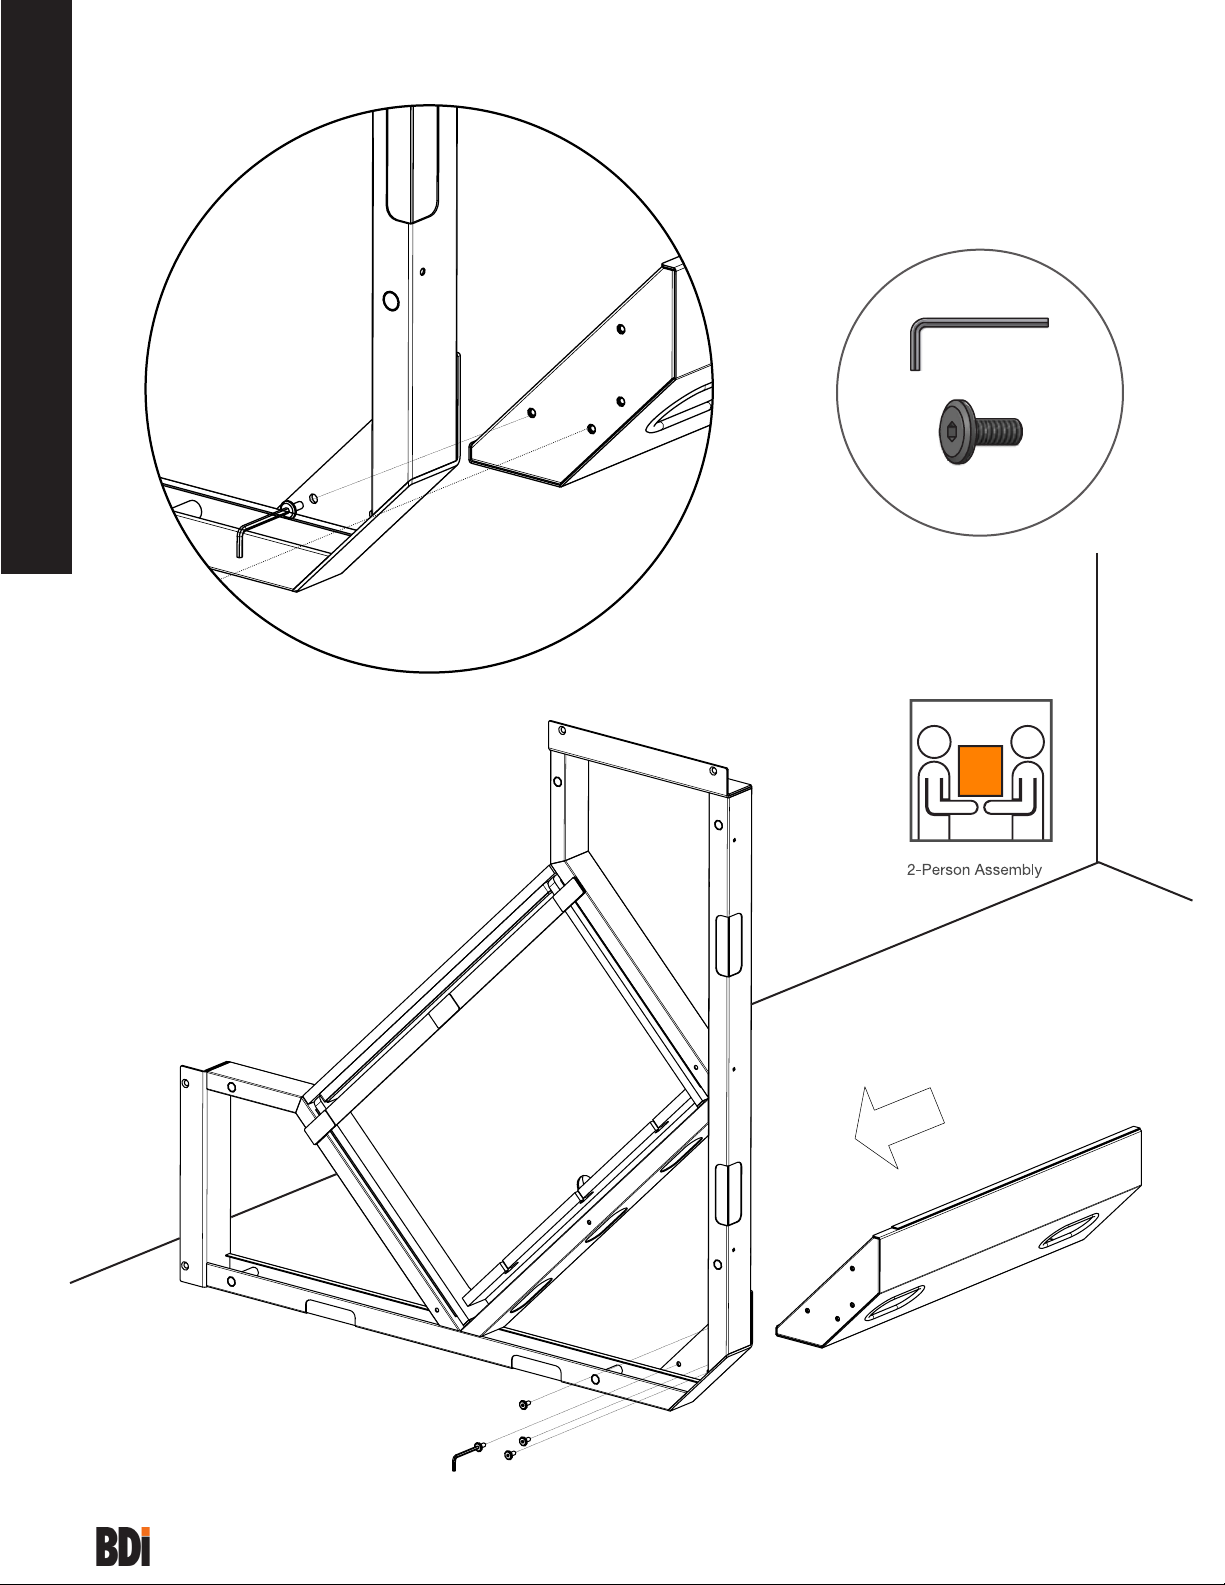
step 1
J
C
E
L
I
G