Bea-fon S20 User manual

1
1
2
3
4
5
6
7
8
9
User Manual
10
for the Bea-fon S20
11
12
13

2
Table of Contents
14
15
16
Table of Contents ..............................................................2
17
General information...........................................................3
18
Your Bea-fon S20 box contains:..........................................3
19
Decice Code: .......................................................................3
20
PIN-Code:............................................................................3
21
First steps...........................................................................4
22
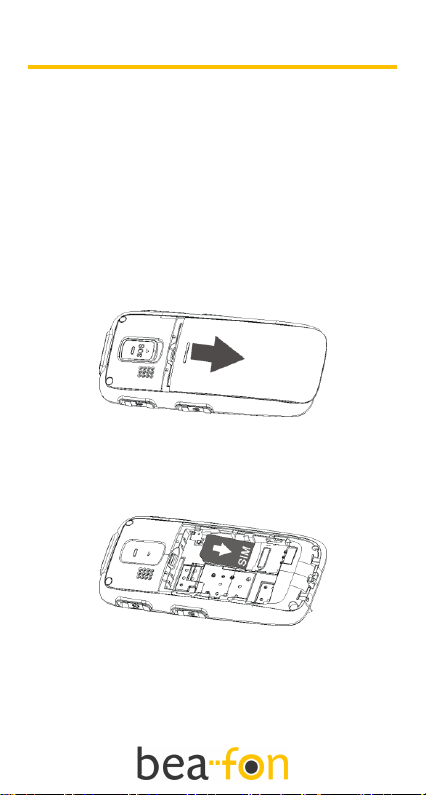
Installing the SIM card:........................................................4
23
Installing the battery:............................................................5
24
Locking the keypad:.............................................................5
25
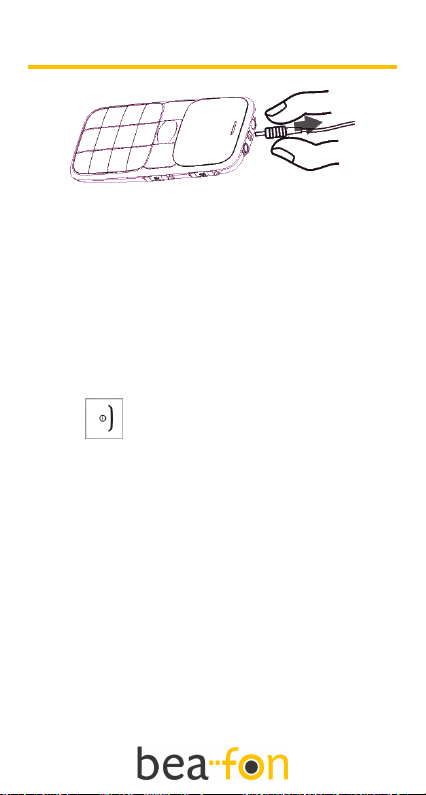
Charging the battery:...........................................................6
26
Switching the phone on or off:.............................................7
27
Main screen: ........................................................................8
28
Calling and receiving calls .............................................12
29
Voicemail: ..........................................................................12
30
Speed dialling:...................................................................13
31
Loudspeaker key: ..............................................................13
32
Phone book ......................................................................14
33
Names and phone numbers: .............................................14
34
Searching for names and phone numbers:.......................14
35
Menu..................................................................................15
36
Menu:.................................................................................15
37
Menu structure::.................................................................15
38
SMS ...................................................................................17
39
Templates:.........................................................................17
40
Log:....................................................................................17
41
Settings:............................................................................18
42
Emergency key ................................................................20
43
Emergency key / Emergency SMS:...................................20
44
Additional features ..........................................................22
45
Calculator:..........................................................................22
46
Alarm:.................................................................................22
47
Radio:.................................................................................22
48
Battery...............................................................................24
49
Telephone:........................................................................25
50
Safety ................................................................................26
51
Safety in traffic:..................................................................27
52
Dangerous locations:.........................................................29
53
Certification / SAR .............................................................29
54
Liability limits:.....................................................................30
55
56

3
General information
57
58
Congratulations on the purchase of your
59
Bea-fon S20!
60
The following pages contain all the information that
61
you will need for the safe and easy use of your
62
mobile phone.
63
If you find the size of the script not easily readable
64
for you, you can also find this manual on our
65
website, where you will be able to adjust the size of
66
the script.
67
Go to: www.beafon.com/products
68
Your Bea-fon S20 box contains:
69
1 mobile phone
70
1 charger
71
1 battery
72
1 headset
73
1 user manual
74
Device Code:
75
This device code ensures that unauthorised
76
persons will not be able to use your phone. The
77
default code is 0000.
78
PIN-Code:
79
The PIN-code was supplied to you by your network
80
provider together with your SIM card and/or
81
adjusted/set up by yourself.
82
83

4
First steps
84
85
Installing the SIM card:
86
Keep the SIM card away from children.
87
The SIM card can easily be damaged or bent. You
88
should therefore handle the SIM card with care
89
during installation and/or removal.
90
91
Switch your phone off, disconnect the charger and
92
remove the battery from the device before installing
93
the SIM card.
94
95
96
97
98
99
100
101
102
Slide the cover down approximately 1 cm with your
103
thumb and remove the cover from your phone.
104
If the battery is in the device, remove it.
105
106
107
108
109
110
111
112
113
Carefully slide the SIM card into the device with the
114
chip facing down. The metal contact strips must
115
point downwards.
116
117

5
First steps
118
119
Installing the battery:
120
121
122
123
124
125
126
127
128
Place the battery in the battery compartment. The
129
text on the battery must be visible, and the metal
130
strips on the battery must be aligned with the metal
131
strips in your device.
132
133
134
135
136
137
138
139
140
141
Close the battery compartment by sliding the cover
142
closed until you hear a „click‟.
143
Locking the keypad:
144
This key prevents keys being
145
accidentally pressed while you have
146
the phone in your pocket or bag. You
147
can lock or unlock the keypad by
148
sliding the key on the side of your
149
telephone up or down.
150
151

6
First steps
152
153
Charging the battery:
154
Remark: Charge the battery for at least 10 hours
155
before using the phone for the first time.
156
157
The telephone can be charged while it is switched
158
on or off. Make sure that the battery is in the phone
159
before you start charging.
160
Place the charger plug in the smallest hole on the
161
top of your device. Insert the plug into the socket.
162
163
164
165
166
167
168
The icon indicating the battery level will continue to
169
blink while charging.
170
171
Charging
Charging finished
172
Your mobile phone will send out a warning tone if
173
the battery is almost discharged, and the message
174
"low battery level" will appear on the screen. If you
175
receive the "low battery level" warning while you are
176
on the phone, you can connect the charger to the
177
socket during your conversation and continue the
178
conversation.
179
180
The battery is fully charged when the 3 bars on the
181
icon are visible.
182

7
First steps
183
184
185
186
187
188
189
190
191
Remove the charger from the socket when the
192
battery is fully charged, and remove the plug from
193
the telephone.
194
Switching the telephone on or off:
195
Remark: Do not switch the telephone on if this is
196
not permitted.
197
198
The telephone can be switched on by pressing the
199
red key for a few seconds. If you have
200
entered a PIN-code before, the phone will ask for
201
the code now. Enter the PIN-code and confirm by
202
pressing the green key.
203
204
Remark: If you enter an incorrect PIN-code 3 times
205
in succession, the phone will require you to enter
206
the PUK-code. You received this PUK-code
207
together with your SIM card.
208
209
If you press the red key again for a few seconds,
210
the telephone will switch off.
211
212
213
214

8
First steps
215
216
Standby
217
If you do not use your phone for a while, it will
218
automatically switch to standby mode. The phone
219
will be activated again by pressing any key. Calls
220
can be received as usual while in standby mode.
221
Main screen:
222
223
224
1. Signal status 4. Time
225
2. Battery status 5. Provider
226
3. Pictograms 6. Menu
227
228
The following symbols can appear on the screen:
229
230
Battery status
Signal status
Alarm
Unread SMS
messages
Voice SMS -
voicemail
Ringtone
Vibrating alarm
231

9
First steps
232
233
234
Call forwarding
Missed calls
Plug in the headset
Keypad locked
Keypad unlocked
New messages
received while
keypad was locked
Missed calls while
keypad was locked
New messages and
missed calls while
keypad was locked
235
236
237
238
239
240
241

10
First steps
242
243
Top view:
244
From left to right: Headset connection, charger
245
connection, flashlight.
246
247
248

11
First steps
249
250
251
252
253
254
255
256
257
258
259
260
261
262
263
264
265
266
267
268
269
270
271
272
273
274
275
276
Side top left: Volume control
277
Side bottom left: Radio key
278
Side top right: Flashlight key
279
Side bottom right: Keypad lock key.
280
281
Remark:
282
The menu key situated between the red and the
283
green key will take you to the menu.
284
285

12
Calling and receiving calls
286
287
Calling:
288
1. To make a call, enter the phone number with
289
the prefix and press the green key. For
290
international calls, enter "+" by pressing 0 for 2
291
sec. Then enter the country code followed by
292
the telephone number, in which the 0 of the
293
prefix must be dropped.
294
2. If you have entered a wrong number, press the
295
red key to remove the number to the left of the
296
blinking cursor.
297
3. Press the green key to establish the
298
connection.
299
4. Press the red key to disconnect.
300
Incoming calls:
301
1. Press the green key if you would like to
302
answer a call.
303
2. Press the red key if you would like to reject a
304
call, or for ending the connection after the call.
305
Voicemail:
306
Voicemail is a service supplied by your network
307
provider. Your network provider will supply you with
308
the number to be entered to enable you to listen to
309
your mailbox. You have the option of entering this
310
number as standard under the speed dial key .
311
To do this, go to [SMS] > [voicemail] > [process] in
312
the menu.
313
314

13
Calling and receiving calls
315
316
Speed dialling:
317
It is possible to enter 10 speed dial numbers that
318
can be called from the stand-by mode by pressing
319
the corresponding number keys (2~9, * and #).
320
321
To do this, go to [Phone book] > [Speed dial] >
322
[Enter number].
323
Loudspeaker key:
324
To switch to handsfree during a call press, the
325
green key. By [Handsfree] you press the green key
326
once again to turn handsfree function on.
327
With the volume keys on the left side of your
328
device, you can adjust the volume of the speaker.
329
To turn off the handsfree during a call, press the
330
green key. By [Handsfree] you press the green key
331
once again to turn off the handsfree function.
332
333
334

14
Phone book
335
336
337
Names and phone numbers:
338
You can save names and phone numbers
339
(contacts) in the telephone memory and in the SIM
340
card memory; contacts stored in the telephone
341
memory are indicated by ; contacts stored in the
342
SIM card memory are marked by .
343
To add new numbers to your phone book: [Phone
344
book] > [New entry] >, select where you want to
345
save the phone number, e.g., [to telephone]. Space
346
for saving up to 500 telephone numbers and names
347
is available here.
348
If you want to search the phone book for a name or
349
number in order to make a call, select [Phone book]
350
first and then [Search].
351
Searching names and phone numbers:
352
In the menu, select: [Phone book] > [Search] and
353
then scroll through the phone book using the arrow
354
keys.
355
You have the following options in the phone book:
356
[Search]
357
[New entry]: to enter a new number
358
[Delete]: to delete phone numbers from the SIM card
359
or from the telephone memory.
360
[Copy]: to copy telephone numbers to the SIM card or
361
telephone memory.
362
[Speed dial]: to program speed dial numbers via keys
363
2 up to 9 and * and #.
364
[SOS number]: to enter up to 5 emergency numbers.
365
[Setting]: to enter the preferred storage and for
366
checking how many telephone numbers can still be
367
entered.
368
369

15
Menu
370
371
Menu:
372
Scroll through the menu using the arrow keys
373
(between the red and the green key).
374
Press the green key to enter the relevant menu and
375
the red key to return.
376
Press the green key to confirm an entry.
377
Menu structure:
378
1. SMS
379
1. Write message
380
2. Inbox
381
3. Outgoing
382
4. Drafts
383
5. Voicemail
384
6. SOS SMS
385
7. Templates
386
8. Message settings
387
9. Delete SMS
388
389
2. Calculator
390
391
3. Alarm
392
393
4. Settings
394
1. Telephone settings
395
2. Network settings
396
3. PIN
397
4. Reminder
398
5. Restore factory settings
399
400
401
402

16
Menu
403
404
5. Profiles
405
1. General
406
2. Meeting
407
3. Outside
408
4. Inside
409
5. Headset
410
6. Phone book
411
1. Search
412
2. New entry
413
3. Delete
414
4. Copy
415
5. Speed dial
416
6. SOS number
417
7. Setting
418
419
7. Log
420
1. Calls made
421
2. Incoming calls
422
3. Missed calls
423
4. Delete log
424
5. Call duration
425
426
8. Radio key
427
1. Select programme automatically
428
2. Manual input
429
3. Volume settings
430
4. Channel list
431
5. Loudspeaker
432
433
434
435

17
SMS
436
437
SMS:
438
If the symbol appears on the screen, this means
439
that you have received a new SMS message. If
440
your storage area for SMS messages is full, will
441
blink until you delete any messages you no longer
442
need.
443
You want to write an SMS message? In the menu,
444
select [SMS] > [write message] to navigate to SMS
445
messages. Each letter corresponds to a number
446
key (2-9). For example, press “2” if you want to type
447
A. Press “2” once again for B, etc. You could also
448
press “1” to enter frequently-used symbols and “0”
449
to enter “0” or spaces.
450
When you have finished your message, press the
451
green key to save, send or delete it.
452
453
If you receive new messages, either press the
454
green call key to read the messages, or press the
455
red end key if you prefer to read the messages
456
later.
457
Templates
458
You can find various examples of SMS templates
459
you could use in the [SMS] > [Templates] menu.
460
Log
461
The log provides a list of various telephone
462
numbers. This could be the last 20 missed calls, the
463
last 20 numbers dialled or the last 20 incoming
464
phone numbers.
465
466

18
Settings
467
468
Settings:
469
You can adjust various phone settings in the
470
[Telephone settings] menu.
471
472
Select [Telephone settings] > [Time & Date] > [Time
473
settings] or [Date settings] to set the time and the
474
date. Only the time is displayed on the screen.
475
476
Select [Telephone settings] > [Time & Date] > [Date
477
format] to set the date format.
478
479
Select [Telephone settings] > [Language] to change
480
the language to Dutch, English, German, French,
481
Spanish or Italian.
482
The option [Network settings] will, for example,
483
enable you to block incoming calls or divert them to
484
a different number.
485
Select [PIN] to select the status (on/off) of the PIN.
486
Important remark: This mobile telephone supports
487
the PIN function.
488
489
You can make a note in the [Reminder] menu, and
490
link this to a specific time when the mobile
491
telephone will issue a reminder message. For
492
example, if you sometimes forget to take your
493
medication at a specific time, you can store a
494
reminder message in your phone.
495
496
497
498
499

19
Settings
500
501
Select [Settings] > [Factory settings] > password
502
[1122] to delete all personal information from the
503
phone. As soon as you confirm this, your phone will
504
be exactly as it was when it was purchased.
505
Attention: Any saved SOS numbers will also
506
disappear after confirmation.
507
Your phone makes use of a number of profiles that
508
can be set to fit your personal requirements. The
509
following profiles are available: [General], [Meeting],
510
[Outside], [Inside], [Headset].
511
Within those profiles, it is possible to adjust the
512
volume of the ringtone you will hear when receiving
513
a call. [General] > [Adjust] > [ Volume] > [Ringtone].
514
515
It is also possible to set the vibrating alarm here:
516
[General] > [Adjust] > [Type of warning] > e.g.
517
[Sound & Vibrate].
518
519
If you receive a call now, the phone will vibrate and
520
you will hear the ringtone simultaneously.
521
522
523
524
525
526
527
528
529
530
531
532

20
Emergency key
533
534
Emergency key / Emergency SMS:
535
To set an emergency call: Select [Phone book] >
536
[SOS number] > [Process]. You can set 5
537
emergency numbers.
538
539
If you have entered SOS numbers, your mobile
540
phone will send an SOS SMS to the entered SOS
541
numbers and will then phone these numbers as
542
soon as you have activated the emergency key.
543
544
The phone will issue an emergency signal as soon
545
as you operate the SOS key.
546
547
The first number on the list will be called first. If the
548
selected number is not available, the phone will
549
continue with the next number on the list, until there
550
is an answer from one of the numbers.
551
552
After the emergency call with the first number that
553
has been reached is finished, your mobile phone
554
will automatically call the next emergency number,
555
until you slide the "SOS" key up into its original
556
position.
557
558
It is possible to compose the emergency message
559
that is sent by SMS when you operate the
560
emergency key yourself. You can enter one
561
emergency message. Go to [SMS] > [SOS SMS] >
562
[Process] and enter the text of your choice.
563
564
The SOS key will only function if the SIM card is
565
installed in the telephone!
566
567
Table of contents
Other Bea-fon Cell Phone manuals

Bea-fon
Bea-fon CLASSIC C245 User manual

Bea-fon
Bea-fon S50 User manual

Bea-fon
Bea-fon Classic series User manual

Bea-fon
Bea-fon S10 User manual

Bea-fon
Bea-fon SL630 User manual

Bea-fon
Bea-fon S700 User manual

Bea-fon
Bea-fon SL205 User manual

Bea-fon
Bea-fon S40 User manual

Bea-fon
Bea-fon SL320 User manual

Bea-fon
Bea-fon SL595 User manual

Bea-fon
Bea-fon S400 User manual

Bea-fon
Bea-fon SL360 User manual

Bea-fon
Bea-fon SL590 User manual

Bea-fon
Bea-fon SL User manual

Bea-fon
Bea-fon X5 Premium User manual

Bea-fon
Bea-fon SL140 User manual

Bea-fon
Bea-fon Active Line Series User manual

Bea-fon
Bea-fon SILVER LINE SL860 User manual

Bea-fon
Bea-fon SL651A User manual

Bea-fon
Bea-fon C150 User manual