Beurer North America LP, Hallandale Beach, FL, 33009, www.beurer.com, Questions or Comments?
711.604 − 0813 Subject to errors and changes
Switching on and setting the thermometer
3
• Remove all packaging.
• ENSURE THAT THE PACKAGING MATERIALS ARE
DISPOSED OF PROPERLY AND THAT THEY DO NOT
FALL INTO CHILDREN’S HANDS DUE TO RISK OF
SUFFOCATION.
• Check the device for damage.
The measuring sensor should be cleaned before
and after each use to eliminate dirt and finger-
prints and ensure accuracy of your readings.
Briefly press the On/Off button .
After a brief self-test and two short beeps the thermo-
meter is ready for forehead measurement.
The device always starts up in forehead temperature
mode .
Setting the basic functions
This menu allows you to set the following functions
individually, one after another.
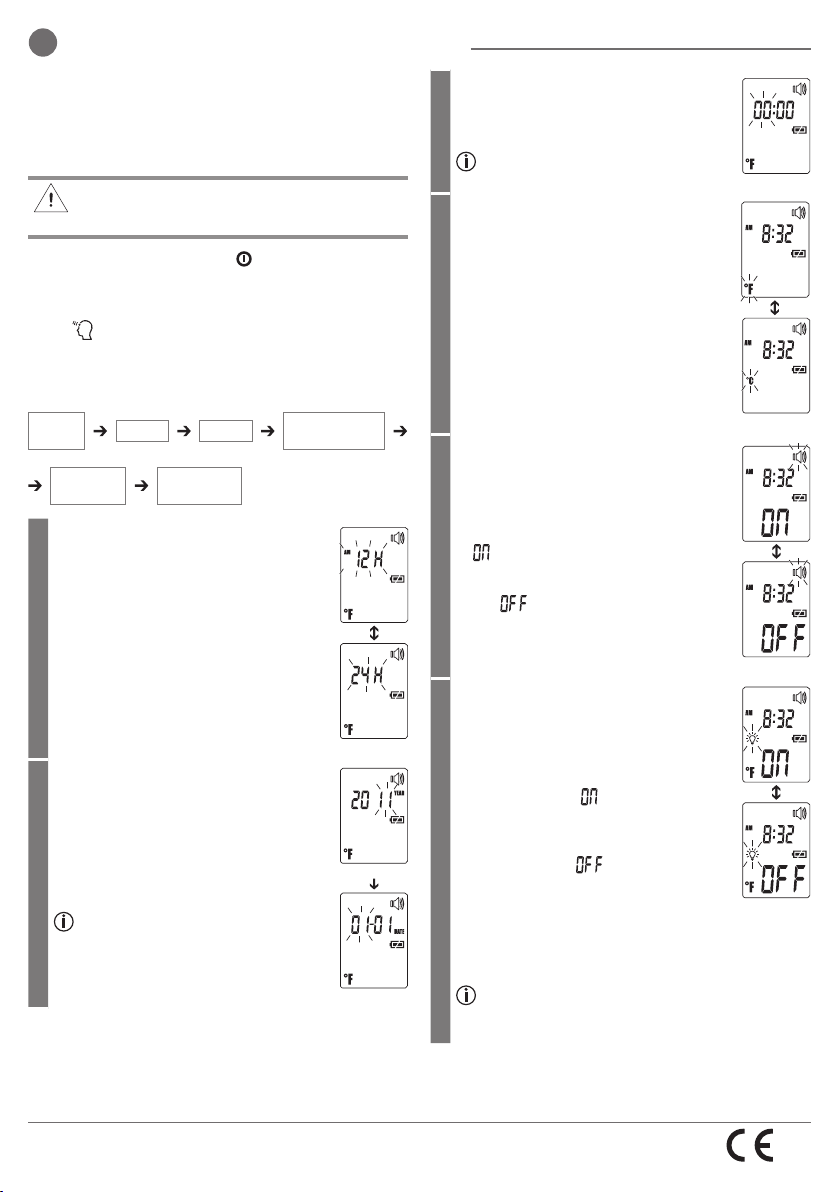
Time format
• With the thermometer switched on,
press and hold the
LIGHT/SET
button
for 5 seconds.
The time format option flashes on the
display (fig. 1).
• Use the MODE/MEM button to set
your preferred time format and confirm
with the LIGHT/SET button.
Fig. 1
Date
The year flashes in the display (fig. 2).
• Use the MODE/MEM button to set the
year and confirm with the LIGHT/SET
button.
Month/day flashes in the display (fig. 3).
• Use the MODE/MEM button to set the
month and day, and confirm with the
LIGHT/SET button.
In the 24h format, the date is
displayed as day/month. In the 12h
format, it is displayed as month/day.
Fig. 3
Fig. 2
Time
The time flashes in the display (fig. 4).
• Use the MODE/MEM button to set the
time and confirm with the LIGHT/SET
button.
In the 12h format, the time is dis-
played as AM/PM.
Fig. 4
Temperature meas. unit
The temperature measurement unit
flashes in the display (fig. 5).
You can set the device to display the
temperature in degrees Fahrenheit (°F) or
degrees Celsius (°C).
• To display the temperature in Celsius,
select °C using the MODE/MEM but-
ton and confirm with the LIGHT/SET
button.
• To display the temperature in Fahren-
heit, select °F using the MODE/MEM
button and confirm with the LIGHT/
SET button.
Fig. 5
Acoustic signal
The acoustic signal symbol flashes in the
display (fig. 6).
You can activate/deactivate the acoustic
signals (device activation, measurement
in progress, measurement completion).
• To activate the acoustic signals, select
using the MODE/MEM button and
confirm with the LIGHT/SET button.
• To deactivate the acoustic signals, se-
lect using the MODE/MEM button
and confirm with the LIGHT/SET but-
ton.
Fig. 6
Illuminated display
The light symbol flashes in the display
(fig. 7).
You can activate or deactivate the auto-
matic illuminated display (appears follow-
ing forehead temperature measurement).
• To activate the automatic illuminated
display, select using the MODE/
MEM button and confirm with the
LIGHT/SET button.
• To deactivate the automatic illuminated
display, select using the MODE/
MEM button and confirm with the
LIGHT/SET button.
Fig. 7
You can also activate the illuminated display manu-
ally by briefly pressing the LIGHT/SET button.
The display lights up for 5 seconds.
The automatic and manual illuminated display
cannot be used while measurement is in prog-
ress.
Temperature
meas. unit
Time
format Date Time
Illuminated
display
Acoustic
signal
0483


