manuals.online logo
Brands
  1. Home
  2. •
  3. Brands
  4. •
  5. BinTec
  6. •
  7. Network Router
  8. •
  9. BinTec BIANCA/BRICK XS User manual

BinTec BIANCA/BRICK XS User manual

Quick Install Guide
BIANCA/BRICK XS/XS office
BIANCA/BRICK-XS and XS office are full-featured multiprotocol router
for smaller companies.
With the Configuration Wizard on the BinTec Companion CD, BinTec
Communications offers you a quick and convenient way to start running
your BIANCA/BRICK XS/XS office. You can perform basic configuration
via serial connection with your Windows PC. This basic configuration in-
cludes all the important settings of the router, access to the Internet via
an Internet Service Provider (ISP), as well as the connection to a WAN
partner (e.g. to a corporate headquarters). The Configuration Wizard
guides you step by step through the configuration and so detailed knowl-
edge of networking technologies is not necessary. Graphic illustrations
and a detailed online help system give you additional support.
The Configuration Wizard is one of several possibilities to configure your
router. In this way, access to your router occurs via the serial interface.
Additional methods of configuring your router are described in your
User’s Guide. With them you are able to fine-tune your configuration.
The following system requirements are necessary:
■Windows 95/98 or Windows NT 4.0 and higher.
■Installed network card (ethernet)
■Installed Microsoft TCP/IP stack (see section 2 "Checking and In-
stalling the TCP/IP Protocol")
■High color monitor (at least 32000 colors) for correct display of
graphics
This Quick Install Guide takes you step by step through a basic configu-
ration of your BIANCA/BRICK XS/XS office. Congratulations on your
new purchase and have fun!
Version 1.1
Document #71010D, February 1999
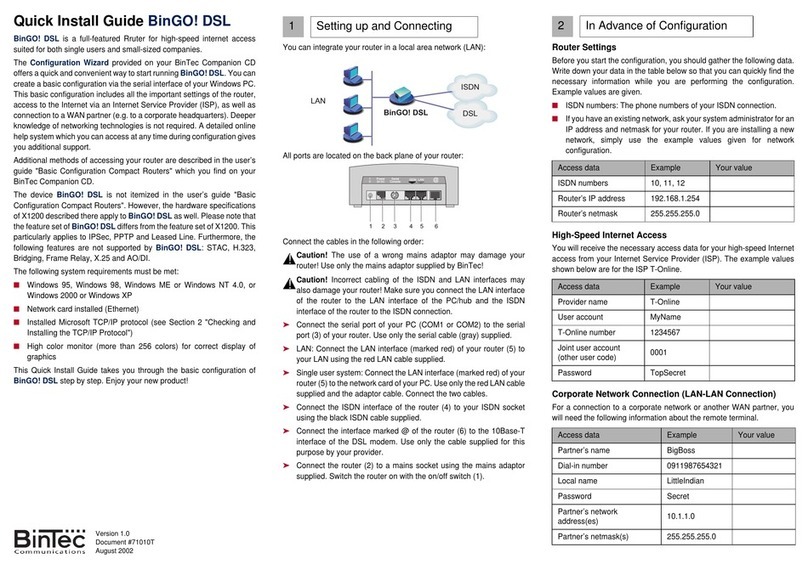
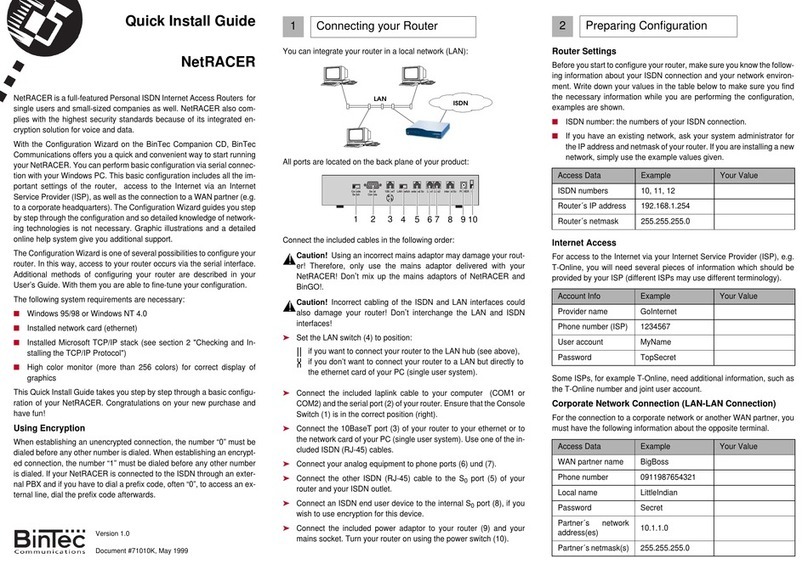
You can integrate your router in a local area network (LAN):
All ports are located on the back plane of your product:
Connect the included cables in the following order:
Caution! Incorrect cabling of the ISDN and LAN interfaces may
damage your router! Don’t interchange the LAN and ISDN interfac-
es!
➤Connect your router to the network or to the network card of your PC
(single user system) using either the 10BaseT (2) or the 10Base2
port (3).
➤Connect the included laplink cable to your computer (COM1 or
COM2) and the serial port (5) of your router.
➤Connect the included ISDN (RJ-45) cable to the S0port (4) of your
router and your ISDN outlet.
Connect the included power cord to your router (1) and your local power
supply.
1 Connecting your Router
ISDN
LAN
ISDN S
0
Serial Console
10BASE2
1234 5
B
A
10BASET
✆
!
Router Settings
Before you start to configure your router, make sure you know the follow-
ing information about your ISDN connection and your network environ-
ment. Write down your values in the table below to make sure you find
the necessary information while you are performing the configuration,
examples are shown.
■ISDN number: the numbers of your ISDN connection.
■If you have an existing network, ask your system administrator for
the IP address and netmask of your router. If you are installing a new
network, simply use the example values given.
Internet Access
For access to the Internet via your Internet Service Provider (ISP), e.g.
T-Online, you will need several pieces of information which should be
provided by your ISP (different ISPs may use different terminology).
Some ISPs, for example T-Online, need additional information, such as
the T-Online number and joint user account.
Corporate Network Connection (LAN-LAN Connection)
For the connection to a corporate network or another WAN partner, you
must have the following information about the opposite terminal.
2 Preparing Configuration
Access data Example Your Value
ISDN numbers 10, 11, 12
Router´s IP address 192.168.1.254
Router´s netmask 255.255.255.0
Account Info Example Your Value
Provider name GoInternet
Phone number (ISP) 1234567
User account MyName
Password TopSecret
Access Data Example Your Value
WAN partner BigBoss
Phone number 0911987654321
Local name LittleIndian
Password Secret
Partner´s network
address(es) 10.1.1.0
Partner´s netmask(s) 255.255.255.0
BinTec Communications AG, Südwestpark 94
90449 Nürnberg
Telefon: +49 911 / 96 73 - 0
Fax: +49 911 / 688 07 25
www.bintec.de, [email protected]
Agree upon the data with your partner: you will both use a common pass-
word; your entry "local name" and your partner´s entry "partner name"
must be identical; your entry "partner name" and your partner´s entry "lo-
cal name" must also be identical.
Checking and Installing the TCP/IP Protocol
The TCP/IP protocol is the "language" PCs use to communicate over the
network and to connect to the Internet. Make sure that the TCP/IP pro-
tocol is installed before you start configuring your router. To check the
installation of the TCP/IP protocol or to install the TCP/IP protocol:
➤In the start menu click Settings ➧Control Panel. Double-click Net-
work.
➤Windows 95/98: search in the network components list for TCP/IP.
➤Windows NT: select the tab Protocols. Search in the network proto-
cols list for TCP/IP protocol.
➤If you can’t find this entry, install the TCP/IP protocol as described
below. Otherwise, close the dialog box and start configuration (sec-
tion 3).
To install the TCP/IP Protocol:
➤Windows 95/98: in the dialog box Network click Add. In the network
components list select protocol and click Add. As manufacturer se-
lect Microsoft and as network protocol select TCP/IP. Click OK.In
an existing network, you might have to configure additional settings
here. Ask your network administrator. If you are setting up a new net-
work, click OK. Your PC is now set up as a DHCP client.
➤Windows NT: in the Network dialog box, click the tab Protocols and
clickAdd.Inthenetwork components list,click TCP/IP protocol and
click OK. Click Yes to set up a new network (PC as DHCP client). In
an existing network, ask your network administrator.
➤Follow the instructions on the screen and finally restart your PC.
Repeat the installation on all PCs with which you need to access the
Internet.
Quit all Windows-based programs on your PC.
➤Put the BinTec Companion CD in the CD-ROM drive of your PC. Af-
ter a few seconds the start window appears. If the start window does
not appear automatically, click in your Windows Explorer your CD-
ROM drive and double-click setup.exe.
➤Click BRICKware to start the setup program.
➤Enter the directory BRICKware shall be installed to.
➤Select your router, thus BIANCA/BRICK XS or XS office.
➤Select the software components you want to have installed. You can
accept the adjusted values.
3 Installing BRICKware
DIME Tools contains mainly tools for configuration, maintenance and di-
agnosis. For the basic functions of your router, it is not necessary to start
DIME Tools automatically with Windows.
The Configuration Wizard starts at the end of the installation.
The configuration of your router is quick and easy with the Configuration
Wizard. Please note: if you have already configured your router with the
Configuration Wizard, the Wizard may assume the preset values. At the
end, the configuration is transferred to the router and saved on the PC.
You can carry out the configuration in either quick or expert mode. If you
are unfamiliar with networking technologies, choose quick mode.
You can select from the following configuration areas: basic router set-
tings, Internet access and corporate network connection (LAN-LAN con-
nection). The basic router settings are essential. They integrate the
router in your local network and enable the use of communications ap-
plications (CAPI).
➤Select the desired subjects and follow the instructions on the screen.
➤If you have set up a new network and installed the TCP/IP protocol
on the PC, as described above, configure your router as a DHCP
server (default).
In this case, the PC has to be assigned an IP address at the end of
configuration. This happens automatically under Windows NT. Under
Windows 95 or 98, the Configuration Wizard starts the program
WINIPCFG:
➤Click Yes to start WINIPCFG. Click Renew All and then click OK.
If you have chosen communications applications (CAPI) during config-
uration, you will be asked to perform CAPI configuration now. Among
other things, CAPI allows you to send and receive fax messages and to
use an answering machine.
➤Click Yes to start configuration. In the Remote CAPI tab enter the IP
address of your router if it isn’t entered already. Also enter the user
name and password for users of telematic services, as entered pre-
viously in the Configuration Wizard. Click Use these values. Click
OK.
To be able to use fax services on your PC, you have to install a CAPI
application like RVS-Com Lite. RVS-Com Lite is included on your BinTec
Companion CD.
➤ClickRVS-Com Lite in the start window to install RVS-ComLite (see
subject 3 "Installing BRICKware") and follow the instructions on the
screen. An online help system is also available.
4 Configuring your Router
5 Configuring your PC
You may allow access to the Internet via your router for all PCs located
in the same network as your router. In order to do this, you must enter
the router as a gateway and as a DNS server for all those PCs that were
not configured as DHCP clients, as described below:
➤In the start menu click Settings ➧Control Panel. Double-click Net-
work.
➤Click TCP/IP in the network components list (for Windows NT it is on
the Protocol tab) and click Properties.
➤Click the Gateway tab and enter the IP address of your router as
New Gateway.(Windows NT: click the IP Address tab and enterthe
IP address of your router as Standard Gateway). Click Add.
➤Click the DNS Configuration tab and enter the IP address of your
router under DNS Server Search Order. Click Add and then OK.
Follow the further instructions on the screen.
You have successfully finished the configuration of your router!
➤Remove the cable from the serial port of your router now.
Caution! Incorrect configuration of the devices in your network may
result in unintended connections and increased charges. Monitor
your router and make sure that the system does not establish
unwanted ISDN connections (and charges). Observe the LED
display of your router (LED ISDN-B is on or blinking: connection
established) or use the monitoring function in the Setup Tool (see
Getting Started and User’s Guide).
➤Test the connection to your router. In the start menu click Run. Enter
ping, followed by a space, followed by the IP address of your router.
A window appears with the response "Reply from...".
➤Now open your Internet Browser and enter www.bintec.de to test the
access to the Internet. At BinTec’s WWW site you will find the latest
news, updates, and documentation.
6 Testing Configuration
!

This manual suits for next models

1

Other BinTec Network Router manuals

BinTec X4100 User manual

BinTec

BinTec X4100 User manual

BinTec X1000 User manual

BinTec

BinTec X1000 User manual

BinTec X4000 User manual

BinTec

BinTec X4000 User manual

BinTec M2 User manual

BinTec

BinTec M2 User manual

BinTec VICAS User manual

BinTec

BinTec VICAS User manual

BinTec X3200 User manual

BinTec

BinTec X3200 User manual

BinTec NetRACER User manual

BinTec

BinTec NetRACER User manual

BinTec BIANCA User manual

BinTec

BinTec BIANCA User manual

BinTec X8500 User manual

BinTec

BinTec X8500 User manual

BinTec elmeg T484 User manual

BinTec

BinTec elmeg T484 User manual

BinTec RS123 User manual

BinTec

BinTec RS123 User manual

BinTec 4Ge-LE User manual

BinTec

BinTec 4Ge-LE User manual

BinTec X2250 Instruction manual

BinTec

BinTec X2250 Instruction manual

BinTec BinGO Plus User manual

BinTec

BinTec BinGO Plus User manual

BinTec XGeneration X2301 User manual

BinTec

BinTec XGeneration X2301 User manual

BinTec BinGO Plus User manual

BinTec

BinTec BinGO Plus User manual

BinTec RV120-4G User manual

BinTec

BinTec RV120-4G User manual

BinTec BinGO Plus User manual

BinTec

BinTec BinGO Plus User manual

BinTec BIANCA/BRICK-XL2 User manual

BinTec

BinTec BIANCA/BRICK-XL2 User manual

BinTec BinGO! DSL II User manual

BinTec

BinTec BinGO! DSL II User manual

BinTec BIANCA/BRI User manual

BinTec

BinTec BIANCA/BRI User manual

BinTec BinGO! DSL User manual

BinTec

BinTec BinGO! DSL User manual

Popular Network Router manuals by other brands

H3C S12500R Series Installation, quick start

H3C

H3C S12500R Series Installation, quick start

Planet WDRT-1202AC user manual

Planet

Planet WDRT-1202AC user manual

Huawei NE20E-S2E Configuration

Huawei

Huawei NE20E-S2E Configuration

Linksys R75 user guide

Linksys

Linksys R75 user guide

Cisco 7304 Series quick start guide

Cisco

Cisco 7304 Series quick start guide

Asus DSL-N55U Quick start manual

Asus

Asus DSL-N55U Quick start manual

H3C SR6600 SPE-FWM Configuration guide

H3C

H3C SR6600 SPE-FWM Configuration guide

Hawking PN9230 Specifications

Hawking

Hawking PN9230 Specifications

BELGACOM B-BOX Instructions for use

BELGACOM

BELGACOM B-BOX Instructions for use

CityGrow CG102IR-AC user manual

CityGrow

CityGrow CG102IR-AC user manual

D-Link DSL-2540U user manual

D-Link

D-Link DSL-2540U user manual

IOGear GHPB31 user manual

IOGear

IOGear GHPB31 user manual

Lancom 9100 VPN manual

Lancom

Lancom 9100 VPN manual

Zonet ZSR4134WS user manual

Zonet

Zonet ZSR4134WS user manual

Repotec RP-WR5822 user manual

Repotec

Repotec RP-WR5822 user manual

Huawei AR1200 Series User configuration guide

Huawei

Huawei AR1200 Series User configuration guide

HPE FlexNetwork HSR6600 Security configuration guide

HPE

HPE FlexNetwork HSR6600 Security configuration guide

HP 7000dl Series Quickspecs

HP

HP 7000dl Series Quickspecs

manuals.online logo
manuals.online logoBrands
  • About & Mission
  • Contact us
  • Privacy Policy
  • Terms and Conditions

Copyright 2025 Manuals.Online. All Rights Reserved.