Bioneer ExiPrep 16 Pro User manual

User Manual(Ver 1.1)
ExiPrep™16 Pro
Fully Automated Nucleic Acid Extraction System

Copyright © 2011 by Bioneer Corporation. All rights reserved.
Contents
I. Getting Started ............................................................................................................... 1
II. Safety Warnings and Precautions ..................................................................................... 2
1. User and experimental precautions ............................................................................................................................. 2
2. Precautions regarding the operation environment ............................................................................................... 2
3. Precautions and warnings regarding instrument installation ........................................................................... 3
4. Precautions and warnings regarding instrument operation .............................................................................. 3
5. Precautions and warnings regarding product usage and maintenance ...................................................... 4
6. UV Lamp .................................................................................................................................................................................. 5
III. System Components and Specifications ........................................................................... 6
1. System Components .......................................................................................................................................................... 6
2. Specifications ......................................................................................................................................................................... 7
3. System Views ......................................................................................................................................................................... 7
IV. Installing the ExiPrep™16 Pro .......................................................................................... 8
V. DNA/ RNA Extraction .................................................................................................... 11
1. Contamination Protection Accessory Installation................................................................................................ 11
2. Sample Preparation ......................................................................................................................................................... 12
3. RUN (Not used PC) .......................................................................................................................................................... 14
VI. ExiStation™ Manager Software ...................................................................................... 18
VII. ExiPrepTM16 Pro Setup .................................................................................................. 23
1. Main Menu .......................................................................................................................................................................... 23
2. Registering a New User ................................................................................................................................................. 27
3. Viewing Run History ........................................................................................................................................................ 28
4. Managing the Login Mode .......................................................................................................................................... 29
5. Managing the Automatic UV-Sterilization Mode ................................................................................................ 30
6. Configuring the System ................................................................................................................................................. 31
7. Administrator Management ......................................................................................................................................... 32
VIII. Updating the ExiPrepTM16 Pro ........................................................................................ 34
IX. DNA/ RNA Extraction Program Number List ..................................................................... 37
X. Troubleshooting ........................................................................................................... 41
XI. Warranty ..................................................................................................................... 45

ExiPrepTM16 Pro
Fully Automated Nucleic Acid Extraction System
A4(210X297)
-1-
I. Getting Started
Thank you for purchasing this Bioneer product.
We will try our best to provide satisfactory results to our customers.
This manual contains practical guidelines and cautions to be taken regarding the instrument.
Please read this manual carefully and thoroughly before using the instrument.
Website
▪Please visit us online at http://www.bioneer.com to obtain more information about ExiPrepTM16
Pro.
General information
▪ExiPrep™16 Pro is a trademark of Bioneer Corporation.
▪The information contained in this manual is under copyright protection. It is unlawful to
reproduce part or all of the contents of this manual without the expressed written consent of
Bioneer Corporation.
▪Bioneer Corporation reserves the right to alter, modify and otherwise make changes to the
instrument and manuals without prior notice.
▪You must be used carefully UV Lamp. Detail can be found in Safety warning and Precautions.
Reversion
Cat. Number A-5040 Rev. 1.1
April/2011

ExiPrepTM16 Pro
Fully Automated Nucleic Acid Extraction System
A4(210X297)
-2-
II. Safety Warnings and Precautions
The warnings and precautions stated below are for the correct and safe operation of the instrument. Please
heed all information for your safety. Bioneer Corporation does not assume responsibility for non-compliance
with the safety warnings and precautions stated below.
1. User and experimental precautions
1) Make sure that the power supply (100-240V, ~50/60Hz) is correctly connected to the power adapter
and that the power adapter is correctly connected to the instrument. Incorrect connection of the
power adapter and power supply can result in instrument damage or failure to turn on.
2) This instrument is intended for nucleic acid extraction. Please use as such.
3) The instrument may stop if the LCD panel is touched while connected to a PC via LAN cable. If
operating the instrument via PC software, please allow for the instrument to finish its programmed
movement before operating the LCD panel.
4) Do not turn the PC off or disconnect the LAN cable connecting the PC to the instrument. Data
communication error can result in instrument malfunction and can affect the results of your
experiment.
5) Please install the instrument on a flat surface.
6) Do not operate the instrument with wet hands as this may result in shock or instrument malfunction.
Please touch the power adapter cord with dry hands.
7) If the instrument is stopped either from operator error including improper accessory insertion or
manually halting the instrument during normal operation, you must re-initialize the instrument before
pulling out the Base Plate. Pulling out the Base Plate without prior initialization can lead to
instrument damage from movement interferences including a raised Heating Block or other
accessories stopped in motion. If Buffer Cartridges are inserted into the Base Plate, please
reinitialize the instrument or pull out the Buffer Cartridges to make sure the Heating Block is not in
the way of normal Base Plate movement.
8) Avoid placing objects in the front and rear of the instrument, as fan blockage may cause lowered
efficiency of the Cooling Block.
9) Be careful not to have any obstructions or foreign materials introduced into the front-lower side
Cooling Fan mesh. Foreign objects can hinder normal Cooling Fan operation and may lead to
overheating of parts or cause a fire.
2. Precautions regarding the operation environment
1) If the power plug is loose, do not use the instrument. Plug overheating may result in shock or fire.
2) Do not operate multiple instruments out of a single wall outlet. The load may cause overheating and
may lead to fire.
3) When plugging or unplugging the power adapter cord from a wall outlet, make sure your hands are

ExiPrepTM16 Pro
Fully Automated Nucleic Acid Extraction System
A4(210X297)
-3-
completely dry. Wet or moist hands may cause electric shock.
4) Avoid placing objects in the front and rear of the instrument.
5) Avoid installing the instrument in a dusty environment. Excessive dust may cause malfunction or
damage to the instrument.
6) Avoid installation near heat sources. This can cause fire.
7) Avoid installation near sources of water or damp locations. This can cause electrical shock, fire or
instrument malfunction.
8) Do not install near sources of flammable or corrosive gas. If there is a gas leak, do not touch the
power plug but open a window to circulate fresh air. Sparks from the power plug can cause fire and
explosions.
9) Do not disassemble or modify the instrument in any way. This can result in fire, electrical shock or
malfunction, and also voids your warranty.
3. Precautions and warnings regarding instrument installation
1) This is a precision instrument. Do not install in a location exposed to direct sunlight.
2) Install the instrument on a flat, solid surface that is flat and does not move.
3) When installing the instrument, make sure at least 15 cm separate the instrument from the nearest
wall.
4) Take caution not to damage the cooling fan mesh (located on the front-bottom) while installing.
5) When connecting the PC, network hub and ExiPrepTM16 Pro, do so with all involved components
powered off. Connecting components while the power is on may cause damage to the instrument.
6) Verify the network cable integrity when connecting between the PC, network hub and ExiPrepTM16
Pro. Unstable network connections may result in invalid experimental data from data communication
errors.
4. Precautions and warnings regarding instrument operation
1) Dust off the power plug and insert the plug so that the connection is firm and does not wiggle.
Incomplete electrical contacts may cause fire.
2) Operate the instrument in an ambient temperature range of 15 ~30 . Excessive exposure to heat℃℃
may affect the instrument and yield inexact results.
3) Operate the instrument within the recommended humidity range (20~80%, no condensation). Humid
conditions may cause corrosion or malfunction.
4) Do not place any objects next to or behind the instrument. The instrument may malfunction.
5) This instrument contains precision machined parts. Do not drop or severely agitate the instrument.
This can break the instrument and compromise the safety of the product.
6) When not using the instrument for a long period of time, turn the instrument off and unplug from the
wall outlet. Overheating and fire may occur.
7) Take caution not to damage the cooling fan mesh located on the front-bottom of the instrument. If

ExiPrepTM16 Pro
Fully Automated Nucleic Acid Extraction System
A4(210X297)
-4-
the mesh is damaged and the Cooling Fan does not work, the Cooling Fan motor and cooling
element may overheat and cause fire.
8) Set your PC's Power Options for 'Turn off the display', 'Turn off the hard disk', 'Standby mode' and
'Sleep mode' to 'Never'. Because the instrument continuously transmits and receives data from the
PC, hard disk power-down may cause malfunctions.
9) The instrument automatically turns off the UV lamp and its operation when the instrument’s door is
open. However, just in case it does NOT turns off when the door is open, please make sure the UV
light does not directly expose to your eyes and skin.
5. Precautions and warnings regarding product usage and maintenance
1) This product must only be used for nucleic acid extraction and automatic aliquot. Do not use the
instrument for any use other than explicitly stated in the User Manual.
2) Do not modify or delete instrument-related information installed within the instrument.
3) Operate the LCD touchscreen using a non-sharp object. Nails and other sharp objects may damage
the product.
4) The instrument UV lamp will only operate if the door is completely shut. Make sure the door sensor
is free of foreign materials or obstructions.
5) Do not use powerful detergents or solvents to clean the outside of the instrument as this may cause
discoloration. If such chemicals are spilled on the instrument, immediately clean with a soft cloth.
6) Do not keep the instrument in an environment with high humidity. Damage from storage in these
conditions is classified as water damage and is not covered by warranty. Also, damage arising from
this type of exposure may be irreparable.
7) Disassembly and/or modification of the instrument voids the warranty and may be refused service.
8) Do not unplug the power adapter from the instrument while the instrument is in use. This may cause
the instrument to break.
9) If a burning smell is detected or the instrument seems to be excessively hot during operation,
immediately stop using the instrument and call your service representative.
10) Do not drop or impact the instrument. This is a direct cause of instrument damage and may void the
warranty.
11) Always verify that the Heating Block is in normal position before pulling out the Base Plate. If the
Base Plate is pulled out while the Heating Block is not in its normal, initialized position, the
interference in movement can cause Heating Block and other internal component damage and lead
to instrument malfunction. Since installed Buffer Cartridges obscure the view, re-initialize the
instrument or take out the Buffer Cartridges and visually inspect the position of the Heating Block
before pulling out the Base Plate.
12) Take caution not to damage the cooling fan mesh located on the front-bottom of the instrument. If
the mesh is damaged and the Cooling Fan does not work, the Cooling Fan motor and cooling
element may overheat and cause fire.

ExiPrepTM16 Pro
Fully Automated Nucleic Acid Extraction System
A4(210X297)
-5-
13) The instrument automatically turns off the UV lamp and its operation when the instrument’s door is
open. However, just in case it does NOT turns off when the door is open, please make sure the UV
light does not directly expose to your eyes and skin.
14) When there is liquid in the Waste Tray in the equipment, take extra caution to push-in or pull-out the
base plate so the liquid does NOT overflow to the instrument inside. If the liquid overflows inside the
instrument, it may damage the instrument or cause the electrocution.
6. UV Lamp
1) UV lamp operation may create Ozone molecules. For the safety issue, the instrument is pre-
programmed the UV lamp operation for 5 minutes only. Please do NOT extensively use UV lamp
operations.
2) The Ultraviolet (UV) ray can seriously damage your eyes and skin when exposed directly (even
through indirectly). When you deal with UV lamp, make sure you are wearing proper protective
equipment.
ExiPrepTM16 Pro
Fully Automated Nucleic Acid Extraction System
A4(210X297)
-6-
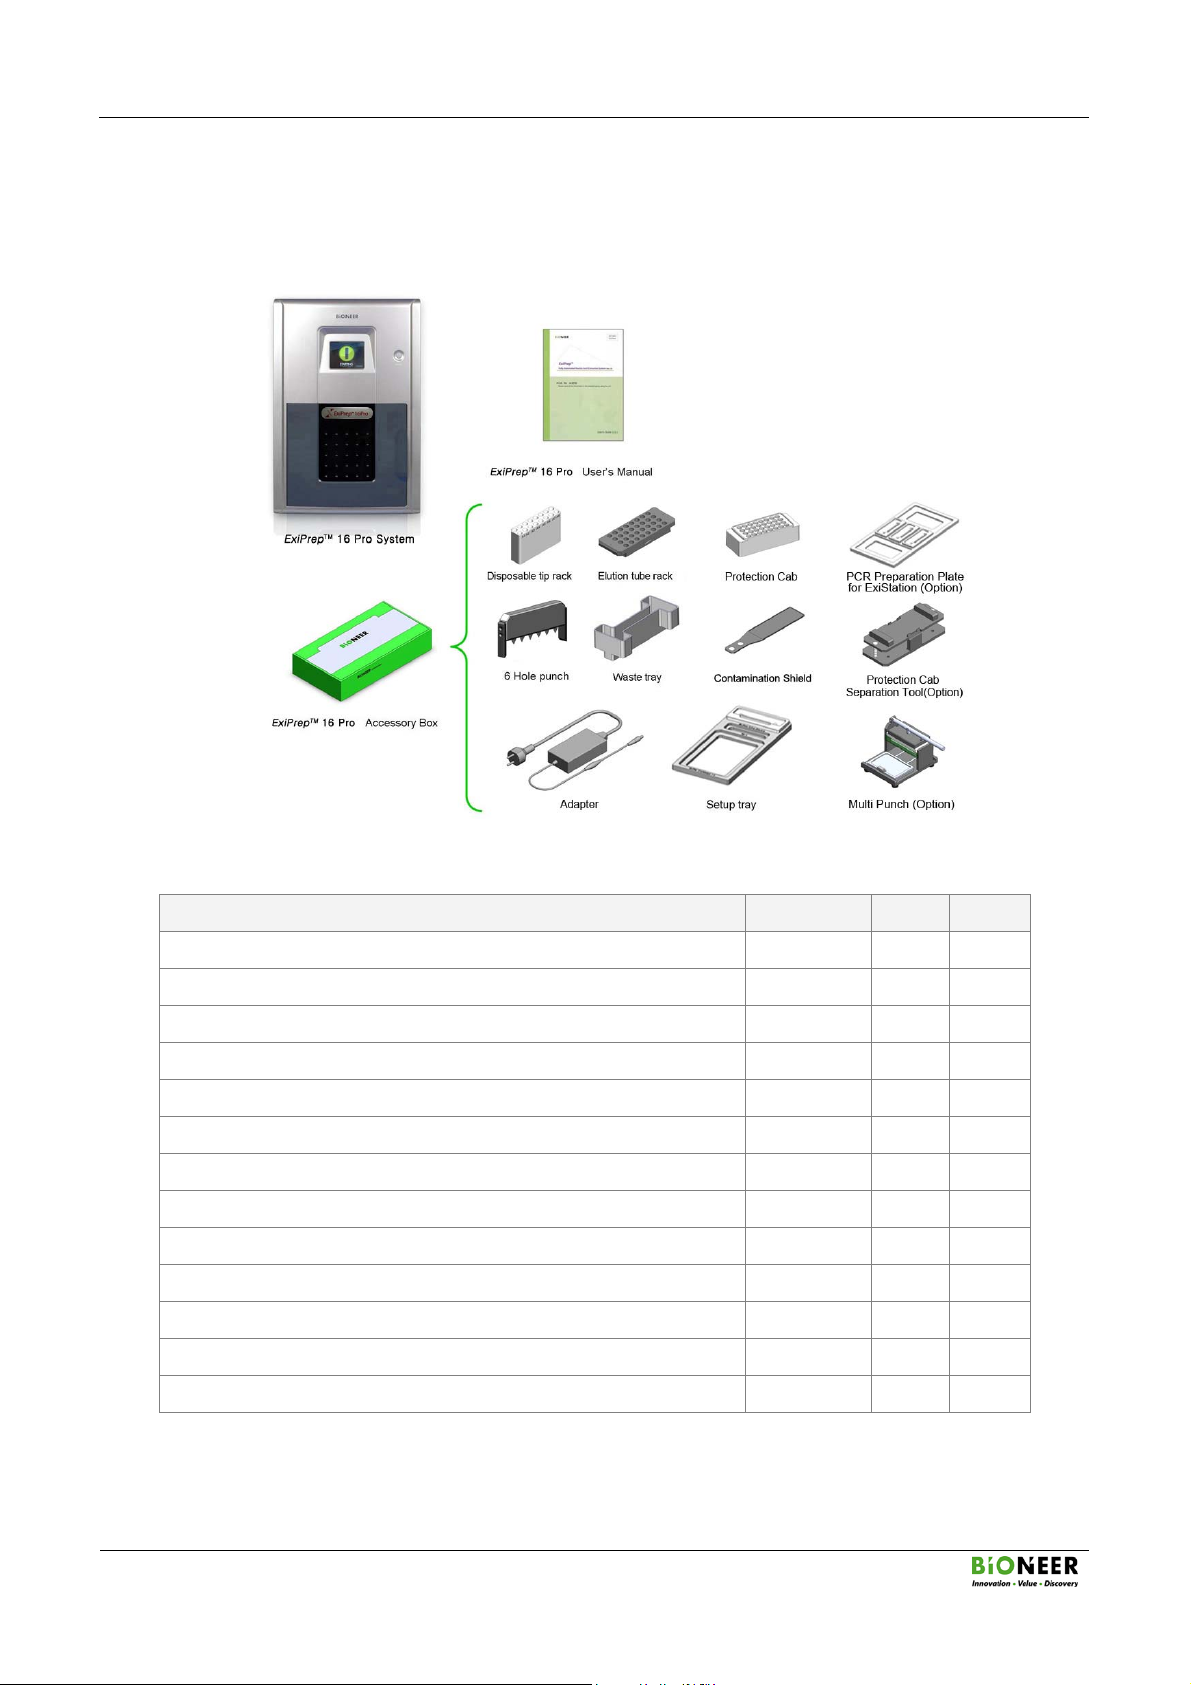
III. System Components and Specifications
1. System Components
- PCR preparation plate: It is used for ExiStationTM system instead of Setup tray.
Part Name Cat. No. Qty. Check
ExiPrep™16 Pro A-5040 1 ea □
User’s Manual 1 ea □
Waste Tray 1 ea □
Elution Tube Rack 1 ea □
Disposable Tip Rack 1 ea □
Protection Cab 1 ea □
Contamination Shield 1 ea □
6 Hole Puncher 1 ea □
Setup Tray 1 ea □
Adapter 1 set □
(Option) Multi Puncher -
(Option) Protection Cab Separation Tool -
(Option) PCR Preparation Plate for ExiStationTM -

ExiPrepTM16 Pro
Fully Automated Nucleic Acid Extraction System
A4(210X297)
-7-
2. Specifications
Dimensions (mm) 320 (W) x 500 (H) x 535 (D)
Weight 27 kg
Operating temperature 15 – 30°C
Operating humidity 20 - 80%, no condensation
Operating system Standalone or PC
Electrical (Voltage / Frequency) 100- 240 VAC, 50/60 Hz
Network support TCP/IP protocol
User interface 320 x 240 touch screen TFT LCD, 18 bit color
3. System Views
ExiPrepTM16 Pro
Fully Automated Nucleic Acid Extraction System
A4(210X297)
-8-
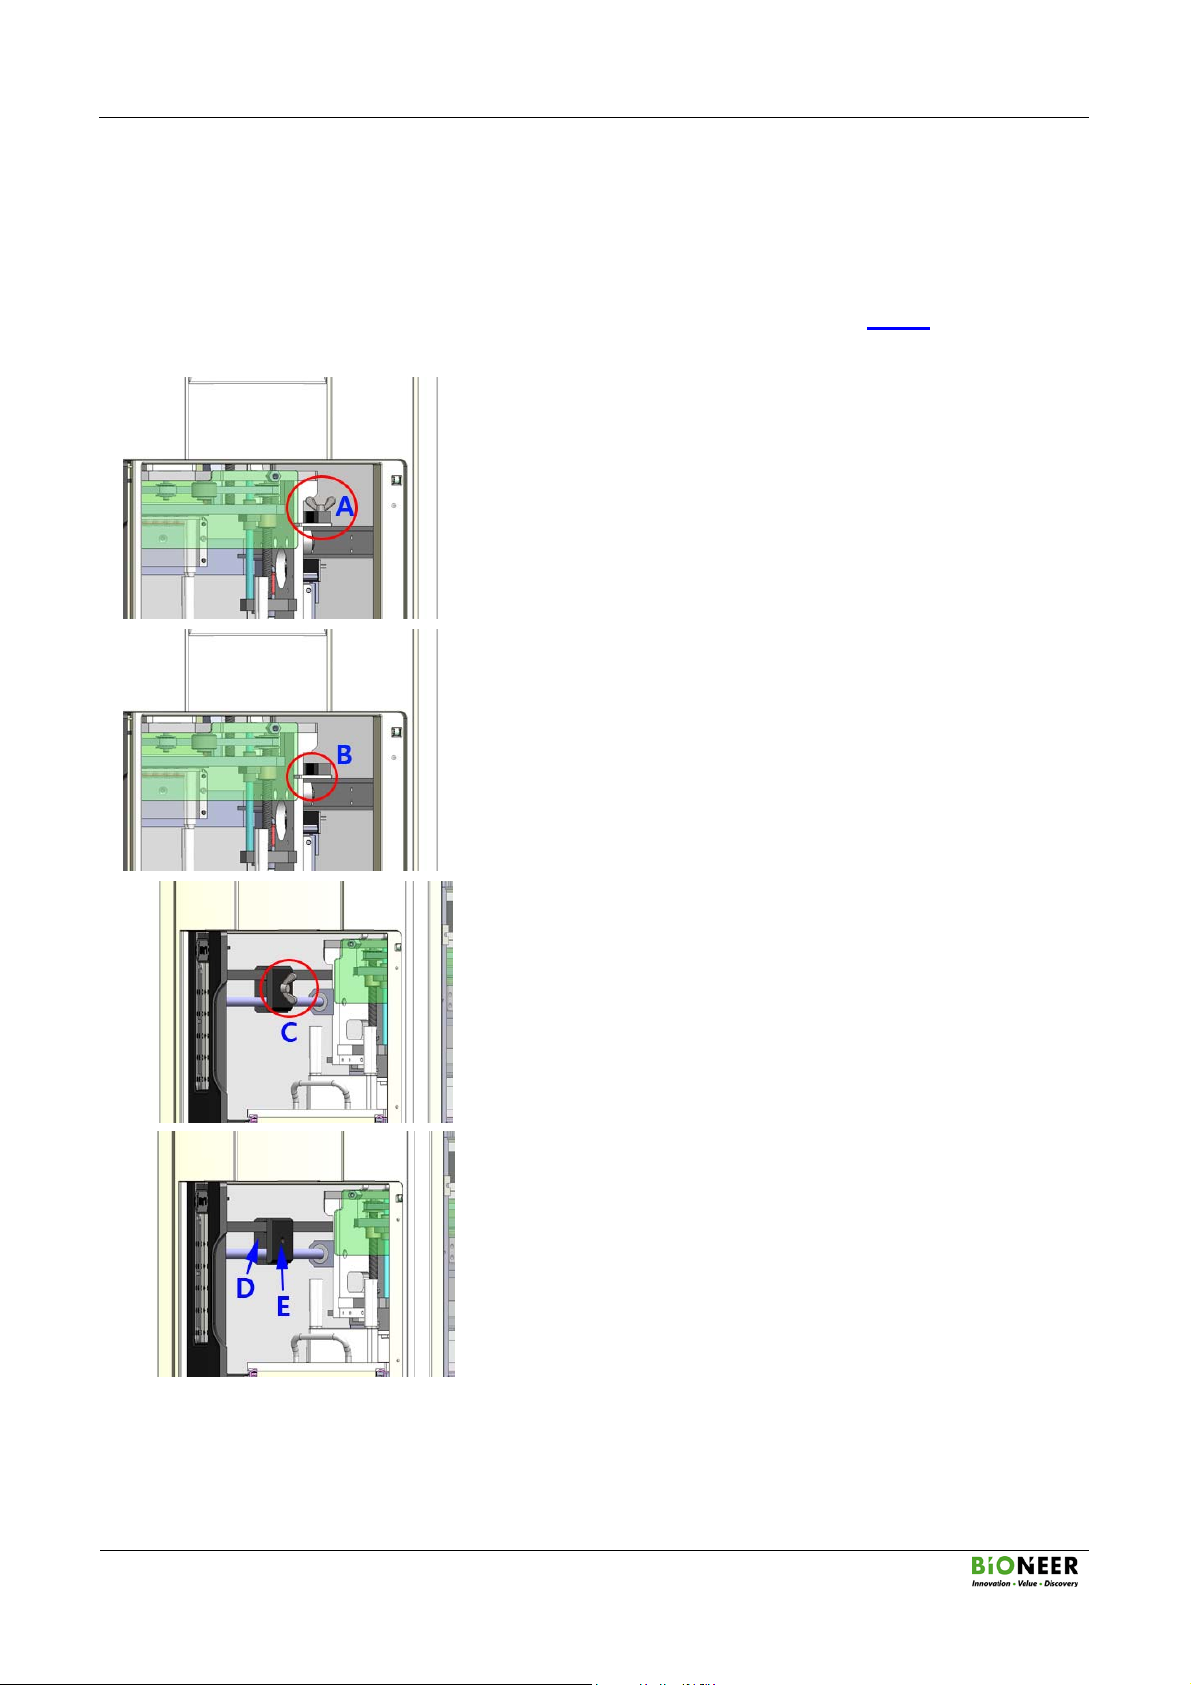
IV. Installing the ExiPrep™16 Pro
- Clear and clean the area where the instrument will be installed.
- Open the instrument door and remove the belt tie and rail bolt.
- Make sure that all components are included. Refer to the list of components on page 6.
1. Open the door and remove the Screw-bolt (A) from the rail.
2. Remove the Plate (B) from the rail and the Syringe Block.
3. Remove the Screw-bolt (C) from the locking block which
immobilizes the belt.
4. Separate the Locking block (D, E) from the belt and remove
it.
ExiPrepTM16 Pro
Fully Automated Nucleic Acid Extraction System
A4(210X297)
-9-
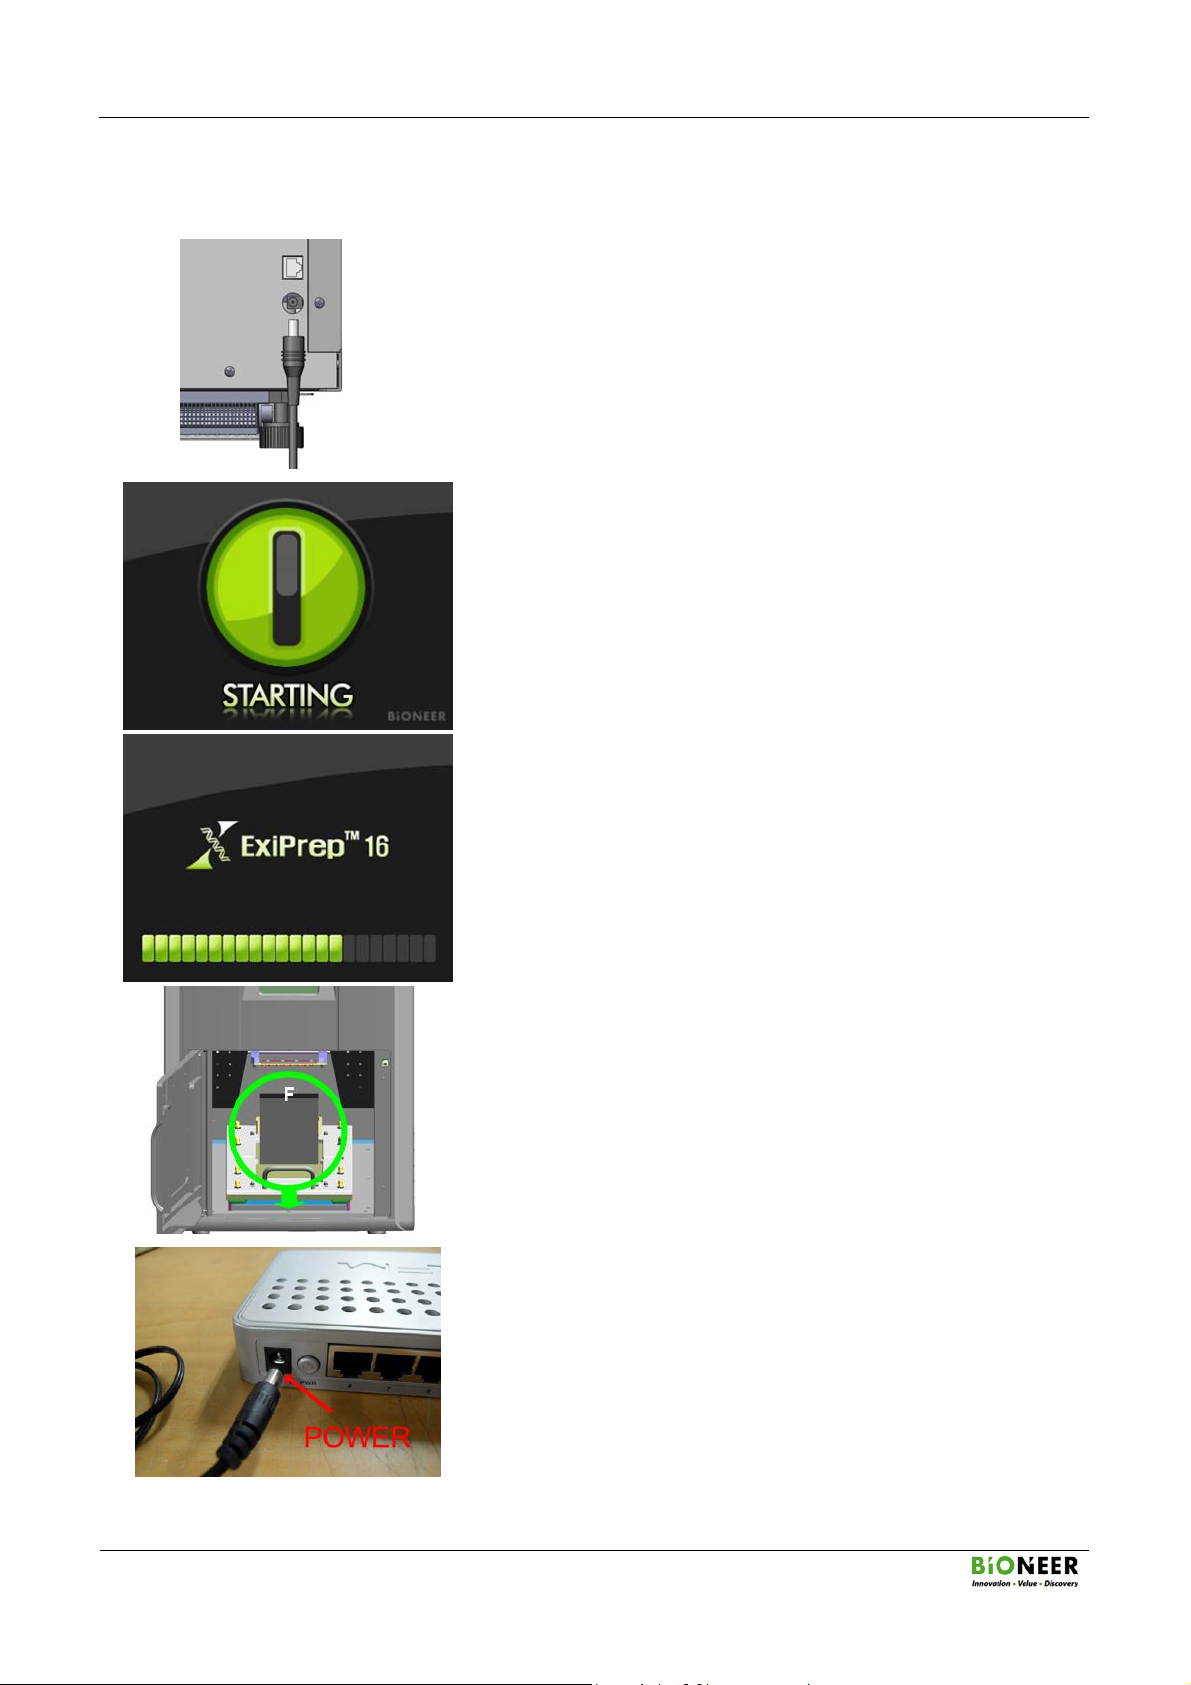
IV. Installing the ExiPrep™16 Pro (continued)
5. Connect the power cable to the rear of the instrument.
6. Turn on the instrument. A power button will display on the
LCD touch screen to indicate normal power on.
7. Press the power button on the LCD screen to initialize the
instrument. A progress bar on the lower portion of the LCD
touchscreen will indicate initialization progress.
8. Open the door and remove the Sponge block (F) from the
Base Plate after initialization.
※ PC connect mode
9. Connect the network hub power adapter to the network
hub and plug the adapter into a wall outlet.
ExiPrepTM16 Pro
Fully Automated Nucleic Acid Extraction System
A4(210X297)
-10-
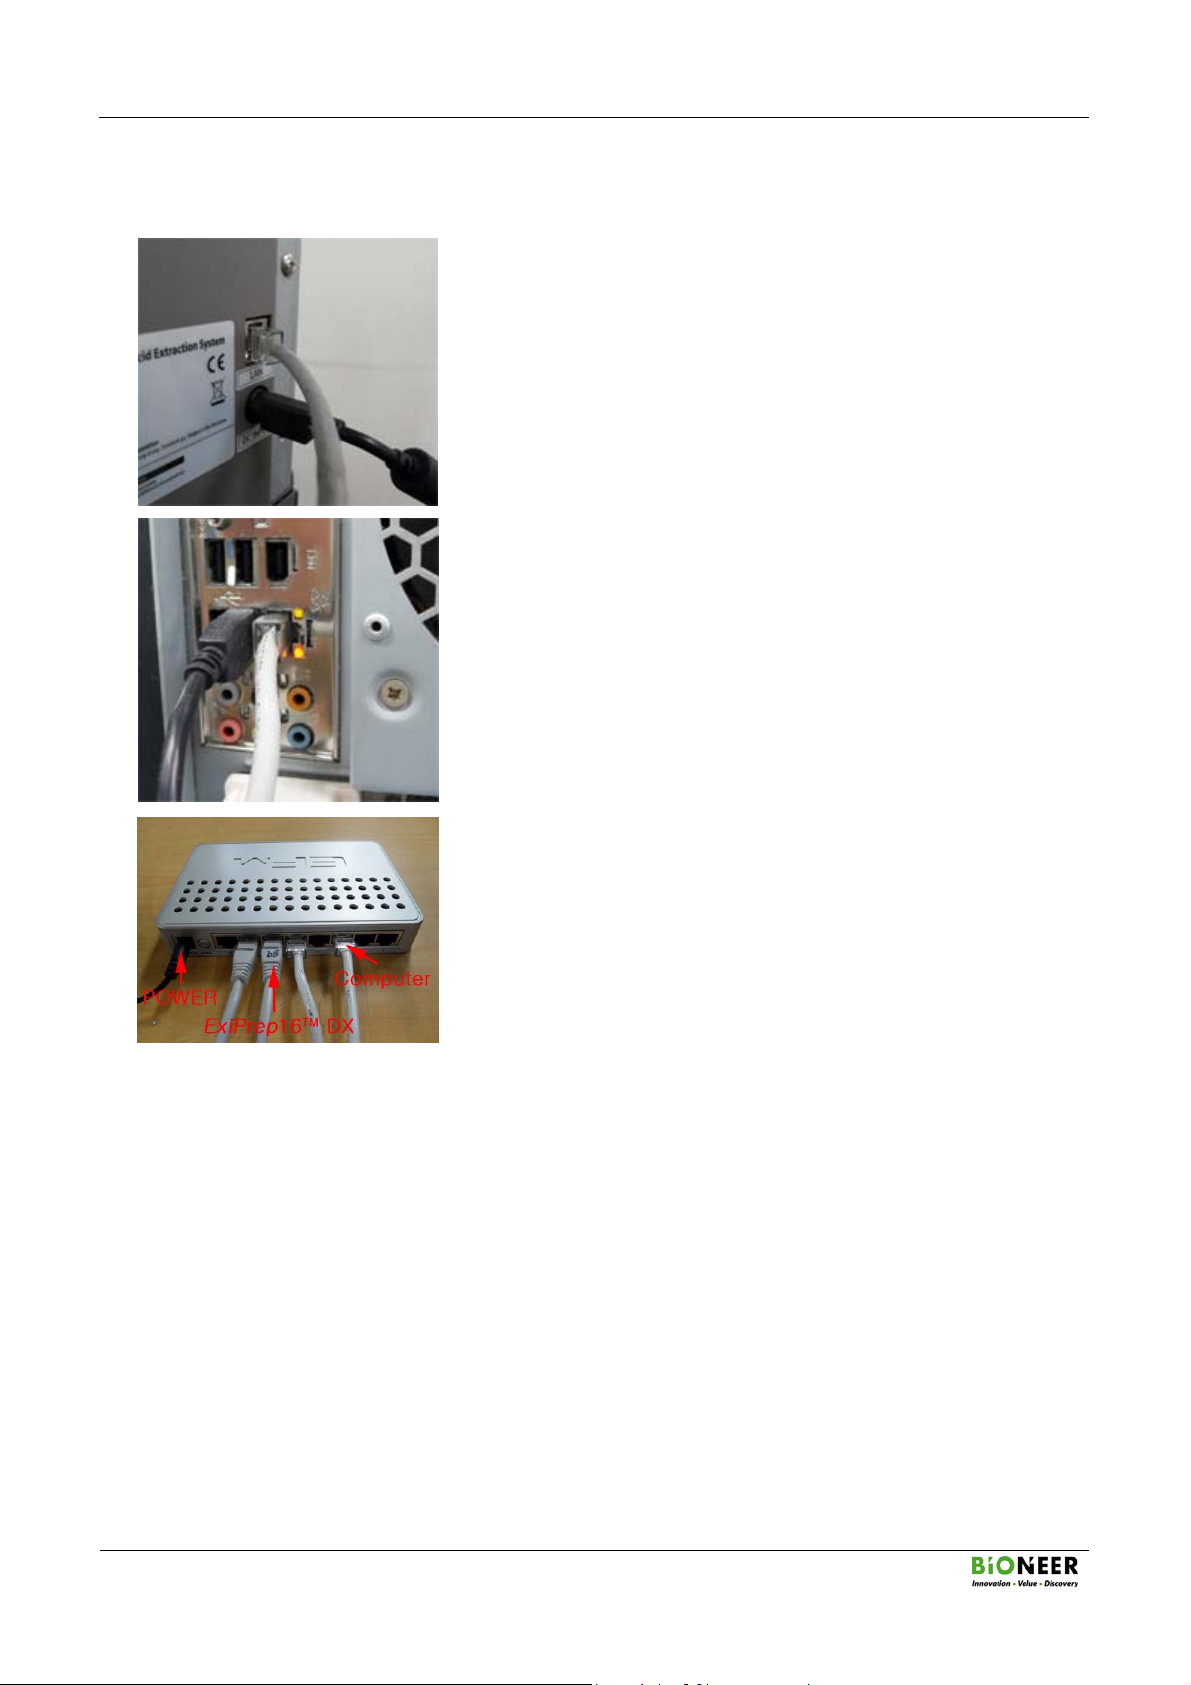
IV. Installing the ExiPrep™16 Pro (continued)
10. Connect the instrument to the network hub using a LAN
cable.
11. Connect a LAN cable between the network hub and the PC
which has the ExiStation™ Manager Software installed.
12. Installation of the instrument is complete.
ExiPrepTM16 Pro
Fully Automated Nucleic Acid Extraction System
A4(210X297)
-11-
V. DNA/ RNA Extraction
1. Contamination Shield Installation
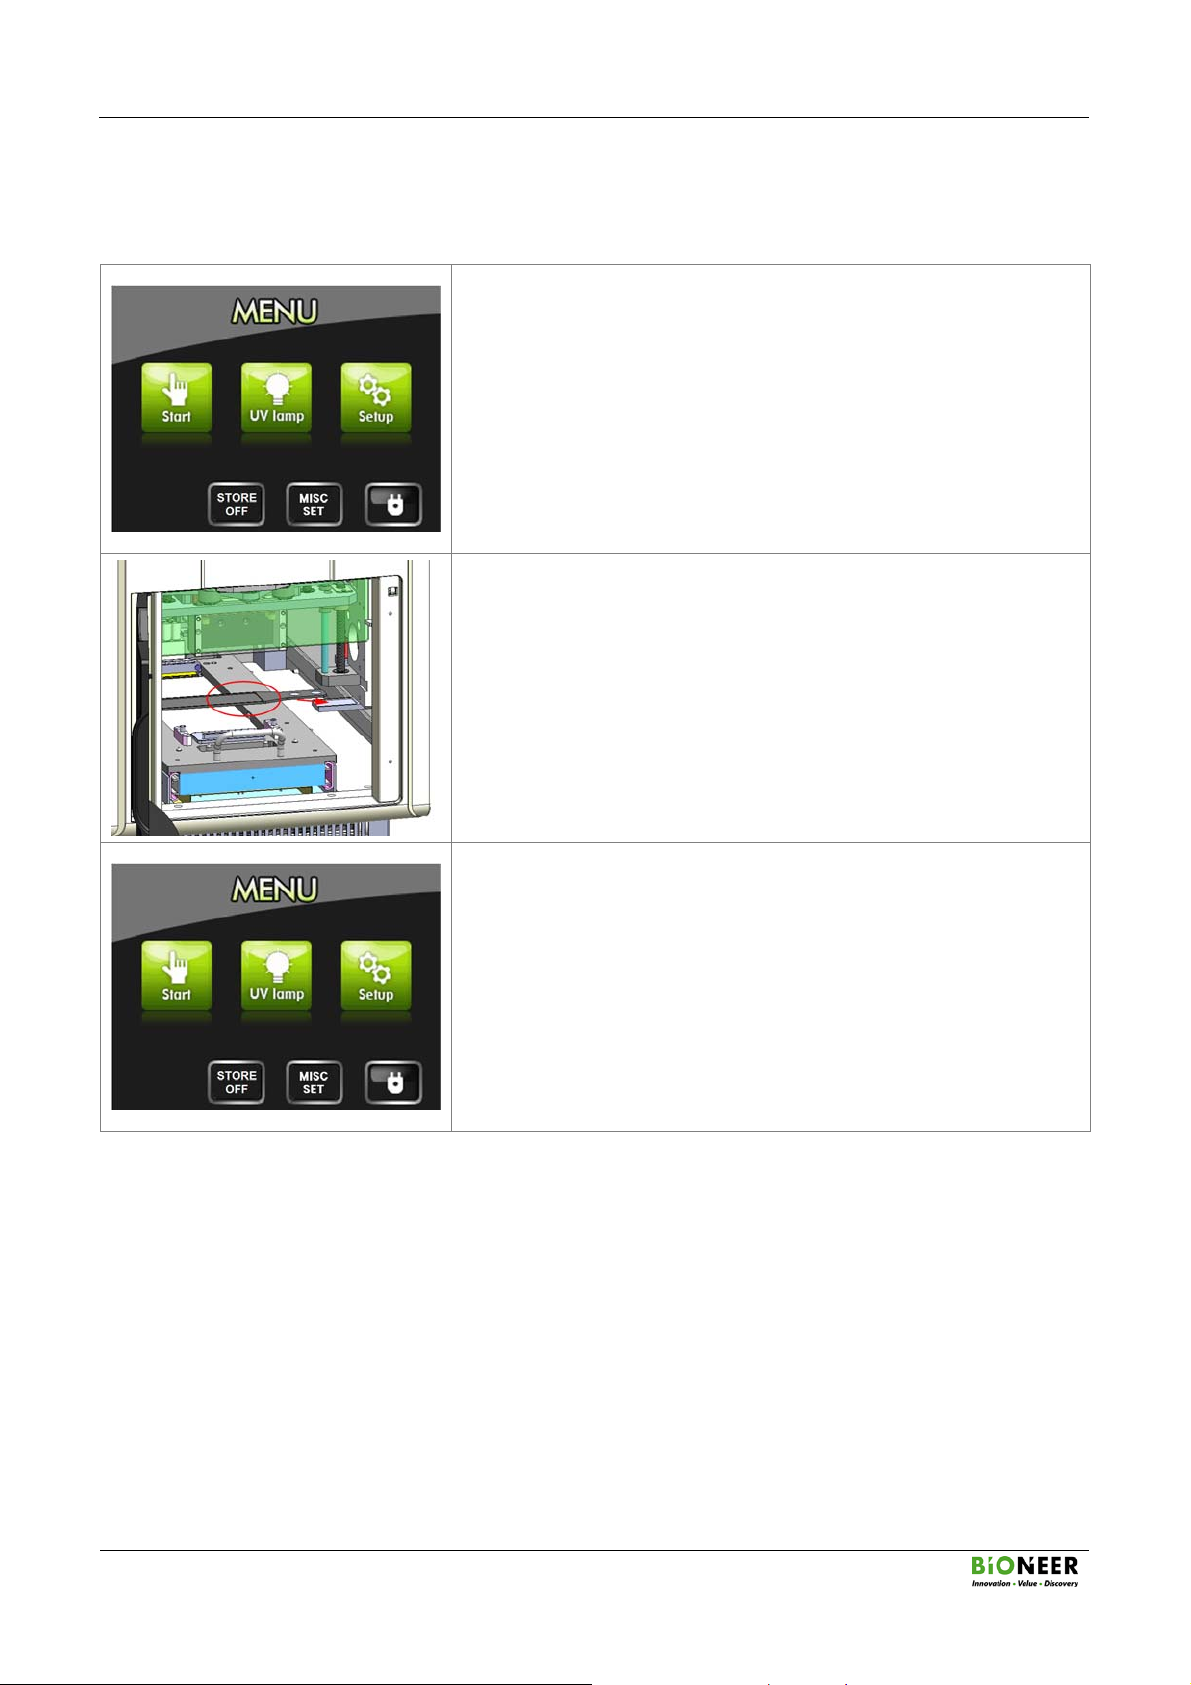
1. From the ‘Menu’ screen, click ‘MISC SET’.
¾Pull out the Syringe block all the way front (outside)
Contamination Shield.
CAUTION!
In order to use contamination shield, this must be installed on
the Base plate accessory.
2. Place the contamination shield on the lower-right side of the
Syringe block.
¾Contamination shield has a magnet which means if you place
on the upside-down right, it will stick to the holding bar.
3. From the ‘Menu’ screen, click ‘MISC SET’.
¾The base plate moves back to the initialization position
(inside the instrument).
ExiPrepTM16 Pro
Fully Automated Nucleic Acid Extraction System
A4(210X297)
-12-
V. DNA/ RNA Extraction (continued)
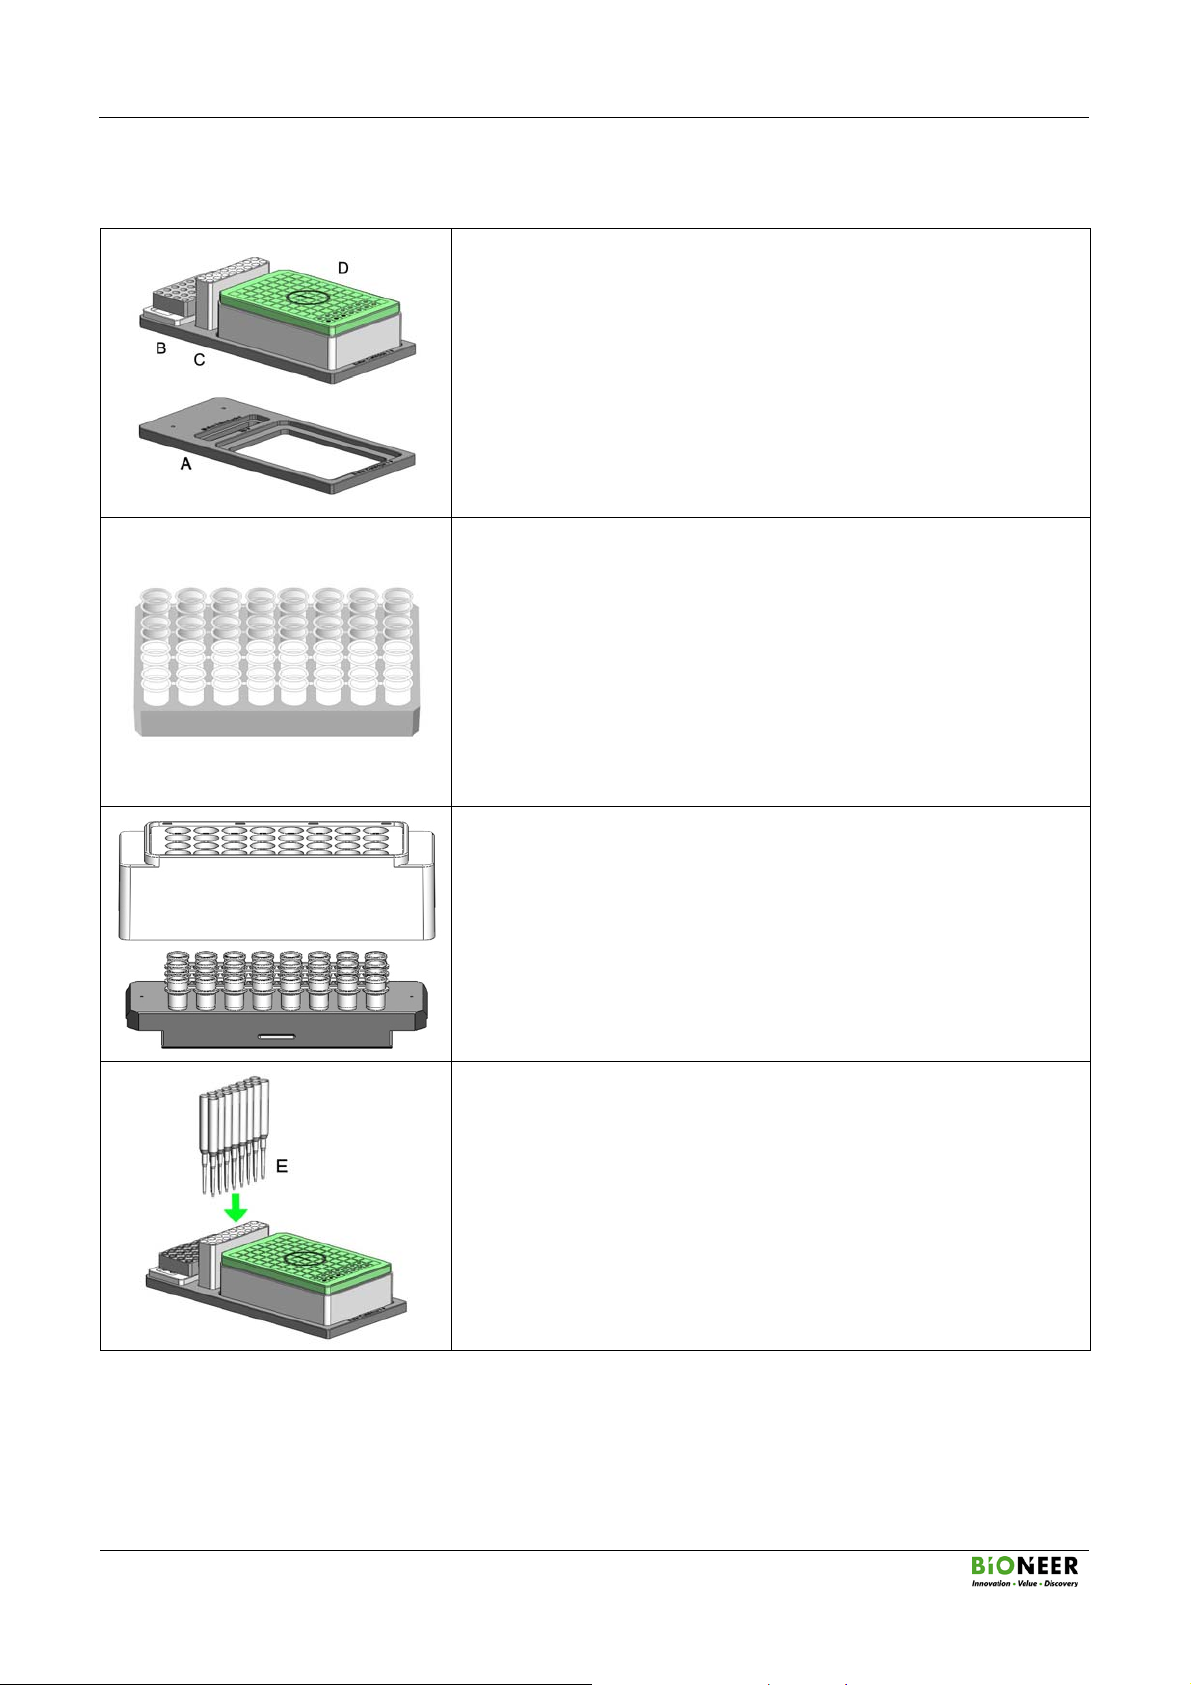
2. Sample Preparation
1. Place ‘Setup tray (A)’ on a flat surfaced desk.
2. On the Setup tray, put on the ‘Buffer Cartridge ①(D)’,
‘Elution tube rack (B), ‘Disposable tip rack (C)’.
¾‘Setup Tray’ and ‘Tip Rack’ are supplied with ExiPrepTM16
Pro.
¾‘Buffer Cartridge’, ‘Disposable Tip’ and ‘Elution Tube’ are
supplied in the DNA/ RNA Extraction Kit.
3. Check DNA/ RNA extraction Kit for the samples and the
nucleic types to be extracted.
4. Place the number of sample tube (from the diagnostic kit) and
the elution tube to be extracted on the Elution tube rack.
¾You may cut the strips if necessary to match the number
tubes to samples.
¾Make sure front and rear sides of the Elution tube rack
before placing tubes.
5. Check the position of the Elution Tubes in the rack. Place the
Protection Cap (F) on to the rack until it clicks into place.
¾DO NOT press too hard on the Protection Cap.
6. Place the Disposable tip (E) for the elution on to the
Disposable tip rack.
ExiPrepTM16 Pro
Fully Automated Nucleic Acid Extraction System
A4(210X297)
-13-
V. DNA/ RNA Extraction (continued)
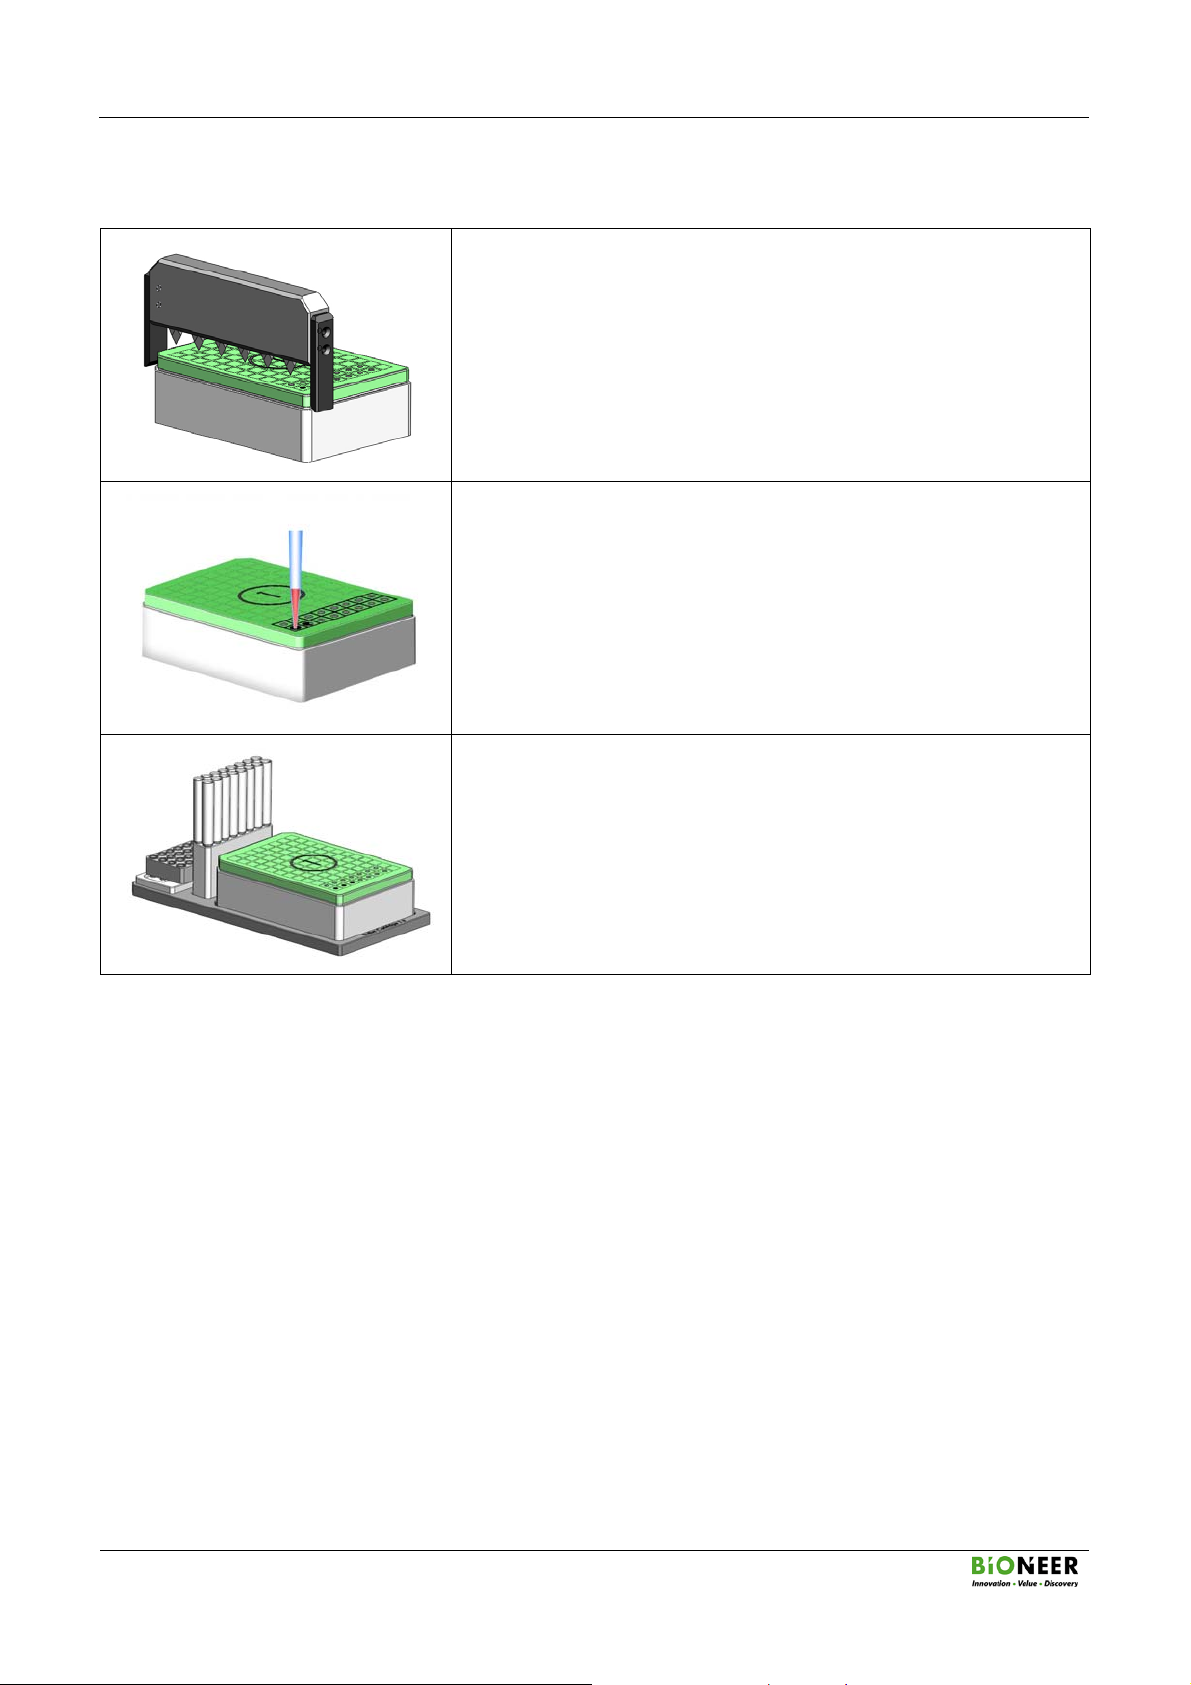
2. Sample Preparation (Continued)
7. Punch holes in the sealing film of Buffer Cartridge ①
corresponding to the relative location and number of tubes and
tips, using the 6 Hole punch tool.
8. Punch holes in sealing the film of Buffer Cartridge ②using the
6 Hole punch tool in the same pattern as Buffer Cartridge ①.
9. Place back the punched Cartridge on the Setup Tray.
10. Insert the sample into ‘Sample Loading Well’ of Buffer
Cartridge ①.
11. Complete the preparation for extraction.

ExiPrepTM16 Pro
Fully Automated Nucleic Acid Extraction System
A4(210X297)
-14-
V. DNA/ RNA Extraction (continued)
3. RUN (Not used PC)
1. Connect the power cable to the rear of the instrument and
separate the LAN cable of the instrument.
2. Press the ‘Store Off’ button to turn the Cooling Block and
cooling fan on. The Cooling Block maintains the Elution Tube
Rack at a low temperature to keep the eluted nucleic acids and
nucleic acid-diagnostic kit mix refrigerated.
3. Press the ‘START’ button to access the PREP SETUP screen.
4. Refer to the code list within this Manual or purchased Kit Manual
to select the three-digit code(37 page) applicable to your
desired nucleic acid and sample source type.
5. Verify the ‘Prep Type’ and ‘Sample SRC’ of the three-digit
code you have entered.
6. Press the ‘Enter’ button to access the ‘elution volume’
selection menu.
ExiPrepTM16 Pro
Fully Automated Nucleic Acid Extraction System
A4(210X297)
-15-
V. DNA/ RNA Extraction (continued)
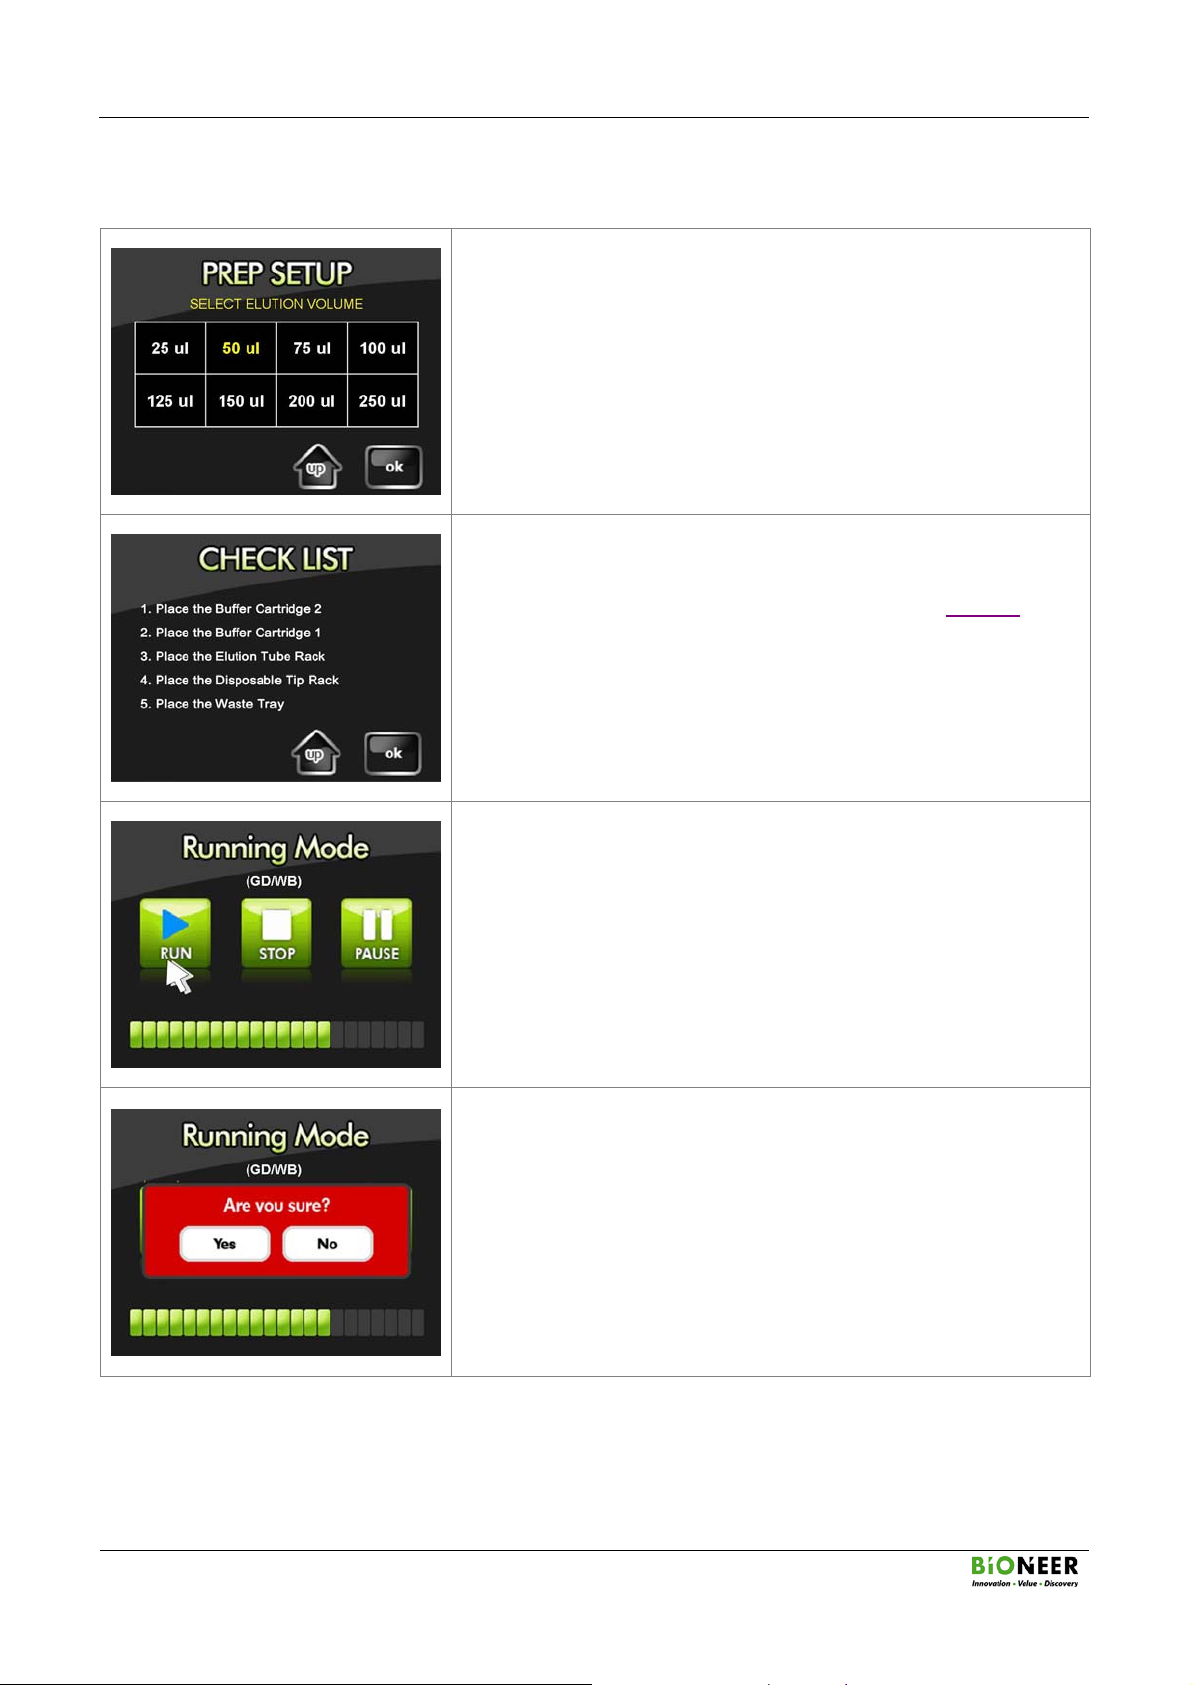
3. RUN( Not used PC) (Continued)
7. Select the ‘elution volume’ from the LCD touchscreen.
8. After selecting the desired ‘elution volume’ press ‘ok’ to
complete PREP SETUP.
9. Open the instrument door and pull out the Base Plate.
10. Place all racks and Buffer Cartridges in their respective locations
on the Base Plate according to the CHECK LIST(17 page) on
the LCD touchscreen.
11. Verify the name of the target nucleic acid type and sample
source type on the Running Mode screen, and press the ‘RUN’
button.
¾Progress of the extraction run can be checked through the
progress bar on the lower portion of the LCD touchscreen.
12. You may press the ‘STOP’ button during the run to terminate the
extraction.
¾If you press ‘STOP’ during an extraction run, a popup
prompt asking you whether you are sure (‘Are you sure?’)
will appear. Select ‘Yes’ to terminate the run, or ‘No’ to
cancel the stop and proceed with the extraction run.
¾You may select ‘PAUSE’ to temporarily stop the run and
‘RUN’ to resume.

ExiPrepTM16 Pro
Fully Automated Nucleic Acid Extraction System
A4(210X297)
-16-
V. DNA/ RNA Extraction (continued)
3. RUN( Not used PC) (Continued)
13. After the extraction run is complete, pull out the Base Plate and
remove the Elution tubes, Buffer Cartridges and all racks from
the Base Plate. After removing all accessories, push the Base
Plate back in completely and close the door.
14. You are given three options at this point:
¾Still remains same work: Repeat the current protocol.
¾Do other work: Perform an extraction run using a different
protocol for another nucleic acid and sample source type.
¾Finish: Finish and exit.
15. If the automatic UV-sterilization option is enabled, a popup
prompt will appear warning you not to open the door as UV
sterilization is in progress. Details can be found in page 30.
16. Press the ‘START’ button to initiate sterilization
¾Select ‘SKIP’ if you wish to pass sterilization.
17. The sterilization process takes 5 minutes. Progress can be
checked through the progress bar.
18. Remove the contamination shield. Detail can be found on page
11.
19. Press the ‘Store On’ button to turn the Cooling Block and
cooling fan off.
ExiPrepTM16 Pro
Fully Automated Nucleic Acid Extraction System
A4(210X297)
-17-
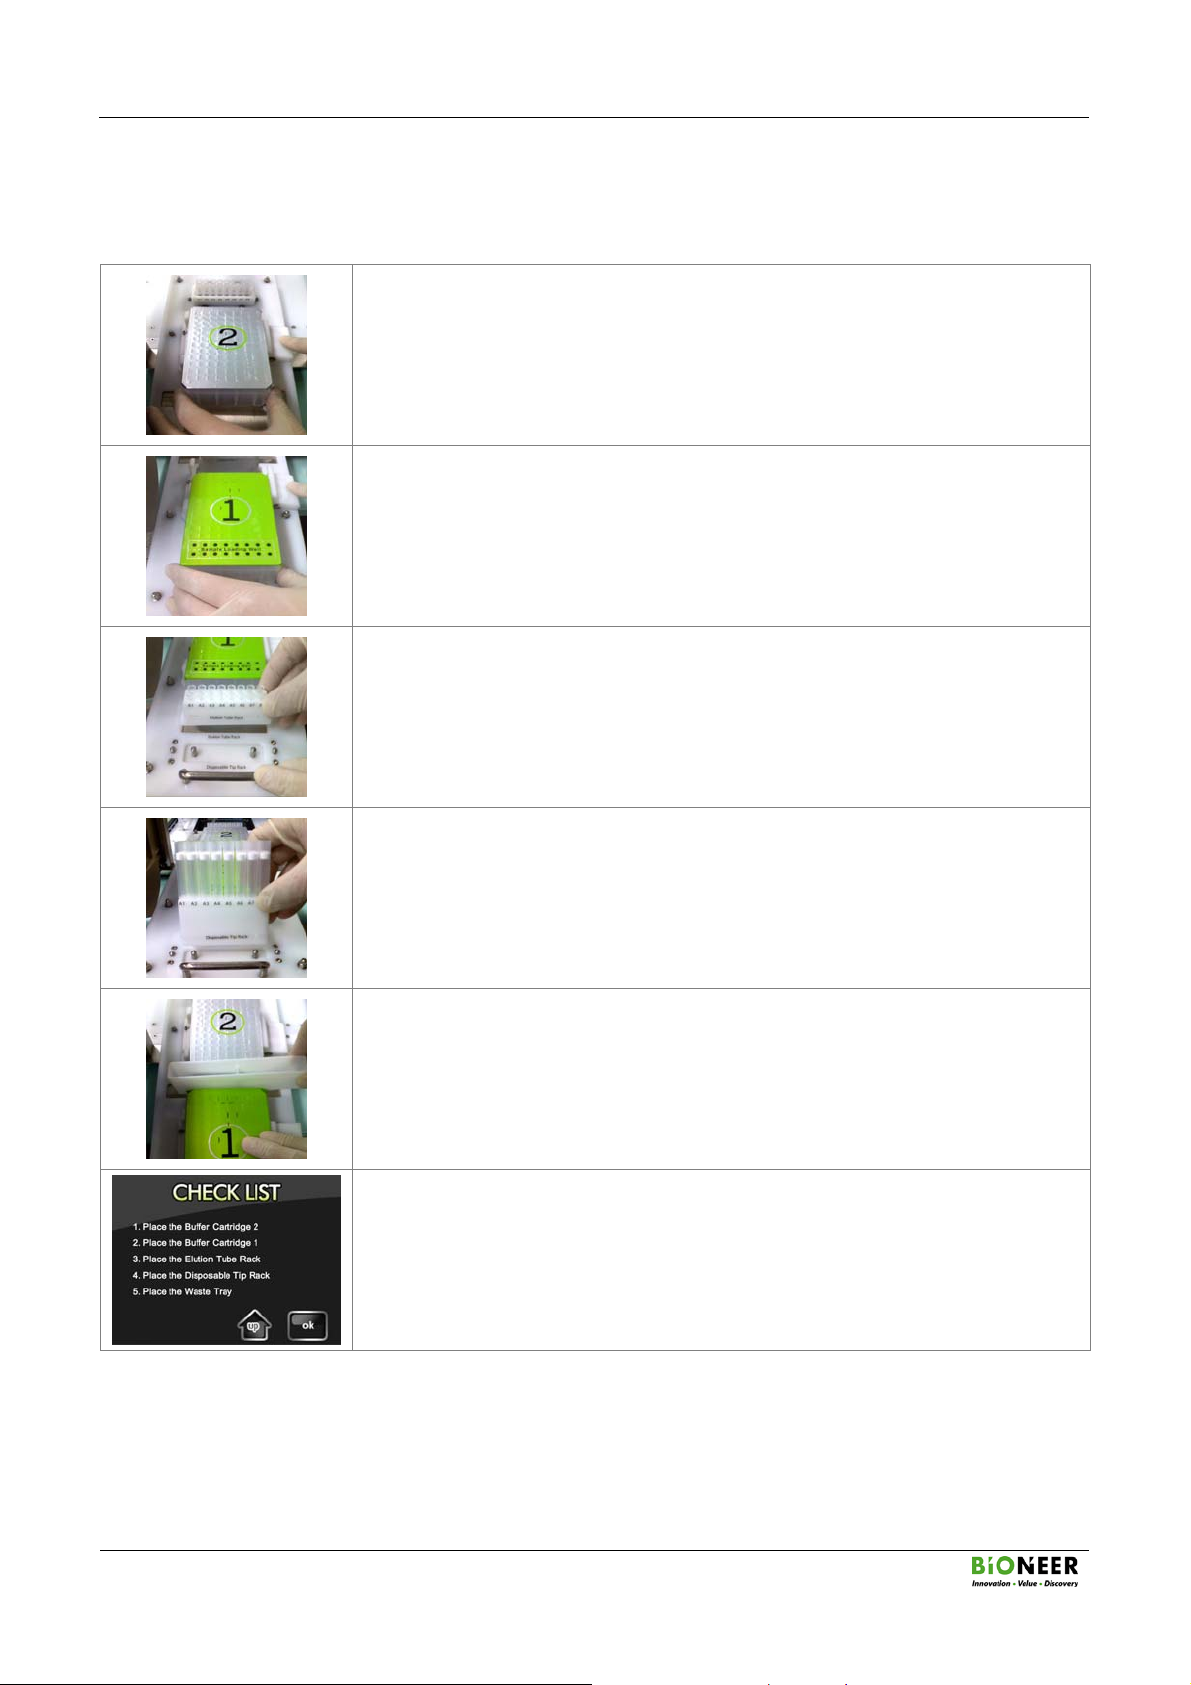
※Setup process according to the CHECK LIST
10a. Insert Buffer Cartridge ②on the Base plate.
¾Make sure the Buffer Cartridge fits snugly and exactly into its place.
Misplacement of the Buffer Cartridge may result in instrument break
down and malfunction.
10b. Insert Buffer Cartridge ①on the Base plate.
¾Make sure the Buffer Cartridge fits snugly and exactly into its place.
Misplacement of the Buffer Cartridge may result in instrument break
down and malfunction.
10c. Place the Elution tube rack on the Base plate.
¾Make sure the direction and location of the Elution tube rack is correct.
10d. Place the Disposable tip rack on the Base plate.
¾Make sure the direction and location of the Disposable tip rack is
correct.
10e. Place the Waste tray into the gap between Buffer Cartridges ①and ②.
10f. Push the Base Plate in completely and close the door.
¾Press the ‘ok’ button to complete.
.

ExiPrepTM16 Pro
Fully Automated Nucleic Acid Extraction System
A4(210X297)
-18-
VI. ExiStation™ Manager Software
1) Press the instrument power button located on the upper-right side to turn the instrument on. Initialize the
instrument by pressing the power icon initially displayed on the LCD touchscreen.
2) Execute the ExiStation™ Manager Software on the computer.
3) Clicking on the ExiPrep™ image will execute the ExiPrep™16 Pro control software module. The
software module is pictured below.
Table of contents
Other Bioneer Laboratory Equipment manuals

Bioneer
Bioneer Exicycler 96 Use and care manual

Bioneer
Bioneer ExiPrep K-3200-CB User manual

Bioneer
Bioneer ExiPrep 16 Plus User manual

Bioneer
Bioneer ExiPrep 16 Dx User manual

Bioneer
Bioneer Exiprep 96 Lite User manual

Bioneer
Bioneer ExiPrep 16 Dx User manual

Bioneer
Bioneer AccuLoader A-5251 User manual

Bioneer
Bioneer Exicycler 384 User manual

Bioneer
Bioneer ExiPrep K-3200-CB User manual

Bioneer
Bioneer AllInOneCycler User manual


