manuals.online logo
Brands
  1. Home
  2. •
  3. Brands
  4. •
  5. Bobrick
  6. •
  7. Dispenser
  8. •
  9. Bobrick Contura Series Operating and maintenance manual

Bobrick Contura Series Operating and maintenance manual

INSTRUCTIONS FOR INSTALLATION AND MAINTENANCE
Bobrick ConturaSeries®Model B-4112 Surface-Mounted Soap Dispenser
INSTALLATION:
Lavatories: Locate dispenser so that spout will be over the lavatory. Allow a minimum of
4'' (100mm) clearance between top of dispenser and bottom of any shelf, cabinet, or other
projection to provide enough space to fill dispenser conveniently.
TO ATTACH WALL PLATE WITH SCREWS, place screws in the three holes provided.
The surface on which unit is to be mounted determines type of screws required for best
installation.
For plaster or dry wall on studs, provide concealed backing and secure dispenser wall
plate with mounting screws furnished by manufacturer. Backing must comply with local
building codes.
For hollow tile partitions and other instances where applicable, use 1/8'' (3mm) round-
head toggle bolts.
For brick, concrete, or solid tile walls, use screws furnished with #8 (4mm) fiber plugs
or provide 1/8'' (3mm) toggle bolts or expansion bolts.
TO MOUNT DISPENSER:
1. Open filler-top by inserting BobKey (24-17) into slot of filler-top and then sliding latch to the left. Lift up filler-top.
2. Using screwdriver as shown (See Figure 1), loosen locking-screw (A).
3. Position dispenser so that edges of back plate (B) fit into grooves of wall plate and then press dispenser down into place (See Figure 2).
4. Tighten locking-screw against washer.Dispenser locks into place when point of locking-screw is lodged under lug (C) of wall plate
(See Figure 2).
CAUTION: Failure to tighten screw securely may cause dispenser to leak when filled above this point.
5. Close and lock filler-top by reversing operation in step 1.
MAINTENANCE:
1. To fill dispenser, open filler-top by inserting BobKey (24-17) into slot of filler-top and then sliding latch to the left.Lift up filler-top.
Fill dispenser.To Prevent corrosion,use only chloride-free pH-neutral liquid soaps. Close filler-top and relock by inserting
BobKey into filler-top slot and sliding latch to the right.
NOTE: Bobrick liquid soap dispensers are designed to dispense commercially marketed all-purpose hand soaps
including liquid and lotion soaps,synthetic detergents,and antibacterial soaps containing PCMX and /orTriclosan.
Bobrick soap dispensers are not designed to dispense alcohol-based hand sanitizers or iodine-based surgical soaps.
2. Clean equipment operates better, lasts longer, and requires less maintenance.Wipe the unit daily, including the spout, using a
damp cloth.Use only water-soluble cleaners.Never use abrasive cleaners.Avoid allowing cleaning liquids to collect behind unit.
Periodically, remove unit from wall to clean back. Refer to technical bulletin TB-21 for further information.
3. Periodically clean the dispenser by pumping warm water mixed with soap from the dispenser through the vessel and valve to flush
out contaminants or dried soap residue. Never use abrasive cleaners.
4. If the soap valve fails to operate satisfactorily, the problem may be caused by dried soap or dirt clogging the spout or the soap
valve. TO REMEDY: Clean spout with end of BobKey and/or flush the dispenser as described above.
5. Do not disassemble the soap valve.NOTE:If for any reason the valve becomes nonfunctional, a new soap valve replacement kit
(Part No. 4112-79) must be ordered.
7''
180mm
9/16''
15mm
6-1/8''
155mm
A
C
B
FIGURE 3
FIGURE 2FIGURE 1
continued . . .
INSTRUCTIONS FOR INSTALLATION AND MAINTENANCE
Bobrick ConturaSeries®Model B-4112 Surface-Mounted Soap Dispenser
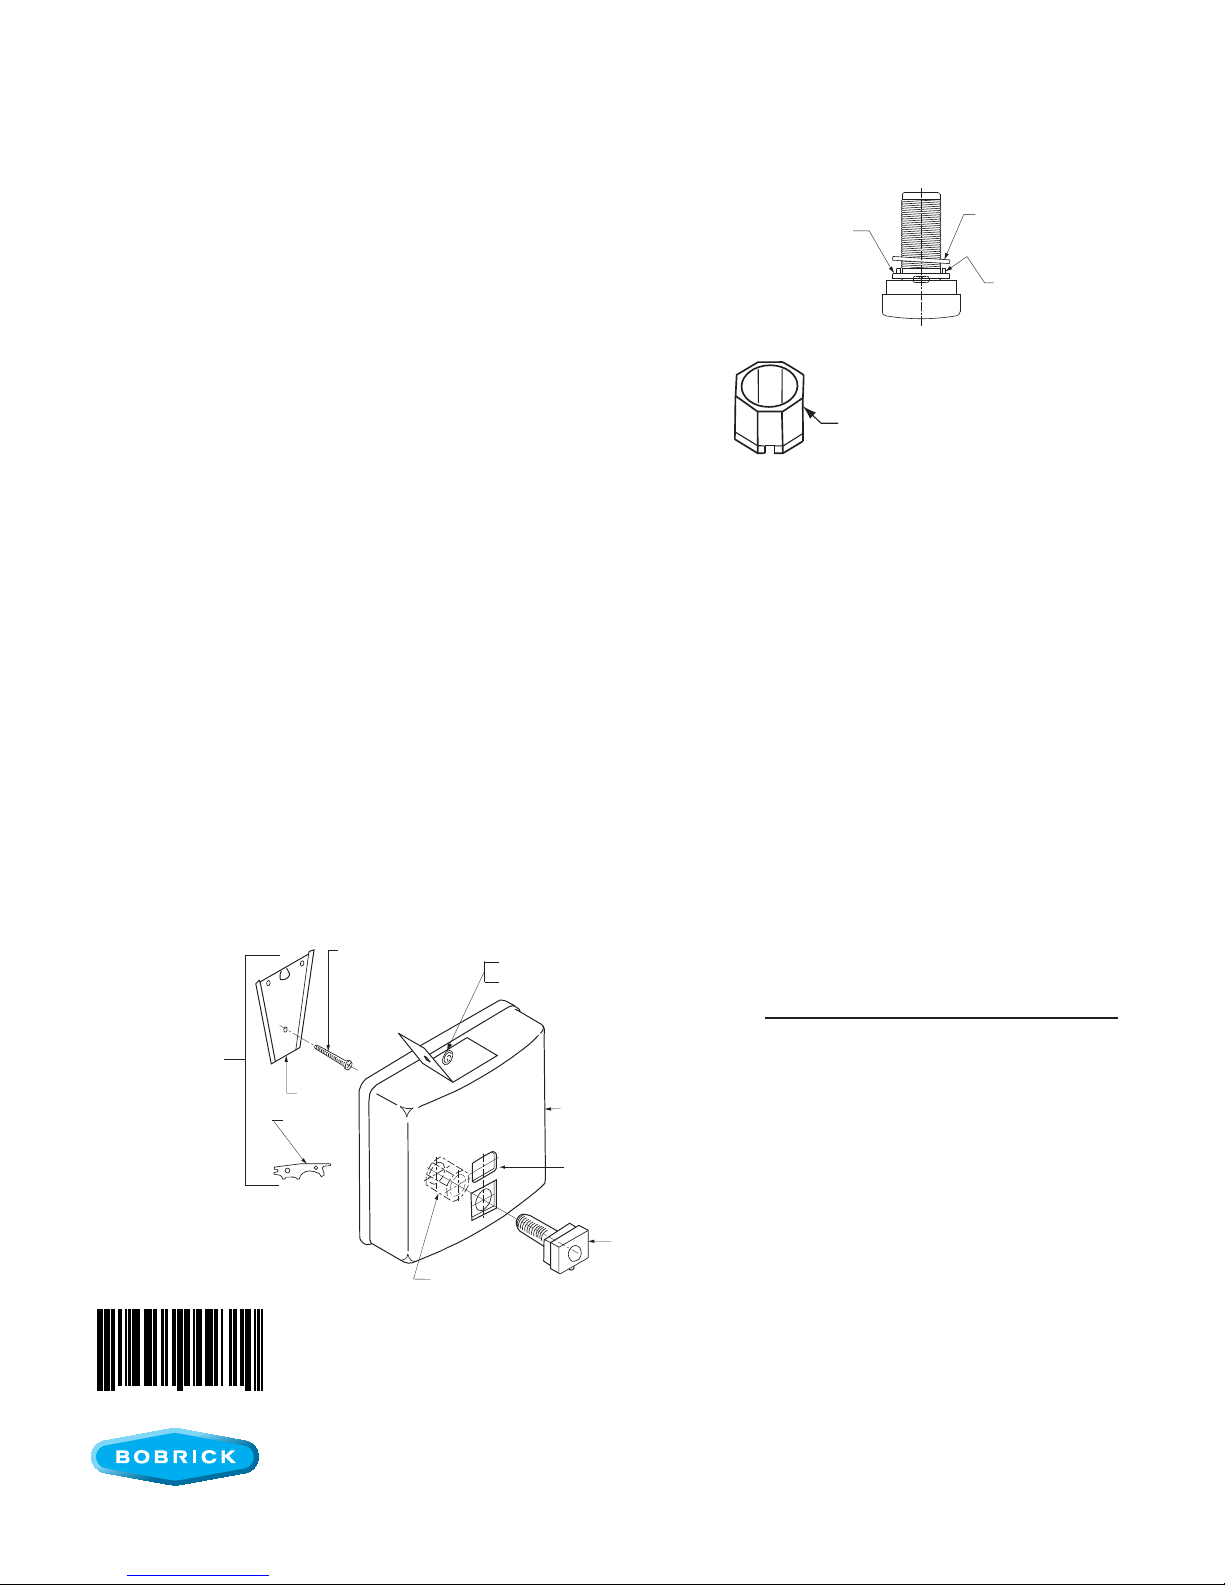
2. Cut plastic tabs off rear of soap valve face flush with indicated surface (See Figure 4).
3. Move flat rubber washer back to its initial position. Make sure flat edge of washer is even with the top of valve face.
4. Hold the collar nut with the 1" (25mm) closed-end wrench. Make sure the notch in the collar nut is facing toward the front of
the dispenser and position nut behind soap valve hole inside dispenser.
5. Screw new soap valve into collar nut, clockwise, until rear of valve face hits the front of the soap container.
6. Push the soap valve into the rectangular recess in the face of the soap container with spout facing downward.
7. Tighten collar nut with wrench until tight enough so that valve will not leak around seal at front of unit.
8. Install soap dispenser on wall bracket.
B. On Units With Notched Soap Valve Hole In Container
1. Hold the collar nut with the 1" (25mm) closed-end wrench. Make sure the notch in the collar nut is facing toward the front of
the dispenser and position nut behind soap valve hole inside dispenser.
2. Screw new soap valve into collar nut, clockwise, until rear of valve face hits the front of the soap container.
3. Push the soap valve into the rectangular recess in the face of the soap container with spout facing downward.
4. Tighten collar nut with wrench until tight enough so that valve will not leak around seal at front of unit.
5. Install soap dispenser on wall bracket.
Note: Should a refill-indicator window replacement be required, order part No. 4112-34.
VALVE REPLACEMENT INSTRUCTIONS
TO REMOVE VALVE:
1. Open filler-top by inserting BobKey (24-17) into slot of filler-top and
then sliding latch to the left. Lift up filler-top.
2. Loosen locking-screw inside dispenser. Remove dispenser from wall
and empty soap container.
3. Place 1" (25mm) closed-end wrench (provided) inside soap container
and over the large collar nut at rear of soap valve and loosen until face
of valve can rotate.
4. While holding the collar nut in place with the wrench, unscrew soap
valve from the front of the unit by rotating counterclockwise.
TO INSTALL VALVE:
A. On Units With Round Hole In Soap Container
1. Pull back flat rubber washer at rear of soap valve face to expose the
two plastic tabs.
REPLACEMENT PARTS LIST
Part Name Part No.
BobKey 24-17
Collar Nut for Valve 4112-19
Wall plate Assembly 4112-23
(wall plate, screws, BobKey)
Window Replacement Kit 4112-34
Aluminum Wrench 4112-41
Locking-Screw 4112-73
Valve Replacement Kit 4112-79
(Round Hole Units Only)
Plastic Tabs To Be Cut Off
Flat With This Surface
Plastic Tab (2)
Flat Rubber Washer
Moved Back To Expose
Plastic Tabs
Collar Nut
4112-19
Valve
Replacement Kit
4112-79
Collar Nut
for Valve
4112-19
BobKey
24-17
Mounting Screw
(3 Required)
Wall Plate
Assembly
(Wall Plate, screws,
and BobKey)
4112-23
Locking Screw
Washer for Locking Screw
Soap Container
Window
Replacement Kit
4112-34
Wall Plate
FIGURE 4
FIGURE 5
716954 00231 0
B-4112
In the U.S.A.: BOBRICK WASHROOM EQUIPMENT, INC.
200 Commerce Drive, Clifton Park, New York 12065-1350 • Tel: (518) 877-7444 • FAX: 518-877-5029
11611 Hart Street, North Hollywood, California 91605-5882 • Tel: (818) 982-9600 • FAX: 818-503-1102
100 Bobrick Drive, Jackson, Tennessee 38301-5625 • Tel: (731) 424-7000 • FAX: 731-424-7800
In Canada: BOBRICK WASHROOM EQUIPMENT COMPANY
45 Rolark Drive, Scarborough, Ontario M1R 3B1 • Tel: (416) 298-1611 • FAX: 416-298-6351
© 2008 by Bobrick Washroom Equipment, Inc.
Form No. 4112-269 Revised 12/08 Printed in U.S.A.

This manual suits for next models

1

Other Bobrick Dispenser manuals

Bobrick B-72974 Guide

Bobrick

Bobrick B-72974 Guide

Bobrick SureFlo B-8281 User manual

Bobrick

Bobrick SureFlo B-8281 User manual

Bobrick B-38030 Operating and maintenance manual

Bobrick

Bobrick B-38030 Operating and maintenance manual

Bobrick B-72974 Guide

Bobrick

Bobrick B-72974 Guide

Bobrick B-820-258 Programming manual

Bobrick

Bobrick B-820-258 Programming manual

Bobrick Designer B-840 User manual

Bobrick

Bobrick Designer B-840 User manual

Bobrick B-828 User manual

Bobrick

Bobrick B-828 User manual

Bobrick 8221 Operating and maintenance manual

Bobrick

Bobrick 8221 Operating and maintenance manual

Bobrick B-3942 User manual

Bobrick

Bobrick B-3942 User manual

Bobrick B-822 Series Operating and maintenance manual

Bobrick

Bobrick B-822 Series Operating and maintenance manual

Bobrick B-850 Configuration guide

Bobrick

Bobrick B-850 Configuration guide

Bobrick B-828 Guide

Bobrick

Bobrick B-828 Guide

Bobrick Designer Series Programming manual

Bobrick

Bobrick Designer Series Programming manual

Bobrick B-828 Configuration guide

Bobrick

Bobrick B-828 Configuration guide

Bobrick RBA7730-860 User manual

Bobrick

Bobrick RBA7730-860 User manual

Bobrick 8221 Operating and maintenance manual

Bobrick

Bobrick 8221 Operating and maintenance manual

Bobrick B-850 User manual

Bobrick

Bobrick B-850 User manual

Bobrick B-922 Operating and maintenance manual

Bobrick

Bobrick B-922 Operating and maintenance manual

Bobrick B-824 Instruction manual

Bobrick

Bobrick B-824 Instruction manual

Bobrick ConturaSeries B-4063 Operating and maintenance manual

Bobrick

Bobrick ConturaSeries B-4063 Operating and maintenance manual

Bobrick B-132 Guide

Bobrick

Bobrick B-132 Guide

Bobrick B-922 Instruction manual

Bobrick

Bobrick B-922 Instruction manual

Bobrick 82216 Operating and maintenance manual

Bobrick

Bobrick 82216 Operating and maintenance manual

Bobrick B-3574 Instruction manual

Bobrick

Bobrick B-3574 Instruction manual

Popular Dispenser manuals by other brands

Bennett 3000 Series installation manual

Bennett

Bennett 3000 Series installation manual

Stoelting Endura 131G owner's manual

Stoelting

Stoelting Endura 131G owner's manual

Keurig K-CUP K140 Setup guide

Keurig

Keurig K-CUP K140 Setup guide

ASEPT MULTIDRESS 77000 user manual

ASEPT

ASEPT MULTIDRESS 77000 user manual

BOWMAN GN401-0111 manual

BOWMAN

BOWMAN GN401-0111 manual

Blendtec BDI-501 manual

Blendtec

Blendtec BDI-501 manual

BOWMAN GL143-0111 manual

BOWMAN

BOWMAN GL143-0111 manual

Parker SciLog LabTec Series Installation, Operation & Maintenance Instruction Manual

Parker

Parker SciLog LabTec Series Installation, Operation & Maintenance Instruction Manual

Gastrodomus CHOCOLADY 5 user manual

Gastrodomus

Gastrodomus CHOCOLADY 5 user manual

Franke SD3200 installation guide

Franke

Franke SD3200 installation guide

ICO ICO001 instruction manual

ICO

ICO ICO001 instruction manual

Star Manufacturing HPD1 Installation and operating instructions

Star Manufacturing

Star Manufacturing HPD1 Installation and operating instructions

Franke KEMWSBF instructions

Franke

Franke KEMWSBF instructions

Dover Hydro AccuPro quick start guide

Dover

Dover Hydro AccuPro quick start guide

Royal Catering RCSD-4 user manual

Royal Catering

Royal Catering RCSD-4 user manual

Loctite 983437 Operating instructions manual

Loctite

Loctite 983437 Operating instructions manual

Essentials M.I.S.T. user guide

Essentials

Essentials M.I.S.T. user guide

BRAVILOR BONAMAT Rivero 12 BLRXL-011 user manual

BRAVILOR BONAMAT

BRAVILOR BONAMAT Rivero 12 BLRXL-011 user manual

manuals.online logo
manuals.online logoBrands
  • About & Mission
  • Contact us
  • Privacy Policy
  • Terms and Conditions

Copyright 2025 Manuals.Online. All Rights Reserved.