BQS BNFIX BI 123 User manual
1
www.babyqs.com
MANUAL DE USO
INSTRUCTIONS MANUAL
INSTRUÇÕES DE UTILIZAÇÃO
BNFIX BI 123
BFL 108
Apto para
Suitable for
Adequado para
9-36 kg

IMPORTANTE:
Conservar para futuras consultas.
Procure que las instrucciones puedan conservarse en el sistema
de retención infantil durante su ciclo vital.
WARNING:
Keep for future reference.
Please kindly pay attention to the state of the instructions
manual, so that it can be kept during the life cycle of the child
restraint system.
IMPORTANTE:
Guardar para futuras consultas.
Preste atenção ao estado do manual de instruções para que
possa ser guardado durante a vida útil do sistema de retenção
infantil.

BNFIX BI 123
ESPAÑOL
Instrucciones de uso
Sistema de retención infantil
Grupo 1/2/3. De 9 a 36 kg
(de 9 meses a 12 años aprox.)
ENGLISH
Instruction manual
Child safety seat
Group 1/2/3. From 9 to 36 kg
(from 9 moths to 12 years approx)
PORTUGUES
Instruções de utilização
Sistema de retenção infantil
Grupo 1/2/3. De 9 a 36 kg
(de 9 meses a 12 anos aprox.)
8
14
20

4BNFIX BI 123
1 • Vista general • Overview • Vista geral
A
B
C
D
E
F
G
H
J
I
M
N
O
P
K
L
Q

5
www.babyqs.com
2 • Puestos de instalación en el vehículo • Positions in the vehicle
• Postos de instalação no veículo
3 • Instalación y ajustes de la silla
• Child seat installation and adjustments
•Instalação e ajustes da cadeira infantil
1
2
Top tether P. 1 Top tether P. 2 Top tether P. 3
3.1 3.2 3.3
3.4

6BNFIX BI 123
4 • Instalación del niño en la silla Grupo 1
• Fastening the child to the seat Group 1
• Instalaçao da criança Grupo 1
3.5 3.6 3.7
3.9
3.11
3.10
4.1
3.8
4.2
H
H
7
www.babyqs.com
M
M
JC
5 • Instalación del niño en la silla Grupo 2/3
• Fastening the child to the seat Group 2/3
• Instalaçao da criança Grupo 2/3
4.8
4.3 4.4
4.6
4.5
4.7
5.1 5.2 5.3
5.65.4
5.5
5.7

8BNFIX BI 123
1. Sólo es apropiado si los vehículos homologados están provistos de
cinturones de seguridad de tres puntos, homologados por el Reglamento nº
16 de la CEPE u norma equivalente.
2. Por favor, lea estas instrucciones atentamente ya que una instalación
incorrecta puede suponer graves lesiones para el niño. Si se produce alguna
lesión debida a una correcta instalación, el fabricante no se hará responsable.
3. Esta silla de retención infantil es apta para su uso como silla de grupo 123,
desde aproximadamente los 9 meses hasta los 12 años (9-36 kg).
4. Esta silla infantil debe utilizarse CON el sistema de arnés para niños entre
9 y 18 Kg.
5. Esta silla infantil puede utilizarse SIN el sistema de arnés para niños de 15 a 36 Kg.
6. Este es un SISTEMA DE RETENCIÓN INFANTIL ISOFIX. Ha sido homologado
con arreglo a la normativa europea ECE R44/04, para su utilización general
en vehículos equipados con sistemas de anclaje ISOFIX tipo A.
7. Por favor nunca utilice la silla de seguridad sin la funda y sin los protectores
del arnés.
8. Proteja la silla de seguridad infantil del contacto directo con la luz solar, porque
la silla podría calentarse y lastimar al niño.
9.
La silla o accesorios del arnés que estén dañados o hayan sido utilizados
incorrectamente deberán ser reemplazados.
10.
No deje objetos pesados en el interior del coche, porque en caso de accidente
podrían lesionar al niño.
11.
Los artículos rígidos y las piezas de plástico de la silla de seguridad deben
colocarse e instalarse de forma que no puedan, durante el uso diario del
vehículo, quedar atrapados en un asiento móvil o en una puerta del coche.
12. Es peligroso realizar cualquier tipo de alteración o incorporación a la silla
de seguridad sin la aprobación de la autoridad competente. Es peligroso no
seguir estrictamente las instrucciones de instalación proporcionadas por el
fabricante de la silla de seguridad para niños.
13.
La silla de seguridad debe permanecer instalada al vehículo mediante el
cinturón de seguridad, aunque el niño no está sentado en la silla. El niño nunca
debe ser desatendido mientras está sentado en la silla de seguridad, tampoco
cuando esté fuera del vehículo.
14.
Por favor, mantenga la silla de seguridad lejos de productos corrosivos.
15.
El fabricante garantiza la calidad de sus productos, pero no la calidad de los
productos de segunda mano u otras marcas.
AVISO
IMPORTANTE
Lea cuidadosamente antes de instalar
la silla infantil en el vehículo.

9
www.babyqs.com
16.
Las ilustraciones de las instrucciones son meramente informativas. El sistema
de retención infantil puede presentar pequeñas diferencias respecto a las
fotografías o imágenes del manual de instrucciones.
DÓNDE:
En los asientos traseros del vehículo
CÓMO:
Instalar en sentido contrario a la marcha.
GRUPO 1 • Instalar en sentido a la marcha.
GRUPO 2/3 • Instalar en sentido a la marcha.
En asientos con:
Anclajes ISOFIX (entre el asiento y el respaldo) y puntos de anclaje Top Tether
(por ejemplo en la bandeja, en el suelo o detrás del respaldo) y cinturón de 3
puntos (cinturón del vehículo).
ATENCIÓN:
Solamente puede ser utilizado en este asiento SI dispone de anclajes ISOFIX y
Top Tether, y cinturón de 3 puntos.
En el asiento delantero solo grupo 2/3. NO instalar salvo en estos casos:
1. Cuando el vehículo no disponga de asientos traseros.
2. Cuando todos los asientos traseros estén ya ocupados por menores de
edad de estatura igual o inferior a 135 centímetros.
3. Cuando no sea posible instalar en los asientos traseros todos los sistemas
de retención infantil.
2
1
A. Reposacabezas.
B. Guías de cinturón diagonal.
Grupo 2/3.
C. Protectores de hombro.
D. Cintas del arnés.
E. Hebilla del arnés.
F. Almohadilla reductora.
G. Cinta de ajuste del arnés.
H. Botón de ajuste del arnés.
I. Botón de desbloqueo de los
conectores Isofix.
J. Guía del cinturón abdominal.
K. Sistema de ajuste del Top Tether.
L. Gancho del Top Tether.
M. Botón regulador de altura
reposacabezas.
N. Cinta del Top Tether.
O. Conector del arnés.
P. Brazos ISOFIX.
Q. Guías de inserción ISOFIX.
1. VISTA GENERAL
2. PUESTOS DE INSTALACIÓN EN EL VEHÍCULO
*Nota: Segun la legislación española sobre sistemas de retención infantil (Real Decreto 667/2015).
10 BNFIX BI 123
3. INSTALACIÓN DE LA SILLA. GRUPO 1
1. Si su vehículo no está equipado con guías de inserción para el anclaje del
sistema isofix puede utilizar las guías de inserción que incluye la silla
(Q)
.
Inserte las 2 guías en los anclajes isofix del asiento del vehículo.
CONSEJO: Los puntos de anclaje isofix del vehículo se encuentran entre la
base y el respaldo del asiento.
2. Pulse el botón de desbloqueo de los conectores ISOFIX
(I)
para extraer
los brazos ISOFIX
(P)
. Mueva ambos brazos de bloqueo para comprobar
que están completamente desplegados (fig. 3.1).
3.
Tome el sistema Top Tether y páselo sobre la silla de seguridad.
4.
Coloque la silla de seguridad orientada en el sentido de la marcha sobre
el asiento del vehículo.
5. Sujete la silla de seguridad con ambas manos e introduzca los dos
brazos
(P)
firmemente en los puntos Isofix del vehículo hasta que los
brazos de bloqueo queden acoplados con un clic en ambos lados. El
botón rojo cambiará a verde en ambos lados (fig. 3.2).
6. Sacuda la silla para comprobar que está correctamente anclada a los
puntos ISOFIX del vehículo.
¡PRECAUCIÓN! Los brazos de bloqueo sólo estarán correctamente
acoplados si en ambos botones de seguridad aparece el color verde.
7.
Empuje la silla de seguridad hacia el respaldo, ejerciendo una presión
firme y constante sobre ambos lados hasta que quede bien pegada al
asiento del vehículo. Si es necesario, regule la inclinación del respaldo del
asiento del vehículo para que la silla quede bien asentada contra el mismo
(fig. 3.3)
.
8. Tome el Top Tether y presione el regulador del Top Tether (K) para estirar
la correa.
9. Enganche el mosquetón de seguridad (L) en el punto de anclaje del Top
Tether recomendado en el manual del vehículo (fig. 3.4).
10. Para tensar el Top Tether, tire del extremo libre del cinturón a través del
regulador del Top Tether (fig. 3.5). El Top Tether estará correctamente
tensado cuando el indicador de tensión rojo pase a color verde (fig. 3.6).
¡PRECAUCIÓN! Asegúrese de no utilizar el mosquetón de
equipaje en lugar del punto de anclaje del Top Tether. Busque
este símbolo en su vehículo:

11
www.babyqs.com
Liberar los anclajes ISOFIX
Para soltar los brazos ISOFIX de los anclajes del coche, pulse firmemente
los botones de desbloqueo
(I)
de cada brazo hasta que el indicador de
cada brazo cambie de color verde a rojo. Tire hacia atrás para liberar la silla
(fig. 3.7).
Ajustar la altura del arnés
1. Pulse y mantenga pulsado el botón de ajuste del arnés
(H)
mientras estira
de las cintas del arnés
(D)
para destensarlas (fig. 3.8).
2. Retire las cintas del conector del arnés
(O)
(fig. 3.9).
3. Extraiga las cintas del arnés
(D)
e insertelas por las aberturas superiores
(fig. 3.10).
4. Vuelva a introducir las cintas
(D)
en el conector del arnés
(O)
(fig. 3.11)
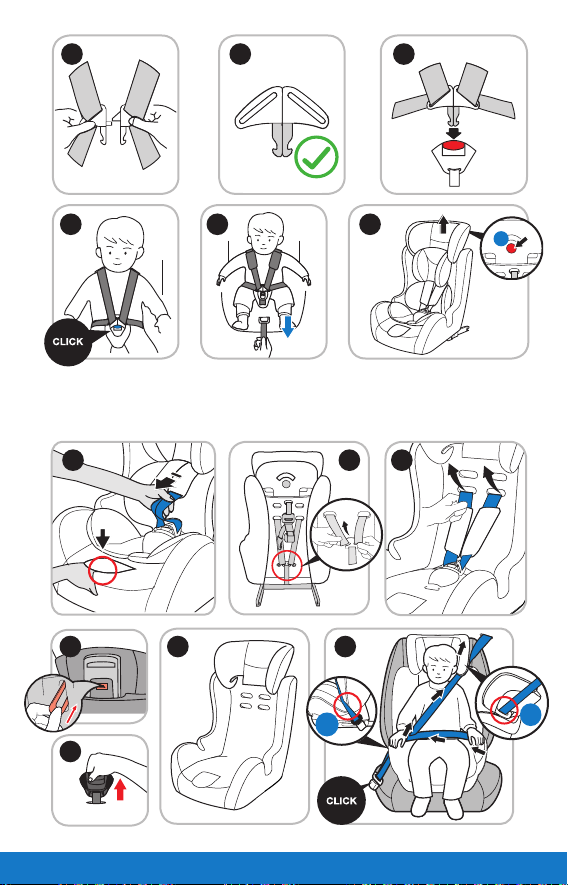
4. INSTALACIÓN DEL NIÑO EN LA SILLA. GRUPO 1
Un arnés correctamente ajustado garantiza una protección óptima del niño
en la silla de seguridad. El arnés debe ajustarse para que las cintas (D)
queden al nivel de los hombros del niño o ligeramente por encima, nunca
por detrás de la espalda o a la altura de las orejas (fig. 4.1)
.
1.
Destense las cintas del arnés (D) tirando de la parte pectoral de este a la vez
que presiona el botón de ajuste de arnés (H) (fig. 4.2)
2. Pulsando el botón rojo, abra la hebilla
(E)
para facilitar la instalación del
niño.
3. Siente al niño en la silla.
4. Coloque al niño el arnés de la silla y junte las 2 partes del broche,
asegurándose de que la parte derecha esté arriba (fig. 4.3 y 4.4)
5. Inserte los broches en la hebilla hasta oir un click que indicará el cierre
correcto de la hebilla (fig. 4.5 y 4.6).
6.
Tire de la cinta de ajuste de arnés (G) para dar la tensión correcta al arnés
(fig. 4.7). Recuerde que para garantizar la seguridad del niño el arnes debe
quedar bien ceñido aunque sin oprimir el cuerpo del niño
.
7. Para regular la altura del reposacabezas
(A)
, pulse y mantenga pulsado el
boton regulador de altura del reposacabezas
(M)
mientras selecciona la
altura óptima para el niño, suelte el botón para fijar la posición (fig. 4.8).
Para retirar al niño de la silla,
destense las cintas del arnés (D) tirando de la
parte pectoral de este a la vez que presiona el botón de ajuste de arnés (H)
(fig. 4.2) y
pulse el botón rojo para abrir la hebilla
(E)
y liberar al niño.
Solamente GRUPO 1.
Desde aprox. 9 meses a 4 años (9-18 kg)
AVISO
12 BNFIX BI 123
5. INSTALACIÓN DEL NIÑO. GRUPO 2/3
5.1 Retirada del arnés y la hebilla
Antes de instalar la silla como Grupo 2/3, deberá retirar de la silla las cintas
del arnés (D), los protectores del arnés (C) y la hebilla del cinturón (E).
Para ello:
1. Destense las cintas del arnés (D) tirando de la parte pectoral de este a la
vez que presiona el botón de ajuste de arnés (H) (fig. 5.1).
2. En la parte trasera de la silla, localice el conector de la cintas del arnés (O)
y desenganche las cintas del arnés para liberarlas del conector (fig. 5.2) y
retírelas tirando de ellas desde la parte delantera de la silla (fig. 5.3).
3. Retire los protectores de hombro, guárdelos para un posterior uso.
4. Retire las cintas del arnés y guárdelas en la bolsa de almacenaje.
5. Voltee la silla y desde la parte inferior del asiento, libere la hebilla del
arnés (E) pasando la placa de retención por la ranura del asiento
(fig. 5.4 y 5.5).
6. Retire la hebilla del arnés (E) y guárdela en la bolsa de almacenaje.
5.2 Instalación de la silla.
1. Coloque la silla de seguridad orientada en el sentido de la marcha sobre
el asiento del vehículo.
2.
Siente al niño en la silla
.
3.
Pase la parte diagonal del cinturón del vehículo por la guía (B) situada
en el reposacabezas, pase la parte del cinturón abdominal por las
guías (J) (fig 5.7). Asegúrese de que la parte del cinturón diagonal pasa
también por la guía (J) más próxima al broche del cinturón.
4. Inserte el cinturón de seguridad en el punto de anclaje del vehículo y
presione hasta oír un “Clic” que indicará que el asiento infantil está
correctamente instalado (fig 5.7)
Solamente GRUPO 2/3.
Desde aprox. 4 a 12 años (15-36 kg)
AVISO
¡PRECAUCIÓN! La parte del cinturón de regazo debe estar lo más abajo
posible sobre las caderas del niño a ambos lados.
13
www.babyqs.com
6. LIMPIEZA Y MANTENIMIENTO
6.1 Retirar la funda.
1. Retire el arnés de 5 puntos
2. Saque la funda del respaldo y la base.
3. Suba el reposacabezas de la silla hasta su máxima posición.
4. Retire la funda de la silla y luego la funda del reposacabezas.
7. GARANTÍA
Este producto está cubierto por la garantía legal, en los términos y
condiciones establecidos en el RDL 1/2007, de 16 de noviembre. Durante
un periodo de 2 años tras la fecha de compra queda cubierta cualquier
falta de conformidad existente en el momento de entrega del producto.
Es imprescindible conservar el ticket de compra o factura acreditativa de
la adquisición del producto dentro del periodo de garantía. Deben seguirse
cuidadosamente las instrucciones de uso facilitadas en el manual del
producto para su puesta en marcha, así como para el posterior y adecuado
funcionamiento del mismo. Esta garantía no cubre los defectos derivados
de un deterioro accidental, a un uso indebido o maltrato del producto, así
como los derivados de un mantenimiento inadecuado, o a una reparación
efectuada por personal o servicio técnico no autorizado, en cuyo caso el
usuario correrá con los gastos derivados del transporte, y en su caso, de
la reparación. La garantía no cubre los componentes consumibles, como
baterías o revestimientos expuestos a desgaste, derivados de un uso normal
del producto.
Para volver a colocar la funda, solo tiene que seguir los pasos anteriores a la
inversa.
6.2 Lavado.
1. Para el lavado de las cintas y partes de plástico enjabonar con detergente
neutro y agua templada.
2. Asegúrese que no entra jabón dentro de la hebilla o piezas metálicas.
3. No utilice productos químicos o lejía en ninguna parte de la silla.
Si tiene alguna duda sobre el uso o colocación de este producto o necesita cualquier
pieza de repuesto, por favor póngase en contacto con nuestro servicio de atención
al cliente.
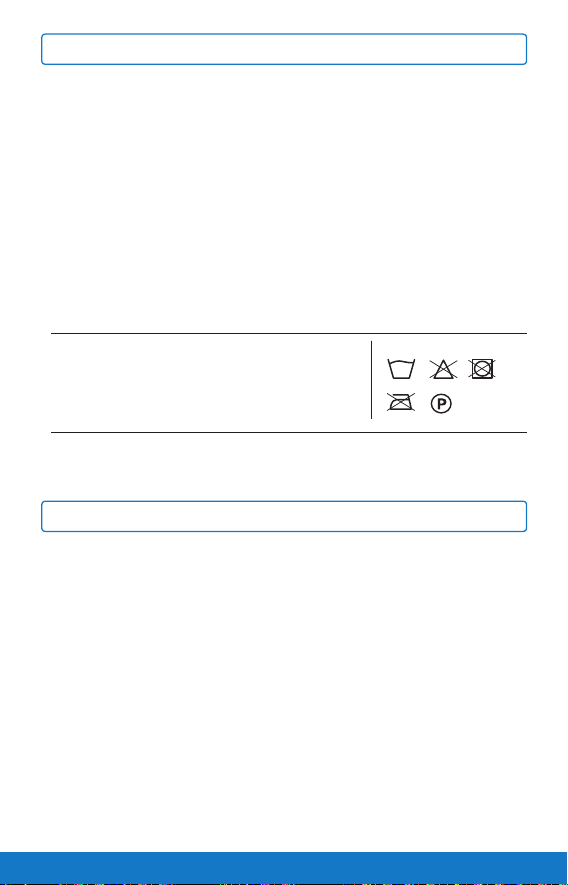
INSTRUCCIONES DE LAVADO:
· La funda es desmontable y
lavable a 30°, sólo se debe
secar al aire libre.
· Lavar en máquina, en frio.
· No usar lejía.
· Limpieza en seco,
cualquier disolvente
excepto tricloroetileno.
· No usar secadora.
· No planchar.
30 °C

14 BNFIX BI 123
1. Only suitable if the approved vehicle has been fitted with three-point safety
belts that meet ECE standard Nº 16 or equivalent.
2. Please read these instructions carefully, as incorrect installation could
result in serious injury. If any injuries should occur as a result of incorrect
installation, the manufacturer will accept no responsibility.
3. This child safety seat is suitable for use as group 123 from approx. 9
months to 12 years age / 9-36 kg.
4. This child seat must be used WITH the harness system for children weighing
between 9 kg and 18 kg.
5. This child seat may be used WITHOUT the harness system for children
weighing between 15 kg and 36 kg.
6.
This child seat is in accordance with the ECE R44/04 regulations and may
be installed in the majority of vehicles equipped with approved points, such
as ISOFIX points, in accordance with ECE regulation 16 type A. However,
prior to purchase, the child seat should always be tested in your vehicle
with the child seated, in order to ensure that the model meets your needs
.
7. Never use the child safety seat without its cover.
8. Protect the child safety seat from direct sunlight, as the seat can get very
hot and harm the child.
9. Child seats or accessories that are damaged or have been used
incorrectly must be replaced.
10. Do not leave heavy objects inside the car, as these may injure the child in
the event of an accident.
11. Ensure that no part of the child seat is caught in the door of the vehicle
or in a reclining seat. In addition, ensure that the safety seat is correctly
installed and secured.
12. Do not disassemble, modify, or add any piece to the child seat or harness,
as this would seriously affect its basic functioning and the safety that the
child seat provides.
13. The safety seat must remain installed in the vehicle. Even if the child is
not seated in the car seat. The child must never be left unattended while
seated in the safety seat, not even outside the vehicle.
14. Keep the safety seat away from corrosive products.
15. The manufacturer guarantees the quality of its products, but not the quality
of second-hand products or products belonging to other companies.
NOTICE
IMPORTANT
Read the instructions carefully before
installing the child seat in the vehicle.
15
www.babyqs.com
16. Instruction illustrations are for informational purposes only. The child
restraint system may contain small differences compared to the
photographs or images in the instruction manual.
A. Headrest.
B. Diagonal belt guides. Group 2/3.
C. Shoulder pads.
D. Harness straps.
E. Harness buckle.
F. Reductor cushion.
G. Harness adjustment strap.
H. Harness adjustment button.
I. ISOFIX arms unlocking button.
J. Abdominal belt guides.
K. Top Tether adjustment device.
L. Top Tether hook.
M.Headrest height regulator button.
N. Top Tether strap.
O. Harness connector.
P. ISOFIX arms.
Q. ISOFIX insert guides.
2. VEHICLE INSTALLATION POINTS
WHERE:
In the vehicle rear seats.
2
1
HOW:
Install rearward facing.
GROUP 1 • Install forward facing.
GROUP 2/3 • Install forward facing.
In seats with:
I
SOFIX anchorages (between seat and backrest) and Top Tether anchor
points (eg in the tray, on the floor or behind the backrest) and 3-point belt
(vehicle belt).
NOTICE:
The child seat must only be used in this seat IF it has ISOFIX and Top
Tether connectors, and 3 points belt.
In vehicle forward seat only group 2/3. DO NOT install except in these
cases:
1. Whenever the vehicle does not count with rear seats.
2. When all rear seats are already occupied by children exceeding
135 cm height.
3. When it is not possible to install all child restraints systems in the rear seats.
*Note: According to Spanish legislation for child restraint systems (Royal Decree 667/2015).
1. GENERAL OVERVIEW

16 BNFIX BI 123
3. INSTALLING THE SEAT. GROUP 1
1. If your vehicle is not equipped with the ISOFIX insert guides as standard, clip
the two insert guides which are included with the seat with the cut-out facing
upwards onto the two ISOFIX attachment points of your vehicle.
TIP: The ISOFIX attachment points are located between the surface and the
backrest of the vehicle seat.
2. Press the ISOFIX connectors unlocking button
(I)
to extract the ISOFIX arms
(P)
. Move locking arms to check that both are fully unfolded. Pull the fabric
loop (03) to pull out both locking arms to longest position (fig. 3.1).
3.
Take the Top Tether and pass it over the seat
.
4.
Place the child safety seat in the back seat of the vehicle facing in the
direction of travel
.
5.
Hold the safety seat with both hands and insert the two locking arms (P) into
the vehicle´s Isofix connectors until they fasten with a click on both sides.
The red button will change to green on both sides
(fig. 3.2).
6.
Shake the seat to check that it is correctly anchored to the vehicle’s ISOFIX
points.
7. Push the safety seat towards the back using a firm, constant pressure on
both sides until it rests firmly against the vehicle seat (fig. 3.3).
8. Take the Top Tether and press the Top Tether (K) adjuster to lenghten the
strap if necessary.
9. Hook the safety clasp (L) to the Top Tether anchor point recommended in
your vehicle instruction manual (fig. 3.4)
10. To tighten the Top Tether, take up any slack by pulling the free end of
the belt through the Top Tether adjuster (fig. 3.5). The Top Tether will be
correctly tightened when the tension indicator changes from red to green
(fig. 3.6).
IMPORTANT!
The locking arms are only correctly fixed if both safety buttons
are green.
IMPORTANT!
Make sure not to use the luggage clip instead of
the Top Tether anchor clip. Look for this symbol in your vehicle.
17
www.babyqs.com
Unlocking the ISOFIX anchors
To unlock the ISOFIX arms from the vehicle’s anchors, press firmly the
release buttons
(I)
on each arm until the indicator changes from green to
red. Pull back to remove the seat (fig. 3.7).
Adjusting the harness height
1. Press and hold the harness adjustment button
(H)
while stretching the
harness straps
(D)
to loosen them (Fig. 3.8).
2. Locate the harness straps connector
(O)
on the back of the seat and
unclip the straps, freeingthem from the connector (fig. 3.9).
3. Remove the harness straps
(D)
and insert them through the upper eyelets
(fig. 3.10).
4. Reinsert the straps
(D)
in the harness connector
(O)
.(fig. 3.11).Make sure
the straps are correctly hooked in the connector.
4. FASTENING THE CHILD IN THE SEAT. GROUP 1
Proper adjustment of the height of the harness ensures the child will be
seated correctly. The harness straps (D) should be adjusted to the height
of the child’s shoulder or slightly above; never behind the child’s back or
level with the ears (fig. 4.1).
1. Loosen the harness straps
(D)
by pulling them gently while pressing the
harness adjustment button
(H)
(fig. 4.2).
2.
Pressing the red button, release the buckle (E) to help to install the child
.
3. Place the child in the seat.
4.
Secure the child with the harness by joining the two parts of the clasp
and fasten the buckle until you hear a click (fig. 4.3 and 4.4).
5. Insert the clasps in the buckle until you hear a click that will indicate the
correct closing of the buckle (fig. 4.5 y 4.6).
6.
Pull the harness adjustment strap (G) to give the correct tension to the
harness(fig. 4.7).
Remember that in order to ensure the child’s safety the
harnesses should fit tightly
7. To change the headrest
(A)
height, press and hold the headrest height
adjuster button
(M)
while selecting the optimal height for the child, release
the button to fix the position (fig. 4.8).
To remove the child from the seat, loosen the harness straps (D) by pulling
the chest part of the harness while pressing the harness adjustment button
(H) (fig. 4.2) and press the red button to open the harness buckle (E) releasing
the child.
GROUP 1 only.
From 9 months to 4 years (9-18 kg)
NOTICE

18 BNFIX BI 123
5. FASTENING THE CHILD. GROUP 2/3
5.1 Removing the harness and the buckle
Before installing the seat for Group 2/3, the seat harness (D), harness
protectors (C) and buckle (E) must be removed.
For it:
1. Loosen the harness straps
(D)
by pulling them gently while pressing the
harness adjustment button
(H)
(fig. 5.1)
2. Loosen the harness straps from the back of the seat, freeing them from the
harness connector
(O) (fig. 5.2)
. Remove them pulling up from the front side
of the seat
(fig. 5.3)
.
3. Take out the shoulder protectors and store them for future uses.
4. Take off the harness straps and save them in the storage bag.
5. Turn the seat over and, from the back of the seat, take off the safety buckle
(E)
, by passing the retention plate through the seat base slot
(fig. 5.4 y 5.5)
.
6. Take out the safety buckle
(E)
and save it in the storage bag.
5.2 Installing the seat.
1. Place the child safety seat in the back seat of the vehicle facing in the
direction of travel.
2.
Place the child in the seat.
3.
Pass the diagonal section of the belt through the diagonal belt guide
(B) of the headrest. Pass the abdominal section of the belt over the
guides (J) (fig. 5.7). Make sure the diagonal belt section pass over the
guide (J) nearest to the vehicle belt buckle.
4. Pass the vehicle belt and buckle the vehicle seat belt until you hear a click
(fig. 5.7)
IMPORTANT! The part of the abdominal belt should rest as low as possible
over the child’s hips, on both sides.
GROUP 2/3 only.
From 4 to 12 years (9-18 kg)
NOTICE

19
www.babyqs.com
6. CLEANING AND MAINTENANCE
6.1 Removing the fabric cover.
1. Remove the 5-point harness.
2. Take off the cover from backrest and base.
3. Move the headrest of child seat up to the higest position.
4. First take the cover of the base of the headrest, then remove the cover of
the headrest.
7. GUARANTEE
This product is covered by a legal warranty under the terms and conditions
in Royal Legislative Decree 1/2007, from the 16th of November. For a period
of 2 years after the date of purchase, any lack of conformity existing at the
time of delivery of the product is covered. It is essential to keep the purchase
ticket or invoice proving the purchase of the product within the warranty
period. The instructions for use given in the product manual must be followed
carefully for its start-up, as well as for the subsequent and proper operation
of the product. This warranty does not cover defects arising from accidental
deterioration, misuse, abuse of the product, improper maintenance, or repair
by unauthorised technical personnel or service, in which case the user shall
bear the costs of delivery and, where applicable, the repair. The warranty
does not cover consumable components, such as batteries or coatings
exposed to wear and tear, that are the result of normal use of the product.
To refit the cover, simply follow the above steps in reverse.
6.2 Washing.
1. To clean the straps and plastic elements of the seat use a neutral
detergent and warm water.
2. Make sure that soap does not enter the buckles or other metallic
elements.
3.
Do not use chemical products or bleach on any part of the seat
.
If you have any doubts or queries regarding the use or placement of this product or you need
any replacement elements, please contact our Customer Services Department.
WASHING INSTRUCTIONS:
· The cover is removable and
can be washed at 30°. It
should not be machine dried.
· Machine wash – Cold cycle.
· Do not bleach.
· For dry cleaning use
any solvent except
trichloroethylene.
· Do not use a drier.
· Do not iron.
30 °C

20 BNFIX BI 123
1. Só é apropriado se os veículos homologados possuírem cintos de segurança
com três pontos de fixação, homologados pelo regulamento n.º 16 da CEPE
ou norma equivalente.
2. Leia estas instruções atentamente para instalar o dispositivo de forma
correcta. Uma instalação incorrecta pode provocar danos graves. Neste
caso, o fabricante não pode ser considerado responsável.
3. Esta cadeira de segurança grupo 123 é adequada para crianças entre 9
meses e 12 anos (9-36kg).
4. Este dispositivo de retenção deve ser utilizado com um sistema de arnês
adequado para crianças entre 9 kg e 18 kg de peso.
5. O dispositivo de retenção para crianças pode ser utilizado sem arnês para
crianças entre 15 kg e 36 kg.
6. Este é um sistema de retençao PARA CRIANÇAS isofix. Esta cadeira está em
conformidade com a Norma de homologação ECE 44/04 e pode ser instalada
na maioria dos veículos equipados com sistemas de ancoragem ISOFIX tipo A.
7. Nunca utilize a cadeira de segurança sem a cobertura e sem os protectores
do arnês.
8. Proteja a cadeira de segurança infantil do contacto directo com a luz solar,
uma vez que a cadeira pode aquecer e magoar a criança.
9. É recomendado trocar o dispositivo quando o mesmo tiver sido submetido a
tensões violentas num acidente.
10.Não deixe objectos pesados no interior do carro, uma vez que, em caso de
acidente, poderiam lesionar a criança.
11.Os itens rígidos e as peças de plástico da cadeira de segurança devem ser
colocados e instalados de modo a não ficarem presos num banco amovível
ou numa porta do automóvel durante a utilização diária do veículo.
12.É perigoso realizar qualquer tipo de alteração ou integração na cadeira
de segurança sem a autorização da autoridade competente. É perigoso
não seguir estritamente as instruções de instalação proporcionadas pelo
fabricante da cadeira de segurança para crianças.
13.A cadeira de segurança deve permanecer instalada no veículo com cinto de
segurança, mesmo quando a criança não está sentada na cadeira.
14.Mantenha a cadeira de segurança afastada de produtos corrosivos.
15.O fabricante garante a qualidade dos seus produtos, mas não a qualidade
dos produtos em segunda mão ou de outras marcas.
16.As ilustrações das instruções são meramente informativas. O sistema
AVISO
IMPORTANTE
Leia atentamente as seguintes instruções
antes de instalar o produto.
This manual suits for next models
1
Table of contents
Languages:
Other BQS Car Seat manuals


