BQS BCAFIX 123 ST-2 User manual

MANUAL DE USO
INSTRUCTIONS MANUAL
BCAFIX 123
ST-2
Apto para
Suitable for
9-36 kg

IMPORTANTE:
Conservar para futuras consultas.
Procure que las instrucciones puedan conservarse en el sistema
de retención infantil durante su ciclo vital.
WARNING:
Keep for future reference.
Please kindly pay attention to the state of the instructions
manual, so that it can be kept during the life cycle of the child
restraint system.
BCAFIX 123
ESPAÑOL
Instrucciones de uso
Sistema de retención infantil
Grupo 1/2/3. De 9 a 36 kg
(de 9 meses a 12 años aprox.)
ENGLISH
Instruction manual
Child safety seat
Group 1/2/3. From 9 to 36 kg
(from 9 moths to 12 years approx)
4
23
4 5
www.babyqs.com
BCA 123
1 • Vista general • Overview 2 • Puestos de instalación en el vehículo • Positions in the vehicle
3 • Tareas preliminares • Preparatory works
P
B
C
D
E
F
G
A
H
O
N
I
J
K
M
O
B
L
N
1
2
1
4
2
5
3
6
6 7
www.babyqs.com
BCA 123
7
10
13
16 17 18
25/A 25/B 26
19 20 21
8 9
11 12
4 • Instalación • Installation
22 23 24
27 28
14 15
8 9
www.babyqs.com
BCA 123
30 31
32
35
38 39 40
36 37
33 34
29 41
45 46
6 • Retirar el arnés de 5 puntos • Removing the 5-point harness 7 • Recolocar el arnés de 5 puntos • Refitting the 5-point harness
42 43
47 48 49
44
50 51 52
10 11
www.babyqs.com
BCA 123
20
21
8 • Cuidado y mantenimiento • Care and maintenance
53
56
59 60
57 58
54 55
1. Sólo es apropiado si los vehículos homologados están provistos de
cinturones de seguridad de tres puntos, homologados por el Reglamento nº
16 de la CEPE u norma equivalente.
2. Por favor, lea estas instrucciones atentamente ya que una instalación
incorrecta puede suponer graves lesiones para el niño. Si se produce alguna
lesión debida a una correcta instalación, el fabricante no se hará responsable.
3. Esta silla de retención infantil es apta para su uso como silla de grupo 123,
desde aproximadamente los 9 meses hasta los 12 años (9-36 kg).
4. Esta silla infantil debe utilizarse CON el sistema de arnés para niños entre
0 y 18 Kg.
5. Esta silla infantil puede utilizarse SIN el sistema de arnés para niños de 15 a 36 Kg.
6. Este es un SISTEMA DE RETENCIÓN INFANTIL ISOFIX. Ha sido homologado
con arreglo a la normativa europea ECE R44/04, para su utilización general
en vehículos equipados con sistemas de anclaje ISOFIX.
7. Por favor nunca utilice la silla de seguridad sin la funda y sin los protectores
del arnés.
8. Proteja la silla de seguridad infantil del contacto directo con la luz solar, porque
la silla podría calentarse y lastimar al niño.
9.
La silla o accesorios del arnés que estén dañados o hayan sido utilizados
incorrectamente deberán ser reemplazados.
10.
No deje objetos pesados en el interior del coche, porque en caso de accidente
podrían lesionar al niño.
11.
Los artículos rígidos y las piezas de plástico de la silla de seguridad deben
colocarse e instalarse de forma que no puedan, durante el uso diario del
vehículo, quedar atrapados en un asiento móvil o en una puerta del coche.
12. Es peligroso realizar cualquier tipo de alteración o incorporación a la silla
de seguridad sin la aprobación de la autoridad competente. Es peligroso no
seguir estrictamente las instrucciones de instalación proporcionadas por el
fabricante de la silla de seguridad para niños.
13.
La silla de seguridad debe permanecer instalada al vehículo mediante el
cinturón de seguridad, aunque el niño no está sentado en la silla. El niño nunca
debe ser desatendido mientras está sentado en la silla de seguridad, tampoco
cuando esté fuera del vehículo.
14.
Por favor, mantenga la silla de seguridad lejos de productos corrosivos.
AVISO
IMPORTANTE
Lea cuidadosamente antes de instalar
la silla infantil en el vehículo.

12 13
www.babyqs.com
BCA 123
15.
El fabricante garantiza la calidad de sus productos, pero no la calidad de los
productos de segunda mano u otras marcas.
16.
Las ilustraciones de las instrucciones son meramente informativas. El sistema
de retención infantil puede presentar pequeñas diferencias respecto a las
fotografías o imágenes del manual de instrucciones.
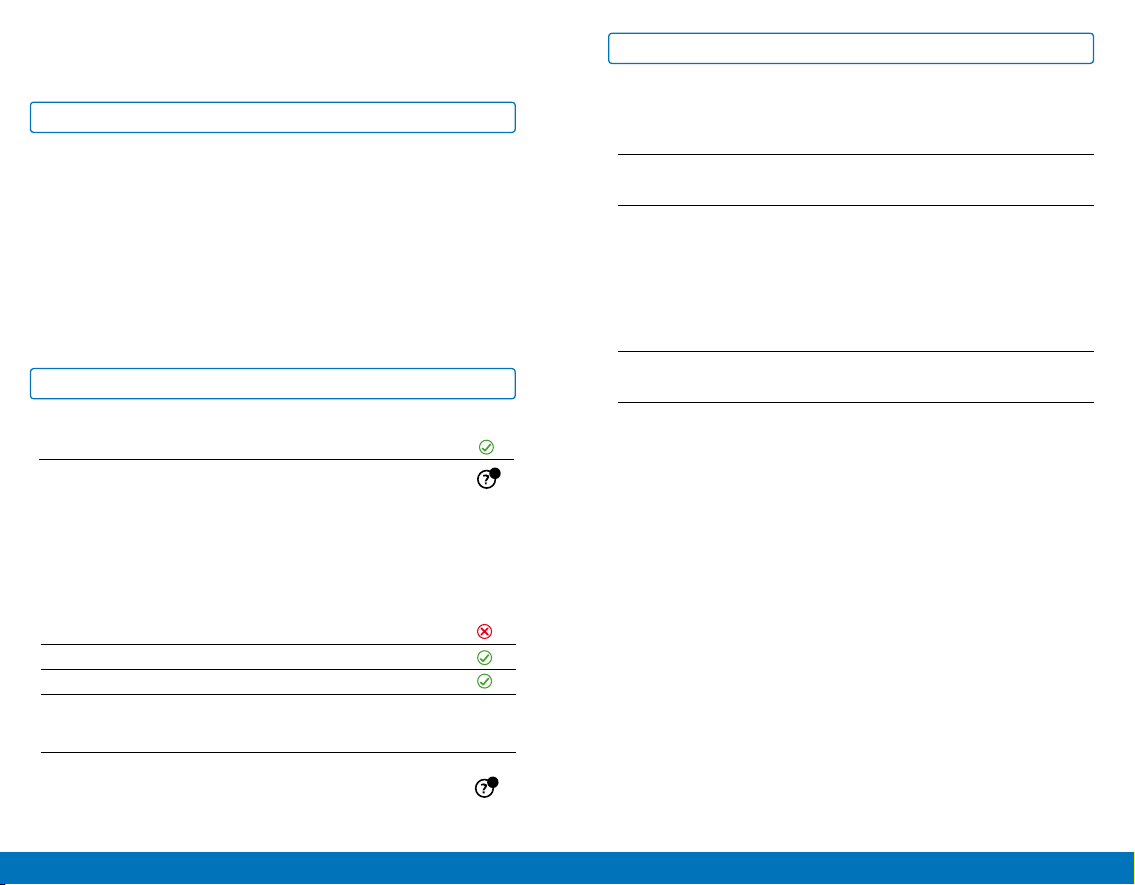
DÓNDE:
En los asientos traseros del vehículo
CÓMO:
Instalar en sentido contrario a la marcha.
GRUPO 1 • Instalar en sentido a la marcha.
GRUPO 2/3 • Instalar en sentido a la marcha.
En asientos con:
Anclajes ISOFIX (entre el asiento y el respaldo) y puntos de anclaje Top Tether
(por ejemplo en la bandeja, en el suelo o detrás del respaldo) y cinturón de 3
puntos (cinturón del vehículo).
ATENCIÓN:
Solamente puede ser utilizado en este asiento SI el vehículo dispone de
cinturón abdominal y diagonal (3 puntos).
*NO instalar en los asientos delanteros salvo en estos casos concretos:
1. Cuando el vehículo no disponga de asientos traseros.
2. Cuando todos los asientos traseros estén ya ocupados por menores de
edad de estatura igual o inferior a 135 centímetros.
3. Cuando no sea posible instalar en los asientos traseros todos los sistemas
de retención infantil.
2
1
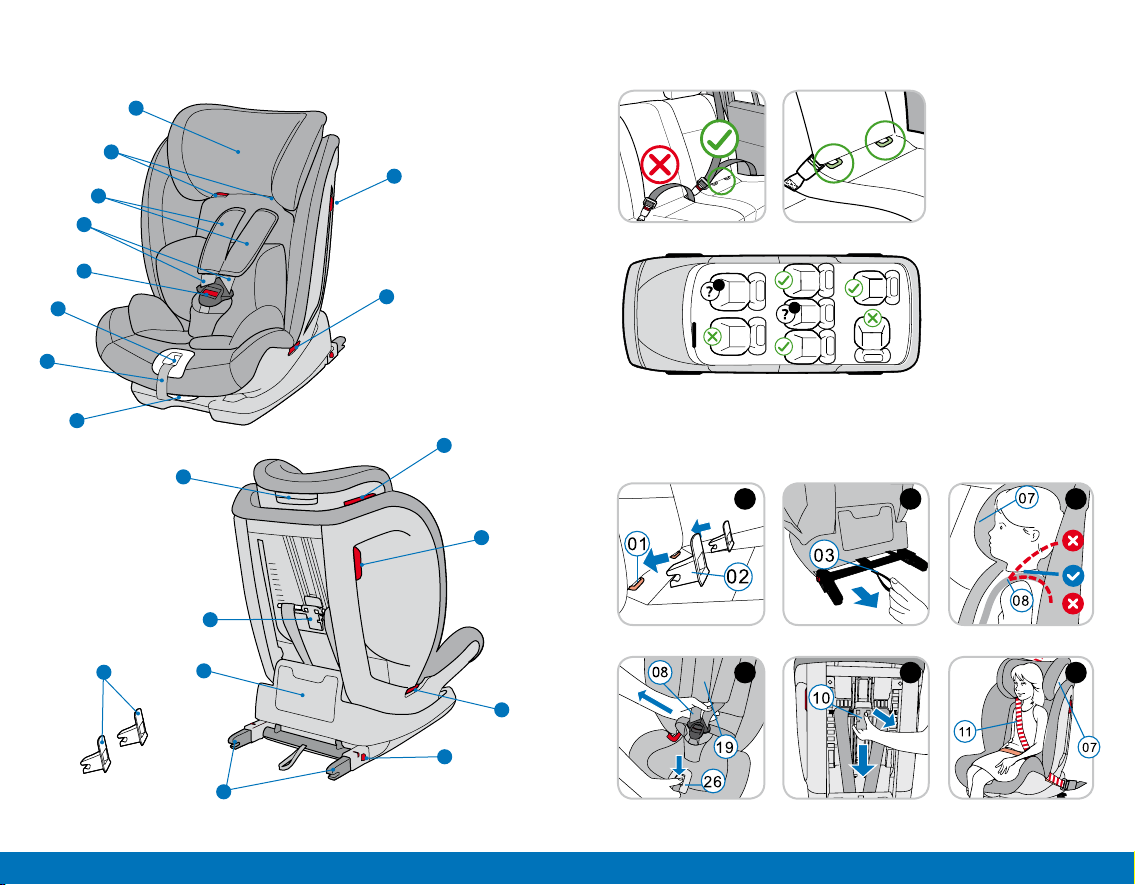
A. Reposacabezas.
B. Guía de cinturón diagonal.
Grupo 2/3.
C. Protectores de hombro.
D. Cintas del arnés.
E. Hebilla del arnés.
F. Botón de ajuste del arnés.
G. Cinta de ajuste del arnés.
H. Palanca de reclinado.
I. Regulador de altura del
reposacabezas
J. Regulador de altura del arnés.
K. Contenedor manual de
instalación.
L. Brazos Isofix.
M. Botón de desbloqueo de los
conectores Isofix.
N. Guía del cinturón abdominal.
O. Dispositivo de bloqueo del
cinturón diagonal.
P. Guías de iserción Isofix.
1. VISTA GENERAL
2. PUESTOS DE INSTALACIÓN EN EL VEHÍCULO
*Nota: Segun la legislación española sobre sistemas de retención infantil (Real Decreto 667/2015).
3. TAREAS PRELIMINARES
3.1 Preparación del sistema Isofix
1. Si su vehículo no está equipado con guías de inserción para el anclaje
del sistema isofix puede utilizar las guías de inserción (02) que incluye la
silla. Inserte las 2 guías en los anclajes isofix del asiento del vehículo tal y
como muestra la fig. 1.
CONSEJO: Los puntos de anclaje isofix del vehículo se encuentra entre la
base y el respaldo del asiento (fig.1).
2. Desde la parte trasera de la silla, Tire de la correa (03) hacia afuera y
extraiga por completo los 2 brazos isofix (fig. 2).
3.2 Ajuste de la altura del reposacabezas para una instalación con el
arnés de 5 puntos. Grupo 1
El ajuste correcto del reposacabezas (07) garantiza la correcta instalación
del niño en la silla:
Debe de ajustarse de modo que el arnés de la silla (08) (que se desplaza junto
con el reposacabezas) quede al nivel de los hombros del niño o ligeramente
por encima, (fig. 3)
PRECAUCIÓN: El arnés nunca debe de quedar por detrás de la espalda o
a la altura de las orejas.
El arnés debe de ajustarse de la siguiente manera:
1. Pulse el botón de ajuste del arnés (26) a la vez que tira de las cintas del
arnés (08) hacia usted. Tenga cuidado de no tirar de las cintas de los
protectores de hombro (19). Afloje el arnés todo lo posible (fig. 4).
Desde la parte trasera de la silla:
2. Tire del regulador de altura del arnés (10) para desbloquear el
reposacabezas.
3. Deslice el regulador (10) para ajustar el arnés (08) a la altura coveniente al
niño. Suelte el regulador de altura para bloquear el reposacabezas (fig.5).
3.3. Ajuste de la altura del reposacabezas para una instalación con el
cinturón de 3 puntos del coche. Grupo 2/3
El ajuste correcto de la altura del reposacabezas (07) garantiza una correcta
posición de la sección diagonal del cinturón del coche (11) ofreciendo la
seguridad necesaria para el niño (fig. 6).
El reposacabezas (07) debe de ajustarse de modo que quede un espacio
aproximado de 2 dedos entre el reposacabezas y el hombro del niño.
Para ajustar el reposacabezas a la altura del niño:

14 15
www.babyqs.com
BCA 123
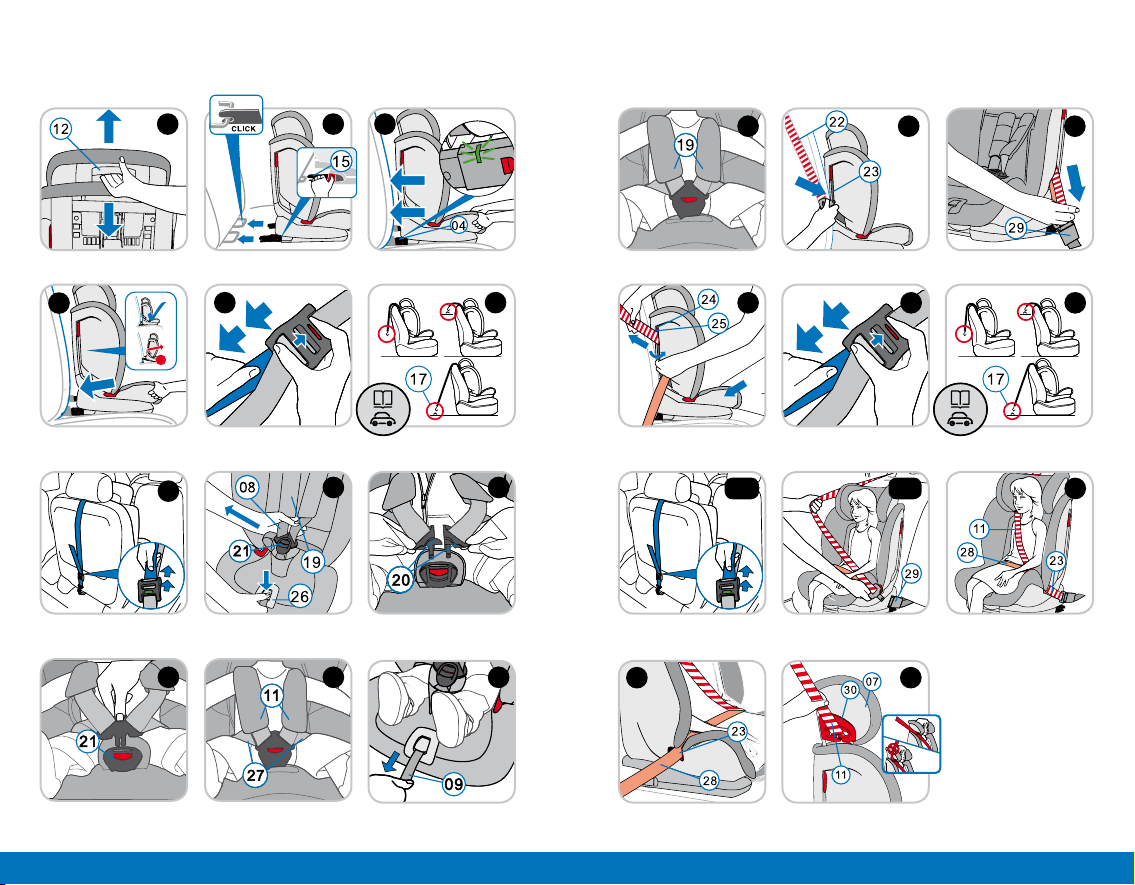
1. Presione hacia arriba el regulador de altura (12) del arnés en la parte
trasera del mismo para desbloquear el reposacabezas (07) (fig.7).
2. Sin dejar de presionar, tire del reposacabezas (07) hacia arriba o hacia
abajo para ajustarlo a la altura conveniente. Una vez que suelte el botón
regulador (12), el reposacabezas (07) quedará bolqueado en esa posición.
3. Si la posición del reposacabezas (07) no se ajusta convenientemente al
niño, reajústelo hasta que la sección diagonal del cinturón (10) quede
posicionado como se indica en el capítulo 3.2.
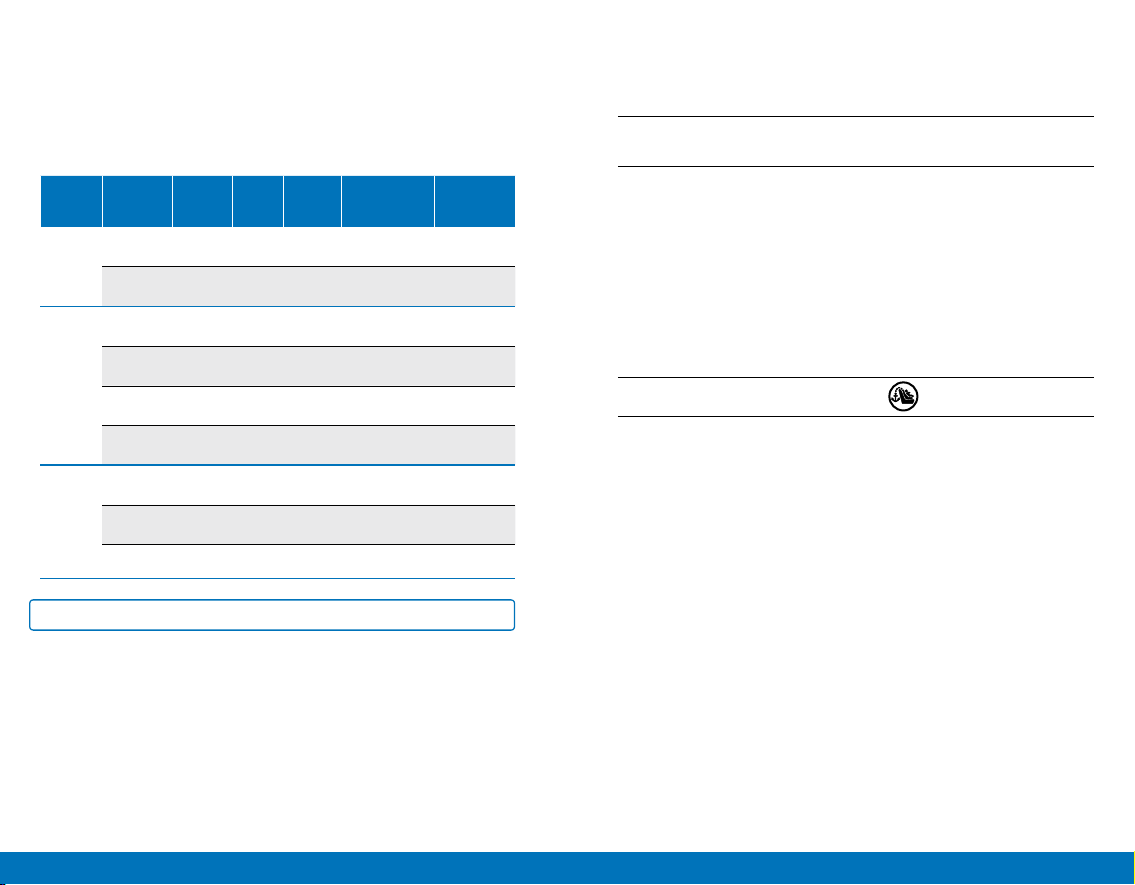
Esta silla ofrece diferentes posibilidades de instalación. La siguiente tabla
muestra los tipos de instalación segun los respectivosd grupos de uso:
grupo Modos de
instalación
cinturón
vehículo isoFiX top
tether
instalación
del niño
capítulo del
Manual
Grupo 1
Modo 1 Si Arnés de
5 puntos 4.1
Modo 2 Si Si Arnés de
5 puntos 4.2
Grupo 2
Modo 1 Si Si Arnés de
5 puntos 4.3
Modo 2 Si Cinturón del
vehículo 4.4
Modo 3 Si Si Cinturón del
vehículo 4.4
Modo 4 Si Si Si Cinturón del
vehículo 4.4
Grupo 3
Modo 1 Si Cinturón del
vehículo 4.4
Modo 2 Si Si Cinturón del
vehículo 4.4
Modo 3 Si Si Si Cinturón del
vehículo 4.4
4. INSTALACIÓN DE LA SILLA
4.1. GRUPO 1 (9-18 kg). Instalación con Isofix+Top tether+arnés de 5 puntos
1. Asegúrese de que el arnés 5 puntos está correctamente instalado (ver
capítulo 7).
2. Siga los pasos descritos en el punto 3.1. ( Preparación del sist. Isofix).
3. Siga los pasos descritos en el punto 3.2. (Ajuste del reposacabezas).
4. Saque el Top tether de su bolsa y déjelo sobre la silla.
5. Coloque la silla sobre el asiento del vehículo en orientada en la dirección
de la marcha.
6. Tomando la silla, inserte ambos brazos Isofix (15) dentro de las guías de
ayuda (02) hasta que se agarren en los anclajes
Isofix
del vehículo y se
cierren haciendo “click”. El indicador de cierre seguro del sistema
Isofix
(04) de la silla cambiará de rojo a verde en ambos lados (gs.8 y 9).
¡PRECAUCIÓN! Los brazos de anclaje isofix solo estarán correctamente
anclados si el los indicadores (04) están completamente verde.
7. Empuje la silla contra el asiento para replegar los brazos Isofix y que la
silla quede lo más pegada posible al asiento (g.10).
8. Sacuda la silla infantil de seguridad para asegurarse de que está anclada
de forma segura y revise los indicadores (04) de los brazos isofix para
comprobar que no hay error en la instalación.
9. Tome el Top Tether y si es necesario alargue la cinta a la medida necesaria
presionando el botón de freno del Top Tether para liberar la cinta, tirando
para ajustarla a la medida necesaria (fig. 11).
10.
Acople el gancho
(17)
del Top Tether en el punto de anclaje Top Tether
recomendado en la guía de usuario de su vehículo (fig.12).
CONSEJO:
Busque este símbolo en su vehículo.
11.
Para tensar el Top Tether retire la holgura tirando del extremo libre de la correa
hasta conseguir la tensión adecuada. El Top Tether estará correctamente
tensado cuando el indicador de tensión de color verde aparezca en su
totalidad (fig. 13).
12. Siga los pasos descritos en el siguiente punto para asegurar al niño con el
arnés de 5 puntos.
4.1.1 Asegurar al niño con el arnés de 5 puntos. Grupo 1
Recuerde que cuanto más ceñido quede el arnés al cuerpo del niño el nivel
de seguridad será mayor. Por lo tanto, evite que el niño vista prendas gruesas
cuando vaya a utilizar la silla con el arnés.
1. Pulsando el botón rojo de apertura, abra la hebilla del arnés .
2. Pulse el botón de ajuste del arnés (26) a la vez que tira de las cintas del
arnés (08) hacia usted. Tenga cuidado de no tirar de las cintas de los
protectores de hombro (19). Afloje el arnés todo lo posible (fig. 14).
3. Siente al niño en la silla.
4. Asegúrese que la espalda del niño queda bien apoyada contra el respaldo
de la silla.
5. Coloque al niño el arnés de la silla y juntando las 2 partes del broche (20),
insértelas en la hebilla (21).Oirá un “Click” indicando el cierre correcto
(fig.15,16,17).
16 17
www.babyqs.com
BCA 123
6. Estire la cinta de ajuste de arnés (09) para dar la tensión correcta al arnés.
Recuerde que para garantizar la seguridad del niño el arnés debe quedar
bien ceñido.
Por la seguridad del niño, antes de cada viaje compruebe que…
• lasillaestácorrectamenteancladamediantelosbrazosisofitalos
conectoresisofixdelvehículoenamboslados(15)ylosindicadoresde
anclaje aparecen completamente verdes.
• lasillaestáfirmementeinstaladaenelvehículo.
• lacintadeltoptether(13)estátensayelindicador(18)estádecolor
verde.
• lascintasdelarnésestánceñidasalcuerpodelniñoperosinoprimirlo.
• lascintasdeloshombros(08)estánajustadasylacintasnoestánni
torcidas ni dobladas.
• losprotectoresdehombro(19)alaalturadeloshombrosdelniño.
• losbrochesdelahebilla(20)estáncorrectamenteconectadosenla
hebilladelarnés(21).
4.2 GRUPO 1 (9-18 kg). Instalación con el cinturón del vehículo+arnés
de 5 puntos
1. Asegúrese de que el arnés está correctamente instalado (ver capítulo 7).
2. Siga los pasos descritos en el punto 3.2 (ajuste del reposacabezas).
3. Coloque la silla sobre el asiento del vehículo orientada en la dirección de
la marcha.
4. Tome del cinturón del vehículo (22) y guíelo a través de las guías para
el cinturón de la silla. Asegurese que el cinturón no queda ni doblado ni
torcido (fig. 20).
5. Conecte el cinturón del vehículo en su hebilla (29). Oirá un “click” que
indica el cierre correcto de la hebilla (fig. 21).
6. Pulse la palanca roja (24) del respaldo de la silla situada en el lado
contrario a la hebilla del cinturón del vehículo e introduzca la parte
diagonal del cinturón dentro del dispositivo de bloqueo del cinturón (25)
(fig. 22).
7. Presione con el cuerpo la silla (puede emplear la rodilla) y, al mismo
tiempo, tire de la sección diagonal del cinturón para tensarlo.
8. Siga los pasos descritos en el punto 4.1.1. “Asegurar al niño con el arnés
de 5 puntos.
Por la seguridad del niño, antes de cada viaje compruebe que…
• lasillaestáfirmementeinstaladaenelvehículo.
• elcinturónnoestádobladonitorcido.
• laseccióndiagonaldelcinturónestasolamentesujetaporeldispositivo
debloqueoenlapartecontrariaalahebilladelcinturóndelvehículo.
• lascintasdelarnésestánceñidasalcuerpodelniñoperosinoprimirlo.
• lascintasdeloshombros(08)estánajustadasylacintasnoestánni
torcidas ni dobladas.
• losprotectoresdehombro(19)alaalturadeloshombrosdelniño.
• losbrochesdelahebilla(20)estáncorrectamenteconectadasenla
hebilladelarnés(21).
4.3 GRUPO 2 (15-25 kg). Instalación con el cinturón del vehículo+arnés
de 5 puntos
1. Siga los pasos descritos en el punto 4.2. (instalar al niño con el cinturón
de 3 puntos).
2. Tome el Top Tether y si es necesario alargue la cinta a la medida necesaria
presionando el botón de freno del Top Tether para liberar la cinta, tirando
para ajustarla a la medida necesaria (fig. 23).
3.
Acople el gancho
(17)
del Top Tether en el punto de anclaje Top Tether
recomendado en la guía de usuario de su vehículo (fig.24).
CONSEJO:
Busque este símbolo en su vehículo.
4.
Para tensar el Top Tether retire la holgura tirando del extremo libre de la correa
hasta conseguir la tensión adecuada. El Top Tether estará correctamente
tensado cuando el indicador de tensión de color verde aparezca en su
totalidad (fig. 25/A).
5. Siga los pasos descritos en el punto 4.1.1 Asegurar al niño con el arnés de 5
puntos.
Por la seguridad del niño, antes de cada viaje compruebe que…
• lasillaestáfirmementeinstaladaenelvehículo.
• elcinturónnoestádobladonitorcido.
• elToptether(13)estátensosobreelrespaldodelasientodelvehículoyel
indicador(18)estáverde.
• laseccióndiagonaldelcinturónestasolamentesujetaporeldispositivo
debloqueo(25)enlapartecontrariaalahebilladelcinturóndelvehículo.
• lascintasdelarnésestánceñidasalcuerpodelniñoperosinoprimirlo.

18 19
www.babyqs.com
BCA 123
• lascintasdeloshombros(08)estánajustadasylacintasnoestánni
torcidas ni dobladas.
• losprotectoresdehombro(19)alaalturadeloshombrosdelniño.
• losbrochesdelahebilla(20)estáncorrectamenteconectadosenla
hebilladelarnés(21).
4.4 GRUPO 2 (15-25 kg) y GRUPO 3 (22-36 kg). Instalación con
el cinturón del vehículo
1. Asegúrese que el arnés de 5 puntos se ha retirado correctamente ( ver
capítulo 6).
2. Siga los pasos descritos en el punto 3.3 (ajuste del reposacabezas).
3. Coloque la silla sobre el asiento del vehículo.
• OPCIÓN A, instalar la silla mediante los conectores ISOFIX y el anclaje Top
tether
1. Saque el Top tether de su bolsa y déjelo sobre la silla.
2. Coloque la silla sobre el asiento del vehículo en orientada en la dirección
de la marcha.
3. Tomando la silla, inserte ambos brazos Isofix (15) dentro de las guías de
ayuda (02) hasta que se agarren en los anclajes
Isofix
del vehículo y se
cierren haciendo “click”. El indicador de cierre seguro del sistema
Isofix
(04) de la silla cambiará de rojo a verde en ambos lados (gs.8 y 9).
¡PRECAUCIÓN! Los brazos de anclaje isofix solo estarán correctamente
anclados si el los indicadores (04) están completamente verde.
4. Empuje la silla contra el asiento para replegar los brazos Isofix y que la
silla quede lo más pegada posible al asiento (g.10).
5. Tome el Top Tether y si es necesario alargue la cinta a la medida necesaria
presionando el botón de freno del Top Tether para liberar la cinta, tirando
para ajustarla a la medida necesaria (fig. 11).
6.
Acople el gancho
(17)
del Top Tether en el punto de anclaje Top Tether
recomendado en la guía de usuario de su vehículo (fig.12).
CONSEJO:
Busque este símbolo en su vehículo.
7.
Para tensar el Top Tether retire la holgura tirando del extremo libre de
la correa hasta conseguir la tensión adecuada. El Top Tether estará
correctamente tensado cuando el indicador de tensión de color verde
aparezca en su totalidad (fig. 13).
• Opción B, Instalación solamente con los conectores Isofix
1. Coloque la silla sobre el asiento del vehículo en orientada en la dirección
de la marcha.
2. Tomando la silla, inserte ambos brazos Isofix (15) dentro de las guías de
ayuda (02) hasta que se agarren en los anclajes
Isofix
del vehículo y se
cierren haciendo “click”. El indicador de cierre seguro del sistema
Isofix
(04) de la silla cambiará de rojo a verde en ambos lados (gs.8 y 9).
• Opción C, Instalación sin conectores Isofix ni Top tether
1. Asegúrese que los brazos Isofix están recogidos.
2. Coloque la silla sobre el asiento del vehículo en orientada en la dirección
de la marcha y siente al niño.
4.4.1 Asegurar al niño con el cinturón del vehículo. Grupo 2/3
1. Tome del cinturón del vehículo (22) y guíelo por encima del niño hasta
conectarlo a la hebilla del asiento vehículo (29). Oirá un “click” que indica
el cierre correcto de la hebilla (fig. 25/B).
PRECAUCIÓN: Asegurese que el cinturón no queda ni doblado ni torcido.
2. Pase el cinturón diagonal (28) por debajo de los reposabrazos a ambos
lados de la silla. Asegúrese que pasa por las guías rojas para el cinturón
(23) (fig.27).
3. Pase la parte superior del cinturón diagonal (11) por la guía roja del
reposacabezas (30) introduciéndolo dentro por completo. Asegúrese que
no queda doblado (fig.28).
4. Asegúrese que el cinturón diagonal (11) pasa sobre el hombro del niño y
no sobre le cuello.
CONSEJO: Puede ajustar la altura del reposacabezas (07) hasta
acomodarlo a la altura del niño.
Por la seguridad del niño, antes de cada viaje compruebe que…
• elcinturón(28)pasaporlasguíasinferiores(23)aambosladosdelasilla.
• elcinturóndiagonal(11)delladodelahebilladelcinturóndelcochepasa
tambiénporlaguíarojainferior(23)correspondiente.
• laseccióndiagonaldelcinturón(11)pordentrodelaguíaroja(30)del
reposacabezas.

20 21
www.babyqs.com
BCA 123
5. DESINSTALACIÓN DE LA SILLA
1. Desinstale los brazos Isofix. Pulse hacia atrás los botones de desbloqueo
(M) en ambos brazos Isofix. Los conectores se abrirán pasando de color
verde a rojo.
2. Abra la hebilla del cinturón del coche para retirar el cinturón del vehículo
en el caso de lo haya empleado para la instalación de la silla.
3. Para retirar el Top tether, destense la cinta pulsando el botón de freno.
Después, retire el gancho.
4. Empuje y recoja los brazos Isofix dentro de la carcasa de la silla.
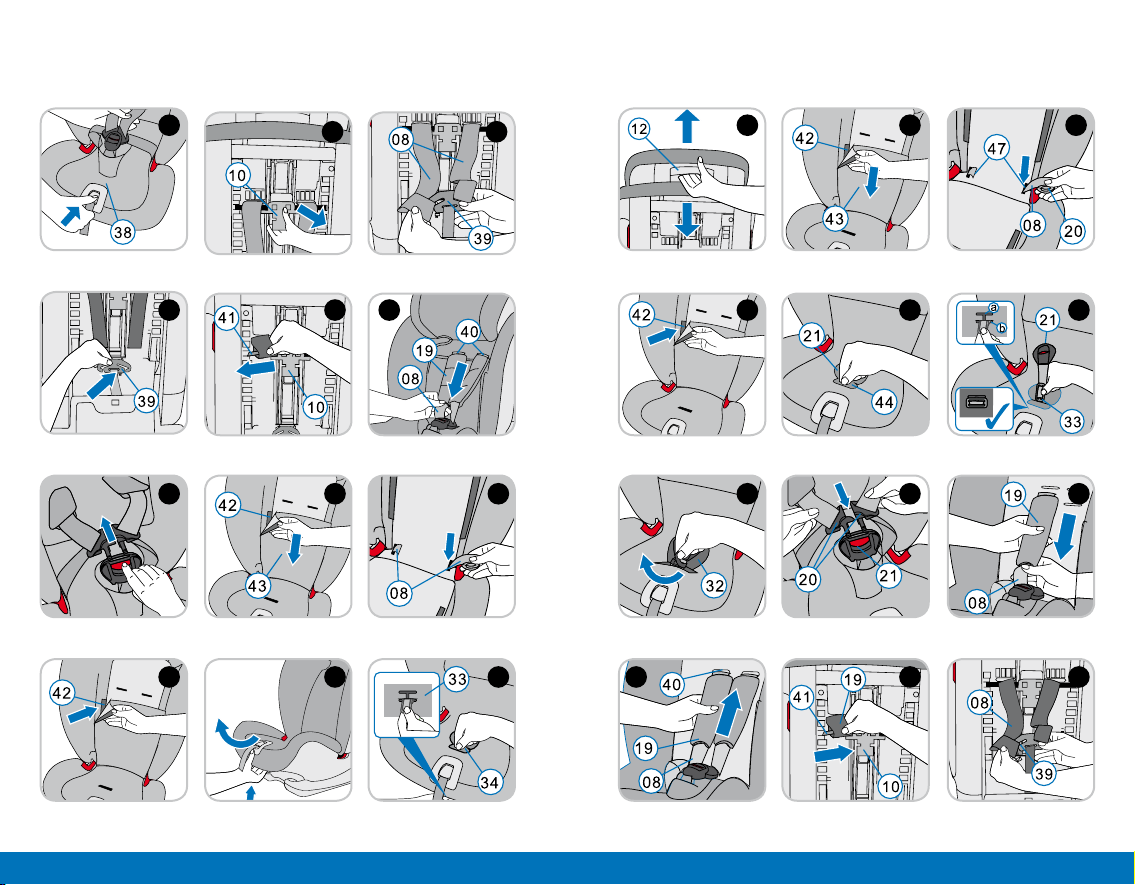
6. RETIRAR EL ARNÉS DE 5 PUNTOS
1. Afloje el arnés de 5 puntos tanto como le sea posible.
Desde la parte trasera de la silla:
2. Presione hacia arriba el regulador de altura (10) del arnés en la parte
trasera del mismo para desbloquearlo y tire hacia usted (fig. 30).
3. Mueva el regulador de altura (10) y fíjelo en la posición más alta.
4. Suelte las cintas del arnés de su conector (39) (fig. 31).
5. Guarde el conector de las cintas del arnés en su lugar de almacenaje (fig. 32).
6. Extraiga las cintas de los protectores de hombro de los ejes de plástico
(41) del regulador de altura del arnés (10) (fig. 33).
Desde la parte frontal de la silla:
7. Tire de los protectores de hombro (19) para retirarlos (40) (fig. 34)
8. Abra la hebilla del arnés (21) (pulsando el botón rojo de apertura) (fig.35)
9. Abra los velcros (42) de la parte inferior del tapizado del respaldo de la
silla (43) y guarde los broches de la hebilla (20) en los compartimentos del
respaldo (figs. 36 y 37).
10. Pliege las cintas del arnés (08) y guárdelas también en dichos
compartimentos (fig. 37)
11. Una vez realizada la operación, vuelva a cerrar el tapizado (42) (fig. 38)
12. Tire de la palanca de reclinado y recline al máximo la silla (fig. 39).
13. Localice la placa de retención de la hebilla del arnés (33) situada en la
parte inferior del asiento y gírela en posición vertical.
14. Empuje la placa (33) hacia arriba a traves de la ranura del asiento (34)
para sacarla y poder retirar la hebillla del arnés (fig. 40).
7. RECOLOCAR EL ARNÉS DE 5 PUNTOS
1. Presione el regulador de altura (12) y mueva el reposacabezas (07) hasta
su posición más baja (fig. 41).
2. Abra los velcros de la parte inferior del tapizado del respaldo de la silla
(43) para acceder al respaldo del asiento (fig. 42).
3. Saque las cintas del arnés y las placas (20) del compartimento de
almacenaje (47) (fig. 43).
4. Desdoble la cintas del arnés y cierre con los velcros (42) la parte inferior
del tapizado (fig. 44).
5. Recoloque la hebilla del arnés (21) y su protector de tela. Para el Grupo
1 (9-18 kg) use la ranura para las cintas más cercana al respaldo y, para
Grupo 2 (15-25 kg), la ranura más alejada.
6. Coja la hebilla del arnés (21) y tomando la placa de la hebilla (33) en
posición vertical a través de la ranura del asiento pasándola hasta el otro
lado (fig. 45).
7. Mire en la parte baja del asiento para asegurarse que la placa de la hebilla
(33) queda en posición perpendicular a la ranura y compruebe que queda
firme tirando de la hebilla varias veces (fig. 46 y 47).
8. Junte los broches del arnés (20) e insértelos en la hebilla del arnés. Oirá
un “Click” indicando el cierre correcto de la hebilla (fig. 48).
¡PRECAUCIÓN! Compruebe que las cintas del arnés no quedan dobladas
ni giradas.
9. Pase las cintas del arnés a través de los protectores de hombro (19)
para volver a colocarlos. Tenga en cuenta la orientación correcta de los
protectores antes de colocarlos. Alinee las cintas de los protectores de
hombro (08) y de las cintas del arnés (19) (fig. 49).
10. Pase ambas cintas a través de las ranuras (40) correspondientes del
respaldo hasta llegar a la parte trasera del respaldo (fig.50).
11. Tire y coloque las cintas del arnés (19) en los ejes de plástico (41) del
regulador de altura del arnés (10) (fig. 51).
12. Saque el conector de las cintas del arnés (39) de su lugar de almacenaje.
13. Enganche las cintas del arnés (08) en el conector metálico (39). La cinta
izquierda, el la parte izquierda y la derecha en la derecha del conector (fig. 52).
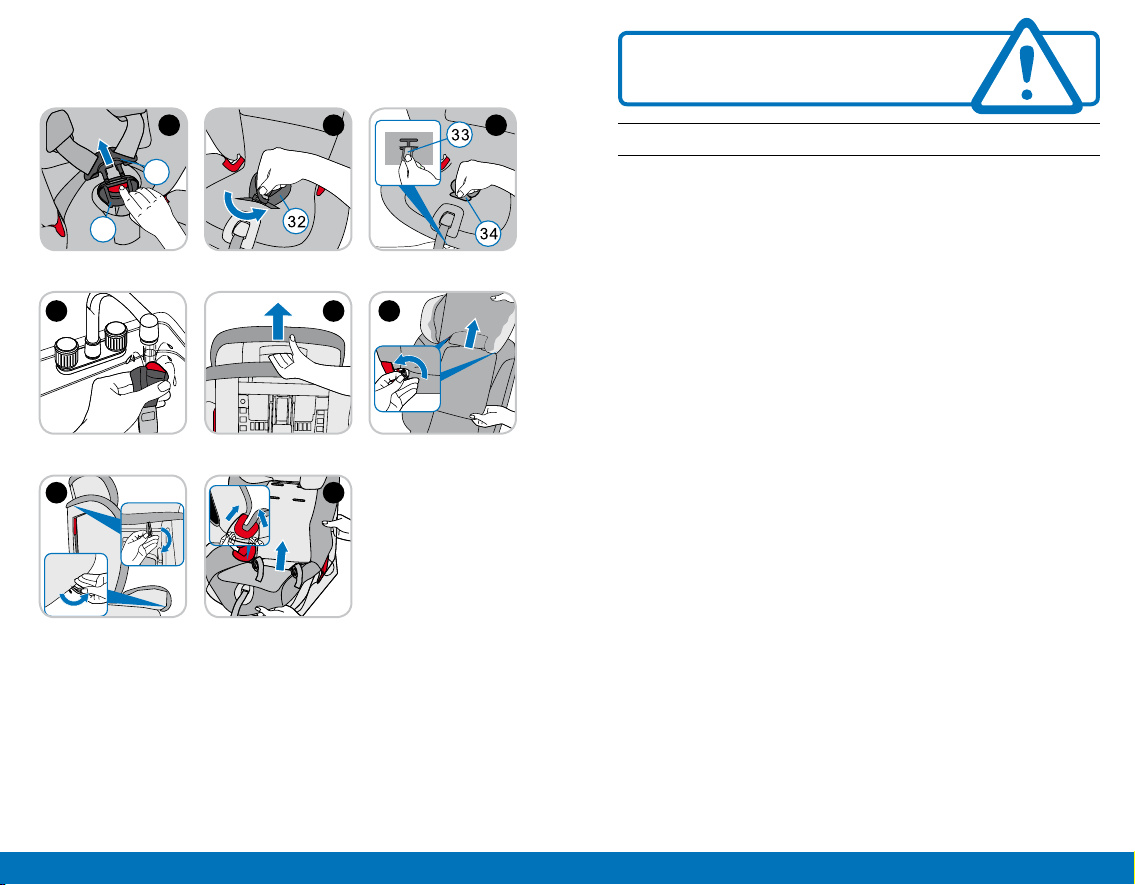
8. CUIDADO Y MANTENIMIENTO
8.1 Cuidado de la hebilla
Es vital para la seguridad del niño, que la hebilla del arnés funcione
correctamente. El mal funcionamiento de la hebilla suele deberse
generalmente a la acumulación de suciedad y cuerpos extraños.
Ejemplosdemalfuncionamiento:
• Los broches de la hebilla son expulsados con demasiada suavidad
cuando pulsamos el botón rojo de apertura de la hebilla.
• losbrochesdelahebillanoenganchanenlahebillaysonexplusadossi
se intenta insertalos en la hebilla.
• Losbrochesdelahebillaseconectanperonoseescuchael“click”de
cierre.
22 23
www.babyqs.com
BCA 123
• Losbrochesseinsertancondificultad(seobservaresistencia).
• Lahebilladelarnéssoloseabresiseaplicamuchafuerzaalbotóndeapertura.
Remedio:
Limpie la hebilla del arnés para que recupere su funcionalidad original.
1. Siga los pasos decritos en el capítulo 6 para retirar la hebilla (21) de la silla
(fig. 53, 54, 55).
2. Sumerja la hebilla del arnés en agua tibia con detergente líquido durante
por lo menos 1 hora. Sáquelo del agua y séquelo cuidadosamente.
8.2 Limpieza
• Latapiceríadelasillasepuededesmontarylimpiar.Porfavor,sigalas
instrucciones de lavado de la etiqueta que acompaña a la tapicería.
Retirarlatapicería
A)Reposacabezas
1. Coloque el reposacabezas en su posición más alta (fig. 57).
2. Suelte las gomas de la tapicería del reposacabezas retirándolas de los ganchos
de plástico de la parte trasera para poder retirar por completo la funda (fig. 58).
B)Cuerpodelatapicería
1. Desenganche la tapicería de los ganchos de la parte inferior (fig. 59).
2. Retire la tapicería (fig. 60)
Paravolveracolocarlafundasigalospasosanterioresalainversa.
9. GARANTÍA
1. Quedan excluidos los defectos o averías producidas por uso inadecuado,
o el incumplimiento de las normas de seguridad de instalación y
mantenimiento descritas en las hojas de instrucciones que acompañan
los productos.
2. Garantizada la reparación totalmente gratuita de defectos originarios.
3. En los supuestos en que la reparación efectuada no fuera satisfactoria
y el producto no revistiese las condiciones óptimas para cumplir el uso
a que estuviese destinado, el titular de la garantía tendrá derecho a la
sustitución del artículo adquirido por otro de similares características o a
la devolución del precio pagado, en los 2 años siguientes a la fecha.
4. La garantía se considerará automáticamente cancelada si el artículo
adquirido hubiera sido reparado o hubiera intentado repararlo una
persona no autorizada por nuestra empresa.
1. Only suitable if the approved vehicle has been fitted with three-point safety
belts that meet ECE standard Nº 16 or equivalent.
2. Please read these instructions carefully, as incorrect installation could
result in serious injury. If any injuries should occur as a result of incorrect
installation, the manufacturer will accept no responsibility.
3. This child safety seat is suitable for use as group 123 from approx. 9
months to 12 years age / 9-36 kg.
4. This child seat must be used WITH the harness system for children weighing
between 0 kg and 18 kg.
5. This child seat may be used WITHOUT the harness system for children
weighing between 15 kg and 36 kg.
6. This child seat is in accordance with the ECE R44/04 regulations and may
be installed in the majority of vehicles equipped with approved points,
such as ISOFIX points, in accordance with ECE regulation 16. However,
prior to purchase, the child seat should always be tested in your vehicle
with the child seated, in order to ensure that the model meets your needs.
7. Never use the child safety seat without its cover.
8. Protect the child safety seat from direct sunlight, as the seat can get very
hot and harm the child.
9. Child seats or accessories that are damaged or have been used
incorrectly must be replaced.
10. Do not leave heavy objects inside the car, as these may injure the child in
the event of an accident.
11. Ensure that no part of the child seat is caught in the door of the vehicle
or in a reclining seat. In addition, ensure that the safety seat is correctly
installed and secured.
12. Do not disassemble, modify, or add any piece to the child seat or harness,
as this would seriously affect its basic functioning and the safety that the
child seat provides.
13. The safety seat must remain installed in the vehicle. Even if the child is
not seated in the car seat. The child must never be left unattended while
seated in the safety seat, not even outside the vehicle.
14. Keep the safety seat away from corrosive products.
15. The manufacturer guarantees the quality of its products, but not the quality
of second-hand products or products belonging to other companies.
NOTICE
IMPORTANT
Read the instructions carefully before
installing the child seat in the vehicle.
24 25
www.babyqs.com
BCA 123
16. Instruction illustrations are for informational purposes only. The child
restraint system may contain small differences compared to the
photographs or images in the instruction manual.
A. Headrest.
B. Diagonal belt guides. Group 2/3.
C. Shoulder pads.
D. Harness straps.
E. Harness buckle.
F. Harness adjustment button.
G. Harness adjustment strap.
H. Reclining lever.
I. Headrest height regulator.
J. Harness Height adjuster.
K. Installation manual bin.
L. Isofix arms.
M. Isofix arms unlocking button.
N. Abdominal belt guides
O. Diagonal belt locking lever.
P. Isofix adapters.
2. VEHICLE INSTALLATION POINTS
WHERE:
In the vehicle rear seats.
2
1
HOW:
Install rearward facing.
GROUP 1 • (optional) Install forward facing.
GROUP 2/3 • Install forward facing.
In seats with:
ISOFIX anchorages (between seat and backrest) and Top Tether anchor points
(eg in the tray, on the floor or behind the backrest) and 3-point belt (vehicle belt).
NOTICE:
The child seat must only be used in this seat IF it has a lap and diagonal
belt (3 points).
* Please, do NOT install the safety seat in forward seats except for the
following cases:
1. Whenever the vehicle does not count with rear seats.
2. When all rear seats are already occupied by children exceeding
135 cm height.
3. When it is not possible to install all child restraints systems in the rear seats.
*Note: According to Spanish legislation for child restraint systems (Royal Decree 667/2015).
1. GENERAL OVERVIEW
3. PREPARATORY WORKS
3.1 Prepare ISOFIX
1. If your vehicle is not equipped with the ISOFIX insert guides as standard, clip
the two insert guides 02 which are included with the seat with the cut-out
facing upwards onto the two ISOFIX attachment points 01 of your vehicle.
TIP: The ISOFIX attachment points are located between the surface and the
backrest of the vehicle seat (fig.1).
2. Pull the fabric loop (03) to pull out both locking arms to longest position (fig.2).
3.2 Adjusting the headrest in 5-point harness installation. Group 1
A correctly adjusted headrest (07) ensures optimal protection for your child
in the safety seat:
The headrest (07) must be adjusted so that the shoulder belts (08) are at the
same level as your child’s shoulders (fig.3).
CAUTION! The shoulder belts (08) must not run behind the back of the
child or at ear height or above the ears.
The shoulder belts are adjusted as follows:
1. Press the adjusting button (26) and at the same time pull both
shoulder belts (08) forwards. Do not pull on the shoulder pads (19),
loosen the 5-point harness of the child seat as mush as possible (fig.4).
Back side of the child seat:
2. Press the button of the shoulder belt height adjuster (10) at the rear of the
seat shell and tilt the shoulder belt height adjuster (10) towards you.
3. Slide the shoulder belt height adjuster (10) to select the correct height of
the shoulder belts (08) and engage it in the position that fits for your child
by releasing the button (fig.5).
3.3. Adjusting the headrest in vehicle belt installation. Group 2/3
A correctly adjusted headrest (07) ensures that the diagonal seat belt section
(11) is optimally positioned, and gives your child the optimal protection.
The headrest (07) must be adjusted so that there is a space two fingers wide
between the headrest (07) and your chidl’s shoulders (fig.6)
To adjust the height of the headrest to fit your child:
1. Squeeze the adjustment handle (12) on the back of the headrest (07). This
unlocks the headrest (fig.7).
2. You can now move the unlocked headrest (07) to the desired height. As
26 27
www.babyqs.com
BCA 123
soon as you release the adjustment handle (12) the headrest (07) will lock
into place.
3. If the position of headrest (07) is still not fix child, additional adjustment
can be made through the shoulder belt height adjuster (10), as explained
in Section 3.2.
This seat offers a variety of mounting options, the following table indicates
the types of installation for the respective groups:
group Fitting
options
vehicle
belt isoFiX top
tether
child
installation
user chapter
guide
Group 1
Method 1 Yes With 5-point
harness 4.1
Method 2 Yes Yes With 5-point
harness 4.2
Group 2
Method 1 Yes Yes With 5-point
harness 4.3
Method 2 Yes Vehicle belt 4.4
Method 3 Yes Yes Vehicle belt 4.4
Method 4 Yes Yes Yes Vehicle belt 4.4
Group 3
Method 1 Yes Vehicle belt 4.4
Method 2 Yes Yes Vehicle belt 4.4
Method 3 Yes Yes Yes Vehicle belt 4.4
4. INSTALLATION
4.1. GROUP 1 (9-18 kg). With ISOFIT + Top Tether + 5-Point Harness
1. Make sure that the child seat’s 5-point harness is installed correctly (see
section 7).
2. Follow the steps in section 3.1(to prepare the ISOFIX.)
3. Follow the steps in section 3.2 (to adjust headrest.)
4. Take the Top Tether and lay it over the child seat.
5. Place the child seat facing in the direction of travel on the vehicle seat.
6. Grasp the child seat with both hands and slide the two locking arms
(15) rmly into the insert guides (02) until the locking arms engage with a
clicking noise on both sides, the ISOFIX indicator (04) turn green on both
side (gs.8 and 9).
CAUTION! The locking arms are only correctly engaged if both of the safety
buttons (04) are completely green.
7. Push the child seat towards the backrest applying rm, even pressure on
both sides (g.10).
8. Try to move the child safety seat to makesure it is safely attached and
recheck the green safety buttons (04) to make sure that both of them are
completely green.
9. Take the top tether and if required, lengthen the belt by pressing the top
tether brake button to release the strap, pulling to adjust as necessary
(g.11).
10. Hook the snap hook (17) into the Top Tether anchoring point recommended
in your vehicle owner’s guide (g.12).
TIP: Look for this symbol in your vehicle.
11. To tension the top tether, remove any slack by pulling on the free end of
strap until it is suitably tightened. The top tether will be properly tightened
when the tension indicator turns completelygreen (g.13).
12. Follow the steps in the next section securing your child with 5-point
harness.
4.1.1. Securing your child with 5-point harness. Group 1
The more snugly the harness fits over your child’s body, the better your
child will be protected. Therefore avoid putting thick clothes on your child
under the belt.
1. Open the harness buckle (21) by pressing red button.
2. Press the adjusting button (26) and at the same time pull both shoulder
belts (08) forwards Do not pull on the shoulder pads (19) (fig.14) .
3. Place your child sit down in the child seat.
4. Make sure that your child’s back lies flat against the backrest of the child
seat.
5. Guide the two buckle latches (20) together and engage them before
putting them into the harness buckle (21) - this should make a click noise
(fig.15,16,17).
6. Pull on the adjuster strap (09) until the harness lies flat and is close
against your child’s body.

28 29
www.babyqs.com
BCA 123
Forthesafetyofyourchild,beforeeveryjourneyinthecarcheckthat...
• thechildsafetyseatisengagedonbothsideswiththeISOFITlocking
arms(15)intheISOFIXattachmentpoints01andthatbothgreensafety
buttons04arecompletelygreen.
• thechildseatisfirmlyinstalledinthevehicle.
• theTopTether(13)istightlytensionedoverthebackrestofthecarseat
andthetensionindicator(18)isgreen.
• thestrapsofthechildsafetyseatareclosetothebodywithout
constrictingthechild.
• theshoulderbelts(08)arecorrectlyadjustedandthestrapsarenot
twisted.
• theshoulderpads(19)areatthesamelevelasyourchild’sshoulders.
• thebucklelatches(20)areengagedintheharnessbuckle(21).
4.2 GROUP 1 (9-18 kg). Vehicle belt+ 5-Point Harness
1. Make sure that the child seat’s 5-point harness is installed correctly (see
section 7).
2. Follow the steps in section 3.2 ( to adjust headrest).
3. Place the child seat facing in the direction of travel on the vehicle seat.
4. Pull the vehicle belt (22) out and guide it through the belt guides of the
child seat. Make sure that the belt is not twisted (fig.20).
5. Engage the buckle tongue in the vehicle seat buckle (29) this should make
a click noise (fig.21).
6. On the side opposite the car seat belt buckle, press lever (24) and hold
down and insert diagonal belt in belt lock-off (25) (fig.22).
7. Apply your body weight to the child seat (kneel into the seat). At the same
time pull the diagonal belt strongly to tighten .
8. Follow the steps in section securing your child with 5-point harness.
Forthesafetyofyourchild,beforeeveryjourneyinthecarcheckthat...
• thechildseatisfirmlyinstalledinthevehicle.
• thebeltisnottwisted.
• thediagonalbeltisonlyclampedbythelock-offwhichislocatedonthe
oppositesidefromthecarseatbeltbuckle.
• thestrapsofthechildsafetyseatareclosetothebodywithout
constrictingthechild.
• theshoulderbelts(08)arecorrectlyadjustedandthestrapsarenottwisted.
• theshoulderpads(19)areatthesamelevelasyourchild’sshoulders.
• thebucklelatches(20)areengagedintheharnessbuckle(21).
4.3 GROUP 2 (15-25 kg). Vehicle belt+ Top tether +5-Point Harness
1. Follow the steps in section 4.2 (to fix child seat by three point belt).
2. Take the top tether and if required, lengthen the belt by pressing the top
tether brake button to release the strap, pulling to adjust as necessary
(fig. 23).
3. Hook the snap hook (17) into the Top Tether anchoring point recommended
in your vehicle owner’s guide (g.24).
TIP: Look for this symbol in your vehicle.
4. To tension the top tether, remove any slack by pulling on the free end of
strap until it is suitably tightened. The top tether will be properly tightened
when the tension indicator turns completely green (fig.25/A).
5. Follow the steps in section securing your child with 5-point harness.
Forthesafetyofyourchild,beforeeveryjourneyinthecarcheckthat...
• thechildseatisfirmlyinstalledinthevehicle.
• thebeltisnottwisted.
• theTopTether(13)istightlytensionedoverthebackrestofthecarseat
andthetensionindicator(18)isgreen.
• thediagonalbeltisonlyclampedbythelock-offwhichislocatedonthe
oppositesidefromthecarseatbeltbuckle.
• thestrapsofthechildsafetyseatareclosetothebodywithout
constrictingthechild.
• theshoulderbelts(08)arecorrectlyadjustedandthestrapsarenottwisted.
• theshoulderpads(19)areatthesamelevelasyourchild’sshoulders.
• thebucklelatches(20)areengagedintheharnessbuckle(21).
4.4 GROUP 2 (15-25 kg) & GROUP 3 (22-36 kg) Vehicle belt
1. Make sure that the child seats 5-point harness is removed correctly (see
section 6).
2. Follow the steps in section 3.3 (to adjust headrest).
3. Install car seat on vehicle.
• Option A, Install child seat with ISOFIX connectors and Top tether.
1. Take the Top Tether and lay it over the child seat.
2. Place the child seat facing in the direction of travel on the vehicle seat.
3. Grasp the child seat with both hands and slide the two locking arms
(15) firmly into the insert guides (02) until the locking armsengage with a
30 31
www.babyqs.com
BCA 123
clicking noise on both sides, the ISOFIX indicator (04) turn green on both
sides (fig.8,9).
4. Take the top tether and if required, lengthen the belt by pressing the top
tether brake button to release the strap, pulling to adjust as necessary
(fig.11).
5. Hook the snap hook (17) into the Top Tether anchoring point recommended
in your vehicle owner’s guide. Look for this symbol in your vehicle (fig.12).
6. To tension the top tether, remove any slack by pulling on the free end of
strap until it is suitably tightened. The top tether will be properly tightened
when the tension indicator turns completely green (fig.13).
• Option B, Install Child seat with ISOFIX connectors only.
1. Place the child seat facing in the direction of travel on the vehicle seat.
2. Grasp the child seat with both hands and slide the two locking arms
15 firmly into the insert guides 02 until the locking arms engage with a
clicking noise on both sides, the ISOFIX indicator (04) turn green onboth
sides (fig.8,9).
• Option C, Install without ISOFIX connectors neither Top tether.
1. Make sure ISOFIX connectors are in shortest position.
2. Have your child sit down in the child seat.
4.4.1 Securing your child using the car seat belt. Group 2/3
2. Pull out the vehicle seat belt and guide it in front of your child to the
vehicle seat buckle (29) . Engage the buckle tongue in the vehicle seat
buckle (29) CLICK! (fig.25/B)
CAUTION! Do not twist the belt.
3. Place the diagonal seat belt section (11) and lap belt section (28) on the
side of the vehicle seat belt buckle (29) under the armrest and into the red
beltguide (23) of the child seat (fig.26).
4. Place the lap belt section (28) on the other side of the child seat in the red
belt guide (23) (fig.27).
5. Guide the diagonal seat belt section (11) into the red belt holder (30) of
the headrest (07) until it lies completely in the belt holder (30) and is not
twisted (fig.28).
6. Make sure that the diagonal seat belt section (11) runs over your child’s
shoulder bone, and not in front of his or her neck.
TIP!You can still adjust the height of the headrest (07) again here inthe vehicle.
Forthesafetyofyourchild,beforeeveryjourneyinthecarcheckthat...
• thelapbeltsection(28)runsthroughthelightredbeltguides(23)onboth
sidesoftheseatcushion
• thediagonalseatbeltsection(11)onthesideofthevehicleseatbelt
buckle(29)alsorunsthroughthelightredbeltguide(23)oftheseat
cushion.
• thediagonalseatbeltsection(11)runsthroughthedarkredbeltholder
(30)oftheheadrest.
5. REMOVAL OF THE CHILD SEAT
1. To release the ISOFIX fastening, squeeze the safety button (M) ,first on
one side, then on the other.
2. Open the buckle of the vehicle seat belt and pull out the diagonal from
lock-off.
3. To release the Top Tether anchoring, loosen the belt by pressing the brake
button of the adjuster. Then take the snap hook out of the anchoring
point.
4. Push the ISOFIX locking arms back into the seat shell.
6. REMOVING THE 5-POINT HARNESS
1. Loosen the 5-point harness 38 of the child seat as much as possible
(fig.29).
Back side of the child seat:
2. Press the button of the shoulder belt height adjuster (10) at the rear of
the seat shell and tilt the shoulder belt height adjuster (10) towards you
(fig.30).
3. Move the shoulder belt height adjuster (10) into the top position and fix
the position by releasing the button of the shoulder belt height adjuster.
4. Loosen the 5-point harness (38) of the child seat as much as possible.
Unhook the shoulder belts 08 on the back side of the child seat from the
connecting piece (39) (fig.31) .
5. Snap the connecting piece 39 in the provided storage (fig.32).
6. Slide the belt loops off of the plastic extensions (41) of the shoulder belt
height adjuster (10) (fig.33).
Front side of the child seat:
7. Pull below both, the shoulder pads 19 and the two shoulder belts (08) to
the front through the slots (40) (front side of the child seat) (fig.34).
32 33
www.babyqs.com
BCA 123
8. Open the harness buckle (21) (press the red release button) (fig.35)
9. Open the left and right velcro (42) on the lower part of the cover (43) and
lift the cover piece to the front. Slide the buckle latches (20) down into the
storage compartments (fig.36,37).
10. Roll the shoulder belts (08) together and place them also into the storage
compartments (fig.37).
11. Repositon the two cover parts to the rear and lock the velcro (42) on the
left and right side of the cover back side (fig.38).
12. Lift the recline handle and pull at the front to fully recline the child seat
(fig.39).
13. Grasp the metal plate (33) from underneath and turn it into a vertical
position.
14. Push upwards and slide the metal plate (33) through the slot (34) .
Remove the harness buckle (fig.40).
7. REFITTING THE 5-POINT HARNESS
1. Squeeze the adjustment handle (12) at the rear of the headrest (07) and
push the headrest into the lowest position (fig.41).
2. Open the left and right buttons on the lower part of the cover (43) and lay
the cover piece on the seating area (fig.42).
3. Take the shoulder belts 08 and the buckle latches (20) from the storage
compartment (47) and unroll the shoulder belts (fig.43).
4. Fold back the two cover pieces and close the left and right poppers (42)
on the lower part of the cover (fig.44).
5. Refitting harness buckle (21) and crotch pad. Group 1 (9-18 kg) use the
belt slot closest to the backrest a ,for Group 2 (15-25 kg) use the one
furthest away.
6. Take the harness buckle (21) and hold the metal plate (33) verticaly. Push
it with the narrow side upwards through the belt slot a or b into the seat
shell from above (fig.45).
7. Ensure by looking underneath the seat that the metal plate (33) is in a
horizontal position and check the installation by pulling on the harness
buckle (21) several times (fig.46,47).
8. Guide the two buckle latches (20) together and engage them before
putting them into the harness buckle (21) - this should make a click noise
(fig.48).
CAUTION! The lap belts must not be twisted or swapped.
9. Thread the shoulder pads (19) onto the shoulder belts 08 in the correct
orientation as shown ensuring there are no twists. Align the two loops of
the shoulder belts (08) and strap loops of the shoulder pads (19) (fig.49) .
10. Pull the shoulder belts (08) and the strap loops of the shoulder pads (19)
through the slots (40) (fig.50).
11. Pull the strap loops of the shoulder pads (19) onto the plastic extensions
(41) of the shoulder belt height adjuster (10) (fig.51).
TIP: the strap loops of the shoulder pads should be the lower loop.
CAUTION! The shoulder belts (08) must not be twisted or swapped.
12. Take the connecting piece (39) from the provided storage on the back
side of the child seat.
13. Hook the shoulder belts (08) back onto the connecting piece (39) . The left
loop on the left arm of the connecting piece and the right loop on the right
arm (fig.52).
8. CARE AND MAINTENANCE
8.1 Care for the harness buckle
It is vital for the safety of your child that the harness buckle works correctly
Malfunctions of the harness buckle are usually caused by accumulations of
dirt or foreign bodies.
Malfunctionsareasfollows:
• Thebucklelatchesareejectedonlyslowlywhentheredreleasebuttonis
pressed.
• Thebucklelatcheswillnolongerlockhome(i.e.theyareejectedagainif
you try to push them in).
• Thebucklelatchesengagewithoutanaudible„click“.
• Thebucklelatchesaredifficulttoinsert(youfeelresistance).
• Thebuckleonlyopensifextremeforceisapplied.
Remedy
Wash out the harness buckle so that it functions properly once again:Cleaning
the harness buckle.
1. Follow section 6 to Remove the harness buckle (21) (fig.53,54,55)
2. Soak the harness buckle (21) in warm water with washing-up liquid for at
least an hour. Then rinse and dry it thoroughly.

34 BCA 123
8.2 Cleaning
• Thecovercanberemovedandwashed.Pleaseobservetheinstructions
on the washing label of the cover.
Removingthecover
A)Headrest
1. Move the headrest of the child seat to the upper position (fig. 57).
2. Take the elastic seam of the cover from the hooks at the back side of the
headrest (fig. 58) and remove the cover of the headrest.
B)Cover
1. Undo the hooks on the bottom side (fig. 59).
2. Remove the cover (fig. 60).
Re-fittingSimplyfollowthestepsintheoppositeorder.
9. GUARANTY
1. The warranty does not cover defects or failures caused by inappropriate
use or non-compliance with the installation and maintenance safety
standards described in the instruction guides provided with the products.
2. Total repair of original defects is guaranteed free of charge.
3. If repairs carried out are not satisfactory and the product does not
meet the optimal conditions for fulfilling its intended use, the holder of
the warranty shall have the right to substitute the acquired article with
another one of similar characteristics, or have the price paid returned, in
the 2 years following the date of purchase.
4. The warranty shall be automatically considered void if the article acquired
has been repaired or if an attempt has been made to repair it by an
individual that is not authorised by our company.
BABYAUTO GROUP
Parque Empresarial Zuatzu
Edificio Donosti, 2ª planta Oficina 3
20018 San Sebastián (Gipuzkoa)
Spain
t. (+34) 943 833 013
f. (+34) 943 833 004
www.babyqs.com
st-2
GR. I-II-III
9/36 kg
ECE R44/04
Table of contents
Languages:
Other BQS Car Seat manuals


