6
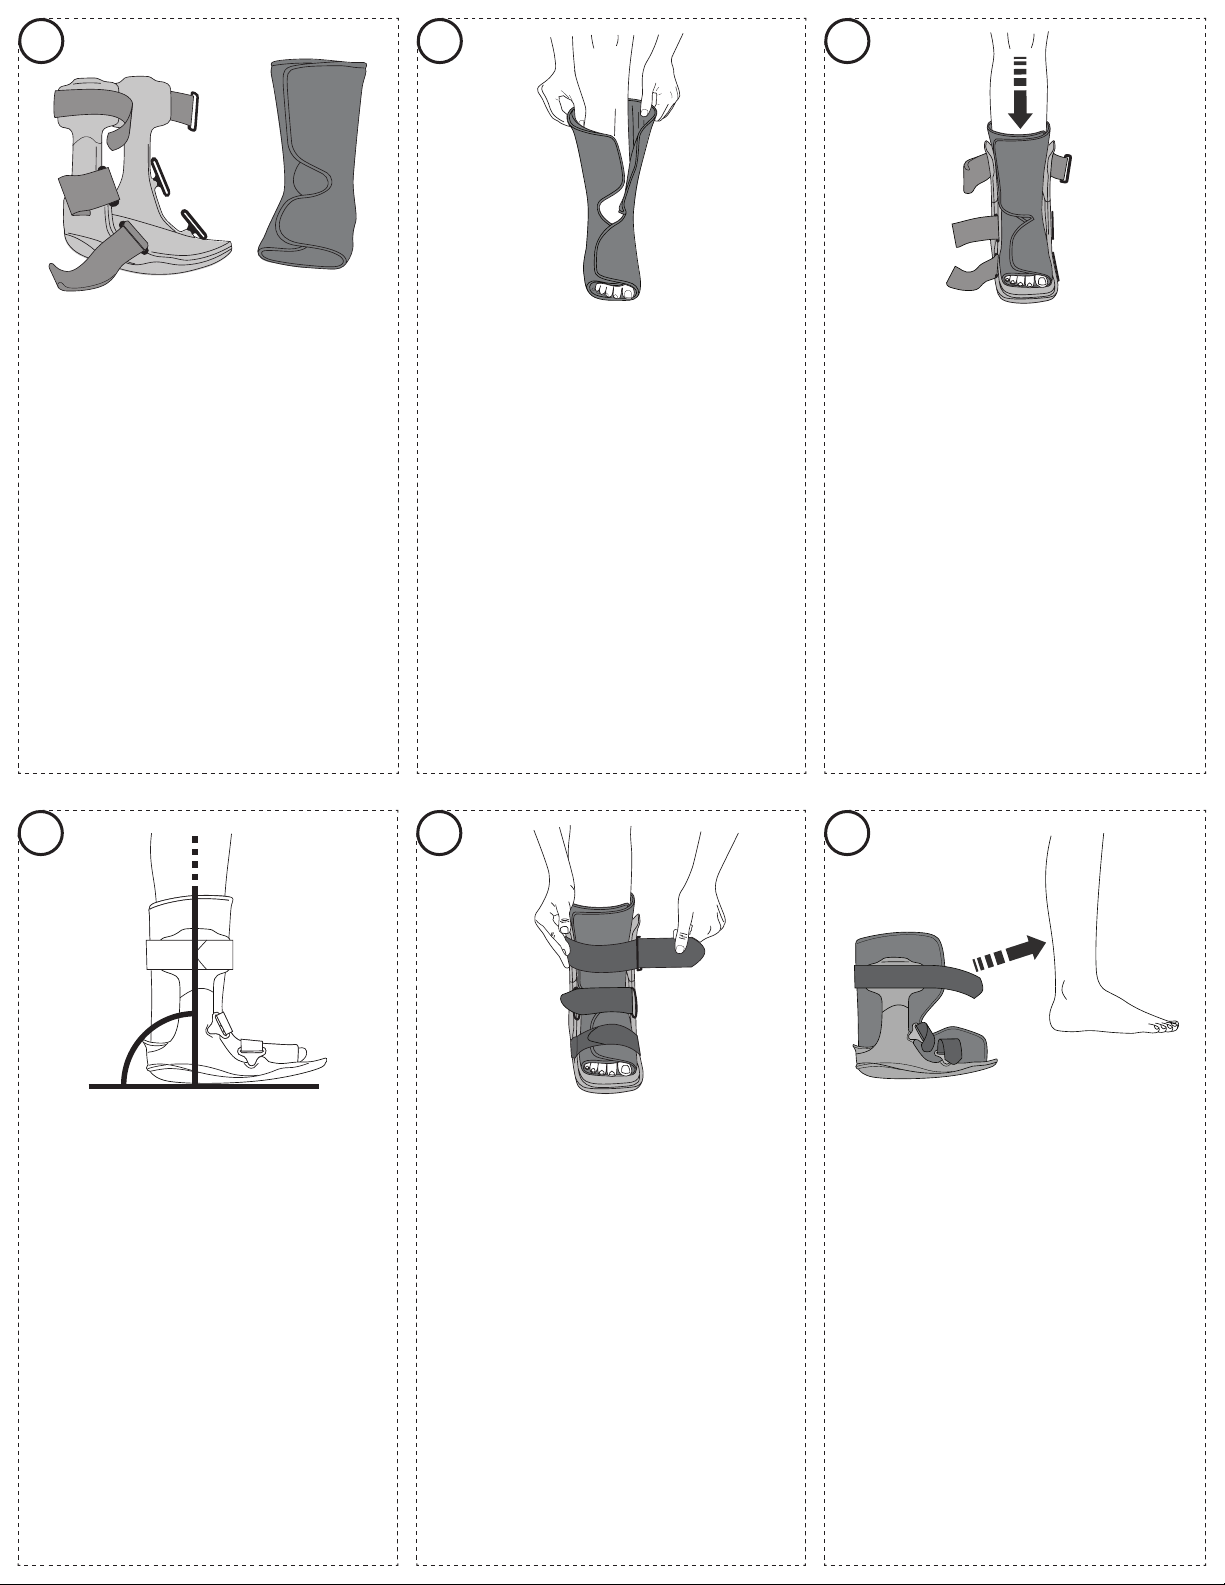
To remove, simply unfasten the straps without removing them
completely from the assembled walker. Unfasten the soft good liner
and gently bring the foot and ankle forward and out of the walker.
To reapply, place the foot and ankle into the liner and reattach the
hook and loop straps (As per Fig. 5).
Para quitarse la férula, simplemente afloje las correas sin quitarlas
completamente de la férula completamente ensamblada. Desabroche
el forro blando bueno y saque suavemente el pie y el tobillo con un
movimiento hacia delante y hacia afuera de la férula.
Para volver a colocársela, coloque el pie y el tobillo en el forro y
vuelva a enganchar las correas de velcro (según la fig. 5).
Pour retirer l’orthèse, il vous sut de détacher les sangles. Il n’est pas
nécessaire de les retirer complètement. Détachez la doublure souple
et sortez doucement le pied et la cheville du déambulateur en les
poussant vers l’avant.
Pour remettre l’orthèse, placez le pied et la cheville dans la
doublure et refixez les sangles autoagrippantes (voir figure 5).
12 3
BEFORE USING THE DEVICE, PLEASE READ THE FOLLOWING
INSTRUCTIONS COMPLETELY AND CAREFULLY. CORRECT APPLICATION
IS VITAL TO THE PROPER FUNCTIONING OF THE DEVICE.
Unfasten hook and loop straps and remove inner soft liner from boot.
ANTES DE USAR EL DISPOSITIVO, POR FAVOR LEA LAS SIGUIENTES
INSTRUCCIONES COMPLETA Y CUIDADOSAMENTE. LA APLICACIÓN
CORRECTA ES VITAL PARA EL FUNCIONAMIENTO CORRECTO DEL
DISPOSITIVO.
Desabroche las correas de velcro y retire el forro blando interior de
la bota.
AVANT D’UTILISER L’ORTHÈSE, VEUILLEZ LIRE ATTENTIVEMENT ET
INTÉGRALEMENT LES INSTRUCTIONS SUIVANTES. LE RESPECT DE CES
INSTRUCTIONS EST INDISPENSABLE AU BON USAGE DE L’ORTHÈSE.
Détachez les sangles autoagrippantes, puis enlevez la doublure
intérieure souple de la botte.
Open the soft liner and place foot inside with the heel fitting snugly
into the back portion of the liner. Fasten and wrap foot flaps then
the leg portion of the liner. Ensure liner is snug but not constrictive.
Abra el forro blando y coloque el pie en el interior con el talón
encajado en la parte posterior del forro. Sujete y enrolle las solapas
del pie y luego la parte del forro para las piernas. Asegúrese de que
el forro esté ajustado pero no constrictivo.
Ouvrez la doublure souple et placez le pied à l’intérieur en vous
assurant de bien positionner le talon dans la partie arrière de la
doublure. Fixez et repliez la doublure du pied, puis la doublure de la
jambe. Veillez à ce qu’elle soit bien ajustée, sans trop la serrer.
Gently spread the side struts and place the lower leg into the brace.
Extienda suavemente los puntales laterales y coloque la parte
inferior de la pierna dentro de la férula.
Écartez doucement les tiges latérales et positionnez la jambe dans
l’orthèse.
45
The ankle should be centered at the struts with the foot and ankle
at 90°.
El tobillo debe estar centrado en los puntales con el pie y el tobillo
a 90°.
La cheville doit être bien centrée sur les tiges et doit former un
angle de 90°.
Fasten the hook and loop straps beginning at the toe then moving
up the leg. Do not overtighten. As swelling pattern changes
throughout the day due to activities, rest, etc., it may be necessary
to adjust the straps for comfort.
Sujete las correas con velcro (bucle y gancho) comenzando en
los dedos del pie y para luego subir por la pierna. No las apriete
excesivamente. Como el patrón de hinchazón cambia a lo largo del
día debido a las actividades, el descanso, etc., puede ser necesario
ajustar las correas para mayor comodidad..
Attachez les sangles autoagrippantes en commençant au niveau des
orteils, puis en remontant. Ne serrez pas trop fort. Comme l’enflure
peut varier tout au long de la journée selon les diérentes activités,
le repos, etc., il peut être nécessaire de réajuster les sangles pour
maintenir le confort.
90
°


