cantaport Assembly Instructions User manual

HZ0966−E
Wide
NameofPart
roofpanel
roundgutter
sideframe
frontframe
sideframe
arm
roof retainer
roof rafter
mainframe
post
gutter
Cantaport made in Japan certified to AU standards
RSC Series Installation Manual
Thank you very much for choosing our company's Cantaport products.
Please be sure to thoroughly read these instructions for assembling the Cantaport product in conjunction with the engineering
details. DIY or Authorisied Cantaport installations must follow the manufactures assembling manual to avoid warranty cover.
Please retain the manual for future reference and maintenance inspection.

Precautions during construction
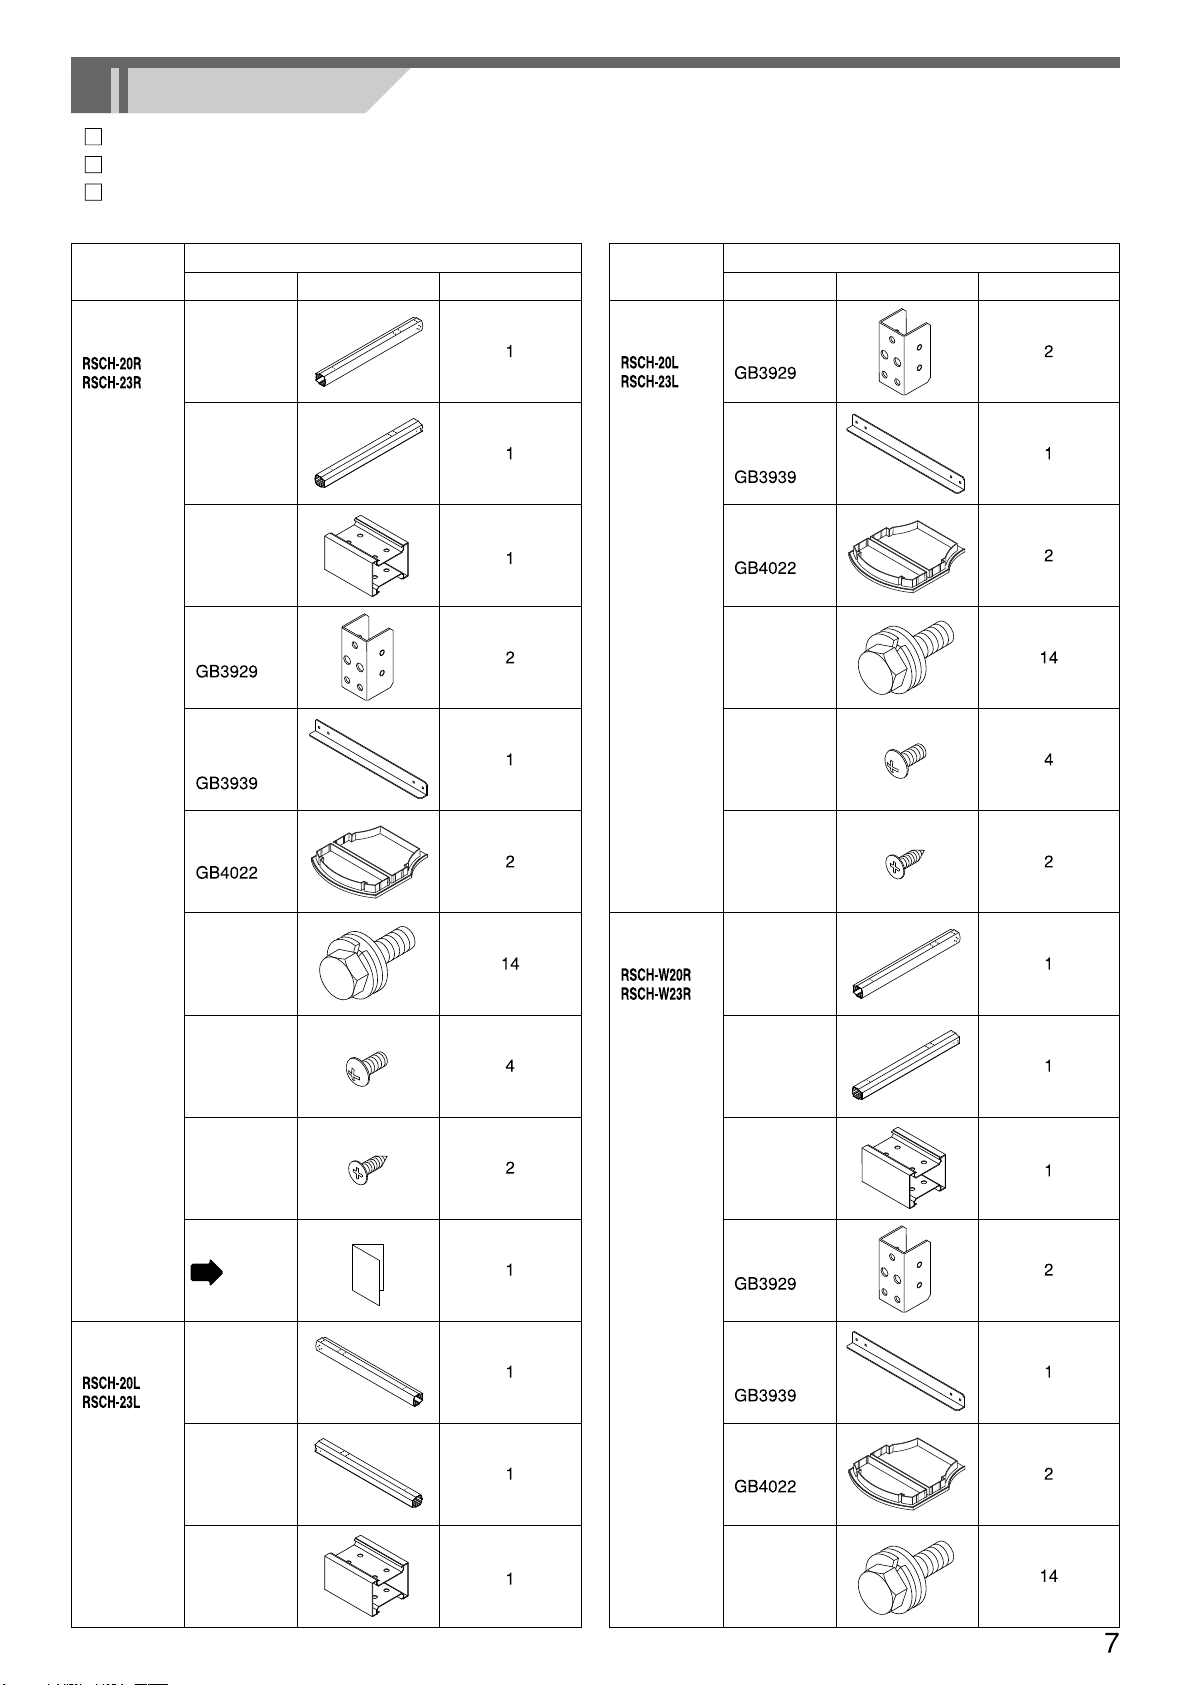
□Follow the instructions and be sure that all the specified screws and bolts for assembly are tightened securely
□Tighten the M8 bolts about 13Nm (130kgfcm) tightening torque.
□Do not use anything other than the specified parts or accessory parts.
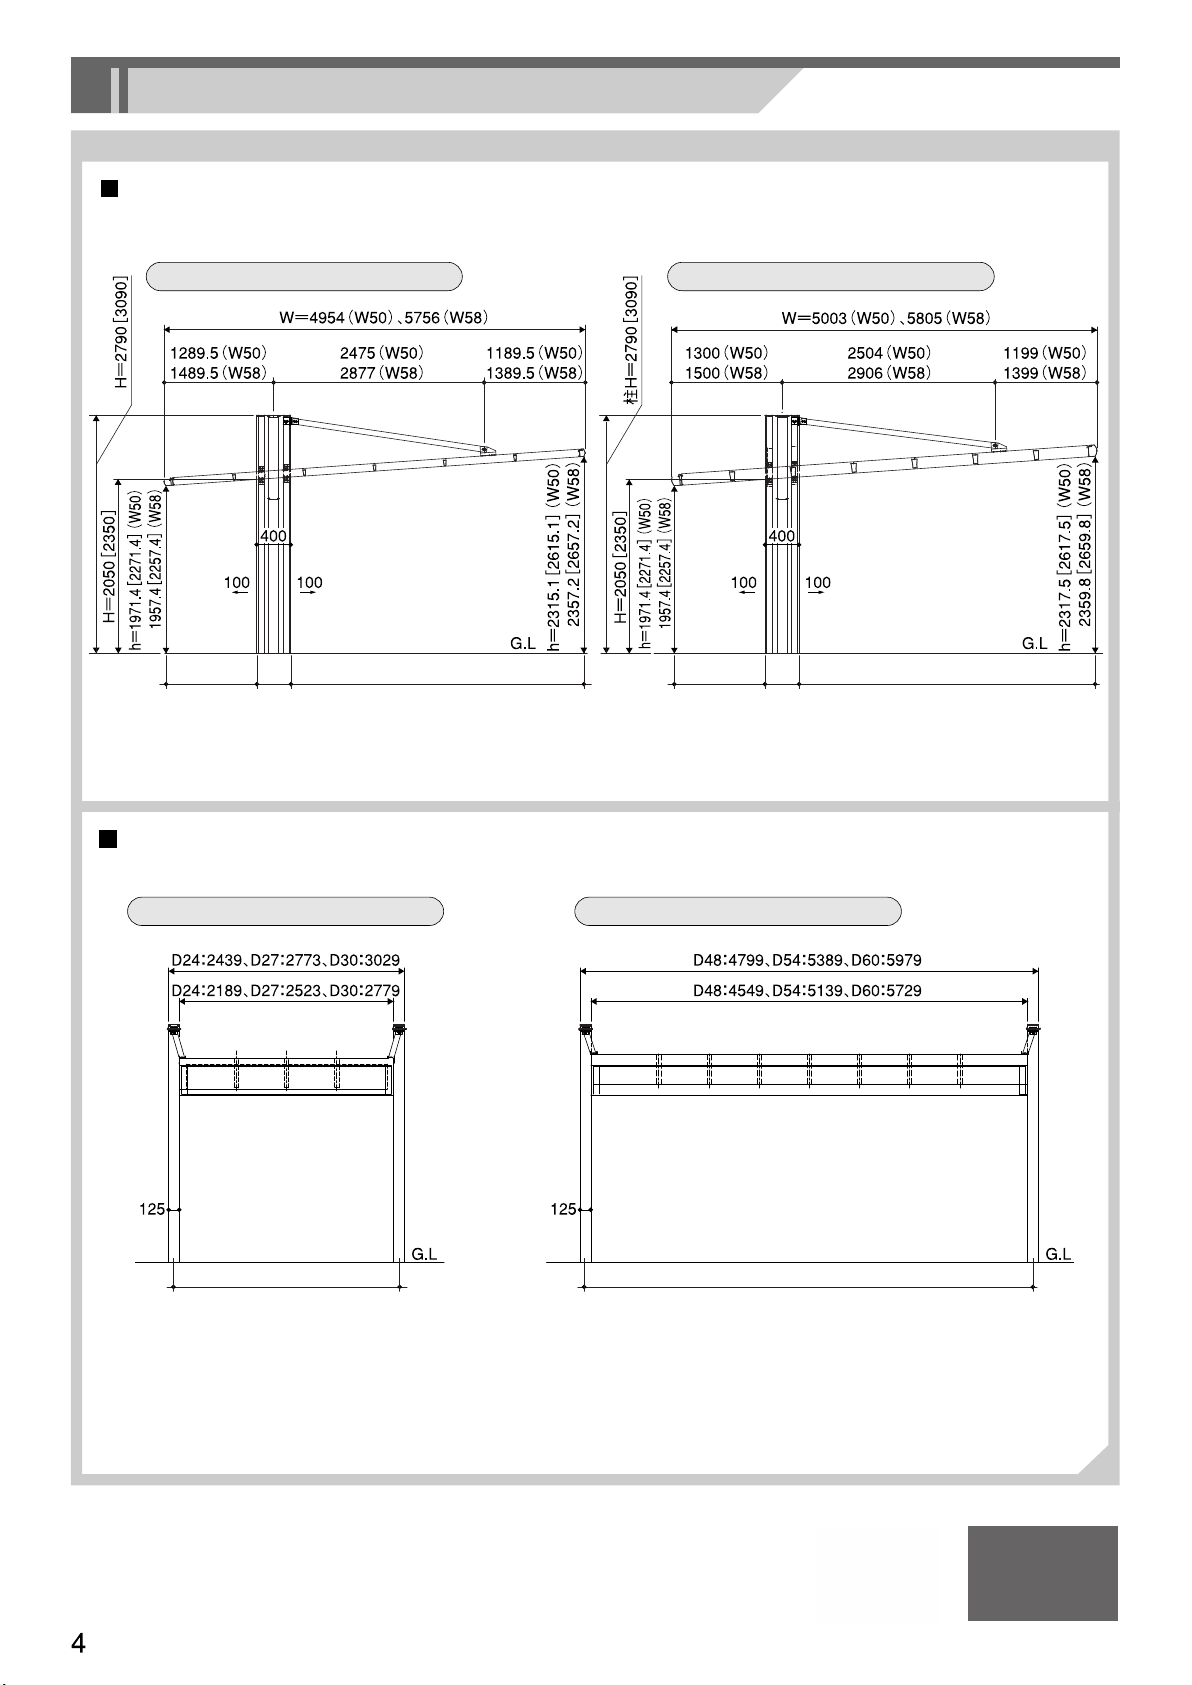
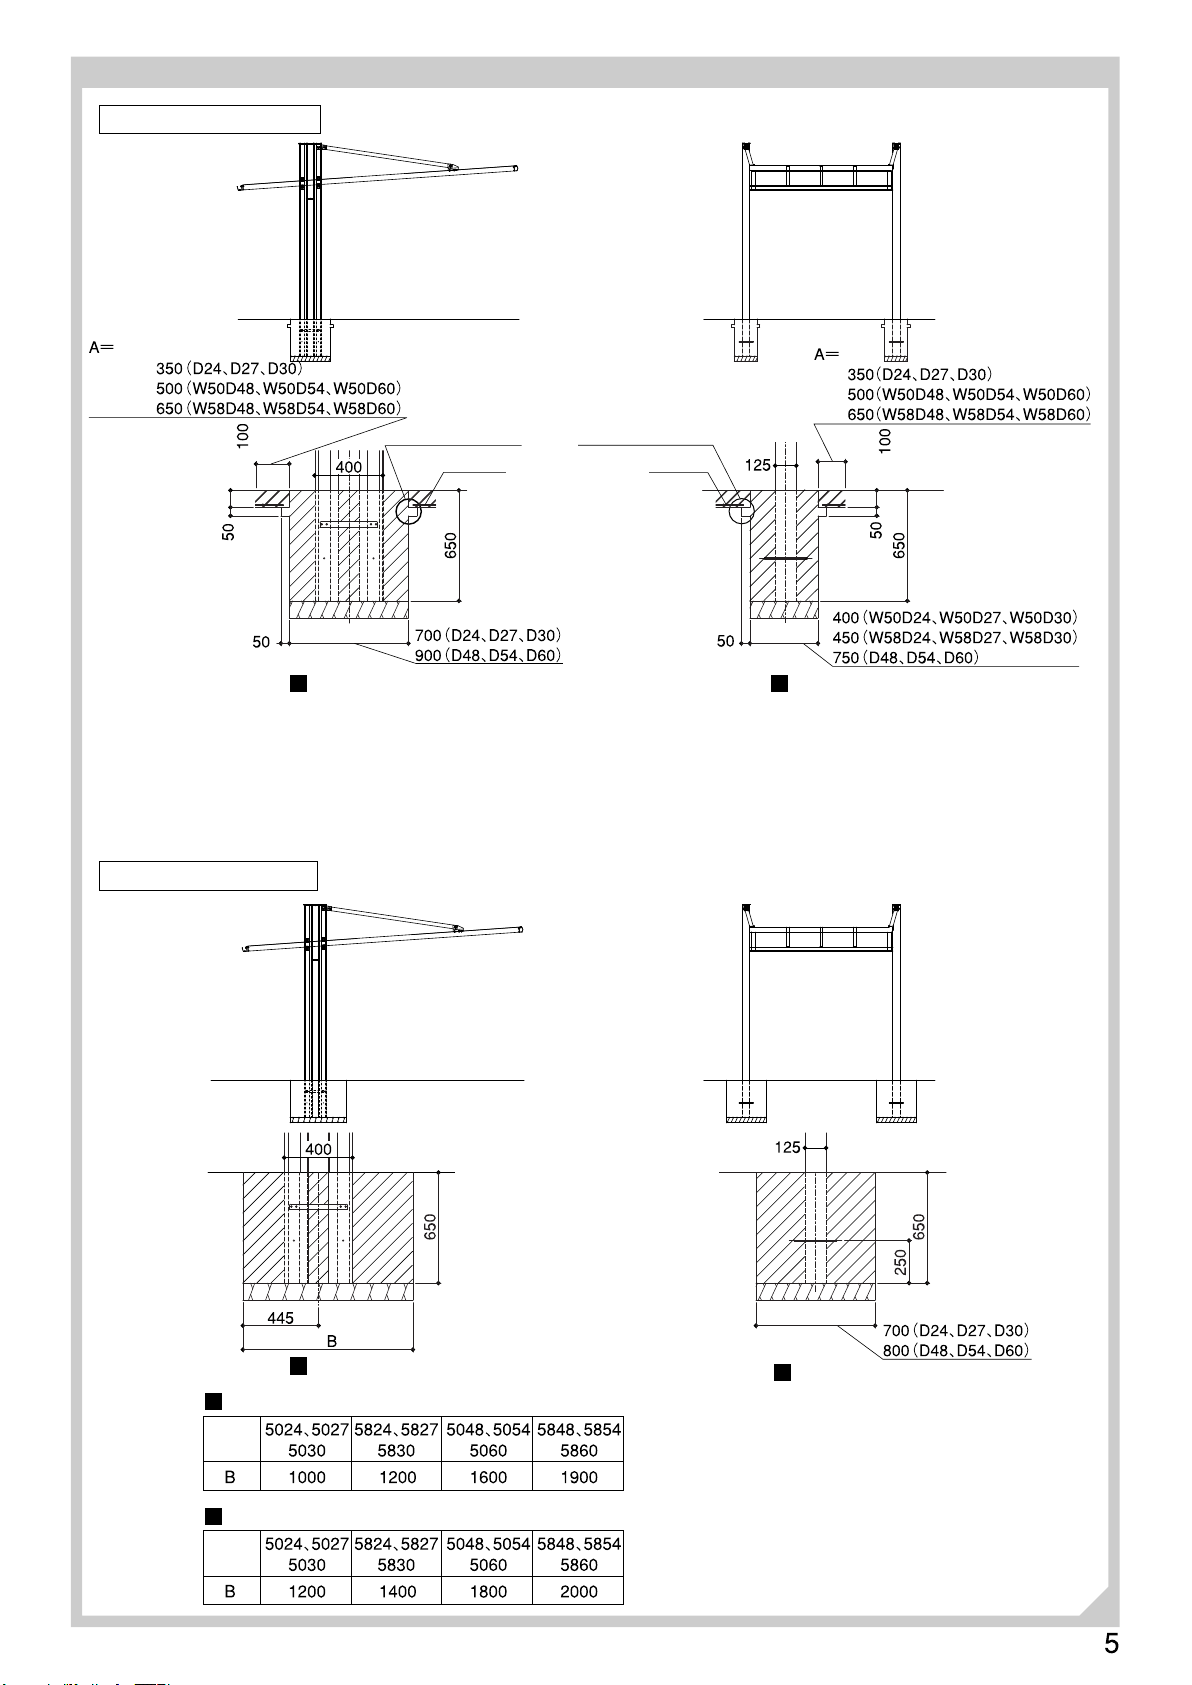
□The foundation should comply with the certified engineering specifications page 4 .
□Allow sufficient curing time for the concrete and do not place heavy objects on it or subject it to vibrations during curing.
□Caution note below to prevent aluminum materials corrode.
sea
sand
cement
enhancer water-
reducingcryopro
tectant
(1) Do not use sea sand for the foundation since it contains
salt and may cause corrosion. Do not use a cement
enhancer, water-reducing agent or cryoprotectant.
They may cause the posts to corrode.
(2) Immediately wipe off any mortar or stains from the surface
of the aluminum parts as they may cause corrosion.
Electric drill
Ratchet wrench, Adjustable wrench
Measure, Level, Plumb bob
Concrete (Cement, Aggregate,etc)
Silicon, Caulk gun, pallet
Grinder
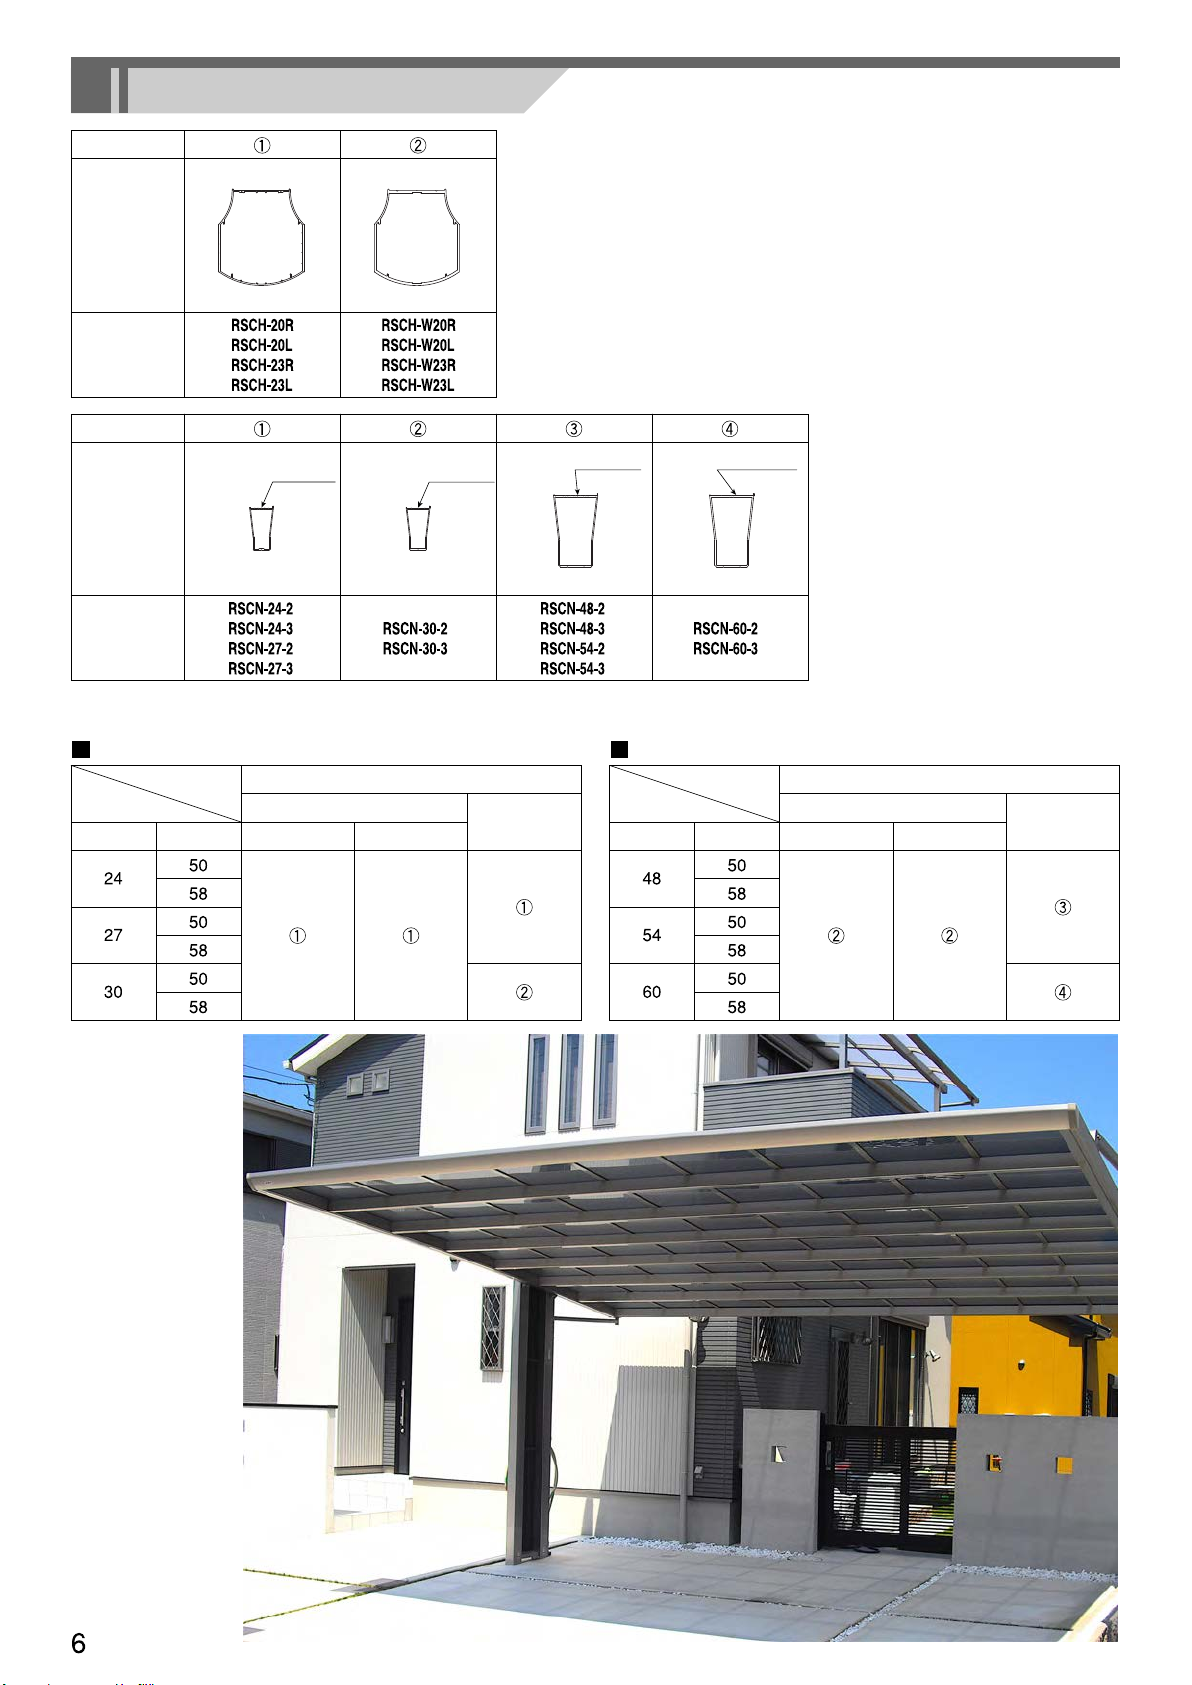
Please prepare tools and materials as required
Necessary Tools and Materials for Installation
aluminiumtype
SLC
SunSilver
UC
UrbanGray
COLOUR SELECTION

1089.5(W50)
1289.5(W58)
3464.5(W50)
4066.5(W58)
400
1100(W50)
1300(W58)
3503(W50)
4105(W58)
400
D24:2314
D27:2648
D30:2904
D48:4674
D54:5264
D60:5854
Dimension,P ositionofPostsandBaseDimension
Dimension,PositionofPost
Single(D24,D27,D30) Wide(D48,D54,D60)
LengthDimension(W),HeightDimension(H)andPostStandardPosition
(postcouldbechangedasthedimensionof← →)
DepthDimension(D)
〔Depth24・27・30・48・54・60size〕
〔Length50・58size,Height20size,〔 〕Height23size〕
Single(D24,D27,D30) Wide(D48,D54,D60)

BaseDimension
1. ConcreteFloor
2. SolidGround
more than
more than
more than
more than
more than
more than
more than more than
more than
more than
more than
more than
�lncaseofusingstandardsizeinconcretefloor,pleaseinstallunderbelowcondition
/N∞Thicknessofconcretefloorismorethan100mm.
/O∞Steelrodandweldingwirenetarearrangedinconcretefloor.
/P∞Dimensionofprojectionwhichpreventsfloatingat4roundsismorethan50mm○50mm
/Q∞Distance≧A∞fromoutsideedgeof basetoaroundconcretefloorismorethandimensionspecifications.
DepthDirection
LengthDirection
DepthDirection
LengthDirection
Incaseof100KN/m2Endurancestrengthofground
Incaseof50KN/m2Endurancestrengthofground
Theprojections
whichprevent
floatingat4rounds
Theprojections
whichprevent
floatingat4rounds
steelrod steelrod

Post・MainFrameList
posttype
section
PartsID
mainframetype
section
PartsID
Ushaped
gutter
5parts
Ushaped
gutter
3parts
Ushaped
gutter
5parts
Ushaped
gutter
3parts
type
Single Wide
bodysize
DepthD LengthW standardpost longpost
post mainframe
componentparts type
bodysize
DepthD LengthW standardpost longpost
post mainframe
componentparts

PartsContents
Pleaseopenthecaptionedcartonandcheckallcontentsinadvance.
Pleasecheckthepartsdefectiveoranydamage.
Wepackedsomeextrascrewinthepartsbox.≧x∞numberisnecessaryQ'tyforinstallation.
content
name quantity
PartsID shape
content
name quantity
PartsID shape
post
≧frontframeside∞
post
≧gutterside∞
post
connecting
parts
connecting
bracket
postfixing
parts
postcap
postsetR
≧single∞
post
≧frontframeside∞
post
≧gutterside∞
post
connecting
parts
postsetL
≧single∞
postsetL
≧single∞
hexagonbolt
≧withwasher,spring
washer∞
M8○25
post
≧frontframeside∞
post
≧gutterside∞
post
connecting
parts
connecting
bracket
postfixing
parts
postcap
postsetR
≧wide∞
hexagonbolt
≧withwasher,spring
washer∞
M8○25
smalltruss
screw
5○10○10
instruction
manual
besuretoreturn
totheowner
notice
flathead
screw
4○12○8
connecting
bracket
postfixing
parts
postcap
hexagonbolt
≧withwasher,spring
washer∞
M8○25
smalltruss
screw
5○10○10
flathead
screw
4○12○8

post
≧frontframeside∞
post
≧gutterside∞
post
connecting
parts
connecting
bracket
postfixing
parts
postcap
postsetR
≧wide∞ post
ornament
set
armset
≧single∞
sideframe
set
≧single∞
postsetR
≧wide∞
hexagonbolt
≧withwasher,spring
washer∞
M8○25
hexagonnut
M8
instruction
manual
besuretoreturn
totheowner
notice
smalltruss
screw
5○10○10
post
ornament
ornament
bracket
flathead
screw
4○12○8
flathead
screw
4○12○8
drilling
screw
4○10○8
arm
armset
≧wide∞ arm
hexagonnut
M8
smalltruss
screw
5○10○10
content
name quantity
PartsID shape
content
name quantity
PartsID shape
sideframe
end
roofretainer
sideframe
set
≧wide∞ sideframe
end
roofretainer
roundgutter
roundgutter
roundgutter
roundgutter
RightLeft
each1pc
RightLeft
each1pc

content
name quantity
PartsID shape
content
name quantity
PartsID shape
roofretainer
gutter
attachment
≧end∞
gutter
attachment
≧end∞
gutter
attachment
≧middle∞
roofrafter
gutter
frontframe
gutter
attachment
≧end∞
gutter
attachment
≧middle∞
gutter
frontframe
mainframe
RightLeft
each2pcs
RightLeft
each2pcs
roof rafter
set
≧single∞
gutter
frontframe
set
≧single∞
gutter
frontframe
set
≧wide∞
mainframeset
anchorrod
armhanging
bracket
armholder
backplate
≧armholder∞
backplate
≧sideframe
fixingbracket∞
sideframe
fixingbracket
≧upper∞
sideframe
fixingbracket
≧under∞
hexagonbolt
M10○150
hexagonbolt
hexagonbolt
washer10
spring
washer10
capnut
partsbox
hexagonbolt
≧withwasher,spring
washer∞
M8○20

RightLeft
each1pc
RightLeft
each1pc
RightLeft
each1pc
RightLeft
each1pc
RightLeft
each2pcs
smalltruss
screw
frontframe
cap
≧single∞
guttercap
≧single∞
guttercap
≧wide∞
armcap
sideframe
fixingbracket
cap
postornament
cap
frontframe
cap
≧wide∞
content
name quantity
PartsID shape
content
name quantity
PartsID shape
partsbox partsbox
smalltruss
screw
drilling
screw
drilling
screw
roofpanel
cushion
gasket
gutter
attachment
gutter
holecap

content
name quantity
PartsID shape
content
name quantity
PartsID shape
partsbox partsbox
When∩markisP,itisthepolycarbonatematpanel.
When∩markisCP,itistheheatprotection
polycarbonatepanel.
When∩markisCF,itistheheatprotection
FRPpanel.
drillingscrew
elbow
drainelbow
saddle
glue
cautionlabel
snowlabel
assembling
manual
roof panel
set roofpanel
≧polycarbonateSI∞
≧heatprotection
polycarbonate∞
≧heatprotection
/////FRP∞

InstallationP rocedure
Installationofthesideframe
Assemblingtheposts Assemblingthepostornament Installationofthearm
post post
post
arm
postfixingparts
postornament
Installationofthegutter・
frontframe Installationofthemainframe
Installationoftheroofrafter Fixingthesideframe Installationoftheroofpanels
Installationoftheroofretainer Attachingtheroundgutterparts
post
mainframe
mainframe
gutter
gutter gutter
gutter gutter
post
arm
frontframe
frontframe
roofretainer
roofrafter
panel
panel
roofrafter
gutterparts
frontframe
sideframe
sideframe
sideframe
sideframe

InstallationofP ost
step3
step1
step2
step4
Thebolthole
isinside.
Attachtheconnectingbrackets
onthepostswithhexagonbolts
M8○25.
Incaseofwide,after
connectingpostsput
thenutsM8tothebolts
M8○25fixingthe
connectingbracketfrom
theinsideofthepost.
�Incaseofsingle
/thereisn'tthis
/process.
Attachtheornamentbracketson
thepostswithdrillingscrew./5
holeoftheornamentbracketis
postside.
�Attachthebracketsbefore
/connectingposts,otherwiseit
/can'tbescrewed.
Inserttheconnectingbracketinto
thepostconnectingparts,andfix
itwithhexagonboltsM8○25.
�Ushapedgutteroftheconnecting
partsisupperside.
Ushapedgutter
Ushaped
up
Fixthepostfixingbracketwith
smalltrussscrew5○10○10.
note
note
Fixtheallhexagonboltsandfastencompletely
becausethispartreceivesthestrongforce.
Ifitisn'tenough,theroofmaycollapse.
Thepostsethasright-left.
Noticethedirectionofthe
post.≧Belowfigureindicatesleft.∞
Thebolthole
isfrontframeside.
hexagonbolt
(withwasher,springwasher)
M8×25(postset)
hexagonbolt
≧withwasher,springwasher∞
M8○25
hexagonnutM8
smalltrussscrew
5×10×10
(postset)
drillingscrew
4×10×8
(postornamentset)
postconnectingparts
connectingbracket
≧postset∞
≧postset∞
≧postset∞
≧postset∞
≧postset∞
≧onlywide∞
hexagonnutM8
≧onlywide∞
post
≧frontframeside∞
postfixingparts
post
≧gutterattachmentside∞
≧postornamentset∞
ornamentbracket

step1
Insertthepostornamentcover
fromthetopandscrewit
throughthepostornamentcap
withdrillingscrew4○10○8.
�Don'tscrewthemiddlepart
/ofthepostornamentcover.
Installtheoppositesideinthesameway.
step2
Insertthepostcapsonthe
topandscrewitwiththe
flatheadscrew4○12○8.
drillingscrew
4×10×8
(postornamentset)
(postset)
flatheadscrew
4×12×8
postornamentcap
≧partsbox∞
≧postornamentset∞
≧postornamentset∞
postornament
ornamentbracket
postcap
≧postset∞
AssemblingPostOrnament

Fixthearmtothearmhanging
bracketwithhexagonbolts
M10○90.
step1
Fixthearmhangingbrackettothe
postwithhexagonboltsM10○150
fromthesideandM10○25fromthe
front.
step2
Attachthearmcaptotheside
framesideofthearmwithdrilling
screw4○10○8.
�Whenscrewing,makea/3hole
firstadjustingtheholeofthearm
cap.
step3
Besuretoinsert
thetwowashers
tothebolt
M10○95.
Theposthas
right-leftand
front-backdirection.
Theboltholeis
insideandthearm
sideisfront.
Theright-leftis
indicatedbythe
viewfromthearm
side(Thefigure
indicatesrightside)
step4
Inserttheanchorrodintothe
posthole.
anchor
step5
support
stand
plumbbob
Insertpostintothebaseholeand
fixwithsupportstandnottofalldown.
Checkif itisflatandverticalwith
plumbbob,andcastconcrete.
hexagonbolt
M10×150
washer10
washer10
washer10
washer10
springwasher10
springwasher10
capnutM10
post
post
ornament
washer10
springwasher10
capnutM10
≧partsbox∞
≧partsbox∞
≧partsbox∞
≧partsbox∞
≧partsbox∞
≧partsbox∞
≧partsbox∞
≧partsbox∞
≧partsbox∞
≧partsbox∞
≧partsbox∞
≧partsbox∞
≧partsbox∞
(partsbox)
hexagonbolt
M10×95-30
(partsbox)
hexagonbolt
M10×25
(partsbox)
drillingscrew
4×10×8
(partsbox)
armhanging
bracket
≧armset∞
arm
arm
armcap
InstallationofArm

Adjustthecenterofthesideframefixing
bracket(upper)tothecenterofthestandard
positionseal.
step1
step2
Insertthebackplate
(armholder)intothefront
framesideofthesideframe.
Fixthearmholdertothe
backplatewithhexagon
boltsM8○20.
Insertthe2pcsbackplates
(sideframefixingbracket)
intotheguttersideoftheside
frame.Fixthesideframefixing
bracket(upper)tothebackplate
withhexagonboltM8○20.
Thisfigureisfront
frameside.
Insertthebackplate
intotheuppersideof
holderpart.
Thesideframefixingbracket
(upper)hasright-left.Installit
asbelowfigure.
Thehighersideisgutterside.
Fixthearmholderandthesideframefixingbracketsasbelow.
frontframeside
frontframeside
gutterside
gutterside
note
hexagonbolt
(withwasher,springwasher)
M8×20(partsbox)
hexagonbolt
(withwasher,springwasher)
M8×20(partsbox)
sideframe
sideframe
sideframe
sideframe
Aview
Aview
standardpositionseal standardposition
seal
Adjustthefrontframeside
ofthearmhdderendtothe
centerofthestandard
positionseal.
frontframe
side
gutter
side
armholder
armholder
backplate
≧armholder∞
backplate
backplate
≧sideframe
fixingbracket∞
sideframe
fixingbracket≧upper∞
sideframe
fixingbracket≧upper∞
sideframe
fixingbracket≧upper∞
sideframe
InstallationofS ideFrame

armholder
step3
step1
Dosiliconworkatthe
frontframecapsandthe
gutterframecapsas
showninthedetailed
figure.
step6
step4
step5
Fixthesideframefixing
bracket(under)tothe
postwithhexagonbolts
M10○25.
Putthesideframeontheside
framefixingbracket(under),and
fixittothepostwithhexagon
boltsM10○25.
Fixthearmtothearmholder
withhexagonboltsM10○95.
FixtheboltM8○20of
thesideframe
completely.
Besuretoinsertthe
twowasherstothebolt
M10○95.
Thesideframefixingbracket
(under)hasright-left.Installitas
belowfigure.
Detailedfigureof thesiliconpart. indicatesthesiliconpart.
hexagonbolt
M10×25
(partsbox)
hexagonbolt
M10×95-30
(partsbox)
washer10
washer10
springwasher10
springwasher10
capnutM10
≧partsbox∞
≧partsbox∞
≧partsbox∞
≧partsbox∞
≧partsbox∞
≧partsbox∞
≧partsbox∞
≧partsbox∞
washer10
≧partsbox∞
sideframe
post
side
frame
Bview
Bview
arm
sideframe
fixingbracket≧upper∞
sideframe
fixingbracket≧under∞
Thehighersideisfrontframeside.
frontframe
side
gutter
side
frontframecap≧Single∞
guttercap≧Single∞
guttercap≧Wide∞ frontframecap≧Wide∞
InstallationofGutter・FrontFrame
sideframe
fixingbracket≧under∞

note
Guttercapmustsealitatthisstage
/becauseit'simpossibleafter
/installation.
Donotsealfrontframecapsatthis
/stage,doitafter
/"/Installationof theroofretainer".
step2
step3
frontframe
side
gutter
side
(partsbox)
smalltrussscrew
5×10×10
(partsbox)
smalltrussscrew
5×10×10
sideframe
sideframe
frontframe
sideframe
Afterconnectingeachframeswith
smalltrussscrewsasfigure,Insert
theguttercapsandthefrontframe
caps.
Dosiliconworkfromthe
insideattheconnectingpart
of theguttercapsasbelow
figure.
silicon
frontframecap
guttercap
guttercap
gutter
gutter
10

Aview
Aview
Whenattachingtheroofpanel
cushion,besurenottobecomesoff.
Attachtheroofpanelcushiononthe
highfins ide.
roofpanel
cushion
roofpanel
cushion
mainframe
main
frame
mainframe
roofpanel
cushion
main
frame
〈Single〉 〈Wide〉
〈Single〉 〈Wide〉
InstallationforSingleis3screws.
ForWideis4screws≧2screwson
topfaceandother2screwsondown
face∞.
step1
step2
Attachtheroofpanel
cushionsonthetopside
ofallmainframesinthe
centerofthenotch.
Thefinnotchfacestogutter
sideandsetitupintoside
framewithsmalltrussscrews.
(partsbox)
smalltrussscrew
5×10×10
frontframe
side
gutter
side
sideframe
InstallationofMainFrame

Fixittotheguidehole
ofthegutterwithdriling
screws4○10○8.
main
frame
main
frame
〈Single〉 〈Wide〉
step1
step2
step3
Beforeinstallingroofrafter
Incaseofnotcomesoutofdiagonaldimensionprecisely,
loosingscrewsatfront,gutter,mainandsideframeandthen
adjustthemonemoretime.
Checkpostinterval,flat,anddiagonaldimensionofroof.
Puttheroofrafterintothe
frontframeandscrewitwith
drilingscrews4○10○8.
Bpart
Bpartdetail
Ushapedgutter Ushapedgutter
AtApart,screwitto
guidehole.
AtBpart,following
U-shapedgutterupand
screwitonsite.
Theroofrafterhasthe
front-backdirection.
markisthe
frontframe
side
Screwittothemain
framewithdrilingscrews
4○10○8.
drillingscrew
4×10×8
(partsbox)
frontframe
guidehole
gutter
roofrafter
Bpart
Bpart
Bpart
Bpart
Apart
Apart
InstallationofRoofRafter

Aftermaking3holestotheside
frameguidingholesofthearm
holder,fixthearmholdertotheside
framewithdrilingscrewstighten.
(Holepositionreferthebelow
screwingpoints.∞
Aftermaking3holestotheside
frameguidingholesofthesideframe
fixingbracket≧upper∞≧under∞,fixtheside
frametothebracketwithdrilingscrews
5○16○10tighten.
Make3holefirstatthescrewing
points.Ifscrewitdirectly,the
screwheadmaybreak.Andplease
notethatifscrewitstronglywith
theimpactdriver,thescrewwill
runidle.
Holderpartofthesideframe,after
making5holeonthetopfaceof
thefin,make 3holeonthe
secondfin.
Putthecapsontotheside
framefixingbracket
≧under∞.
Aftermaking3holeto
thepostadjustingthecap
holeon-site,fixthecaps
withdrilingscrew
4○10○8.
step1
step1
step2
step3
step2
drillingscrew
5×16×10
(partsbox)
drillingscrew
4×10×8
(partsbox)
〈Single〉
Screwingpoints ofthearmholder
〈Wide〉
armholder
sideframe
fixingbracket≧under∞
sideframe
fixingbracket≧upper∞
sideframe
fixingbracket≧under∞
standardposition
seal
standardposition
seal
sideframe
sideframe
fixtwoscrewsin
thecenter
fixallsixscrews
sideframe
fixingbracketcap
5
3
note
FixingSideFrame
making3hole
Table of contents
Other cantaport Shelter manuals
Popular Shelter manuals by other brands

Sequoia
Sequoia TubTop FS Assembly guide

PLASTIC VACUUM FORMING
PLASTIC VACUUM FORMING The Blynd Bow Assembly instructions

Storage Canopy
Storage Canopy FB406021DP Assembly instructions

Gazebo penguin
Gazebo penguin 7171020 instruction manual

Kiwi Camping
Kiwi Camping Oasis 4 quick start guide

Dancover
Dancover ST03810 manual