CAS ER Series User manual

ER Series
Price Computing Scale
OWNER’S MANUAL

CONTENTS
PRECAUTIONS 4
PREFACE 6
OVERALL VIEW OF ER SERIES 6
DISPLAY & KEYBOARD 7
OPERATIONS 11
1. Programming mode 11
Chapter 1. Basic Operation 12
Chapter 2. PLU Saving & Calling - up 13
Chapter 3. User's Set-up Mode 16
Chapter 4. Formatting Printing Receipt 20
2. Sales Mode 24
Chapter 5. Basic Operation 25
Chapter 6. Sales Transaction 27
Chapter 7. Discount & Payment 35
Chapter 8. Daily Total Sales Amount 37
ASCII CODE 39
ERROR MESSAGES 40
SPECIFICATION 41

45
PRECAUTIONS WARNING
Precautions when installing the scale. To ensure that you get the most from
your scale,pleasefollowthese instruction. Make sure to plug your scal into the proper power outlet. For maximum
performance,plug into apower outlet30minutes beforethe usage forwarm up.
Do not disassemble the scale.
When any damage or defect occurs,
contact your CAS
authorized dealer
immediately for
proper repair.
Do not overload beyond the maximum
weight limit.
Do not pull the plug by its cord when
unplugging. Damaged cord could cause
electric shock or fire.
To prevent from fire occurring, Do not
place or use the scale near flammable or
corrosive gas.
Avoid placing the scale near heater
or in direct sunlight.
Scale must be grounded to minimize
electricity static. This will minimize
defect or electric shock.
Insert plug firmly to wall outlet to
prevent electric shock. Use proper Adapter. Incorred adapter
could damage the scale.
To reduce electric shock or incorrect
reading, Do not spill water on the scale
or place it in humid condition.
Warning
For consistent and accurate reading,
maintain periodical check by your
CAS authorized dealer.
Avoid sudden shock to the scale.
Internal mechanism could be damaged.
Place the scale on firm and temperature
consistent environment.
Take the battery out when scale is not in
use for long time. Leakage from the
batteries is hazardous.
Keep the scale away from other
electromagnetic generating devices.
This may interfere with accurate
reading.
Risk of explosion if battery is replaced by an incorrect type.
Dispose of used batteries according to the instruction.
Correct type of battery
Grab on the bottom of the scale when
moving. Do not hold by the platter.
Attention
By adjusting 4 corners of the scale, set
the scale even using the built in scale
leveling indicator.

7
6
PREFACE
OVERALL VIEW
Thank you for the purchasing of CAS ER series.
This series have been designed with CAS reliability, under rigid quality control
and with outstanding performance. Your specialty departments can enjoy with
CAS product. We hope that CAS product meets your needs.
The user manual is designed to guide you to understand product operation and
proper care of product.
DISPLAY & KEYBOARD
LCD TYPE : Front Display
LCD TYPE : Rear Display
STADARD TYPE
POLE TYPE
VFD TYPE : Front Display
VFD TYPE : Rear Display

9
8
KEYBAORD
Table : Symbols on Display
SYMBOLS DESCRIPTION
To adjust zero
Tare on
Backlight on
Low battery warning
LCD TYPE : Front Display
LCD TYPE : Rear Display
VFD TYPE : Front Display
VFD TYPE : Rear Display

To input all of numerical data
Direct PLU keys
To save PLU
To call up PLU
To clear data
To set zero
To set or clear tare value
To turn on & off the scale or backlight (LCD version only)
To make several sales transaction by adding up
To make discount transaction
To multiply the same item when making sales transaction
To check total sales amount or finalize sales transaction
10 11
OPERATIONS
1. Programming Mode
Chapter 1. Basic Operation
a. Turning the scale on / off
b. Turning backlight on / off (a option in LCD version only)
c. Zero function
Chapter 2. PLU Saving & Calling-up
a. Saving unit price on PLU
b. Saving PLU name (option)
c. Calling up PLU
- Indirect PLU
- Direct PLU (M1~M5)
Chapter 3. User's Set-up Mode
a. Auto power-off
b. EL backlight on / off (backlight option in LCD version only)
c. Selecting printer
d. Option setting for daily total sales amount
Chapter 4. Formatting Printing Receipt
a. Using Printer
b. Receipt header setting
c. Receipt currency (unit) setting
d. Receipt date setting
Table : Key Functions
KEYS FUNCTIONS

12 13
Chapter 2. PLU Saving & PLU Calling-up
a. Saving unit price on PLU
This section explains how to save unit price in PLU.
Number of direct PLU may be different on product model.
“C” key is to clear data input.
Number of PLU Range Remarks
PLU 199 1~199
PLU name (option) 28 1~28
“C” key is to input, save a character, and move to next character (or byte).
“ZERO” key is to move previous character (or byte).
“TARE” key is to move next programming menu.
Press numeric key to input unit price you wish
to have. Ex) 1.99 Press “ M” key.
Press numeric key to input a PLU address.
Ex) PLU 10.
Chapter 1. Basic Operation
a. Turning the scale on / off
Press ON/OFF key to turn on. Press ON/OFF key to turn on.
b. Turning the backlight on / off (Option in LCD version only)
Press ON/OFF key again for a few seconds
under the power on. Press ON/OFF key again under the backlight
on.
c. Zero function
Press ZERO key to set zero point when the
weight is unstable.

14 15
c. Calling up a PLU
To call up indirect PLU saved
press appropriate numeric keys (address) and
“M ” key. Ex) PLU 10
To go back to normal weighing mode
press “C” key.
To call up direct PLU saved just
press appropriate direct PLU key. Ex) PLU 2 To go back to normal weighing mode
press “C” key.
“ ”
Press “ M” key to save it.
b. Saving PLU name (option)
If you have “28 PLU name inputting option” you may save the name of PLU
for 1~28.
“C” key is to input, save a character, and move to next character (or byte).
“ZERO” key is to move previous character (or byte).
“TARE” key is to move next programming menu.
Input appropriate ASCII codes to save the PLU
name. Ex) “APPLE” is “4, 1, C, 5, 0, C, 5, 0,
C, 4, C, C, 4, 5, C”
Press TARE key to exit to normal weighing
mode or C key up to maximum 8th byte. Then
automatically exit to normal weighing mode.

17
16
a. Auto power-off
This section explains how to set backlight on & off function and automatic off
function.
Select a option you wish to have by using
“TARE” key. Ex) 30 (minuets)
Options Description Remarks
NO No auto power-off.
10 (minutes) Auto power-off in 10 minutes when no use.
30 (minutes) Auto power-off in 30 minutes when no use.
60 (minutes) Auto power-off in 60 minutes when no use.
Chapter 3. User's Set-up Mode
This section explains how to set up the following functions.
To get into “User’s Set-up Mode” press
ON/OFF key pressing and holding ZERO key.
Functions Options Remarks
1. Auto power-off NO / 10 / 30 / 60
2. EL Backlight On/OFF OFF / ON / 3 / 5 / 10 When backlight option selected
in LCD version only
3. Printer selection NON / Top / EPSON /Dep-50
Press “ZERO” key to save current option and move to next function setting
mode.
Press “TARE” key to move to other next option.

19
18
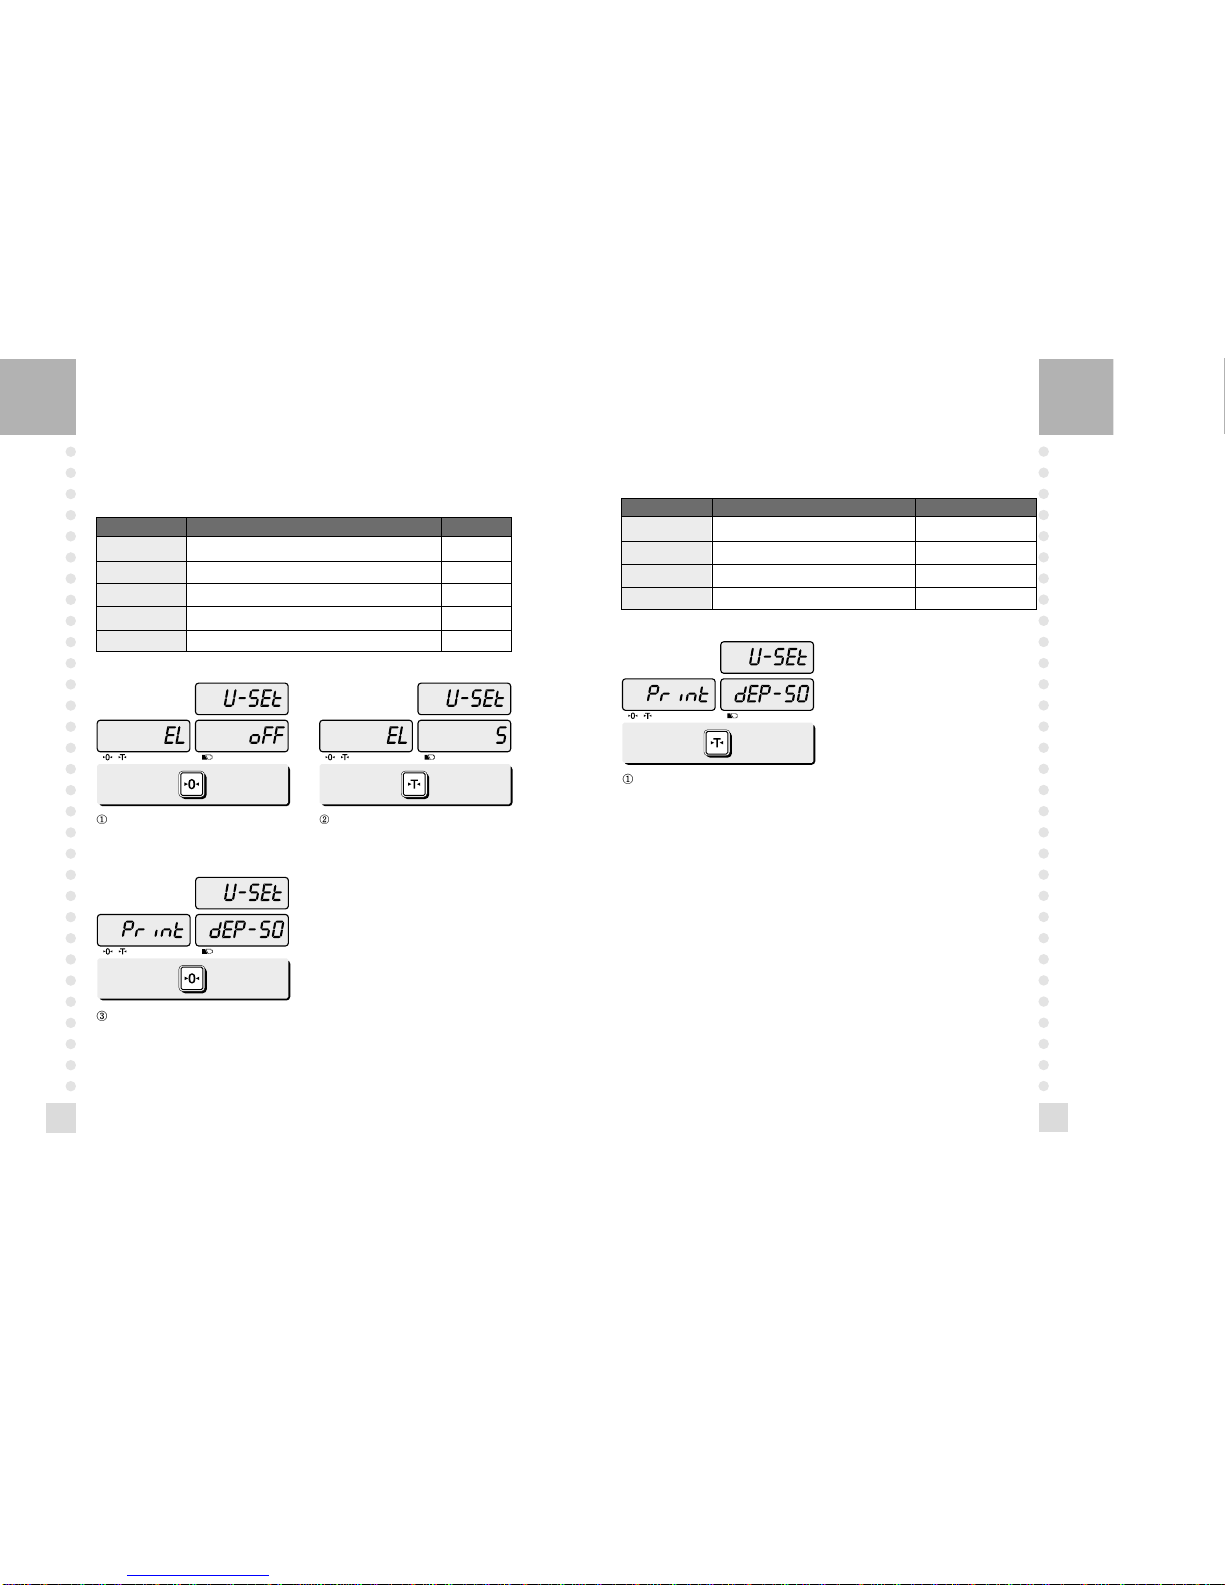
c. Selecting the printer
This section explains how to select the printer option when you'd like to use the
printer connected to ER series.
Select the printer you’re using with ER by
pressing °”TARE” key. EX) DEP-50
Options Description Remarks
NON No printer in use
TOP Top printer interface
EPSON Epson printer interface
DEP-50 DEP-50 printer interface
b. EL backlight ON/OFF function
(Only when backlight option selected in LCD version)
This section explains how to set backlight on & off function and automatic off
function.
Options Description Remarks
OFF Backlight OFF
ON Backlight ON
3 (Seconds) Automatic backlight-off when not in use for 3 seconds.
5 (Seconds) Automatic backlight-off when not in use for 5 seconds.
10 (Seconds) Automatic backlight-off when not in use for 10 seconds.
Press “ZERO” key to move next function
setting, EL Backlight ON/OFF. Use “TARE” key to select one of backlight
auto power-off option or EL Backlight ON/OFF.
Ex) Select 5 seconds auto power-off option.
Press “ZERO” key to save current option and
move to next function setting.

21
20
b. Receipt header setting
Options Description
HEADER To input characters you wish to have Maximum 1,2 line / 24 characters,
on the receipt header. 3 line / 16 characters for each line
User may input the name of store, telephone number, or other expressions
he/she wishes to have on the receipt.
Pressing and holding “C” key, press
“ON/OFF” key under the scale power off.
“O1” on the “Unit Price” display represents
that you are ready to input the first character.
Input appropriate ASCII codes (page on 20)
you wish to have.
Ex) CAS.
To save it and go next header line press
“TARE” key. Using ASCII code you can input appropriate
data on Header 2.
Ex) 820-1111, telephone #.
Chapter 4. Formatting printing receipt
This chapter explains how to set the receipt format in the following fields.
Options Description
HEADER To input characters you wish to have Maximum 1,2 line / 24 characters,
on the receipt header. 3 line / 16 characters for each line
UNIT To input currency symbol or characters Maximum 8 characters
you wish to have on the receipt.
DATE To input date on the receipt.
a. Setting the printer
Please connect your printer to RS 232 port, which is located at the gray part on
the picture, using RS 232 Cable.

23
22
Press “C” key to go to next “DAY” setting. Just input appropriate month you wish to
have, not using ASCII code.
Ex) 12th day
Press “C” key to go to next “YEAR” setting. ust input appropriate month you wish to have,
not using ASCII code.
Ex) Year 2004
If you press “C” or “T(TARE)” key you can automatically go to normal
weighing mode.
To save it and go next header line press
“TARE” key. Using ASCII code you can input appropriate
data on Header 2.
Ex) THANK YOU
c. Receipt currency (unit) setting
Initial CURRENCY (UNIT) display status. Using ASCII code you can input appropriate
character or currency symbols on UNIT.
Ex) $
d. Receipt DATE setting
To save it and go to “Initial DATE display”
status press “TARE” key. Just input appropriate month you wish to
have, not using ASCII code.
Ex) 12 (December)

25
24
Chapter 5. Basic Operation
a. Turning the scale on / off
Press ON/OFF key to turn on. Press ON/OFF key to turn on.
b. Turning the backlight on / off (Backlight option in LCD version only)
Press ON/OFF key again for a few seconds
under the power on. Press ON/OFF key again under the backlight
on.
c. Zero function
Press ZERO key to set zero point when the
weight is unstable.
2. Sales Mode
Chapter 5. Basic Operation
a. Turning the scale on / off
b. Turning backlight on / off (LCD version only)
c. Zero function
d. Tare function
- One time tare
- Successive tare
- Preset tare
Chapter 6. Sales Transaction
a. Sales with free price (hand pricing)
b. Sales using PLU
- direct PLU
- indirect PLU
c. Adding up several sales for weighed item
d. Adding up several sales for non-weighed item (Fixed Price Added)
e. Multiplying same item
f. Calling up or deleting total amount
g. Cancel
Chapter 7. Discount & Payment
a. Discount on subtotal
b. Payment
Chapter 8. Daily Total Sales
a. Calling up daily total sales data
b. Deleting daily total sales data

27
26
Preset tare
Press appropriate numeric keys.
Ex) 10 g Press “TARE” key to set zero.
Chapter 6. Sales Transaction
ER series may make sales transaction either with free price or with PLU.
a. Sales with free price (hand pricing)
This section explains how to make sales transaction with free price (hand pricing).
Place an item on the platter and press
appropriate numeric keys to input unit price.
Ex) 1.99 for unit price.
Remove the item from the platter. It may
automatically print out the receipt if the
printer is set.
d. Tare function
Tare means the weight of container. You may use tare function when you weigh an
item with container and measure only the weight of item.
One time tare
Place a container on the platter.
Ex) 200 g of tare. Press “TARE” key to set zero point
Ex) 200 g of tare.
Successive tare
Place another container on the platter.
Ex) 100 g of tare Press ‘TARE” key to set zero point
After weighing item remove all of the
container from the platter. Press “TARE” key again to set zero.

29
28
c. Adding up several sales transactions for weighed items
Use “+” key to makes the adding-up transactions.
You may either call up PLU or just input the unit price.
Call up a indirect PLU.
Ex) “PLU 6 for Kiwi”. Place an item on the platter.
If you press “ ” key after 2nd step the scale is automatically going to
normal weighing mode and add this transaction to daily total amount and
number of sales data.
Press “+” key. Remove the item from the platter.
Input a unit price
Ex) 2.99 for Honey melon. Place an item on the platter.
b. Sales using PLU (Price Look-Up)
Direct PLU
Call up a direct PLU.
Ex) “M1” Place an item on the platter.
Remove the item from the platter. It will
automatically print out the receipt if the
printer is set as auto mode in user set mode.
Indirect PLU
Call up a indirect PLU.
Ex) “PLU 6 for Kiwi’. Place an item on the platter.

31
30
d. Adding up several sales transactions for non-weighed items
(Fixed price added)
Input a unit price
Ex) 2.99 for “Strawberry Cream Cheese”. Press ‘+’ key.
Press “+” key to go to normal “0” point
mode. Call up another PLU.
Ex) PLU# 8 which unit price is 3.99 for “Garlic
bread”.
Press “+” key. Press “+” key to go to normal “0” point
mode.
Please refer to “Chapter 7. Daily Total Sales Amount” for calling up or
deleting the daily total.
Press “+” key. “Total Price” display says
total price added, and “Unit Price” display
says the number of sales transactions added.
Remove the item from the platter.
You may also place the item on the platter first and then input unit price in the
scale later.
You may add sales transactions up to 99 times and total amount of sales up to
999,999.

33
32
e. Multiplying the same item sales
You may either call up PLU or input unit price into the scale.
Input a unit price
Ex) 3.00 for “Canned Soup”. Press “X” key.
Press appropriate numeric key to input the
number of items. Press “+” key.
f. Calling up or deleting total amount
When you just check total amount.
Press “ ” key just to check total amount.
Ex) Total amount=115.00, Total number of
transaction= 5.
Press “+” key to go to normal “0” point
mode.
Press “+” key to go to normal “0” point
mode.
You may cancel previous number of item input by pressing “C” key and retry
it.
You may go back to normal weighing mode by pressing “C” key when “Unit
Price” display shows “0”.
The scale beeps when there is no adding-up transaction.
When you delete total amount.
Press “ ” key just to check total amount.
Ex) Total amount=115.00, Total number of
transaction= 5.
Press “C” key to delete total amount.
However, this total amount is still saved on
daily total sales amount.

35
34
g. Cancel
When user makes more than two sales transactions he/she can cancel previous
mistake transaction(s) of them by doing “Cancel” function.
Press numeric keys to input a unit price.
Ex) Item’s unit price=2.00 Press “+” key and appropriate numeric keys
to make next another sales transaction.
Ex) unit price=1.99, 1 kg
Place item on the platter and do “ADD”
function. Ex) unit price=1.99, 1 kg
Remove it from the platter.
To cancel previous transaction input the same
unit price and place the same item on the
platter. Then, press “-” key.
Remove the item from the platter. For sure user may check total number of a
series of transactions after canceling previous one by pressing “ ” key to
call up “ttP(Total Price)”.
Chapter 7. Discount & Payment on total sales amount
a. Discount on total sales amount
Press “ ” key just to check total amount.
Ex) Total amount=115.00, Total number of
transaction= 5.
Press “-” key.
Press appropriate numeric keys to input the
amount of discount. Press “-” key.
Press “ ” key to finalize these transactions. “Payment” function will be
followed.
b. Payment function on total sales amount
Press “ ” key to call up total price. Press appropriate numeric keys to make
payment.
Ex) 120.00 payment

37
36
Press “ ” key to call up the change amount. After checking the change amount press
“” key to go back to normal weighing
mode.
In the case of no change needed then, just press “ ” key to finalize the sales
transactions. However, in the case of change needed please continue the
following steps.
Chapter 8. Daily Total Sales (option)
a. Calling up daily total sales data
Press “ ” key for 3 seconds until “dtP”
message shows up. Press “ ” key again to call up daily total
sales.
Ex) daily total amount of sales=444.99,
If you look at the amount of individual PLU
sales call up appropriate PLU.
Ex) PLU#1(Banana: Direct PLU) & PLU # 14.
For PLU #14, press appropriate numeric keys
and “M ” to show daily total amount of
sales and the daily total number of sale
transactions.
To go back to “Daily total sales” mode simply press “ ” key. And then,
To go back to normal weighing mode. press “ ” key.
If you want to print out current status press “T” key. Then, it prints out current
daily total information.

39
38
To go back to "Daily total sales" mode simply
press “ ” key.
b. Deleting daily total sales data
Press “ ” key for 3 seconds until “dtP”
message shows up. Press “ ” key again to call up daily total
sales.
Ex) daily total amount of sales=444.99,
Press “C” key to delete “daily total
sales”data. “Clear” message shows up
shortly, and then it goes to normal weighing
mode.
Table : ASCII Code
Picture1 : Alphabet location on the keybarod
Other manuals for ER Series
1
Table of contents
Other CAS Scale manuals

CAS
CAS AP-US Series User manual

CAS
CAS CASTON II User manual

CAS
CAS AP Series User manual

CAS
CAS PD-II User manual

CAS
CAS LP-II Installation and maintenance instructions

CAS
CAS EB Series User manual

CAS
CAS CL5000 Series User manual

CAS
CAS CL5200J Series User manual

CAS
CAS NC-1 User manual

CAS
CAS PR2-15 User manual