CDVI RX26-XPL5-GFA User manual

Fabricant de Contrôle d’Accès depuis 1985 Manufacturing Access Control since 1985
The installer’s choice
Receiver type: Supereheterodyne.
Demodulation: AM/ASK.
Operating frequency: 433.92 Mhz.
Sensitivity ( for good signal ): -115 dBm.
Input load: 50 Ohm.
Power supply : 12 o 24 V ac/dc.
Current consumption ( @12Vdc) from 25 mA to 90 mA (max)
N° of relays: 2 (1 NO and 1NO / NC).
Max power on relay output: 24VA max 60V .
Memory capacity: 500 transmitters
Security protocol Keeloq® Hopping code
N° of code combinations 2exp64
Operating temperature: from -20 to + 70 °C.
Dimensions ( Fig. 2): 120 x 80 x 40 mm
Weight: 65 gr.
Relay operating mode Pulse, step, timed
Delay from 1 sec. to 24h: 59 min.
The receiver Erone type XPL500 ( Fig. 1) is a single conversion superheterodyne
receiver with integrated rolling-code decoding. The demodulation is AM/ASK.
A special algorithm allows to keep synchronyzed transmitter and receiver. The receiver,
having dry contacts relays output, can be connected to any type of device ( gate, garage
door, rolling shutters, awnings, anti-burglar appliances, lighting, etc.).
The transmitter memorization can be carried out either with 2 push-buttons of the
receiver or remotely, using only the keys of the transmitter. The setup of the remaining
parameters of the receiver can be done only with the 2 push buttons of the receiver.
All the setting steps are displayed by a backlit LCD display.
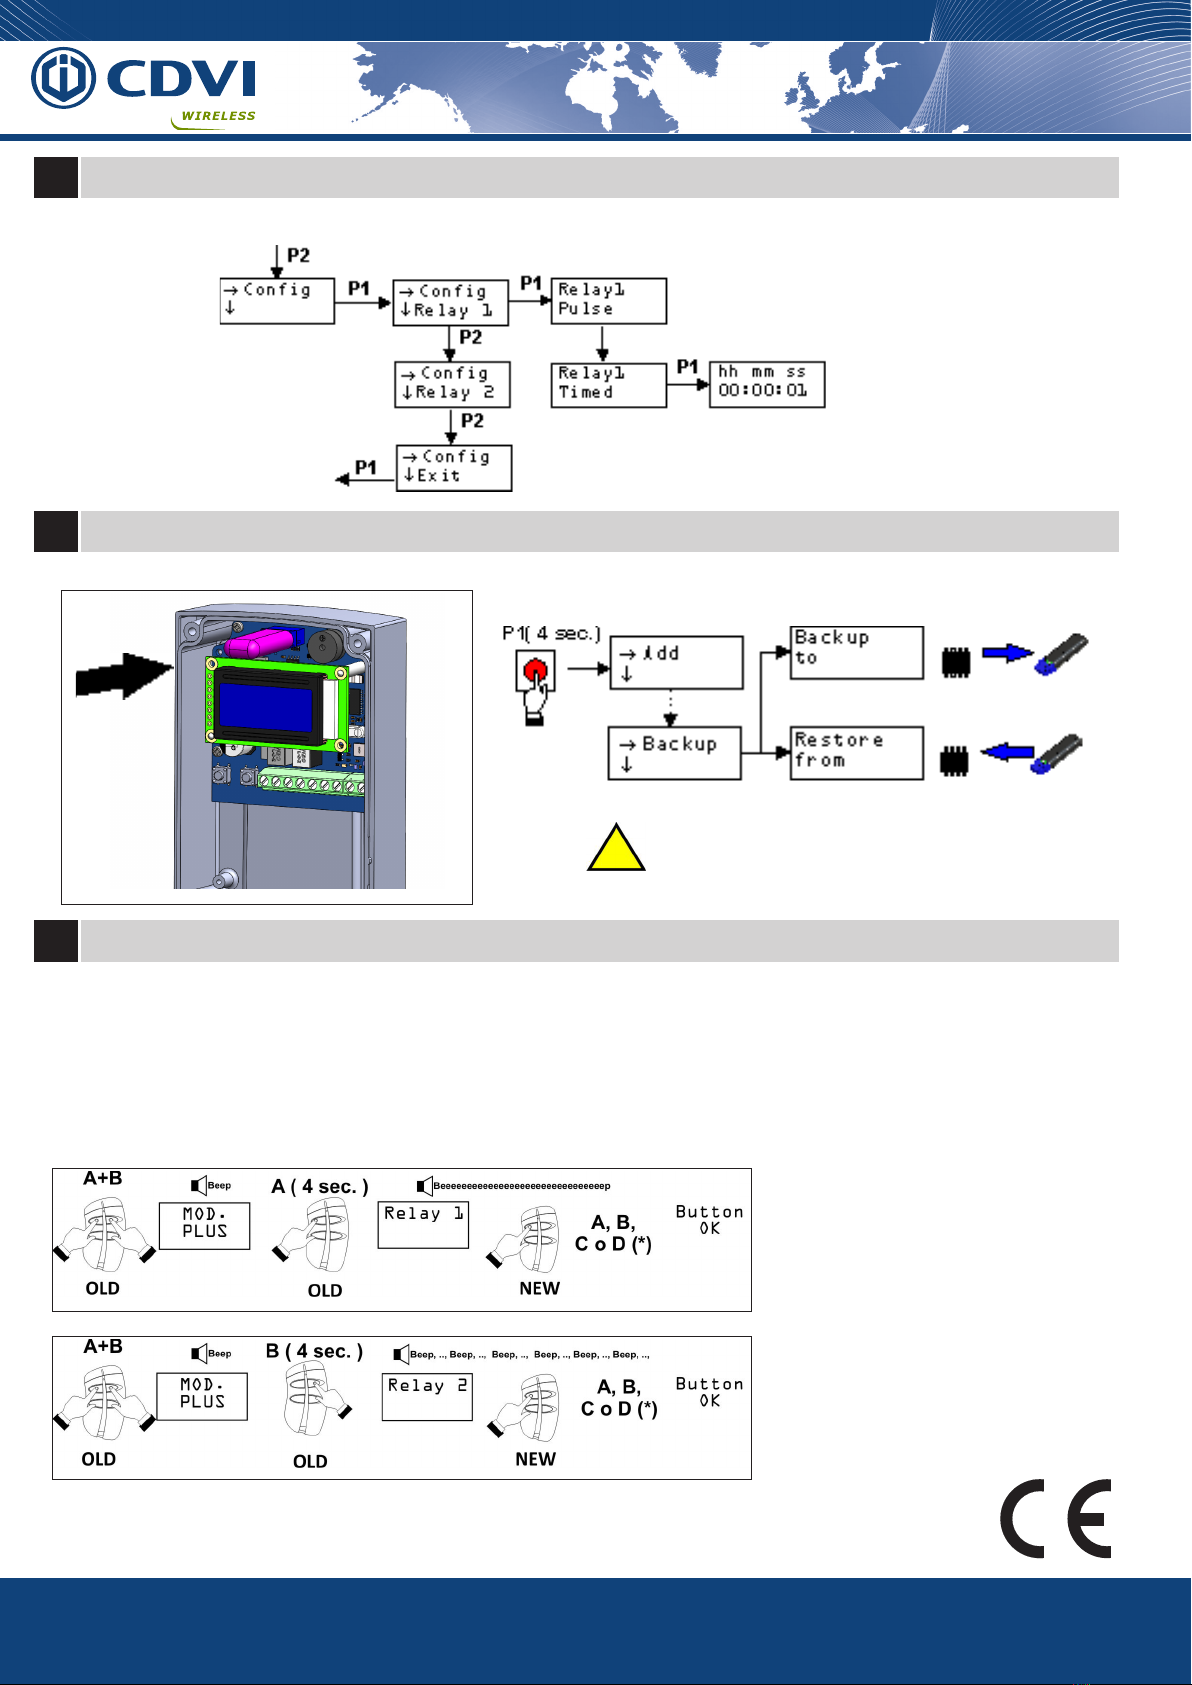
The internal data can be saved/restored to/from an external memory.
2 RELAY RECEIVER RX26-XPL5-GFA
2Technical Specications
3Mounting
www.erone.com - www.cdvigroup.com
Fig.1
1Introduction
Option A ) make a hole ( ø11 mm )
on the bottom of the box and pass
the cables throught
Option B ) Use of Pg7 cable gland
Drill the placing surface
with ø6 tool and insert the
2 plugs
Then x the support with
the screws provided
F1001000082
Fig. 3
Fig. 2
Fig. 1
ERONE
XPL500
ERONE
XPL500
ERONE
XPL500

Fabricant de Contrôle d’Accès depuis 1985 Manufacturing Access Control since 1985
The installer’s choice
4Layout & Wiring
GFA transmitters
The receiver allocation is very important for the best operation of the
system. Place the receiver far from interference sources such as big
magnetic elds or radio emissions. The installation and the positioning
of the antenna is very important as well. Before installing the antenna
it’s advisable to make some tests on the site.
The distance between 2 receiver must be at least 1,5m.
The appliance full comply with the requirements of the following
European Directives : 2006/95/CE, 2004/108/CE, 99/05/CE and the
Standard EN 60335-1.
5Compatible transmitters
6Warnings
7Display Legend
There are 2 methods available:
1) Using P1 and P2 throughout the menu
2) Remote from the receiver, using a transmitter already in the receivers memory
(Mode PLUS ).
P1 : enter the menu ( 4 sec.)
or
conrm the choice
P2 : navigate
the menu
8Programming / Navigation menu
Button activated TX Serial number
Relay activated
The factory value for the timing is 1
sec. Use P1 to scroll the digits and P2
to conrm
Relay 1 : Pulse Relay 1 : Step Relay 2 : Timed
Menu
Timed
Add: Add transmitters s/n
Delete TX : Delete a single transmitter, the button of a transmitter, a transmitter
from a list , all transmitters Reset to factory default
Info relays : Display relays operating mode, the number of Tx memorized, the of
Transmitters, the SW release.
Cong relay 1 or 2
Set relay operating mode ( pulse , step, timed )
Set delay time of relay
Backup to : data backup to an external memory
Restore from : data restore from an external memory
Plus ON : Enable remote transmitter memorization
Plus Limited : Enable remote transmitter memorization only using a TX «ma-
ster» ( see chapter 12 )
Plus OFF : disable remote transmitter memorization
Connector for
backup memory
Backlit
LCD Display
Buzzer
ERONE
XPL500
www.erone.com - www.cdvigroup.com
Fig. 5

Fabricant de Contrôle d’Accès depuis 1985 Manufacturing Access Control since 1985
The installer’s choice
www.erone.com - www.cdvigroup.com
9Menu Add
(*) NOTE : The rst TX added acts as Master: that means that it can be used to add more tx using the PLUS option.
The submenu Add Master allows to assign the Master property to any other TX already in memory even not memorized on the rst position.
Once a TX has been assigned as Master, its property cannot be removed unless to delete it from the memory using the Delete menu.
The transmitters «Master» are identied with the «#» in the list.
10 Menu Delete
11 Menu Info
Delete TX : Delete a transmitter. It’s necessary to have the transmitter available because the system
requires the RF transmission;
Delete Button : Delete the single button of a transmitter;
Delete by List : Delete a transmitter from a list. In this case it is enough to know the S/N of the transmitter to
delete to complete the cancellation;
Delete All TX : Delete all transmitters;
Delete setting : Reset to factory default: delete all the transmitters and reset the operating mode of the relays
to PULSE.
For all the options, use P2 to scroll and P1 to conrm
Info relays : Display relays operating mode
Info N. Users : Display number of Tx memorized
Info List : List of Transmitters
Info Version : SW release.
For all the options, use P2 to scroll and P1 to conrm
Enter the number
of TX [1 < n < 500]
Push Button of the TX
to store as Master (*)
Push TX
Button
Push Button
of the rst TX
Press the transmitter buttons
which activate Relay 1 and
press P1 to conrm
Example: Relay 1 of the full block
will be activated by buttons A
and C
Example: Relay 2 of the full block
will be activated by buttons A,C
and D
Press the transmitter buttons
which activate Relay 2 and
press P1 to conrm
Block memorization
GUARANTEE
The warranty period for this product is 12 months, beginning from the manufacturer date. During this period, if the product does not
work correctly, due to a defective component, the product will be repaired or substituted at our discretion. The guarantee does not
cover the plastic container integrity. After-sale service is supplied at the factory.
Fabricant de Contrôle d’Accès depuis 1985 Manufacturing Access Control since 1985
The installer’s choice
12 Menu Cong
14 Memorization Plus
13 Backup / Restore
(*) : Push the button of the new transmitter
before the end of the beep.
NOTE : If the option «PLUS LIMITED» is set,
the transmitter which «opens» the memoriza-
tion can be only the rst transmitter memorized.
If the option PLUS is OFF the remote memori-
zation is disabled.
If the option PLUS is ON the remote memoriza-
tion of a new transmitter can be done using any
transmitter already in memory.
The memorization PLUS is active only if there
is, at least, one transmitter in the memory.
When the memory is empty, the memorization
of the rst transmitter can be eected only
using the buttons P1 and P2.
Memo TX on relay 1
Memo TX on relay 2
!(*) Attention : this operation will overwrite all data of the internal memory
Sold by : GfA ELEKTROMATEN UK Ltd, Agincourt Road, Warwick, CV34 6XZ, United Kindgom
Tel : +44 (0) 1926 452 452 - Fax : +44 (0) 1926 336 417
www.gfa-elektromaten.co.uk
Fig.4
Fig.5
Allows to set the operating mode of the relays R1 and R2, as Pulse, Step or Timed. In case of Timed it’s possible to set the delay time from
1 sec. to 24h: 59 min.
Select PULSE, STEP or TIMED with P2
Set the desired delay time using P2 to scroll the digits and
P1 to conrm and shift to next : the time is expressed in
hours , minutes and seconds
External
Internal
External
Internal
Save
Restore (*)
MEM.
MEM.
MEM.
MEM.
Allows to create a backup of the memory data base and save it onto an external
memory ( g. 6)
Plug-in the memory in the proper receiver connector
The memorization PLUS allows to add a new transmitter remotely, without using the push-buttons P1 & P2. It’s enough to use a transmitter «Master».
A transmitter «Master» can be :
1) the rst transmitter added;
2) any transmitter memorized and changed as «master» using the Add Master submenu ;
The PLUS feature can be : ON, Limited or OFF
Plus ON : remote transmitter memorization enabled;
Plus Limited : remote transmitter memorization enabled only using a TX «master» ( see g. 7-8 );
Plus OFF : remote transmitter memorization disabled;
Fig. 7
Fig. 8
Fig. 6
ERONE
XPL500
Other CDVI Receiver manuals

CDVI
CDVI DIGITAG-LR DTRR1434R User manual

CDVI
CDVI Digitag LR DTRR1434R User manual

CDVI
CDVI SEL2641R433-XPL4P User manual

CDVI
CDVI SELWR433-SAT User manual

CDVI
CDVI ERONE SEL2641R433-XPL4V User manual

CDVI
CDVI SEL2641R433-XPL User manual

CDVI
CDVI SEL2641R433-IP User manual

CDVI
CDVI SEL128R433-WPL User guide

CDVI
CDVI ERONE SEL2641R433-XPL1V User manual

CDVI
CDVI SEL2641R433-XPL2P User manual


