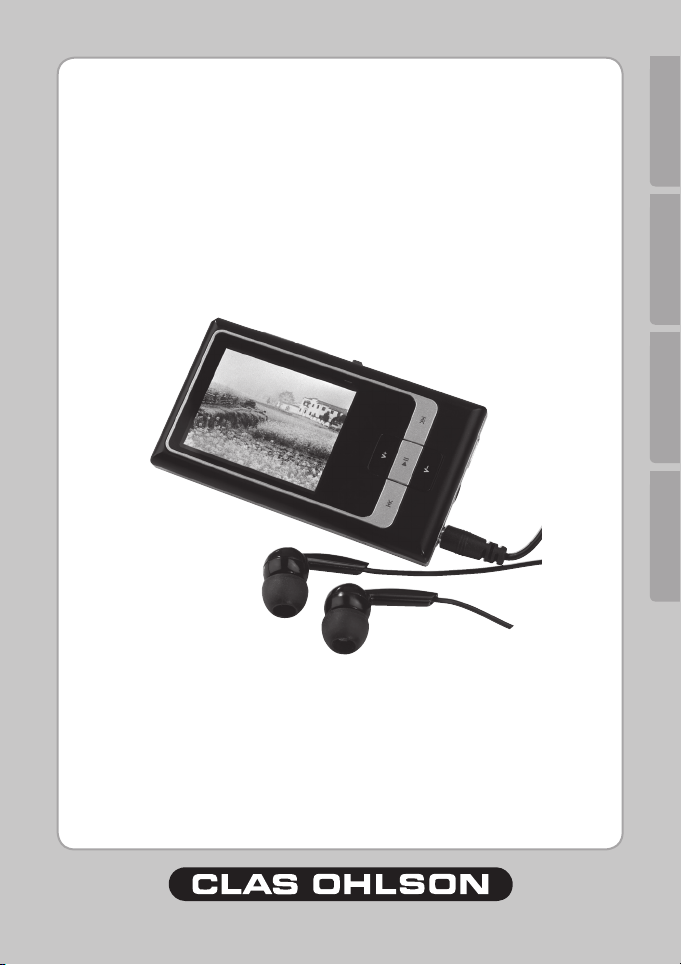
Clas Ohlson MP734AF User manual
SUOMINORSKSVENSKAENGLISH
MP3/WMA Player with radio
Art.no. Model
38-2888(2GB) MP734AF
38-2889(4GB)
38-3192(8GB)


ENGLISH
MP3/MWA Player with radio
Please read the entire instruction manual before using the product and save it for future reference.
We apologise for any text or photographic errors and any changes of technical data. If you have any
questions concerning technical problems please contact our Customer Service Department
(see address on reverse.)
Table of Contents
1. Safety
2. Product Description
. Buttons and Functions 4
4. Getting Started 5
5. Basic Operation 7
6. Operating Instructions 8
7. Converting Video to Other Formats 16
8. Care and Maintenance 17
9. Troubleshooting 17
10. Disposal 17
11. Specications 18
1. Safety
- Long exposure of high volume from headphones can damage your hearing.
- Never expose the player to direct sunlight, sources of heat, moisture or rain.
- Never expose the player to knocks or blows.
- Never place the player beside magnets such as loudspeakers.
2. Product Description
2.1 System requirements
- Pentium 200 MHz or greater
- Windows 98SE/2000/ME/XP/VISTA
- 120 MB of available hard disk space
- USB port
- CD reader

4
ENGLISH
V+
V–
►II
>>II<<
3. Buttons and Functions
1. ON/OFF – Turns the player on or off
2. FUNC – Functions button
3. MicroSD – Memory card slot (microSD)
4. Display
5. [V+] – Up/Volume up
6. [] – Forward
7. [V-] – Down/Volume down
8. [] – Back
9. [] – Play/Pause
10. RESET – Push to reset
11. MIC – Built-in microphone
12. 2earphonejacks(3.5mm)
NB: The left earphone jack must be used for listening to the radio since
the earphones also serve as the radio aerial.
13. USBconnection
5
ENGLISH
4. Getting Started
4.1 Connecting to the computer
The player can be connected or disconnected from the computer without having to turn the computer
off. The player will automatically be allocated a device letter by the computer. The MP player does
not have to be restarted before transferring les.
The following installation instructions apply for Windows XP with Service Pack 2 installed.
4.1.1InstallationusingWindowsXP
1. No extra driver is required for Windows XP (if your computer is running Win98SE, you must install
the driver provided on the CD before connecting the player to your computer).
2. Connect the included usb cable to a vacant usb port on the computer and then to the usb
connector (B) on the player.
. The computer automatically recognises the player as “Removable Hardware” and is allocated its
own device symbol/letter in “My Computer” (the player’s internal memory and the memory card
will each receive their own device symbol/letter).
4.1.2Transferringles
When a connection has been made pictures, music and videos can be transferred to the player.
1. Select the les on your computer. Right-click and Copythe les.
2. Double-click on the device’s symbol (e.g. “F”). The device symbol allocated to your computer may
vary depending on the conguration of your computer.
. Right-click on the player and select Paste.
Tip!
- You can also use the “drag and drop” method to copy or transfer les between your computer
and the player.
Sortingles
- The player automatically sorts les after the last character in the le name (up to 15 characters)
and plays les in normal this order unless another order has been chosen (random).

6
ENGLISH
4.1.3Disconnectingtheplayer
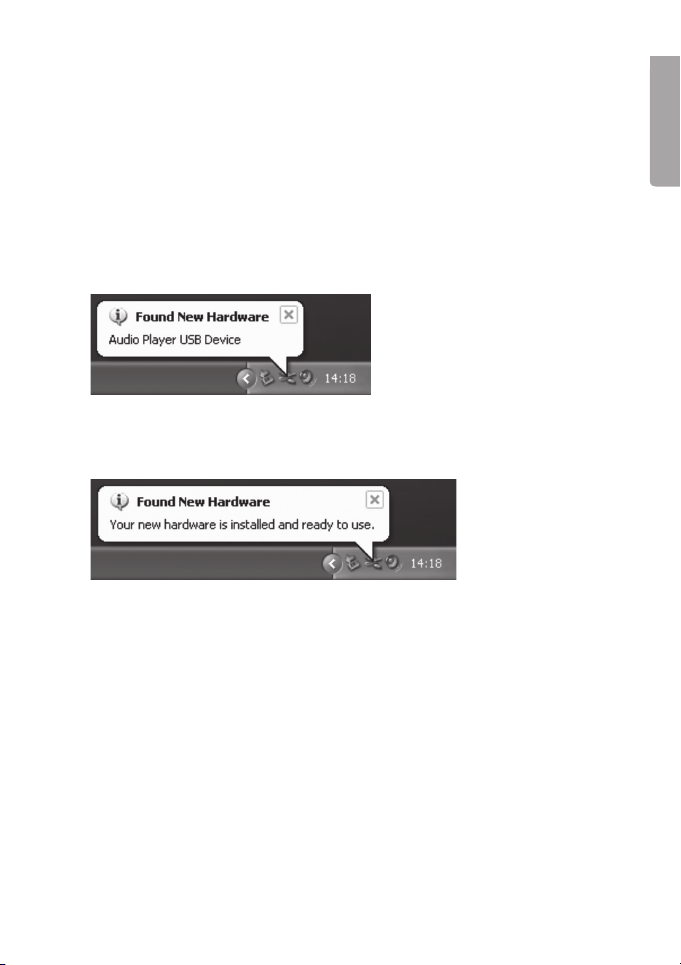
1. Double click on SafelyRemoveHardware on the task bar.
2. Highlight USBMassStorageUnit and then click on Stop.
. Highlight AudioPlayerUSBDevice and click OK.
4. The player can now be safely removed from the USB port.
N.B: Do not remove the player from the USB port when data is being transferred to or from the
memory. The built-in ash memory could become damaged.

7
ENGLISH
4.2 Charging the battery
The player has a built-in rechargeable battery. The status of the battery is indicated by the battery
symbol in the upper right-hand corner of the display. When the symbol appears empty it is time
to recharge the battery. A USB charger cable is provided for recharging the battery.
1. Connect the USB cable to a vacant USB port on your computer and then to the USB port on
the player.
2. When the battery symbol appears full the battery is fully charged.
Important:
- Charge the battery fully before using it for the rst time.
- Charge the battery as soon as the “Low Battery” message is displayed.
- Release the USB cable when the battery is fully charged. Overcharging the battery will shorten
its life.
- The battery can discharge if the player is not used for a long time (more than months). To avoid
the battery becoming discharged it should be fully charged every second or third month.
4.3 Using a microSD memory card
For a more accessible type of memory storage a microSD memory card (up to 4 GB) can be
connected to the player.
1. Open the ap () on the rights side of the player.
2. Insert the memory card with the label facing upwards and the arrow pointing inwards. Carefully
push the memory card into the slot until it clicks into place.
- To remove the card, carefully apply pressure to the edge of the card until it clicks, the card will
then spring out.
- Make sure that you selected SD memory card as the active memory in the Setup>Storage menu.
Important:
- Do not remove the card when data is being transferred between the computer and the player.
- Do not remove the card during playback.
5. Basic Operation
5.1 Turning the player on and off
Toturnon – Push and hold ON/OFF for two seconds.
Toturnoff – Push and hold ON/OFF for two seconds.
5.2 Adjusting the volume
Press [V+] to increase, and [V-] to decrease the volume.
5.3 Preparations
- Download les to the player as described in section 4.1.2 Transferring files.
- Make sure that the battery is charged and that your earphones are plugged into one of the jacks.
- If the player is turned off, press and hold ON/OFF to turn it on.
8
ENGLISH
6. Operating Instructions
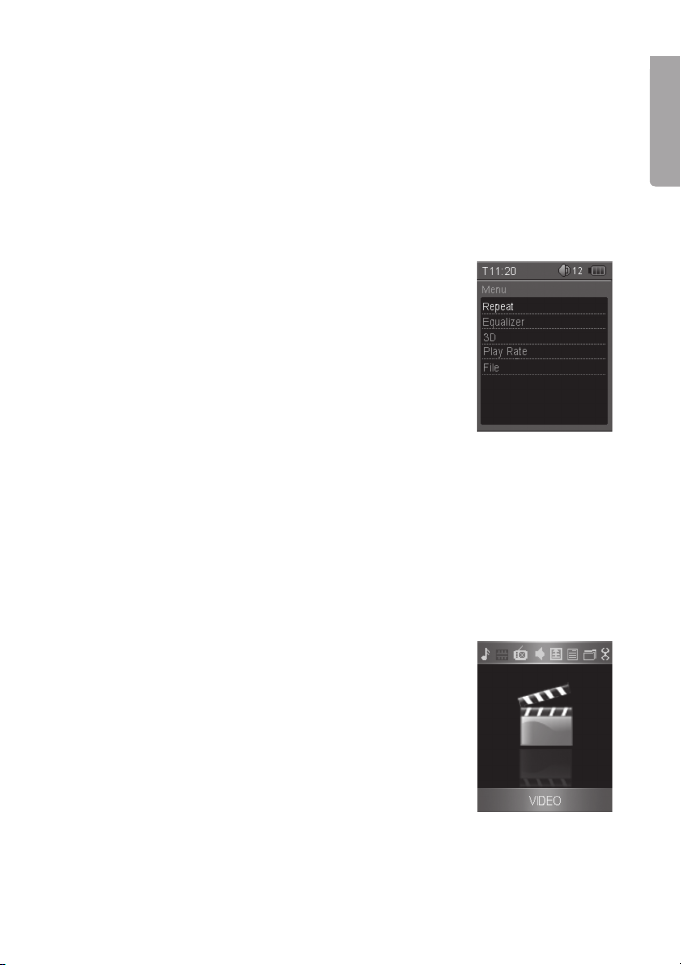
MainMenuKey
Key to the main menu selection:
1. Press and hold [] to enter the main menu from another application.
2. Use [] and [] to browse the menu.
. Press [] to conrm and select the highlighted function.
4. Use the []button to search backwards in the menu.
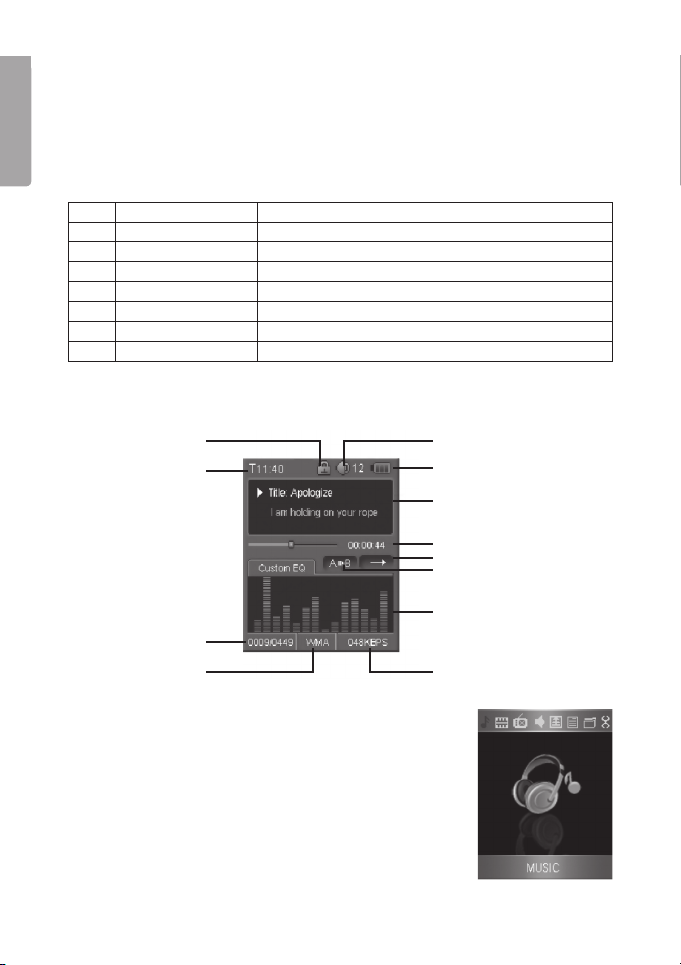
1. Music Music playback
2. Video Video playback
3. FM Listening to and recording from the radio
4. Voice Voice memory Recording via the built-in microphone
5. Photo Picture viewer
6. E-Book Text le reader
7. File File organiser
8. Setup Changes the basic settings
6.1 Music
6.1.1DisplayKey
Current time
6.1.2Listeningtomusic
1. Select Music from the main menu and conrm by pressing [].
2. Use [] and [] to select desired track. Press [] to conrm
and begin playback.
- Use [] and [] to change track forwards or backwards.
- Press and hold [] and [] fast forward or rewind.
- Press [] to pause play, press it once more to
continue playback.
Key locked indicator Volume level
Battery Indicator
Current track information
(le name/ID tag)
Elapsed time
Play mode indicator
A-B repeat indicator
Equalizer
Current track / total
number of tracks
File format Bit rate
9
ENGLISH
6.1.3A-BFunction
- Press the ON/OFF button once during playback to mark the start of the section to be repeated.
The display will show “A>>”.
- Press ON/OFFonce more to mark the end of the section. B>> will appear on the display and the
music between the two marks will be played.
- Press ON/OFF once more to resume normal playback.
NB: This function can only be used within the same track.
6.1.4Usingthemusicmenu
- In music mode, press FUNC once to enter the music menu. Press FUNC again to exit the menu.
- Use [V+] and [V-] to make a selection, press [] to conrm.
- Select an alternative and press [] to conrm and exit.
Video Menu Key
- Repeat – Repeats a track, all tracks or a folder. Random playback
- Equalizer – Select from 6 pre-programmed equalizer settings
(Normal, Pop, Rock, Classic, Jazz, Bass) or congure your own
mode (Custom EQ).
Conguringyourownequalizersetting:
1. Select CustomEQ and conrm using [].
2. Use [V+] and [V-] to mark the bar (frequency range) you wish
to use, press [] to conrm. The arrow above the bar will
become red.
. Change the level of the bars using the [V+] and [V-]buttons,
conrm using [].
4. Continue in the same way with the other bars.
5. Press [] to save your settings.
Press it once more to exit the menu.
- 3D – Gives the sound more “depth”.
- Playrate – Changes the rate of play.
- File – Navigate through the music les stored in the memory/ on the memory card. Select a
le for playback and press [] to play the selected le.
6.2 Video
The built-in video player can play videos in MTV format. Videos can be converted to MTV format using
the converter programme on the accompanying CD-ROM.
See section 7. Converting video files.
6.2.1Watchingavideo
1. Select Video from the main menu and conrm by pressing [].
2. A list of available video les will be displayed. Use [V+] and [V-]
to select the desired video. Press [] to start playback.
- Use [] and [] to select another video le.
- Press and hold [] and [] fast forward or rewind.
- Press [] to pause play, press it once more to continue
playback.

10
ENGLISH
6.2.2Usingthevideomenu
- In video mode, press FUNCto enter the video menu, playback
will stop and the video menu will be displayed (press FUNC once
more to exit the video menu).
- Use [V+] and [V-] to make a selection, press [] to conrm.
- Select an alternative and press [] to conrm and exit.
Video Menu Key
- Repeat – Repeats a track, all tracks or a folder. Random playback
- VideoOSDColor– Colour of on screen display text. Choose
from black, grey, red, green, blue or cyan.
6.3 FM(Radio)
6.3.1Preparations
Always connect the earphones to the left earphone jack. The ear-
phone cable serves as an aerial.
6.3.2Listeningtotheradio
1. Select FM from the main menu and conrm by pressing [].
2. The rst time you use the radio or after resetting, the radio auto-
matically searches for all radio stations with the strongest recep-
tion and saves the rst 20 in the memory.
. The rst of the stored stations will start to be played as soon as
the search has nished.
6.3.3DisplayKey
Current time
Key locked indicator Volume level
Battery Indicator
Frequency indicator
MONO or STEREO indicator
Current playing frequency
PRESET or SCAN
mode indicator
FM region indicator
Current playing preset channel
Table of contents
Languages:
Other Clas Ohlson MP3 Player manuals

Clas Ohlson
Clas Ohlson BM366 User manual

Clas Ohlson
Clas Ohlson LD05-2GB User manual

Clas Ohlson
Clas Ohlson MP-567AF User manual

Clas Ohlson
Clas Ohlson MPCD-122 User manual

Clas Ohlson
Clas Ohlson MP714AF User manual

Clas Ohlson
Clas Ohlson COBY MP-CD521 User manual

Clas Ohlson
Clas Ohlson BBU125EMR User manual

Clas Ohlson
Clas Ohlson KA10 User manual

Clas Ohlson
Clas Ohlson MP569A User manual

Clas Ohlson
Clas Ohlson PT15 User manual


