Comunello Automation SWIFT User manual

HOME....................................................................................................................................................................................................................................................................1
ITALIANO.................................... 2
ENGLISH.................................... 5
FRANÇAIS.................................. 8
ESPAÑOL................................. 11
PORTOGUESE......................... 14
РУССКИЙ................................ 17
NEDERLANDS ......................... 20
POLSKI .................................... 23
MAGYAR .................................. 26
....................................... 29
32 ..........................................
35 .........................................
HOME
GSWIFT LEDSTLYB00A
Safety accessories
SWIFT LED
INSTALLATION AND
USER’S MANUAL

GSWIFT LEDSTLYB00A
Safety accessories
SWIFT LED
91300396 - Rev. 00 - 11.05.20
INSTALLATION AND
USER’S MANUAL
FRATELLI COMUNELLO S.P.A.
AUTOMATION GATE DIVISION
Via Cassola, 64 - C.P. 79
36027 Rosà, Vicenza, Italy
Tel. +39 0424 585111
Fax +39 0424 533417
Fratelli Comunello S.p.A. dichiara che i prodotti SWIFT LED sono
conformi ai requisiti delle Direttive RoHS 2011/65/UE e EMCD 2014/30/
UE. Dichiarazione al link:
https://bit.ly/comunello-swift-ce
Fratelli Comunello S.p.A. declares that SWIFT LED products conform
to the requirements of the Directives RoHS 2011/65/EU and EMCD
2014/30/EU. Declaration available from the link:
https://bit.ly/comunello-swift-ce
ITALIANO

158 mm
16 mm15 mm
110 mm
55.5 mm
75.5 mm
44.5 mm
SWIFT LED
DART
TACT
max Ø 5
not included
2
5 76
89
13 4
10 11

13
14
2
3
1
12
ALIMENTAZIONE
LAMPEGGIANTE
24Vdc
24/230Vac
1
2
3
1
2
3
SET LAMPEGGIO
2-3= lampeggiante
1-2= luce fissa
SET PARPADEO
2-3= parpadeante
1-2= luz fija
INSTELLING KNIPPERING
2-3= knipperend
1-2= continu brandend
FASTON (terminazione antenna)
FASTON (antenna terminator)
FASTON (terminaison antenne)
FASTON (terminación antena)
FASTON (terminal antena)
FASTON
(вывод антенны)
FASTON (aansluiting antenne)
FASTON (ko
ń
cówka anteny)
FASTON (antenna végpontja)
ON
24V
230V
FLASH
ANT
FLASH SETTINGS
2-3 = flashing
1-2 = steady light
CONJUNTO LUZ
INTERMITENTE
2-3= luz intermitente
1-2= luz fixa
ZESTAW PULSACYJNY
2-3= światło pulsacyjne
1-2= światło stałe
НАСТРОЙКА
МИГАНИЯ
2-3=
мигает
1-2=
горит ровно
SET CLIGNOTEMENT
2-3= clignotante
1-2= lumière fixe
VILLOGÓ KÉSZLET
2-3= villogó
1-2= állandó fény
POWER SUPPLY
BEACON
VOEDING
KNIPPERLICHT
ALIMENTAÇÃO
LUZ INTERMITENTE
ALIMENTACIÓN
PARPADEANTE
TÁPELLÁTÁS
VILLOGÓ
ALIMENTATION
CLIGNOTANT
ZASILANIE
DIODA PULSACYJNA
ПИТАНИЕ
МИГАЕТ
INGRESSO ANTENNA
ANTENNA INPUT
ENTRÉE ANTENNE
ENTRADA ANTENA
ENTRADA DA ANTENA
АНТЕННЫЙ ВХОД
ANTENNE-INGANG
WEJŚCIE ANTENY
ANTENNA BEMENET
Grazie per aver scelto un prodotto COMUNELLO
AUTOMATION.
Questo manuale fornisce tutte le informazioni specifiche
necessarie alla conoscenza e al corretto utilizzo
dell’apparecchiatura; deve essere letto attentamente e
compreso all’atto dell’acquisto e consultato qualora vi
siano dubbi sull’utilizzo o si debbano fare interventi di
manutenzione.
Il produttore si riserva il diritto di apportare eventuali
modifiche al prodotto e al presente documento senza
preavviso.
AVVERTENZE
Leggere attentamente il presente manuale prima di
iniziare l’installazione ed eseguire gli interventi come
specificato dal costruttore.
Il presente manuale di installazione è rivolto
esclusivamente a personale professionalmente
competente.
Tutto quello non espressamente previsto in queste
istruzioni non è permesso.
In particolare è importante prestare attenzione alla
seguente avvertenza:
• Verificare la compatibilità della tensione.
• Togliere tensione prima di effettuare i collegamenti
elettrici.
• La fonte luminosa contenuta in questo apparecchio
può essere sostituita solamente dal costruttore o da
altro personale qualificato.
• Il cavo di alimentazione può essere sostituito solo
da personale qualificato.
• Questo prodotto non è adatto al montaggio su
superfici normalmente infiammabili.
DESCRIZIONE DEL PRODOTTO E
DESTINAZIONE D’USO
SWIFT LED è un lampeggiante a led per l’automazione
di cancelli, portoni sezionali, portoni basculanti,
alzabarriere, ecc.
CARATTERISTICHE TECNICHE
Alimentazione
24 Vac/dc -
230 Vac 50/60Hz
Grado protezione
IP 54
Lampada Led 24V 2W
Antenna integrata SI 433,92 MHz
VERIFICHE PRELIMINARI
• Verificare che il prodotto all’interno dell’imballo sia
integro ed in buone condizioni.
• Verificare che il luogo di installazione consenta una
buona visibilità anche da lontano.
• Verificare che il lampeggiante venga fissato ad
una superficie solida che consenta un fissaggio
adeguato in un punto facilmente raggiungibile in
caso di manutenzione.
INSTALLAZIONE E COLLEGAMENTI ELETTRICI
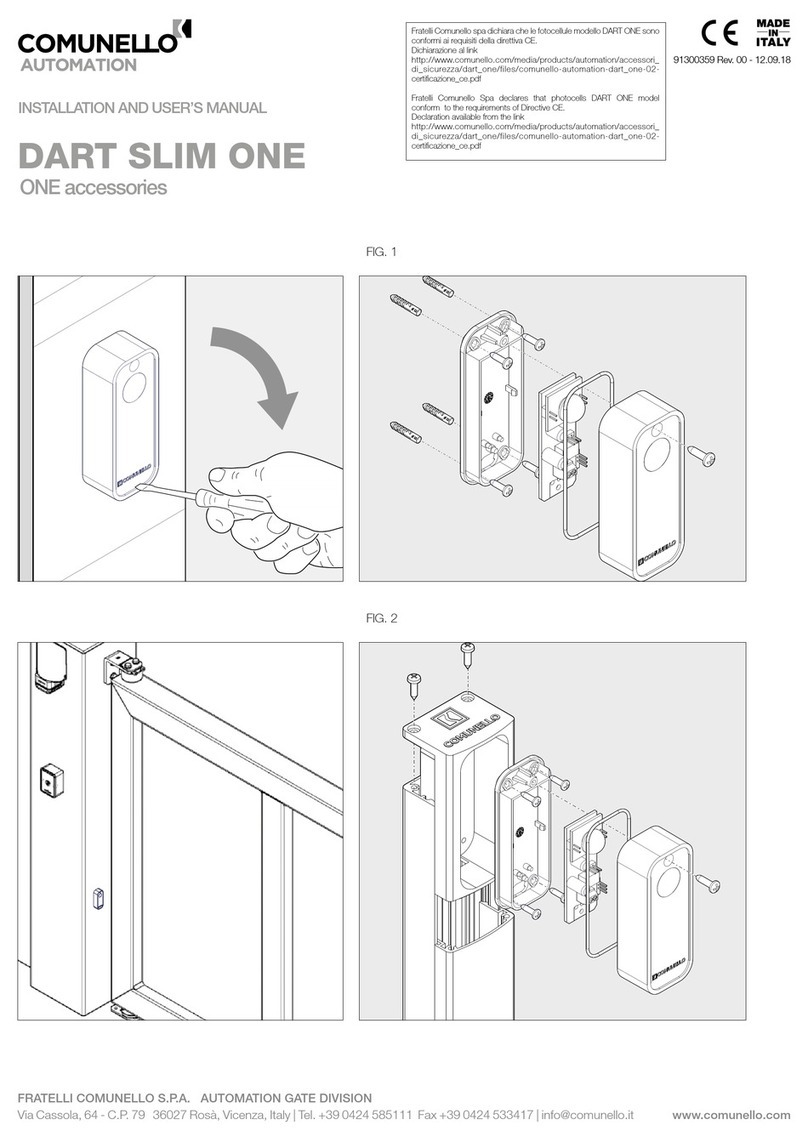
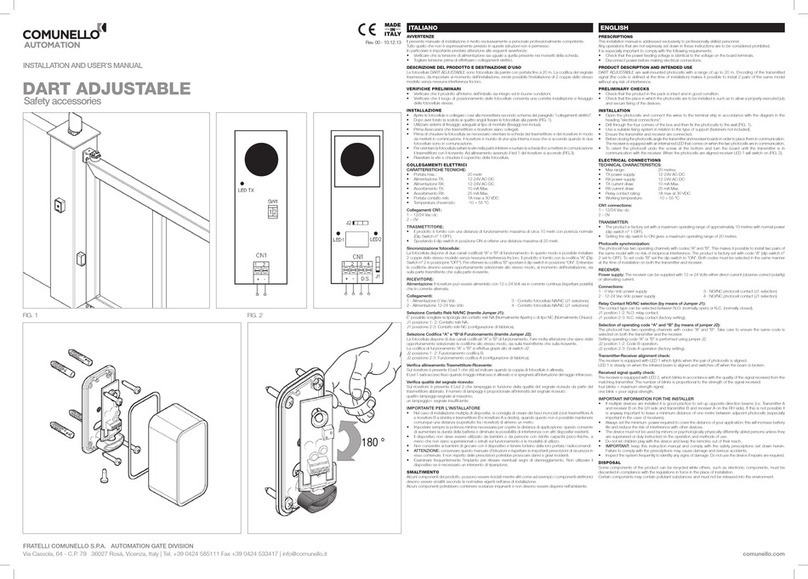
• Procedere come mostrato in figura 3-4.
• In funzione della posizione di installazione, preforare
le relative sedi di fissaggio (vedi figura 5).
• In funzione della posizione di passaggio del cavo,
forare la base in corrispondenza dell’apposita
predisposizione (vedi figura 6).
• Procedere come mostrato in figura 7 utilizzando
opportuni tasselli (Ø max 5 mm) e relative viti (non
inclusi).
• Collegare i due fili di alimentazione dalla centrale
al relativo morsetto del lampeggiante. Non è
necessario rispettare nessuna polarità sia per
alimentazione 24Vdc/ac che 230Vac.
• È possibile programmare il tipo di luce, lampeggiante
(configurazione di fabbrica) o fissa, posizionando il
jumper nelle posizioni 1-2 oppure 2-3 secondo le
indicazioni riportate in fig. 12.
• Collegare il cavo coassiale dell’antenna al morsetto
dedicato, rispettando le polarità come indicato in
figura 8.
• Applicare il silicone per sigillare il foro di passaggio
cavo (fig. 9).
• Procedere come mostrato nelle figure 10-11.
SOSTITUZIONE SCHEDA
In caso di necessità sostituire la scheda come mostrato
nelle figure 13-14.
SMALTIMENTO
Alcuni componenti del prodotto possono essere
riciclatimentrealtricomeadesempioicomponenti
elettronici devono essere smaltiti secondo le normative
vigenti nell’area di installazione.
Alcuni componenti potrebbero contenere sostanze
inquinanti e non devono essere dispersi nell’ambiente.

GSWIFT LEDSTLYB00A
Safety accessories
SWIFT LED
91300396 - Rev. 00 - 11.05.20
INSTALLATION AND
USER’S MANUAL
FRATELLI COMUNELLO S.P.A.
AUTOMATION GATE DIVISION
Via Cassola, 64 - C.P. 79
36027 Rosà, Vicenza, Italy
Tel. +39 0424 585111
Fax +39 0424 533417
Fratelli Comunello S.p.A. dichiara che i prodotti SWIFT LED sono
conformi ai requisiti delle Direttive RoHS 2011/65/UE e EMCD 2014/30/
UE. Dichiarazione al link:
https://bit.ly/comunello-swift-ce
Fratelli Comunello S.p.A. declares that SWIFT LED products conform
to the requirements of the Directives RoHS 2011/65/EU and EMCD
2014/30/EU. Declaration available from the link:
https://bit.ly/comunello-swift-ce
ENGLISH

158 mm
16 mm15 mm
110 mm
55.5 mm
75.5 mm
44.5 mm
SWIFT LED
DART
TACT
max Ø 5
not included
2
5 76
89
13 4
10 11

13
14
2
3
1
12
ALIMENTAZIONE
LAMPEGGIANTE
24Vdc
24/230Vac
1
2
3
1
2
3
SET LAMPEGGIO
2-3= lampeggiante
1-2= luce fissa
SET PARPADEO
2-3= parpadeante
1-2= luz fija
INSTELLING KNIPPERING
2-3= knipperend
1-2= continu brandend
FASTON (terminazione antenna)
FASTON (antenna terminator)
FASTON (terminaison antenne)
FASTON (terminación antena)
FASTON (terminal antena)
FASTON
(вывод антенны)
FASTON (aansluiting antenne)
FASTON (ko
ń
cówka anteny)
FASTON (antenna végpontja)
ON
24V
230V
FLASH
ANT
FLASH SETTINGS
2-3 = flashing
1-2 = steady light
CONJUNTO LUZ
INTERMITENTE
2-3= luz intermitente
1-2= luz fixa
ZESTAW PULSACYJNY
2-3= światło pulsacyjne
1-2= światło stałe
НАСТРОЙКА
МИГАНИЯ
2-3=
мигает
1-2=
горит ровно
SET CLIGNOTEMENT
2-3= clignotante
1-2= lumière fixe
VILLOGÓ KÉSZLET
2-3= villogó
1-2= állandó fény
POWER SUPPLY
BEACON
VOEDING
KNIPPERLICHT
ALIMENTAÇÃO
LUZ INTERMITENTE
ALIMENTACIÓN
PARPADEANTE
TÁPELLÁTÁS
VILLOGÓ
ALIMENTATION
CLIGNOTANT
ZASILANIE
DIODA PULSACYJNA
ПИТАНИЕ
МИГАЕТ
INGRESSO ANTENNA
ANTENNA INPUT
ENTRÉE ANTENNE
ENTRADA ANTENA
ENTRADA DA ANTENA
АНТЕННЫЙ ВХОД
ANTENNE-INGANG
WEJŚCIE ANTENY
ANTENNA BEMENET
Thank you for choosing a COMUNELLO
AUTOMATION product.
This manual provides all the detailed information
required for the understanding and correct use of
the equipment. It must be read carefully at the time
of purchase and consulted if there are any doubts
regarding its use or when maintenance is required.
The manufacturer reserves the right to make any
modifications to the item and to this document without
prior notice.
WARNINGS
Please read this manual carefully before beginning
installation and carry out the procedures as specified
by the manufacturer.
This installation manual is only intended for professional
personnel.
Anything not expressly included in these instructions
is prohibited.
In particular, your attention should be drawn towards
the following warning:
• Check voltage compatibility.
• Disconnect power before making any electrical
connections.
• The light source included in this piece of equipment
may only be replaced by the manufacturer or other
qualified personnel.
• The power cord may only be replaced by qualified
personnel.
• This item is not suitable for mounting on surfaces
that are usually flammable.
PRODUCT DESCRIPTION AND INTENDED USE
SWIFT LED is a beacon used in the automation
of gates, sectional doors, overhead doors, barrier
systems, etc.
TECHNICAL SPECIFICATIONS
Power supply
24V AC/DC -
230V AC 50/60Hz
IP
protection rating 54
LED lamp 24V 2W
Integrated antenna SI 433.92 MHz
PRELIMINARY CHECKS
• Check that the item inside the packaging is intact
and in good condition.
• Ensure that the installation site allows good visibility,
even from a distance.
• Ensure that the beacon is secured to a solid
foundation and is positioned in a location that is
easily accessible for maintenance.
INSTALLATION AND ELECTRICAL
CONNECTIONS
• Proceed as shown in Figures 3-4.
• Depending on the installation location, drill the
corresponding securing holes (see Figure. 5).
• Depending on the cable routing position, drill holes
in the base in the prearranged area (see Figure. 6).
• Proceed as shown in Figure 7 using rawlplugs
(Ø max. 5 mm) and corresponding screws (not
included).
• Connect the two power supply wires from the
control unit to the corresponding beacon terminal.
Polarities may be reversed for 24V AC/DC and
230V AC power supplies.
• Flashing (factory settings) or steady light type
can be programmed by positioning the jumper to
positions 1-2 or 2-3 following the instructions in Fig.
12.
• Connect the coaxial cable of the antenna to the
dedicated terminal, observing the polarities as
shown in Figure 8.
• Use silicone to seal the cable entry hole (Fig. 9).
• Proceed as shown in Figures 10-11.
BOARD REPLACEMENT
If required, replace the board as shown in Figures 13-
14.
DISPOSAL
A number of components of the item
can be recycled while others, such
as electronic components must be
disposed of in accordance with the regulations in force
in the country of installation.
A number of components may contain pollutants that
must not be released into the environment.

GSWIFT LEDSTLYB00A
Safety accessories
SWIFT LED
91300396 - Rev. 00 - 11.05.20
INSTALLATION AND
USER’S MANUAL
FRATELLI COMUNELLO S.P.A.
AUTOMATION GATE DIVISION
Via Cassola, 64 - C.P. 79
36027 Rosà, Vicenza, Italy
Tel. +39 0424 585111
Fax +39 0424 533417
Fratelli Comunello S.p.A. dichiara che i prodotti SWIFT LED sono
conformi ai requisiti delle Direttive RoHS 2011/65/UE e EMCD 2014/30/
UE. Dichiarazione al link:
https://bit.ly/comunello-swift-ce
Fratelli Comunello S.p.A. declares that SWIFT LED products conform
to the requirements of the Directives RoHS 2011/65/EU and EMCD
2014/30/EU. Declaration available from the link:
https://bit.ly/comunello-swift-ce
FRANÇAIS

158 mm
16 mm15 mm
110 mm
55.5 mm
75.5 mm
44.5 mm
SWIFT LED
DART
TACT
max Ø 5
not included
2
5 76
89
13 4
10 11

13
14
2
3
1
12
ALIMENTAZIONE
LAMPEGGIANTE
24Vdc
24/230Vac
1
2
3
1
2
3
SET LAMPEGGIO
2-3= lampeggiante
1-2= luce fissa
SET PARPADEO
2-3= parpadeante
1-2= luz fija
INSTELLING KNIPPERING
2-3= knipperend
1-2= continu brandend
FASTON (terminazione antenna)
FASTON (antenna terminator)
FASTON (terminaison antenne)
FASTON (terminación antena)
FASTON (terminal antena)
FASTON
(вывод антенны)
FASTON (aansluiting antenne)
FASTON (ko
ń
cówka anteny)
FASTON (antenna végpontja)
ON
24V
230V
FLASH
ANT
FLASH SETTINGS
2-3 = flashing
1-2 = steady light
CONJUNTO LUZ
INTERMITENTE
2-3= luz intermitente
1-2= luz fixa
ZESTAW PULSACYJNY
2-3= światło pulsacyjne
1-2= światło stałe
НАСТРОЙКА
МИГАНИЯ
2-3=
мигает
1-2=
горит ровно
SET CLIGNOTEMENT
2-3= clignotante
1-2= lumière fixe
VILLOGÓ KÉSZLET
2-3= villogó
1-2= állandó fény
POWER SUPPLY
BEACON
VOEDING
KNIPPERLICHT
ALIMENTAÇÃO
LUZ INTERMITENTE
ALIMENTACIÓN
PARPADEANTE
TÁPELLÁTÁS
VILLOGÓ
ALIMENTATION
CLIGNOTANT
ZASILANIE
DIODA PULSACYJNA
ПИТАНИЕ
МИГАЕТ
INGRESSO ANTENNA
ANTENNA INPUT
ENTRÉE ANTENNE
ENTRADA ANTENA
ENTRADA DA ANTENA
АНТЕННЫЙ ВХОД
ANTENNE-INGANG
WEJŚCIE ANTENY
ANTENNA BEMENET
Merci d’avoir choisi un produit COMUNELLO
AUTOMATION.
Ce manuel fournit toutes les informations spécifiques
nécessaires à la connaissance et à l’utilisation correcte
de l’appareil ; il doit être lu attentivement et compris au
moment de l’achat et consulté en cas de doute sur son
utilisation ou si une maintenance est nécessaire.
Le fabricant se réserve le droit d’apporter toute
modification au produit et au présent document sans
préavis.
AVERTISSEMENTS
Lire attentivement ce manuel avant de commencer
l’installation et effectuer les travaux comme indiqué par
le fabricant.
Ce manuel d’installation est uniquement destiné à être
utilisé par un personnel professionnellement qualifié.
Tout ce qui n’est pas expressément prévu dans ces
instructions est interdit.
Il est notamment important de prêter attention à
l’avertissement suivant :
• Vérifier la compatibilité de la tension.
• Couper l’alimentation avant d’effectuer les
branchements électriques.
• La source lumineuse contenue dans cet appareil
peut être remplacée seulement par le fabricant ou
par un technicien qualifié.
• Le câble d’alimentation peut être remplacé
seulement par des techniciens qualifiés.
• Ce produit n’est pas indiqué pour le montage sur
des surfaces normalement inflammables.
DESCRIPTION DU PRODUIT ET USAGE PRÉVU
SWIFT LED est un clignotant à LED pour l’automation
des portails, des portes sectionnelles, des portes
basculantes, des barrières levantes, etc.
CARACTÉRISTIQUES TECHNIQUES
Alimentation
24 Vca/cc -
230 Vca 50/60Hz
Degré de protection
IP 54
Lampe à LED 24V 2W
Antenne intégrée SI 433,92 MHz
CONTRÔLES PRÉLIMINAIRES
• Vérifier que le produit à l’intérieur de l’emballage soit
intègre et en bonnes conditions.
• Vérifier que le lieu d’installation permette une bonne
visibilité même de loin.
• Vérifier que le clignotant soit fixé sur une surface
solide qui permette une fixation adéquate sur un
point facilement accessible en cas de maintenance.
INSTALLATION ET BRANCHEMENTS
ÉLECTRIQUES
• Procéder comme illustrer en figure 3-4.
• En fonction de la position d’installation, perforer les
sièges de fixation (voir figure 5).
• En fonction de la position de passage du
câble, percer la base en correspondance de la
prédisposition (voir figure 6).
• Procéder comme illustré en figure 7, en utilisant les
chevilles (Ø max 5 mm) et les vis (non fournies).
• Brancher les deux fils d’alimentation provenant de la
centrale à la borne respective du clignotant. Il n’est
pas nécessaire de respecter les polarités, aussi
bien pour l’alimentation 24Vcc/ca que 230Vca.
• Il est possible de programmer le type de lumière,
clignotante (configuration de fabrication) ou fixe, en
positionnant le jumper sur 1-2 ou sur 2-3 selon les
indications reportées en fig. 14.
• Brancher le câble coaxial de l’antenne à la borne
dédiée, en respectant les polarités comme indiqué
en figure 8.
• Appliquer le silicone pour sceller le trou de passage
du câble (fig. 9).
• Procéder comsme illustré dans les figures 10-11.
REMPLACEMENT DE LA CARTE
En cas de nécessité, remplacer la fiche comme illustré
dans les figures 13-14
ÉLIMINATION
Certains composants du produit
peuvent être recyclés tandis que
d’autres, tels que les composants
électroniques, doivent être éliminé selon les
règlementations en vigueur dans la zone d’installation.
Certains composants peuvent contenir des
substances polluantes et ne doivent pas être rejetés
dans l’environnement.
GSWIFT LEDSTLYB00A
Safety accessories
SWIFT LED
91300396 - Rev. 00 - 11.05.20
INSTALLATION AND
USER’S MANUAL
FRATELLI COMUNELLO S.P.A.
AUTOMATION GATE DIVISION
Via Cassola, 64 - C.P. 79
36027 Rosà, Vicenza, Italy
Tel. +39 0424 585111
Fax +39 0424 533417
Fratelli Comunello S.p.A. dichiara che i prodotti SWIFT LED sono
conformi ai requisiti delle Direttive RoHS 2011/65/UE e EMCD 2014/30/
UE. Dichiarazione al link:
https://bit.ly/comunello-swift-ce
Fratelli Comunello S.p.A. declares that SWIFT LED products conform
to the requirements of the Directives RoHS 2011/65/EU and EMCD
2014/30/EU. Declaration available from the link:
https://bit.ly/comunello-swift-ce
ESPAÑOL

158 mm
16 mm15 mm
110 mm
55.5 mm
75.5 mm
44.5 mm
SWIFT LED
DART
TACT
max Ø 5
not included
2
5 76
89
13 4
10 11

13
14
2
3
1
12
ALIMENTAZIONE
LAMPEGGIANTE
24Vdc
24/230Vac
1
2
3
1
2
3
SET LAMPEGGIO
2-3= lampeggiante
1-2= luce fissa
SET PARPADEO
2-3= parpadeante
1-2= luz fija
INSTELLING KNIPPERING
2-3= knipperend
1-2= continu brandend
FASTON (terminazione antenna)
FASTON (antenna terminator)
FASTON (terminaison antenne)
FASTON (terminación antena)
FASTON (terminal antena)
FASTON
(вывод антенны)
FASTON (aansluiting antenne)
FASTON (ko
ń
cówka anteny)
FASTON (antenna végpontja)
ON
24V
230V
FLASH
ANT
FLASH SETTINGS
2-3 = flashing
1-2 = steady light
CONJUNTO LUZ
INTERMITENTE
2-3= luz intermitente
1-2= luz fixa
ZESTAW PULSACYJNY
2-3= światło pulsacyjne
1-2= światło stałe
НАСТРОЙКА
МИГАНИЯ
2-3=
мигает
1-2=
горит ровно
SET CLIGNOTEMENT
2-3= clignotante
1-2= lumière fixe
VILLOGÓ KÉSZLET
2-3= villogó
1-2= állandó fény
POWER SUPPLY
BEACON
VOEDING
KNIPPERLICHT
ALIMENTAÇÃO
LUZ INTERMITENTE
ALIMENTACIÓN
PARPADEANTE
TÁPELLÁTÁS
VILLOGÓ
ALIMENTATION
CLIGNOTANT
ZASILANIE
DIODA PULSACYJNA
ПИТАНИЕ
МИГАЕТ
INGRESSO ANTENNA
ANTENNA INPUT
ENTRÉE ANTENNE
ENTRADA ANTENA
ENTRADA DA ANTENA
АНТЕННЫЙ ВХОД
ANTENNE-INGANG
WEJŚCIE ANTENY
ANTENNA BEMENET
Gracias por haber elegido un producto
COMUNELLO AUTOMATION.
Este manual proporciona toda la información específica
necesaria para el conocimiento y el uso correcto del
aparato; debe ser leído atentamente y comprendido en
el acto de compra y consultado siempre que se tengan
dudas sobre el uso o se deban realizar operaciones de
mantenimiento.
El fabricante se reserva el derecho de aportar
eventuales modificaciones al producto y al presente
documento sin preaviso.
ADVERTENCIAS
Lea atentamente el presente manual antes de
comenzar la instalación y realice las operaciones como
especifica el fabricante.
El presente manual de instalación está dirigido
exclusivamente a personal profesionalmente
competente.
Todo lo que no está específicamente previsto en estas
instrucciones no está permitido.
En particular es importante prestar atención a la
siguiente advertencia:
• Compruebe la compatibilidad de la tensión.
• Quite la tensión antes de realizar las conexiones
eléctricas.
• La fuente luminosa contenida en este aparato
puede ser sustituida solamente por el fabricante o
por otro personal cualificado.
• El cable de alimentación puede ser sustituido solo
por personal cualificado.
• Este producto no es adecuado para el montaje en
superficies normalmente inflamables.
DESCRIPCIÓN DEL PRODUCTO Y USO
PREVISTO
SWIFT LED es un parpadeante de led para la
automatización de barreras, portones seccionales,
portones basculantes, barreras automáticas, etc.
CARACTERÍSTICAS TÉCNICAS
Alimentación
24 Vac/dc -
230 Vac 50/60Hz
Grado de protección
IP 54
Lámpara Led 24V 2W
Antena integrada SI 433,92 MHz
VERIFICACIONES PRELIMINARES
• Compruebe que el producto en el interior del
embalaje esté intacto y en buenas condiciones.
• Compruebe que el lugar de instalación permita una
buena visibilidad incluso desde lejos.
• Compruebe que el parpadeante esté fijado en una
superficie sólida que permita una fijación adecuada
en un punto fácilmente alcanzable en caso de
mantenimiento.
INSTALACIÓN Y CONEXIONES ELÉCTRICAS
• Proceda como se muestra en la figura 3-4.
• En función de la posición de instalación, perfore las
sedes relativas de fijación (véase figura 5).
• En función de la posición de pasaje del cable,
perfore la base en correspondencia con la
predisposición adecuada (véase figura 6).
• Proceda como se muestra en la figura 7 utilizando
los tacos correspondientes (Ø máx 5 mm) y los
tornillos relativos (no incluidos).
• Conecte los dos cables de alimentación de la
central en el borne relativo del parpadeante. No es
necesario respetar ninguna polaridad tanto para la
alimentación 24Vdc/ac como para 230Vac.
• Es posible programar el tipo de luz, parpadeante
(configuración de fábrica) o fija, posicionando
el jumper en las posiciones 1-2 o 2-3 según las
indicaciones que se muestran en la fig. 12.
• Conecte el cable coaxial de la antena al borne
dedicado, respetando las polaridades como se
indica en la figura 8.
• Aplique la silicona para sellar el orificio de pasaje del
cable (fig. 9).
• Proceda como se muestra en las figuras 10-11.
SUSTITUCIÓN DE LA FICHA
En caso de necesidad sustituya la ficha como se
muestra en las figuras 13-14.
ELIMINACIÓN
Algunos componentes del producto
pueden reciclarse mientras otros,
como por ejemplo los componentes
electrónicos, deben eliminarse según las normativas
vigentes en el área de instalación.
Algunos componentes podrían contener sustancias
contaminantes y no deben ser liberados en el medio
ambiente.

GSWIFT LEDSTLYB00A
Safety accessories
SWIFT LED
91300396 - Rev. 00 - 11.05.20
INSTALLATION AND
USER’S MANUAL
FRATELLI COMUNELLO S.P.A.
AUTOMATION GATE DIVISION
Via Cassola, 64 - C.P. 79
36027 Rosà, Vicenza, Italy
Tel. +39 0424 585111
Fax +39 0424 533417
Fratelli Comunello S.p.A. dichiara che i prodotti SWIFT LED sono
conformi ai requisiti delle Direttive RoHS 2011/65/UE e EMCD 2014/30/
UE. Dichiarazione al link:
https://bit.ly/comunello-swift-ce
Fratelli Comunello S.p.A. declares that SWIFT LED products conform
to the requirements of the Directives RoHS 2011/65/EU and EMCD
2014/30/EU. Declaration available from the link:
https://bit.ly/comunello-swift-ce
PORTOGUESE

158 mm
16 mm15 mm
110 mm
55.5 mm
75.5 mm
44.5 mm
SWIFT LED
DART
TACT
max Ø 5
not included
2
5 76
89
13 4
10 11

13
14
2
3
1
12
ALIMENTAZIONE
LAMPEGGIANTE
24Vdc
24/230Vac
1
2
3
1
2
3
SET LAMPEGGIO
2-3= lampeggiante
1-2= luce fissa
SET PARPADEO
2-3= parpadeante
1-2= luz fija
INSTELLING KNIPPERING
2-3= knipperend
1-2= continu brandend
FASTON (terminazione antenna)
FASTON (antenna terminator)
FASTON (terminaison antenne)
FASTON (terminación antena)
FASTON (terminal antena)
FASTON
(вывод антенны)
FASTON (aansluiting antenne)
FASTON (ko
ń
cówka anteny)
FASTON (antenna végpontja)
ON
24V
230V
FLASH
ANT
FLASH SETTINGS
2-3 = flashing
1-2 = steady light
CONJUNTO LUZ
INTERMITENTE
2-3= luz intermitente
1-2= luz fixa
ZESTAW PULSACYJNY
2-3= światło pulsacyjne
1-2= światło stałe
НАСТРОЙКА
МИГАНИЯ
2-3=
мигает
1-2=
горит ровно
SET CLIGNOTEMENT
2-3= clignotante
1-2= lumière fixe
VILLOGÓ KÉSZLET
2-3= villogó
1-2= állandó fény
POWER SUPPLY
BEACON
VOEDING
KNIPPERLICHT
ALIMENTAÇÃO
LUZ INTERMITENTE
ALIMENTACIÓN
PARPADEANTE
TÁPELLÁTÁS
VILLOGÓ
ALIMENTATION
CLIGNOTANT
ZASILANIE
DIODA PULSACYJNA
ПИТАНИЕ
МИГАЕТ
INGRESSO ANTENNA
ANTENNA INPUT
ENTRÉE ANTENNE
ENTRADA ANTENA
ENTRADA DA ANTENA
АНТЕННЫЙ ВХОД
ANTENNE-INGANG
WEJŚCIE ANTENY
ANTENNA BEMENET
Obrigado por ter escolhido um produto
COMUNELLO AUTOMATION.
Este manual fornece todas as informações específicas
necessárias para o conhecimento e uso correto do
equipamento; deve ser lido com atenção e entendido
no momento da compra, e consultado quando houver
dúvidas sobre o seu uso ou quando se deva fazer
intervenções de manutenção.
O fabricante reserva-se o direito de fazer eventuais
alterações ao produto e a este documento sem aviso
prévio.
AVISOS
Leia este manual com atenção antes de iniciar
a instalação e execute as operações conforme
especificado pelo fabricante.
Este manual de instalação é destinado apenas a
pessoal profissionalmente competente.
Tudo o que não esteja expressamente previsto nestas
instruções não é permitido.
Em particular, é importante prestar atenção ao
seguinte aviso:
• Verifique a compatibilidade da tensão.
• Retire a tensão antes de estabelecer as ligações
elétricas.
• A fonte de luz contida neste aparelho só pode ser
substituída pelo fabricante ou por outro pessoal
qualificado.
• O cabo de alimentação só pode ser substituído por
pessoal qualificado.
• Este produto não é adequado para montagem em
superfícies normalmente inflamáveis.
DESCRIÇÃO DO PRODUTO E FINALIDADE DE
USO
SWIFT LED é uma luz intermitente a LED para
a automação de portões de batente, portões
seccionados, portões basculantes, barreiras
automáticas etc.
CARACTERÍSTICAS TÉCNICAS
Alimentação
24 V ca/cc -
230 V ca 50/60 Hz
Grau de proteção
IP 54
Lâmpada LED 24 V 2 W
Antena integrada SI 433,92 MHz
VERIFICAÇÕES PRELIMINARES
• Verifique se o produto no interior da embalagem
está intacto e em boas condições.
• Certifique-se que o local da instalação permite uma
boa visibilidade, mesmo à distância.
• Certifique-se que a luz intermitente esteja fixa em
uma superfície sólida que permita uma fixação
adequada em um ponto facilmente acessível em
caso de manutenção.
INSTALAÇÃO E LIGAÇÕES ELÉTRICAS
• Proceda conforme mostrado na figura 3-4.
• Dependendo da posição de instalação, perfure
previamente os respetivos pontos de fixação (veja a
figura 5).
• Dependendo da posição de passagem do cabo,
perfure a base em correspondência com a
respetiva predisposição (veja a figura 6).
• Proceda conforme mostrado na figura 7, usando
buchas apropriadas (Ø máx 5 mm) e respetivos
parafusos (não incluídos).
• Ligue os dois fios da alimentação da unidade de
controle ao respetivo terminal da luz intermitente. Não
é necessário respeitar nenhuma polaridade quer
para a alimentação de 24 V cc / ca quer de 230 V ca.
• É possível programar o tipo de luz, intermitente
(configuração de fábrica) ou fixa, posicionando o
jumper nas posições 1-2 ou 2-3, de acordo com as
indicações mostradas na fig. 12.
• Ligue o cabo coaxial da antena ao terminal
dedicado, respeitando a polaridade conforme
indicado na figura 8.
• Aplique silicone para selar o orifício de passagem
do cabo (fig. 9).
• Proceda conforme mostrado nas figuras 10-11.
SUBSTITUIÇÃO DA PLACA
Se necessário, substitua a placa conforme mostrado
nas figuras 13-14.
ELIMINAÇÃO
Alguns componentes do produto
podem ser reciclados, enquanto
outros, como por ex. os componentes
eletrónicos, devem ser eliminados de acordo com as
normas em vigor no local de instalação.
Alguns componentes podem conter substâncias polu-
entes que não devem ser dispersas no ambiente.

GSWIFT LEDSTLYB00A
Safety accessories
SWIFT LED
91300396 - Rev. 00 - 11.05.20
INSTALLATION AND
USER’S MANUAL
FRATELLI COMUNELLO S.P.A.
AUTOMATION GATE DIVISION
Via Cassola, 64 - C.P. 79
36027 Rosà, Vicenza, Italy
Tel. +39 0424 585111
Fax +39 0424 533417
Fratelli Comunello S.p.A. dichiara che i prodotti SWIFT LED sono
conformi ai requisiti delle Direttive RoHS 2011/65/UE e EMCD 2014/30/
UE. Dichiarazione al link:
https://bit.ly/comunello-swift-ce
Fratelli Comunello S.p.A. declares that SWIFT LED products conform
to the requirements of the Directives RoHS 2011/65/EU and EMCD
2014/30/EU. Declaration available from the link:
https://bit.ly/comunello-swift-ce
РУССКИЙ

158 mm
16 mm15 mm
110 mm
55.5 mm
75.5 mm
44.5 mm
SWIFT LED
DART
TACT
max Ø 5
not included
2
5 76
89
13 4
10 11

13
14
2
3
1
12
ALIMENTAZIONE
LAMPEGGIANTE
24Vdc
24/230Vac
1
2
3
1
2
3
SET LAMPEGGIO
2-3= lampeggiante
1-2= luce fissa
SET PARPADEO
2-3= parpadeante
1-2= luz fija
INSTELLING KNIPPERING
2-3= knipperend
1-2= continu brandend
FASTON (terminazione antenna)
FASTON (antenna terminator)
FASTON (terminaison antenne)
FASTON (terminación antena)
FASTON (terminal antena)
FASTON
(вывод антенны)
FASTON (aansluiting antenne)
FASTON (ko
ń
cówka anteny)
FASTON (antenna végpontja)
ON
24V
230V
FLASH
ANT
FLASH SETTINGS
2-3 = flashing
1-2 = steady light
CONJUNTO LUZ
INTERMITENTE
2-3= luz intermitente
1-2= luz fixa
ZESTAW PULSACYJNY
2-3= światło pulsacyjne
1-2= światło stałe
НАСТРОЙКА
МИГАНИЯ
2-3=
мигает
1-2=
горит ровно
SET CLIGNOTEMENT
2-3= clignotante
1-2= lumière fixe
VILLOGÓ KÉSZLET
2-3= villogó
1-2= állandó fény
POWER SUPPLY
BEACON
VOEDING
KNIPPERLICHT
ALIMENTAÇÃO
LUZ INTERMITENTE
ALIMENTACIÓN
PARPADEANTE
TÁPELLÁTÁS
VILLOGÓ
ALIMENTATION
CLIGNOTANT
ZASILANIE
DIODA PULSACYJNA
ПИТАНИЕ
МИГАЕТ
INGRESSO ANTENNA
ANTENNA INPUT
ENTRÉE ANTENNE
ENTRADA ANTENA
ENTRADA DA ANTENA
АНТЕННЫЙ ВХОД
ANTENNE-INGANG
WEJŚCIE ANTENY
ANTENNA BEMENET
Благодарим за выбор изделия COMUNELLO
AUTOMATION.
-
-
-
-
МЕРЫ БЕЗОПАСНОСТИ
-
-
-
-
-
-
ОПИСАНИЕ ИЗДЕЛИЯ И ЕГО
ПРЕДНАЗНАЧЕНИЕ
-
ТЕХНИЧЕСКИЕ ХАРАКТЕРИСТИКИ
IP 54
24V 2W
ПРЕДВАРИТЕЛЬНЫЕ ПРОВЕРКИ
-
УСТАНОВКА И ЭЛЕКТРИЧЕСКИЕ
ПОДКЛЮЧЕНИЯ
3-4.
-
-
-
-
-
-
-
-
-
10-11.
ЗАМЕНА ПЛАТЫ
УТИЛИЗАЦИЯ
-
-
-
-

GSWIFT LEDSTLYB00A
Safety accessories
SWIFT LED
91300396 - Rev. 00 - 11.05.20
INSTALLATION AND
USER’S MANUAL
FRATELLI COMUNELLO S.P.A.
AUTOMATION GATE DIVISION
Via Cassola, 64 - C.P. 79
36027 Rosà, Vicenza, Italy
Tel. +39 0424 585111
Fax +39 0424 533417
Fratelli Comunello S.p.A. dichiara che i prodotti SWIFT LED sono
conformi ai requisiti delle Direttive RoHS 2011/65/UE e EMCD 2014/30/
UE. Dichiarazione al link:
https://bit.ly/comunello-swift-ce
Fratelli Comunello S.p.A. declares that SWIFT LED products conform
to the requirements of the Directives RoHS 2011/65/EU and EMCD
2014/30/EU. Declaration available from the link:
https://bit.ly/comunello-swift-ce
NEDERLANDS
Other manuals for SWIFT
2
Table of contents
Languages:
Other Comunello Automation Gate Opener manuals

Comunello Automation
Comunello Automation DART User manual

Comunello Automation
Comunello Automation LIWIN User manual

Comunello Automation
Comunello Automation MAST TWIN User manual

Comunello Automation
Comunello Automation MAST GMAST005N0G00A User manual

Comunello Automation
Comunello Automation DART ADJUSTABLE User manual

Comunello Automation
Comunello Automation MAST SLIM GMASTS05N0G00A User manual

Comunello Automation
Comunello Automation RAM 220 User manual

Comunello Automation
Comunello Automation ABACUS 220 User manual

Comunello Automation
Comunello Automation CONDOR 220 User manual

Comunello Automation
Comunello Automation INDEX EURO User manual