Cricket A100 User manual

cricKet
A100 User Guide

Table of contents
Safety............................................... 4
About your device.................................4
Before using your phone.............. 6
Handset description.............................6
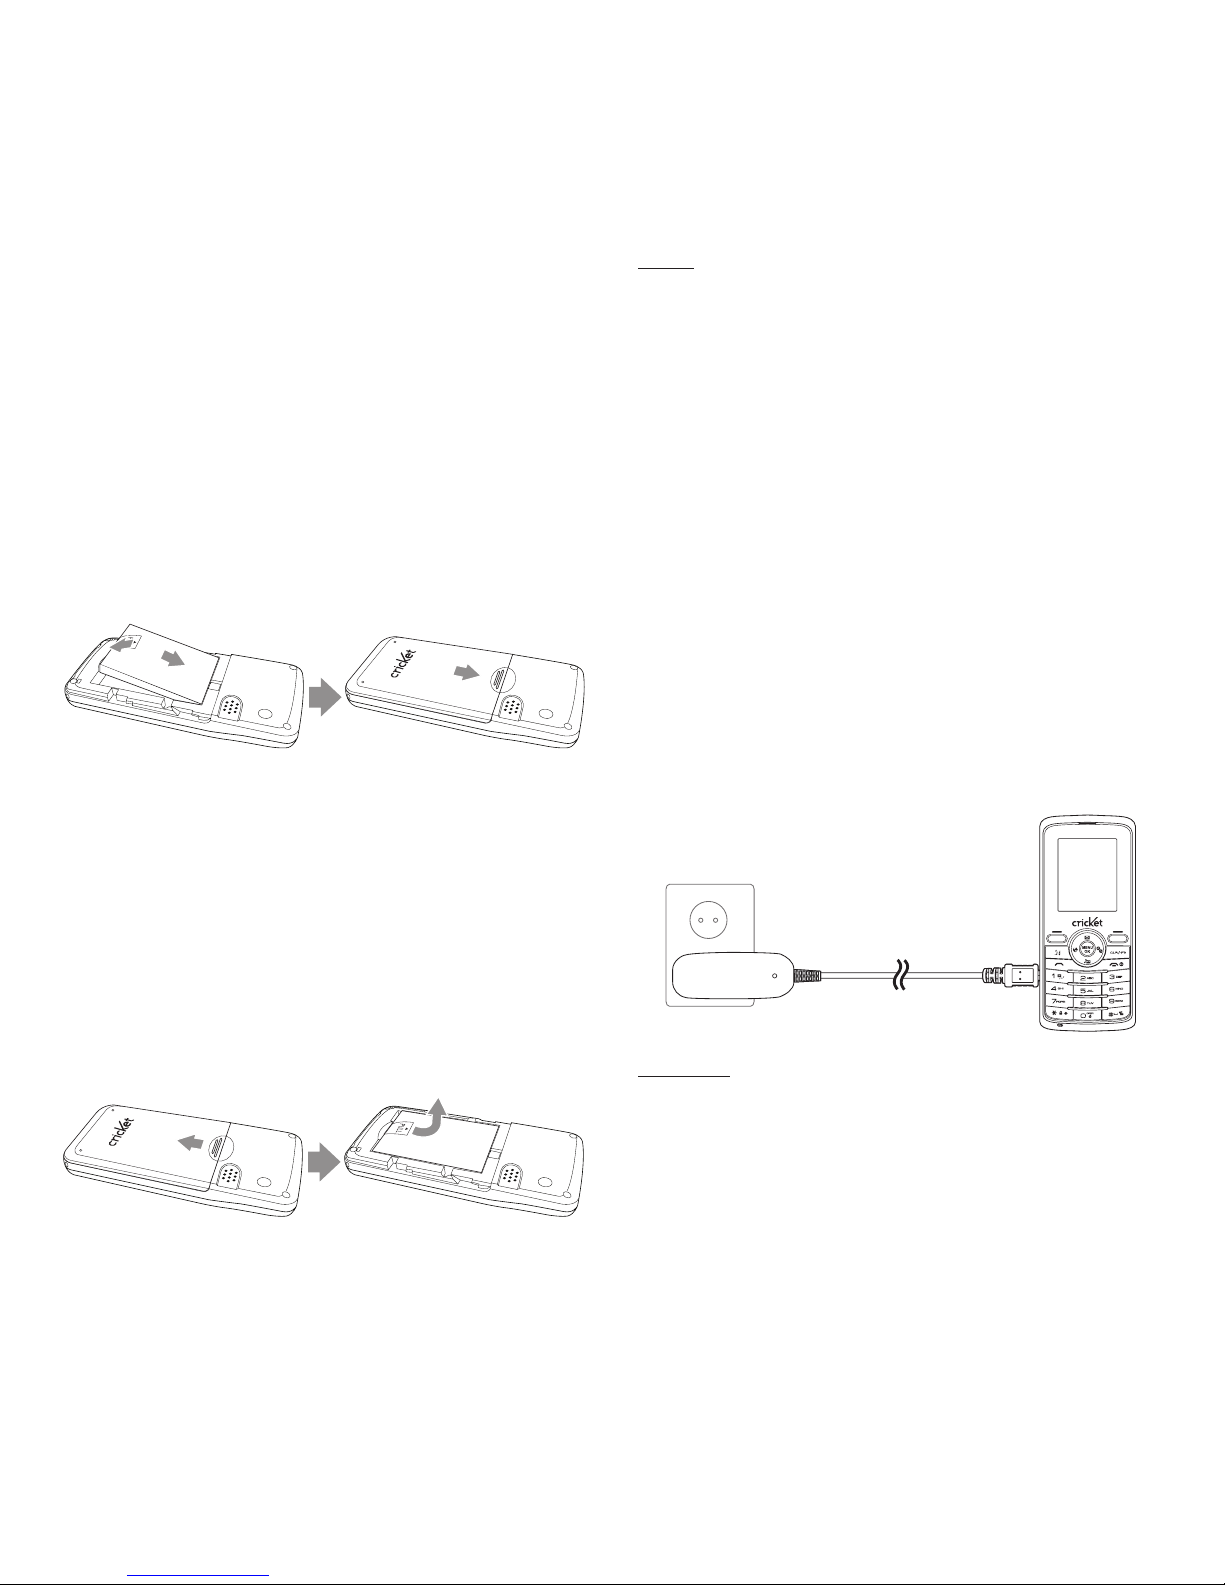
Battery usage...........................................7
Battery charging.....................................7
Battery handling information ........8
Basic operation .............................. 9
Turning the phone on/off................9
Accessing the menu ............................9
Accessing the menu map..............10
Basic functions.....................................10
During a call...........................................12
Memory function..........................14
Storing a phone number................14
Entering letters, numbers &
symbols .....................................................14
Making a call through the
contact list...............................................15
Recent calls ..................................16
All calls ......................................................16
Missed calls.............................................16
Incoming calls.......................................16
Outgoing calls.......................................16
Call timers................................................17
Messages.......................................17
Send message.......................................17
Inbox............................................................17
Outbox .......................................................18
Drafts...........................................................18
Voicemail..................................................18
Settings......................................................19
Contacts ........................................20
Find...............................................................20
Add new entry......................................20
Speed dials..............................................21
Group..........................................................21
Service number....................................22
My phone number..............................22
Multimedia ....................................22
My images................................................22
My sounds................................................22
Browser .........................................23
Browser menu.......................................23
Games & Apps ..............................23
Tools...............................................24
Schedule...................................................24
Alarm...........................................................25
2Table of contents

World time...............................................26
Memo pad................................................26
Calculator.................................................26
Tip calculator.........................................27
Stop watch ..............................................27
Unit converter.......................................27
Voice service.................................28
Voice command ...................................28
V.Cmd settings ......................................28
Voice memo............................................29
Settings..........................................29
Display........................................................29
Sounds .......................................................31
Call................................................................32
Security......................................................33
Others.........................................................35
Phone info...............................................36
Care and maintenance................37
Additional safety information...38
Small children .......................................38
Operating environment..................38
Medical devices....................................39
Vehicles .....................................................40
Potentially explosive
environments.........................................41
Emergency calls...................................41
Certification information (SAR)..42
Safety information for fixed
wireless terminals potentially
explosive atmospheres ...................42
Interference to medical divices. 42
Exposure to RF energy ....................43
Body-worn operation.......................43
FCC Compliance Information......43
U.S.A.
U.S.Federal communications
commission radio frequency
interference statement ...................43
FCC Hearing-Aid Compatibility
(HAC) Regulations For Wireless
Devices.......................................................44
Table of contents 3

Safety
Read these simple guidelines. Not follow-
ing them may be dangerous or illegal. Read
the complete user guide for further infor-
mation.
Switch on safely
must be in the Do not switch the device on
when wireless phone use is prohibited or
when it may cause interference or danger.
Road safety comes first
Obey all local laws. Always keep your hands
free to operate the vehicle while driving.
Your first consideration while driving should
be road safety.
Interference
All wireless devices may be susceptible to
interference, which could affect perfor-
mance.
Switch off in restricted areas
Follow any restrictions. Switch the device
off in aircraft, near medical equipment, fuel,
chemicals, or blasting areas.
Qualified service
Only qualified personnel may install or re-
pair this product.
Enhancements and batteries
Use only approved enhancements and bat-
teries. Do not connect incompatible prod-
ucts.
Water-resistance
Your device is not water-resistant. Keep it
dry.
About your device
The wireless device described in this guide
is approved for use on the CDMA 800, 1700,
1900 and 2100 MHz networks. Contact your
service provider for more information about
networks.
When using the features in this device, obey
all laws and respect local customs, privacy
and legitimate rights of others, including
copyrights.
Copyright protection may prevent some im-
ages, music, and other content from being
copied, modified, or transferred.
Warning: To use any features in this device,
other than the alarm clock, the device must
be switched on. Do not switch the device on
when wireless device use may cause inter-
ference or danger.
Remember to make back-up copies or keep
a written record of all important information
stored in your device.
4Safety

Safety 5
When connecting to any other device, read
its user guide for detailed safety instructions.
Do not connect incompatible products.

6Before using your phone
Before using your phone
Handset description
1. Menu/Ok key
2. Settings menu
3. Voice command key
4. Send key
5. Microphone
6. Navi key
7. Contacts menu
8. CLR key
9. End key
10. Numeric keypad
11. Speaker
12. Headset port
13. Side volume keys
14. Charger port
2
3
4
5
7
8
9
10
1 6
12
13
14
11

Before using your phone 7
Battery usage
Battery installation
1. Place the battery (label side up) on
the back of the phone so the metal
contacts match up on the battery
and in the battery cavity.
2. Slide the battery down into the bat-
tery cavity until it locks into place.
Battery removal
1. Push down the release latch but-
ton, then slide the battery cover off
the phone.
2. Pull up battery strap and out of the
battery cavity from the top of the
battery.
note If the battery is not correctly
placed in the compartment, the hand-
set will not turn on and/or the battery
may detach during use.
Battery charging
Power connection
1. Plug the AC Charger into a standard
outlet.
2. Plug the other end of the AC Char-
ger into the charging port on your
phone. The battery must be installed
onto the phone to work properly.
hot key
• When you charge the battery with
the phone power off, you will see a
charging status screen. You cannot
operate the phone until it is pow-
ered on.

• The battery is not charged at the
time of purchase.
• Fully charge the battery before use.
• It is more efficient to charge the bat-
tery with the handset powered off.
• The battery must be connected to
the phone in order to charge it.
• Battery operating time gradually de-
creases over time.
• If the battery fails to perform nor-
mally, you may need to replace the
battery.
Battery handling information
Do’s
• Only use the battery and charger
approved by the manufacturer.
• Only use the battery for its original
purpose.
• Try to keep batteries in a tempera-
ture between 41oF (5oC ) and 95oF
(35oC).
• If the battery is stored in tempera-
tures above or below the recom-
mended range, give it time to warm
up or cool down before using.
• Completely drain the battery before
recharging. It may take one to four
days to completely drain.
• Store the discharged battery in a
cool, dark, and dry place.
• Purchase a new battery when its
operating time gradually decreases
after fully charging.
• Properly dispose of the battery ac-
cording to local laws.
Don’ts
• Don’t attempt to disassemble the
battery – it is a sealed unit with no
serviceable parts.
• Don’t accidentally short circuit the
battery by carrying it in your pocket
or purse with other metallic objects
such as coins, clips and pens. This
may critically damage the battery.
• Don’t leave the battery in hot or cold
temperatures. Otherwise, it could
significantly reduce the capacity
and lifetime of the battery.
• Don’t dispose of the battery into a
fire.
8Before using your phone

Basic operation
Turning the phone on/off
Turning the phone on
1. Press the END Key until your
“cricKet” logo appears and the tone
sounds.
note
• If “Password” appears on the display
enter your 4-digit password to un-
lock your phone.
• The default password is the last 4
digits of your phone number.
Turning the phone off
1. Press and hold the END Key until
your “cricKet” logo appears.
note
• Immediately change or recharge the
battery when “Powering down phone
now. Please recharge”appears on
the display. Memory may possibly be
damaged if the phone turns off due
to the battery completely draining.
• Turn the phone off before removing
or replacing the battery. If the phone
is on, unsaved data may be lost.
Accessing the menu
Your phone can be customized via the
menu. Each function can be accessed
by scrolling with the Navigation Key
or by pressing the number that cor-
responds with the menu item.
1. To access the menu in the idle
mode, press the OK Key Menu.
2. Press the Navigation Key left or
right to scroll through the menu
items. Press the Navigation Key up
or down to scroll through the sub-
menus for each menu item.
3. To return to the previous page,
press the Clear Key. To exit the cur-
rent menu and return to the idle
mode, press the END Key.
4. Press the OK Key to enter a function
when its main page is displayed or
press its assigned number to have
direct access to the function.
Basic operation 9

note
• Navigation Key up : Messages
• Navigation Key down : Multimedia
• Navigation Key left : Browser
• Navigation Key right : Games&Apps
Accessing the menu map
1. Recent Calls
1. All Calls
2. Missed Calls
3. Incoming Calls
4. Outgoing Calls
5. Call Timers
2. MESSAGES
1. Send Message
2. Inbox
3. Outbox
4. Drafts
5. Voicemail
6. Settings
3. Contacts
1. Find
2. Add New Entry
3. Speed Dials
4. Group
5. Service Number
6. My Phone Num-
ber
4. Multimedia
1. My Images
2. My Sounds
5. Browser
6. Games &
Apps
7. Tools
1. Schedule
2. Alarm
3. World Time
4. Memo Pad
5. Calculator
6. Tip Calculator
7. Stop Watch
8. Unit Converter
8. Voice Service
1. Voice Com-
mand
2. V.Cmd Settings
3. Voice memo
9. Settings
1. Display
2. Sounds
3. Call
4. Security
5. Others
6. Phone Info
Basic functions
Making a call
1. Enter a phone number.
note To modify the phone number you
have entered :
• To erase one digit at a time press
the Clear Key.
• To erase the entire number, press
and hold the Clear Key.
2. Press the SEND Key.
note
• If “CALL FAILED” appears on the
display or the line is busy, press the
SEND Key or the END Key.
• If you activate the “AUTO RETRY”
function, the phone will automati-
cally retry for the number until you
10 Basic operation

select the End key.
• When you place or receive a call
from stored phone numbers, only
the name will be displayed.
• If “Please enter lock code” appears
on the display enter your 4-digit
password to unlock your phone.
• Your default password is the last 4
digits of your phone number.
3. To end a call, press the END Key.
Call Answer
1. When your phone rings or vibrates,
press the SEND Key to answer the
incoming call. (Depending on your
phone’s settings, you may also an-
swer incoming calls by opening the
phone or by pressing any digit key.
See page 33 for details.)
note To reject incoming calls, press the
Right Soft Key Reject.
2. To end a call, press the END Key.
Wait/pause feature
Pauses are used for automated sys-
tems (i.e., Voicemail, calling cards).
Insert a pause after a phone number
then enter another group of numbers.
The second set of numbers is dialed
automatically after the pause. This
feature is useful for dialing into sys-
tems that require a code.
1. To insert a wait/pause, enter a
phone number then press the Right
Soft Key Options. Select either a
Type ‘P‘ (“P” appears) or a Type ‘T‘
(“T” appears).
note
• Type “P“: A hard pause stops the
calling sequence until further input
from you.
• Type “T“: A two second pause stops
the calling sequence for two sec-
onds and then automatically send
the remaining digits.
2. Press the SEND Key to dial or Left
Soft Key Save to save the number.
Basic operation 11

3-way calling
With 3-Way Calling, you can talk to
two people at the same time. When
using this feature, the normal airtime
rates will be applied for each of the
two calls.
1. Enter a number you wish to call
then press the SEND Key.
2. Once you have established the con-
nection, enter the second number
you wish to call then press the
SEND Key.
3. When you’re connected to the sec-
ond party, press the SEND Key again
to begin your 3-Way call.
note 3-way calling is a system depen-
dent feature. Please contact your ser-
vice provider for details.
Caller ID function
Identifies caller by displaying their
phone number. If the caller’s name
and number are already stored in your
phone book, their name will appear.
This is a system dependent feature.
Please contact your service provider
for details.
Call waiting function
Notifies you of an incoming call when
you are already on a call by sound-
ing a beep tone and displaying the
caller’s phone number.
1. To answer another call while on
the phone, press the SEND Key.
This places the first call on hold. To
switch back to the first caller, press
the SEND Key again.
note Call Waiting is a system depen-
dent feature. Please contact your ser-
vice provider for details.
Adjusting volume
1. During a call, press Side Volume Key
up or down to adjust the earpiece
volume.
During a call
1. Press the Left Soft Key Mute.
• Mute (Unmute) : If you press Mute
12 Basic operation

during a call, the person you are
speaking with cannot hear you or
any sounds from your side of the
conversation. However, you can still
hear them. To activate Mute during
a call.
note
• To deactivate, press the Left Soft Key
Unmute.
• The phone will automatically un-
mute in Emergency Call or Callback
Mode.
2. Press the Right Soft Key Options.
• 3 Way Calls : To call a second
party during a call, dial the num-
ber or select it from the directory
by accessing the menu during a
call.
• Voice Memo : To record a voice
memo during a call.
• Call History : To select a phone
number from your Recent Calls
List during a call.
• Contacts : To view a phone num-
ber from your Contact list during
a call.
• Messaging : To send a text mes-
sage (SMS) during a call.
Making an emergency call
The 911 feature puts the phone in the
Emergency Call Mode when you dial
the preprogrammed emergency num-
ber, 911. It also operates in Lock Mode
and outside the service area.
911 in lock mode
The 911 call service is available even
in Lock Mode.
1. Enter “911”, then press the SEND
Key.
2. The call connects.
3. When the call ends, the phone re-
turns to Lock Mode.
911 using any available system
1. Enter “911”, then press the SEND
Key.
2. The call connects.
Basic operation 13

3. The phone maintains the Emer-
gency Mode and the phone can
receive an incoming call from any
available system. However, it can’t
make a call.
Memory function
Storing a phone number
The phone book stores up to 500 en-
tries.
1. Enter phone number then press the
Left Soft Key Save.
2. Select “New entry“ or “Existing en-
try“.
3. If “Existing entry” is selected, your
contact list is displayed. Choose
the entry to add the number, then
press Left Soft Key Done. Select
the type of Phone you are adding
from the icon list, then press Left
Soft Key Select. Press Left Soft Key
Save. Press the Navigation Key up
or down to select primary phone
number, then press Left Soft Key
Select to save contact.
If “New entry“ is selected, the
New entry icon list appears. Press
the Navigation Key up or down to
choose the type of Phone you are
adding. Press Left Soft Key Select
to select. Enter a name. To change
the input mode, press Right Soft
Key Options. Press the Navigation
Key down to enter information in
other fields for the contact. Fields
include “Name”, “Mobile”, “Phone
number”, “Email address”, “URL”,
“Group”, “Ringtone”, “Msg alert”,
“Secret”, “Memo”.
4. To store the entry in your contact
list, press the Left Soft Key Save.
“Saved“ will be displayed.
Entering letters, numbers & sym-
bols
The input mode will automatically be
activated when it is necessary to enter
letters and numbers. There are 5 avail-
able modes: Standard Alphabet mode
[Abc], T9 Mode [T9Word], Numeric
14 Basic operation / Memory function

mode [123], Symbol mode [Symbols]
and Emoticon mode [Emoticon]. The
input mode indicator appears on the
lower portion of the display when let-
ters and numbers are entered. To se-
lect the desired input mode, press the
Right Soft Key Options, then choose
from the list on screen.
• Standard input mode : Use the digit
keys to enter letters, numbers and
characters.
• T9 input mode : T9 mode incorpo-
rates a built-in-dictionary to deter-
mine a word based on the entered
characters. A word can be entered
more quickly by pressing each key
once per character.
• Number mode : Allows you to enter
numbers.
• Symbol mode : Allows you to enter
symbols.
• Emoticon mode: Allows you to enter
Emoticon.
Making a call through the contact
list
One-touch/two-touch dialing
Ideal for frequently dialed numbers,
this feature allows entries in your
contact list to be dialed via the key-
pad with only one or two key presses.
In order for One-Touch/Two-Touch
Dialing to properly work, it must be
enabled.
One-touch dialing
2-9: Press and hold the correspond-
ing memory number for more than 1
second.
Two-touch dialing
10-99: Press and the first digit and
second digits of the memory number
short and long respectively.
note
• If no phone number is stored in
the location entered, “Speed dial is
empty“ will appear on the screen.
• If One Touch Dial is set to Off: Enter
the speed dial location number then
press the SEND Key.
Memory function 15

• Location 1 is reserved for voicemail.
Location 2-99 are unassigned. To
assign a speed dial location, please
see page 21.
Recent calls
All calls
1. Press the OK Key Menu > Recent
Calls > All Calls. If the number
is already stored in your contact
list, only the name appears. If the
number is not stored, the number
appears.
2. To view details, press the OK Key.
note After the 240th missed, incoming
or outgoing calls, the oldest call will
automatically be erased from the his-
tory.
Missed calls
1. Press the OK Key Menu > Recent
Calls > Missed Calls. If the num-
ber is already stored in your contact
list, only the name appears. If the
number is not stored, the phone
number appears.
2. To view missed call details, press
the OK Key.
note After 80 missed calls, the oldest
call will be automatically erased from
the history.
Incoming calls
1. Press the OK Key Menu > Recent
Calls > Incoming Calls. If the
number is already stored in your
contact list, only the name appears.
If the number is not stored, the
number appears.
2. To view incoming call details, press
the OK Key.
note After 80 incoming calls, the old-
est call will automatically be erased
from the history.
Outgoing calls
1. Press the OK Key Menu > Recent
Calls > Outgoing Calls. If the
number is already stored in your
16 Memory function / Recent calls

contact list, only the name appears.
If the number is not stored, the
number appears.
2. To view outgoing call details, press
the OK Key.
note After 80 outgoing calls, the old-
est call will automatically be erased
from the history.
Call timers
Checks the usage time and manages
your calls within the limit you set. The
11 timers include (Last Call, Dialed
Calls, Received Calls, Home Calls,
Roam Calls, All Calls, Lifetime Calls,
Transmit Kb, Received Kb, Total Kb,
Lifetime Data Counter, Last Reset):
1. Press the OK Key Menu > Recent
Calls > Call Timers.
2. To reset all timers, press the Right
Soft Key Reset All. “Reset all?” will
be displayed. Select ”Yes” and press
the OK Key.
Messages
Send message
To send a new message:
1. Press the OK Key Menu > Messag-
es > Send Message.
2. Under “Send To”, input the phone
number. Press the Left Soft Key
Next.
• Press Right Soft Key Options.
(Recent Calls, Contacts, Group
Lists, Entry Mode)
3. Under “Enter Msg.”, input your mes-
sage.
• Press Right Soft Key Options.
(Preset Msgs., Entry Mode, Save
As Draft, Save As Preset, Add To
Contacts, Delivery, Cancel Msg.)
4. To send the message, press the Left
Soft Key Send.
Inbox
The Inbox manages received text/web
alert messages. To access:
Recent calls / Messages 17

1. Press the OK Key Menu > Mes-
sages > Inbox.
2. To delete a message, press the Left
Soft Key Erase, then select “Yes”
and press the OK Key. To delete all
messages, press the Right Soft Key
Erase All, then select “Yes” and
press the OK Key.
3. Select a message, then press the
OK Key. The message is displayed.
Press the Left Soft Key Reply, to
send the reply message.
Outbox
Manages sent messages.
1. Press the OK Key Menu > Mes-
sages > Outbox.
2. To delete a message, press the Left
Soft Key Erase, then select “Yes”
and press the OK Key. To delete all
messages, press the Right Soft Key
Erase All, then select “Yes” and
press the OK Key.
3. Select a message, then press the
OK Key. The message is displayed.
Press the Left Soft Key Erase to
erase the selected message.
• Press Right Soft Key Options.
(Forward, Save As Draft, Save
Contact)
Drafts
Draft Folder contains any draft mes-
sages or saved messages. If message
composition is interrupted by a voice
call or other interrupting event, the
text of the current composition is au-
tomatically saved in the drafts folder.
1. Press the OK Key Menu > Messag-
es > Drafts.
2. Select a message then press the
OK Key.
• Press Right Soft Key Options.
(1. Forward, 2. Save Contact,
3. Erase, 4. Edit)
3. To send the message, press the Left
Soft Key Send.
Voicemail
Voicemail allows callers to leave voice
18 Messages

messages in your voice mailbox, and
lets you review, play, and delete your
voice messages any time you are in
your Carrier’s network coverage area.
1. Press the OK Key Menu > Messag-
es > Voicemail. Call Voicemail.
or
Press the OK Key Send to dial voice-
mail. From the idle screen, press then
the SEND Key Send to direct dial
voicemail. If the feature “Speed Dial”
is enabled you can press and hold to
speed dial voicemail.
Call Voicemail
Place a call to the number (*99) the
voicemail was sent to.
1. Press the OK Key Menu > Messag-
es > Voicemail > Call Voicemail.
Details
View last voicemail information.
1. Press the OK Key Menu > Messag-
es > Voicemail > Details.
Clear Notification
Delete the voicemail icon.
1. Press the OK Key Menu > Mes-
sages > Voicemail > Clear Noti-
fication.
Settings
1. Press the OK Key Menu > Messag-
es > Settings.
• Notification : To set a notification.
Select ”Msg. & Icon” or ”Icon Only”.
• Auto Save : Select if you want to
automatically save a message af-
ter sending it. Select ”Auto Save”,
“Prompt” or ”Do Not Save”.
• Auto Erase : Automatically erases
Inbox messages when new messag-
es arrive. Select ”On” or ”Off”.
• Auto View : To set Auto View. Select
”On” or ”Off”.
• Entry Mode : To change the text in-
put mode. Select ”T9Word”, “Abc”,
”ABC” or “123”.
Messages 19

• Callback # : Allows you to input a
specific callback number. Callback
numbers are used in text messaging
so the other party knows how to get
back to you. Select ”None”, ”MDN”or
“Custom” .
• Voicemail # : To set your voicemail
number. Enter the desired voicemail
access number. (Default setting is
*99)
• Signature : To create a signature
that can be automatically inserted
at the end of a text message. Select
“None” or “Custom” then press Left
Soft Key Set to save the setting. If
you select “Custom”, the signature
input screen appears.
• Preset Msgs. : The preset messages
are displayed.
Contacts
Find
Retrieves an entry by name and calls
the primary number by simply press-
ing the SEND Key. You can review all
the entries stored in your contacts list
or quickly find an entry by entering a
name or its character string.
1. Press the OK Key Menu > Contacts
> Find.
2. The list of names in your contacts is
displayed alphabetically.
3. Enter a name or its character string
or scroll through the list by pressing
the Navigation Key up or down.
Add new entry
You can add new entry when you
need. Please check next process.
1. Press the OK Key Menu > Contacts
> Add New Entry.
2. Fill in the fields as they are select-
ed. Press the Navigation Key up or
down to select a field.
• Phone book fields : Name , Phone
number (Mobile, Office, Home,
Pager, Other), Email address, URL,
Group (No Group, Family, Friends,
Work), Ringtone, Msg alert, Se-
cret, Memo
20 Messages / Contacts
Other manuals for A100
1
Table of contents
Other Cricket Cell Phone manuals

Cricket
Cricket TXTM8 User manual

Cricket
Cricket Vision User manual

Cricket
Cricket moto g User manual

Cricket
Cricket UTStarcom mini User manual

Cricket
Cricket TXTM8 User manual

Cricket
Cricket TXTM8 User manual

Cricket
Cricket Icon 2 User manual

Cricket
Cricket A150 User manual

Cricket
Cricket SL101AE User manual

Cricket
Cricket A200 User manual

Cricket
Cricket A100 User manual

Cricket
Cricket CAPTR User manual

Cricket
Cricket A300 User manual

Cricket
Cricket CAPTR II User manual

Cricket
Cricket EZ User manual

Cricket
Cricket MSGM8 II User manual

Cricket
Cricket Alcatel APPRISE User manual

Cricket
Cricket M615 User manual

Cricket
Cricket Wave User manual

Cricket
Cricket Vision Plus User manual