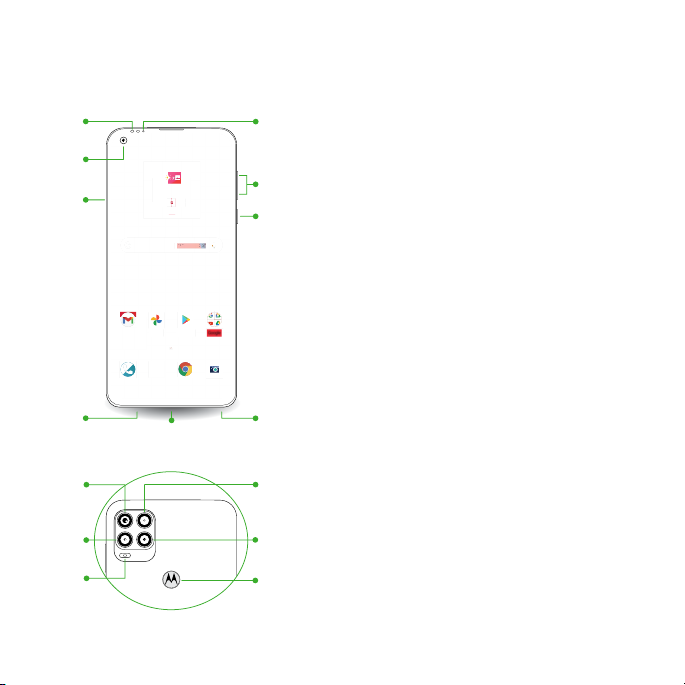
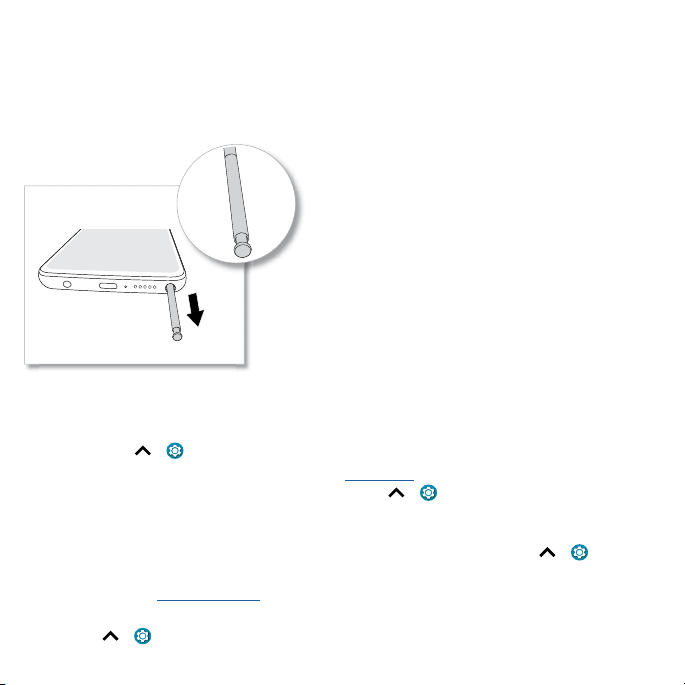
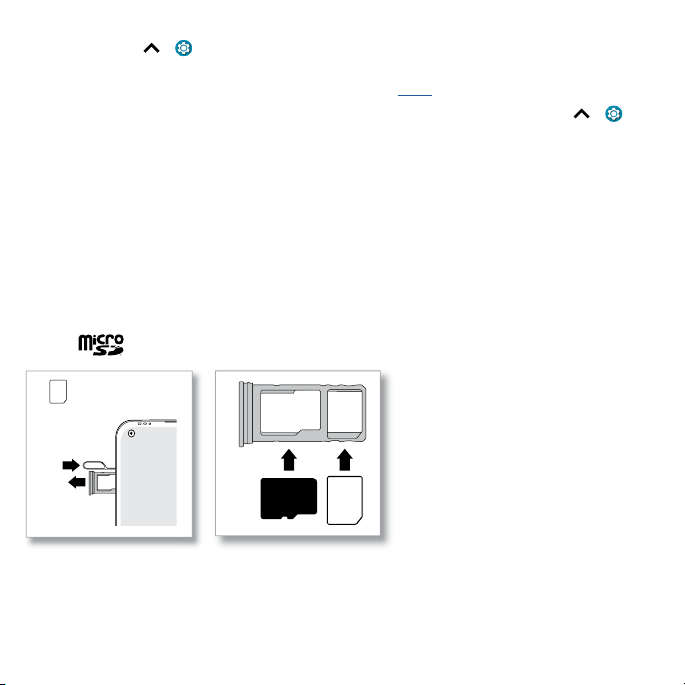
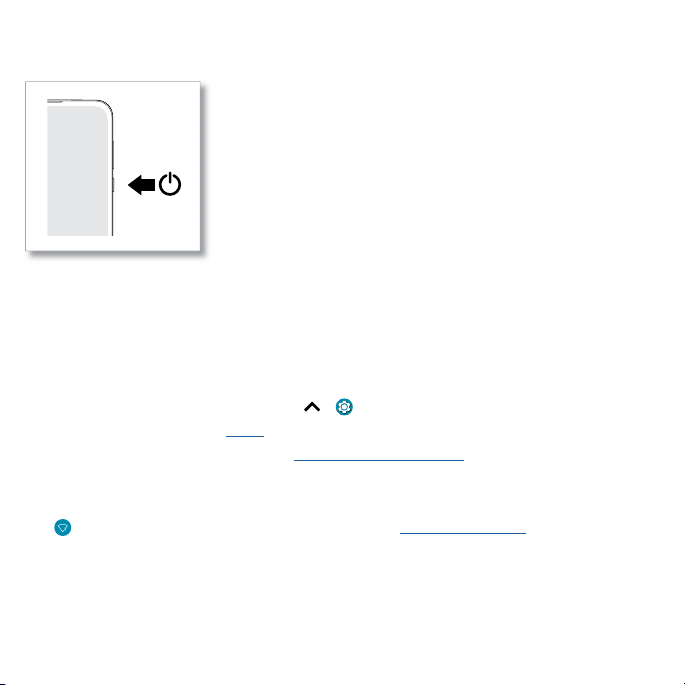
Cricket moto g User manual

User Guide

Your phone is designed to make it easy for you to access a wide variety of content. For your
protection, we want you to be aware that some applications that you enable may involve the location
of your phone being shared. For applications available through Cricket, we oer privacy controls that
let you decide how an application may use the location of your phone and other phones on your
account. However, the Cricket privacy tools do not apply to applications available outside of Cricket.
Please review the terms and conditions and the associated privacy policy for each location-based
service to learn how location information will be used and protected. In addition, your Cricket phone
may be used to access the internet and to download, and/or purchase goods, applications, and
services from Cricket or elsewhere from third parties. Cricket provides tools for you to control access
to the Internet and certain Internet content. These controls may not be available for certain devices
which bypass Cricket controls.
© 2021 Cricket Wireless LLC. All rights reserved. Cricket and the Cricket logo are registered
trademarks under license to Cricket Wireless LLC.

Contents
Hot topics
Get Started
First look
Insert the SIM and microSD cards
Power on
Sign in
Connect to Wi-Fi
Check your battery charge level
Navigate your phone
Improve battery life
Care for your phone
Learn the basics
Home screen
Help & more
Search
Notifications
Status icons
Volume
Do not disturb
Lock screen
Quick settings
Speak
Gestures
Stylus shortcuts
Direct Share
Picture-in-Picture
Personalize your phone
Redecorate your home screen
Discover Moto
Digital wellbeing & parental controls
Apps
Phone
Messages
Chrome™
Camera
Photos
Gmail
Duo
Moto
Moto Note
Coloring book
Calendar
More apps
Connect, share, pay & sync
Connect with Wi-Fi
Connect with Bluetooth wireless
Share files with your computer
Share your data connection
Share files with Nearby Share
Print
Sync to the cloud
Cast your screen to a TV
Use a memory card
Airplane mode
Mobile network
Protect your phone
Screen lock
Your privacy
App pinning
Backup & restore
App safety
Data usage
Troubleshoot your phone
Restart or remove an app
Restart your phone
Check for software update
Reset
Stolen phone
Find the IMEI number
Accessibility
Create a shortcut
Make your phone speak
Speak to your phone
Change your phone’s display
Change your phone’s sounds
Hearing aids (U.S. only)
Get more help
Where is my legal, safety & regulatory
information?
Service & repairs
Copyright & trademarks

Hot topics Get Started
Hot topics
» Stylus shortcuts
» Quick settings
» Personalize your phone
» Camera
» Moto
» Protect your phone
» Speak
» Connect to Wi-Fi
» Navigate your phone
Tip: To view all of these topics on your phone, swipe up from the home screen and tap
Settings > Help. For FAQs and other phone support, visit www.motorola.com/support.
To view the SAR and/or PD values for your phone, visit www.motorola.com/sar.
This product meets the applicable national or international RF exposure guidance (SAR
guideline) when used normally against your head or, when worn or carried, at a distance of 5
mm from the body. To meet RF exposure guidelines during body-worn operation, the device should
be positioned at least this distance away from the body. The SAR guideline includes a considerable
safety margin designed to assure the safety of all persons, regardless of age and health.
To view additional information, visit www.motorola.com/rfhealth.
Caution: Before using your phone, please read the legal information. Swipe up > Settings >
About phone > Legal information.

Hot topics Get Started
Get Started
First look
Let’s get started. We’ll guide you through startup and tell you a bit about your phone’s features.
Phone hardware buttons: top right are Volume up and down keys, middle right is Power button. Bottom middle is charging port. Bottom left is headset jack. On screen, top left is front camera. Navigation icons are along the bottom.
Note: Certain apps and features may not be available in all countries.
Flash
Depth
Camera
Ultr
a-wide
Camera
Main
Camera
Front
Camera
USB-C®/Charger
Headset
Jack
SIM &
microSD
Card Tray
Volume
Buttons
Power
Button
Front
Flash
Stylus
Proximity
Sensor
Fingerprint
Sensor
Macro
Camera
Play Store
Photos
Gmail
S
a
“
“
H
H
e
e
yGoo
g
g
g
g
g
g
g
l
l
l
l
e
e
e
e
e
e
e
e
”
”
”
”
”
”
y
Google
11:35
3
3
3
3
3
APR
3
3
TUE
11:35
cricket

Get Started
Power button
Choose from these options:
» Power on/o: Press and hold the Power button, then tap Power o. When your phone is o, press
and hold the Power button to turn it on.
» Sleep/Wake up: To conserve battery power and prevent accidental touches, put the touchscreen
to sleep by pressing the Power button. Press it again to wake it up.
» Restart: To restart your phone, press and hold the Power button, then tap Restart.
Tip: To add security to your phone, see Protect your phone.
Volume buttons
To turn volume up or down:
» Media volume: Press the volume buttons when your phone is not ringing, or during a song or
video, to adjust media volume.
» Call volume: Press the volume buttons during a call.
» Ring & notification volume: Press a volume button, then tap and slide the Ring & notification
volume bar. Press a volume button when your phone is ringing to silence a call.
» Alarm volume: Press a volume button, then tap and slide the Alarm volume bar.
Tip: Tap > See more to see all Sound & vibration controls. Or tap > Done. For more on volume
control, see Volume.

Get Started Get Started
Stylus
Your phone comes with a stylus that you can use to navigate apps, take notes, edit screenshots, color
images, and more.
To remove the stylus, push the stylus inward to release it, then pull it out.
To store the stylus, insert it into the slot. Then, push it until it locks in place.
Stylus: bottom right is the stylus.
Set up the stylus
See and change stylus default settings.
Find it: Swipe up > Settings > Stylus
» Open Moto Note from locked screen: To launch Moto Note with your screen locked, remove the
stylus from the slot. To switch this feature o, swipe up > Settings > Stylus > When device
is locked > Don’t open anything.
» Customize stylus shortcuts: The stylus shortcuts show by default when the stylus is removed from
unlocked screen. To add, delete, or change the order of the shortcuts, swipe up > Settings >
Stylus > When device is unlocked.
Tip: For more, see Stylus shortcuts.
» Set a removal reminder: Set a reminder when the stylus is out for a period of time without use.
Swipe up > Settings > Stylus, then tap the switch next to Removal reminder to turn it on. To
change when your phone sends the notification, tap Removal reminder.

Get Started
» Record time and location of the last removal: To record when and where you last removed the
stylus, swipe up > Settings > Stylus, then tap the switch next to Record last removal to turn
it on.
Tip: Tap the recorded coordinates to view the location in Maps.
» Vibrate when inserted: To feel a quick vibration when the stylus is in place, swipe up >
Settings > Stylus, then tap Vibrate when inserted to turn it on.
Insert the SIM and microSD cards
To activate phone service, you might need to insert a SIM card, or this may have been done for you.
You can also add a microSD card, which is optional and sold separately.
Make sure you use the correct size SIM card and don’t cut the SIM card.
1 Insert the SIM tool into the SIM tray hole to pop out the tray.
Tip: Refer to the diagram below for tray and hole location.
2 Insert the SIM card with the gold contacts down, then gently push the tray into the slot. Add a
microSD card for additional storage.
Note: microSD card is optional, sold separately.
SIM card insert graphic. After the battery is removed, the SIM card is inserted in the slot on the left with the clipped corner to the upper left. The SDcard is inserted in the right slot.
Nano SIM
SIM

Get Started
Power on
Press and hold the Power button, then follow the prompts to get started.
Power on graphic. Press and hold the Power button until the screen lights up.
Sign in
If you use Gmail™, you already have a Google™ account—if not, you can create an account during
setup. Signing into your Google account lets you access, sync, and backup your stu. You can see
your Google apps, contacts, calendar, photos, and more.
Tips
» To add, edit, or delete accounts, swipe up > Settings > Accounts.
» To set up email accounts, see Gmail.
» For help with your Google account, visit www.google.com/accounts.
Connect to Wi-Fi
For faster Internet access and to conserve mobile data use, swipe the status bar down. Touch and
hold to choose a Wi-Fi network. For full instructions, see Connect with Wi-Fi.
Note: This phone supports apps and services that may use a lot of data, so make sure your data plan
meets your needs. Contact your service provider for details.

Get Started
Check your battery charge level
Now is a good time to check if your phone needs to be charged. Swipe down on the home screen to
show battery charge level.
USB-C
Charge phone graphic. Plug in a charger to charge your phone fully.
To charge your phone, insert the charging cable that came with your phone into the charging port
(see First look for port location). Plug the other end into a power receptacle.
Note: Use of other chargers is not recommended.
Navigate your phone
Explore by touch
Use the stylus or your fingers to find your way around:
» Tap: Choose an icon or option.
» Touch and hold: See more options.
» Drag: Move items on the home screen.
» Swipe: Scroll through lists or between screens.
» Pinch or double-tap: Zoom in and out on websites, photos, and maps.
» Twist: Twist a map with two fingers to rotate it, and pull two fingers down to tilt it.
» Split screen: Swipe up from the bottom of the screen and hold, then tap the icon at the top of the
screen and tap Split screen. Not all apps will work in split screen. To close the split screen, drag
the dividing line to the bottom of the screen.

Get Started Get Started
» Menus: When you see , , or , you can tap it to open options for the current screen.
» Close Keyboard: To close a keyboard, tap .
Tip: To quickly open Settings, swipe down twice on the status bar and tap .
System navigation
Navigate using either gestures or buttons on the screen.
Navigation bar
Find it: Swipe up > Settings > System > Gestures >System navigation >Gesture navigation
Navigation bar. To go to the home screen, swipe up from the bottom of the screen. To see your recent apps, swipe up from the bottom and hold. To go back a screen, swipe toward the middle from the left or right edge.
» Go to the home screen: Swipe up from the bottom of the screen.
» See recent apps: Swipe up from the bottom of the screen and hold. Tap an app to reopen it. Tap
the app icon to see app info or split the screen.
» Go back a screen: Swipe toward the middle of the screen from the left or right edge.
» Switch between apps: Swipe left or right across the bottom of the screen.
» Launch the Google Assistant: Swipe up diagonally from the bottom corner of the screen to launch
the Google Assistant. Learn more about The Google Assistant™.
For Home screen,
swipe up.
To go back, swipe
toward the middle.
For recent apps,
swipe up and hold.
To switch apps,
swipe left or right at
the bottom.
For Google
Assistant, swipe
up diagonally.

Get Started
Navigation buttons
Find it: Swipe up > Settings > System > Gestures >System navigation >3-button navigation
» Back: Tap Back to go to the previous screen.
» Home: Tap Home to return to the home screen.
» Recents: Tap Recents to see your recent apps (or browser tabs), and tap an app to reopen it.
Double-tap to quickly switch between your recent apps. To remove an app from the recent list,
swipe it up. To scroll the list, swipe right or left.
» Google Assistant: Touch and hold Home to launch the Google Assistant. Learn more about The
Google Assistant™.
Improve battery life
Your phone processes tons of information. Depending on what apps are in use, your phone may use
a lot of power.
When your phone is not in use for a period of time, unnecessary background processes are shut
down to optimize battery life.
» To see what’s using up battery power, swipe up > Settings > Battery > USAGE DETAILS.
» To help improve battery life, swipe up > Settings > Battery > Battery Saver, and tap Turn on
now. When on, your phone’s display changes to Dark theme.
» To limit battery use for apps that you don’t use often, swipe up > Settings > Battery >
Adaptive Battery, and turn it on.
Battery Tips
To save even more battery life between charges, you could reduce:
» Widgets that stream information to your home screen, like news or weather.
» Unused accounts: Swipe up > Settings > Accounts.
» Recording or streaming videos or music.
Care for your phone
Tips
» When you’re near water, consider using a Bluetooth speaker to listen to music from your phone
while keeping it safe. For more, see Connect with Bluetooth wireless.

Get Started
» Hold your phone firmly when using gestures to open the camera or to turn the flashlight on/o.
For more, see Gestures.
» Don’t leave your phone in a hot car on a sunny day. If you do accidentally do this, let your phone
cool o before powering up.
In case of water
Mobile devices marketed as water repellent are not waterproof. Avoid prolonged exposure to water,
and do not submerge in water. In the event your device is exposed to water, dry your device and
ports thoroughly with a soft, clean cloth. Water damage is not covered by your warranty.
Tips to prevent damage to your phone:
» Dry your phone and ports thoroughly with a soft, clean cloth.
» Don’t try to charge your phone when it’s wet.
» Do not expose your phone to salt water or other liquids.
» Do not expose your phone to water at high pressure.
» Do not drop or puncture your device, as this could damage the water repellent features.
Clean your phone
To disinfect your phone:
» Use wipes or cloths moistened with isopropyl alcohol with a concentration of 70% (specific for
electro-electronic products).
» It is recommended that you turn your phone o to clean it.
» Avoid moisture in the phone’s openings, including the charging port, headset jack, microphones,
and speakers.
» Do not immerse the phone in cleaning agents, and do not use cleaning materials that contain
bleach or abrasive agents.
» Do not use sprays directly on the screen.

Learn the basics
Learn the basics
Home screen
The home screen is what you see when you turn on your phone. From here you can explore apps and
more.
Note: Software updates may change the look of your home screen.
Home screen. At the top, tap the Google bar to type search options or tap the right hand microphone icon to speak a search. Icons at the top show notifications and phone status icons. Swipe up from center bottom to get to your apps. App icons along
the bottom are commonly used apps: phone, message, Google Chrome, Gallery, and camera.
Tips
» Open app list: Swipe up to see all your apps.
» Return home: To return to the home screen from any location, swipe up from the navigation bar.
» Pages: To add a page, drag an app to the right side of the screen until you see a new page. You
can add multiple pages. To see other pages of shortcuts and widgets (if available), swipe the home
screen left.
Play Store
Photos
P
Gmail
Sa
Sa
“
He
He
y
y
G
Go
og
g
g
g
g
g
le
le
e
e
e
le
e
e
l
”
”
”
”
”
”
y
y
Google
11:35
3
3
3
3
3
APR
3
3
TUE
11:35
cricket
Swipe up to see
all your apps.
Search by typing, or
tap the microphone
and say a command.
Swipe down for
notifications and
settings.

Learn the basics Learn the basics
» Settings: To quickly open common settings, swipe the status bar down. To open more settings,
swipe the status bar down again and tap .
» Customization: To personalize your home screen and other features, see Personalize your phone.
Help & more
Learn even more about your phone and get support.
Find it: Swipe up > Settings > Help
Tip: Some apps have their own help that’s specific to their features. Just tap the menu inside the app
for details.
Search
On the home screen, tap the Google Search box for a text search or tap to search by voice.
When you type, suggestions appear below the search field:
» To search for a suggestion, tap it.
» To search for text in the search field, tap on the keyboard.
Tip: To close the keyboard, tap .
Note: For voice search, see Speak.

Learn the basics
Notifications
At the top of the screen, icons on the left notify you about new messages or events. If you don’t know
what an icon means, swipe the status bar down for details.
Tip: Getting too many notifications? Touch and hold a notification to see which app is sending them
to you. Then you can turn them o.
Note: Your screen may look dierent.
Notifications screen. Swipe down from the top of the home screen down to view notifications.
Tip: To quickly change common settings, swipe the status bar down. For more, see Quick settings.
Bubbles
Easily see and participate in conversations using notification bubbles that float on top of the display.
Find it: Swipe up > Settings > Apps & notifications > Notifications > Bubbles, then tap the
switch to turn it on
To use, tap a bubble to open and reply to a conversation. Drag the bubble around the screen to move
it.
Note: Not all apps support this feature.
Tip: Swipe left or right to remove a
notification. Some notifications show
more options when you slide them
halfway.
Swipe down to see
your notifications.
Tap a notification to open it, or
choose an option, such as Reply.
Manage Clear all
Battery Tracer
Service is running fine
Silent
Finish setup
Notifications
Finish setting up your phone
Android Setup
Copy your data, set wallpaper,and more
Tue, Apr 3

Learn the basics
Smart reply
See suggestions based on notification content. For example, a text with an address may show Google
Maps as an option.
To turn o Smart reply, tap Messages > Menu > Settings > Suggestions in chat > Smart Reply.
App notifications
You may see a notification dot on an app. This app notification, or badge, tells you the
app has an update or an announcement, such as a new email or a missed call. Touch and
hold the app for more information, options, or app shortcuts.
Wireless Emergency Alerts (U.S.)
Wireless Emergency Alerts, also known as CMAS or PLAN, is a U.S. national
emergency alert system. Emergency alerts can pop up to tell you about a
national or local crisis. After you close an alert, you can reopen it by swiping up
> Settings > Apps & notifications > Advanced > Wireless emergency alerts.
Tip: Emergency alerts have a special sound and vibration that is two seconds long, followed by one
second, then another one second.
To choose which types of alerts you receive, swipe up > Settings > Apps & notifications >
Advanced > Wireless emergency alerts. The U.S. and local governments send these alerts through
your service provider. So you will always receive alerts for the area where you are, and you won’t
receive alerts if you’re outside of the U.S.
For more, visit www.ctia.org and search “wireless emergency alerts.”
A
LERTS
WIRELESS
CAPABLE
EMERGENCY
TM

Learn the basics
Status icons
Icons at the top right of the screen tell you about phone status:
Status Icons
Network strength Alarm set
/ Wi-Fi in range/connected Data Saver on
Airplane mode Battery Saver on
Do not disturb Wi-Fi hotspot on
/ Battery charging/full / Bluetooth on/connected
Volume
Press the side volume buttons up or down to select a ringer volume and see other controls.
Volume screen. Press the Volume keys up or down to control the volume for Ring Notification, Media, and Alarm sounds. On screen, change the volume using slide bars.
Live Caption detects speech on your phone and shows you captions. When a caption shows,
touch and hold the caption to move it. Double-tap the caption to expand it.
Show all volume controls.
Mut
e the ringer or set phone
to vibrate.
Slide to increase/decrease
volume.
Mute the media player.
Turn on Live Caption.

Learn the basics Learn the basics
Do not disturb
To turn o some or all sounds, swipe the status bar down, and tap Do Not Disturb. To change Do
Not Disturb settings, touch and hold Do Not Disturb, then select an option:
» People: Allow some people to interrupt when they call, send a message, or start a conversation.
Tip: Create an exception for repeat callers that allows a call to sound from the same person within
a 15 minute period, tap People > Calls > Allow repeat callers.
» Apps: Choose the apps that can interrupt you when Do Not Disturb is on.
» Alarms & other interruptions: Choose whether to hear sounds from alarms, media, keypad,
reminders, and calendar events.
» Schedules: Set a schedule to turn on Do Not Disturb at specific times during the day or night.

Learn the basics
Lock screen
Your touchscreen is on when you need it and o when you don’t.
Lock screen showing access to voice control on the bottom left and camera on the bottom right. Swipe this screen up to unlock it.
» Screen o and on: Press the Power button to turn the screen o and on.
» Screen lock: To unlock the main lock screen, swipe up from the bottom of the screen. To apply
security to the lock screen (recommended), see Screen lock.
» Notifications: Double-tap a notification to open it.
Tip: To prevent notifications from appearing in the lock screen, swipe up > Settings > Apps
& notifications > Notifications > Notifications on lock screen > Don’t show any notifications.
» Lock screen message: To add a message to your lock screen, such as your name in case your
phone gets lost, swipe up > Settings > Display >Advanced > Lock screen > Add text on
lock screen.
» Screen timeout: To change your timeout (screen locks automatically), swipe up > Settings >
Display > Advanced > Screen timeout.
11:35
11:35
Tue, 3 April
Tue, 3 April
Add a lock screen message for
anyone who finds your phone.
Thanks for finding my phone!
Swipe up to unlock
your screen.
cricket
Table of contents
Other Cricket Cell Phone manuals

Cricket
Cricket Alcatel APPRISE User manual

Cricket
Cricket TXTM8 User manual

Cricket
Cricket EZ User manual

Cricket
Cricket MSGM8 II User manual

Cricket
Cricket A200 User manual

Cricket
Cricket CAPTR II User manual

Cricket
Cricket Vision Plus User manual

Cricket
Cricket UTStarcom mini User manual

Cricket
Cricket A100 User manual

Cricket
Cricket TXTM8 User manual

Cricket
Cricket A100 User manual

Cricket
Cricket A300 User manual

Cricket
Cricket M615 User manual

Cricket
Cricket Wave User manual

Cricket
Cricket SL101AE User manual

Cricket
Cricket A150 User manual

Cricket
Cricket TXTM8 User manual

Cricket
Cricket TXTM8 3G User manual

Cricket
Cricket Icon 2 User manual

Cricket
Cricket CAPTR User manual