CrustBuster Speed King Seed Tote 4 Box User manual

P.O. Box 526 - Spearville, Kansas 67876 - (620) 227-7106
crustbuster.com
Seed Tote 4 Box
#17930900 (2018) Updated 04/21


Table of Contents
Warranty Information . . . . . . . . . . . . . . . 1
Operator Qualifications . . . . . . . . . . . . . 2
Safety and Warnings . . . . . . . . . . . . 3-10
Operation, Maintenance & Belt Training .
............................ 11-16
Repair Parts
Seed Tote 4 Box . . . . . . . . . . . 17-20
Telescoping Conveyor . . . . . . . 21-26
Carriage Assembly. . . . . . . . . . . . . 27
Hopper Assembly. . . . . . . . . . . . . . 27
Engine Assembly . . . . . . . . . . . . . . 28
Remote Assembly . . . . . . . . . . 29-30
Wiring Harness. . . . . . . . . . . . . 31-32
Trailer Assembly . . . . . . . . . . . 33-34
Identification
Your Seed Tote is identified by a Serial Number and Model Number. Record these numbers
in the spaces provided in this manual and refer to them when ordering parts or requesting
service.
Serial Number Model Number
Warranty
WARRANTY: In addition to the implied warranties of fitness and of merchantability,
CrustBuster®/Speed King, Inc. warrants new products sold by it to be free from defects in
workmanship and material for a period of 12 months, from the date of delivery to the first user
customer. Warranty on purchased parts (cylinder, blades, bearings, shanks, etc.) will be the
same as that offered by the appropriate manufacturer of these parts.
EXCLUSIONS: No warranty of any kind is made by CrustBuster®/Speed King, Inc. with regard
to new products which have been subject to operation in excess of recommended capacities,
misuse, abuse, negligence, or accident, or have been altered or repaired in any manner not
authorized by CrustBuster®/Speed King, Inc. CrustBuster®/Speed King, Inc. is constantly
striving to improve its products. Changes in design and improvement will be made whenever
CrustBuster®/Speed King, Inc. believes the efficiency of its products will be improved thereby,
but without incurring any obligation to incorporate such improvements in any products which
have been shipped or are in service. No obligation exists for compensation of unauthorized
repairs or modifications without prior approval. And in no event will CrustBuster®/Speed King,
Inc. be liable for consequential damages, such as but not limited to: downtime, delayed or late
tillage or planting, etc.
WARRANTY REGISTRATION: This warranty is not valid unless registered with
CrustBuster®/Speed King, Inc. within 10 days from the date of purchase. It is the sole
responsibility of the selling retail dealer to fill out the registration forms and see that they are
properly filed with CrustBuster®/Speed King, Inc. This can be done at crustbuster.com.
WARRANTY PROCEDURE: Should any part fail to conform with this warranty,
CrustBuster®/Speed King, Inc. will repair or replace the part or parts which do not conform.
If a part is defective, take it to your authorized CrustBuster® Farm Equipment Dealer
immediately, along with your warranty registration, and complete the proper forms requesting
a warranty adjustment. Our representative will pick up the part to be returned to the factory
for examination. If the customer (first user) requests that a new part be substituted for the old
part, a new part will be charged to the dealer who will in turn charge the customer. If the part
is found by us to be defective, a credit for the part will be given to the dealer to be passed on
to the customer. If the dealer or customer wishes to repair the part, this will be done only if
authorized by CrustBuster®/Speed King, Inc. This warranty procedure is in addition to all
remedies authorized by law.
CRUST BUSTER®/SPEED KING, INC.
Box 526
Spearville, KS 67876
Specifications are subject to change without notice. ® is a registered trademark of CrustBuster/Speed King,Inc
1
Operator Qualifications
Operation of this Seed Tote shall be limited to competent and experienced persons. In addition,
anyone who will operate or work around this equipment must use good common sense. In order
to be qualified, he or she must also know and meet all other requirements, such as:
1. Some regulations specify that no one under the age of 16 may operate
power machinery. It is your responsibility to know what these regulations
are in your area or situation.
2. Current OSHA regulations state in part: "At the time of initial assignment
and at least annually thereafter the employer shall instruct EVERY
employee in the safe operation of servicing of all equipment with which the
employer is, or will be involved."
3. Unqualified persons are to STAY OUT of the work area.
4. A person who has not read and understood all operating and safety
instructions is not qualified to operate the machinery.
FAILURE TO READ THIS SEED TENDER MANUAL AND
ITS SAFETY INSTRUCTIONS IS A MISUSE OF THE
EQUIPMENT.
Sign Off Sheet
As a requirement of OSHA, it is necessary for the employer to train the employee in the safe
operation and safety procedures with this Seed Tender. We include this sign off sheet for your
convenience and personal record keeping.
DATE EMPLOYER EMPLOYER'S SIGNATURE
2

BE ALERT!
Your Safety is involved.
General Safety Statement
WATCH FOR THIS SYMBOL. IT POINTS OUT IMPORTANT
SAFETY PRECAUTIONS. IT MEANS "ATTENTION ))) BECOME
ALERT!"
YOUR SAFETY IS INVOLVED.
It is your responsibility as an owner, operator, or supervisor to know and instruct everyone using
this Seed Tote at the time of initial assignment and at least annually thereafter, of the proper
operation, precautions, and work hazards which exist in the operation of this Seed Tote in
accordance with OSHA Regulations.
Safety Is No Accident
The following safety instructions, combined with common sense, will save your equipment from
needless damage and the operator from unnecessary exposure to personal hazard. Pay special
attention to the caution notes in the text. Review this manual at least once each year with new
and/or experienced operators.
1. Read and understand the operator's manual before operating this Seed Tote.
Failure to do so is considered a misuse of the equipment.
2. Make sure Seed Tote is secure before operating.
3. Always keep children away from Seed Tote when operating.
4. Make sure everyone that is not directly involved with the operation is out of the
work area before beginning the operation.
5. Make sure all safety devices, shields, and guards are in place and are
functional before beginning the operation.
6. Shut off power to adjust, service, or clean.
7. Keep hands, feet, and clothing away from moving parts. It is a good idea to
remove all jewelry before starting the operation.
8. Visually inspect the Seed Tote periodically during operation for signs of
excessive vibration, loose fasteners, and unusual noises.
9. Before transportation unit, make sure tube assembly is locked into place and
safety strap is on and secure.
10. Keep box tote on level surface.
DANGER: Indicates an imminently hazardous situation which, if not avoided, will result in death
or serious injury.
WARNING: Indicates a hazardous situation which, if not avoided, could result in death or
serious injury.
CAUTION: Indicates a potentially hazardous situation which, if not avoided, may result in minor
or moderate injury.
NOTICE: Used to address practices not related to physical injury.
3

CAUTION
1. Read and understand instruction manual before operating.
2. Keep all safety shields and devices in place.
3. Make certain everyone is clear before operating machine.
4. Keep hands, feet, and clothing away from moving parts.
5. Shut off power to adjust, service, or clean.
6. Make sure machine is secured before operating.
7. When transporting, shut fuel valve lever off.
Pre-Operation Check List
1. Check all bearings for proper lubrication.
2. Check the tube for foreign material.
3. Check all belts for proper tension.
4. Start unit and check tender belt alignment while unit is empty.
BELT CARE ………
It is suggested that the unit be run every two to three days or more often if possible. This tends to
keep the tender belt alive and stops any forming of the belt to the curvature of the tube while the unit
is not in use.
NOTE: Belt may deteriorate if not in use and exposed to weather conditions for any prolonged
period of time.
Operation Sequence
1. Check drive belt for proper tension.
2. Make sure tender belt is properly tensioned.
3. Allow unit to run empty for a few minutes to flex tender belt.
4. Check tender belt for proper alignment.
5. Before shutting power off, be certain head and tail unit is empty.
STORAGE ………
Temporary Storage
1. Relieve tension from all belts; both v-belt and tender belt.
2. Store all belt equipment in a dry place. If equipment cannot be stored out of the weather,
cover engine and mechanical parts with waterproof material.
Prolonged Storage
1. Remove all belts and store in a cool, dark, dry place.
2. Wash belt thoroughly.
3. Wash tube both inside and out.
4. Lubricate all bearings.
5. Store in a dry shelter.
4

Operation Cautions
Operation Remote
Belt On º »Belt Off
Gate Close º »Gate Open
Telescope In º »Telescope Out
Rotate Rear º »Rotate Foward
Shuttle Rear º »Shuttle Foward
Step 1: Make sure conveyor has all transport locks removed.
Step 2: Rotate conveyor rearward until conveyor clears stand corner.
Step 3: Move shuttle rearward until conveyor is lined up with rear spout.
(Note: There are prox sensors that stop shuttle when all the way back.)
Step 4: Flip toggle switch located on remote box to the Gate 2 (rear gate).
»Front Gate
»Rear Gate
Step 5: Open tote box.
Step 6: Open gate to allow seed access to belt.
Step 7: Position spout to unit to be filled by using the rotate and telescoping buttons.
Step 8: Turn belt on and off as needed to fill unit. Once unit is full, close gate and run
excess seed out of tube.
Step 9: Shut gate of pro box.
Step 10: Move shuttle to forward position.
Step 11: Rotate conveyor to forward postion .
Step 12: Re-attach transport hooks.
5

Safety Decals
REMEMBER: If Safety signs have been damaged, removed, become illegible or parts
replaced without decals, new decals must be applied. New decals are
available from your authorized distributor or factory. Individual decals
shown below.
#05326400 #05303300
#05312400
#05328000
#05316500
#05310800
6

Safety Decals Cont’d
#05310800 #05325600
#05315700
7
Danger
BE ALERT! YOUR PERSONAL SAFETY IS INVOLVED.
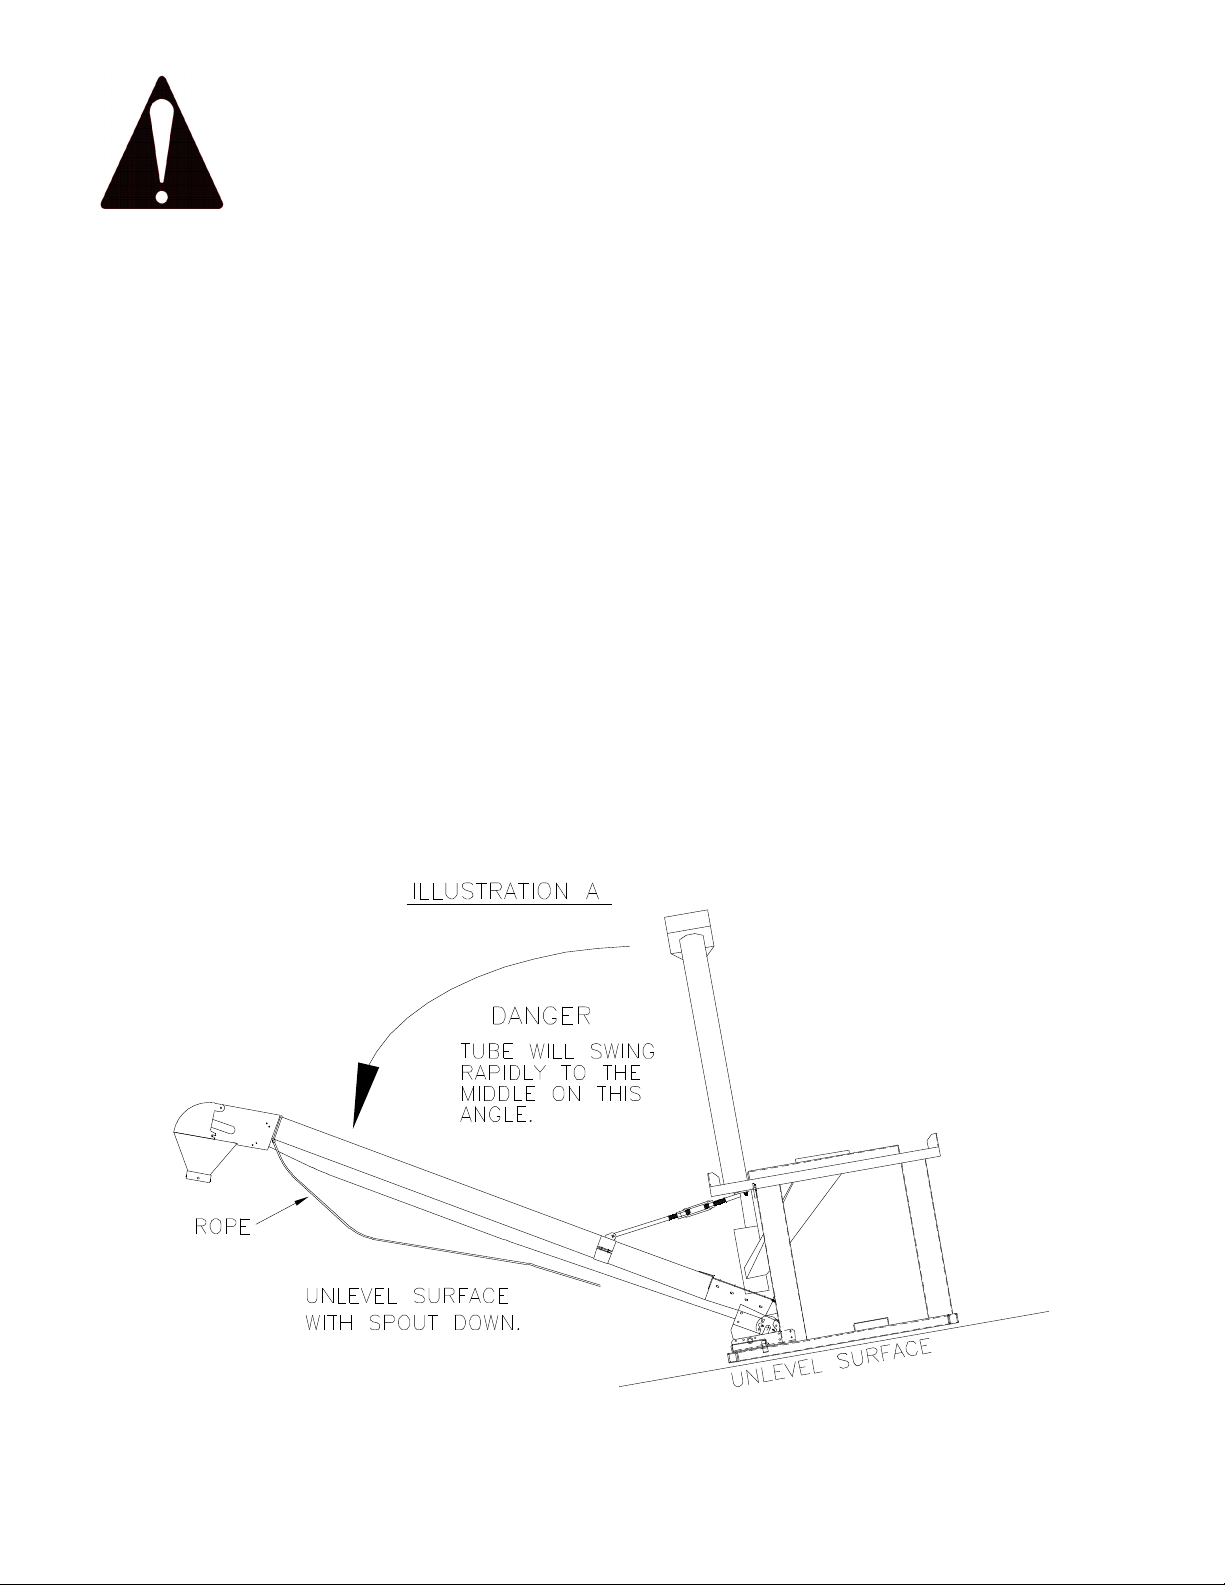
ALWAYS PARK TENDER ON LEVEL SURFACE TO UNLOAD.
Before releasing safety strap that secures tube assembly,
make sure tender is sitting on a level surface.
If parked on an unlevel surface, and the tube assembly is not
restrained, it could swing rapidly and out of control to one side
or the other.
The rope attached to the tube is to assist in guiding the tube.
If tube is swinging out of control, the rope may not control the
tube.
If parked on an unlevel surface with the spout side down, (See
illustration A)the tube could rapidly swing out.
8

If parked on an unlevel surface with the spout
side up, (See illustration B)the tube will rapidly
swing to one end or the other depending on
which side the gravity pulls it. This could be
very hazardous for anyone standing in its path.
Be very cautious of situation.
If parked on an unlevel surface with the spout
side up, (See illustration C)the tube could
rapidly swing from one end to the other.
This could be very hazardous for anyone
standing in its path. Be very cautious of this
situation. This could also cause damage to the
tube assembly.
Danger
9

FUEL VALVE
When engine is not in use, leave the fuel
valve lever in the OFF position to prevent
- carburetor flooding
- fuel in the oil crank case because of
transporting vibrations
- the possibility of fuel leakage.
See engine owner’s manual to help you avoid
other damage to your engine.
CAUTION
NOTE: Crust Buster recommends fuel
valve be shut off and the motor
run completely out of fuel before
transporting.
10

Maintenance
Preventive maintenance is the key to the long life of any mechanical device.
Careful and systematic inspection of the Seed Tender will result in maximum, trouble-free service.
BELT REPLACEMENT ………
To replace the belt, cut it into and hand rotate the head roller until belt has been removed. Install
appropriate belt as outlined in assembly instructions. (See page 6.)
HEAD ASSEMBLY TAKE-UP ………
After extended use, the belt may stretch to the point that there is not sufficient take-up in the head
assembly to tighten it. Obtain additional take-up by cutting a 6" to 8" section from the belt. A new
splice lacing may be ordered from your CrustBuster/Speed King distributor or from the factory.
PERIODIC CLEAN-OUT ………
Due to the characteristics of certain materials, residue sometimes collects between the tender belt
and the tube. Check the unit periodically for any material build up in this area. If residue appears
excessive, remove the tender belt and thoroughly wash the belt and tube. Allow belt and tube to dry
before reinstalling the belt.
When the Seed Tender is not being used, secure belt to the tube to prevent belt from flopping in the
wind, possibly breaking return idlers or ripping belt.
LUBRICATION ………
All bearings which are fitted with grease zerks should be lubricated at the conclusion of each
operating day. Before greasing the bearings, make certain the zerks are free of dirt, otherwise this
will be passed into the bearing race. If the unit will be out of service for a period of time, purge the
bearings.
BELT TRAINING PROCEDURE ………
A belt correctly installed and trained will run straight and true. The belt must run centered on all
terminal rollers, take-up rollers, and return idlers throughout the entire belt length.
Incorrect installation and training can result in severe edge damage, material spillage, material
leakage through the skirt rubber at the loading point, and excessive power demands. Material
spillage is the usual reason for belt carcass ruptures and pulley cover gouging and stripping, while
leakage at the skirt rubber results in excessive conveyor cover wear under the skirts.
ALIGNMENT ………
All rotating parts -head roller, tail roller, and return idlers- must be at a 90 degree angle to the
direction of belt travel, must be level, and the midpoint of each centered on a line when properly
aligned.
Alignment is checked by running a tight wire from the center of the head roller to the center of the
tail roller.
Level all rotating parts. If a part is not level, the belt will run to the lower side.
BELT SPLICING ………
A belt must not run out at the splice area. Runout will occur if the belt is not cut square or splice is
not installed square.
11

4 Box
Dimensions
12

Through the down periods, the belt can adhesively
stick to the bottom of the tube. To unstick the belt,
use a screwdriver or a rod to push the belt up off
the bottom of the feed tube using holes located on
the bottom of the tube before running the unit.
Failure to make sure the belt is free will result in
belt failure.
Operation
1. Prior to the start-up, check to see that belt is free from any objects that would bind or tear.
2. On starting for the first time, with no load on belt, apply power for a few seconds only to see that
the belt is well centered in the tube and on the return.
3. It should be noted at this time that too much tension on the belt will make adjustment or training
much more difficult, shorten the life of the belt, and waste power. The belt should be tensioned
tight enough so the drive roller does not slip.
BELT TRAINING ………
It is essential that the belt be properly trained at all times. For this reason, all rotating parts should
always be at right angles to the tender belt.
Slight adjustment of roller shafts may be required to keep belts centered on them i.e., if the belt runs
to one side of the roller - apply more tension to this side of the belt by advancing the roller shaft on
this side. This can be done on the head section as long as adjustment bolt does not vary more than
1/4". If it does, then some adjustment will need to be done on the tail end.
If the belt tends to veer to one side of the return strand, the belt can be centered by "knocking" ahead
(in the direction of belt travel) the end of the return idler to which the belt runs. A belt correctly
installed will usually train well both empty and loaded, except as noted:
1. One or more rotating parts not in alignment.
2. Belt tensions in some part of system (usually at tail section) are below minimum recommended.
3. Belt not loaded centrally.
When a belt is initially started, it should be jogged around the system to determine if a major runout
occurs which could damage belt and belt edges. If runout occurs at some point of the system, the
reason is usually a return idler or roller out of alignment before the runout. Alignment should be
rechecked before restarting.
After the belt can be safely run without damage, final training should begin with the head roller. The
belt must enter the head roller in the center without movement from side to side. If the belt is not
centered on the tail pulley, the return strand of belt should be observed for any section which is not
centered on the return idlers. If the belt is not centered at some point, move return idlers starting
before this point to correct centering of belt. Movement of idler bracket should be gradual and only
1/16" to 1/8" remembering that the belt will move in the direction that it first contacts the idler. The
same corrective action should be taken at the tail roller.
After the belt is trained empty, the belt should be trained with a load. The take-up adjustments are
made to prevent belt slip and keep tensions at all points above minimums recommended when belt
is operating with a load.
If slip occurs under load, additional belt tension should be applied by adjusting the take-up only
enough to prevent slip from occurring under load, and when started with a load.
13

BELT TIGHTENING
INSTRUCTIONS
Belt should be tightened before you train
the belt. Tightening the belt is done on
the head roller by tightening the take up
bars evenly. Belt is tight when applying
25 lbs. of force, centered between the
return rollers, there is no more than 2
inches of deflection.
BELT ASSEMBLY INSTRUCTIONS
At the start point, see view of head and tail assembly. Drop belt
over the top of head roller and gravity feed belt down the tender
tube to the bottom. Guide the belt over the top of the tail roller.
Make sure rough side is UP and the smooth side is DOWN
against the inside of wall of the tube.
Route both ends around head and tail rollers and over all return
idlers mounted under the tube. Slide belt forward or back
through tube so the ends of the belt meet at a convenient
location between return idlers to facilitate joining.
Align and interlace belt and clipper lacings. Slip splice pin
(Plastic covered cable) through clipper lacings to secure.
Belt Assembly
FOR FERTILIZER USE ONLY
Apply rubber adhesive, from tube furnished, to both sides of clipper lacing. This is
not done at the factory before shipping. Smooth adhesive and allow to set in
accordance with package directions. This rubber adhesive secures splice pin in
place and seals, so fertilizer dust does not settle on back side of belt and cause
inside of tube to rust.
Tighten belt by turning adjustment bolts on head assembly in. Tighten evenly on
each side until belt is tight.
To train belt, see belt training instructions in this manual.
14
NOTE:
For proper seal to hopper,
container should be lowered
straight down as shown. Make
sure there is no debris on hopper
top. Make sure rubber skirtboard
deflector is not bent under and
preventing a good seal.
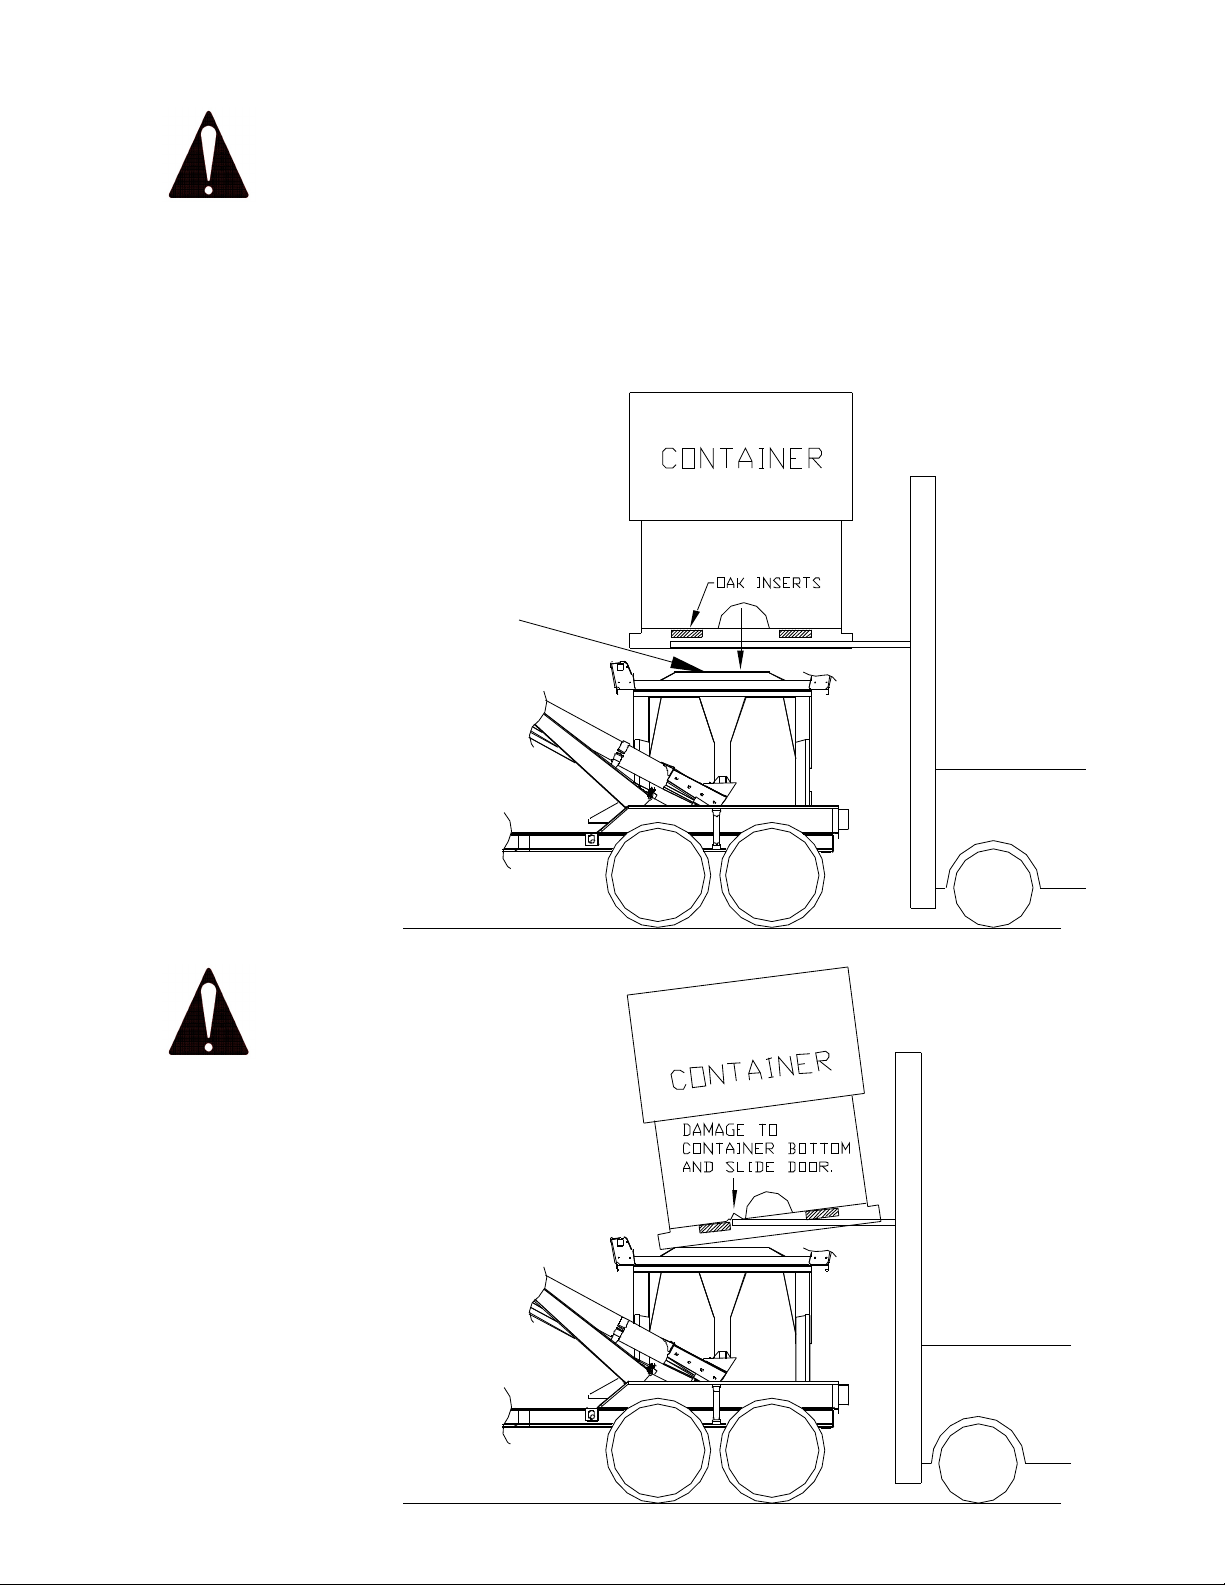
CAUTION
FAILURE TO EXTEND FORKS UNDER
OAK INSERTS WILL CAUSE DAMAGE
TO SLIDE DOOR ON THE UNDER
SIDE OF CONTAINER. THIS IS A
DANGEROUS SITUATION ALSO.
Assembly
CAUTION
ALWAYS LIFT THE CONTAINER FROM THE BOTTOM. NEVER USE STRAPS
OR LIFT BY TYING ANYTHING TO THE SIDES OF THE CONTAINER.
REQUIRES MINIMUM 3000 LB. FORKLIFT TO PICK UP FULL CONTAINER.
OAK INSERTS, LOCATED IN THE BASE OF THE CONTAINER, REDUCE
LIPPAGE ON FORKLIFT FORKS AND PROVIDE STRUCTURAL SUPPORT.
15

TO LOAD SEED BOXES, THE
TOTE SHOULD BE ON LEVEL
GROUND OR SURFACE AS
SHOWN.
IF IT IS NOT POSSIBLE TO
LOAD ON A LEVEL SURFACE,
LOAD THE DOWN HILL
CONTAINER FIRST, AS
SHOWN.
THIS IS THE RIGHT WAY!
IF YOU LOAD THE UP HILL
BOX FIRST, IT WILL BE VERY
DIFFICULT TO GET THE
SECOND BOX LOADED.
THIS IS THE WRONG WAY!
Seed Box Loading
16

Seed Tote 4 Box
17
Table of contents
Other CrustBuster Farm Equipment manuals

CrustBuster
CrustBuster Speed King 10" BeltVeyor User manual

CrustBuster
CrustBuster Speed King User manual

CrustBuster
CrustBuster SPEED KING 5000 User manual

CrustBuster
CrustBuster DrillMaster User manual

CrustBuster
CrustBuster 4750 Drill User manual

CrustBuster
CrustBuster 4600 Series User manual

CrustBuster
CrustBuster Seed Tender 160 User manual

CrustBuster
CrustBuster COTTON MODULE BUILDER User manual

CrustBuster
CrustBuster Speed King Drive Over- Pit User manual

CrustBuster
CrustBuster 3200 User manual


