CYP AU-D160 User manual

AU-D160
Professional USB Digital Audio
Converter (DAC) with Integrated
Headphone Amplier
OPERATION MANUAL

Safety Precautions
Please read all instructions before attempting to unpack or install or
operate this equipment, and before connecting the power supply.
Please keep the following in mind as you unpack and install this
equipment:
Always follow basic safety precautions to reduce the risk of
re, electrical shock and injury to persons.
To prevent re or shock hazard, do not expose the unit to rain,
moisture or install this product near water.
Never spill liquid of any kind on or into this product.
Never push an object of any kind into this product through
module openings or empty slots, as you may damage parts.
Do not attach the power supply cabling to building surfaces.
Do not allow anything to rest on the power cabling or allow it to
be abused by persons walking on it.
To protect the equipment from overheating, do not block the
slots and openings in the module housing that provide ventilation.
Revision History
Version No Date Summary of Change
VR0 20110131 Preliminary Release

Table of Contents
1. Introduction..................................................................................1
2. Applications.................................................................................1
3. Package Contents ......................................................................1
4. System Requirement ...................................................................1
5. Features........................................................................................1
6. Specifications ..............................................................................2
7. Operation Controls and Functions............................................. 3
7.1 Top Panel .......................................................................... 3
7.2 Left Side Panel.................................................................. 3
7.3 Right Side Panel ............................................................... 4
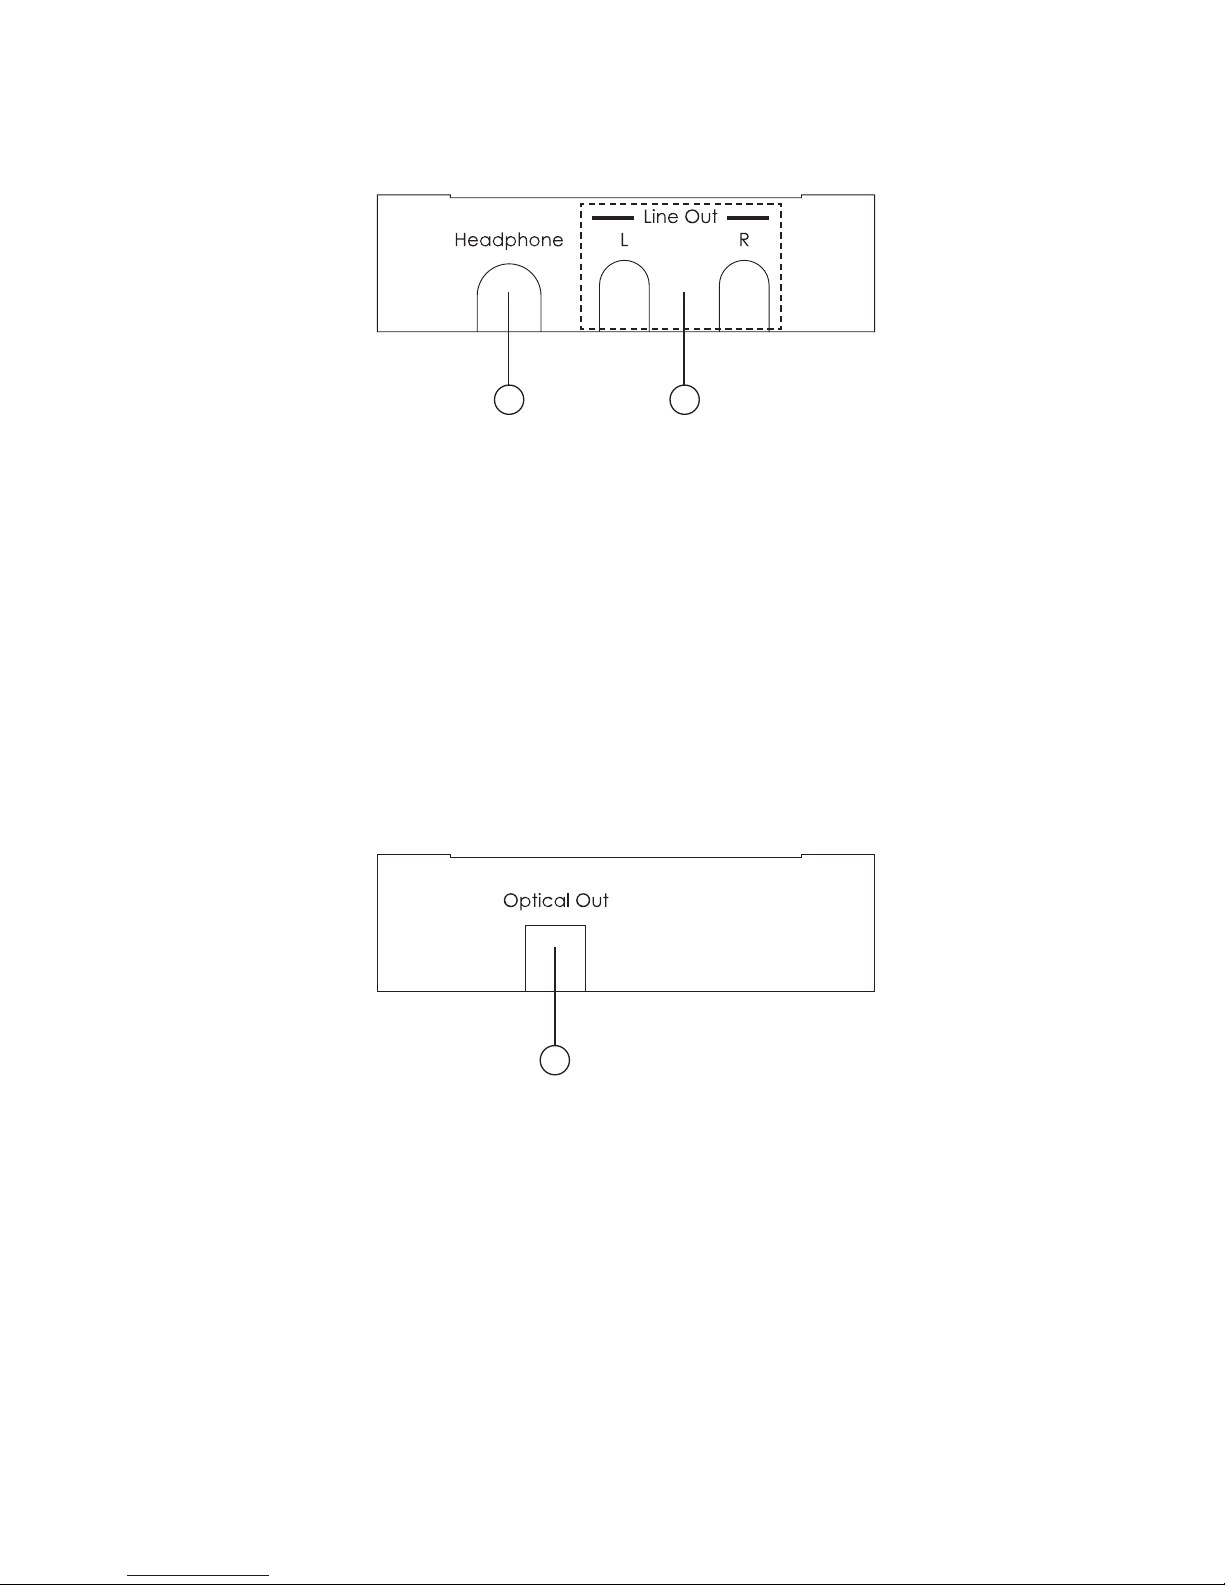
7.4 Front Panel........................................................................ 4
8. Software Installation ...................................................................5
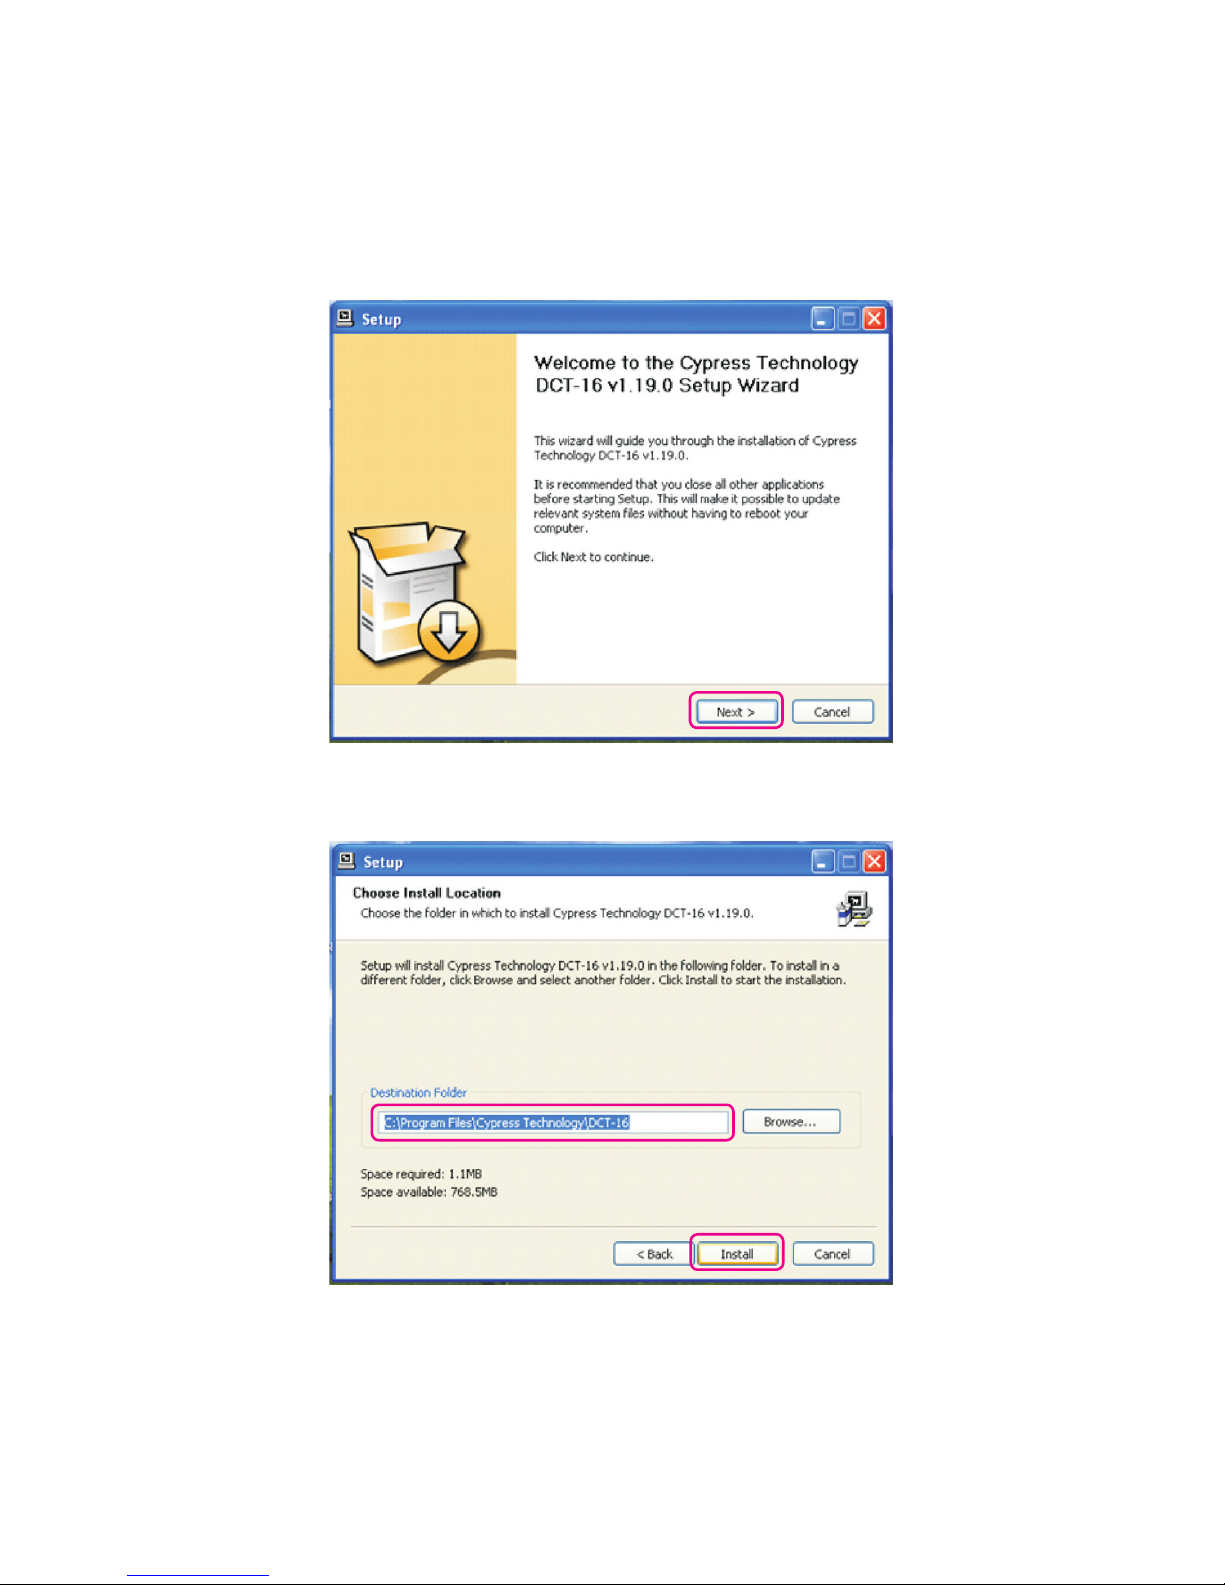
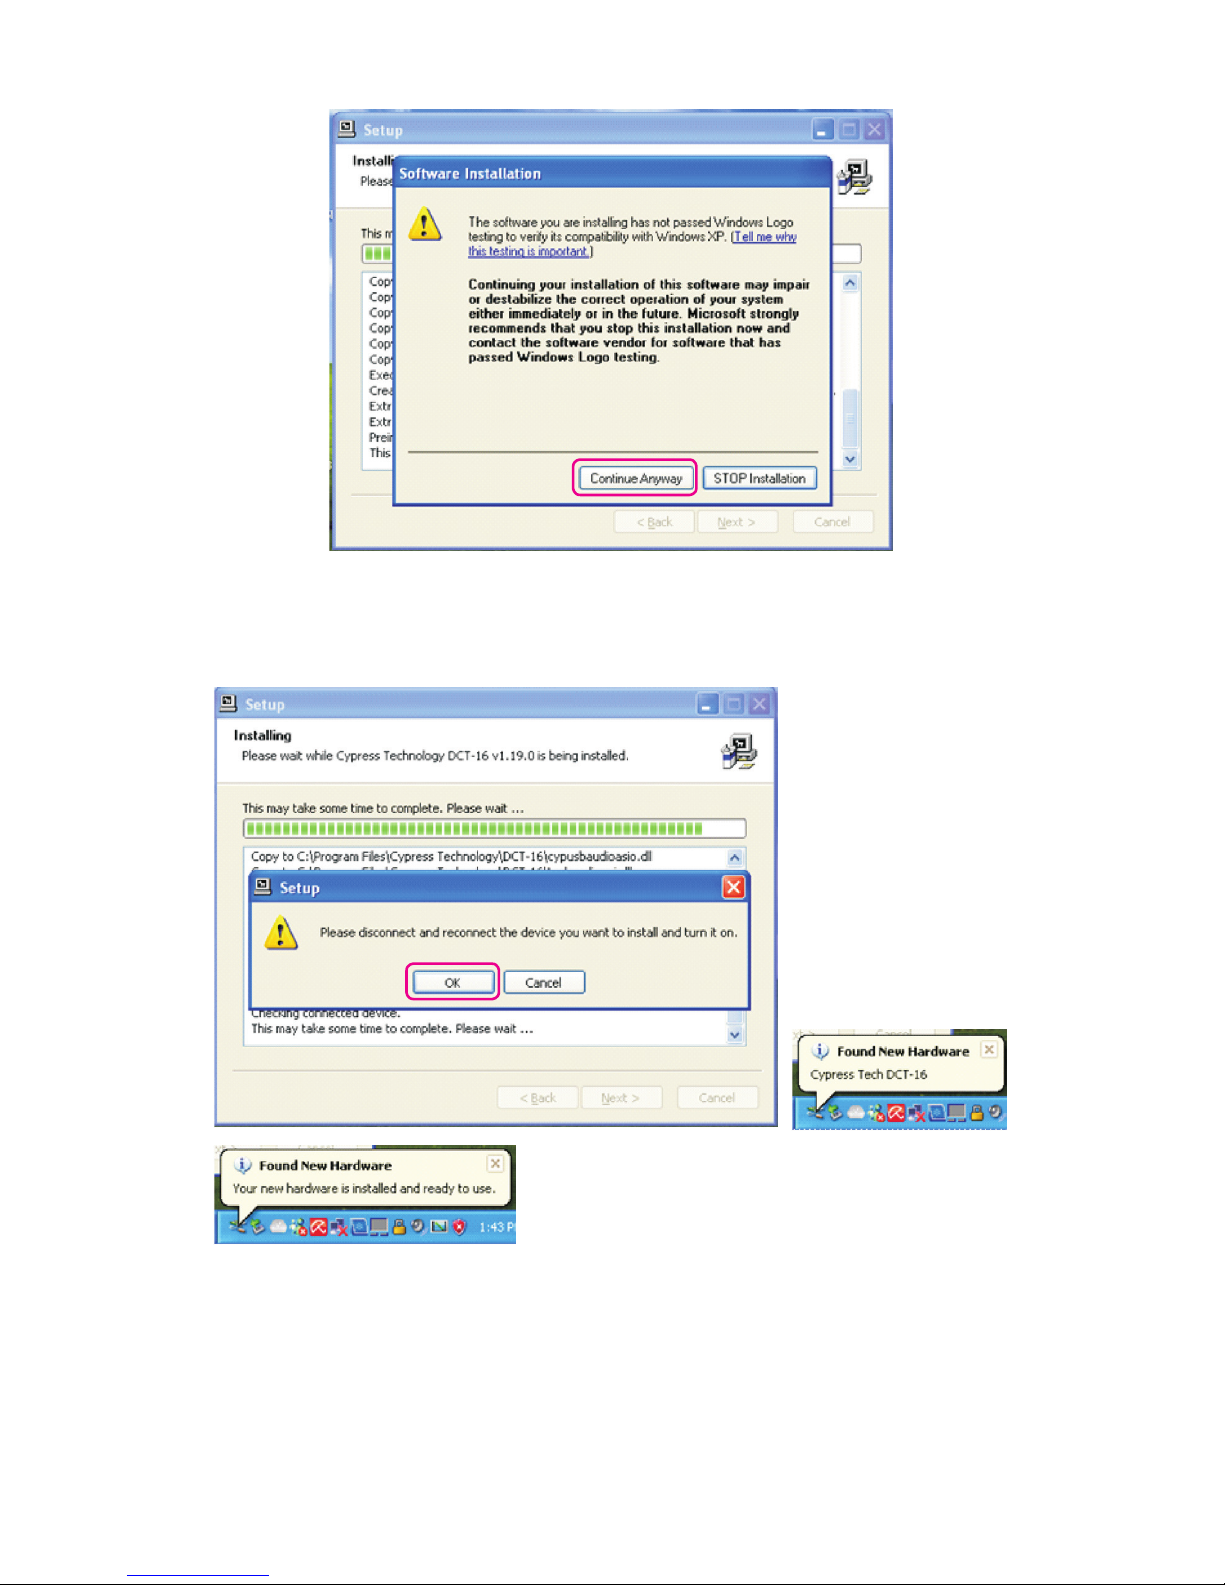
8.1 Window Installation Process ........................................... 5
8.2 Mac Installation Process.................................................. 9
8.3 Sampling Rate Selection............................................... 11
8.3.1 Window 7 ............................................................... 11
8.3.2 Mac System ........................................................... 12
9. Uninstall the Device Driver........................................................ 14
10. Foobar 2000 ASIO Installation .................................................15
11. Connection and Installation..................................................... 21
12. Acronyms................................................................................... 22

1
1. Introduction
The USB HD Audio Converter Pro is compliant with USB audio 2.0 which is able
to accept high resolution digital/analog audio up to 192K and a high bit rate
resolution of 24-bits. This device allows PC audio signals to be output to an
amplier active speakers for users to enjoy the original true sound. Furthermore
the professional headphone output that accepts 6.3mm Headphone jacks will
please professionals who need a more rened audio experience. The USB HD
Audio Converter Pro is an excellent tool for your PC audio entertainment.
2. Applications
• PC Game entertainment
• Professional audio environment
• Showroom environment
3. Package Contents
• USB HD Audio Converter Pro
• 6.3mm to 3.5mm Phone Jack Connector
• Installation CD Driver
• USB to mini USB Cable
• Operation Manual
4. System Requirement
Input source equipment such as PC/MAC with mini USB port and output to
AVRor Headphone.
5. Features
• Supports standard sampling rates - 44.1kHz, 48kHz, 88.2kHz, 96kHz, 192kHz
• Supports Bits : 16 Bits / 24Bits
• Support for Windows and MAC OS
• Compact and elegant design
• Power supplied by USB BUS Power
• The Headphone, R/L and Optical ports will simultaneously support audio
output
• ASIO driver supported
• USB asynchronus mode

2
• LED indicators 1. Power on / streaming (Illuminate/Flash)
2. Sample-rate : 44.1K
3. Sample-rate : 48K
4. Sample-rate : 88.2K
5. Sample-rate : 96K
6. Sample-rate : 176.4K
7. Sample-rate : 192K
6. Specications
Input port USB Audio Class 2.0
Output port 6.3mm Headphone, L/R and Optical
L/R Output Full-Scale : 2Vrms
THD+N : -95dB (A-weighting)
SNR : -108dB
Crosstalk : -96dB
Frequency Response : ±0.05dBrA
IMD SMPTE : -83dB
IMD DFD : -97dB
IMD MOD : -81dB
Headphone output load : 16 ohm
Output Power : 200mW
Full-Scale : 2Vrms
THD+N : -80dB (A-weighting)
SNR : -103dB
Crosstalk : -80dB
Frequency Response : ±0.1dBrA
IMD SMPTE : -77dB
IMD DFD : -92dB
IMD MOD : -70dB
Optical Output THD+N -144dB
ESD Protection ± 15kV (air-gap discharge)
± 8kV (contact discharge)
Power Supply USB 5V
Dimensions (mm) 97(W) x 85(D) x 35(H)
Weight(g) 120
Chassis Material Plastic
Silkscreen Color White
Operating Temperature 0˚C~40˚C / 32˚F ~ 104˚F
Storage temperature -20˚C~60˚C / -4˚F ~ 140˚F
Relative Humidity 20~90% RH (no condensation)

3
7. Operation Controls and Functions
The following sections describe the hardware components of the unit.
7.1 Top Panel
21
①
. Power/Streaming LED: When the Mini USB port has been detected the
the system is performing the audio.
②
. 44.1K/48K/88.2K/96K/176.4K/192K LED: The system will automatically
detect the audio sampling rates and LED will illuminate as it is.
7.2 Left Side Panel
1
①
. Mini USB: This slot is where you connect with the Mini USB to USB A type
cable to PC's USB port which is able to send digital/analog audio up to
192K and a high bit rate of 24-bits to the system.

4
7.3RightSidePanel
21
1. Headphone output: This slot is where you connect 6.3mm Headphone
to the system which can listen the audio from PC. The package will
included 6.3mm to 3.5mm phone jack for user to convert 3.5mm phone
jack to 6.3mm phone jack.
2. R/L audio line out: This slot is where you connect the R/L to the AVR
(Audio Video Receiver) R/L.
7.4FrontPanel
1
q. Optical out: This slot is where you connect the Optical to the AVR (Audio
Video Receiver) Optical input.

5
8. Software Installation
8.1WindowInstallationProcess
Insert the CD driver included in the package on PC/laptop source device
and the driver will Autorun the setup. Connect the USB HD Audio Converter
Pro along with the source device.
Click on “Next” to start the setup.
Make sure the “Destination Folder” is from the CD driver le and click on
“Install” to continue the setpup.

6
While the installation may take sometimes, message appeared in between
like above click “Continue Anyway” to continue the installation.
During the setup the hardware device must be connect to your PC/laptop
source device and when the message appear to ask for disconnect and
reconnect, follow the instruction and when nish doing so click on “OK”. The
source device should recognize the DCT-16 and a message will show on the
bottom right side.

7
The installation will continue and message appeared like above again click
“Continue Anyway” to continue the installation.
When the installation is complete click on “Next”

8
Go to the Control Panel from “start” and click on “Sounds, Speech, and
Audio Devices”.
Then click on “Sound and Audio Devices”

9
Select Audio and choose “Cypress Tech Audio 2.0 Output” from the Sound
playback’s Default device. Then click “Ok” to start using USB HD Audio
Converter Pro.
8.2MacInstallationProcess
There is no installation require for Mac system however, a simple setting is
require in order to allow the USB HD Audio to be active.
Note: Please make sure the USB Audio is upgrade to 2.0 version. If USB Audio
driver is under 2.0 version some noise may occured.

10
Simply click on “System preferences” and select “Sound”.
When the sound window appear click on “Output” and select “USB”.

11
8.3SamplingRateSelection
8.3.1Window7
Sampling rate is only selectable from Window 7 version other Window versions
are not supported with this function. Output sound quality depending on
the original source audio signal may have different performance therefore,
the selection of the sampling rate may support better sound on some of the
audio signal.
Start from Control Panel and click on Hardware and Sound. Click on
Playback and select the device “DCT-16” and click on Properties.

12
Select Advanced and click on the ▼arrow next to Test and select the desire
sampling rate. Click on OK to conrm the selection and the sampling rate
selection is complete.
8.3.2MacSystem
Sampling Rate is selectable in all Mac System and again the output sound
quality depending on the original source audio signal may have different
performance therefore, the selection of the sampling rate may support
better sound on some of the audio signal.
Click on Go and select Utilities.

13
Click on Go and select Utilities.
Select the Built-in Output and then go to format. Click on the ▼arrow to
select the desire sample rate.

14
9. Uninstall the Device Driver
Follow the steps below to uninstall the Cypress Technology DCT-16’s driver.
Step 1: Open the Control Panel from START and double click on the Control
Panel then select Add or Remove Programs.
Step 2: Select Cypress Technology DCT-16 and click Remove.
Step 3: Click Yes to conrm the removal and click Yes again to restart the
computer in order to remove the software completely.

15
10. Foobar2000 ASIO installation
1. Enter into the website: http://www.foobar2000.org to download the latest
Foobar2000 and complete the installation.
2. Click on Components and search for ASIO and click on ASIO support 1.2.7
or the latest version of ASIO support to enter into the link.

16
3. Double click on Download to download the ASIO software..
4. Click Open/Save to open or save the ASIO software. If click on Save user
must remember the saving direction.

17
5. Unzip the ”foo_out_asio.dll” le
6. Copy the ”foo_out_asio.dll” le to Foobar2000 under the Components’
le with enter of ”C:\Program Files\foobar2000\components” or the
Saved direction
Table of contents
Other CYP Media Converter manuals
Popular Media Converter manuals by other brands

Transition Networks
Transition Networks CETTF10XX-200 user guide

HEIDENHAIN
HEIDENHAIN AK LIDA 47 Mounting instructions

M-Audio
M-Audio CO3 manual

Dolby Laboratories
Dolby Laboratories 422 user manual

Omnitron Systems Technology
Omnitron Systems Technology iConverter GX/T2 user manual

GoMax Electronics
GoMax Electronics CV-513ZK-BI user manual